Syntiro 915c - Phone DORO - Free user manual and instructions
Find the device manual for free Syntiro 915c DORO in PDF.
| Product type | Corded phone with amplified functions |
| Brand | Doro |
| Model | Syntiro 915c |
| Dimensions | 170 x 190 x 60 mm |
| Weight | 750 g (with batteries) |
| Power supply | 4 AAA alkaline batteries 1.5 V + 9 V mains adapter (included) |
| Display type | Large character backlit LCD screen |
| Keypad | Extra-large, wide and spaced keys |
| Phonebook | Up to 30 entries (name + number) |
| Call memory | Last 15 incoming and outgoing calls |
| Speed dial keys | 8 programmable keys (M1-M8) |
| Volume amplification | +10 dB, activation by dedicated key |
| Tone adjustment | Bass/treble (left side, active in amplified mode) |
| Ring volume | High/Low/Off (rear switch) |
| Hands-free mode | Yes, with built-in speaker |
| Visual call indicator | Flashing LED for incoming and missed calls |
| Hearing aid compatible | Yes, T position |
| External accessory socket | For vibrator or flashing light |
| Wall mountable | Possible (optional bracket WB200/300) |
| Warranty | 2 years (France) |
| Maintenance | Clean with a soft, dry cloth; avoid chemical products |
| Repairability | Must be entrusted to an authorized service center; do not open yourself |
Frequently Asked Questions - Syntiro 915c DORO
User questions about Syntiro 915c DORO
0 question about this device. Answer the ones you know or ask your own.
Ask a new question about this device
Download the instructions for your Phone in PDF format for free! Find your manual Syntiro 915c - DORO and take your electronic device back in hand. On this page are published all the documents necessary for the use of your device. Syntiro 915c by DORO.
USER MANUAL Syntiro 915c DORO
- Vibrator socket
- Hanger Hook for wall mounting
- Handset volume
- Volume boost
- Handset tone
- Call memory / OK
- Ringer indicator
- Ringer indicator ON/OFF
-
Ring volume
-
New call indicator
- Speed dial keys
- Phone book
- UP/DOWN
- Delete
- Speaker volume
- Speakerphone
- Recall (R key)
Svenska
- Vibratoruttag
- Hangtapp for luren
- Volymkontroll für luren
- Volym Förstärkning
- Toninställning für luren
- Samtalsminne / OK
- Ringsignalsindikator
- Ringsignalsindikator AV/PA
-
Ringsignalsvolym
-
Indikator for nytt samtal
- Snabbvalsknappar
- Telefonbok
- UPP/NED
- Radera
- Hogtalarvolym
- Hogtalartelefon
17.R-knapp (R)
Norsk
- Vibratorkontakt
- Oppengstapp for handsettet
- Volumkontroll, Telefonrø
- Volumforsterker
- Tone i telefonrøret
- Anropsminne / OK
- Ringeindikator
- Ringeindikator PÄ/AV
-
Ringevolum
-
Indikator for nytt anrop
- Hurtigmaster
- Telefonbok
- OPP/NED
- Slett
- Høytalervolum
- Høytalerfunksjon
- R-knapp
Dansk
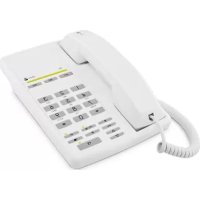
This product can be used as a desktop or wall-mounted telephone. Handset tone control, volume boost, enhanced ring volume and visual call indication make the telephone well suited for people with hearing difficulties.
The extra-large keypad and easy to read display with large characters make the telephone easy to use even with impaired eyesight.
The built-in phonebook can store up to 30 names and numbers. Eight one touch memory keys can be programmed for frequently used numbers or emergency numbers. A call memory logs the 15 most recently incoming and outgoing calls.
A speakerphone function allows you to talk hands-free with the simple press of a button.
Care and maintenance
Your unit is a technically advanced product and should be treated with the greatest care. Negligence may void the warranty.
- Protect the unit from moisture. Rain/snowfall, moisture and all types of liquid can contain substances that corrode the electronic circuits. If the unit gets wet, you should remove the battery and allow the unit to dry completely before you replace it.
- Do not use or keep the unit in dusty, dirty environments. The unit's moving parts and electronic components can be damaged.
- Do not keep the unit in warm places. High temperatures can reduce the lifespan for electronic equipment, damage batteries and distort or melt certain plastics.
- Do not keep the unit in cold places. When the unit warms up to normal temperature, condensation can form on the inside which can damage the electronic circuits.
- Do not try to open the unit in any other way than that which is indicated here.
- Do not drop the unit. Do not knock or shake it either. If it is treated roughly the circuits and precision mechanics can be broken.
- Do not use strong chemicals to clean the unit.
The advice above applies to the unit, battery, mains adapter and other accessories. If the telephone is not working as it should, please contact the place of purchase for service. Don't forget the receipt or a copy of the invoice.
Installation
Connection
- Connect the curly cord to the handset and to the socket marked on the telephone.
- Connect the telephone line cord to a network wall socket and to the socket on the back of the telephone.
- Connect the mains adapter to the mains power wall socket and to the DC 9V socket on the telephone.
- Lift the handset and listen for the dial tone.
IMPORTANT: Use the telephone line cord supplied, an existing line cord from a previous phone may not be compatible
Batteries
Four AAA alkaline batteries are needed as backup for the call memory and speakerphone.
When BATT. LOW is displayed, replace all 4 batteries. Use only AAA alkaline batteries of good quality (not included).
Note! Before installing or changing the batteries, make sure that the telephone is not connected to the telephone network.
- Remove the battery cover and insert the batteries ensuring correct battery polarity is observed.
- Replace the battery cover and reconnect the telephone line cord.
Basic setup
Before using the telephone the first time, the following basic settings should be made.
After confirming a setting, the next setting is automatically displayed. To skip to the next setting, press
The phone will return to standby mode after 30 seconds of inactivity or when pressing C.
On first setup the display will show 00:00.
- Press and hold for about 5 seconds until the hour flashes.
2.Use / to change the value and confirm with - Repeat step 2 to set the minutes, day and month.
ENGLISH is displayed.
Use / to select the desired language, then confirm with
-2-CONTRAST
Use / to set the display contrast setting (1-4), and confirm with
KEYT.ON
Use / to set key tone ON/OFF, and confirm with
-100- FLASH
Use / to set the flash key time (100/300/600 ms) and confirm with
The standard setting is 100 for most countries, 300 for France/Portugal, 600 for New Zealand.
LED OFF
Use / to enable/disable the LED indicator for new calls, and confirm with
TONE
Use / to select either tone or pulse dialling mode, and confirm with
Note!
If unsure of which mode to use, select TONE as this works in most locations.
-1-RING TYPE
Use / to select one of 3 ring tones, and confirm with
Basic setup is now complete
Wall mounting
The telephone can be wall mounted using an optional wall mount bracket. The wall mount bracket is available as an accessory, part number WB200/300 in white or black.
- Fix the wall mount bracket on the back of the telephone.
- Secure two screws, vertically positioned 83 mm apart.
- Activate the hanging peg (located by the hook switch) by rotating it 180 degrees.
Operation
Making a call
Normal dialling
- Lift the handset.
- Dial the number. Hang up the handset to terminate the call.
Speakerphone
Note!
The speakerphone only works when batteries are installed.
- Press to activate the speakerphone. The LED next to the key will light up.
- Dial the number. Press again to terminate the call.
Lift the handset to switch from speaker to handset during a call.
Pre-dialling
- Enter the number. Press C to delete the last entered digit.
- Lift the handset or press to dial.
Quick redial
- Lift the handset or press
- Press to medial the last dialled number.
Dialling numbers in the call memory
- Press to display the most recent call.
- Use / to scroll through the last 15 incoming and outgoing calls.

= Incom ing call
Outgoing call
- Lift the handset or press to dial the displayed number.
Speed dial (one-touch dialling)
- Press one of the speed dialling keys M1-M8. The stored telephone number is displayed.
- Lift the handset or press to dial.
Dialling numbers in the phone book
- Press to open the phone book.
- Use / to browse through the phone book, or enter the first character in the name to quickly find an entry (see Keypad characters).
- Lift the handset or press to dial.
Answering
Lift the handset to answer an incoming call, or press to answer using the speakerphone.
Volume control
The speaker volume control is located on the right side of the telephone.
The handset volume control is located under the handset.
Ring volume

Ring volume can be set to HIGH/LOW/OFF with a switch on the back of the telephone.
Additional functions
Phone book
The phone book can store up to 30 entries. When the memory is full, -100% is displayed.
Storing numbers in the phone book
- Press and hold until a blinking cursor is shown.
- Enter a telephone number (up to 22 digits). Use / to move the cursor and C to erase if needed.Use to insert a pause in the number.
- Press to confirm. A blinking cursor will be shown on the second line on the display.
- Enter a name (up to 9 characters) for the number to be stored.
- Press to confirm. OK is now displayed.
- Repeat steps 1-5 to store another number, or press and hold C to exit.
Deleting numbers from the phone book
- Press to open the phone book.
- Use / to browse through the phone book, or enter the first character to quickly find an entry.
- Press and hold C to delete the entry.
Editing numbers in the phone book
- Press to open the phone book.
- Use / to browse through the phone book, or enter the first character to quickly find an entry.
- Press and hold until the blinking cursor appears.
- Use / to move the cursor, and use C and the keypad to erase and enter new data.
- Press to confirm. The cursor will move to the second line.
- Repeat step 4 to edit the name/ description.
- Press to confirm. OK is displayed.
Speed dial
The telephone has 8 speed dialling keys that can be used for numbers that are called frequently, or for emergency numbers.
Storing speed dial numbers
- Press and hold one of the speed dialling keys M1-M8 until a blinking cursor is shown on the first line on the display.
- Enter a telephone number (up to 22 digits) using the keypad. Use / to move the cursor and C to erase if needed. Use to insert a pause in the number.
- Press to confirm. A blinking cursor will be shown on the second line on the display.
- Enter a name (up to 9 characters) for the number to be stored.
- Press to confirm. OK is displayed.
- Repeat steps 1-5 to store numbers for the other speed dialling keys.
Deleting speed dial numbers
Speed dial numbers can not be deleted, they can only be replaced by storing a new number.
Caller ID and call memory
Caller ID allows you to see who is calling before you answer and to see who has called in your absence.
Note!
The Caller ID function must be subscribed. Please contact your network operator for more information.
The call memory will store the last 15 incoming and 15 outgoing calls. On the display, incoming (answered and unanswered) calls are indicated with and outgoing calls with
If the Call Indicator function is active, a blinking light indicates that an unanswered call has been received since the call memory was last checked.
Browsing the call memory
- Press then / to scroll through the call memory. The number and time of each call will be displayed. For calls older than 24 hours, the date of the call is displayed instead of the time.
- Press C to exit the call memory.
Deleting numbers from the call memory
- Press then / to scroll through the call memory.
- Press and hold C to delete the selected entry.
Copying call memory entries to the phone book
- Press then / to scroll through the call memory.
- Press and hold until OK is displayed. The selected number has now been saved to the phone book.
Call timer
The display shows the current time when in standby mode. During a call the display will show a call timer instead, indicating the duration of the call. The call duration is displayed for 5 seconds after the call is terminated.
Recall key (R)
Press the R key followed by the extension number to transfer a call when connected to a PBX system.
Additional network services may be accessible by using the R, × and keys. Please contact your network operator for more information about the available network services.
Volume Boost

The handset volume can be raised another 30 dB by pressing the Volume Boost key while talking. The LED indicator on the key will light up.
Press the key again or terminate the call to turn off Volume Boost.
Warning!
The handset volume can be very loud with this setting. Volume boost should only be used by persons with impaired hearing.
Handset tone

The speech tone (bass/treble) can be adjusted for better clarity using the handset tone control on the left side of the phone.
PLEASE NOTE! Only works when the powerful amplification (Boost) is active.
Ringer indicator
The Ringer indicator lights up on an incoming call. The indicator is enabled/disabled with a switch on the back of the telephone.
External alert (o))
An external alert device such as a vibrator can be connected to the vibrator socket on the back of the telephone.
Hearing aid
This telephone is hearing aid compatible. Select the T mode on your hearing aid to enable this feature.
Warranty and technical data
This product is guaranteed for a period of 24 months from the date of purchase. In the unlikely event of a fault occurring during this period, please contact the place of purchase. Proof of purchase is required for any service or support needed during the guarantee period.
This guarantee will not apply to a fault caused by an accident or a similar incident or damage, liquid ingress, negligence, abnormal usage, non-maintenance or any other circumstances on the user's part. Furthermore, this guarantee will not apply to any fault caused by a thunderstorm or any other voltage fluctuations. As a matter of precaution, we recommend disconnecting the device during a thunderstorm.
Use only AAA Alkaline batteries of good quality.
NOTE! This guarantee does not affect your legal (statutory) rights under your applicable national laws relating to the sale of consumer products.
Specifications
Size: 170mm× 190mm× 60mm
Weight: 750g (including batteries)
Battery: 4 × 1.5 V AAA Alkaline batteries
Declaration of Conformity
Doro hereby declares that Doro 915c Syntiro conforms to the essential requirements and other relevant regulations contained in the Directives 1999/5/EC (R&TTE) and 2002/95/ EC (RoHS).
A copy of the Declaration of Conformity is available at www.doro.com/dofc
UK
Technical support is available by email on tech@doro-uk.com
Premium rate telephone number: 0905 895 0854, calls cost 50 pence per minute (price correct at the time of publication). Open Monday to Friday, 9.00AM until 5.00PM.
You can also contact us in writing (regarding any Spares or Technical query):
Customer Services
Doro UK Ltd
1 High Street
Chalfont St Peter
Buckinghamshire
SL9 9QE
Further contact details are available on our website: www.doro-uk.com.