
Diábolo Plus - Vacuum Cleaner PALSON - Free user manual and instructions
Find the device manual for free Diábolo Plus PALSON in PDF.
| Product type | Intelligent robot vacuum |
| Dimensions | 320 x 87 mm (diameter x height) |
| Weight | 3.2 kg |
| Power | Rechargeable battery 14.4 V / 2200 mAh |
| Battery life | 100 to 120 minutes |
| Charging time | About 5 hours |
| Rated power | <24 W |
| Remote control | Wireless 2.4 GHz, range ≥ 10 m |
| Main functions | Automatic suction, scheduled cleaning, continuous cleaning, manual mode, UV lamp |
| Sensors | Floor detection, wall detection, infrared |
| Cleaning methods | Spiral, linear, zigzag, wall following |
| UV lamp | Sterilization, can be enabled/disabled |
| Programming | Setting time and day, timer up to 7 days |
| Continuous cleaning | Automatic return to charging station if battery low |
| Filters | 2 filters (pre-filter and main filter) |
| Brushes | Main brush, 2 side brushes, caterpillar brush |
| Docking station | With charging electrodes, infrared transmitter, LED indicators |
| Space limiter | Adjustable infrared barrier (4 or 6 m) |
| Maintenance | Regular cleaning of dustbin, filters, brushes, sensors |
| Safety | Automatic stop in case of obstacle, void detection (stairs), drop protection |
Frequently Asked Questions - Diábolo Plus PALSON
User questions about Diábolo Plus PALSON
0 question about this device. Answer the ones you know or ask your own.
Ask a new question about this device
Download the instructions for your Vacuum Cleaner in PDF format for free! Find your manual Diábolo Plus - PALSON and take your electronic device back in hand. On this page are published all the documents necessary for the use of your device. Diábolo Plus by PALSON.
USER MANUAL Diábolo Plus PALSON
- Interruption/selector
Our products are developed to reach the highest standards of quality, functionality and design. We hope you enjoy your new PALSON DIABOLO PLUS intelligent robotic vacuum cleaner.
SAFETY INFORMATION
- This product may only be disassembled, maintained or changed by PALSON-appointed technicians; failure to observe this warning could result in fire, electric shock or personal injury.
- Do not touch the device's high voltage power cable with your hands as you could suffer an electric shock.
- Do not place clothes or hands inside the brush or in openings on the robot as this could result in injury.
- Use the exclusive robotic vacuum charger only; failure to observe this warning could result in fire, electric shock or personal injury.
- Do not over-bend the power cable or place weight on top of it as this could damage the cable or result in electric shock or fire.
- Do not place the device close to cigarettes, lighters, matches or any other heat sources, including combustible materials, petrol, solvents, etc.
CAUTION:
- Do not forget to turn off the device during transport or when storing it away for a long period of time, as leaving it on could damage the battery.
- Check that the charger-socket connection is secure; a poor connection could result in improper charging or even fire.
- Use the robotic vacuum carefully in the presence of children to avoid frightening or injuring them.
- Do not allow the device to take in liquid as this could damage the product.
- Do not use the robotic vacuum outside as this could damage the unit.
- Move any breakable items in the vicinity of the device (e.g. lamps, glass bottles, etc.) before using it as they could become damaged or may affect vacuum operation.
- Do not sit or stand on the robotic vacuum as this could damage the unit or cause personal injury.
Do not use the robotic vacuum on small tables, chairs or other small surfaces as it could become damaged.
Do not use the robotic vacuum in commercial establishments as it could become damaged due to excessive use.
Do not leave cords, cables or other loose items longer than 150~mm on the floor or they could become tangled in the brush.
If the power cable is damaged, for safety reasons it must be replaced by the manufacturer or its authorised technical support service, or by a qualified technician
This product may not be used by minors or other unsupervised persons who, due to physical, sensorial or mental conditions, are unable to use it safely. Children must be supervised at all times to ensure they do not use the product as a toy.
Application:
This product, designed primarily for domestic use, hotel rooms or in small offices, is ideal for cleaning different types of floors: short-hair rugs, hardwood floors, tiles, ceramic floors, etc.
Introduction on using the device
This is a latest-generation robotic vacuum cleaner with a rechargeable battery and controlled by an intelligent guidance program, which has the following features: automatic vacuum, mop, scheduled cleaning, continuous cleaning, wireless remote control, speed selector, simplicity of use and cleaning.
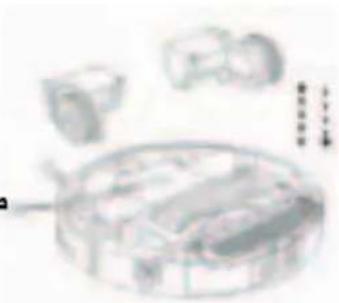
Robotic vacuum components

Pull bar Mop Dust brush Side brush (two) Filter (two)
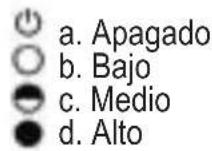
Adapter
Docking station
adhesive
Introduction
4.1. Control panel
| Control panel | Description of function | |
| UV Sterilising UV light button | ||
| I/O | Start/stop cleaning | |
| CARGA/CHARGE | Return to charging station | |
| ● | Power/charge indicator | |
| Button Description of function | |
| UV | This robot has a built-in UV light which disinfects the floor, particularly useful for people who suffer from allergies or in houses with pets. a. Press "UV" to turn the ultraviolet light on/off. b. The UV light will only work when the robotic vacuum is switched on, and will switch off when you turn off the robot. c. I/O mode on the UV light will be stored automatically. |
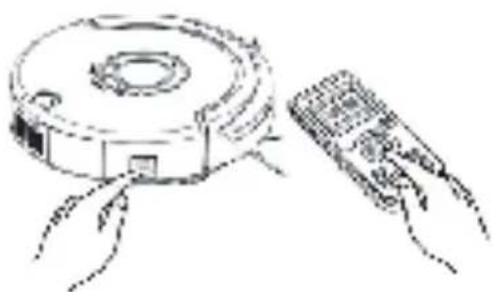
| INICIO/PARO START/STOP | a. Remove all small objects or obstacles from the room before cleaning, then press I/O to start cleaning in spiral, linear or zig-zag mode or along the walls automatically. b. When starting the device, you can select either fast or slow mode (using the remote control). c. When the battery is low, the robot will stop working; it will then beep ten times and search for the docking station to charge automatically. d. The robot will stop cleaning as soon as you press I/O.. |
| CARGA/CHARGE | a. When you press CARGA/CHARGE, the indicator will light up. b. When the machine returns to the docking station for charging, the indicator will start flashing |
| ◎ | 1. When the machine is turned on in standby mode, the indicator will light up. 2. When the battery is low, the indicator will flash. 3. When the battery is fully charged, the indicator will light up as normal |
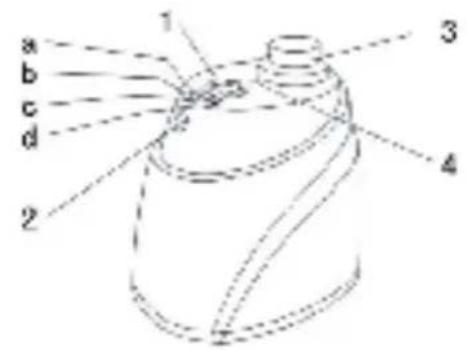
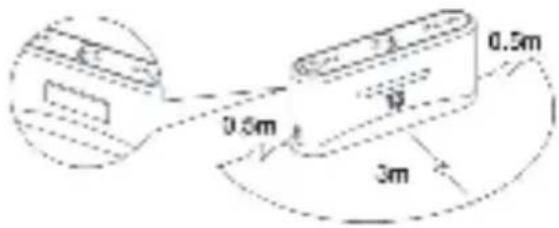
Installing the docking station and recharging the robot Automatic recharge
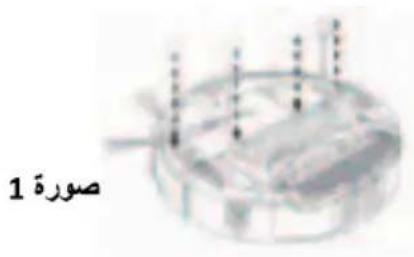
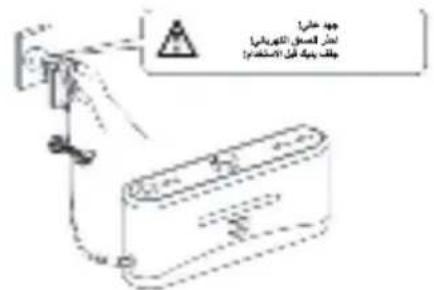
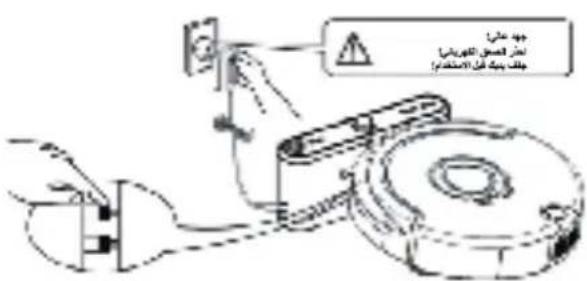
- Install the docking station securely on a flat floor (attach to the wall using the docking station adhesive).
- There must be no obstacles or holes within 3 metres of the front of the docking station or 0.5m to the left and right (See figure 1).
- The robot cannot locate the docking station for charging if the window for transmitting the infrared signal from the charger is covered.
- Connect the adapter outlet to the recharging station connection. (See figure 2).
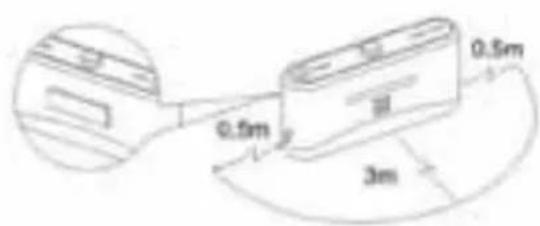
figure 1
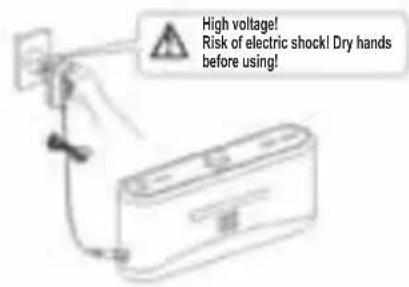
figure 2

Run the adapter power cable along the wall as it could interfere with the brushes or wheels.
Automatic charge
The main unit will search for the docking station to charge automatically in case the battery runs low during cleaning.
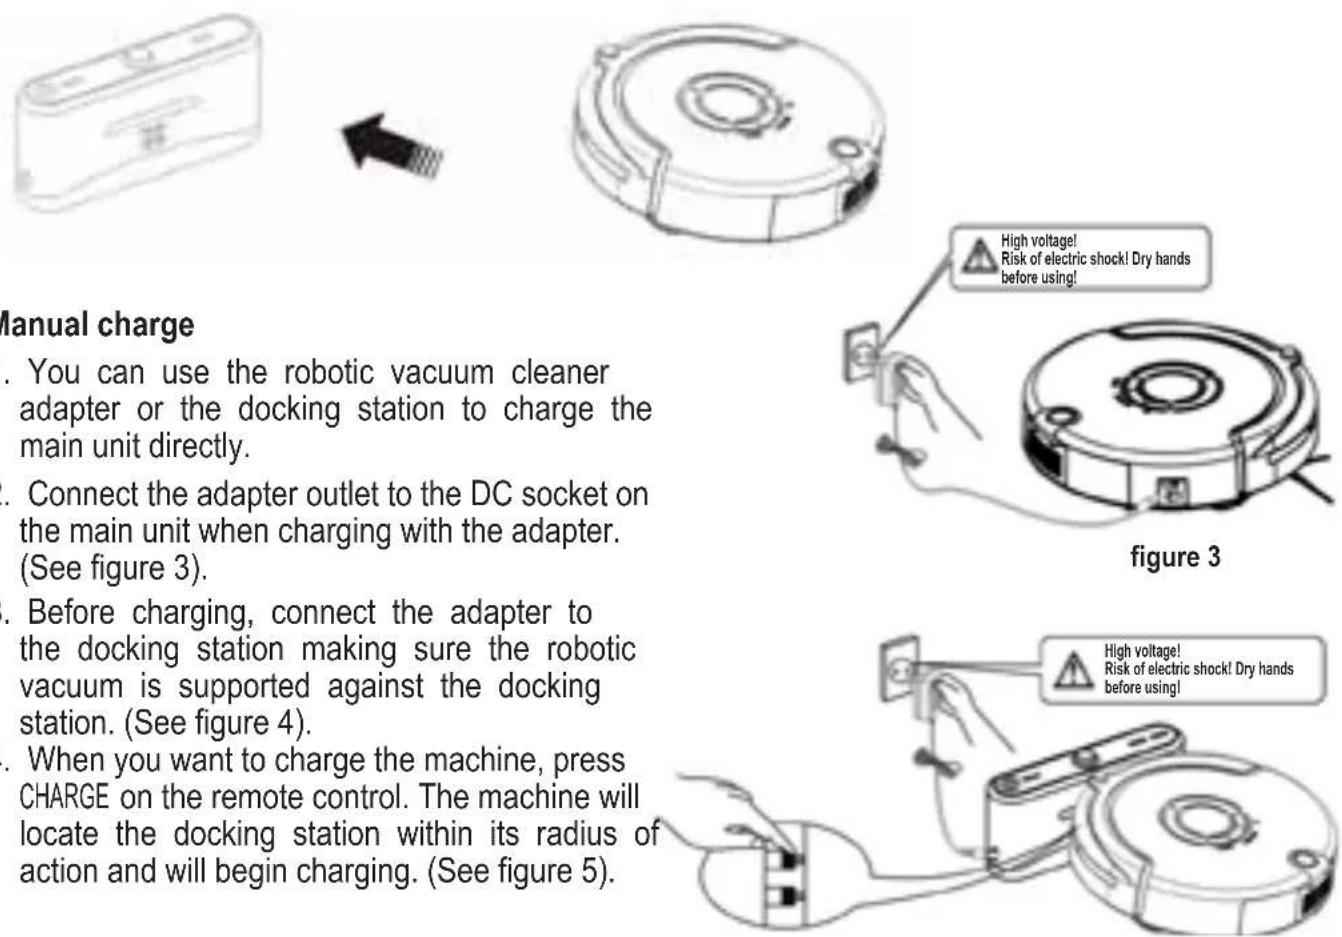
figure 4
GB
5 When the machine is searching for the docking station, if you press CHARGE on the control panel or the POWER button (indicated in red) and CHARGE on the remote control, the machine will stop searching for the docking station. (See figure 6).
6. When the battery is empty, the indicator will flash. When the indicator lights up, this means the battery is fully charged. (See figure 7).
7. When you start the machine, a flashing power indicator means the battery level is low and the battery needs to be charged. (See figure 8).
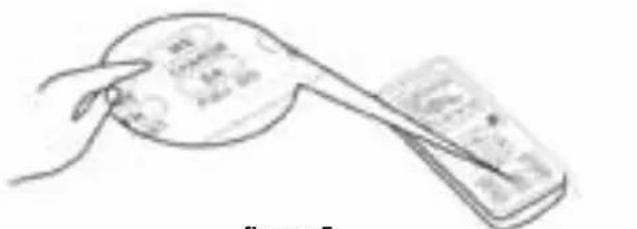
figure 5
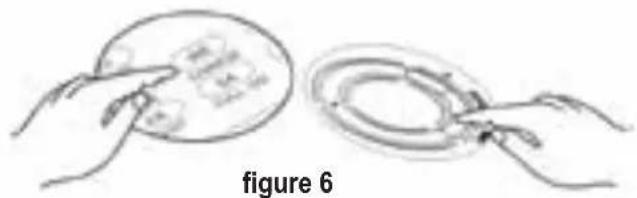
figure 6
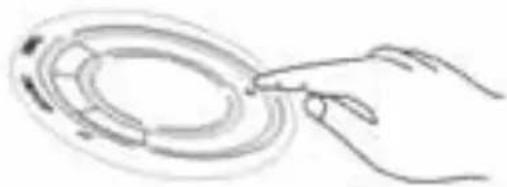
figure 7
figure 8
- The robotic vacuum may not locate the docking station if there is an obstruction, the battery is low or in more complex situations. The docking station should therefore be placed in a wide open space, where possible.
- When the robot finishes cleaning, the battery will be very hot, meaning longer charging times
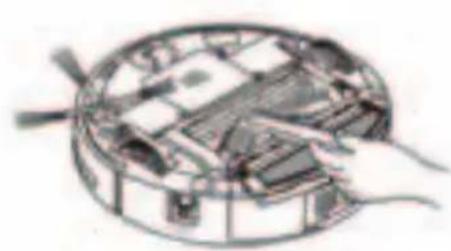
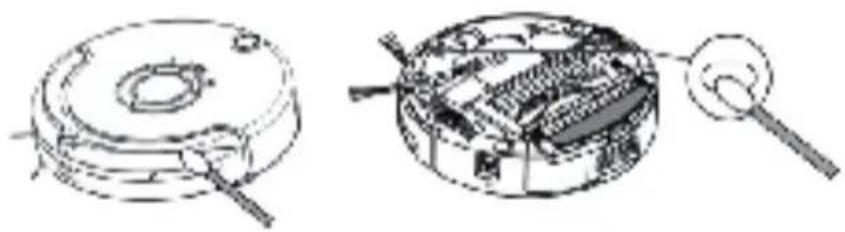
Installing/dismantling and cleaning the container
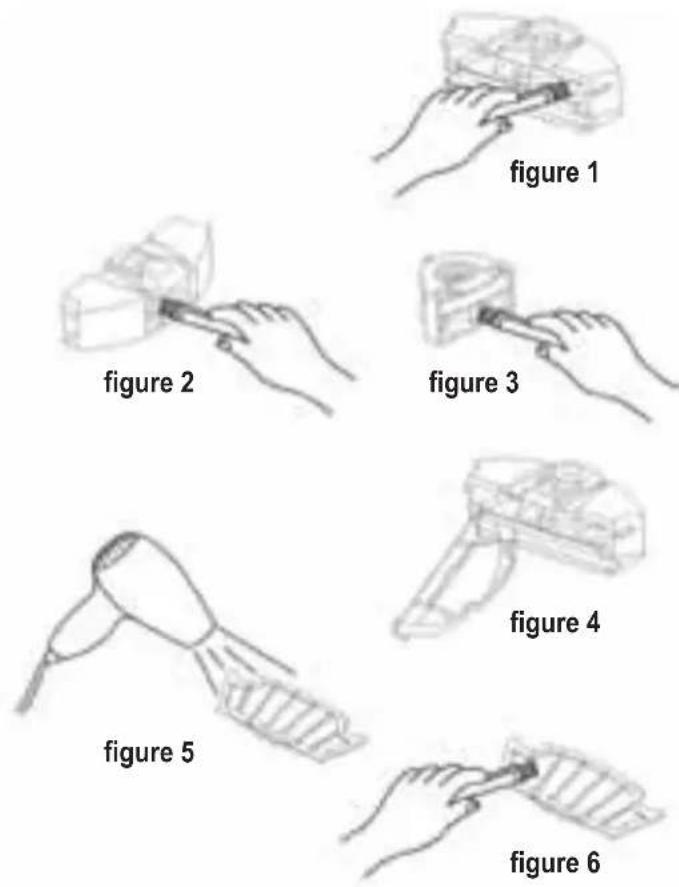
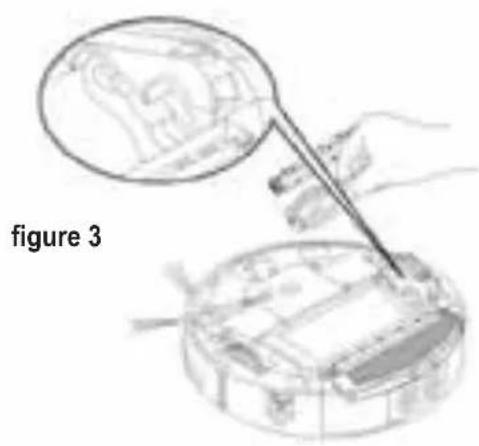
Installation and dismantling
- Remove the container by pressing the button on the top. (See figures 1 and 2).
- Press the red button on the top and the fan will pop out automatically. (See figure 3).
- Turn the fan around, release the two catches and open the cover for cleaning. (See figures 4 and 5).
- Pull the tab on the right hand side towards you and the filter will appear. (See figure 6).
- Clean the filter or insert a new one, press the semicircular bracket with one hand to release the filter mesh clips and remove the grill with the other hand to clean it or to replace it. (See figure 7).
- Turn the container back around; to remove the mop, release the right and left clips on the bottom of the container (See figures 8 and 9). All parts must be replaced following the dismantling steps in reverse order.
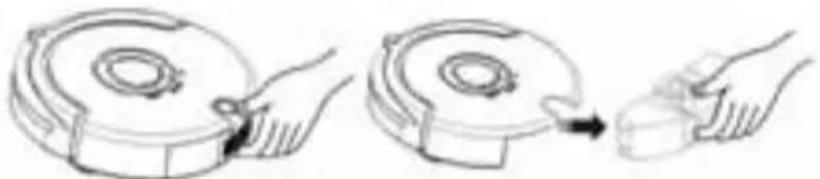
figure 1 figure 2
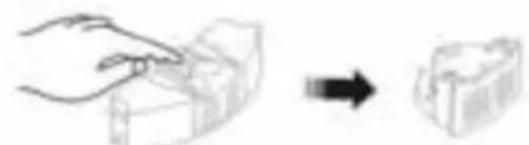
figure 3

figure 4 figure 5
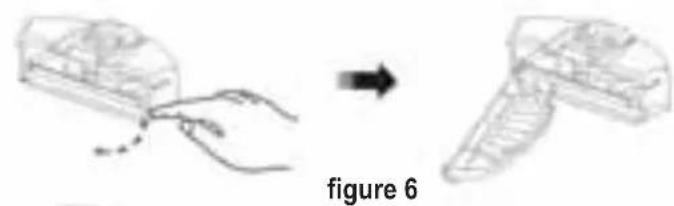
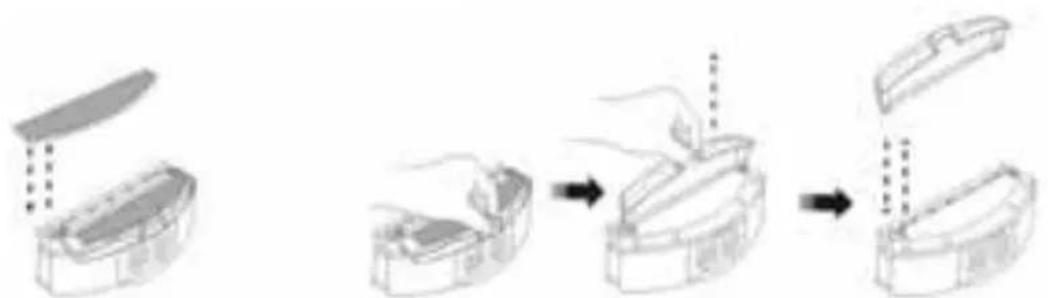
figure 7
figure 8 figure 9
Do not use the mop or pull bar on rugs or uneven floors.
GB
Cleaning the container and fan:
- First empty the container and then clean it using the cleaning brush. (See figure 1).
- Remove the fan housing and clean the air intake/outlet using the cleaning brush. (See figures 2 and 3).
- Do not clean the fan with water!
- Remove the filter and then clean the container. (See figure 4).
- Clean the filter using a hair dryer or with the cleaning brush (See figures 5 and 6).
- After cleaning, put it firmly back in place as it was before dismantling.
Installing/dismantling and cleaning the brushes Installing/dismantling the main brush and the floor brush:
- Push the locking bar backwards and lift the cover with your right thumb; then lift the central cleaning brush using your left hand. (See figures 1 and 2)
- Remove the main brush and the rubber roller. (See figure 3)
- Insert the main brush and the floor brush into their corresponding holes before closing the cover.
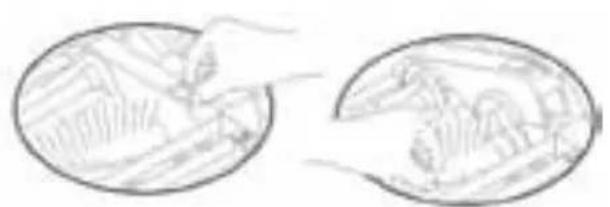
figure 1 figure 2
Installing and dismantling the side brush:
Installation:
- Loosen the screw in the main shaft of the side brush before changing it.
Dismantling:
- Push the side brush against the main shaft and then tighten the screw. (See figure).
Cleaning the side and floor brushes:
-
For optimum cleaning, frequently remove built-up hair and dust from the rubber and floor rollers. Clean any dust build-up on the air intake. Remove waste paper or dust directly using the dust brush. Carefully rotate the brush and cut out any built-up hair, threads or other entangled objects using scissors or pull them out by hand.
-
The main brush and rubber roller can be cleaned following the installation and dismantling section.
Installing/dismantling and cleaning the left/right wheel
- Loosen the screw in the left/right wheel using a screwdriver. (See figure 1).
- Remove the left/right wheel and clean it with the brush (see figure 2).
Do not clean with water!
- Fit the left/right wheel in its original position and tighten the screws during installation.
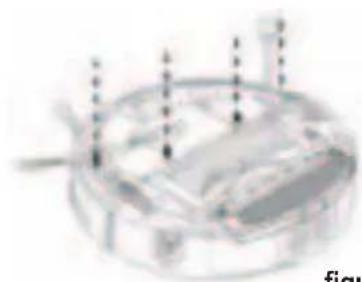
figure 1
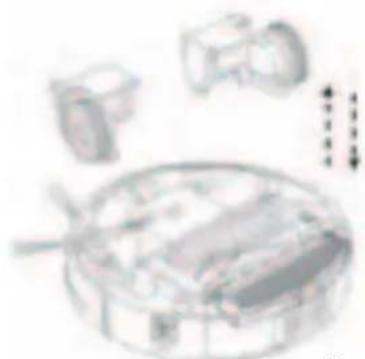
figure 2
GB
Installing/dismantling and cleaning the front wheel
- Remove the front wheel using a tool for leverage and clean it. (See figure).
- Fit and press the front wheel into its position to reinstall.
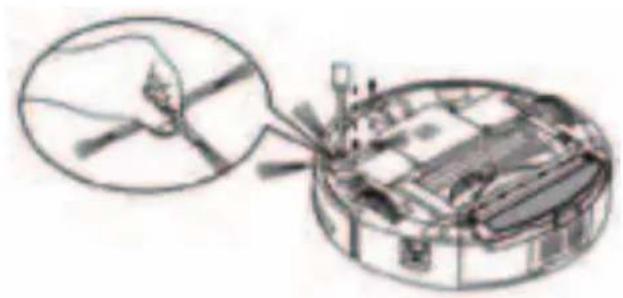
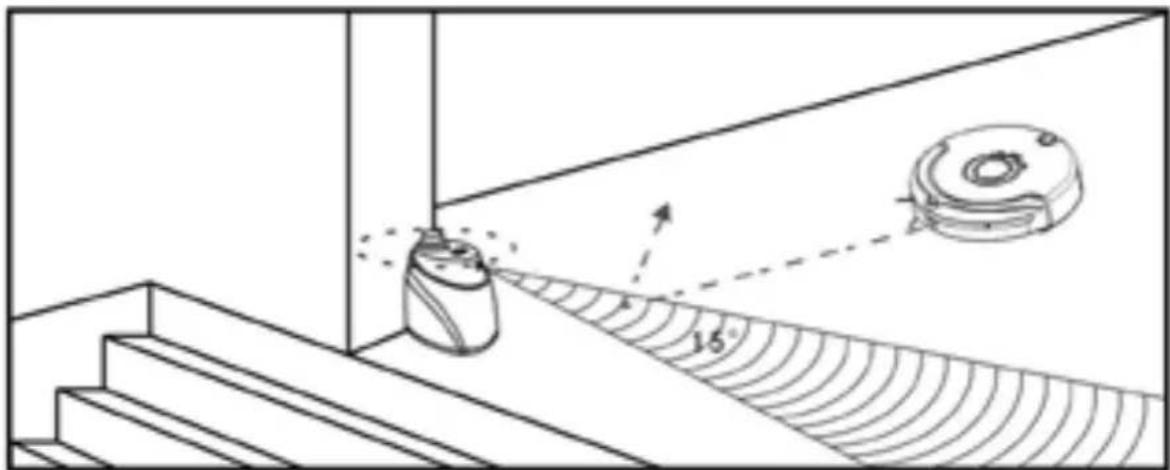
Cleaning the sensor and the transparent infrared window:
- Clean the sensor and the transparent infrared window using a soft cloth.
- The wall dirt sensor is located on the front of the robot, while the floor sensor and the transparent infrared window are located on the bottom. (See figure below).
- Keep the transparent window clean to ensure optimum performance.
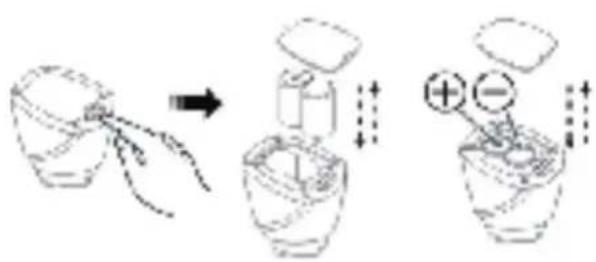
Changing the virtual wall battery:
- Remove the screw using a screwdriver and open the cover.
- Make sure the positive and negative electrodes are correctly aligned, otherwise you could damage the device.
- Insert the batteries correctly.
- Remove the battery if you do not plan to use the device for a long period time.
- The device uses LR20 batteries.
figure 1 figure 2 figure 3
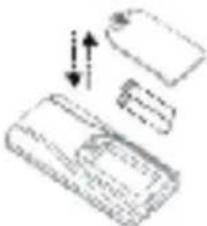
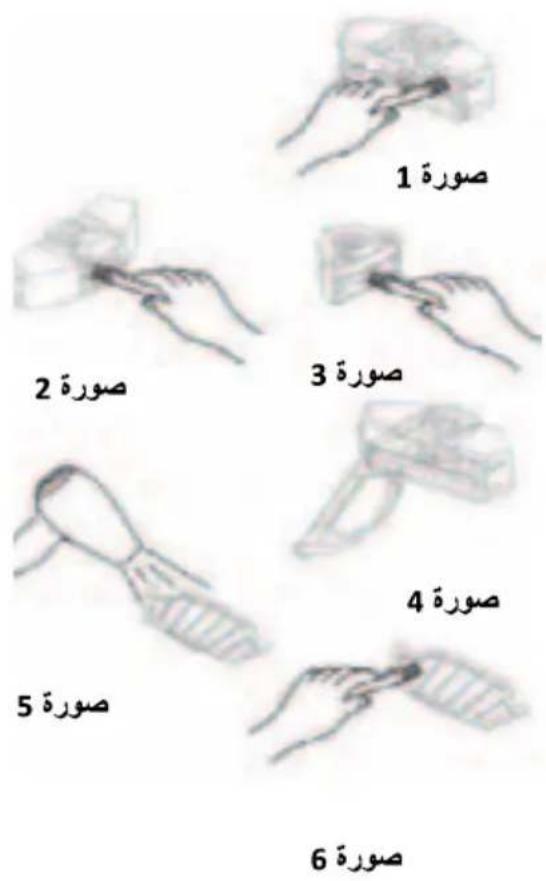
Changing the remote control battery:
- Open the battery cover and change the batteries. (See figure 1).
- Make sure the positive and negative electrodes are correctly aligned, otherwise you could damage the device. (See figure 2).
- Remove the batteries if you do not plan to use the device for a long period time.
- The device uses AAA batteries.
figure 1 figure 2
Remote control:
Control panel:
General view Description of the buttons
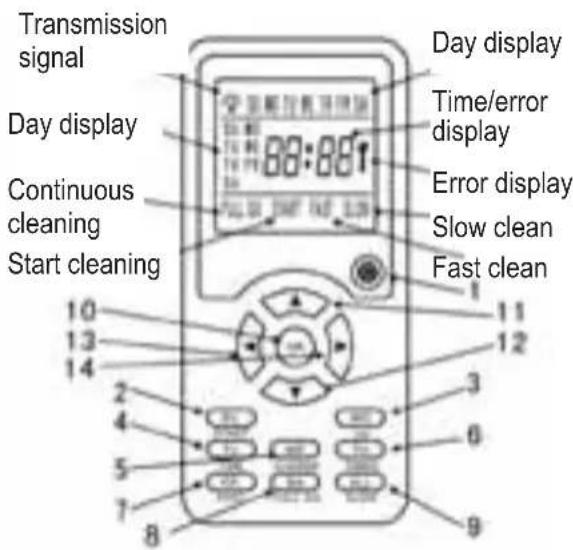
- “” On
- "SUNDAY, START/Stop" Sunday, Start/Stop
- "SOP" Monday/UV
- "TIME" Tuesday/time setting
- "WE CHARGE" Wednesday/charge
- "TtTER" Thursday/timer
- "FR Friday/fast cleaning
- "FULLGO" Saturday/Automatic cleaning after full charge
- "ALL" All days of the week/slow cleaning
- "OK" Order confirmation
- “▲” Forward
- “▼” Backwards
13 “<” Turn left - “▶” Turn right
GB
Control panel instructions for use and operating mode

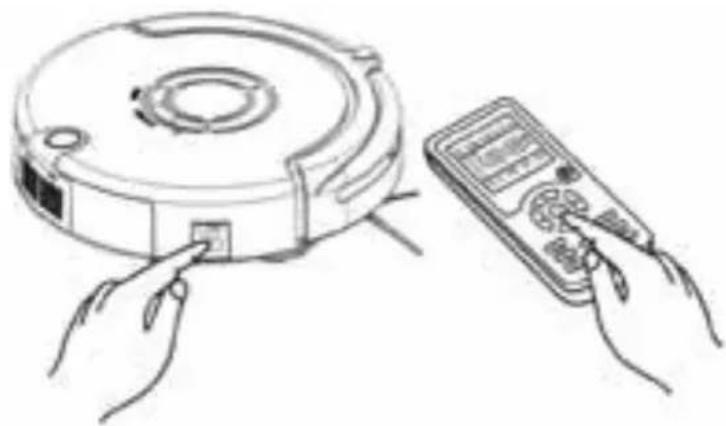
The following steps are very important: be sure not to press the wrong buttons on the remote control!
-
You must recheck the code on the remote control or main unit when you change them after first use or during maintenance.
-
Check that the battery in the remote control and in the main unit have sufficient charge; turn off the main unit; press and hold OK on the remote control for more than 4 seconds and then turn on the main unit without releasing the OK button. When you hear the robot beep twice, release the OK button to complete the code test.
-
If you do not hear the beeps during code testing, repeat the previous steps.
| Operating guide Operating information | |
| Start/Stop | Turn on the machine; when you press the Start/Stop button, the machine will start working, and pressing it again will turn the machine off. |
| Setting the current date and time | 1. Turn on the machine. 2. When you press "TIME", the current time number BB will start flashing. Use the▲▼ buttons to select time. 3. When you press the ▲▶ buttons, the minute indicator will start flashing. Use ▲▼ to set the minute. 4. Then press ▲▶ to set the hour. 5. To set the day of the week, press one of the buttons SUN, MON, TUE, WED, THU, FRI or SAT. 6. Once you have configured the setting, press OK. 7. Pressing the on button during configuration cancels the setting. |
| Setting cleaning time Setting continuous cleaning | Setting days of the week for cleaning: 1. Turn on the machine. 2. Pressing "TIMER", SUN, MON, TUE, WED, THU, FRI or SAT will appear. 3. Press any given day of the week, several days or all days to set the device to clean on any one, several days or every day of the week. The current date will flash. Setting the cleaning time: 4. Press "TIMER"; the number BB will start flashing. Use the ▲▼ buttons to select your desired hour of cleaning. 5. Press ▲▶, again; the number BB in minutes will start flashing. Use ▲▼ to set your desired minutes of cleaning. 6. Once you have configured the setting, press OK. 7. Pressing the on button during configuration cancels the setting. Setting continuous cleaning If you have a large house, you can use function "FULL GO" (continuous cleaning), in which the robotic vacuum will start cleaning when fully charged and return to the docking station automatically before its battery is flat. 1. Press "FULL GO"; the "FI indicator on the remote control LCD screen will start flashing. 2. Once you have configured the setting, press OK. 3. The robotic vacuum will start cleaning automatically when the battery is charged (charging time is about 5 or 6 hours). Note: The continuous cleaning and scheduled cleaning functions cannot be used at the same time! |
| Error display | If you are certain that there is an error with the device, with the remote control within range, press this function button on the remote. The screen will show an error code which you should be able to clear by following instructions in the troubleshooting section. |
| Speed selection | Press "FAST" or "SLOW" to select either fast or slow cleaning. The machine will automatically save your selection for future use. |
| Turn off/Cancel/Stop | 1. Press the robot on button. When the view function is in normal mode, press this button to turn the robot on or off. 2. With the unit switched on, press this button to stop the device in the corresponding mode. 3. When setting the programmable cleaning date and time, if the setting is incorrect or you want to cancel it, press this button to cancel the programmed mode and return to normal status. 4. Press and hold this button for more than 5 seconds; this will erase the entire setting and return the unit to the default setting |
| OK button After setting the configuration, press OK to save it. | |
| FULL GO | After fully charging the battery, the machine will begin to clean automatically on repeated occasions. |
| CHARGE | If you press this button when the robot is in stand-by mode or in operation, the robot will search for the docking station to recharge itself. When the robot stops working, it will stop recharging if you press this button again. |
| ▲ Forward button | By pressing "Forward", the robot will move forwards cleaning in the direction of the arrow; press "off" to stop it. If it encounters and obstacle, the robot will stop. |
| ▼ Backward | By pressing and holding "Backward", the robot will move backwards cleaning in the direction of the arrow and will stop when you release the button. |
| ▲ Turn left button | By pressing and holding the "Turn left" button for a few seconds, the robot will turn anticlockwise until you release the button, and will then move forwards in the indicated direction. Press "Off" to stop the robot. If it encounters and obstacle, the robot will stop. |
| ▼ Turn right button | By pressing and holding the "Turn right" button for a few seconds, the robot will turn clockwise until you release the button, and will then move forwards in the indicated direction. Press "Off" to stop the robot. If it encounters and obstacle, the robot will stop. |

- The remote control must be used within a radius of 10 metres, otherwise you will not be able to operate the unit.
- The robotic vacuum may not locate the docking station when you press automatic recharge if there is an obstruction, the battery is low or in more complex situations.
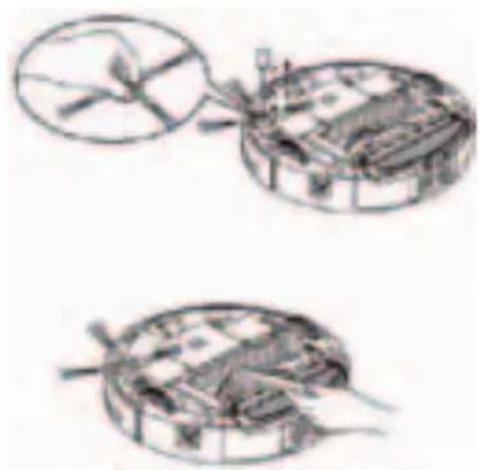
Docking station for automatic recharging
Charger display and control panel
Main view Operating instructions
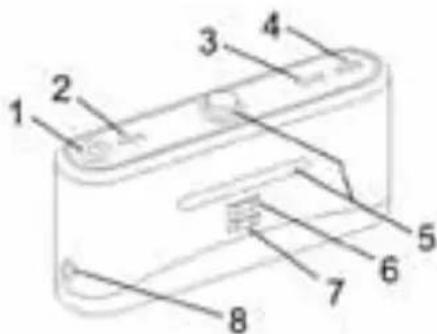
- LED accent light
- Accent light indicator
- On LED
- Charging indicator
- Signal transmitter
- Positive charge point
- Negative charge point
- DC power socket
Docking station instructions for use and operating mode
| No. | Operating guide Operating information |
| 1 LED accent light | |
| 2 Accent light indicator Press the switch to turn the accent light on or off | |
| 3 Power LED | The power LED will turn on when the docking station is connected to the mains, and will turn off when disconnected. |
| 4 Charging indicator | The indicator will flash for as long as the charger is connected to the robot. |
| 5 Signal transmission | The signal transmission is the only way to guide the robot to the docking station to recharge; therefore the path of the transmission signal must be clear and free from obstructions. |
| 6-7 | Positive and negative electrode recharge The electrode and the robot are connected to charge upon contact, therefore the path must be free from obstacles while in use, which could have an impact on the recharge. |
| 8 | DC power recharging socket The recharging socket, or charger, is used to connect the 24V DC outlet to the adapter and acts as the transit station for charging between robot and adapter. The charger should be securely attached to the wall and the adapter cable kept far away from the charger to prevent the robot from being knocked or entangled during cleaning. |
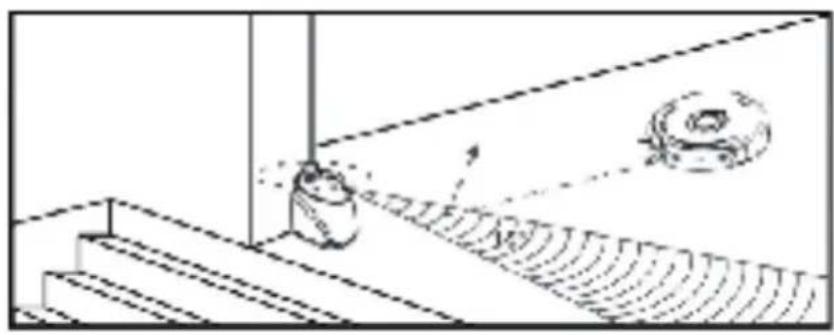
View of the space divider and control panel
Main view Operating instructions
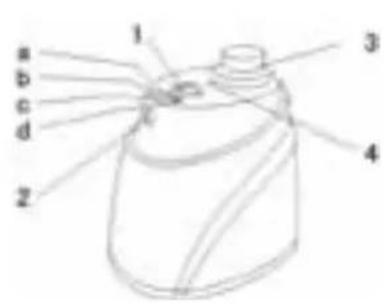
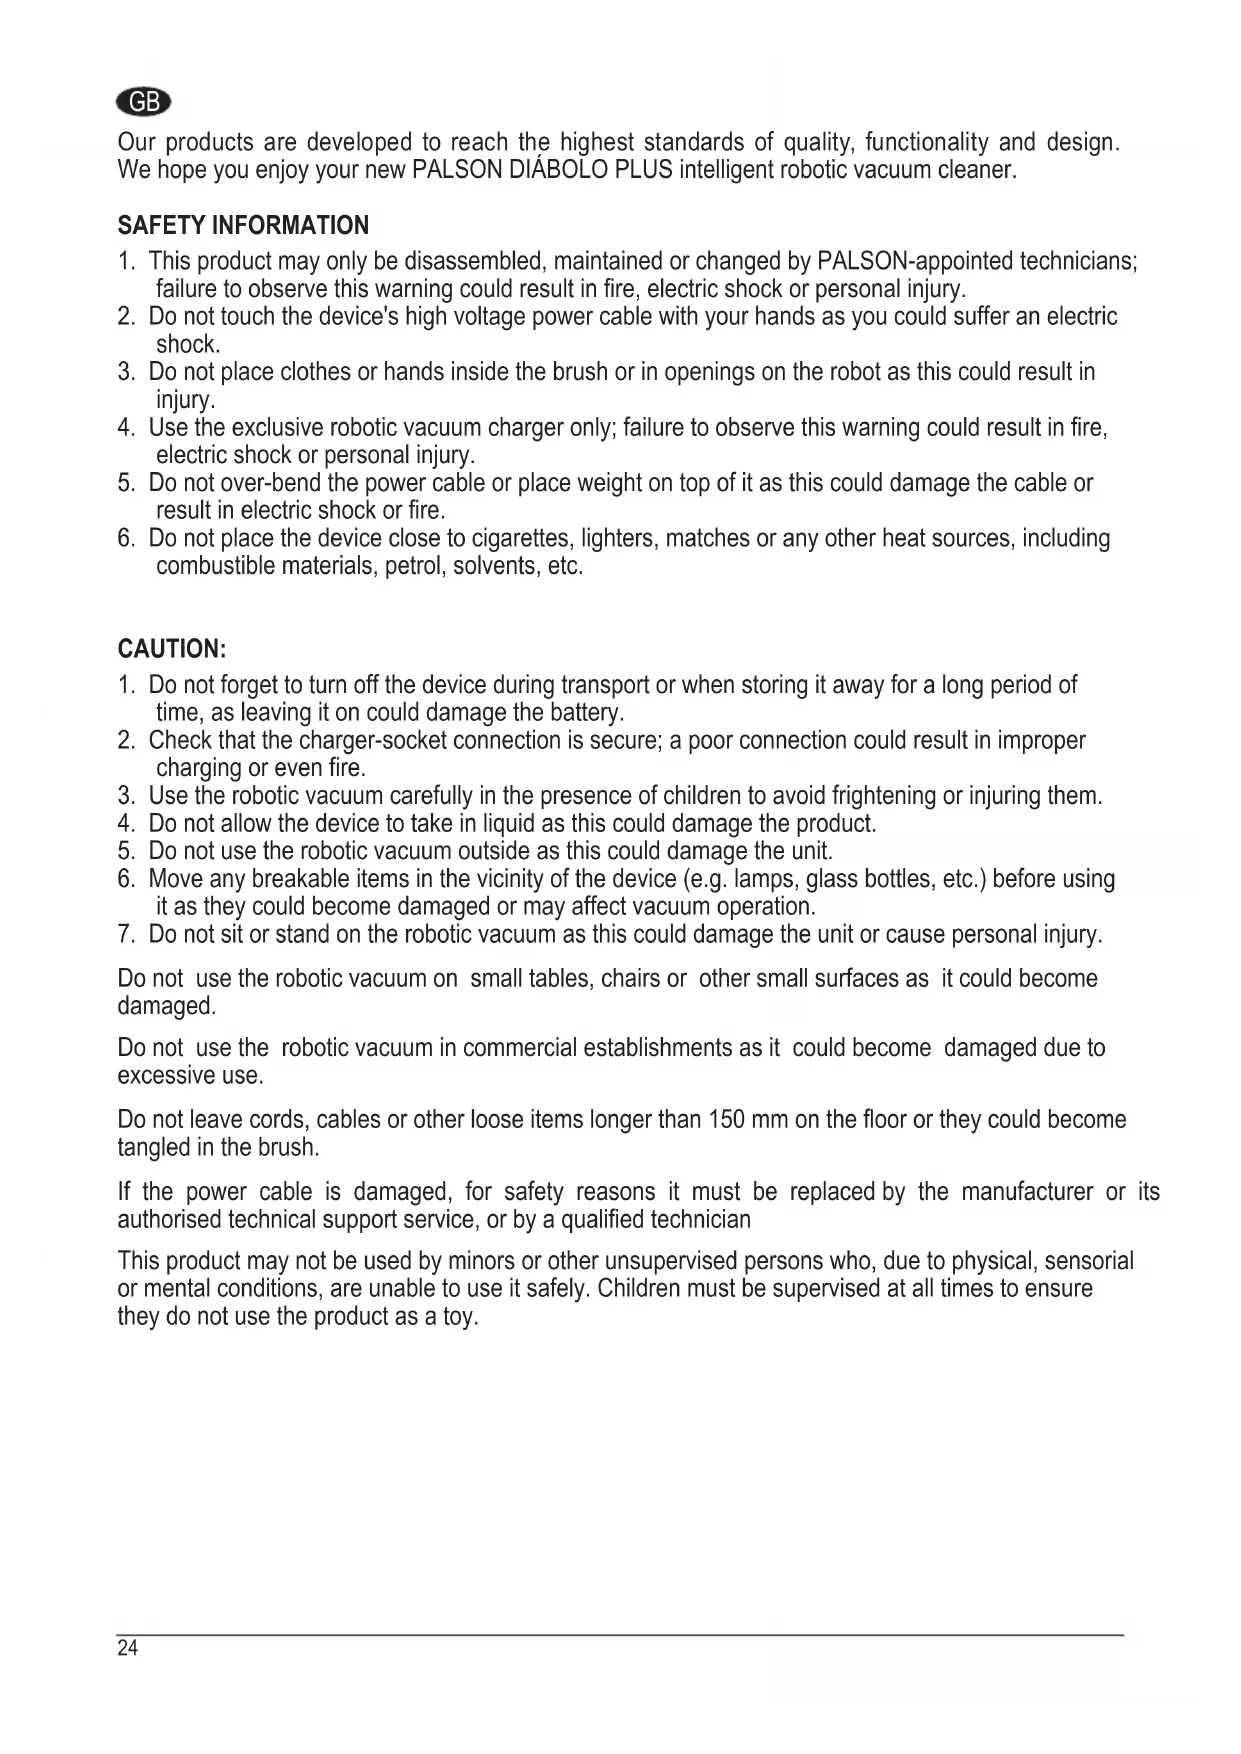
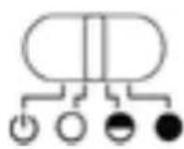
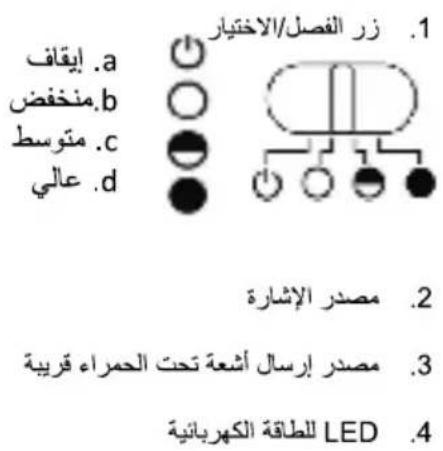
- Switch/selector


a. Off
b. Low
c. Medium
d. High
- Signal head
- Local infrared transmission point
- Power LED
Operating the space divider:
The space divider is a robot accessory that can isolate a certain area by sending a special infrared signal, which prevents the robotic vacuum from entering areas you do not which to clean.
Space divider instructions for use and operating mode
| No. | Name Operating information | |
| 1 | Switch/selector | You can change between operating modes using the switch Off, Low, Medium and High |
| a Off | Move the switch to this position to turn off the device | |
| b Low | Move the switch to this position to turn off the device | |
| c Medium | Move the switch to this option and turn on the device; you can select a distance of up to 4 metres according to the infrared wall settings | |
| d High | Move the switch to the Medium option and turn on the device; you can select a distance of up to 6 metres according to the infrared wall settings | |
| 2 | Infrared wall signal transmitter | Move the switch, then you can adjust the distance of the space divider |
| 3 | Local infrared transmission point | The local infrared transmission signal allows the robotic vacuum to operate 50-100cm outside the range of the space divider without affecting its performance |
| 4 Power LED | The power LED will flash once every 8 seconds until the battery is low; once you set the switch to Low, Medium and High, the robot will work as normal | |

- Open the battery cover before use and insert two batteries (not included) into the compartment.
«D» Check that the batteries are inserted correctly otherwise the space divider will not work. - Battery duration depends on the selected distance of transmission and the operating time. Select the appropriate transmission distance and a low transmission power to save battery power. Do not forget to turn of the unit when not in use.
- You may notice differences in direction, space divider infrared signal transmission and robot reception distance due to the surrounding environment and to the movement of the robot during use. This difference may vary according to the current surroundings and different battery energy levels in the robot and the space divider.
Space divider installation procedure
- The space divider is commonly placed at the top of a staircase or at the entrance to a room.
- The space divider can be placed in a certain position to prevent the robot from entering certain places.
- Where possible, remove any obstacles from the area you wish to isolate in front of the space divider to ensure it functions correctly.
- The space divider must be placed at the same level as the floor on which the robot is in operation.
- Check that the robot is able to pass through the space divider when using it for the first time.
- The space divider must be at least 3 metres away from the charger to avoid interference.
GB
Troubleshooting
The robot doesn't work or doesn't clean properly
- Check that the switch is set to ON.
- Check that the device, filter and air intake are clean and that the side brush is working correctly.
- Check to see if the battery level has fallen significantly.
The remote control doesn't work
- Check the remote control battery status.
- Check the robot battery status.
- Run a code test between the remote control and the main unit.
- Check whether the remote control is within the transmission signal radius.
The robot will not charge automatically.
- Check that the adapter is properly connected to the charger and that the LED power indicator is on.
- Check to see if the battery is too low; if so, charge the robot directly using the adapter.
- Make sure there are no obstacles in front of the docking station.
- Use the remote control to return the robotic vacuum to the docking station.
Increased noise level during cleaning
- Clean the container and the filter.
- Check for dirt in the main brush and side brush.
- If the noise is extremely loud, you may send you robotic vacuum to an authorised technical support centre for lubrication.
The robot suddenly stops working and starts making intermittent beeps
- Check to see if the set cleaning time has finished.
- Check for error codes on the remote control screen, with reference to the following.
The robot is stuck in reverse.
- Avoid using it in direct sunlight or on thick rugs.
- Knock lightly on the front bumper.
The robot has fallen down stairs.
Clean the floor detection sensors on the bottom front part of the unit.
The robot does not charge automatically after being unused for long periods.
Use the adapter to ensure it is fully charged.
The robot stops, but no error code appears.
Do not take it apart or try to repair it; contact an authorised technical support centre.
Possible errors that may appear during use
| Error code | Cause of error How to resolve it | |
| E001 | Floor detection sensors | Clean the sensors on the front bottom part of the robot |
| E002 Main brush Remove any dirt, hair or fibres trapped in the brush | ||
| E003 Off | Use the adapter to charge the unit; once it is fully charged you may continue to use it. | |
| E004 Left/right wheel Check the left/right wheels and clean off any dirt | ||
| E005 | Insufficient container contact | Check the container for dirt, clean if necessary and reattach it |
If the error persists after completing the above steps, contact after-sales maintenance, a professional repair company or the company's technical centre; do not attempt to dismantle or fix the unit yourself. Possible errors that may appear during use.
Technical specifications
| Applicable models XR210C | ||
| 1 Nominal voltage | ---- 14.4V | |
| 2 Battery | Rechargeable battery (recharging time is around 5 hours) | |
| 3 | Total operating time with battery fully charged | Around 100-120 minutes (2200 mA) |
| 4 Nominal power <24W | ||
| 5 Operating temperature range | -10°C~45°C | |
| 6 Operating humidity range | ≤85RH | |
| 7 Supply voltage/current 24V | ---- 1A | |
| 8 Wireless remote control ISM frequency | band 2.4GHz | |
| 9 Specifications | Φ320x87mm (including wheel height) | |
| 10 Weight 3.2kg | ||
| 11 Battery capacity 2200mA | ||
Remote control technical specifications
| Applicable models XR210C | |
| Nominal voltage | ----3V |
| Battery 2 x AAA batteries (not included) | |
| Remote mode ISM frequency band 2.4GHz | |
| Receiving and transmitting distance | ≥10M |
| Transmission power | 0dB |
| Operating temperature range | -10°C~45°C |
| Operating humidity range | ≤85RH |
| Characteristics | 120L×55A×Depth: 25 mm |
| Weight | 0.08kg |
Technical specifications of docking station
| No. | Models Parameters Observation | |
| 1 Characteristics L×An×To: 200×51×102mm | ||
| 2 Weight 0.23kg | ||
| 3 Nominal voltage | ---- 24V | |
| 4 | Operating temperature range | -10°C~45°C |
| 5 | Operating humidity range | ≤85RH |
Technical specifications of space divider
| No. | Models Parameters Observation | |
| 1 Characteristics L×An×To: 102×71×106mm | ||
| 2 Weight 0.14kg | ||
| 3 Nominal voltage | ---- 3V | |
| 4 Battery 2 x 3V "D" batteries (not included) | ||
| 5 | Operating temperature range | -10°C~45°C |
| 6 | Operating humidity range | ≤85RH |
ENVIRONMENTAL PROTECTION
Used electrical products must not be discarded with household waste. This device must be taken to a local recycling centre for safe disposal.
Thank you for purchasing one of our products.
F
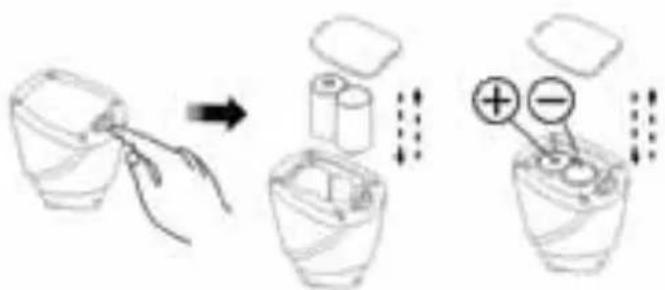
figure 1
figure 2 figure 3
Control panel instructions for use and operating mode
Specifications techniques
aalal aolal elal cai aai JwJg, oaiy jia 3
J 1
aallll 1
aalwll
1
JSLJI JIJI JIJI JIJI JIJI JIJI JIJI JIJI JIJI JIJI JIJI JIJI JIJI JIJI JIJI JIJI JIJI JIJI JIJI JIJI JIJI JIJI JIJI JIJI JIJI JIJI JIJI JIJI JIJI JIJI JIJI JIJI JIJI JIJI JIWI
1 3
4
1 1.1
aalwaa aagaae
eal al aaiy y aol s JLa la n 1n S ay Cuy Bg y aalall
-
"TME"
-
"WE CHARGE"
-
"TH"
-
“FR FAST”
yj
- "FULL GO"
Jll jll 1
1
2x - 6 = 2 + 2k ,
- “▲”
12.“
-
“
-
“
a 1
1 1
1
aill
2
.0K JJIO
aill aal 1 1 1 1 1 1 1 1 1 1 1 1 1 1 1 1 1 1 1 1 1 1
.().
.2
1yll 2aaiyaiiaaii yjaiy jie
a 1
j 2
).
(
3
:
.1
2
jglj j
.3
8j 4
4y
LR20gilln
1 2

1
3
28
.1
2
(2).
3
山
AAA 4
:
:
1
:
2
()
:
1
1 1
y j 1
15 1
2
slll, 1
i/(gssal aai gii
(1) (2)
.(20 1.2
y
.3
28
aiee aae eae eae ae eae 1
(1)
2
20
(3)
1y 3
bail).gsswall 1y
(4)
.5
.65
aaiin n nn nnnn nnnn nnnn nnnn nnnn nnnn nnnn nnnn nnnn nnnn nnnn nnnn nnnn nnnn nnnn nnnn nnnn nnnn nnnn nnnn nnnn nnnn nnnn nnnn nnnn nnnn nnnn nnnn nnnn nnnn nnnn nnnn nnnn nnnn nn
Jj
1
28
C
()blloljy
(1)
y,calacn
Poi Jiaol 3 aIw
0.5 1
)
.2
.3
1
slll Cts 15 jn Jua
a
olbaa jalil jao jao
Jaaal 1000
()
.3

1

30
48
1
a
j 2( p - 1) ( p - 1) ( p - 1) ( p - 1)
jll bial ail jai lal
CHARGE
Lgac Jg juaiy 1y iSll
(5)
Jia 1
| شجبیه | الZR |
| دی پوره نهام پوره پوره پوره پوره پوره پوره پوره پوره پوره پوره پوره پوره پوره پوره پوره پوره پوره پوره پوره پوره پوره پوره پوره پوره پوره پوره پوره پوره پوره پوره پوره پوره پوره پوره蒲لی پوره پوره پوره پوره پوره پوره پوره پوره پوره پوره پوره پوره پوره پوره پوره پوره پوره پوره پوره پوره پوره پوره پوره پوره پوره پوره پوره پوره پوره پوره پوره پوره پوره pbیفی پوره پوره پوره پوره پوره پوره پوره پوره پوره پوره پوره پوره پوره پوره پوره پوره پوره پوره پوره پوره پوره پوره پوره پوره پوره پوره پوره پوره پوره پوره پوره پوره پورhee پوره پوره پوره پوره پوره پوره پوره پوره پوره پوره پوره پوره پوره پوره پوره پوره پوره پوره پوره پوره پوره پوره پوره پوره پوره پوره پوره پوره پوره پوره پوره پوره پورهabayی پوره پوره پوره پوره پوره پوره پوره پوره پوره پوره پوره پوره پوره پوره پوره پوره پوره پوره پوره پوره پوره پوره پوره پوره پوره پوره پوره پوره پوره پوره پوره پوره پورhetی پوره پوره پوره پوره پوره پوره پوره پوره پوره پوره پوره پوره پوره پوره پوره پوره پوره پوره پوره پوره پوره پوره پوره پوره پوره پوره پوره پوره پوره پوره پوره پوره پور. مین پوره پوره پوره پوره پوره پوره پوره پوره پوره پوره پوره پوره پوره پوره پوره پوره پوره پوره پوره پوره پوره پوره پوره پوره پوره پوره پوره پوره پوره پوره پوره پوره پورهpscیفی پوره پوره پوره پوره پوره پوره پوره پوره پوره پوره پوره پوره پوره پوره پوره پوره پوره پوره پوره پوره پوره پوره پوره پوره پوره پوره پوره پوره پوره پوره پوره پورهpscیفí پوره پوره پوره پوره پوره پوره پوره پوره پوره پوره پوره پوره پوره پوره پوره پوره پوره پوره پوره پوره پوره پوره پوره پوره پوره پوره پوره پوره پوره پوره پوره پوره پورهخیفی پوره پوره پوره پوره پوره پوره پوره پوره پوره پوره پوره پوره پوره پوره پوره پوره پوره پوره پوره پوره پوره پوره پوره پوره پوره پوره پوره پوره پوره پوره پوره پوره蒲یفی پوره پوره پوره پوره پوره پوره پوره پوره پوره پوره پوره پوره پوره پوره پوره پوره پوره پوره پوره پوره پوره پوره پوره پوره پوره پوره پوره پوره پوره پوره پوره پوره pbیفí پوره پوره پوره پوره پوره پوره پوره پوره پوره پوره پوره پوره پوره پوره پوره پوره پوره پوره پوره پوره پوره پوره پوره پوره پوره پوره پوره پوره پوره پوره پوره پوره pbیفís蒲یفی پوره پوره پوره پوره پوره پوره پوره پوره پوره پوره پوره پوره پوره پوره پوره پوره پوره پوره پوره پوره پوره پوره پوره پوره پوره پوره پوره پوره پوره پوره پوره پورhetی蒲یفی پوره پوره پوره پوره پورhetی蒲یفی蒲یفی蒲یفی蒲یفی蒲یفی蒲یفی蒲یفی蒲یفی蒲یفی蒲یفی蒲یفی蒲یفی蒲یفی蒲یفی蒲یفی蒲یفی蒲یفی蒲یفی蒲یفی蒲یفی蒲یفی蒲یفی蒲یفی蒲یفی蒲یفی蒲ی°F蒲یفی蒲یفی蒲یفی蒲یفی蒲یفی蒲یفی蒲یفی蒲یفی蒲یفی蒲یفی蒲یفی蒲یفی蒲یفی蒲یفی蒲یفی蒲یفی蒲یفی蒲یفی蒲یفی蒲یفی蒲یفی蒲یفی蒲یفی蒲یفی蒲یف丫蒲یف丫蒲یف丫蒲یف丫蒲یف丫蒲یف丫蒲یف丫蒲یف丫蒲彎丫蒲彎丫蒲彎丫蒲彎丫蒲彎丫蒲彎丫蒲彎丫蒲彎丫蒲彎丫蒲彎丫蒲彎丫蒲彎丫蒲彎丫蒲彎丫蒲彎丫蒲彎丫蒲彎丫蒲彎丫蒲彎丫蒲彎丫蒲彎丫蒲彎丫蒲彎丫蒲彎丫蒲彎丫蒲彵丫蒲彵丫蒲彵丫蒲彵丫蒲彵丫蒲彵丫蒲彵丫蒲彵丫蒲彵丫蒲彵丫蒲彵丫蒲彵丫蒲彵丫蒲彵丫蒲彵丫蒲彵丫蒲彵丫蒲彵丫蒲彵丫蒲彵丫蒲彵丫蒲彵丫蒲彵丫蒲彵丫蒲彵丫蒲影丫蒲影丫蒲影丫蒲影丫蒲影丫蒲影丫蒲影丫蒲影丫蒲影丫蒲影丫蒲影丫蒲影丫蒲影丫蒲影丫蒲影丫蒲影丫蒲影丫蒲影丫蒲影丫蒲影丫蒲影丫蒲影丫蒲影丫蒲影丫蒲影丫蒲彵丫蒲影丫蒲影丫蒲影丫蒲影丫蒲影丫蒲影丫蒲影丫蒲影丫蒲影丫蒲影丫蒲影丫蒲影丫蒲影丫蒲影丫蒲影丫蒲影丫蒲影丫蒲影丫蒲影丫蒲影丫蒲影丫蒲影丫蒲影丫蒲彵丫蒲彵丫蒲影丫蒲影丫蒲影丫蒲影丫蒲影丫蒲影丫蒲影丫蒲影丫蒲影丫蒲影丫蒲影丫蒲影丫蒲影丫蒲影丫蒲影丫蒲影丫蒲影丫蒲影丫蒲影丫蒲影丫蒲影丫蒲影丫蒲彵丫蒲影丫蒲彵丫蒲影丫蒲影丫蒲影丫蒲影丫蒲影丫蒲影丫蒲影丫蒲影丫蒲影丫蒲影丫蒲影丫蒲影丫蒲影丫蒲影丫蒲影丫蒲影丫蒲影丫蒲影丫蒲影丫蒲影丫蒲影丫蒲影丫蒲彵丫蒲彵丫蒲彵丫蒲影丫蒲影丫蒲影丫蒲影丫蒲影丫蒲影丫蒲影丫蒲影丫蒲影丫蒲影丫蒲影丫蒲影丫蒲影丫蒲影丫蒲影丫蒲影丫蒲影丫蒲影丫蒲影丫蒲影丫蒲影丫蒲彵丫蒲影丫蒲影丫蒲彵丫蒲影丫蒲影丫蒲影丫蒲影丫蒲影丫蒲影丫蒲影丫蒲影丫蒲影丫蒲影丫蒲影丫蒲影丫蒲影丫蒲影丫蒲影丫蒲影丫蒲影丫蒲影丫蒲影丫蒲影丫蒲影丫蒲彵丫蒲影丫蒲彵丫蒲彵丫蒲影丫蒲影丫蒲影丫蒲影丫蒲影丫蒲影丫蒲影丫蒲影丫蒲影丫蒲影丫蒲影丫蒲影丫蒲影丫蒲影丫蒲影丫蒲影丫蒲影丫蒲影丫蒲影丫蒲影丫蒲影丫蒲彵丫蒲彵丫蒲影丫蒲彵丫蒲影丫蒲影丫蒲影丫蒲影丫蒲影丫蒲影丫蒲影丫蒲影丫蒲影丫蒲影丫蒲影丫蒲影丫蒲影丫蒲影丫蒲影丫蒲影丫蒲影丫蒲影丫蒲影丫蒲影丫蒲影丫蒲彵丫蒲彵丫蒲彵丫蒲彵丫蒲影丫蒲影丫蒲影丫蒲影丫蒲影丫蒲影丫蒲影丫蒲影丫蒲影丫蒲影丫蒲影丫蒲影丫蒲影丫蒲影丫蒲影丫蒲影丫蒲影丫蒲影丫蒲影丫蒲影丫蒲彵丫蒲影丫蒲影丫蒲影丫蒲彵丫蒲影丫蒲影丫蒲影丫蒲影丫蒲影丫蒲影丫蒲影丫蒲影丫蒲影丫蒲影丫蒲影丫蒲影丫蒲影丫蒲影丫蒲影丫蒲影丫蒲影丫蒲影丫蒲影丫蒲影丫蒲彵丫蒲影丫蒲影丫蒲彵丫蒲彵丫蒲影丫蒲影丫蒲影丫蒲影丫蒲影丫蒲影丫蒲影丫蒲影丫蒲影丫蒲影丫蒲影丫蒲影丫蒲影丫蒲影丫蒲影丫蒲影丫蒲影丫蒲影丫蒲影丫蒲影丫蒲彵丫蒲影丫蒲彵丫蒲影丫蒲彵丫蒲影丫蒲影丫蒲影丫蒲影丫蒲影丫蒲影丫蒲影丫蒲影丫蒲影丫蒲影丫蒲影丫蒲影丫蒲影丫蒲影丫蒲影丫蒲影丫蒲影丫蒲影丫蒲影丫蒲影丫蒲彵丫蒲影丫蒲彵丫蒲彵丫蒲彵丫蒲影丫蒲影丫蒲影丫蒲影丫蒲影丫蒲影丫蒲影丫蒲影丫蒲影丫蒲影丫蒲影丫蒲影丫蒲影丫蒲影丫蒲影丫蒲影丫蒲影丫蒲影丫蒲影丫蒲影丫蒲彵丫蒲彵丫蒲影丫蒲影丫蒲彵丫蒲影丫蒲影丫蒲影丫蒲影丫蒲影丫蒲影丫蒲影丫蒲影丫蒲影丫蒲影丫蒲影丫蒲影丫蒲影丫蒲影丫蒲影丫蒲影丫蒲影丫蒲影丫蒲影丫蒲影丫蒲彵丫蒲彵丫蒲影丫蒲彵丫蒲彵丫蒲影丫蒲影丫蒲影丫蒲影丫蒲影丫蒲影丫蒲影丫蒲影丫蒲影丫蒲影丫蒲影丫蒲影丫蒲影丫蒲影丫蒲影丫蒲影丫蒲影丫蒲影丫蒲影丫蒲影丫蒲彵丫蒲彵丫蒲彵丫蒲影丫蒲彵丫蒲影丫蒲影丫蒲影丫蒲影丫蒲影丫蒲影丫蒲影丫蒲影丫蒲影丫蒲影丫蒲影丫蒲影丫蒲影丫蒲影丫蒲影丫蒲影丫蒲影丫蒲影丫蒲影丫蒲影丫蒲彵丫蒲彵丫蒲彵丫蒲彵丫蒲彵丫蒲影丫蒲影丫蒲影丫蒲影丫蒲影丫蒲影丫蒲影丫蒲影丫蒲影丫蒲影丫蒲影丫蒲影丫蒲影丫蒲影丫蒲影丫蒲影丫蒲影丫蒲影丫蒲影丫蒲彵丫蒲影丫蒲影丫蒲影丫蒲影丫蒲彵丫蒲影丫蒲影丫蒲影丫蒲影丫蒲影丫蒲影丫蒲影丫蒲影丫蒲影丫蒲影丫蒲影丫蒲影丫蒲影丫蒲影丫蒲影丫蒲影丫蒲影丫蒲影丫蒲影丫蒲彵丫蒲影丫蒲影丫蒲影丫蒲彵丫蒲彵丫蒲影丫蒲影丫蒲影丫蒲影丫蒲影丫蒲影丫蒲影丫蒲影丫蒲影丫蒲影丫蒲影丫蒲影丫蒲影丫蒲影丫蒲影丫蒲影丫蒲影丫蒲影丫蒲影丫蒲彵丫蒲影丫蒲影丫蒲彵丫蒲影丫蒲彵丫蒲影丫蒲影丫蒲影丫蒲影丫蒲影丫蒲影丫蒲影丫蒲影丫蒲影丫蒲影丫蒲影丫蒲影丫蒲影丫蒲影丫蒲影丫蒲影丫蒲影丫蒲影丫蒲影丫蒲彵丫蒲影丫蒲影丫蒲彵丫蒲彵丫蒲彵丫蒲影丫蒲影丫蒲影丫蒲影丫蒲影丫蒲影丫蒲影丫蒲影丫蒲影丫蒲影丫蒲影丫蒲影丫蒲影丫蒲影丫蒲影丫蒲影丫蒲影丫蒲影丫蒲影丫蒲彵丫蒲影丫蒲彵丫蒲影丫蒲影丫蒲彵丫蒲影丫蒲影丫蒲影丫蒲影丫蒲影丫蒲影丫蒲影丫蒲影丫蒲影丫蒲影丫蒲影丫蒲影丫蒲影丫蒲影丫蒲影丫蒲影丫蒲影丫蒲影丫蒲影丫蒲彵丫蒲影丫蒲彵丫蒲影丫蒲彵丫蒲彵丫蒲影丫蒲影丫蒲影丫蒲影丫蒲影丫蒲影丫蒲影丫蒲影丫蒲影丫蒲影丫蒲影丫蒲影丫蒲影丫蒲影丫蒲影丫蒲影丫蒲影丫蒲影丫蒲影丫蒲彵丫蒲影丫蒲彵丫蒲彵丫蒲影丫蒲彵丫蒲影丫蒲影丫蒲影丫蒲影丫蒲影丫蒲影丫蒲影丫蒲影丫蒲影丫蒲影丫蒲影丫蒲影丫蒲影丫蒲影丫蒲影丫蒲影丫蒲影丫蒲影丫蒲影丫蒲彵丫蒲影丫蒲彵丫蒲彵丫蒲彵丫蒲彵丫蒲影丫蒲影丫蒲影丫蒲影丫蒲影丫蒲影丫蒲影丫蒲影丫蒲影丫蒲影丫蒲影丫蒲影丫蒲影丫蒲影丫蒲影丫蒲影丫蒲影丫蒲影丫蒲影丫蒲彵丫蒲彵丫蒲影丫蒲影丫蒲影丫蒲彵丫蒲影丫蒲影丫蒲影丫蒲影丫蒲影丫蒲影丫蒲影丫蒲影丫蒲影丫蒲影丫蒲影丫蒲影丫蒲影丫蒲影丫蒲影丫蒲影丫蒲影丫蒲影丫蒲影丫蒲彵丫蒲彵丫蒲影丫蒲影丫蒲彵丫蒲彵丫蒲影丫蒲影丫蒲影丫蒲影丫蒲影丫蒲影丫蒲影丫蒲影丫蒲影丫蒲影丫蒲影丫蒲影丫蒲影丫蒲影丫蒲影丫蒲影丫蒲影丫蒲影丫蒲影丫蒲彵丫蒲彵丫蒲影丫蒲彵丫蒲影丫蒲彵丫蒲影丫蒲影丫蒲影丫蒲影丫蒲影丫蒲影丫蒲影丫蒲影丫蒲影丫蒲影丫蒲影丫蒲影丫蒲影丫蒲影丫蒲影丫蒲影丫蒲影丫蒲影丫蒲影丫蒲彵丫蒲彵丫蒲影丫蒲彵丫蒲彵丫蒲彵丫蒲影丫蒲影丫蒲影丫蒲影丫蒲影丫蒲影丫蒲影丫蒲影丫蒲影丫蒲影丫蒲影丫蒲影丫蒲影丫蒲影丫蒲影丫蒲影丫蒲影丫蒲影丫蒲影丫蒲彵丫蒲彵丫蒲彵丫蒲影丫蒲影丫蒲彵丫蒲影丫蒲影丫蒲影丫蒲影丫蒲影丫蒲影丫蒲影丫蒲影丫蒲影丫蒲影丫蒲影丫蒲影丫蒲影丫蒲影丫蒲影丫蒲影丫蒲影丫蒲影丫蒲影丫蒲彵丫蒲彵丫蒲彵丫蒲影丫蒲彵丫蒲彵丫蒲影丫蒲影丫蒲影丫蒲影丫蒲影丫蒲影丫蒲影丫蒲影丫蒲影丫蒲影丫蒲影丫蒲影丫蒲影丫蒲影丫蒲影丫蒲影丫蒲影丫蒲影丫蒲影丫蒲彵丫蒲彵丫蒲彵丫蒲彵丫蒲影丫蒲彵丫蒲影丫蒲影丫蒲影丫蒲影丫蒲影丫蒲影丫蒲影丫蒲影丫蒲影丫蒲影丫蒲影丫蒲影丫蒲影丫蒲影丫蒲影丫蒲影丫蒲影丫蒲影丫蒲影丫蒲彵丫蒲彵丫蒲彵丫蒲彵丫蒲彵丫蒲彵丫蒲影丫蒲影丫蒲影丫蒲影丫蒲影丫蒲影丫蒲影丫蒲影丫蒲影丫蒲影丫蒲影丫蒲影丫蒲影丫蒲影丫蒲影丫蒲影丫蒲影丫蒲影丫蒲彵丫蒲影丫蒲影丫蒲影丫蒲影丫蒲影丫蒲彵丫蒲影丫蒲影丫蒲影丫蒲影丫蒲影丫蒲影丫蒲影丫蒲影丫蒲影丫蒲影丫蒲影丫蒲影丫蒲影丫蒲影丫蒲影丫蒲影丫蒲影丫蒲影丫蒲彵丫蒲影丫蒲影丫蒲影丫蒲影丫蒲彵丫蒲彵丫蒲影丫蒲影丫蒲影丫蒲影丫蒲影丫蒲影丫蒲影丫蒲影丫蒲影丫蒲影丫蒲影丫蒲影丫蒲影丫蒲影丫蒲影丫蒲影丫蒲影丫蒲影丫蒲彵丫蒲影丫蒲影丫蒲影丫蒲彵丫蒲影丫蒲彵丫蒲影丫蒲影丫蒲影丫蒲影丫蒲影丫蒲影丫蒲影丫蒲影丫蒲影丫蒲影丫蒲影丫蒲影丫蒲影丫蒲影丫蒲影丫蒲影丫蒲影丫蒲影丫蒲彵丫蒲影丫蒲影丫蒲影丫蒲彵丫蒲彵丫蒲彵丫蒲影丫蒲影丫蒲影丫蒲影丫蒲影丫蒲影丫蒲影丫蒲影丫蒲影丫蒲影丫蒲影丫蒲影丫蒲影丫蒲影丫蒲影丫蒲影丫蒲影丫蒲影丫蒲彵丫蒲影丫蒲影丫蒲彵丫蒲影丫蒲影丫蒲彵丫蒲影丫蒲影丫蒲影丫蒲影丫蒲影丫蒲影丫蒲影丫蒲影丫蒲影丫蒲影丫蒲影丫蒲影丫蒲影丫蒲影丫蒲影丫蒲影丫蒲影丫蒲影丫蒲彵丫蒲影丫蒲影丫蒲彵丫蒲影丫蒲彵丫蒲彵丫蒲影丫蒲影丫蒲影丫蒲影丫蒲影丫蒲影丫蒲影丫蒲影丫蒲影丫蒲影丫蒲影丫蒲影丫蒲影丫蒲影丫蒲影丫蒲影丫蒲影丫蒲影丫蒲彵丫蒲影丫蒲影丫蒲彵丫蒲彵丫蒲影丫蒲彵丫蒲影丫蒲影丫蒲影丫蒲影丫蒲影丫蒲彵丫蒲影丫蒲影丫蒲影丫蒲影丫蒲影丫蒲影丫蒲影丫蒲影丫蒲影丫蒲影丫蒲影丫蒲影丫蒲影丫蒲影丫蒲影丫蒲影丫蒲彵丫蒲影丫蒲影丫蒲影丫蒲影丫蒲影丫蒲影丫蒲影丫蒲彵丫蒲影丫蒲影丫蒲影丫蒲影丫蒲影丫蒲影丫蒲影丫蒲影丫蒲影丫蒲影丫蒲影丫蒲影丫蒲影丫蒲影丫蒲影丫蒲影丫蒲彵丫蒲影丫蒲彵丫蒲影丫蒲影丫蒲影丫蒲影丫蒲影丫蒲彵丫蒲影丫蒲影丫蒲影丫蒲影丫蒲影丫蒲影丫蒲影丫蒲影丫蒲影丫蒲影丫蒲影丫蒲影丫蒲影丫蒲影丫蒲影丫蒲彵丫蒲影丫蒲影丫蒲影丫蒲影丫蒲影丫蒲影丫蒲影丫蒲影丫蒲彵丫蒲影丫蒲影丫蒲影丫蒲影丫蒲影丫蒲影丫蒲影丫蒲影丫蒲影丫蒲影丫蒲影丫蒲影丫蒲影丫蒲影丫蒲影丫蒲彵丫蒲影丫蒲影丫蒲彵丫蒲影丫蒲影丫蒲影丫蒲影丫蒲影丫蒲彵丫蒲影丫蒲影丫蒲影丫蒲影丫蒲影丫蒲影丫蒲影丫蒲影丫蒲影丫蒲影丫蒲影丫蒲影丫蒲影丫蒲影丫蒲影丫蒲彵丫蒲彲丫蒲彲丫蒲彲丫蒲彲丫蒲彲丫蒲彲丫蒲彲丫蒲彲丫蒲彲丫蒲彲丫蒲彲丫蒲彲丫蒲彲丫蒲彲丫蒲彲丫蒲彲丫蒲彲丫蒲彲丫蒲彲丫蒲彲丫蒲彲丫蒲彲丫蒲彲丫蒲彲丫蒲彲丫蒲彳丫蒲彲丫蒲彲丫蒲彲丫蒲彲丫蒲彲丫蒲彲丫蒲彲丫蒲彲丫蒲彲丫蒲彲丫蒲彲丫蒲彲丫蒲彲丫蒲彲丫蒲彲丫蒲彲丫蒲彲丫蒲彲丫蒲彲丫蒲彲丫蒲彲丫蒲彲丫蒲彲丫蒲彲丫蒲彼丫蒲彲丫蒲彲丫蒲彲丫蒲彲丫蒲彲丫蒲彲丫蒲彲丫蒲彲丫蒲彲丫蒲彲丫蒲彲丫蒲彲丫蒲彲丫蒲彲丫蒲彲丫蒲彲丫蒲彲丫蒲彲丫蒲彲丫蒲彲丫蒲彲丫蒲彲丫蒲彲丫蒲彲丫蒲彸丫蒲彲丫蒲彲丫蒲彲丫蒲彲丫蒲彲丫蒲彲丫蒲彲丫蒲彲丫蒲彲丫蒲彲丫蒲彲丫蒲彲丫蒲彲丫蒲彲丫蒲彲丫蒲彲丫蒲彲丫蒲彲丫蒲彲丫蒲彲丫蒲彲丫蒲彲丫蒲彲丫蒲彲丫蒲彵丫蒲彲丫蒲彲丫蒲彲丫蒲彲丫蒲彲丫蒲彲丫蒲彲丫蒲彲丫蒲彲丫蒲彲丫蒲彲丫蒲彲丫蒲彲丫蒲彲丫蒲彲丫蒲彲丫蒲彲丫蒲彲丫蒲彲丫蒲彲丫蒲彲丫蒲彲丫蒲彲丫蒲彳丫蒲彳丫蒲彳丫蒲彳丫蒲彳丫蒲彳丫蒲彳丫蒲彳丫蒲彳丫蒲彳丫蒲彳丫蒲彳丫蒲彳丫蒲彳丫蒲彳丫蒲彳丫蒲彳丫蒲彳丫蒲彳丫蒲彳丫蒲彳丫蒲彳丫蒲彳丫蒲彳丫蒲彳丫蒲彲丫蒲彳丫蒲彳丫蒲彳丫蒲彳丫蒲彳丫蒲彳丫蒲彳丫蒲彳丫蒲彳丫蒲彳丫蒲彳丫蒲彳丫蒲彳丫蒲彳丫蒲彳丫蒲彳丫蒲彳丫蒲彳丫蒲彳丫蒲彳丫蒲彳丫蒲彳丫蒲彳丫蒲彲丫蒲彲丫蒲彳丫蒲彳丫蒲彳丫蒲彳丫蒲彳丫蒲彳丫蒲彳丫蒲彳丫蒲彳丫蒲彳丫蒲彳丫蒲彳丫蒲彳丫蒲彳丫蒲彳丫蒲彳丫蒲彳丫蒲彳丫蒲彳丫蒲彳丫蒲彳丫蒲彳丫蒲彲丫蒲彳丫蒲彲丫蒲彳丫蒲彳丫蒲彳丫蒲彳丫蒲彳丫蒲彳丫蒲彳丫蒲彳丫蒲彳丫蒲彳丫蒲彳丫蒲彳丫蒲彳丫蒲彳丫蒲彳丫蒲彳丫蒲彳丫蒲彳丫蒲彳丫蒲彳丫蒲彳丫蒲彳丫蒲彲丫蒲彲丫蒲彲丫蒲彳丫蒲彳丫蒲彳丫蒲彳丫蒲彳丫蒲彳丫蒲彳丫蒲彳丫蒲彳丫蒲彳丫蒲彳丫蒲彳丫蒲彳丫蒲彳丫蒲彳丫蒲彳丫蒲彳丫蒲彳丫蒲彳丫蒲彳丫蒲彳丫蒲彲丫蒲彳丫蒲彳丫蒲彲丫蒲彳丫蒲彳丫蒲彳丫蒲彳丫蒲彳丫蒲彳丫蒲彳丫蒲彳丫蒲彳丫蒲彳丫蒲彳丫蒲彳丫蒲彳丫蒲彳丫蒲彳丫蒲彳丫蒲彳丫蒲彳丫蒲彳丫蒲彳丫蒲彳丫蒲彲丫蒲彳丫蒲彲丫蒲彲丫蒲彳丫蒲彳丫蒲彳丫蒲彳丫蒲彳丫蒲彳丫蒲彳丫蒲彳丫蒲彳丫蒲彳丫蒲彳丫蒲彳丫蒲彳丫蒲彳丫蒲彳丫蒲彳丫蒲彳丫蒲彳丫蒲彳丫蒲彳丫蒲彳丫蒲彲丫蒲彲丫蒲彳丫蒲彲丫蒲彳丫蒲彳丫蒲彳丫蒲彳丫蒲彳丫蒲彳丫蒲彳丫蒲彳丫蒲彳丫蒲彳丫蒲彳丫蒲彳丫蒲彳丫蒲彳丫蒲彳丫蒲彳丫蒲彳丫蒲彳丫蒲彳丫蒲彳丫蒲彳丫蒲彲丫蒲彲丫蒲彲丫蒲彲丫蒲彳丫蒲彳丫蒲彳丫蒲彳丫蒲彳丫蒲彳丫蒲彳丫蒲彳丫蒲彳丫蒲彳丫蒲彳丫蒲彳丫蒲彳丫蒲彳丫蒲彳丫蒲彳丫蒲彳丫蒲彳丫蒲彳丫蒲彳丫蒲彲丫蒲彳丫蒲彳丫蒲彳丫蒲彲丫蒲彳丫蒲彳丫蒲彳丫蒲彳丫蒲彳丫蒲彳丫蒲彳丫蒲彳丫蒲彳丫蒲彳丫蒲彳丫蒲彳丫蒲彳丫蒲彳丫蒲彳丫蒲彳丫蒲彳丫蒲彳丫蒲彳丫蒲彳丫蒲彲丫蒲彳丫蒲彳丫蒲彲丫蒲彲丫蒲彳丫蒲彳丫蒲彳丫蒲彳丫蒲彳丫蒲彳丫蒲彳丫蒲彳丫蒲彳丫蒲彳丫蒲彳丫蒲彳丫蒲彳丫蒲彳丫蒲彳丫蒲彳丫蒲彳丫蒲彳丫蒲彳丫蒲彳丫蒲彲丫蒲彳丫蒲彲丫蒲彳丫蒲彲丫蒲彳丫蒲彳丫蒲彳丫蒲彳丫蒲彳丫蒲彳丫蒲彳丫蒲彳丫蒲彳丫蒲彳丫蒲彳丫蒲彳丫蒲彳丫蒲彳丫蒲彳丫蒲彳丫蒲彳丫蒲彳丫蒲彳丫蒲彳丫蒲彲丫蒲彳丫蒲彲丫蒲彲丫蒲彲丫蒲彳丫蒲彳丫蒲彳丫蒲彳丫蒲彳丫蒲彳丫蒲彳丫蒲彳丫蒲彳丫蒲彳丫蒲彳丫蒲彳丫蒲彳丫蒲彳丫蒲彳丫蒲彳丫蒲彳丫蒲彳丫蒲彳丫蒲彳丫蒲彋 |
:Jaeui.1
a 1
.
J 2
.3
y
i 1
:

(2)
(2)
11yol
图
wS
JUaY1
()
:
lg( b - a) = -
y
150 150
a
Disposal of old Electrical & Electronic Equipment (Applicable throughout the European Union and other European countries with separate collection programs)
This symbol, found on your product or on its packaging, indicates that this product should not be treated as household waste when you wish to dispose of it. Instead, it should be handed over to an applicable collection point for the recycling of electrical and electronic equipment. By ensuring this product is disposed of correctly, you will help prevent negative consequences to the environment and human health, which could otherwise be caused by inappropriate disposal of this product. The recycling of materials will help to conserve natural resources. For more detailed information about the recycling of this product, please contact your local city office, household waste disposal service or the retail store where you purchased this product.


- SAFETY INFORMATION
- CAUTION:
- Application:
- Introduction on using the device
- Robotic vacuum components
- Introduction
- Control panel
- Installing the docking station and recharging the robot Automatic recharge
- Automatic charge
- GB
- Installing/dismantling and cleaning the container
- Installation and dismantling
- Cleaning the container and fan:
- Installing/dismantling and cleaning the brushes Installing/dismantling the main brush and the floor brush:
- Installing and dismantling the side brush:
- Installation:
- Dismantling:
- Cleaning the side and floor brushes:
- Installing/dismantling and cleaning the left/right wheel
- Do not clean with water!
- Installing/dismantling and cleaning the front wheel
- Cleaning the sensor and the transparent infrared window:
- Changing the virtual wall battery:
- Changing the remote control battery:
- Remote control:
- Control panel:
- General view Description of the buttons
- Control panel instructions for use and operating mode
- The following steps are very important: be sure not to press the wrong buttons on the remote control!
- Docking station for automatic recharging
- Charger display and control panel
- Main view Operating instructions
- Docking station instructions for use and operating mode
- View of the space divider and control panel
- Operating the space divider:
- Space divider instructions for use and operating mode
- Space divider installation procedure
- Troubleshooting
- The robot doesn't work or doesn't clean properly
- The remote control doesn't work
- The robot will not charge automatically.
- Increased noise level during cleaning
- The robot suddenly stops working and starts making intermittent beeps
- The robot is stuck in reverse.
- The robot has fallen down stairs.
- The robot stops, but no error code appears.
- Technical specifications
- Remote control technical specifications
- ENVIRONMENTAL PROTECTION
- F
- Specifications techniques
Brand : PALSON
Model : Diábolo Plus
Category : Vacuum Cleaner