PowerPoint LG290 - Remote control Logic3 - Free user manual and instructions
Find the device manual for free PowerPoint LG290 Logic3 in PDF.
| Product Type | Presentation remote with laser pointer |
| Brand | Logic3 |
| Model | PowerPoint LG290 |
| Category | Remote |
| Frequency Band | 2400-2483 MHz (16 channels, 65535 IDs) |
| Operating Distance | 20 meters indoors |
| Remote Power Supply | CR2032 battery (1x) |
| Operating Voltage | 2.6 V - 3.3 V |
| Power Consumption | Normal < 5 mA, Laser < 30 mA, Standby < 10 µA |
| Dimensions | 75 mm (L) x 34 mm (W) x 5 mm (H) |
| Weight | Approximately 14 g (receiver and battery included) |
| Laser Pointer | Class II, 1 mW power, 650 nm wavelength |
| System Compatibility | Windows 2000/XP/Vista, Mac OS X 10.4/10.5, USB port |
| Supported Software | PowerPoint 2000+, Keynote (Mac) |
| Main Functions | Previous/Next slide, laser pointer, black/white screen, Alt+Tab, FN, link |
| Storage | Slot for ExpressCard/PCMCIA port |
| Low Battery Indicator | Yes (indicator on the presenter) |
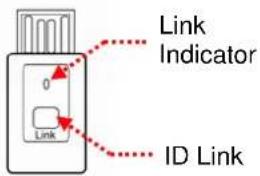
| Receiver | USB with link indicator and ID button |
| Safety | Caution class II laser, do not look directly, keep out of reach of children |
| Spare Parts | Available at www.logic3.com |
| Care | Clean with a soft dry cloth |
Frequently Asked Questions - PowerPoint LG290 Logic3
User questions about PowerPoint LG290 Logic3
0 question about this device. Answer the ones you know or ask your own.
Ask a new question about this device
Download the instructions for your Remote control in PDF format for free! Find your manual PowerPoint LG290 - Logic3 and take your electronic device back in hand. On this page are published all the documents necessary for the use of your device. PowerPoint LG290 by Logic3.
USER MANUAL PowerPoint LG290 Logic3
Thank you for purchasing the Logic3 PowerPoint/Keynote Remote Control. As with all Logic3 products it has been built to the highest manufacturing standards and tested throughout its development, to ensure you get the best possible product. Please read through and familiarise yourself with this manual before you use the PowerPoint/Keynote Remote Control.
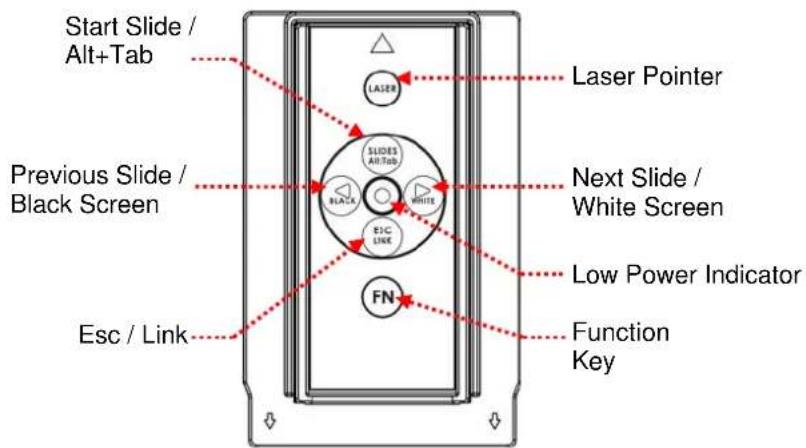
Product Overview
text_image
Start Slide / Alt+Tab Previous Slide / Black Screen Esc / Link LASER Laser Pointer SLIDES Alt+Tab BLACK WHITE E1C LINE FN Next Slide / White Screen Low Power Indicator Function KeyRemote Control
text_image
Link Indicator 0 Link ID LinkUSB Receiver
Setup of PowerPoint/Keynote Remote Control
natural_image
Illustration of a remote control device with a red arrow indicating compression or disassembly (no text or symbols)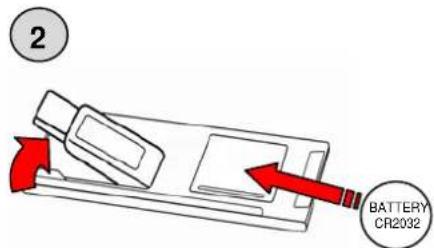
text_image
2 BATTERY CR2032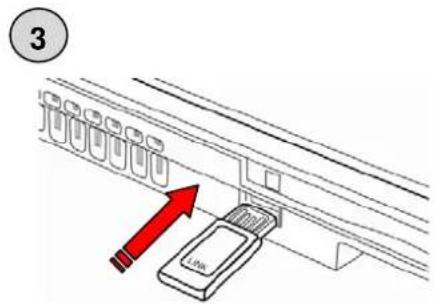
text_image
3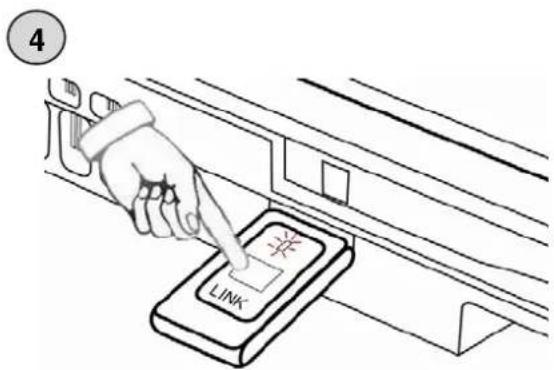
text_image
4 LINK
text_image
5 3LIDES Alt/Tab BLACK ESC LINK FNSetup/Pairing of PowerPoint/Keynote Remote Control
-
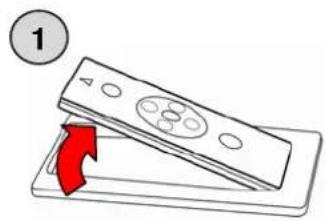
Remove the Remote Control from the Holder.
-
Remove the USB Receiver from the back of the Remote Control.
Open the battery lid and put in the battery, replace battery lid.
WARNING: Please ensure that the battery is inserted correctly. If the battery is inserted incorrectly (reversed polarity), this may cause personal injury as well as damage to your PowerPoint/Keynote Remote Control
-
Plug the USB Receiver into the USB port of your Note Book.
-
Press the ID Link button on the USB Receiver (Link Indicator will light up).
-
Press and hold the FN and Link button on the remote control until the Link Indicator on the Receiver starts to blink, this will indicate pairing is successful.
For MAC OS.X. Please follow the below steps (Only to be performed the first time the remote is used):-
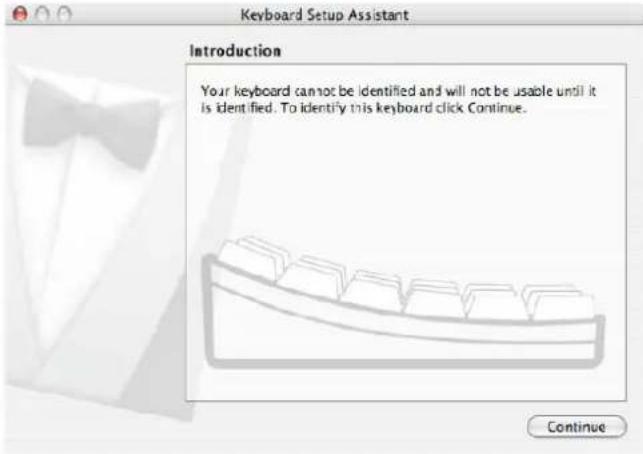
(1) When you first plug-in the Receiver, the Mac OS X keyboard pairing window will be displayed on screen.
text_image
Keyboard Setup Assistant Introduction Your keyboard cannot be identified and will not be usable until it is identified. To identify this keyboard click Continue. Continue(2) Follow Pairing as explained in Setup/Pairing of PowerPoint/Keynote Remote Control
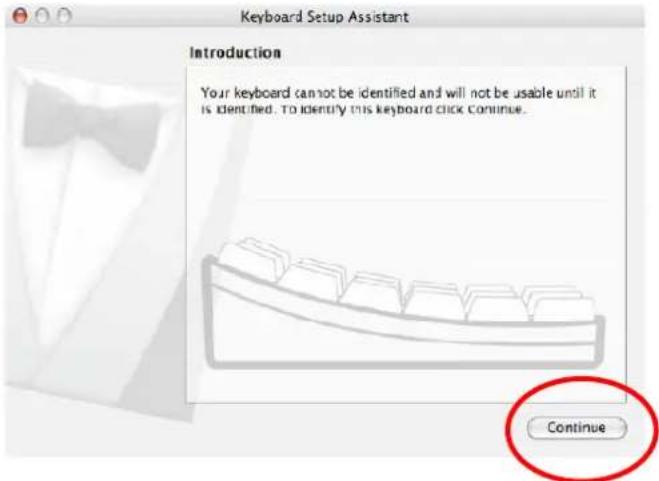
(3) Click 'Continue' on the Keyboard Setup Assistant.
Note : PowerPoint/Keynote Remote Control is designed to be seen by your system as a keyboard to enable you to use it without installing additional software drivers (re-spin this as needed).
text_image
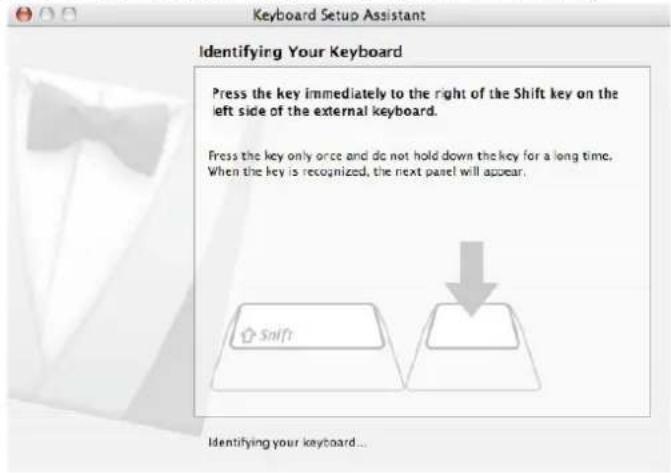
Keyboard Setup Assistant Introduction Your keyboard cannot be identified and will not be usable until it is identified. To identify this keyboard click continue. Continue(4) The assistant will ask you to press the key right of the shift key.
text_image
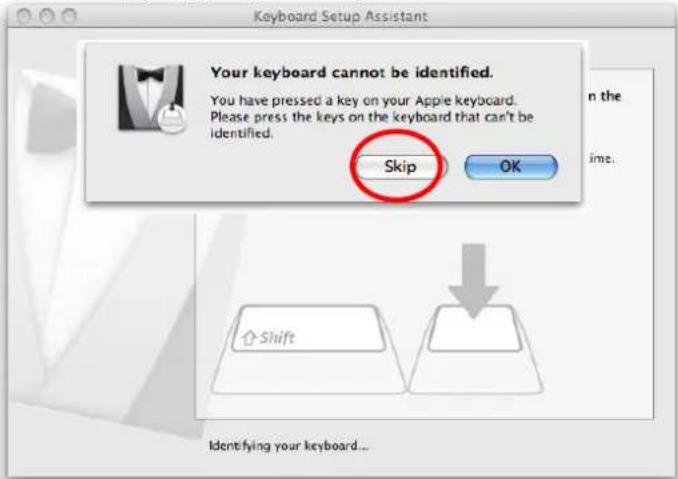
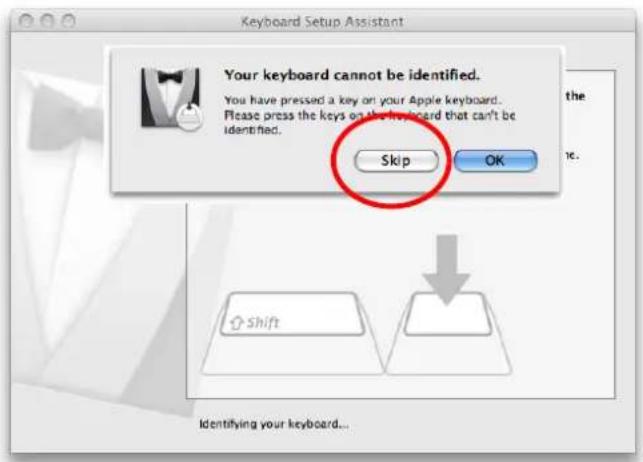
Keyboard Setup Assistant Identifying Your Keyboard Press the key immediately to the right of the Shift key on the left side of the external keyboard. Press the key only once and do not hold down the key for a long time. When the key is recognized, the next panel will appear. Shift Identifying your keyboard...(5) A window will then pop up just press Skip
text_image
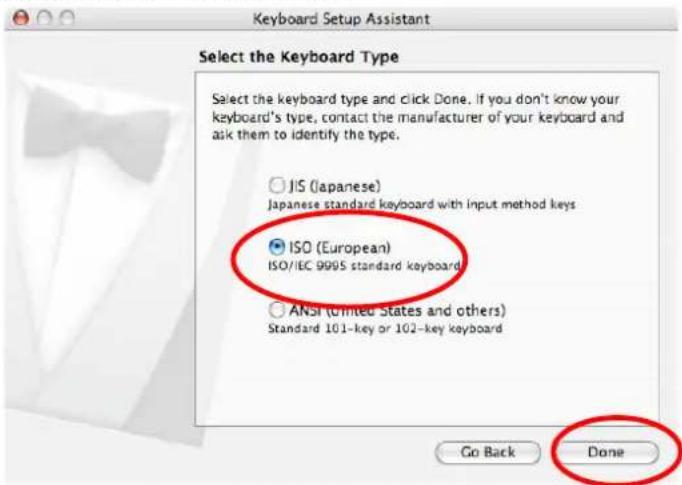
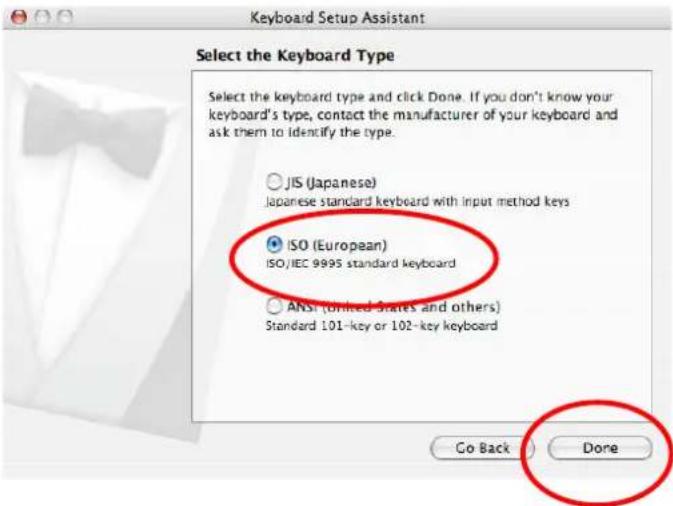
Keyboard Setup Assistant Your keyboard cannot be identified. You have pressed a key on your Apple keyboard. Please press the keys on the keyboard that can't be identified. Skip OK Identifying your keyboard...(6) Select 'ISO (European)' and click 'Done'.
text_image
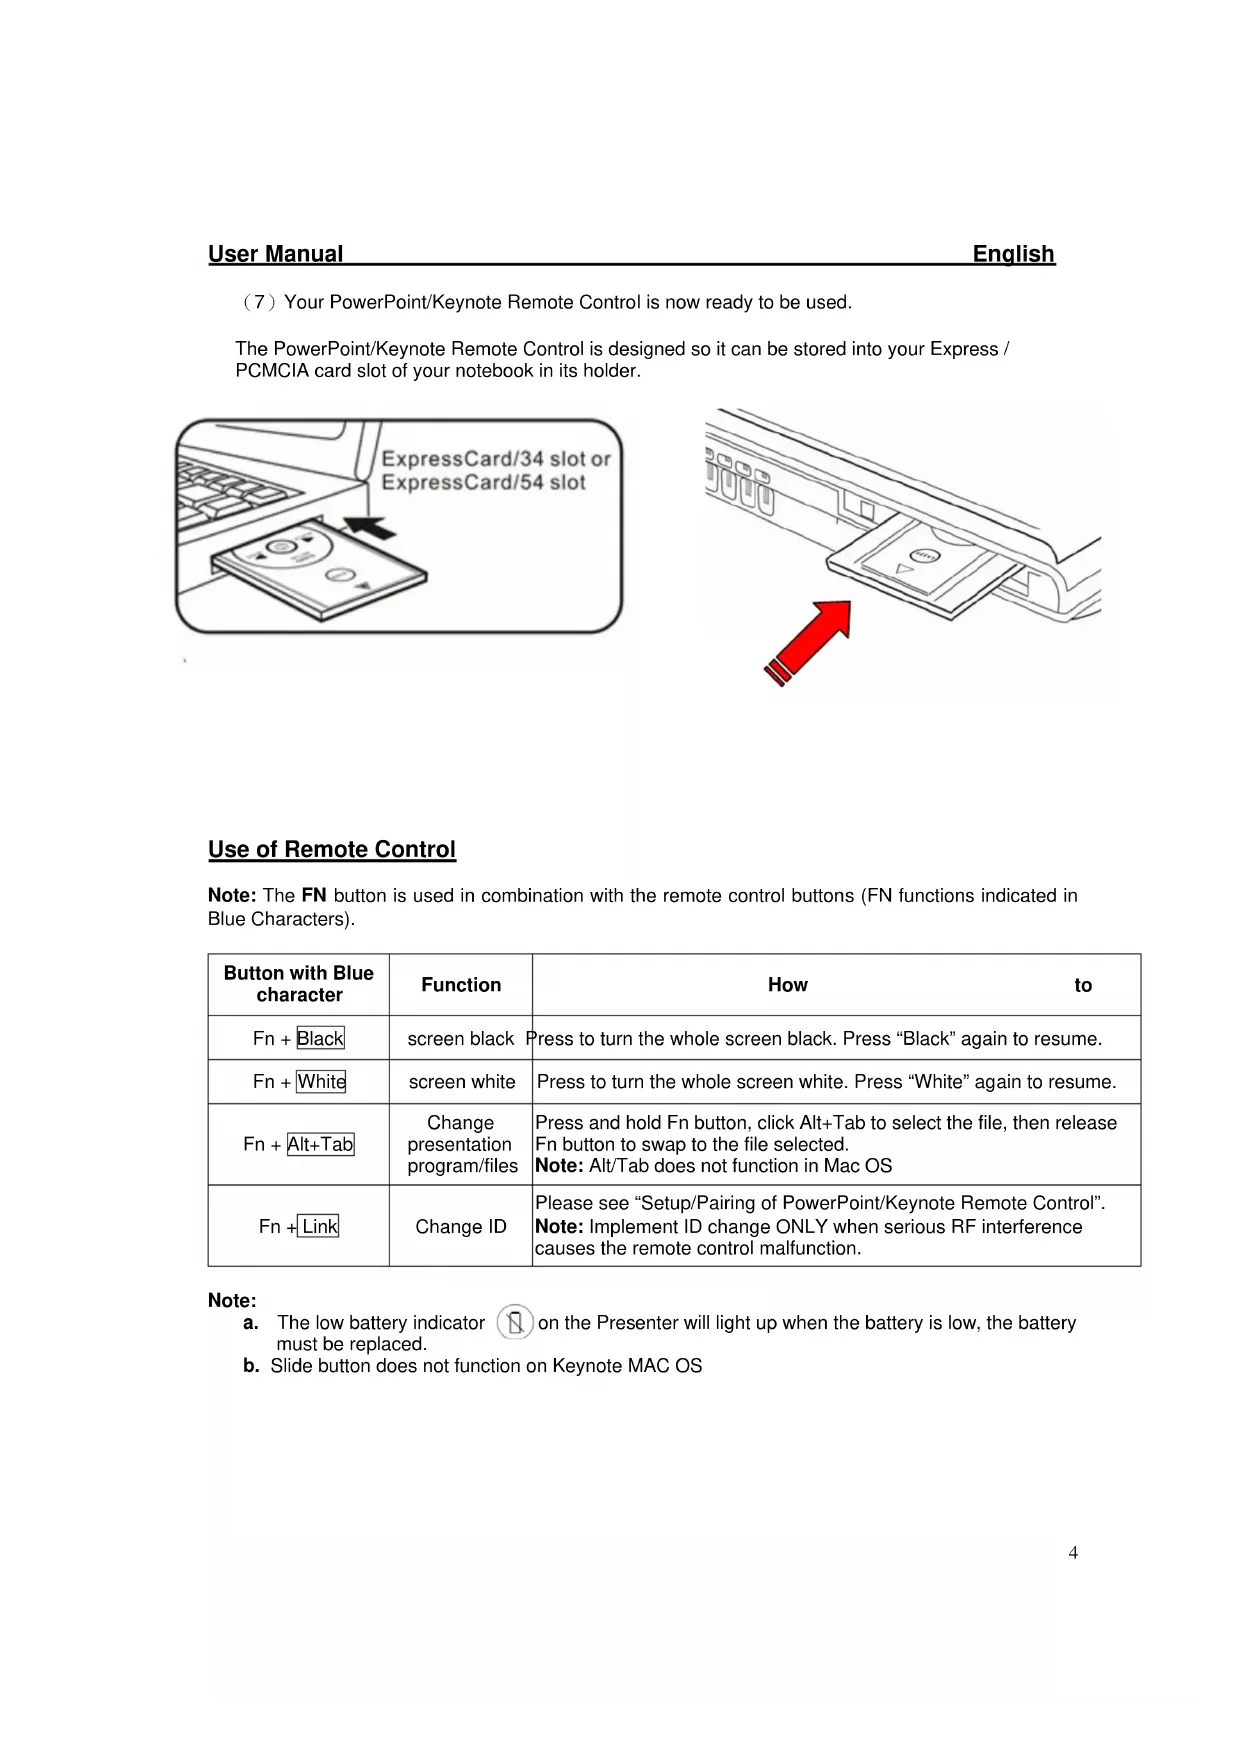
Keyboard Setup Assistant Select the Keyboard Type Select the keyboard type and click Done. If you don't know your keyboard's type, contact the manufacturer of your keyboard and ask them to identify the type. JIS (Japanese) Japanese standard keyboard with input method keys ISO (European) ISO/IEC 9995 standard keyboard ANSI (United States and others) Standard 101-key or 102-key keyboard Go Back Done(7) Your PowerPoint/Keynote Remote Control is now ready to be used.
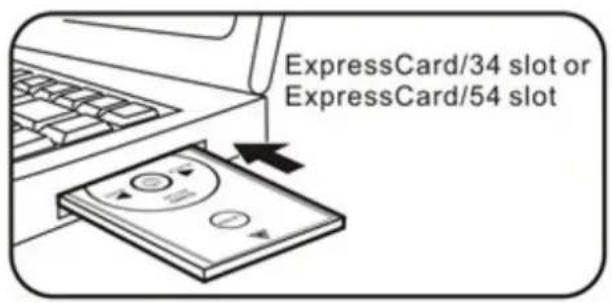
The PowerPoint/Keynote Remote Control is designed so it can be stored into your Express / PCMCIA card slot of your notebook in its holder.
text_image
ExpressCard/34 slot or ExpressCard/54 slot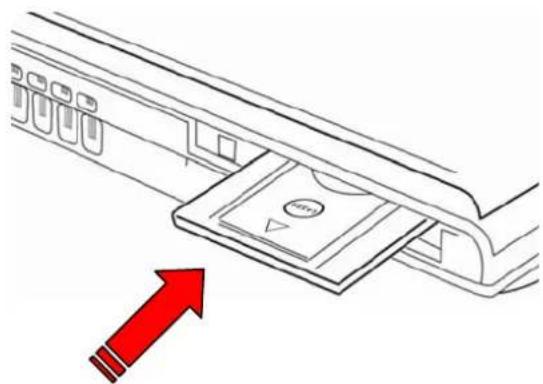
natural_image
Diagram of a device panel being inserted into a rack, with a red arrow indicating the direction (no text or symbols present)Use of Remote Control
Note: The FN button is used in combination with the remote control buttons (FN functions indicated in Blue Characters).
| Button with Blue character | Function | How to |
| Fn + Black | screen black | Press to turn the whole screen black. Press “Black” again to resume. |
| Fn + White | screen white | Press to turn the whole screen white. Press “White” again to resume. |
| Fn + Alt+Tab | Change presentation program/files | Press and hold Fn button, click Alt+Tab to select the file, then release Fn button to swap to the file selected.Note: Alt/Tab does not function in Mac OS |
| Fn + Link | Change ID | Please see “Setup/Pairing of PowerPoint/Keynote Remote Control”.Note: Implement ID change ONLY when serious RF interference causes the remote control malfunction. |
Note:
a. The low battery indicator ☐ on the Presenter will light up when the battery is low, the battery must be replaced.
b. Slide button does not function on Keynote MAC OS
System Requirements
Windows 2000/XP/Windows VistaPC with a USB port
Presentation software: PowerPoint 2000 or later
Mac OS X v.10.4 and 10.5 with a USB port
Presentation software: PowerPoint v. X for Mac OS X or later
Product Specifications
Frequency Range: 2400-2483 MHz (16 multi channels and 65535 ID channels)
Remote Range: 66 feet (20 metres) indoors
Operating Voltage: Remote control 2.6V-3.3V
Power: Battery CR2032 x1
Power Consumption: Normal Operation <5mA
Laser Operation <30mA
Sleep Operation <10
Output Power: Under 1mW
Product Dimensions
Size: 75mm(L) × 34mm(W) × 5mm(H)
Weight: Approx 14g (including receiver and battery)
IMPORTANT SAFETY AND HEALTH INFORMATION
CAUTION
LASER RADIATION-DO NOT STARE INTO BEAM

MAX OUTPUT:1mW
WAVE LENGTH:650± 20nm
CLASS II LASER PRODUCT.
This product complies with 21 CFR.
WARNING! RISK OF INJURY!
Laser beam can cause permanent damage to eyes. Do not look into the laser beam or shine the laser beam into your eyes, other peoples' eyes, or pet's eyes.
WARNING! RISK OF INJURY!
Keep this device away from Children. This is a working tool, not a toy or entertainment device. It should only be used by adults.
Trouble Shooting
| Problem What Should I Do? | |
| Remote control does not function | Ensure that the Remote Control and Dongle is connected, check the Link Indicator on the Dongle is LIT. |
| Ensure the battery of the remote control is inserted correctly | |
| Replace the remote control battery with a new one | |
| Check System compatibility | |
| Ensure you are within the remote range (20metres) | |
Should you have any connection or setup problems with the PowerPoint/Keynote Remote Control (LG290) please contact our Technical Support Hotline on +44 (01923) 471 000 National/International call rates apply or E-mail support@logic3.com Spare parts are available for some models at our website www.logic3.com
text_image
Keyboard Setup Assistant Introduction Your keyboard cannot be identified and will not be usable until it is identified. To identify this keyboard click Continue. Continuetext_image
Keyboard Setup Assistant Introduction Your keyboard cannot be identified and will not be usable until it is identified. To identify this keyboard click Continue. Continuetext_image
Keyboard Setup Assistant Identifying Your Keyboard Press the key immediately to the right of the Shift key on the left side of the external keyboard. Press the key only once and do not hold down the key for a long time. When the key is recognized, the next panel will appear. Identifying your keyboard...text_image
Keyboard Setup Assistant Your keyboard cannot be identified. You have pressed a key on your Apple keyboard. Please press the keys on the keyboard that can't be identified. Skip OK Shift Identifying your keyboard...text_image
Keyboard Setup Assistant Select the Keyboard Type Select the keyboard type and click Done. If you don't know your keyboard's type, contact the manufacturer of your keyboard and ask them to identify the type. JIS (Japanese) Japanese standard keyboard with input method keys ISO (European) ISO/IEC 9995 standard keyboard ANSI (United States and others) Standard 101-key or 102-key keyboard Go Back Donenatural_image
Diagram of a device panel with a red arrow pointing to a component, no text or symbols presenttext_image
Diagram illustrating five steps of battery control system with labeled components and directional arrowstext_image
Keyboard Setup Assistant Introduction Your keyboard cannot be identified and will not be usable until it is identified. To identify this keyboard click Continue. Continuetext_image
Keyboard Setup Assistant Introduction Your keyboard cannot be identified and will not be usable until it is identified. To identify this keyboard click Continue. Continuetext_image
Keyboard Setup Assistant Identifying Your Keyboard Press the key immediately to the right of the Shift key on the left side of the external keyboard. Press the key only once and do not hold down the key for a long time. When the key is recognized, the next panel will appear. Shift Identifying your keyboard...text_image
Keyboard Setup Assistant Your keyboard cannot be identified. You have pressed a key on your Apple keyboard. Please press the keys on the keyboard that can't be identified. Skip OK Shift Identifying your keyboard...text_image
Keyboard Setup Assistant Select the Keyboard Type Select the keyboard type and click Done. If you don't know your keyboard's type, contact the manufacturer of your keyboard and ask them to identify the type. JIS (Japanese) Japanese standard keyboard with input method keys ISO (European) ISO/IEC 9995 standard keyboard ANSI (United States and others) Standard 101-key or 102-key keyboard Go Back Donenatural_image
Diagram of a device panel with a red upward arrow indicating direction (no text or symbols present)text_image
Keyboard Setup Assistant Introduction Your keyboard cannot be identified and will not be usable until it is identified. To identify this keyboard click Continue. Continuetext_image
Keyboard Setup Assistant Introduction Your keyboard cannot be identified and will not be usable until it is identified. To identify this keyboard click Continue. Continuetext_image
Keyboard Setup Assistant Identifying Your Keyboard Press the key immediately to the right of the Shift key on the left side of the external keyboard. Press the key only once and do not hold down the key for a long time. When the key is recognized, the next panel will appear. Shift Identifying your keyboard...text_image
Keyboard Setup Assistant Your keyboard cannot be identified. You have pressed a key on your Apple keyboard. Please press the keys on the keyboard that can't be identified. Skip OK Shift Identifying your keyboard...text_image
Keyboard Setup Assistant Select the Keyboard Type Select the keyboard type and click Done. If you don't know your keyboard's type, contact the manufacturer of your keyboard and ask them to identify the type. ○ JIS (Japanese) Japanese standard keyboard with input method keys ● ISO (European) ISO/IEC 9905 standard keyboard ○ ANSI (United States and others) Standard 101-key or 102-key keyboard Go Back Donetext_image
Diagram illustrating five steps of a PILA remote control panel with labeled buttons and directional arrows indicating action.text_image
Keyboard Setup Assistant Introduction Your keyboard cannot be identified and will not be usable until it is identified. To identify this keyboard click Continue. Continuetext_image
Keyboard Setup Assistant Introduction Your keyboard cannot be identified and will not be usable until it is identified. To identify this keyboard click Continue. Continuetext_image
Keyboard Setup Assistant Identifying Your Keyboard Press the key immediately to the right of the Shift key on the left side of the external keyboard. Press the key only once and do not hold down the key for a long time. When the key is recognized, the next panel will appear. Identifying your keyboard...(5) Aparecerá una pantalla emergente. Pulse Omitir.
text_image
Keyboard Setup Assistant Your keyboard cannot be identified. You have pressed a key on your Apple keyboard... Please press the keys on the keyboard that can't be identified. Skip OK Identifying your keyboard...text_image
Keyboard Setup Assistant Select the Keyboard Type Select the keyboard type and click Done. If you don't know your keyboard's type, contact the manufacturer of your keyboard and ask them to identify the type. JIS (Japanese) Japanese/1999/1999 standard keyboard with input method keys ISO (European) SONEC 9995 standard keyboard ANSI (United States and others) Standard 101-key or 102-key keyboard Go Back Donenatural_image
Diagram of a device's internal structure with a red arrow pointing to a component (no text or symbols)Uso del control remoto
text_image
Keyboard Setup Assistant Introduction Your keyboard cannot be identified and will not be usable until it is identified. To identify this keyboard click Continue. Continuetext_image
Keyboard Setup Assistant Introduction Your keyboard cannot be identified and will not be usable until it is identified. To identify this keyboard click Continue. Continuetext_image
Keyboard Setup Assistant Identifying Your Keyboard Press the key immediately to the right of the Shift key on the left side of the external keyboard. Press the key only once and do not hold down the key for a long time. When the key is recognized, the next panel will appear. Identifying your keyboard...text_image
Keyboard Setup Assistant Your keyboard cannot be identified. You have pressed a key on your Apple keyboard. Please press the keys on the keyboard that can't be identified. Skip OK Key on the long time. Shift Identifying your keyboard...text_image
Keyboard Setup Assistant Select the Keyboard Type Select the keyboard type and click Done. If you don't know your keyboard's type, contact the manufacturer of your keyboard and ask them to identify the type. JIS (Japanese) Japanese standard keyboard with input method keys ISO (European) ISO/IEC 9995 standard keyboard ANSI (United States and others) Standard 101-key or 102-key keyboard Go Back Donenatural_image
Diagram of a device panel being inserted into a container, with a red arrow indicating the direction (no text or symbols present)Utilizar o Controlo Remoto
Tamanho: 75 mm (C) x 34 mm (L) x 5 mm (A)
text_image
Keyboard Setup Assistant Introduction Your keyboard cannot be identified and will not be usable until it is identified. To identify this keyboard click Continue. Continuetext_image
Keyboard Setup Assistant Introduction Your keyboard cannot be identified and will not be usable until it is identified. To identify this keyboard click Continue. Continuetext_image
Keyboard Setup Assistant Identifying Your Keyboard Press the key immediately to the right: of the Shift key on the left side of the external keyboard. Press the key only once and do not hold down the key for a long time. When the key is recognized, the next panel will appear. Shift Identifying your keyboard...text_image
Keyboard Setup Assistant Your keyboard cannot be identified. You have pressed a key on your Apple keyboard. Please press the keys on the keyboard that can't be identified. Skip OK on the time. Shift Identifying your keyboard...(6) Selecteer 'ISO (European)' en klik op 'Voltooid'.
text_image
Keyboard Setup Assistant Select the Keyboard Type Select the keyboard type and click Done. If you don't know your keyboard's type, contact the manufacturer of your keyboard and ask them to identify the type. JIS (Japanese) Japanese standard keyboard with input method keys ISO (European) ISO/IEC 9995 standard keyboard ANSI (onlined states and others) Standard 101-key or 102-key keyboard Go Back Donenatural_image
Diagram of a device panel with a red arrow pointing to a component, no text or symbols presentKLASSE II LASERPRODUCT.
WAARSCHUWING! LETSELGEVAAR!
WAARSCHUWING! LETSELGEVAAR!
This device complies with Part 15 of the FCC Rules. Operation is subject to the following two conditions:(1) this device may not cause harmful interference, and (2) this device must accept any interference received, including interference that may cause undesired operation.
NOTE
This equipment has been tested and found to comply with the limits for a Class B digital device, pursuant to Part 15 of the FCC Rules. These limits are designed to provide reasonable protection against harmful interference in a residential installation. This equipment generates, uses and can radiated radio frequency energy and, if not installed and used in accordance with the instructions, may cause harmful interference to radio communications. However, there is no guarantee that interference will not occur in a particular installation If this equipment does cause harmful interference to radio or television reception, which can be determined by turning the equipment off and on, the user is encouraged to try to correct the interference by one or more of the following measures:
-Reorient or relocate the receiving antenna.
-Increase the separation between the equipment and receiver.
-Connect the equipment into an outlet on a circuit different from that to which the receiver is connected.
-Consult the dealer or an experienced radio/TV technician for help.
Changes or modifications not expressly approved by the party responsible for compliance could void the user's authority to operate the equipment.
This device and its antenna(s) must not be co-located or operating in conjunction with any other antenna or transmitter.