ACK540 MACRF - Keyboard KeySonic - Free user manual and instructions
Find the device manual for free ACK540 MACRF KeySonic in PDF.
User questions about ACK540 MACRF KeySonic
0 question about this device. Answer the ones you know or ask your own.
Ask a new question about this device
Download the instructions for your Keyboard in PDF format for free! Find your manual ACK540 MACRF - KeySonic and take your electronic device back in hand. On this page are published all the documents necessary for the use of your device. ACK540 MACRF by KeySonic.
USER MANUAL ACK540 MACRF KeySonic
Information on disposal of old batteries (Battery Regulation)
The new Regulation obliges battery manufacturers and importers to take back, sort and dispose all old batteries. The consumer is obliged to give back used batteries in retail stores or in municipal collection points. The disposal in municipal waste is explicitly prohibited according to Battery Regulation. You can send batteries purchased from us after consumption to the following address via sufficient stamped mail:
MaxPoint Handelsgesellschaft mbH, Kurt-Fischer-Straße 50, D-22926 Ahrensburg Batteries, which contain pollutants, are marked with the symbol of a crossed-out dustbin, similar to the symbol in the illustration. The chemical description of the pollutant is situated below the symbol of the dustbin. "Cd" stands for Cadmium, "Pb" for Lead, "Hg" for Mercury.
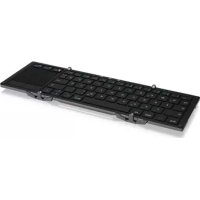
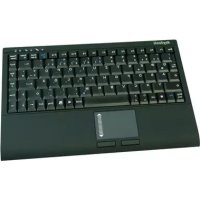
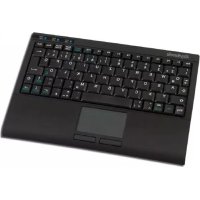
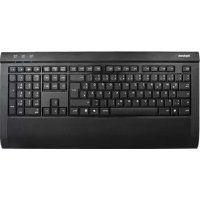
1.1 Special Features
- Wireless mini-keyboard with integrated touchpad
- Far-ranging and reliable radio-frequency transmission at 2.4 GHz up to approx. 10m away from the PC
Built-in 1000 dpi touchpad with scroll page area and 2 mouse function keys - Extremely flat construction with built-in hand cushion for comfortable work
Full functionality of a full-size layout keyboard - Extremely silent stroke and tactile feedback due to high quality X-Type membrane technology
- Tilt feet for adjustment of the tilt angle for an ergonomic and non-fatigue operation
- Plug & Play installation without special driver
Available in various country layouts - Optimal for Digital Living Room (HTPC) as well as for training, conference and presentation facilities etc.


1.2 Technical data:
Key count: 88
Construction X-Type membrane technology
Life expectancy: approx. 7 million strokes per key
Switch travel: 3.0 ± 0.5 ~mm total run
Pressure point: 55 ± 15 ~g
Radio Transmission: 2.4 - 2.483 GHz, ISM band, GFSK, 1 channel
Device recognition: 256 IDs (Channels to differentiate several
keyboards in a room)
Effective operation distance: max. 10 m
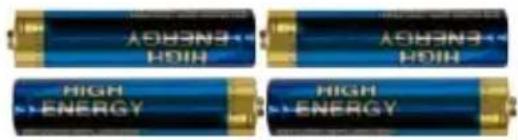
Battery type: 4 × AAA 1.5 V
Power supply: Keyboard: +6 V DC ±5 %
Receiver: +5V DC ±5%
Power consumption maximal: Operation: 7 mA
Standby: 5 mA (after 1 sec.)
Sleep-Mode: 150~ A (after 30 min.)
Temperature: Operating: -5 ^ C up to +40^
Storage: -20 °C up to +65 °C
Humidity: Operating/storage: 10% up to 85% RH
Dimensions approx.: Keyboard: 300 × 210 × 20.5 ~mm
Receiver: 80 × 22 × 14 ~mm
Weight approx.: Keyboard: 570 g (incl. batteries)
Receiver: 12 g
Interface: USB (for dongle receiver)
Scope of delivery: Keyboard, USB dongle receiver, 1 set of batter
ies,
user manual
Certificated: CE, FCC, WEEE/RoHS
Compatibility: Mac OS X v10.4.10 or higher
2. Installation
2.1 System Requirements
This keyboard requires a Mac with USB connection and one of the following operating systems:
Mac OS X v10.4.10 or higher
For the installation of the keyboard under the mentioned above operating systems you need NO special driver!
2.2 Installation of the keyboard
In order to install your keyboard, please perform the following steps:
- Remove the covering of the battery case on the bottom of your keyboard. Install the included batteries of type AAA 1.5 V considering the right polarity in the battery case (see picture).
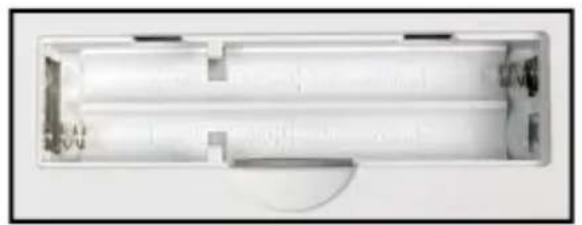
4x
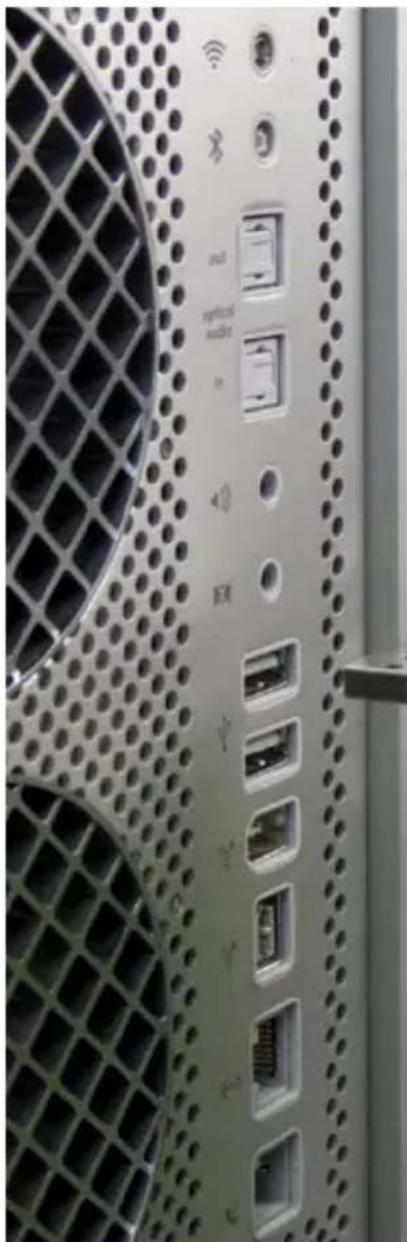
- Connect the included USB receiver (dongle receiver) to a free USB port on your Mac.
Advise:
Please ensure, that the USB receiver has a minimal distance of 20 cm to metallic dividing walls, other computer cases, monitors, ZIP drives, loudspeakers and switching power supplies.
- All above mentioned operating systems will recognize your keyboard automatically and load the required drivers. The USB receiver is now ready for operation.
Advice:
The USB receiver and the keyboard are factory-made already synchronised on the same channel. Usually you have not to make a new-synchronisation (as described under point 2.3). If the operation of your keyboard is influenced by other users utilising a wireless keyboard not far from you, please also make a new-synchronisation.
KeySonic
- In some cases the installation of the keyboard is possible only indirectly. If you have connected the USB receiver and your system informs you about
an identifica tion problem, please follow the instructions on your screen.
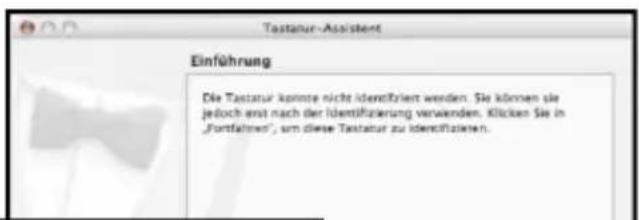
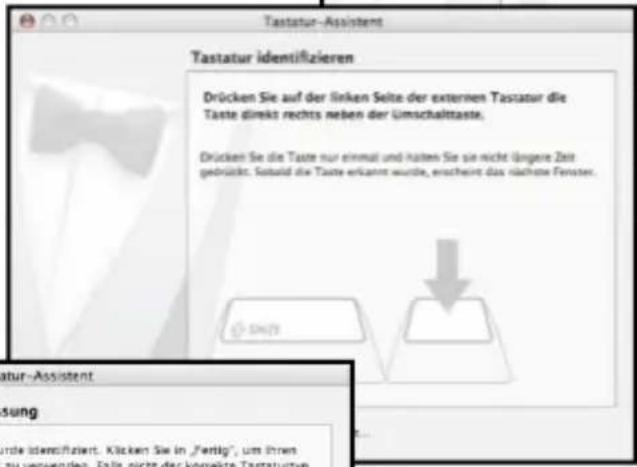
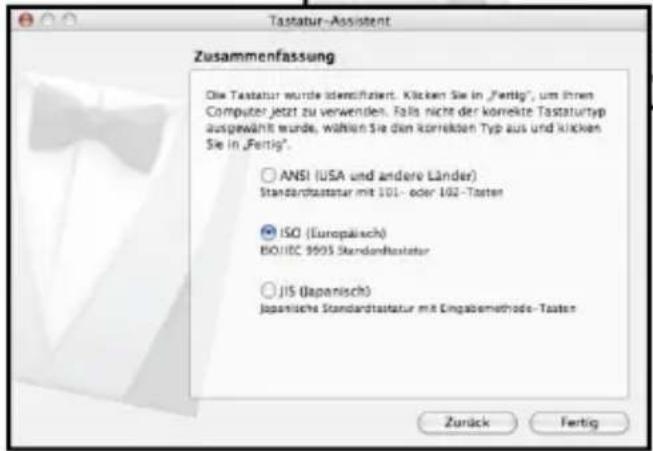
-
After selection of keyboard type ISO (for Europe) and closing confirmation by Ready, your keyboard should work now correctly.
-
Should your system-updates also keep out of success, it is recommendable to test the keyboard with another Mac with the same operating system to rule out a hardware damage of the USB receiver.
2.3 New-synchronisation of the radio channel
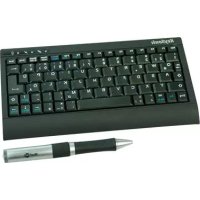
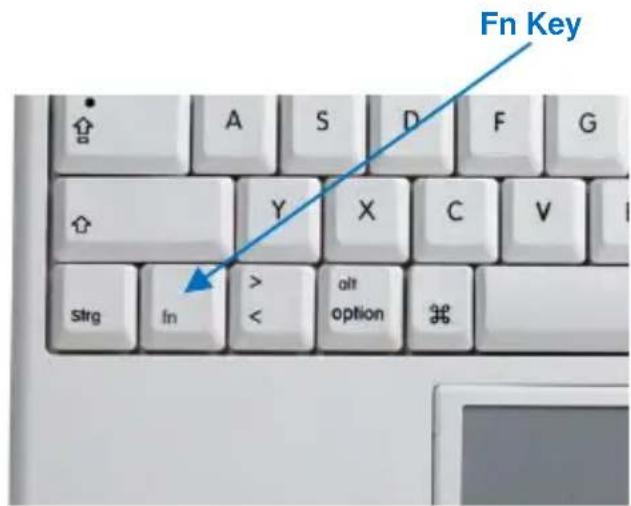
- When you start up your keyboard and no connection could be established, so synchronise the radio channel between keyboard and USB receiver again by pressing firstly the synchronisation key on the USB receiver with a sharp object (for instance a ball-pen).
- Press now within the next 3 seconds the key Fn below on the left of the keyboard for more
than 1 second by which the synchronization-signal is sent to the USB-Receiver.
The keyboard is ready for use now.
Advise: Should the Fn key on your keyboard not be pressed within 3 seconds, so turns the USB receiver without previous new-synchronisation back to the condition of origin.
KeySonic
Is your keyboard after new-synchronisation still not working, you have the following possibilities to solve the problem:
- Repeat the procedure of synchronisation as described under 2.3. Sometimes it is necessary to repeat this routine several times, until the right radio channel was found.
- In case your USB receiver is attached to an USB hub, you should install it directly on the USB connector of your notebook or desktop.
- During the procedure of synchronisation the keyboard should be located close to the USB receiver to make sure, that the immediate environment has no influence on the radio transmission (for instance reduction/interferences due to metal cases, other sources of interferences etc.).
- Ensure that you use only batteries with full loading capacity. In case of doubt change the old batteries before next synchronisation against new ones as a precaution.
3. How to use the keyboard
After successful launch enjoy now during the operation a free and independent choice of location up to approx. 10m distance to the Mac. More or less range can be caused, like mentioned above, by metallic dividing walls, other computer cases, monitors, ZIP drives, loudspeakers, switching power supplies etc., but also by different loading capacity of the batteries.
3.1 Special operation modes of the keyboard
- Sleep-Mode
When 10 minutes happens no input in your keyboard respectively touchpad, the keyboard turns automatically into Sleep-Mode (idle state) to save battery capacity.
- Wake up-Mode
For activating the keyboard from Sleep-Mode press any key on your keypad (not the left or right mouse function key of the touchpad or the touchpad itself!).
- Re-Connect-Mode
After reactivation the keyboard connects automatically again with the USB receiver. Depending on environmental conditions for the radio transmission it needs for that between less than 1 second up to few minutes.
3.2 Touchpad
As a mouse alternative the keyboard is equipped with a touchpad inclusive two mouse function keys allowing comfortable and ergonomic handling of the Mac, for instance from a sofa. Thereby the handling of the touchpad is as simple as brilliant.
Gently glide over the touchpad surface with your finger in order to move the cursor, and press it in order to "click".
- Click, double-click, marking, and drag functions of the left and
right mouse button can be performed directly by tapping on the surface of the touchpad. You don't need to apply a lot of pressure in order to do that. You will get the best reaction by clicking gently and rapidly (optional you can use for that the mouse function keys as well).
- In order to "drag", to draw, or to mark, you must apply a double-click with the finger remaining on the touchpad after the second click. Then, glide over the touchpad with your finger in order to complete the movement.
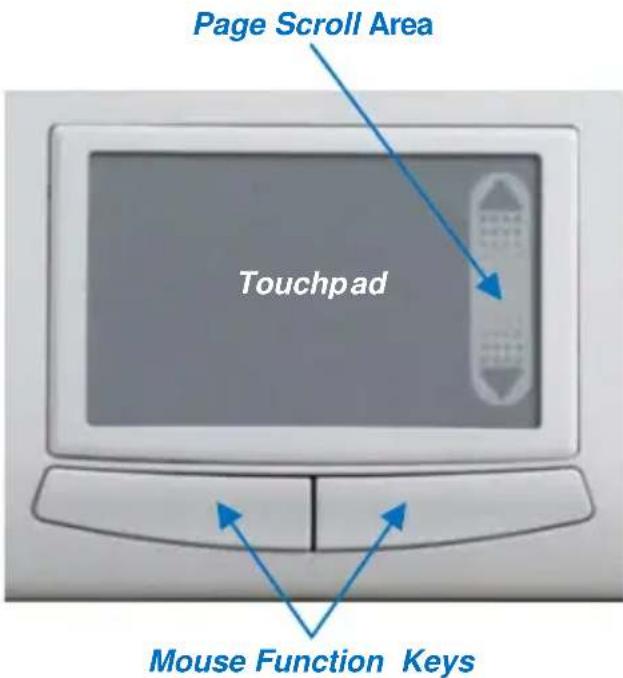
- Put your finger on the Page-Scroll-Area and glide over to scroll up and down in your application (identically to a scroll ball or mouse scroll wheel).
- Using notebooks with already integrated touchpad and mouse function keys you have to de-activate these intern control devices in case of error messages or malfunctions*.
- In order to increase or decrease the speed of double-click and the speed of cursor movements, change the settings of the keyboard & mouse options in your system control.
Advice:
The sensitivity and the deactivation of the click-function of the touchpad cannot be changed.
There is also no separate driver supporting these settings.
- Please refer details to the manual of your Mac.
3.3 Keys with double functions
The layout of the keyboard is a special space-saving layout with the same virtual numeric keypad also used in notebook keyboards as well as with different special function keys.
- Press the Fn key (lower left of the keyboard) in order to switch the virtual numeric keypad function temporarily on and off

(similar to a Shift key). Thereby the double functional keys get the blue imprinted significations. So, for example, to increase the volume press the keys FN + F14 simultaneously.

Reduces the brightness of the screen

Increases the brightness of the screen

Reduces the volume of the loudspeakers

Increases the volume of the loudspeakers

Activates or deactivates the muting of the loudspeakers

Opens or closes the CD/DVD drive
4. How to Clean the Keyboard
- Remove dust with a brush, with soft compressed air, or with a vacuum cleaner with brush head nozzle.
- Remove fine dirt with a not-too-damp cloth.
DO NOT use any aggressive detergents, solvents or gasoline in order to clean the keyboard.
Manufacturer's Disclaimer Statement
The information in this document is subject to change without notice and does not represent a commitment on the part of the vendor. No warranty or representation, either expressed or implied, is made with respect to the quality, accuracy or fitness for any particular purpose of this document. The manufacturer reserves the right to make changes to the content of this document and/or the products associated with it at any time without obligation to notify any person or organization of such changes. In no event will the manufacturer be liable for direct, indirect, special, incidental or consequential damages arising out of the use or inability to use this product or documentation, even if advised of the possibility of such damages. This document contains materials protected by copyright. All rights are reserved. No part of this manual may be reproduced or transmitted in any form, by any means or for any purpose without expressed written consent of its authors. Product names appearing in this document are mentioned for identification purchases only. All trademarks, product names or brand names appearing in this document are registered property of their respective owner.
1. Introduction ACK-540 RF
Certificé: CE, FCC, WEEE/RoHS
Declaration of Conformity
We, MaxPoint Handelsges. mbH, declare under our sole responsibility, that the product
Description: Wireless Mini Keyboard
Model Name: KeySonic ACK-540 MAC-RF
Mark: EAR888-62976468
is herewith confirmed to comply with the requirements set out in the
R&TTE Directive 1999/5/EC of 9. March 1999.
This declaration is based on the full compliance of the product with the following European specifications/ standards: EN 50371 (Health), EN 60950-1 (Safety), EN 301 489-1/-3 (EMC), EN 300 440-1/-2 (Radio).
The product shall be marked with the CE conformity marking and the Notified Body number C0678
Alreusborg 20.06.2008 Place and Date

Federal Communications Commission (FCC) Notice
This device complies with Part 15 of the FCC rules. Operation is subject to the following two conditions
(1) This device may not cause harmful interference, and
(2) This device must accept any interference received, including interference that may cause undesired operation.
This equipment has been tested and found to comply with the limits of a Class B digital device, pursuant to Part 15 of the FCC Rules. These limits are designed to provide reasonable protection against harmful interference in a residential installation. This equipment generates, uses and can radiate radio frequency energy and, if not installed and used in accordance with the instructions, may cause harmful interference to radio communications. However, there is no guarantee that interference will not occur in particular installations. If this equipment does cause harmful interference to radio or television reception, which can be determined by turning the equipment off and on, the user is encouraged to try to correct the interference by one or more of the following measures:
- Reorient / Relocate the receiving antenna.
- Increase the distance between the mouse and receiver.
- Connect the equipment into an outlet on a circuit different from that the receiver is connected.
CAUTION:
Change or modifications not expressly approved by the manufacturer responsible for compliance could void the user's authority to operate the equipment.