
R 907 - Speaker JAMO - Free user manual and instructions
Find the device manual for free R 907 JAMO in PDF.
| Product type | Dipolar column speaker |
| Acoustic system | 3-way dipole |
| Woofer | 2 x 12 inches (2 x 380 mm) |
| Recommended listening positions | 30° angle from each speaker, distance between speakers equal to listening distance |
| Recommended distance from rear wall | 90 cm (3 ft) |
| Recommended distance from side walls | 1.20 m (4 ft) |
| Angle relative to rear wall | 10 degrees |
| Wiring type | Single, bi-wiring or bi-amplification |
| Decoupling spikes | Screw-in, with rubber caps or metal nuts optional |
| Fabric front grilles | Removable, minimal impact on sound |
| Fabric rear grilles | Removable, held by magnets, no sonic impact |
| Cleaning | Soft dry or slightly damp cloth; no detergent |
| Manufacturer warranty | 7 years from invoice date |
| Recommended break-in period | 2 to 3 days of listening |
Frequently Asked Questions - R 907 JAMO
User questions about R 907 JAMO
0 question about this device. Answer the ones you know or ask your own.
Ask a new question about this device
Download the instructions for your Speaker in PDF format for free! Find your manual R 907 - JAMO and take your electronic device back in hand. On this page are published all the documents necessary for the use of your device. R 907 by JAMO.
USER MANUAL R 907 JAMO
Front and back fabric covers 11
Cleaning 12
Specifications 12
The scope of the warranty 13
INTRODUCTION
Welcome to the exclusive circle of Jamo R 907 owners! This manual will give you a quick overview of how to set up your speakers in your room. For more in-depth information about the technologies please refer to the R 907 technical description.
The first word of advice. After setting up your R 907s for the first time, please allow yourself a couple of days to listen to them before you start fi ne-tuning the sound. This will serve two purposes. Firstly, you will get a sense of what these speakers sound like. Secondly, it will give time for the speakers to run in: the tonal quality of this design changes slightly after the first couple days of playing music.
Please remember the guidelines in this manual are only recommendations. There are no hard and fast rules about setting up a pair of speakers as unique as these. When you get down to fi ne-tuning their performance in your room don't be afraid of experimenting: any speaker will sound different when moved a few inches. Feel free to change the speakers' positions and move them around the room to determine your best listening position and sound.
Always rely on your own judgement to determine what sounds best. We do...
Enjoy!
PLACEMENT
As a starting point, we suggest you initially position the R 907s 3 feet from the back wall and 4 feet from the side wall.
Angling the speakers 10 degrees to the back wall will reflect the generated sound off your back and side walls, which will give you the acoustic impression of a much larger room.
Also remember that a dipole speaker emits virtually no sound from the side. You can take advantage of this trait to cancel reflections from the side wall by varying the toe-in angle.

text_image
3 ft 4 ft 10°LISTENING POSITION
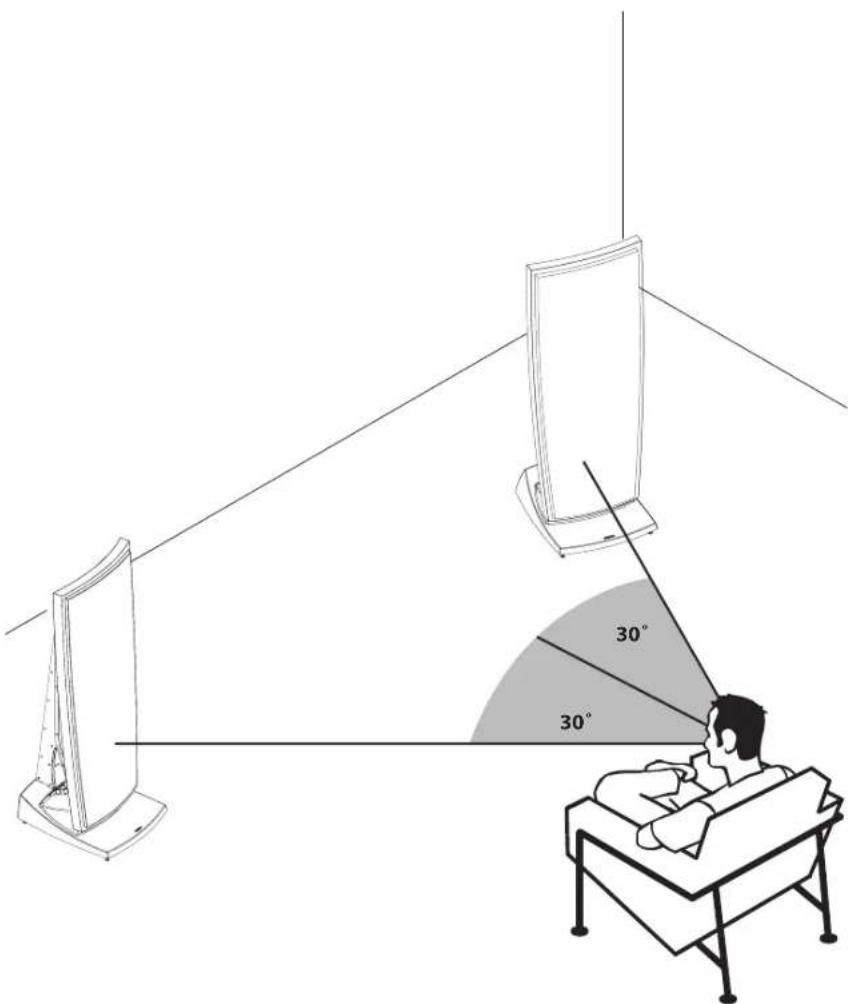
To find the best listening position, place yourself at a 30 degree angle from each speaker. Doing so means that you will be seated at about the same distance away from the speakers as the actual gap between them. The benefit of this is that the direct radiating sounds from each speaker will cross each other at a point behind you.
IF YOUR ROOM...
a) doesn't allow you to get the speakers the required distance from the back and side walls or...
b) has highly reflective surfaces (ie. glass windows or bare plastered walls) or...
c) still doesn't sound quite right
...we strongly recommend that you damp your room's critical surfaces. This can be done by the simple expedient of adding curtains, furniture, bookshelves and so on. A damped surface is almost always preferable to a hard reflective surface.
text_image
30° 30°SPIKES
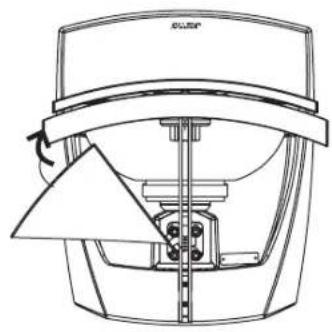
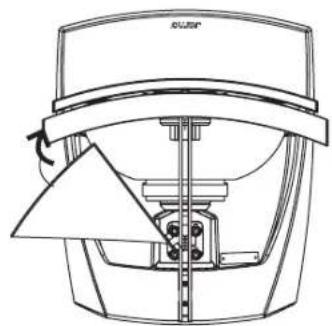
After the initial placement of the speakers it's now time to screw in the spikes. Because of the weight of the R 907, we recommend that you gently lay it on one side and screw in all four spikes together. Before you do this, however, be sure to place a couple of thick towels or similar underneath the side of the speaker. This will prevent accidental scratching to the surface of the R 907 and, equally importantly, will avoid you putting a rather large dent in your floor.

natural_image
Technical line drawing of a mechanical component with an inset showing a pin labeled 1 and 2 (no text or symbols on the main diagram)After screwing in the spikes, we recommend you fit them with the hard rubber feet and the indented metal washers we've supplied. These will spare the floor from damage and allow you to gently bring the speaker to its vertical position. Once upright simply adjust the spikes to give optimal support.
Floor surfaces vary considerably so we have given you 3 different choices when it comes to spiking options. You can keep the hard rubber feet on the spikes, rest the spikes on the four indented metal washers, or place the spikes directly onto the floor. Always choose the option that gives the most stability for your speakers in your domestic environment.

natural_image
Mechanical assembly diagram showing a shaft and rotor assembly with directional arrows (no text or labels)Using the spikes without the hard rubber feet or indented metal washers will give the very best support and sound quality. If you want to spare your floor surface from being punctured however, the rubber feet or indented metal washers are a good compromise. Sonically, there's really very little difference between them - use whichever one suits your floor surface better.
A warning: be careful when using the spikes with the indented metal washers - you don't want to get your finger trapped between the two!
Whichever spiking option you choose, avoid "walking" the speakers if you need to move them to a different position... especially on hard wood floors!
CONNECTING
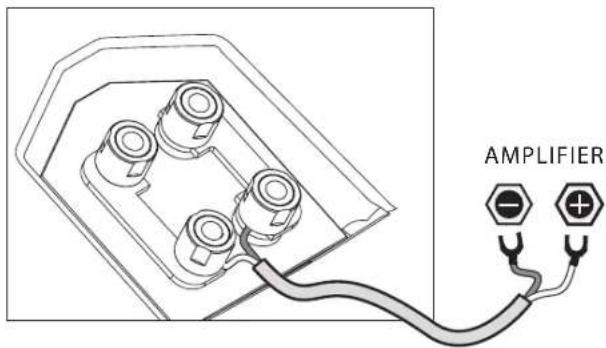
SINGLE-WIRING
For single-wire connections, the terminal jumpers should be attached as shown in the illustration.
text_image
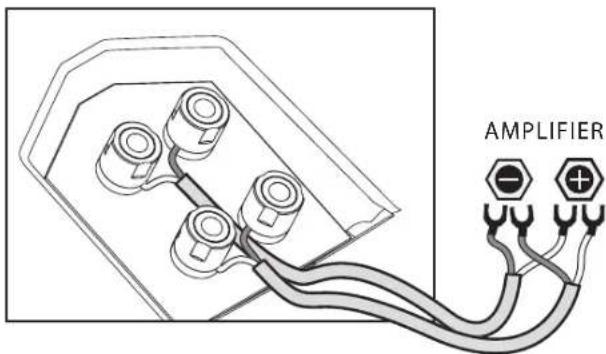
AMPLIFIERBI-WIRING
If you'd like to use a bi-wiring arrangement, make sure you remove all the terminal jumpers before you connect up your loudspeaker cables.
text_image
AMPLIFIERBI-AMPING
In a bi-amped system, make sure you remove the terminal jumpers before connecting up your cables. The top pair of terminals drive the tweeter while the pair underneath drive the bass and midrange units.
If you choose this option, we recommend you use identical amplifiers for both terminals.

text_image
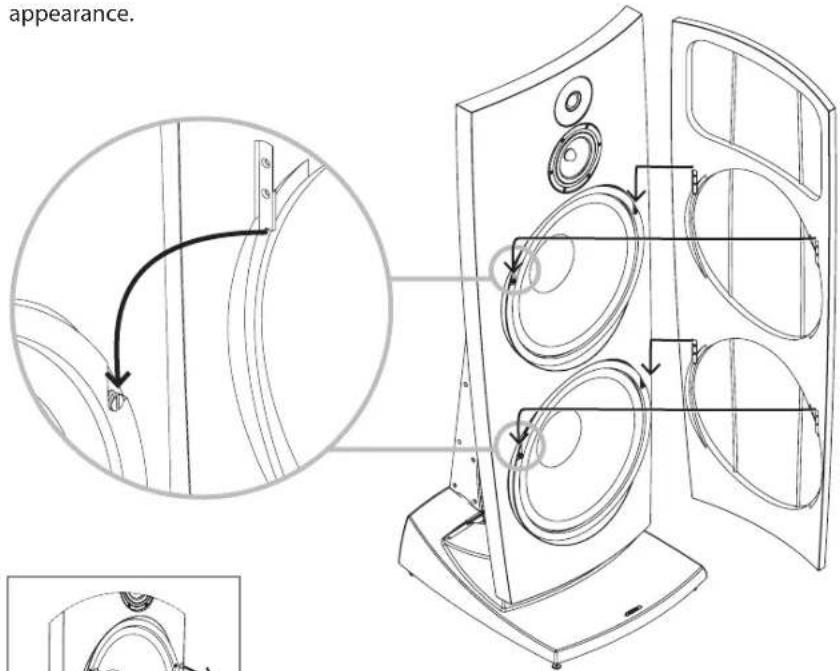
AMPLIFIER 1 AMPLIFIER 2FRONT AND BACK FABRIC COVERS
The front fabric covers have been designed to have minimal influence on the sound quality. However, for critical listening we would advocate that you remove them.
The rear fabric covers have no influence on the sound quality. It's entirely up to you and your aesthetic preference whether you have them on or not.

text_image
Warning symbol with exclamation mark and magnified view of a device handleWhen removing and putting on the front and back covers, however, make sure you do so gently, in order to prevent scratching or marking.
We recommend placing your hands level with the two top hooks on the front cover when lifting it, for optimal balance.
We recommend placing your hands level with the two top hooks on the front cover when lifting it, for optimal balance.
Please note that the front fabric cover, like the speaker itself, isn't of conventional design. When putting the cover on, make sure all four metal hooks on its frame are resting securely on all four screws. If not placed correctly, it could fall off and perhaps even be damaged.
If you choose to remove the front cover for longer periods of time, the four screws onto which you mount the cover can be unscrewed, for a more attractive aesthetic appearance.
text_image
appearance.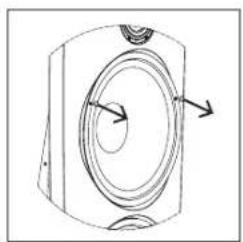
natural_image
Diagram of a speaker with concentric circles and directional arrows indicating sound waves (no text or symbols)If you choose to remove the front cover for longer periods of time, the four screws onto which you mount the cover can be unscrewed, for a more attractive aesthetic appearance.
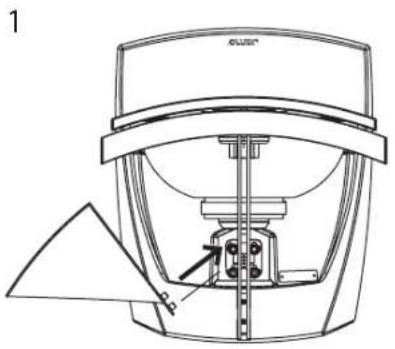
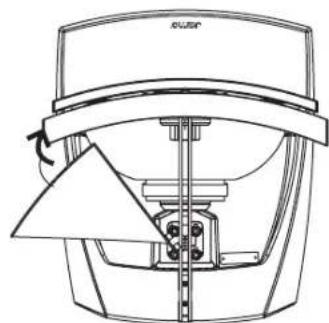
It's also worth noting that the rear fabric cover is mainly held in place by magnets. When mounting it make sure that you gently push the two fabric cover holders into the corresponding brace holes.
natural_image
Technical line drawing of a mechanical device with no visible text or symbols
natural_image
Technical line drawing of a mechanical device with no visible text or symbolsCLEANING
Please use a dust-free cloth to clean the R 907. It is also possible to use a slightly damp cloth for more stubborn marks.
Under no circumstances should you use any kind of cleaning agent on, or in close proximity to, these speakers.
SPECIFICATIONS
Type....R 907
System 3-way dipole
Woofer (In / mm)....2 x 12 / 2 x 380
Midrange (In / mm)....5½ / 150
Tweeter (In / mm)....1 / 28
Short term power (W)......Min 500
Sensitivity (dB/2.8v@1 m) 89
Frequency range (Hz) 35 - 30.000 (-6dB@29Hz)
Impedance (Ohm)....4
Crossover frequencies (Hz) 250 and 2.500
Weight (Kg / lbs)....58 / 133
Dimensions (HxWxD mm / in) 1189 x 440 x 487
46.8 × 17.3 × 19.2
THE SCOPE OF THE WARRANTY
The warranty period will come into force as from the purchase date stated on the invoice. The warranty will apply for the following period of time:
7 years
In case of warranty inquiries, please contact your dealer.
In case of request for service under warranty, please enclose your original receipt.
Defects covered by the warranty:
Except for the defects stated below, the warranty covers any production and material defects of the product.
Defects not covered by the warranty:
- Defects arising from accidents, misuse, normal wear and tear, mis-maintenance, voltage variation, overloading, stroke of lightning, and other force majeure events
- Defects arising from incorrect installation or operation
- Defects arising from modification/repair/attempt of repair by a non-authorised service centre
- Defects arising from the use of non-original spare parts
- Defects on products with altered or lacking series number
- Other defects due to conditions or circumstances beyond the supplier's control
Transportation costs for servicing are not covered by the warranty.
The supplier is liable only to repair or replace defective parts or products and the supplier is not responsible for indirect losses or damages arising from the use of the product. A replacement cannot exceed the value of the product under warranty.
To the extent that the enclosed conditions, including the limitation of liabilities, are inconsistent with indispensable regulations in the customer's country of residence, the latter shall have precedence.
OWNERS MANUAL
Jamo R 907
français
CONTENTS
Introduction 18
Positionnement 19
text_image
3 ft 4 ft 10°POSITION D'ÉCOUTE
natural_image
Technical line drawing of a mechanical component with an inset showing a circular component labeled 1 and 2 (no text or symbols beyond labels)natural_image
Mechanical assembly diagram showing a shaft and rotor assembly with directional arrows (no text or labels)text_image
Warning symbol with exclamation mark and labeled parts including 'B', 'C', and 'E'natural_image
Technical line drawing of a mechanical device with no visible text or symbols2

natural_image
Technical line drawing of a mechanical device with no visible text or symbolsNETTOYAGE
Midrange (In / mm)....5½ / 150
Tweeter (In / mm)....1 / 28
Short term power (W)....Min 500
Sensitivity (dB/2.8v@1 m) 89
Frequency range (Hz) 35 - 30.000 (-6dB@29Hz)
Impedance (Ohm) 4
Crossover frequencies (Hz) 250 and 2.500
Weight (Kg / lbs) 58 / 133
Dimensions (HxWxD mm / in) 1189 x 440 x 487
46.8 × 17.3 × 19.2
COUVERTURE DE LA GARANTIE
text_image
3 ft 4 ft 10°HÖRPOSITION
text_image
Diagram illustrating a person viewing a screen with 30-degree angles, showing viewing setup and perspective projection.SPIKES
natural_image
Technical line drawing of a mechanical component with an inset showing a circular component labeled 1, 2 (no text or symbols on the diagram itself)text_image
Diagram showing mechanical assembly steps with labeled components and directional arrowstext_image
Warning symbol with exclamation mark and hand gesture, next to a door diagram with circular cutoutstext_image
Technical diagram showing assembly steps of a speaker into a multi-nozzle device, with magnified views highlighting component positioning.natural_image
Technical line drawing of a mechanical device with no visible text or symbols2
natural_image
Technical line drawing of a mechanical device with no visible text or symbolsREINIGUNG
Midrange (In / mm)....5½ / 150
Tweeter (In / mm)....1 / 28
Short term power (W)......Min 500
Sensitivity (dB/2.8v@1 m) 89
Frequency range (Hz) 35 - 30.000 (-6dB@29Hz)
Impedance (Ohm) 4
Crossover frequencies (Hz) 250 and 2.500
Weight (Kg / lbs)....58 / 133
Dimensions (HxWxD mm / in) 1189 x 440 x 487
46.8 × 17.3 × 19.2
GARANTIEUMFANG
text_image
3 ft 4 ft 10°LYTTEPOSITION
text_image
Diagram illustrating a person viewing a screen with 30-degree angles, showing perspective and perspective views.SPIKES
natural_image
Technical line drawing of a mechanical component with an inset showing a circular component labeled 1, 2 (no text or symbols on the main diagram)text_image
Diagram showing mechanical assembly steps with labeled components and directional arrowstext_image
Warning symbol with exclamation mark and magnified view of a device handle, indicating hazard or alertnatural_image
Technical line drawing of a mechanical device with no visible text or symbols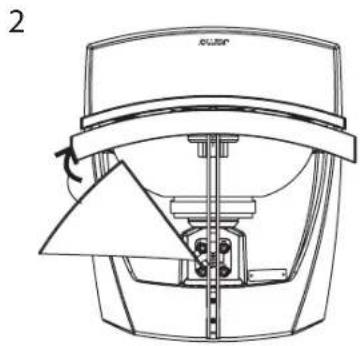
natural_image
Technical line drawing of a mechanical device with no visible text or symbolsRENG∅RING
Midrange (In / mm)....5½ / 150
Tweeter (In / mm)....1 / 28
Short term power (W)....Min 500
Sensitivity (dB/2.8v@1 m) 89
Frequency range (Hz) 35 - 30.000 (-6dB@29Hz)
Impedance (Ohm) 4
Crossover frequencies (Hz) 250 and 2.500
Weight (Kg / lbs)....58 / 133
Dimensions (HxWxD mm / in) 1189 x 440 x 487
46.8 × 17.3 × 19.2
GARANTIENS OMFANG
text_image
3 ft 4 ft 10°LYSSNINGSLÄGET
text_image
Diagram illustrating a person viewing a screen with 30-degree angles, showing perspective and perspective views.SPIKFÖTTER
natural_image
Technical line drawing of a mechanical component with an inset showing a circular component labeled 1 and 2 (no text or symbols beyond labels)natural_image
Pure mechanical component diagrams without any text, numbers, or symbolstext_image
Warning symbol with exclamation mark and magnified view of a device handle, indicating hazard or alert.natural_image
Technical line drawing of a mechanical device with no visible text or symbols2
natural_image
Technical line drawing of a mechanical device with no visible text or symbolsRENGÖRING
Midrange (In / mm)....5½ / 150
Tweeter (ln / mm) 1 / 28
Short term power (W)....Min 500
Sensitivity (dB/2.8v@1 m) 89
Frequency range (Hz) 35 - 30.000 (-6dB@29Hz)
Impedance (Ohm) 4
Crossover frequencies (Hz) 250 and 2.500
Weight (Kg / lbs)....58 / 133
Dimensions (HxWxD mm / in) 1189 x 440 x 487
46.8 × 17.3 × 19.2
GARANTINS OMFATTNING
text_image
3 ft 4 ft 10°KUUNTELUPISTE
text_image
Diagram illustrating a person viewing two screens with 30-degree angles, showing perspective and perspective views.ASENNUSPIIKIT
natural_image
Technical line drawing of a mechanical component with an inset showing a circular component labeled 1, 2 (no text or symbols on the diagram itself)text_image
Diagram showing mechanical assembly steps with labeled components and directional arrowstext_image
Warning symbol with exclamation mark and magnified view of a device handle, indicating hazard or alerttext_image
Technical diagram showing assembly of speaker panels with labeled components and directional arrows indicating motion or assembly steps.natural_image
Technical line drawing of a mechanical device with no visible text or symbols2

natural_image
Technical line drawing of a mechanical device with no visible text or symbolsPUHDISTUS
Midrange (In / mm)....5½ / 150
Tweeter (In / mm) 1 / 28
Short term power (W)......Min 500
Sensitivity (dB/2.8v@1 m) 89
Frequency range (Hz) 35 - 30.000 (-6dB@29Hz)
Impedance (Ohm) 4
Crossover frequencies (Hz) 250 and 2.500
Weight (Kg / lbs)....58 / 133
Dimensions (HxWxD mm / in) 1189 x 440 x 487
46.8 × 17.3 × 19.2
TAKUUEHDOT
text_image
3 ft 4 ft 10°POSICIÓN DE ESCUCHA
text_image
Diagram illustrating a person viewing a screen with 30-degree angles, showing perspective projection and viewing setup.PUNTAS DE DESACOPLO
natural_image
Technical line drawing of a mechanical component with an inset showing a circular component labeled 1 and 2 (no text or symbols beyond labels)natural_image
Mechanical component diagrams showing shafts and housing assembly (no text or labels)text_image
Warning symbol with exclamation mark and magnified view of a door handle, indicating hazard or cautionnatural_image
Technical line drawing of a mechanical device with no visible text or symbols2

natural_image
Technical line drawing of a mechanical device with no visible text or symbolsLIMPIEZA
Midrange (In / mm)....5½ / 150
Tweeter (In / mm) 1 / 28
Short term power (W)....Min 500
Sensitivity (dB/2.8v@1 m) 89
Frequency range (Hz) 35 - 30.000 (-6dB@29Hz)
Impedance (Ohm) 4
Crossover frequencies (Hz) 250 and 2.500
Weight (Kg / lbs) 58 / 133
Dimensions (HxWxD mm / in) 1189 x 440 x 487
46.8 × 17.3 × 19.2
ALCANCE DE LA GARANTÍA
text_image
3 ft 4 ft 10°natural_image
Technical line drawing of a mechanical component with an inset showing a circular component labeled 1, 2, and a threaded part (no text or symbols beyond labels)natural_image
Mechanical assembly diagram showing a shaft and rotor with directional arrows indicating movement (no text or symbols)text_image
Warning symbol with exclamation mark and hand holding a door, indicating hazard or cautionnatural_image
Line drawing of a speaker with concentric circles and an arrow indicating motion (no text or symbols)natural_image
Technical line drawing of a mechanical device with no visible text or symbols2
natural_image
Technical line drawing of a mechanical device with no visible text or symbolsPULIZIA
Midrange (In / mm)....5½ / 150
Tweeter (ln / mm)....1 / 28
Short term power (W)....Min 500
Sensitivity (dB/2.8v@1 m) 89
Frequency range (Hz) 35 - 30.000 (-6dB@29Hz)
Impedance (Ohm)....4
Crossover frequencies (Hz) 250 and 2.500
Weight (Kg / lbs)....58 / 133
Dimensions (HxWxD mm / in) 1189 x 440 x 487
46.8 × 17.3 × 19.2
GARANZIA
text_image
3 ft 4 ft 10°LUISTERPOSITIE
text_image
Diagram illustrating a person viewing a screen with 30-degree angles, showing perspective and perspective views.SPIKES
natural_image
Technical line drawing of a mechanical component with an inset showing a circular component labeled 1, 2 (no text or symbols on the diagram itself)natural_image
Mechanical assembly diagram showing a cylindrical component being inserted into a housing, with no visible text or symbols.natural_image
Technical line drawing of a mechanical device with no visible text or symbols2

natural_image
Technical line drawing of a mechanical device with no visible text or symbolsSCHOONMAKEN
Midrange (In / mm)....5½ / 150
Tweeter (In / mm)....1 / 28
Short term power (W)....Min 500
Sensitivity (dB/2.8v@1 m) 89
Frequency range (Hz) 35 - 30.000 (-6dB@29Hz)
Impedance (Ohm)....4
Crossover frequencies (Hz) 250 and 2.500
Weight (Kg / lbs)....58 / 133
Dimensions (HxWxD mm / in) 1189 x 440 x 487
46.8 × 17.3 × 19.2
GARANTIEVOORWAARDEN
text_image
3 ft 4 ft 10°聆听位置
natural_image
Technical line drawing of a mechanical component with an inset showing a circular component labeled 1, 2 (no text or symbols on the diagram itself)natural_image
Mechanical assembly diagram showing a shaft and rotor assembly with directional arrows (no text or labels)text_image
Warning symbol with exclamation mark and labeled parts, indicating an alert or warning about a device.natural_image
Technical line drawing of a mechanical device with no visible text or symbols2

natural_image
Technical line drawing of a mechanical device with no visible text or symbols清洁
Midrange (In / mm)....5½ / 150
Tweeter (In / mm)....1 / 28
Short term power (W)......Min 500
Sensitivity (dB/2.8v@1 m) 89
Frequency range (Hz) 35 - 30.000 (-6dB@29Hz)
Impedance (Ohm)....4
Crossover frequencies (Hz) 250 and 2.500
Weight (Kg / lbs)....58 / 133
Dimensions (HxWxD mm / in) 1189 x 440 x 487
46.8 × 17.3 × 19.2