
SMV69U80EU - Dishwasher BOSCH - Free user manual and instructions
Find the device manual for free SMV69U80EU BOSCH in PDF.
| Product type | Built-in dishwasher |
| Brand | Bosch |
| Model | SMV69U80EU |
| Weight | 60 kg max |
| Power supply | 220-240 V, 50/60 Hz, 10/16 A |
| Connected load | 2.0 - 2.4 kW |
| Capacity | 12 to 15 place settings |
| Wash programs | Eco 50°, Auto 45-65°, Auto 65-75°, Quick 45°, Pre-rinse |
| Additional functions | VarioSpeedPlus, Half-load, HygienePlus, Intensive zone, Sparkling drying, Energy Save |
| Drying technology | Zeolite drying (Zeolith) |
| Aquasensor | Yes (turbidity detection) |
| Water softener | Adjustable from H:00 to H:07 |
| Safety | Aqua-Stop, child safety lock (door lock) |
| Maintenance | Regular cleaning of filters and spray arms |
| Customer service | E-Nr and FD number on rating plate |
Frequently Asked Questions - SMV69U80EU BOSCH
User questions about SMV69U80EU BOSCH
0 question about this device. Answer the ones you know or ask your own.
Ask a new question about this device
Download the instructions for your Dishwasher in PDF format for free! Find your manual SMV69U80EU - BOSCH and take your electronic device back in hand. On this page are published all the documents necessary for the use of your device. SMV69U80EU by BOSCH.
USER MANUAL SMV69U80EU BOSCH
natural_image
Composite image showing a washing machine with open lid and kitchen utensils, alongside a modern white corrugated dish (no text or symbols visible)
text_image
- 35-45° auto + eco 45-65° 65-75° 50°SM...
SB...

BOSCH

text_image
Diagram of a device control panel with labeled ports and digital display showing 108 and 24 microcontroller units
text_image
Diagram of a multi-chamber refrigerator with labeled internal compartments and external casingÍndice

flowchart
graph TD
    A["Top Row White Arrow"] --> B["Bottom Row Black Block"]
    C["Right Row Black Block"] --> D["Bottom Row Black Block"]
    E["Left Row White Arrow"] --> F["Right Row Black Block"]
natural_image
Illustration of a conveyor belt pouring granular material into a conical hopper on a stovetop, with a circular component nearby (no text or symbols)natural_image
Diagram of a device interior with arrows indicating movement or operation, no readable text or symbols present.- Cuidadosamente, deitar o abrilhantador até à marca de máx. da abertura de enchimento.
natural_image
Illustration of a hand pouring liquid into a device with a droplet inside (no text or symbols)text_image
Diagram showing two scenarios of a mechanical device with a cross symbol and a checkmark, likely illustrating a safety or inspection process.Panelas
Cesto inferior 30

natural_image
Illustration of a shopping basket filled with various food items (no text or symbols visible)Conselho
natural_image
Interior view of a kitchen appliance with open drawer and side dishes (no text or symbols visible)natural_image
Technical diagram of a mechanical assembly with internal grid structure and directional arrows indicating motion (no text or symbols)
natural_image
Isometric architectural diagram of a multi-level building with grid patterns and a star overlay (no text or symbols)pt Loiça
natural_image
Technical diagram of a mechanical assembly with no visible text or symbolsnatural_image
Illustration of a container with a hook attached to a grid-like structure (no text or symbols)natural_image
Illustration of a hand pressing down on a computer monitor with a starburst symbol (no text or symbols present)
natural_image
Illustration of a robotic arm handling a device with a brush (no text or symbols visible)pt Detergente
natural_image
Mechanical component diagram showing a rotating assembly with a central hub and surrounding blades (no text or symbols)
natural_image
Mechanical assembly diagram showing a bolted joint inserted into a gear-like component with a downward arrow indicating force or motion (no text or symbols present)natural_image
Diagram of a kitchen appliance showing a propeller and fan assembly with directional arrows indicating motion (no text or symbols)natural_image
Mechanical assembly diagram showing a rotating component with a tool interacting with it (no text or symbols present)natural_image
Cross-sectional diagram of a mechanical device with arrows indicating motion or force direction (no text or symbols)natural_image
Simple diagram of a rectangular box with internal compartments and a circle pointing to it (no text or symbols)
flowchart
graph TD
    A["Start"] --> B["Process Step 1"]
    B --> C["Process Step 2"]
    C --> D["Process Step 3"]
text_image
Diagram showing two labeled components (① and ②) with arrows indicating movement or flow, likely illustrating a process or system.40

text_image
Diagram showing hands installing a component with numbered labels and directional arrows indicating process steps41

text_image
Diagram showing a hand placing a labeled object into a drawer with numbered arrows indicating steps ① and ②.42

text_image
Diagram illustrating a food delivery or storage system with labeled components and directional arrows indicating flow or movement.
natural_image
Interior view of a kitchen appliance with a white rack unit and metal fixtures (no text or symbols visible)The image is too blurry to recognize any text content.

natural_image
Composite image showing a washing machine with open lid and kitchen utensils, alongside a modern white corrugated dish (no text or symbols visible)
text_image
- 35-45° auto + eco 45-65° 65-75° 50°SM...
SB...

BOSCH

text_image
Diagram of a device control panel with labeled ports and digital display showing 108 and 24 microcontroller units
text_image
Technical diagram of a multi-chamber refrigerator with labeled internal compartments and external casingСъдържание

Използване по
предназначение 4

Указания за безопасност ..... 4
flowchart
graph TD
    A["Top Row: White Arrow"] --> B["Bottom Row: Black Block"]
    C["Right Row: Black Block"] --> D["Bottom Row: Black Block"]
    E["Left Row: White Arrow"] --> F["Right Row: Black Block"]
natural_image
Illustration of a conveyor belt system with particles being inserted into a funnel (no text or symbols)natural_image
Diagram of a device with two arrows pointing to internal components (no text or symbols)natural_image
Illustration of a hand pouring liquid into a device with a droplet inside (no text or symbols)natural_image
Illustration of a multi-tiered plastic basket filled with various kitchen utensils (no text or symbols visible)Указание
natural_image
Two-panel illustration showing a mechanical device with a cross mark and checkmark inside a container, no text or symbols present.Тенджери
natural_image
Illustration of a shopping basket filled with various food items (no text or symbols visible)Съвет
natural_image
Interior view of a kitchen appliance showing open drawer with cutlery and utensils (no text or symbols visible)natural_image
Technical diagram of a multi-level industrial or warehouse structure with internal grid patterns and directional arrows indicating flow or movement (no text or symbols present)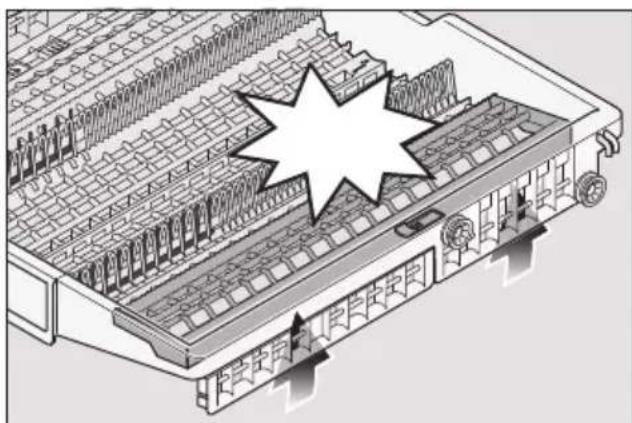
natural_image
Isometric technical diagram of a multi-level industrial or warehouse structure with no visible text, numbers, or symbols.natural_image
Diagram of a vehicle climbing stairs with directional arrows indicating movement (no text or symbols)Поставка за дребни части \*
natural_image
Illustration of a container with a hook attached to a grid-like structure (no text or symbols)natural_image
Illustration of a hand pressing down on a computer monitor with a screwdriver (no text or symbols visible)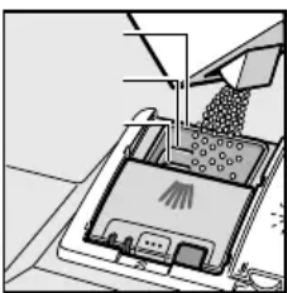
natural_image
Illustration of a robotic arm interacting with a device (no text or symbols visible)natural_image
Mechanical component diagram showing a rotating assembly with a central hub and fan base (no text or symbols)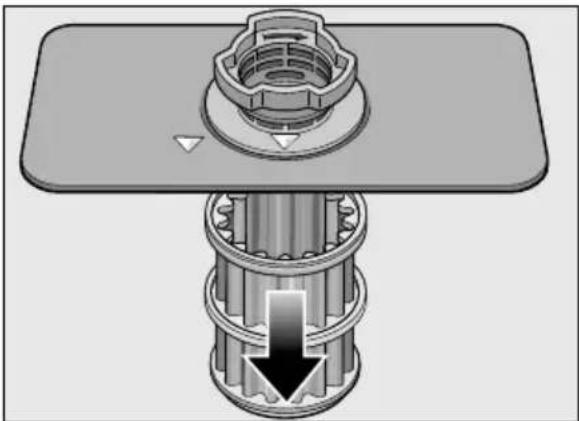
natural_image
Mechanical assembly diagram showing a bolted joint inserted into a cylindrical housing with a downward arrow indicating force or motion (no text or symbols present)natural_image
Diagram of a kitchen appliance showing a propeller with directional arrows indicating rotation and assembly (no text or symbols)natural_image
Mechanical assembly diagram showing a tool interacting with a circular component (no text or symbols visible)natural_image
Cross-sectional diagram of a mechanical device with arrows indicating motion or force direction (no text or symbols)natural_image
Simple diagram of a rectangular box with internal compartments and a circle pointing to the top-left corner (no text or symbols)
natural_image
Pure electrical circuit lines without any symbolstext_image
Diagram showing two labeled components (① and ②) with arrows indicating movement or flow, likely illustrating a process or system.40

text_image
Diagram showing hands installing a component with numbered labels and directional arrows indicating process flow41

text_image
Diagram showing a hand pressing a button labeled with numbers 1 and 2 on a cabinet or shelf, indicating a step in the process.42

natural_image
Diagram showing a kitchen appliance with a computer monitor and a close-up of its interior, illustrating the process of lifting or removing weights (no text or symbols present)
natural_image
Interior view of a kitchen appliance with a white rack unit and metal fixtures (no text or symbols visible)
natural_image
Composite image showing a washing machine with open lid and kitchen utensils, alongside a modern white corrugated dish (no text or symbols visible)
text_image
- 35-45° auto + eco 45-65° 65-75° 50°SM...
SB...

BOSCH

text_image
Diagram of a device control panel with labeled ports and digital display showing 108 and 24 microcontroller units
text_image
Diagram of a multi-chamber refrigerator with labeled internal compartments and external casingIndice

natural_image
Illustration of a conveyor belt system with granular material inside, emitting powder from a funnel (no text or symbols)natural_image
Diagram of a device with two labeled components and directional arrows indicating movement or assembly (no text or symbols present)natural_image
Illustration of a hand pouring liquid into a device with a magnified inset showing liquid being poured (no text or symbols)natural_image
Black-and-white illustration of a multi-tiered plastic crate filled with various kitchen utensils (no text or symbols visible)Avvertenza
natural_image
Two-panel illustration showing a mechanical device with a cross mark and checkmark, no text or symbols present.Pentole
natural_image
Illustration of a basket filled with various food items, including eggs and vegetables (no text or symbols)Consiglio
natural_image
Interior view of a kitchen appliance drawer with open compartments containing kitchen utensils and utensils (no text or labels visible)text_image
Technical diagram of a mechanical assembly with labeled components and directional arrows indicating motion or flow.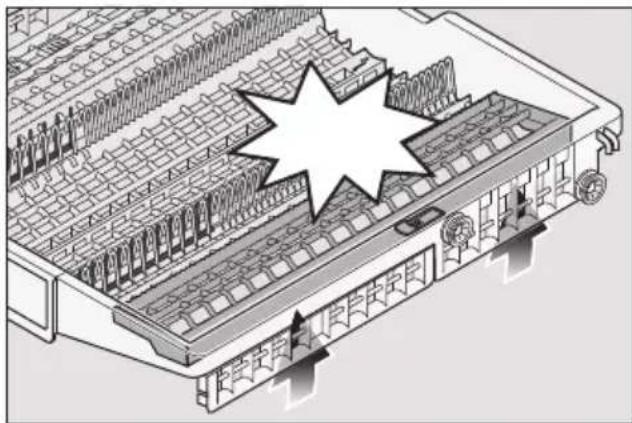
natural_image
Isometric architectural diagram of a multi-level building with grid patterns and structural elements, featuring a starburst overlay (no text or symbols)Divisori ribaltabili \*
natural_image
Technical diagram of a mechanical assembly with rods and gears, showing motion direction (no text or symbols)natural_image
Illustration of a container with a hook attached to a grid-like structure (no text or symbols)natural_image
Illustration of a hand pressing down on a computer monitor with a starburst symbol (no text or symbols present)
natural_image
Illustration of a robotic arm handling a device with a brush (no text or symbols visible)natural_image
Mechanical component diagram showing a rotating assembly with a central hub and base plate (no text or symbols)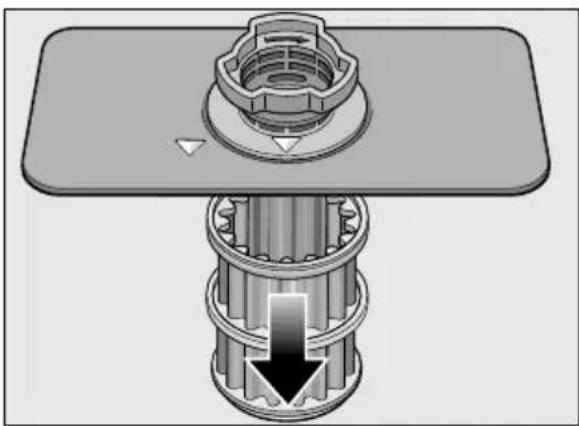
natural_image
Mechanical assembly diagram showing a bolted joint inserted into a cylindrical component with a downward arrow indicating force or motion (no text or symbols present)natural_image
Diagram of a mechanical device showing a propeller with directional arrows indicating motion or force (no text or symbols present)natural_image
Mechanical assembly diagram showing a tool interacting with a circular component (no text or symbols visible)natural_image
Cross-sectional diagram of a mechanical device with arrows indicating motion or force direction (no text or symbols)natural_image
Simple diagram of a rectangular box with internal blocks and a circle on top (no text or symbols)
natural_image
Pure electrical circuit lines without any symbolstext_image
Diagram showing two labeled components (① and ②) with arrows indicating movement or flow, likely illustrating a process or system.40

text_image
Diagram showing hands installing a component with numbered labels and directional arrows indicating process flow41

text_image
Diagram showing a hand placing a labeled object into a drawer with numbered arrows indicating steps ① and ②.42

natural_image
Diagram showing a kitchen appliance with a computer monitor and a close-up of its interior, illustrating the process of lifting or removing weights (no text or symbols present)
natural_image
Interior view of a kitchen appliance with a white rack unit and metal fixtures (no text or symbols visible)
natural_image
Composite image showing a washing machine with open lid and kitchen utensils, alongside a modern white corrugated dish (no text or symbols visible)
text_image
- 35-45° auto + eco 45-65° 65-75° 50°SM...
SB...

BOSCH

text_image
Diagram of a device control panel with labeled ports and digital display showing 108 and 24 microcontroller units
text_image
Technical diagram of a multi-chamber refrigerator with labeled components in ChineseKazalo

Predvidjena uporaba.... 4

Sigurnosni napuci.... 4
Prije nego što aparat stavite u rad . . . 4
Pri dopremi....5
Pri instalaciji 5
U svakodnevnom radu ..... 6
zaključavanje vrata ..... 6
Pri nastanku štete ..... 6
Pri zbrinjavanju 6

Zaštita okoliša 8
Ambalaža 8
Stari aparati 8

flowchart
graph TD
    A["Top Row White Arrow"] --> B["Bottom Row Black Block"]
    C["Right Row Black Block"] --> D["Bottom Row Black Block"]
    E["Left Row White Arrow"] --> F["Right Row Black Block"]
Uporaba specijalne soli
natural_image
Illustration of a conveyor belt system with granular material inside, emitting powder from a funnel (no text or symbols)* ovisno o modelu
Uporaba sredstva za pranje sa solnom komponentom
Kod uporabe kombiniranih sredstava za pranje sa solnom komponentom se može općenito odreći specijalne soli do tvrdoće vode od 21° dH (37° fH, 26° Clarke, 3,7 mmol/l). Kod tvrdoća vode preko 21° dH i ovdje je takodjer potrebna uporaba sredstva za dodavanje soli.
Isključivanje pokazivanja punjenja soli/umekšavanje vode
natural_image
Diagram of a device interior with arrows indicating movement or operation, no visible text or symbolshr
natural_image
Illustration of a hand pouring liquid into a device with a droplet inside (no text or symbols)-
Zatvoriti poklopac tako da se čujno učvrsti.
-
Proliveno sredstvo za davanje sjaja po potrebi ukloniti krpom da prilikom slijedećeg ispiranja ne bi došlo do prekomjernog nastanka pjene.
natural_image
Illustration of a multi-tiered plastic basket filled with various kitchen utensils (no text or symbols visible)Napomena
Obratite pozornost da se komadi posudja ne nalaze iznad prihvatne posude za tablete 24. Oni mogu blokirati poklopac pretinca za sredstvo za pranje 32.
text_image
Diagram showing two scenarios of a mechanical device with a cross mark and checkmark, likely illustrating a safety or inspection process.Lonci
natural_image
Illustration of a shopping basket filled with various food items (no text or symbols visible)Savjet
natural_image
Interior view of a kitchen appliance drawer with open compartments containing various kitchen utensils (no text or labels visible)text_image
Technical diagram showing a multi-level mechanical or electrical component with directional arrows indicating flow or movement.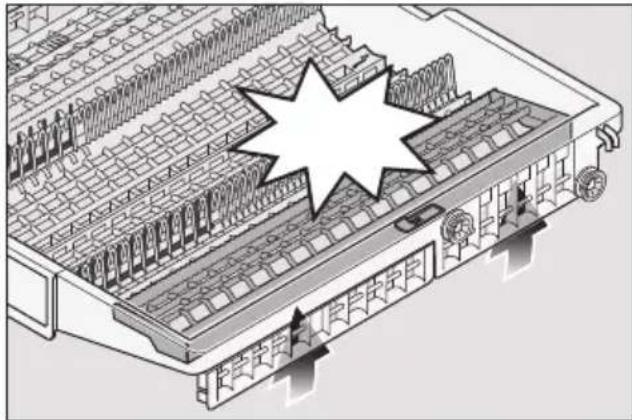
natural_image
Isometric technical diagram of a multi-level industrial or warehouse structure with no visible text or symbolsPreklopne kandže \*
natural_image
Technical diagram of a mechanical assembly with rods and a gear mechanism, showing motion direction (no text or symbols)hr Posudje
Držač za male posude \*
* ovisno o modelu
natural_image
Illustration of a container being lifted by a hook, surrounded by coiled wires (no text or symbols)Premještanje visine košare
natural_image
Illustration of a hand pressing down on a device component (no text or symbols visible)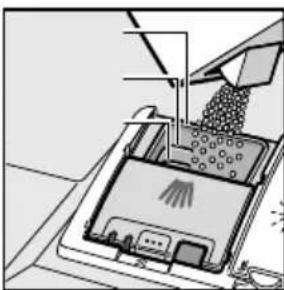
natural_image
Illustration of a robotic arm handling a device with a cloth, no text or symbols visible- Poklopac komore za sredstvo za pranje zatvarati gurajući ga naviše dok se zatvarač ne učvrsti bez problema.
text_image
klicknatural_image
Mechanical component diagram showing a rotating assembly with a central hub and fan base (no text or symbols)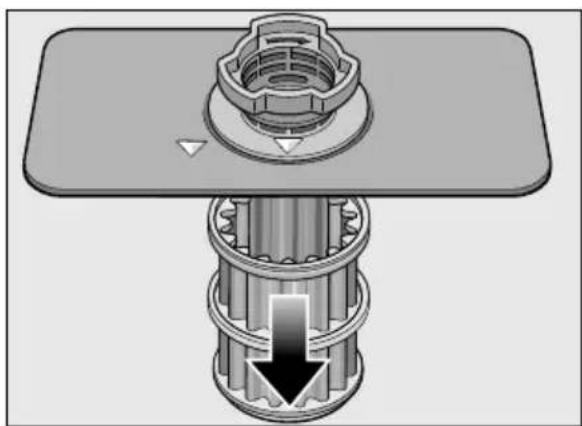
natural_image
Mechanical assembly diagram showing a bolted joint with a threaded shaft and a base, no text or symbols present.- Moguće ostatke ukloniti te sita očistiti pod mlazom tekuće vode.
- Sustav sita ponovno ugraditi obrnutim redoslijedom i obratiti pozornost na to da strelice za obilježavanje nakon zatvaranja stoje jedna naspram druge.
Ručice za prskanje
Vapnenac i nečistoća iz sapunice mogu blokirati sapnice i ležajeve prskalica 23 i 27.
- Izlazne sapnice prskalica provjeriti jesu li začepljene.
- Odvijčati gornju prskalicu 23.
- Donju prskalicu 27 skinuti na gore.
natural_image
Diagram of a kitchen appliance showing a propeller with directional arrows indicating rotation and assembly (no text or symbols)- Ručice za prskanje očistiti tekućom vodom.
- Ponovno umetnuti ručice za prskanje i čvrsto ih zavrnuti.

⚠ Upozorenje – Mislite na to:
natural_image
Mechanical assembly diagram showing a tool interacting with a circular component (no text or symbols visible)- Provjeriti ima li stranih objekata na krilnom vodomjeru i u slučaju potrebe dotične ukloniti.
- Zaštitni poklopac dovesti u prvotni položaj i pritisnuti je nadolje da bi ušel u svoje ležište (klik).

natural_image
Mechanical diagram showing a rotating component with motion arrows and a starburst symbol (no text or labels)text_image
Diagram showing two labeled components (① and ②) with arrows indicating movement or flow, likely illustrating a process or system.40

text_image
Diagram showing hands installing a component with numbered labels and directional arrows indicating process flow41

text_image
Diagram showing a hand placing a labeled object into a drawer with numbered arrows indicating steps ① and ②.42

natural_image
Diagram showing a kitchen appliance with a computer monitor and a close-up of its interior, illustrating the process of lifting or removing weights (no text or symbols present)
natural_image
Interior view of a kitchen appliance with a white rack unit and metal fixtures (no text or symbols visible)
natural_image
Composite image showing a washing machine with open lid and kitchen utensils, alongside a modern white corrugated dish (no text or symbols visible)
text_image
- 35-45° auto + eco 45-65° 65-75° 50°SM...
SB...

BOSCH

text_image
Diagram of a device control panel with labeled ports and digital display showing 108 and 24 microcontroller units
text_image
Diagram of a multi-chamber refrigerator with labeled internal compartments and external casingTable of contents

Intended use 4

Safety instructions .... 4
Before you switch ON the appliance 4
Delivery....5
Installation. 5
In daily use 6
Door lock 6
Damage 6
Disposal 6

Protection of the environment 8
Packaging....8
Old appliances 8

Getting to know your appliance 9
Control panel 9
Appliance interior 9
Overview of menu. 9

Water softening system/ Special salt 10
Setting 10
Water hardness table ..... 10
Using special salt 10
Detergents with salt component .... 11
Switching off water softening system.... 11

Rinse aid 11
Setting amount of rinse aid. . . . . . . 12
Switching off rinse aid refill indicator 12

Utensils 13
Not suitable.... 13
Glass and utensil damage ..... 13
Loading the dishwasher ..... 13
Unloading the dishwasher ..... 13
Cups and glasses. 14
Pans 14
Cutlery drawer....15
Folding spikes 15
Small accessories holder ..... 15
Adjusting the height of the basket . . 16

Detergent 16
Adding detergent 17
Combination detergent ..... 17

Overview of programmes .... 19
Programme selection ..... 19
Information for test institutes ..... 20

Additional options .....20
Express WaschPlus/
SpeedPerfectPlus
(VarioSpeedPlus) 20
Half load 20
HygienePlus 20
Intensive zone 20
High gloss drying ..... 20
Energy Save 20

Operating the appliance .....21
Programme data ..... 21
Aqua sensor 21
Zeolith drying 21
Switching on the appliance. . . . . . . 22
Optical display while the programme is running ..... 22
Remaining running time display . . . . 23
Timer programming 23
End of programme 23
Automatic switch off / interior light . . 24
Switching off the appliance. . . . . . . 24
Interrupting the programme ..... 24
Terminating the programme ..... 25
Changing the programme. . . . . . . . 25
Intensive drying. 25

Cleaning and maintenance... 25
Overall condition of the machine ... 25
Special salt and rinse aid ..... 26
Filters 26
Spray arms 27

Fault, what to do? 27
Waste water pump 28
Fault table....29

Customer service .... 37

Installation and connection .. 37
Product package 37
Safety instructions. 37
Delivery....38
Technical specifications ..... 38
Installation. 38
Waste-water connection ..... 38
Drinking water connection ..... 39
Warm water connection ..... 39
Electrical connection....39
Removing the appliance ..... 40
Transportation. 40
Protection against frost
(Emptying the appliance) ..... 40

Intended use
■ This appliance is intended for use in the home and the home environment.
■ Use the dishwasher only in the household and only for its designed purpose: for washing domestic dishes.

Safety instructions
Children from 8 years of age or people whose physical, sensory or mental abilities or their lack of experience or knowledge prevent them from using the appliance safely must not use this appliance without supervision or instruction by a responsible person.
Before you switch ON the appliance
Please read the operating and installation instructions carefully. They contain important information on how to install, use and maintain the appliance.
Retain all documents for subsequent use or for the next owner.
Delivery
- Check the packaging and dishwasher immediately for damage caused in transit. Do not switch on a damaged appliance, but contact your supplier.
- Please dispose of the packaging material in an environmentally friendly manner.
- Do not let children play with packaging and its parts. There is a risk of suffocation from collapsible boxes and film.
Installation
■ Following installation, ensure that the back of the dishwasher is not freely accessible (protection against contact due to hot surface).
■ Install and connect the appliance according to the installation and assembly instructions.
■ Prior to installation, disconnect the dishwasher from the power supply.
■ Ensure that the protective conductor system of the domestic supply has been correctly installed.
■ The electrical connection conditions must correspond with the specifications on the dishwasher rating plate 34.
If the power cord of this appliance is damaged, it must be replaced with a particular power cord. To prevent injury, the power cord may be purchased from customer service only.
■ If the dishwasher is installed in a high-sided unit, the unit must be secured properly.
If the dishwasher is installed below or above other domestic appliances, follow the information for installation in combination with a dishwasher in the installation instructions for the particular appliances.
■ Also follow the installation instructions for the dishwasher to ensure that all appliances are operated safely.
If there is no information or if the installation instructions do not include the appropriate information, contact the manufacturer of these appliances to ensure that the dishwasher can be installed above or below these appliances.
■ If you cannot obtain any information from the manufacturer, you must not install the dishwasher above or below these appliances.
■ If you install a microwave oven above the dishwasher, the microwave oven may be damaged.
■ Install built-under or integratable appliances only under continuous worktops which have been screwed to adjacent cupboards to ensure stability.
- Do not install the appliance near heat sources (radiators, heat storage tanks, cookers or other appliances which generate heat) and do not install under a hob.
■ After installing the appliance, ensure that the plug is easily accessible.
(See Electrical connection)
■ Some models:
The plastic housing on the water connection contains an electric valve, the connecting cables are in the supply hose. Do not cut through this hose, do not immerse the plastic housing in water.
In daily use
Read and observe the safety information and instructions for use on the packaging for cleaning and rinsing agents.
Childproof lock (door lock) \*
The description of the childproof lock is at the back in the envelope.
* depending on model
Damage
■ The appliance may be repaired and opened up by a technician only. To do this, disconnect the appliance from the power supply. Pull out the mains plug or switch off the fuse. Turn off the tap.
If the appliance is damaged, especially the fascia (cracks, holes, broken buttons), or the door function is impaired, stop operating the appliance. Pull out mains plug or switch off fuse. Turn off tap, call customer service.
Disposal
- Make redundant appliances unusable to prevent subsequent accidents.
- Dispose of the appliance in a n environmentally friendly manner.
⚠ Warning Risk of injury!
■ To prevent injuries, e.g. caused by stumbling, open the dishwasher only briefly in order to load and unload the dishwasher.
■ Knives and other utensils with sharp points must be placed horizontally in the cutlery drawer.
■ Do not lean or sit on the open door.
■ In the case of free-standing appliances, ensure that the baskets are not overloaded.
If the appliance is not in a cavity and a side panel is accessible, the door hinge area must be covered at the side for reasons of safety (risk of injury). The covers are available as optional accessories from customer service or specialist outlets.
⚠ Warning Risk of explosion!
Do not add any solvents to the washing chamber. Danger of explosion!
⚠ Warning Risk of scalding!
Open the door carefully when the programme is still running. There is a risk of hot water spraying out of the appliance.
⚠ Warning Risks to children!
■ If fitted, use the childproof lock. An exact description can be found in the back of the envelope.
■ Do not allow children to play with or operate the appliance.
- Keep children away from detergents and rinse aid. These may cause chemical burns in the mouth, throat and eyes or asphyxiation.
- Keep children away from open dishwasher. There may be small parts in the dishwasher which children could swallow and the water inside the dishwasher is not drinking water as it may contain detergent residue.
■ Ensure that children do not place fingers in the tablet collecting tray 24. Small fingers could become caught in the slots.
■ When opening and closing the door on an eye-level appliance, ensure that children do not become jammed or crushed between the appliance door and the cupboard door below.
■ Children could become locked in the appliance (danger of suffocation) or get into another dangerous situation.
Redundant appliances: Pull out the mains plug, sever and dispose of the power cord. Destroy the door lock so that the door can no longer be closed.

Protection of the environment
Both the packaging of new appliances and the old appliances themselves contain valuable raw materials and recyclable materials.
Please dispose of the individual parts separated according to type.
Please ask your dealer or inquire at your local authority about current means of disposal.
Packaging
All plastic parts of the appliance are identified with internationally standardised abbreviations (e.g. >PS< polystyrene). Therefore, plastic waste can be sorted out when the appliance is being disposed of.
Please follow the safety instructions under "Delivery".
Old appliances
Please follow the safety instructions under "Disposal of your appliance".
This appliance is labelled in accordance with European Directive 2012/19/EU concerning used electrical and electronic appliances (waste electrical and electronic equipment - WEEE). The guideline determines the framework for the return and recycling of used appliances as applicable throughout the EU

Getting to know your appliance
Diagrams of the control panel and the interior of the appliance can be found in the envelope at the front.
Individual positions are referred to in the text.
Control panel
1 ON/OFF switch
2 Programme buttons **
3 Digital display
4 Display "Check water supply"
5 Salt refill indicator
6 Rinse aid refill indicator
7 Timer programming display
8 Timer programming
9 Additional options **
10 START button
11 Door opener
** Number depending on model
Appliance interior
20 Interior light *
21 Cutlery drawer
22 Top basket
23 Top spray arm
24 Tablet collecting tray
25 Intake opening
26 Blow opening (Zeolith container)
27 Bottom spray arm
28 Dispenser for special salt
29 Filters
30 Bottom basket
31 Dispenser for rinse aid
32 Detergent dispenser
33 Lock for detergent dispenser
34 Rating plate
* depending on model
Overview of menu
The settings can be found in the individual chapters.
H Water Hardness H:00 - H:07
d Intensive drying d:00 - d:01
- Rinse aid r:00 - r:05
A Hot water R:00 - R:01
b End of programme buzzing sound
b:00 - b:03
P Automatic disconnection 800 - P:02
5 Optical display while the programme is running 5:00-5:02

Water softening system/Special salt
To ensure good washing results, the dishwasher requires soft water, i.e. containing low amounts of lime, otherwise white limescale will be deposited on the utensils and inner container.
Tap water above 1.2 mmol/l must be softened. The water is softened with special salt (regeneration salt) in the water softening system of the dishwasher.
The setting and therefore the required amount of salt depends on the degree of hardness of your tap water (see table).
Setting
The amount of salt dispensed can be set from H:00 to H:07.
Salt is not required at the set value H:00.
- Find out about the hardness value of your tap water. Your water utility company will help you with this.
- Set value can be found in the water hardness table.
- Open the door.
- Switch on ON/OFF switch 1.
-
Hold down programme button A and press START button 10 until H:0.... is indicated on the digital display.
-
Release both buttons. The LED for button A flashes and the digital display 3 displays the factory setting H:04.
To change the setting:
- Press programme button C.
Each time the button is pressed, the set value increases by one level; when the value of H:07 has been reached, the display jumps back to H:00 (off). - Press START button 10.
The chosen setting has now been stored. - Close the door.
Water hardness table
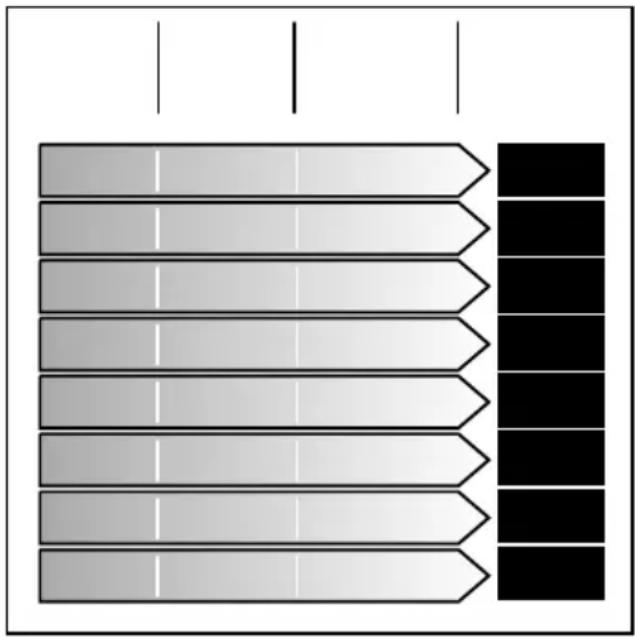
flowchart
graph TD
    A["Top Row: White Arrow"] --> B["Bottom Row: Black Block"]
    C["Right Row: Black Block"] --> D["Bottom Row: Black Block"]
    E["Left Row: White Arrow"] --> F["Right Row: Black Block"]
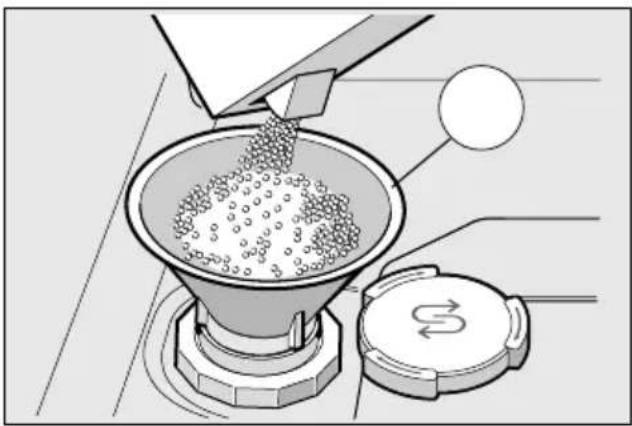
Using special salt
Always refill with special salt immediately before switching on the appliance. This ensures that overrun special salt solution is immediately washed out and does not corrode the rinsing tank.
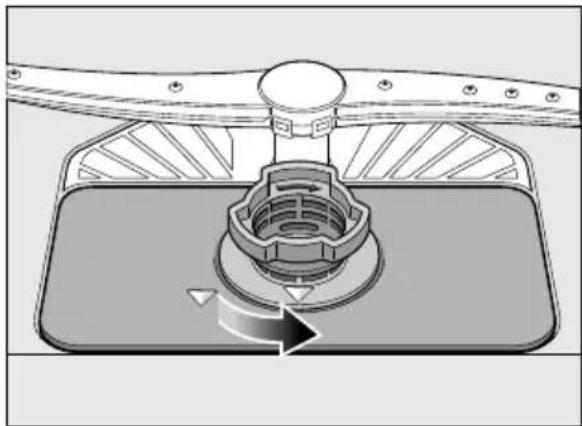
- Open the screw-type cap of the compartment [28].
- Fill the tank with water (only required when switching on the appliance for the first time).
- Then add dishwasher salt (not table salt or tablets).
The water is displaced and runs out. As soon as the salt refill indicator 5 on the fascia is lit, top up the salt.
natural_image
Illustration of a conveyor belt system with granular material being inserted into a funnel (no text or symbols visible)* depending on model
Using detergents with salt component
If combined detergents with a salt component are used, salt can usually be omitted up to a water hardness of 21^ dH ( 37^ fH, 26^ Clarke, 3.7 mmol/l). If the water hardness is over 21^ dH, special salt must be used.
Switching off salt refill indicator/ water softening system
If the salt refill indicator 5 is impaired (e.g. when using combined detergents containing salt component), it can be switched off.
■ Proceed as described under "Adjusting the water softening system" and set the value to H:00. The water softening system and salt refill indicator are now switched off.
Caution
Never fill the salt dispenser with detergent. You will destroy the water softening system.

Rinse aid
As soon as the rinse-aid refill indicator 6 is lit on the fascia, there is still a rinse-aid reserve of 1-2 rinsing processes. Refill with rinse aid.
The rinse aid is required for stain-free utensils and clear glasses. Use only rinse aid for domestic dishwashers.
Combined detergents with rinse-aid component may be used up to a water hardness of 21^ dH ( 37^ fH, 26^ Clarke, 3.7 mmol/l) only. If the water hardness is over 21^ dH, rinse aid must be used.
en Rinse aid
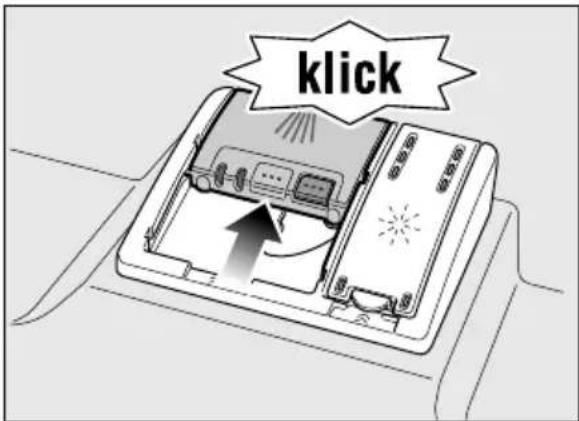
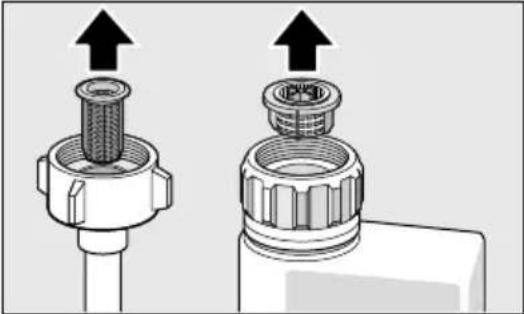
- Open the dispenser 31 by pressing and lifting the plate on the cover.

natural_image
Diagram of a device with two arrows indicating directional movement or operation, no text or symbols present.- Carefully pour rinse aid up to the max. mark in the filler opening.

natural_image
Illustration of a hand pouring liquid into a device with a magnified inset showing internal components (no text or symbols)-
Close cover until it clicks shut.
-
To prevent excessive foam formation during the next rinse cycle, remove any rinse aid which has run over with a cloth.
Setting amount of rinse aid
The amount of rinse aid can be set from r:00 to r:05. Please set rinse aid on r:05 to obtain very good drying results (r:05 is already set in factory).
Change this setting, only if streaks (select lower setting) or water stains (select higher setting) are left on the utensils.
-
Open the door.
-
Switch on ON/OFF switch 1.
-
Hold down programme button A and press START button 10 until H:0.... is indicated on the digital display.
-
Release both buttons.
The LED for button A flashes and the digital display 3 displays the factory setting H:04.
- Press programme button A until the factory set value r:05 is indicated on the digital display 3.
To change the setting:
-
Press programme button C. Each time the button is pressed, the set value increases by one level; when the value of r:06 has been reached, the display jumps back to r:00 (off).
-
Press START button [10]. The set value is saved.
-
Close the door.
Switching off rinse aid refill indicator
If the rinse-aid refill indicator 6 is impaired (e.g. when using combined detergents containing rinse aid component), it can be switched off.
■ Proceed as described under "Setting amount of rinse aid" and set the value to r:00.
The rinse aid refill indicator 6 is now switched off.

Utensils
Not suitable
■ Cutlery and utensils made of wood.
■ Delicate decorative glasses, craft and antique utensils. These decors are not dishwasher-proof.
■ Plastic parts not resistant to heat.
■ Copper and tin utensils.
■ Utensils which are soiled with ash, wax, lubricating grease or ink.
Aluminium and silver parts have a tendency to discolour and fade during the wash cycle. Even some types of glass (e.g. crystal glass objects) may turn cloudy after many wash cycles.
Glass and utensil damage
Causes:
■ Glass type and glass production process.
■ Chemical composition of the detergent.
■ Water temperature of the wash programme.
Recommendation:
■ Use only glasses and porcelain which the manufacturer designates as dishwasher-proof.
■ Use a detergent which protects utensils.
■ Take glass and cutlery out of the dishwasher as soon as possible after the programme ends.
Loading the dishwasher
-
Remove large food remnants. It is not necessary to prerinse utensils under running water.
-
Place the utensils so that
-
they are secure over.
- all u t e n s i l s w face down.
- parts with cur are at an angle, thereby allowing water to drain.
- does not obst r two spray arms 23 and 27.
Very small utensils should not be washed in the machine, as they may fall out of the baskets.
Unloading the dishwasher
To prevent water from dripping off the upper basket onto the utensils in the lower basket, it is recommended to empty the appliance from the bottom up.
Hot utensils are sensitive to shock! Therefore, when the programme ends, leave the utensils to cool down in the dishwasher until they can be handled.
Note
When the programme ends, water droplets can still be seen inside the appliance. This does not affect the drying of the utensils.
Cups and glasses
Top basket 22
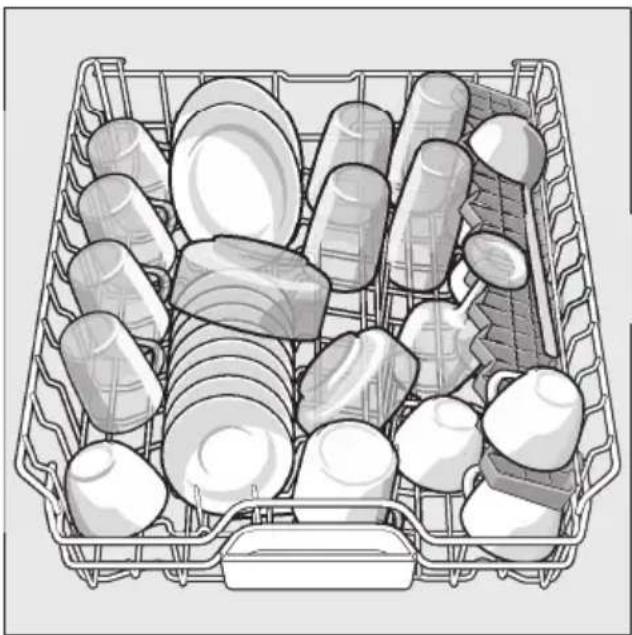
natural_image
Illustration of a multi-tiered plastic crate filled with various kitchen utensils (no text or symbols visible)Note
Utensils must not be placed above the tablet collecting tray 24. These may block the lid of the detergent dispenser and prevent it from opening fully.

text_image
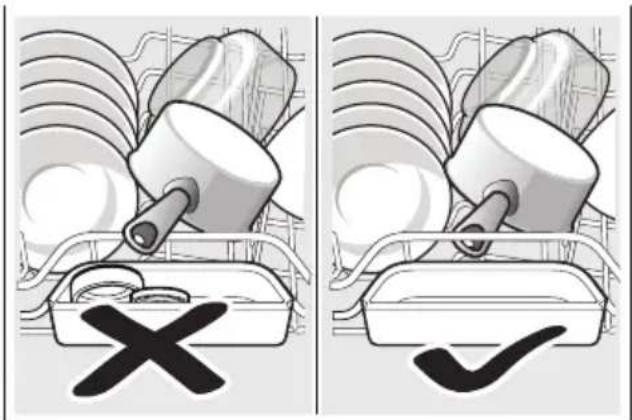
Diagram showing two scenarios of a container with a cross mark and a checkmark, likely illustrating a selection or inspection process.Pans
Bottom basket 30
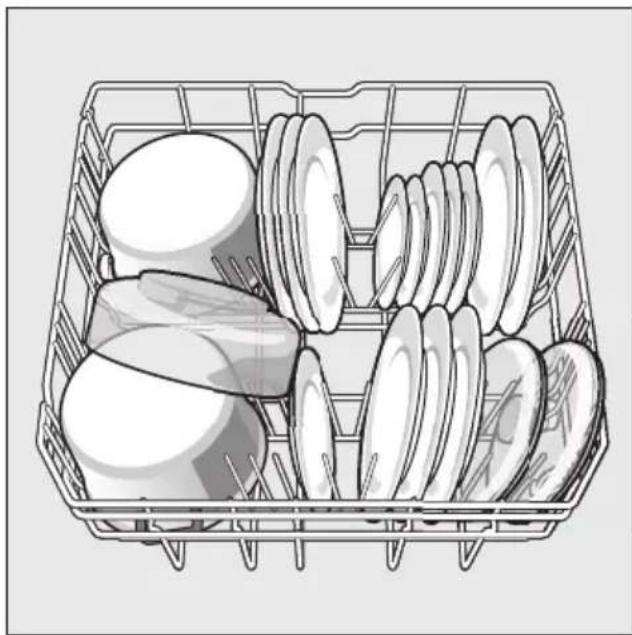
natural_image
Illustration of a shopping basket filled with various food items (no text or symbols visible)Tip
Heavily soiled utensils (pans) should be placed in the bottom basket. The more powerful spray jet provides a better dishwashing result.
Tip
Other examples, such as the best way of loading your dishwasher, can be found on our homepage as a free download. The corresponding Internet address can be found on the back page of these instructions for use.
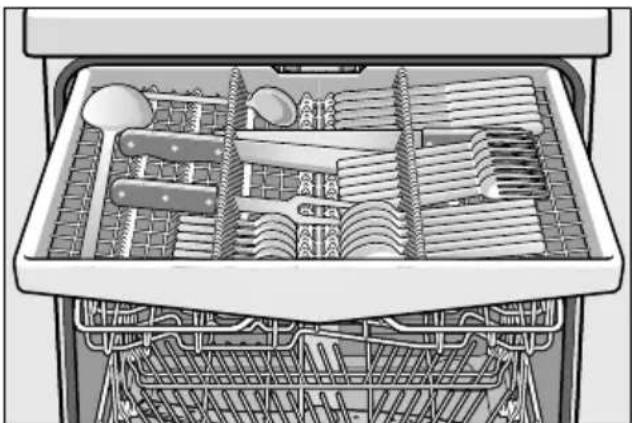
Cutlery drawer
Arrange the cutlery in the cutlery drawer 21 as illustrated. Separately arranged utensils are easier to remove after washing.
The drawer can be taken out.
natural_image
Illustration of a kitchen appliance with open drawer and accessories (no text or symbols)Depending on the model, you can fold down the side shelves to provide more room for taller items of cutlery. The front rows of prongs can be folded down to provide room for wider handles.

text_image
Technical diagram of a mechanical assembly with labeled components and directional arrows indicating motion or flow.
natural_image
Isometric technical diagram of a warehouse or storage area with grid-like structures and a star overlay (no text or symbols)Folding spikes \*
* depending on model
The spikes can be folded down to improve arrangement of pans, bowls and glasses.

natural_image
Technical diagram of a mechanical assembly with rods and gears, showing motion direction (no text or symbols)Small accessories holder \*
* depending on model
Light-weight plastic accessories, e.g. cups, lids, etc. can be held securely in the small accessories holder.

natural_image
Illustration of a container with a hook attached to a grid-like structure (no text or symbols)Adjusting the height of the basket
The height of the upper utensils basket 22 can be adjusted in 3 stages to create more space either in the upper or lower basket.
Appliance height 81.5 cm
| Top basket | Bottombasket | |
| Setting 1 max. ø 16 cm | 30 cm | |
| Setting 2 max. ø 18.5 cm | 27.5 cm | |
| Setting 3 max. ø 21 cm | 25 cm |
Appliance height 86.5 cm
| Top basket | Bottombasket | |
| Setting 1 max. ø 18 cm | 33 cm | |
| Setting 2 max. ø 20.5 cm | 30.5 cm | |
| Setting 3 max. ø 23 cm | 28 cm |
- Pull out the top basket 22 out.
- To lower the basket, press in the left and then the right lever on the outside of the basket. In doing so, hold the sides of the basket along the upper edge to prevent it from suddenly dropping.

text_image
1 2 3- To raise the basket, hold the basket on the sides of the upper edge and lift it up.
- Before re-inserting the basket again, ensure that it is at the same height on both sides. Otherwise, the appliance door cannot be closed and the upper spray arm will not be connected to the water circuit.

Detergent
You can use tablets as well as powder or liquid detergents for dishwashers, but never use washing up liquid. The dosage can be individually adjusted with powder or a liquid detergent according to the degree of soiling. Tablets contain an adequately large amount of active ingredients for all cleaning tasks. Modern, powerful detergents predominantly use a low-alkaline formulation with phosphate and enzymes. Phosphates bond the lime in the water. Enzymes break down starch and remove protein. Phosphate-free detergents are less frequent. These have a slightly weaker lime bonding capacity and require a higher dosage. To remove coloured stains (e.g. tea, tomato sauce), oxygen-based bleaching agents are usually used.
Note
To ensure a good washing result, always follow the instructions on the detergent packaging! If you have further questions, we recommend that you contact the detergent manufacturers' helpline.
⚠ Warning – Read and observe the safety information and instructions for use on the packaging for cleaning and rinsing agents.
Adding detergent
- If the detergent dispenser 32 is still closed, press the lock 33 to open the detergent dispenser.
Pour detergent into the dry detergent dispenser 32 only (insert tablet flat, not on its edge).
Dosage: see manufacturer's instructions on the packaging.
The graduated detergent dispenser 32 helps you add the correct amount of powder or liquid detergent.
Usually 20 ml–25 ml are adequate for normal soiling. If using tablets, one tablet is adequate.

natural_image
Illustration of a hand pressing down on a printer cover (no text or symbols visible)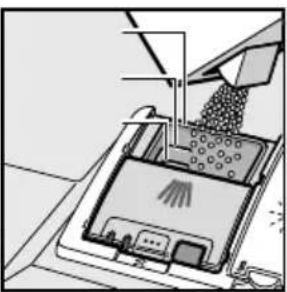
natural_image
Illustration of a robotic arm handling a tray with a cloth, no text or symbols present- Close the cover on the detergent dispenser by sliding it up until the lock engages without difficulty.

text_image
klickThe detergent dispenser opens automatically at the optimum time depending on the programme. The powder or liquid detergent is distributed in the appliance and is dissolved, the tablet falls into the tablet collecting tray where it dissolves in doses.
Tip
If the utensils are only lightly soiled, slightly less than the indicated amount of detergent is usually adequate.
Suitable detergents and care products can be purchased online via our website or via customer service (see back page).
Combination detergent
Apart from conventional detergents (Solo), a number of products are offered with additional functions. These products contain not only the detergent but also rinse-aid and salt replacement substances (3in1) and, depending on the combination (4in1, 5in1, etc.), additional components such as glass protection or stainless steel cleaner. Combination detergents function only up to a specific degree of hardness (usually 21°dH). Over this limit salt and rinse-aid must be added.
As soon as combined detergents are used, the rinse programme is adjusted automatically to ensure the best possible rinsing and drying result.
⚠ Warning – Do not place small parts for washing in the tablet collecting tray 24; this prevents the tablet from dissolving evenly.
⚠ Warning – If you want to add more utensils after the programme has started, do not use the tablet collecting tray 24 as a handle for the upper basket. The tablet could already be there and you will touch the partially dissolved tablet.
en Detergent
Notes
■ You will obtain optimum rinsing and drying results by using solo detergents and applying salt and rinse aid separately.
If programmes are short, tablets may not have full cleaning effect due to different dissolving properties and there may even be undissolved detergent residue. It is recommended to use washing powder for these programmes.
- The Intensive programme (on some models) requires one tab only. When using washing powder, you can apply some of this cleaning agent to the inside of the appliance’s door.
■ Even if the rinse-aid and/or salt refill indicator is lit, the rinse programme will run correctly with combined detergents.
If using detergents in a water-soluble protective cover: Take hold of the cover with dry hands only and put the detergent into an absolutely dry detergent dispenser only, otherwise the detergent may stick.
If you switch from combined detergents to solo detergents, ensure that the water softening system and amount of rinse aid have been set to the correct value.

Overview of programmes
The max. possible number of programmes is illustrated in this overview. The corresponding programmes and their arrangement can be found on the fascia.
| Type of utensils Type of soiling Programme Possible | additional options | Programme sequence | ||
| pots and pans, non-sensitive utensils and cutlery | very adhesive burned-in or dried-on food remnants containing starch or protein | [2K2K]Auto 65° - 75° | all | Is optimised according to the soiling with the aid of sensors. |
 Auto 45° - 65° Auto 45° - 65° | all | |||
| mixed utensils and cutlery | part dried, common household food remnants |  Auto 45° - 65° Auto 45° - 65° | all | Is optimised according to the soiling with the aid of sensors. |
 /eco /eco | all | PrerinseClean 50°Intermediate rinseFinal rinse 65°Drying | ||
| sensitive utensils, cutlery, temperature-sensitive plastic and glasses | slightly adhesive, fresh food remnants |  +W7KY] +W7KY] | IntensivZoneExpress Wash/Speed Perfect (VarioSpeed)Energy SaveHalf loadGlossy drying | Is optimised according to the soiling with the aid of sensors. |
 'Quick 45° 'Quick 45° | Glossy drying | Clean 45°Intermediate rinseFinal rinse 55° | ||
| all types of utensils | cold rinsing, intermediate cleaning |   | none Prerinse | |


Information for test institutes
Test institutes receive the information for comparability tests (e.g. according to EN60436).
These are the conditions for conducting the tests, however these are not the results or consumption values.
Request by e-mail to:
dishwasher@test-appliances.com
The product number (E no.) and the production number (FD) are required which you can find on the rating plate 34 on the appliance door.

Additional options
* depending on model
Additional options can be set with the buttons 9.

Express WashPlus/Speed PerfectPlus (rioSpeedPlus) \*
This function can reduce the running time by approx. 20% to 66% depending on the selected rinse programme. To obtain optimum cleaning and drying results at a reduced running time, water and energy consumption are increased.

Half load \*
If you have only a few items to wash (e.g. glasses, cups, plates), you can switch to "half load". This will save water, energy and time. It is recommended to put a little less detergent in the detergent dispenser than for a full load.

HygienePlus \*
This function increases the temperatures and retains them for an extra long time to obtain a defined disinfection performance. Continuous use of this function increases the hygiene status. This additional option is ideal for cleaning e.g. chopping boards and baby bottles.

Intensive zone \*
Perfect for a mixed load. You can wash very soiled pots and pans in the lower basket together with normally soiled utensils in the upper basket. The spray pressure in the lower basket is intensified, the rinsing temperature is increased slightly.

High gloss drying \*
By increasing the amount of water during the rinse cycle and extending the drying phase, stains are prevented and the drying result is improved. There is a slight increase in the energy consumption. Rinse aid is recommended for the high gloss drying function (even when using combination detergents).

Energy Save \*
Water and energy consumption can be reduced with the “Energy Save” function. The running time is extended for optimum cleaning and drying results.

Operating the appliance
Programme data
The programme data (consumption values) can be found in the summary of instructions. They refer to normal conditions and the water hardness set value H:04. Different influencing factors such as e.g. water temperature or line pressure may result in deviations.
Aqua sensor \*
* depending on model
The Aqua sensor is an optical measuring device (light barrier) which measures the turbidity of the rinsing water.
The Aqua sensor is used according to the programme. If the Aqua sensor is active, “clean” rinsing water can be transferred to the next rinse bath and water consumption can be reduced by 3–6 litres. If the turbidity is greater, the water is drained and is replaced with fresh water. In the automatic programmes the temperature and running time can also be adjusted to the degree of soiling.
Zeolith drying
The appliance features a Zeolith container Zeolith is a mineral which can store moisture and heat energy and release them again.
During the washing step this heat energy is used to dry the mineral and heat up the rinsing water.
During the drying phase moisture from the washing compartment is stored in the mineral and heat energy is released. This released heat energy is blown into the washing compartment with dry air. This accelerates and improves drying.
These processes therefore save a great deal of energy.
Caution
Please ensure that the intake opening 25 is not obstructed and do not place any temperature-sensitive utensils in the lower basket at the rear right side above the blow opening 26.
⚠ Warning – Risk of injury!
Do not touch the blow opening [26] . The blow opening becomes hot and, furthermore, any damage will result in a chargeable callout by customer service.
Switching on the appliance
- Turn on the tap fully.
- Open the door.
- Switch on ON/OFF switch 1.
The Eco 50° programme display flashes. This programme remains selected if no other programme button 2 is pressed. The expected programme duration flashes on the digital display 3.
- Press the START button 10.
- Close the door.
The programme starts running.
Note
- for environmentally friendly operation of the dishwasher:
For ecological reasons the Eco 50° programme is preset whenever the appliance starts. This conserves environmental resources and not least saves you money.
The Eco 50° programme is a particularly environmentally friendly programme. According to EU regulation 1016/2010 it is the “Standard programme” which is the most efficient standard cleaning cycle for cleaning normally soiled utensils in terms of the combined energy and water consumption for cleaning these types of utensils.
Optical display while the programme is running \*
* depending on model
While the programme is running, an optical display is indicated on the floor under the appliance door.
If the base panel is pulled forwards or if the appliance is installed at eye-level with flush furniture front, the display is not visible.
Possible settings of the optical display:
5:00 The display is switched off.
5:01 Programme, timer programming, remaining time, end of programme and, if required, low water level are displayed.
5:02 Same as 5:01. Other programme information is also displayed, e.g. the symbol for half load 12 or glass protection system active ☎.
5:01 is set at the factory.
To change the setting:
- Open the door.
- Switch on ON/OFF switch 1.
- Hold down programme button A and press START button 10 until H:0.... is indicated on the digital display.
- Release both buttons. The illuminated display of the button A flashes.
- Keep pressing programme button □A until the previously set value, e.g. 5:01, is indicated on the digital display ▢3 5:0... (for the optical display).
- Keep pressing programme button C until the required value, e.g. 5:02, is indicated on the digital display 3.
- Press START button [10]. The set value is saved.
- Close the door.
Remaining running time display
When the programme is selected, the programme running time is indicated on the digital display 3. When the programme has started, the remaining running time is displayed on the floor (only for settings 5:01 and 5:02).
The running time is determined during the programme by the water temperature, the number of utensils as well as the degree of soiling and may vary (depending on the selected programme).
Timer programming
You can delay the start of the programme in 1 hour steps up to 24 hours.
- Open the door.
- Switch on ON/OFF switch 1.
- Press the button 8 + until 01 is flaching in the timer programming display 7.
- Press + or - button until the 8 displayed time corresponds with your requirements.
- Press START button 10, timer programming is activated.
- To delete timer programming 8, press the + or - button until 00 is indicated on the digital display 7. You can change your programme selection at any time until the programme starts.
- Close the door.
End of programme
The end of the programme →1 / 0:00 is displayed on the floor – provided the optical display is switched on and is visible.
The end of the programme is also indicated by an acoustic signal. This function can be changed as follows:
- Open the door.
- Switch on ON/OFF switch 1.
- Hold down programme button A and press START button 10 until H:0.... is indicated on the digital display.
- Release both buttons.
The LED for button A flashes and the digital display 3 displays the factory setting H:04. - Press programme button A until the factory set value 6:02 is indicated on the digital display 3.
To change the setting,
- Press programme button C. Each time the button is pressed, the set value increases by one level; when the value of b:03 has been reached, the display jumps back to b:00 (off).
- Press START button 10, the set value is saved.
- Close the door.
Note
Depending on the setting for “Automatic switch off when programme ends or interior light”, the optical display is no longer or only briefly visible.
Automatic switch off after end of programme or interior light\*
* depending on model
To save energy, the dishwasher can be automatically switched off 1 min or 120 min after the programme ends.
The setting can be selected from P:00 to P:02.
P:00 Appliance does not switch off automatically.
The interior light 20 comes on when the door is opened irrespective of whether the ON/OFF switch 1 is switched on or off. When the door is closed the light is off. If the door is open for longer than 60 min., the light switches off automatically. The interior light 20 is lit only when the set value P:00 is selected.
P:01 Appliance switches off after 1 min.
P:02 Appliance switches off after 120 min.
- Open the door.
- Switch on ON/OFF switch 1.
- Hold down programme button A and press START button 10 until H:0... is indicated on the digital display.
- Release both buttons. The LED for button A flashes and the digital display 3 displays the factory setting H:04.
- Keep pressing programme button □A until the value P:0... is indicated on the numerical display 3.
To change the setting:
- Press programme button C.
Each time the button is pressed, the set value increases by one level; when the value of P:02 has been reached, the display jumps back to P:00. - Press START button 10.
The set value is saved. - Close the door.
Switching off the appliance
Short time after the end of the programme:
- Open the door.
- Switch off ON/OFF switch 1.
- Turn off the tap (not applicable if Aqua-Stop fitted).
- Remove the utensils when they have cooled down.
Note
When the programme ends, leave the appliance to cool down a while before opening it. This will prevent steam from escaping and causing long-term damage to your built-in furniture.
Interrupting the programme
- Open the door.
-
Switch off ON/OFF switch 1.
The LEDs go out. The programme is saved.
If the door was opened on an appliance which has a warm water connection or is heated, first leave the door ajar for several minutes and then close. Otherwise, expansion (pressure) may cause the appliance door to spring open or water to run out of the appliance. -
To continue the programme, switch on the ON/OFF switch 1 again.
- Close the door.
Terminating the programme (Reset)
- Open the door.
- Press START button 10 for approx. 3 sec. The numerical display 3 indicates 0:0 1.
- Close the door. The programme sequence lasts approx. 1 min. On the digital display ☐ 3 is indicated 0:00.
- Open the door.
- Switch off ON/OFF switch 1.
- Close the door.
Changing the programme
When the START button 10 has been pressed, the programme cannot be changed.
The only way a programme can be changed is by Cancel programme (Reset).
Intensive drying
The final rinse uses a higher temperature which improves the drying result. The running time may increase slightly. (Caution if utensils are delicate!)
- Open the door.
- Switch on ON/OFF switch 1.
-
Hold down programme button □A and press START button □10 until H:0.... is indicated on the digital display.
-
Release both buttons. The LED for button A flashes and the digital display 3 displays the factory setting H:04.
- Press programme button A until the factory set value d:00 is indicated on the digital display 3.
To change the setting,
- Press the button C to switch the Intensive drying on d:01 or off d:00.
- Press START button [10]. The set value is saved.
- Close the door.

Cleaning and maintenance
A regular inspection and maintenance of your machine will help to prevent faults. This saves time and prevents problems.
Overall condition of the machine
■ Check spray arm for grease and limescale deposits.
If you find such deposits:
- Fill detergent dispenser with detergent. Start the appliance without utensils in the programme with the highest rinsing temperature.
Clean the appliance with detergents/appliance cleaners which are particularly suitable for use with dishwashers.
en
Cleaning and maintenance
■ To ensure that the door seal always remains clean and hygienic, regularly clean it with a damp cloth and a little washing-up liquid.
If the appliance is switched off for a prolonged period, leave the door ajar to prevent the formation of an unpleasant odour.
Never use a steam cleaner to clean your dishwasher. The manufacturer is not liable for any consequential damage.
Regularly wipe the front of the appliance and fascia with a damp cloth; water and a little washing up liquid are adequate. Do not use sponges with a rough surface or abrasive detergents, as these could scratch the surfaces.
Stainless steel appliances: To prevent corrosion, avoid using sponge cloths or wash them out thoroughly several times before using for the first time.

Warning – Health hazard
Never use other domestic detergents, e.g. containing chlorine!
Special salt and rinse aid
- Check the refill indicators 5 and 6. If required, refill salt and/or rinse aid.
Filters
The filters 29 keep large foreign objects in the rinsing water away from the pump. These foreign objects may occasionally block the filters.
The filter system consists of a coarse filter, a flat fine filter and a microfilter.
- After each washing cycle check the filters for residue.
- Unscrew filter cylinder as illustrated and take out filter system.
natural_image
Mechanical component diagram showing a rotating assembly with a central hub and fan base (no text or symbols)
natural_image
Mechanical assembly diagram showing a bolted joint inserted into a cylindrical housing with a downward arrow indicating force or motion (no text or symbols present)- Remove any residue and clean filters under running water.
- Re-install filter system in reverse sequence and ensure that the arrow marks are opposite each other after closing the filter system.
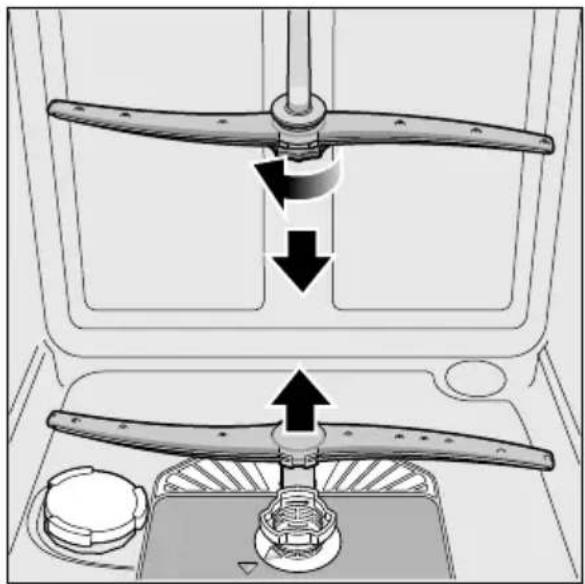
Spray arms
Limescale and contaminants in the rinsing water may block nozzles and bearings on the spray arms 23 and 27.
- Check outlet nozzles on the spray arms for blockages.
- Unscrew the upper spray arm 23 .
- Remove the lower spray arm 27 upwards.

natural_image
Diagram of a mechanical device with two propellers and directional arrows indicating motion (no text or symbols)- Clean spray arms under running water.
- Re-engage or screw on spray arms.

Fault, what to do?
Experience has shown that you can rectify most faults which occur in daily operation yourself. This ensures that the machine is quickly available to you again. In the following overview you can find possible causes of malfunctions and helpful information for rectifying them.
Note
If the appliance stops during dishwashing or does not start for no obvious reason, first run the Abort programme function (Reset). (See chapter entitled “Operating the appliance”)

Warning – Don't forget: Repairs may be carried out by technicians only. If a component has to be replaced, ensure that only original spare parts are used. Improper repairs or use of non-original spare parts may cause considerable damage and put the user at considerable risk.
en Fault, what to do?
Waste water pump
Large food remnants or foreign objects which were not captured by the filters may block the waste water pump. The rinsing water will then be above the filter.
⚠ Warning – Risk of cuts!
When cleaning the waste water pump, ensure that you do not injure yourself on pieces of broken glass or pointed implements.
In this case:
- First always disconnect the appliance from the power supply.
- Take out top basket 22 and bottom basket 30 .
- Remove the filters 29.
- Scoop out water, use a sponge if required.
- Prise out the white pump cover (as illustrated) using a spoon. Grip the cover on the crosspiece and lift diagonally inwards. Remove cover completely.

natural_image
Mechanical assembly diagram showing a tool interacting with a circular component (no text or symbols visible)- Check impeller wheel and remove any foreign objects.
- Place cover in the original position and press down until it engages (click).

natural_image
Cross-sectional diagram of a mechanical device with arrows indicating motion or force direction (no text or symbols)- Install filters.
- Re-insert baskets.
Fault table
Fault Cause Remedial action
| "Check water supply" display 4 lights up. | Supply hose kinked. Install supply hose without kinks. | |
| Tap turned off. Turn the tap on. | ||
| Tap jammed or calcified. Turn the tap on. | Flow rate must be min. 10 l/min. when water supply is open. | |
| Filter in the water supply blocked. Switch off the appliance and pull out the mains plug. Turn off the tap. Unscrew water connection. | ||
 | ||
| Clean filter in the supply hose. Screw water connection on again. Check for leaks. Reconnect power supply. Switch on the appliance. | ||
| Error code E:07 is lit. | Intake opening (on right inside of appliance) covered by utensils. | Arrange utensils so that the intake opening is not obstructed. |
| Error code E:12 is lit. | Heating element calcified or soiled. | Clean appliance with dishwasher cleaning agent or descaler. Operate the dishwasher with water softening system and check the setting (see chapter "Water softening system/Special salt"). |
| Error code E:22 is lit. | Filters [29] are soiled or blocked. | Clean filters.(see "Cleaning and maintenance"). |
| Error code E:24 is lit. | Waste-water hose kinked or blocked. | Install hose without kinks, remove any residue. |
| Siphon connection still sealed. Check connection to siphon and open if required. | ||
| Cover on the waste water pump loose. | Lock cover correctly.(See "Waste water pump") | |
| Error code E:25 is lit. | Waste water pump blocked or cover on the waste water pump is not locked in position. | Clean pump and lock cover correctly. (See "Waste water pump") |
| Error code E:27 is lit. | Mains voltage too low. | Not an appliance fault, have the mains voltage and electrical installation checked. |
| Fault Cause Remedial action | ||
| A different error code is indicated on the digital display.(E:01 to E:30) | A technical fault has probably occurred. | Switch off appliances with the ON/OFF switch 1. After a short time restart the appliance.If the problem recurs, turn off the tap and pull out the mains plug.Call customer service and mention the error code. |
| Display flashes. Door not closed properly. Close the door. Ensure that no objects (utensil, fragrance dispenser) are protruding over the basket and preventing the door from closing. | ||
| Refill indicator for salt 5and/or rinse-aid 6 is lit. | No rinse aid. Refill rinse aid. | |
| No salt. Refill with special salt. | ||
| Sensor does not detect salt tablets. | Use different special salt. | |
| Refill indicator for salt 5and/or rinse-aid 6 is not lit. | Refill indicator switched off. Activation/deactivation (see chapter Water softening system/Special salt or Rinse aid). | |
| There is still enough special salt/ rinse aid available. | Check refill indicator, levels. | |
| Water is left in the appliance at the end of the programme. | Filter system or area under the filters 29 is blocked. | Clean filters and area underneath (see “Waste water pump”). |
| Program has not ended yet. Wait until programme ends or reset (see “Terminating the programme”). | ||
Fault Cause Remedial action
| Utensils not dry. No or too little rinse aid in the dispenser. | Refill rinse aid. | |
| Programme selected without drying. | Select programme with drying (see “Overview of programmes”, “Programme sequence”). | |
| Water collecting in depressions on the utensils and cutlery. | Arrange utensils in a sloping position, arrange affected utensils as sloping as possible. | |
 |  | |
| The combined detergent used has a poor drying performance | Use different combination detergent with better drying performance. Use of rinse aid also increases the drying performance. | |
| Intensive drying to increase drying not activated. | Activate intensive drying (see “Operating the appliance”) | |
| Utensils were removed too early or drying process had not ended yet. | Wait until program ends or wait until 30 min after program ends before removing utensils. | |
| The eco rinse aid used has a poor drying performance. | Use a proprietary rinse aid. Eco products are much less effective. | |
| Plastic utensils not dry. Special properties of plastic. Plastic has a lower heat storage capacity and therefore dries less well. | ||
| Cutlery not dry. Cutlery not arranged properly in the cutlery basket. | Separate cutlery if possible, prevent contact points. | |
| Cutlery not arranged properly in the cutlery drawer. | Arrange cutlery properly and separate if possible. | |
| Appliance interior wet after rinse cycle. | No appliance fault On account of the “Condensation drying” principle, water droplets are physically induced and required in the container. The humidity in the air condenses on the inner walls of the dishwasher, drains and is pumped out. | |
Fault Cause Remedial action
| Food remnants on the utensils. | Utensils placed too closely together, utensils basket overfilled. | Arrange utensils with adequate clearance between them ensuring that the spray jets can reach the surface of the utensils. Prevent contact points. |
| Spray arm rotation obstructed. Arrange utensils so that the spray arm can rotate without obstruction. | ||
| Spray arm nozzles are blocked. Clean the spray arm nozzles, (see “Cleaning and maintenance”). | ||
| Filters 29 dirty. Clean filters (see “Cleaning and maintenance”). | ||
| Filters 29 inserted incorrectly and/or not engaged. | Insert and engage filters correctly. | |
| Rinse programme too weak. Select a more intensive rinse programme. | ||
| Utensils precleaned too intensely; sensors therefore decide on weak programme sequence. Stubborn soiling cannot be completely removed. | Do not prerinse utensils. Remove only large food remnants. Recommended programme Eco 50° or Intensive. | |
| Tall narrow receptacles in corner areas are not rinsed adequately. | Do not place hollow receptacles too obliquely and do not place in the corner area. | |
| Top basket 22 on right and left not set to same height. | Set top basket to same height using side levers. | |
| Detergent residue. Detergent dispenser cover blocked by utensils and therefore does not open fully. | Detergent dispenser cover must not be obstructed by utensils. Do not place utensils or fragrance dispenser in the tablet collecting tray. | |
| Tablet must be inserted flat and not upright. | ||
| Tablets used in the quick or short programme. Dissolving time of the detergent is not reached in the selected short programme. Use a detergent powder or select a more intensive programme. | ||
| Washing effect and dissolving performance are reduced after a prolonged storage time or detergent is very lumpy. Change detergent. | ||
Fault Cause Remedial action
| Water stains on plastic parts. | Droplet formation on plastic surface is physically unavoidable. After drying, water stains are visible. | Use a more intensive programme (more water changes). Arrange utensils in a sloping position. Use rinse aid. If required, increase softening setting. |
| Washable or water-soluble coatings in the container or on the door. | Detergent substances are deposited. These coatings cannot usually be removed with chemicals (appliance cleaner, ...). | Change detergent brand. Clean appliance mechanically. |
| If there is a “white coating” on the container floor, the water softening system has been set marginally. | Increase softening setting and change detergent if required. | |
| Salt dispenser cover 28 not closed. | Close salt dispenser cover correctly. | |
| Only for glasses: Initial glass corrosion - can only apparently be wiped off. | See “Glass and utensil damage”. | |
| White, stubborn coatings; limescale on the utensils, container or door. | Detergent substances are deposited. These coatings cannot usually be removed with chemicals (appliance cleaner, ...). | Change detergent brand. Clean appliance mechanically. |
| Hardness range incorrectly set or water hardness greater than 8.9 mmol/l. | Set water softening system according to instructions for use or top up salt. | |
| 3 in 1 detergent or bio/eco detergent not effective enough. | Set water softening system according to instructions for use or use separate detergents (proprietary detergent, salt, rinse aid). | |
| Underdosing of detergent. Increase detergent dosage or change detergent. | ||
| Too weak rinse programme selected. | Select a more intensive rinse programme. | |
| Tea or lipstick residue on the utensils. | Too low rinsing temperature. Select programme with higher washing temperature. | |
| Too little or unsuitable detergent. Use suitable detergent at correct dosage. | ||
| Utensils precleaned too intensely; sensors therefore decide on weak programme sequence. Stubborn soiling cannot be completely removed. | Do not prerinse utensils. Remove only large food remnants. Recommended programme Eco 50° | |
Fault Cause Remedial action
| Coloured (blue, yellow, brown), difficult to remove to non-removable coatings in the appliance or on stainless steel utensils. | Film formation consisting of ingredients from vegetables (e.g. cabbage, celery, potatoes, noodles, ...) or the tap water (e.g. manganese). | Can be partly removed with machine cleaner or by mechanical cleaning. Coatings are harmless. |
| Film formation caused by metallic components on silver or aluminium utensils. | Can be partly removed with machine cleaner or by mechanical cleaning. | |
| Coloured (yellow, orange, brown), easily removable deposits inside the appliance (mainly in the floor area) | Film formation consisting of ingredients from food remnants and substances from the tap water (limescale), “soapy” | Check function of the water softening system (refill with salt) or, if using combined detergents (tablets), activate water softening system (see chapter “Water softening system/Special salt”) |
| Discolouration of the plastic parts inside the appliance. | Plastic parts inside the appliance may become discoloured during the service life of the dishwasher. | Discolouration is normal and will not impair the function of the dishwasher. |
| Plastic parts discoloured. Too low rinsing temperature. Select programme with higher washing temperature. | ||
| Removable streaks on glasses, glasses with metallic appearance and cutlery. | Too much rinse aid. Set rinse aid amount to lower setting. | |
| No rinse aid added or setting too low. | Add rinse aid and check dosage (recommended setting 4–5). | |
| Detergent residue in the final rinse programme section. Detergent dispenser cover blocked by utensils (cover does not open fully). | Detergent dispenser cover must not be obstructed by utensils. Do not place utensils or fragrance dispenser in the tablet collecting tray. | |
| Utensils precleaned too intensely; sensors therefore decide on weak programme sequence. Stubborn soiling cannot be completely removed. | Do not prerinse utensils. Remove only large food remnants. Recommended programme Eco 50° | |
Fault Cause Remedial action
| Initial or existing, irreversible clouding of glass. | Glasses not dishwasher-proof, only suitable for dishwasher. | Use dishwasher-proof glasses.Avoid long steam phase (standing time after wash cycle ends).Use wash cycle at lower temperature.Set water softening system according to the water hardness (if required one setting lower).Use detergent with glass protection component. | |
| Rust spots on the cutlery. Cutlery not adequately rust-resistant. Knife blades are frequently more severely affected. | Use corrosion-resistant cutlery. | ||
| Cutlery will also rust if rusting parts are rinsed at the same time (pan handles, damaged utensil baskets, etc.). | |||
| Salt content in the rinsing water too high, as salt dispenser lock not fastened firmly or salt was spilled while being refilled. | |||
| Appliance does not start. The mains fuse has tripped. Check mains fuse. | |||
| Power cord not inserted. Ensure that the power cord is plugged all the way into the back of the appliance and into the socket. Check that the socket functions. | |||
| The appliance door has not been shut properly. | |||
| Programme starts automatically. | You did not wait until programme ended. | Perform reset.(See “Terminating the programme”). | |
| The door is difficult to open. | Child lock is activated. Deactivate child lock. (See instructions for use at the back) | ||
| Door cannot be closed. Door lock has been activated. Close door with increased force. | |||
| Door cannot be closed due to installation. | |||
| Cover on the detergent dispenser cannot be closed. | Detergent dispenser or cover guide blocked by sticky detergent residue. | Remove detergent residue. | |
| Fault Cause Remedial action | |||
| Detergent residue in the detergent dispenser or in the tablet collecting tray. | Spray arms blocked by utensils, therefore detergent is not rinsed out. | Ensure that the spray arms can rotate freely. | |
| The detergent dispenser was damp when filled. | Pour detergent into the dry detergent dispenser only. | ||
| Appliance stops in the programme or programme is interrupted. | Door not closed properly. Close the door. | ||
| Do not place utensils or fragrance dispenser in the tablet collecting tray.Top basket presses against the door and prevents door from being closed securely. | Check whether rear panel is being pressed in, e.g. by socket or by hose holder which has not been removed. | ||
| Power and/or water supply interrupted. | Restore power and/or water supply. | ||
| Filling valves making striking noises. | Depends on domestic installation, as appliance is not defective. No effect on appliance function. | No remedial action possible. | |
| Knocking or rattling noise. | Spray arm strikes the utensils, utensils not positioned correctly. | Position utensils so that the spray arms do not strike the utensils. | |
| If there is a low load, the water jets strike the washing tank directly. | Load the appliance with more utensils or distribute the utensils more evenly in the dishwasher. | ||
| Light utensils move during the wash cycle. | Arrange light utensils securely. | ||
| Unusual foam formation. | Handwash liquid in the rinse aid dispenser. | Immediately refill rinse aid dispenser with rinse aid. | |
| Rinse aid spilled. Remove rinse aid with a cloth. | |||

Customer service
If you are unable to rectify the fault, please contact your customer service. We always find a suitable solution, even to avoid unnecessary visits by technicians. Contact information for your nearest customer service can be found on the back of these instructions for use or on the enclosed customer service list. When calling, please state the appliance number (E-Nr. = 1) and the production number (FD = 2) which can be found on the rating plate 34 on the appliance door.
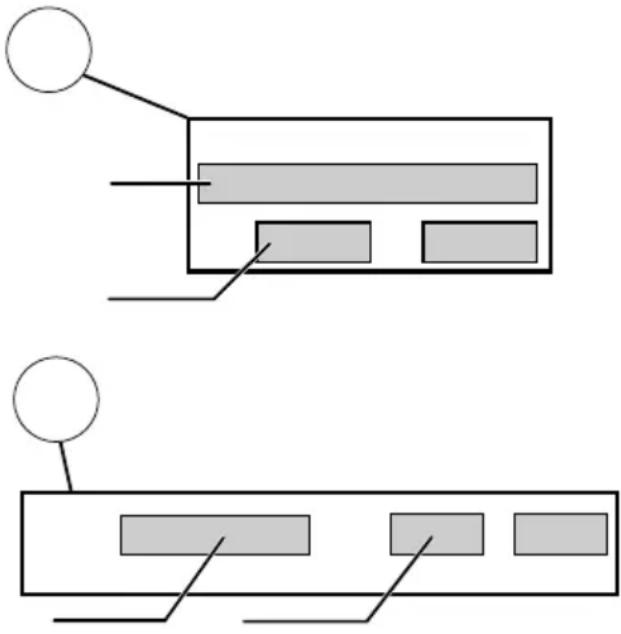
Rely on the competence of the manufacturer. Contact us. You can therefore be sure that the repair is carried out by trained service technicians who carry original spare parts for your domestic appliances.
* depending on model

Installation and connection
The dishwasher must be connected correctly, otherwise it will not function properly. The specifications for the inlet and outlet as well as the electrical connected loads must correspond with the required criteria as specified in the following paragraphs or in the installation instructions.
Install the appliance in the correct sequence:
- Checking appliance on delivery
- Installing the appliance
- Waste water connection
- Drinking water connection
- Electrical connection
Product package
If you have any complaints, contact the dealer where you purchased the appliance or our customer service.
■ Dishwasher
■ Instructions for use
■ Installation instructions
Warranty*
■ Installation materials
■ Steam guard plate*
■ Rubber apron*
Power cord
* depending on model
Safety instructions
Please follow the safety instructions under "Installation".
Delivery
Your dishwasher has been checked thoroughly in the factory to ensure that it is in working order. This may cause small water stains. These will disappear after the first wash cycle.
Technical specifications
Weight:
max. 60 kg
Voltage:
220–240 V, 50 Hz or 60 Hz
Connected load:
2.0–2.4 kW
Fuse:
10/16 A (UK 13A)
Power input:
switched off 0.50 W
not switched off 0.50 W
Water pressure:
at least 0.05 MPa (0.5 bar), maximum 1 MPa (10 bar). At a higher water pressure: connect pressure-reducing valve ahead.
Inlet rate:
minimum 10 litres/minute
Water temperature:
cold water; hot water max. temperature 60^ C.
Capacity:
12–15 place settings (depending on model).
Installation
The required installation dimensions can be found in the installation instructions. Level the appliance with the aid of the height-adjustable feet. Ensure that the appliance is situated securely on the floor.
■ A built-under or integrated appliance which is installed subsequently as a free-standing appliance must be secured to prevent it from overturning, e.g. by screwing it to the wall or by installing it under a continuous worktop which is screwed to adjacent cupboards.
■ The appliance can easily be installed in a fitted kitchen between wooden and plastic walls.
Waste-water connection
-
The required work sequence can be found in the installation instructions. If required, fit a siphon with an drainage connection.
-
Connect the waste-water hose to the drainage connection of the siphon with the enclosed parts.
Ensure that the drainage hose is not kinked, crushed or twisted and that there is no cover plate in the drainage to prevent the waste water from flowing out!
Drinking water connection
- Fasten the drinking water connection to the tap according to the installation instructions using the enclosed parts. Ensure that the drinking water connection is not kinked, crushed or twisted.
- When replacing the appliance, always use a new water supply hose.
Water pressure:
At least 0.05 MPa (0.5 bar), maximum 1 MPa (10 bar). At a higher water pressure: connect pressure-reducing valve ahead.
Inlet rate:
Minimum 10 litres/minute
Water temperature:
Cold water; hot water max. temperature 60 °C.
Warm water connection \*
* depending on model
The dishwasher can be connected to cold or hot water up to max. 60 °C.
Connection to hot water is recommended if the hot water can be supplied by energetically favourable means and from a suitable installation, e.g. solar heating system with circulation line.
This will save energy and time.
The hot water setting R:01 allows you to adjust your appliance optimally to operation with hot water.
It is recommended to have a water temperature (temperature of the incoming water) of at least 40 °C and no more than 60 °C.
It is not recommended to connect the appliance to hot water if the water is supplied from an electric boiler.
Setting hot water:
- Open the door.
- Switch on ON/OFF switch 1.
- Hold down programme button □A and press START button □10 until H:0... is indicated on the digital display.
- Release both buttons.
The LED for button A flashes and the digital display 3 displays the factory setting H:04.
- Press programme button A until the factory set value R:00 is indicated on the digital display 3.
To change the setting:
- By pressing the C button, you can switch the hot water setting off R:00 or on R:01.
- Press START button 10. The set value is saved.
- Close the door.
Electrical connection
■ Connect the appliance to an alternating current only, ranging from 220 V to 240 V and 50 Hz or 60 Hz via a correctly installed socket with protective earth conductor. See rating plate for required fusing 34.
■ The socket must be near the appliance and freely accessible following installation.
If the plug is not freely accessible, an allpole disconnector with a contact opening of at least 3 mm must be fitted on the installation side to satisfy the relevant safety instructions.
■ The connection may be modified by technicians only.
■ A power cord extension may be purchased from customer service only.
en
Installation and connection
■ Use only a residual current operated circuit-breaker which features the symbol 📂. Only this extension guarantees compliance with the currently valid regulations.
■ The appliance features a water damage protection system. Please note the system will not function unless the power supply is connected.
Removing the appliance
Also observe
the sequence of worksteps here.
- Disconnect the appliance from the power supply.
- Turn off the water supply.
- Undo the waste water and drinking water connection.
- Loosen fastening screws for the furniture parts.
- If fitted, remove the base panel.
- Pull out the appliance, carefully pulling the hose behind.
Transportation
Empty the dishwasher and secure loose parts.
Drain the appliance according to the following steps:
- Turn on the tap.
- Open the door.
- Switch on ON/OFF switch 1.
-
Select programme with the highest temperature.
The expected programme duration is indicated on the numerical display 3. -
Press START button 10.
- Close the door. Programme sequence starts.
- Open door after approx. 4 minutes.
- Press START button 10 until 0:01 is indicated on the digital display.
- Close the door.
- Open door after approx. 1 minute.
The numerical display indicates 0:00.
11.Switch off ON/OFF switch 1. - Turn off the tap, disconnect supply hose and drain water.
Transport appliance upright only.
(This prevents residual water from running into the machine control and damaging the programme sequence.)
Protection against frost
If the appliance is in a room where there is a risk of frost (e.g. holiday home), empty the appliance completely (see Transportation).
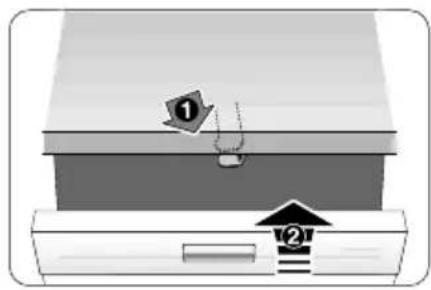
text_image
Diagram showing two labeled components (① and ②) with arrows indicating movement or flow, likely illustrating a process or system.40

text_image
Diagram showing hands installing a component with numbered labels and directional arrows indicating process flow41

text_image
Diagram showing a hand pressing a button labeled with numbers 1 and 2 on a cabinet or shelf, indicating a step in a procedure.42

natural_image
Diagram showing a kitchen appliance with a computer monitor and a close-up of its interior, illustrating the process of lifting or removing weights (no text or symbols present)
natural_image
Interior view of a kitchen appliance with a white rack unit and metal fixtures (no text or symbols visible)
natural_image
Composite image showing a washing machine with open lid and kitchen utensils, alongside a modern white corrugated dish (no text or symbols visible)
text_image
- 35-45° auto + eco 45-65° 65-75° 50°SM...
SB...

BOSCH

text_image
Diagram of a device control panel with labeled ports and digital display showing 108 and 24 microcontroller units
text_image
Diagram of a multi-chamber refrigerator with labeled internal compartments and external casingTable of contents

Intended use 4

Safety instructions .... 4
Before you switch ON the appliance 4
Delivery....5
Installation. 5
In daily use 6
Door lock 6
Damage 6
Disposal 6

Protection of the environment 8
Packaging....8
Old appliances 8

Getting to know your appliance 9
Control panel 9
Appliance interior 9
Overview of menu. 9

Water softening system/ Special salt 10
Setting 10
Water hardness table ..... 10
Using special salt 10
Detergents with salt component .... 11
Switching off water softening system.... 11

Rinse aid 11
Setting amount of rinse aid. . . . . . . 12
Switching off rinse aid refill indicator 12

Utensils 13
Not suitable.... 13
Glass and utensil damage ..... 13
Loading the dishwasher ..... 13
Unloading the dishwasher ..... 13
Cups and glasses. 14
Pans 14
Cutlery drawer....15
Folding spikes 15
Small accessories holder ..... 15
Adjusting the height of the basket . . 16

Detergent 16
Adding detergent 17
Combination detergent ..... 17

Overview of programmes .... 19
Programme selection ..... 19
Information for test institutes ..... 20

Additional options .....20
Express WaschPlus/
SpeedPerfectPlus
(VarioSpeedPlus) 20
Half load 20
HygienePlus 20
Intensive zone 20
High gloss drying ..... 20
Energy Save 20

Operating the appliance .....21
Programme data ..... 21
Aqua sensor 21
Zeolith drying 21
Switching on the appliance. . . . . . . 22
Optical display while the programme is running ..... 22
Remaining running time display . . . . 23
Timer programming 23
End of programme 23
Automatic switch off / interior light . . 24
Switching off the appliance. . . . . . . 24
Interrupting the programme ..... 24
Terminating the programme ..... 25
Changing the programme. . . . . . . . 25
Intensive drying. 25

Cleaning and maintenance... 25
Overall condition of the machine ... 25
Special salt and rinse aid ..... 26
Filters 26
Spray arms 27

Fault, what to do? 27
Waste water pump 28
Fault table....29

Customer service .... 37

Installation and connection .. 37
Product package 37
Safety instructions. 37
Delivery....38
Technical specifications ..... 38
Installation. 38
Waste-water connection ..... 38
Drinking water connection ..... 39
Warm water connection ..... 39
Electrical connection....39
Removing the appliance ..... 40
Transportation. 40
Protection against frost
(Emptying the appliance) ..... 40

Intended use
■ This appliance is intended for use in the home and the home environment.
■ Use the dishwasher only in the household and only for its designed purpose: for washing domestic dishes.

Safety instructions
Children from 8 years of age or people whose physical, sensory or mental abilities or their lack of experience or knowledge prevent them from using the appliance safely must not use this appliance without supervision or instruction by a responsible person.
Before you switch ON the appliance
Please read the operating and installation instructions carefully. They contain important information on how to install, use and maintain the appliance.
Retain all documents for subsequent use or for the next owner.
Delivery
- Check the packaging and dishwasher immediately for damage caused in transit. Do not switch on a damaged appliance, but contact your supplier.
- Please dispose of the packaging material in an environmentally friendly manner.
- Do not let children play with packaging and its parts. There is a risk of suffocation from collapsible boxes and film.
Installation
■ Following installation, ensure that the back of the dishwasher is not freely accessible (protection against contact due to hot surface).
■ Install and connect the appliance according to the installation and assembly instructions.
■ Prior to installation, disconnect the dishwasher from the power supply.
■ Ensure that the protective conductor system of the domestic supply has been correctly installed.
■ The electrical connection conditions must correspond with the specifications on the dishwasher rating plate 34.
If the power cord of this appliance is damaged, it must be replaced with a particular power cord. To prevent injury, the power cord may be purchased from customer service only.
■ If the dishwasher is installed in a high-sided unit, the unit must be secured properly.
If the dishwasher is installed below or above other domestic appliances, follow the information for installation in combination with a dishwasher in the installation instructions for the particular appliances.
■ Also follow the installation instructions for the dishwasher to ensure that all appliances are operated safely.
If there is no information or if the installation instructions do not include the appropriate information, contact the manufacturer of these appliances to ensure that the dishwasher can be installed above or below these appliances.
■ If you cannot obtain any information from the manufacturer, you must not install the dishwasher above or below these appliances.
■ If you install a microwave oven above the dishwasher, the microwave oven may be damaged.
■ Install built-under or integratable appliances only under continuous worktops which have been screwed to adjacent cupboards to ensure stability.
- Do not install the appliance near heat sources (radiators, heat storage tanks, cookers or other appliances which generate heat) and do not install under a hob.
■ After installing the appliance, ensure that the plug is easily accessible.
(See Electrical connection)
■ Some models:
The plastic housing on the water connection contains an electric valve, the connecting cables are in the supply hose. Do not cut through this hose, do not immerse the plastic housing in water.
In daily use
Read and observe the safety information and instructions for use on the packaging for cleaning and rinsing agents.
Childproof lock (door lock) \*
The description of the childproof lock is at the back in the envelope.
* depending on model
Damage
■ The appliance may be repaired and opened up by a technician only. To do this, disconnect the appliance from the power supply. Pull out the mains plug or switch off the fuse. Turn off the tap.
If the appliance is damaged, especially the fascia (cracks, holes, broken buttons), or the door function is impaired, stop operating the appliance. Pull out mains plug or switch off fuse. Turn off tap, call customer service.
Disposal
- Make redundant appliances unusable to prevent subsequent accidents.
- Dispose of the appliance in a n environmentally friendly manner.
⚠ Warning Risk of injury!
■ To prevent injuries, e.g. caused by stumbling, open the dishwasher only briefly in order to load and unload the dishwasher.
■ Knives and other utensils with sharp points must be placed horizontally in the cutlery drawer.
■ Do not lean or sit on the open door.
■ In the case of free-standing appliances, ensure that the baskets are not overloaded.
If the appliance is not in a cavity and a side panel is accessible, the door hinge area must be covered at the side for reasons of safety (risk of injury). The covers are available as optional accessories from customer service or specialist outlets.
⚠ Warning Risk of explosion!
Do not add any solvents to the washing chamber. Danger of explosion!
⚠ Warning Risk of scalding!
Open the door carefully when the programme is still running. There is a risk of hot water spraying out of the appliance.
⚠ Warning Risks to children!
If fitted, use the childproof lock. An exact description can be found in the back of the envelope.
■ Do not allow children to play with or operate the appliance.
- Keep children away from detergents and rinse aid. These may cause chemical burns in the mouth, throat and eyes or asphyxiation.
- Keep children away from open dishwasher. There may be small parts in the dishwasher which children could swallow and the water inside the dishwasher is not drinking water as it may contain detergent residue.
■ Ensure that children do not place fingers in the tablet collecting tray 24. Small fingers could become caught in the slots.
■ When opening and closing the door on an eye-level appliance, ensure that children do not become jammed or crushed between the appliance door and the cupboard door below.
■ Children could become locked in the appliance (danger of suffocation) or get into another dangerous situation.
Redundant appliances: Pull out the mains plug, sever and dispose of the power cord. Destroy the door lock so that the door can no longer be closed.

Protection of the environment
Both the packaging of new appliances and the old appliances themselves contain valuable raw materials and recyclable materials.
Please dispose of the individual parts separated according to type.
Please ask your dealer or inquire at your local authority about current means of disposal.
Packaging
All plastic parts of the appliance are identified with internationally standardised abbreviations (e.g. >PS< polystyrene). Therefore, plastic waste can be sorted out when the appliance is being disposed of.
Please follow the safety instructions under "Delivery".
Old appliances
Please follow the safety instructions under "Disposal of your appliance".
This appliance is labelled in accordance with European Directive 2012/19/EU concerning used electrical and electronic appliances (waste electrical and electronic equipment - WEEE). The guideline determines the framework for the return and recycling of used appliances as applicable throughout the EU

Getting to know your appliance
Diagrams of the control panel and the interior of the appliance can be found in the envelope at the front.
Individual positions are referred to in the text.
Control panel
1 ON/OFF switch
2 Programme buttons **
3 Digital display
4 Display "Check water supply"
5 Salt refill indicator
6 Rinse aid refill indicator
7 Timer programming display
8 Timer programming
9 Additional options **
10 START button
11 Door opener
** Number depending on model
Appliance interior
20 Interior light *
21 Cutlery drawer
22 Top basket
23 Top spray arm
24 Tablet collecting tray
25 Intake opening
26 Blow opening (Zeolith container)
27 Bottom spray arm
28 Dispenser for special salt
29 Filters
30 Bottom basket
31 Dispenser for rinse aid
32 Detergent dispenser
33 Lock for detergent dispenser
34 Rating plate
* depending on model
Overview of menu
The settings can be found in the individual chapters.
H Water Hardness H:00 - H:07
d Intensive drying d:00 - d:01
- Rinse aid r:00 - r:05
A Hot water R:00 - R:01
b End of programme buzzing sound
b:00 - b:03
P Automatic disconnection 800 - P:02
5 Optical display while the programme is running 5:00-5:02

Water softening system/Special salt
To ensure good washing results, the dishwasher requires soft water, i.e. containing low amounts of lime, otherwise white limescale will be deposited on the utensils and inner container.
Tap water above 1.2 mmol/l must be softened. The water is softened with special salt (regeneration salt) in the water softening system of the dishwasher.
The setting and therefore the required amount of salt depends on the degree of hardness of your tap water (see table).
Setting
The amount of salt dispensed can be set from H:00 to H:07.
Salt is not required at the set value H:00.
- Find out about the hardness value of your tap water. Your water utility company will help you with this.
- Set value can be found in the water hardness table.
- Open the door.
- Switch on ON/OFF switch 1.
- Hold down programme button A and press START button 10 until H:0.... is indicated on the digital display.
- Release both buttons. The LED for button A flashes and the digital display 3 displays the factory setting H:04.
To change the setting:
- Press programme button C. Each time the button is pressed, the set value increases by one level; when the value of H:07 has been reached, the display jumps back to H:00 (off).
- Press START button 10. The chosen setting has now been stored.
- Close the door.
Water hardness table

flowchart
graph TD
    A["Top Row: White Arrow"] --> B["Bottom Row: Black Block"]
    C["Right Row: Black Block"] --> D["Bottom Row: Black Block"]
    E["Left Row: White Arrow"] --> F["Right Row: Black Block"]
Using special salt
Always refill with special salt immediately before switching on the appliance. This ensures that overrun special salt solution is immediately washed out and does not corrode the rinsing tank.
- Open the screw-type cap of the compartment [28].
- Fill the tank with water (only required when switching on the appliance for the first time).
- Then add dishwasher salt (not table salt or tablets).
The water is displaced and runs out. As soon as the salt refill indicator 5 on the fascia is lit, top up the salt.

natural_image
Illustration of a conveyor belt system with granular material being inserted into a funnel (no text or symbols visible)* depending on model
Using detergents with salt component
If combined detergents with a salt component are used, salt can usually be omitted up to a water hardness of 21^ dH ( 37^ fH, 26^ Clarke, 3.7 mmol/l). If the water hardness is over 21^ dH, special salt must be used.
Switching off salt refill indicator/ water softening system
If the salt refill indicator 5 is impaired (e.g. when using combined detergents containing salt component), it can be switched off.
■ Proceed as described under "Adjusting the water softening system" and set the value to H:00. The water softening system and salt refill indicator are now switched off.
Caution
Never fill the salt dispenser with detergent. You will destroy the water softening system.

Rinse aid
As soon as the rinse-aid refill indicator 6 is lit on the fascia, there is still a rinse-aid reserve of 1-2 rinsing processes. Refill with rinse aid.
The rinse aid is required for stain-free utensils and clear glasses. Use only rinse aid for domestic dishwashers.
Combined detergents with rinse-aid component may be used up to a water hardness of 21^ dH ( 37^ fH, 26^ Clarke, 3.7 mmol/l) only. If the water hardness is over 21^ dH, rinse aid must be used.
en Rinse aid
- Open the dispenser 31 by pressing and lifting the plate on the cover.
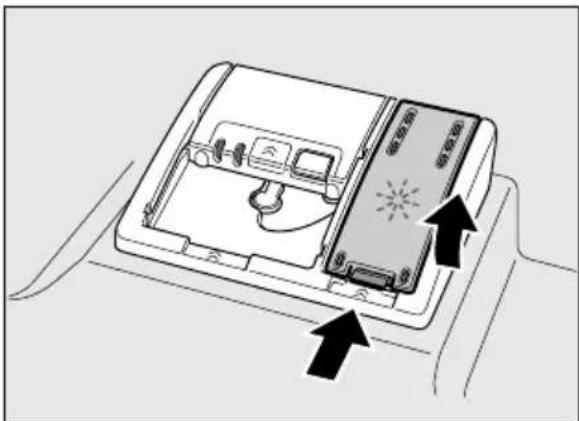
natural_image
Diagram of a device with two arrows indicating directional movement or operation, no text or symbols present.- Carefully pour rinse aid up to the max. mark in the filler opening.
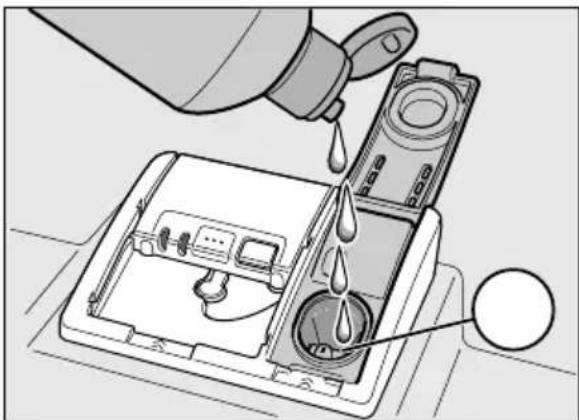
natural_image
Illustration of a hand pouring liquid into a device with a magnified inset showing internal components (no text or symbols)-
Close cover until it clicks shut.
-
To prevent excessive foam formation during the next rinse cycle, remove any rinse aid which has run over with a cloth.
Setting amount of rinse aid
The amount of rinse aid can be set from r:00 to r:05. Please set rinse aid on r:05 to obtain very good drying results (r:05 is already set in factory).
Change this setting, only if streaks (select lower setting) or water stains (select higher setting) are left on the utensils.
-
Open the door.
-
Switch on ON/OFF switch 1.
-
Hold down programme button A and press START button 10 until H:0.... is indicated on the digital display.
-
Release both buttons.
The LED for button A flashes and the digital display 3 displays the factory setting H:04.
- Press programme button A until the factory set value r:05 is indicated on the digital display 3.
To change the setting:
-
Press programme button C. Each time the button is pressed, the set value increases by one level; when the value of r:06 has been reached, the display jumps back to r:00 (off).
-
Press START button [10]. The set value is saved.
-
Close the door.
Switching off rinse aid refill indicator
If the rinse-aid refill indicator 6 is impaired (e.g. when using combined detergents containing rinse aid component), it can be switched off.
■ Proceed as described under "Setting amount of rinse aid" and set the value to r:00.
The rinse aid refill indicator 6 is now switched off.

Utensils
Not suitable
■ Cutlery and utensils made of wood.
■ Delicate decorative glasses, craft and antique utensils. These decors are not dishwasher-proof.
■ Plastic parts not resistant to heat.
■ Copper and tin utensils.
■ Utensils which are soiled with ash, wax, lubricating grease or ink.
Aluminium and silver parts have a tendency to discolour and fade during the wash cycle. Even some types of glass (e.g. crystal glass objects) may turn cloudy after many wash cycles.
Glass and utensil damage
Causes:
■ Glass type and glass production process.
■ Chemical composition of the detergent.
■ Water temperature of the wash programme.
Recommendation:
■ Use only glasses and porcelain which the manufacturer designates as dishwasher-proof.
■ Use a detergent which protects utensils.
■ Take glass and cutlery out of the dishwasher as soon as possible after the programme ends.
Loading the dishwasher
-
Remove large food remnants. It is not necessary to prerinse utensils under running water.
-
Place the utensils so that
-
they are secure over.
- all u t e n s i l s w face down.
- parts with cur are at an angle, thereby allowing water to drain.
- does not obst r two spray arms 23 and 27.
Very small utensils should not be washed in the machine, as they may fall out of the baskets.
Unloading the dishwasher
To prevent water from dripping off the upper basket onto the utensils in the lower basket, it is recommended to empty the appliance from the bottom up.
Hot utensils are sensitive to shock! Therefore, when the programme ends, leave the utensils to cool down in the dishwasher until they can be handled.
Note
When the programme ends, water droplets can still be seen inside the appliance. This does not affect the drying of the utensils.
Cups and glasses
Top basket 22

natural_image
Illustration of a multi-tiered plastic crate filled with various kitchen utensils (no text or symbols visible)Note
Utensils must not be placed above the tablet collecting tray 24. These may block the lid of the detergent dispenser and prevent it from opening fully.
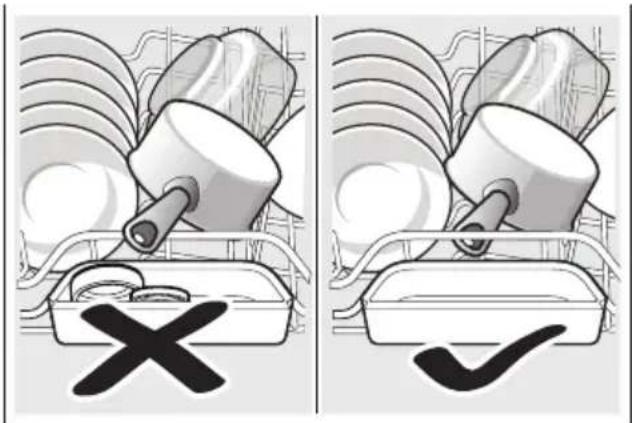
text_image
Diagram showing two scenarios of a container with a cross mark and a checkmark, likely illustrating a selection or inspection process.Pans
Bottom basket 30

natural_image
Illustration of a shopping basket filled with various food items (no text or symbols visible)Tip
Heavily soiled utensils (pans) should be placed in the bottom basket. The more powerful spray jet provides a better dishwashing result.
Tip
Other examples, such as the best way of loading your dishwasher, can be found on our homepage as a free download. The corresponding Internet address can be found on the back page of these instructions for use.
Cutlery drawer
Arrange the cutlery in the cutlery drawer 21 as illustrated. Separately arranged utensils are easier to remove after washing.
The drawer can be taken out.

natural_image
Illustration of a kitchen appliance with open drawer and accessories (no text or symbols)Depending on the model, you can fold down the side shelves to provide more room for taller items of cutlery. The front rows of prongs can be folded down to provide room for wider handles.
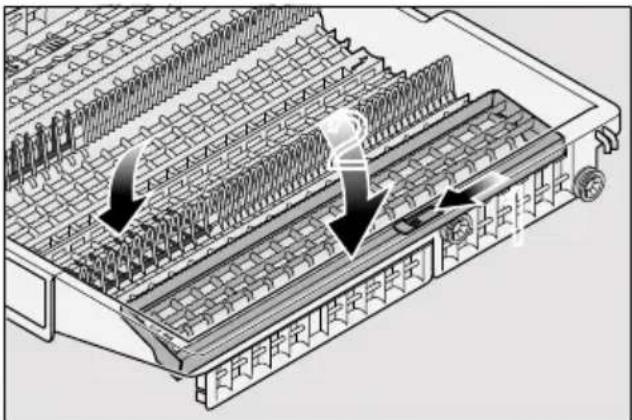
text_image
Technical diagram of a mechanical assembly with labeled components and directional arrows indicating motion or flow.
natural_image
Isometric technical diagram of a warehouse or storage area with grid-like structures and a star overlay (no text or symbols)Folding spikes \*
* depending on model
The spikes can be folded down to improve arrangement of pans, bowls and glasses.
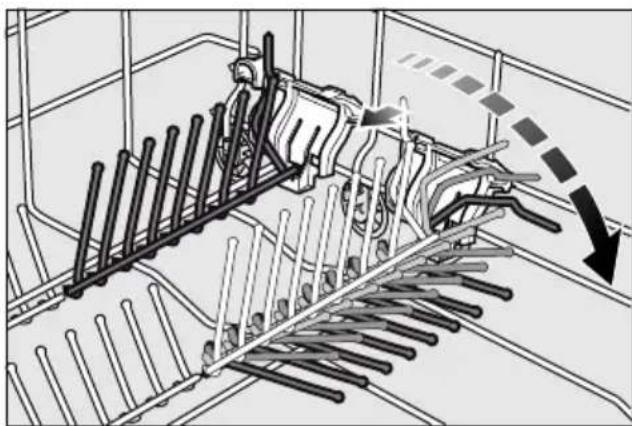
natural_image
Technical diagram of a mechanical assembly with rods and gears, showing motion direction (no text or symbols)Small accessories holder \*
* depending on model
Light-weight plastic accessories, e.g. cups, lids, etc. can be held securely in the small accessories holder.
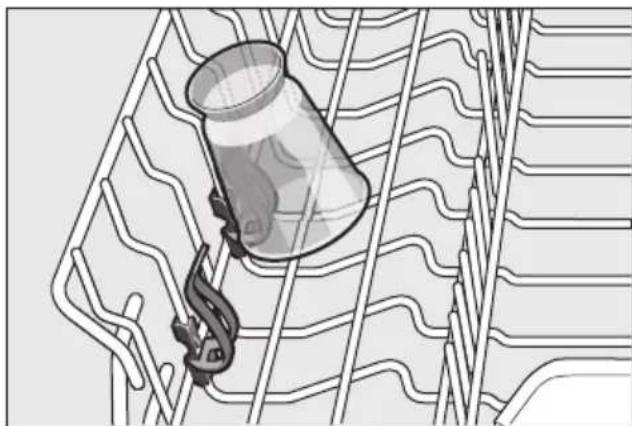
natural_image
Illustration of a container with a hook attached to a grid-like structure (no text or symbols)Adjusting the height of the basket
The height of the upper utensils basket 22 can be adjusted in 3 stages to create more space either in the upper or lower basket.
Appliance height 81.5 cm
| Top basket | Bottombasket | |
| Setting 1 max. ø 16 cm | 30 cm | |
| Setting 2 max. ø 18.5 cm | 27.5 cm | |
| Setting 3 max. ø 21 cm | 25 cm |
Appliance height 86.5 cm
| Top basket | Bottombasket | |
| Setting 1 max. ø 18 cm | 33 cm | |
| Setting 2 max. ø 20.5 cm | 30.5 cm | |
| Setting 3 max. ø 23 cm | 28 cm |
- Pull out the top basket 22 out.
- To lower the basket, press in the left and then the right lever on the outside of the basket. In doing so, hold the sides of the basket along the upper edge to prevent it from suddenly dropping.

text_image
1 2 3- To raise the basket, hold the basket on the sides of the upper edge and lift it up.
- Before re-inserting the basket again, ensure that it is at the same height on both sides. Otherwise, the appliance door cannot be closed and the upper spray arm will not be connected to the water circuit.

Detergent
You can use tablets as well as powder or liquid detergents for dishwashers, but never use washing up liquid. The dosage can be individually adjusted with powder or a liquid detergent according to the degree of soiling. Tablets contain an adequately large amount of active ingredients for all cleaning tasks. Modern, powerful detergents predominantly use a low-alkaline formulation with phosphate and enzymes. Phosphates bond the lime in the water. Enzymes break down starch and remove protein. Phosphate-free detergents are less frequent. These have a slightly weaker lime bonding capacity and require a higher dosage. To remove coloured stains (e.g. tea, tomato sauce), oxygen-based bleaching agents are usually used.
Note
To ensure a good washing result, always follow the instructions on the detergent packaging! If you have further questions, we recommend that you contact the detergent manufacturers' helpline.
⚠ Warning – Read and observe the safety information and instructions for use on the packaging for cleaning and rinsing agents.
Adding detergent
- If the detergent dispenser 32 is still closed, press the lock 33 to open the detergent dispenser.
Pour detergent into the dry detergent dispenser 32 only (insert tablet flat, not on its edge).
Dosage: see manufacturer's instructions on the packaging.
The graduated detergent dispenser 32 helps you add the correct amount of powder or liquid detergent.
Usually 20 ml–25 ml are adequate for normal soiling. If using tablets, one tablet is adequate.
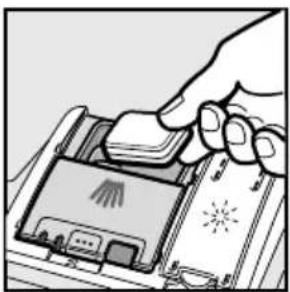
natural_image
Illustration of a hand pressing down on a printer cover (no text or symbols visible)
natural_image
Illustration of a robotic arm handling a tray with a cloth, no text or symbols present- Close the cover on the detergent dispenser by sliding it up until the lock engages without difficulty.
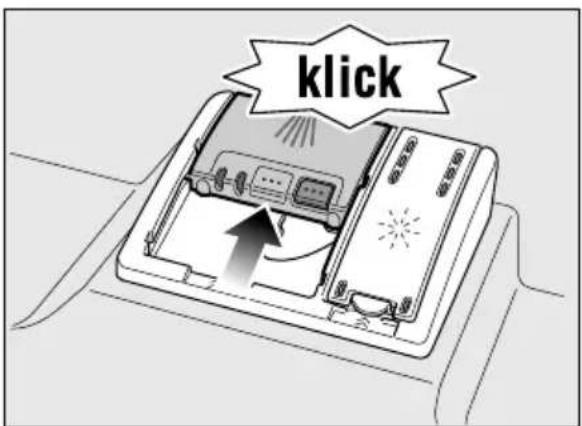
text_image
klickThe detergent dispenser opens automatically at the optimum time depending on the programme. The powder or liquid detergent is distributed in the appliance and is dissolved, the tablet falls into the tablet collecting tray where it dissolves in doses.
Tip
If the utensils are only lightly soiled, slightly less than the indicated amount of detergent is usually adequate.
Suitable detergents and care products can be purchased online via our website or via customer service (see back page).
Combination detergent
Apart from conventional detergents (Solo), a number of products are offered with additional functions. These products contain not only the detergent but also rinse-aid and salt replacement substances (3in1) and, depending on the combination (4in1, 5in1, etc.), additional components such as glass protection or stainless steel cleaner. Combination detergents function only up to a specific degree of hardness (usually 21°dH). Over this limit salt and rinse-aid must be added.
As soon as combined detergents are used, the rinse programme is adjusted automatically to ensure the best possible rinsing and drying result.
⚠ Warning – Do not place small parts for washing in the tablet collecting tray 24; this prevents the tablet from dissolving evenly.
⚠ Warning – If you want to add more utensils after the programme has started, do not use the tablet collecting tray 24 as a handle for the upper basket. The tablet could already be there and you will touch the partially dissolved tablet.
en Detergent
Notes
■ You will obtain optimum rinsing and drying results by using solo detergents and applying salt and rinse aid separately.
If programmes are short, tablets may not have full cleaning effect due to different dissolving properties and there may even be undissolved detergent residue. It is recommended to use washing powder for these programmes.
- The Intensive programme (on some models) requires one tab only. When using washing powder, you can apply some of this cleaning agent to the inside of the appliance's door.
■ Even if the rinse-aid and/or salt refill indicator is lit, the rinse programme will run correctly with combined detergents.
If using detergents in a water-soluble protective cover: Take hold of the cover with dry hands only and put the detergent into an absolutely dry detergent dispenser only, otherwise the detergent may stick.
If you switch from combined detergents to solo detergents, ensure that the water softening system and amount of rinse aid have been set to the correct value.

Overview of programmes
The max. possible number of programmes is illustrated in this overview. The corresponding programmes and their arrangement can be found on the fascia.
| Type of utensils | Type of soiling Programme Possible | additional options | Programme sequence | |
| pots and pans, non-sensitive utensils and cutlery | very adhesive burned-in or dried-on food remnants containing starch or protein |  Auto 65° - 75° Auto 65° - 75° | all | Is optimised according to the soiling with the aid of sensors. |
| Auto 45° - 65° | all | |||
| mixed utensils and cutlery | part dried, common household food remnants | Auto 45° - 65° | all | Is optimised according to the soiling with the aid of sensors. |
| /eco | all | PrerinseClean 50°Intermediate rinseFinal rinse 65°Drying | ||
| sensitive utensils, cutlery, temperature-sensitive plastic and glasses | slightly adhesive, fresh food remnants | [HGST]Auto 35° - 45° | IntensivZoneExpress Wash/Speed Perfect (VarioSpeed)Energy SaveHalf loadGlossy drying | Is optimised according to the soiling with the aid of sensors. |
| Quick 45° | Glossy drying | Clean 45°Intermediate rinseFinal rinse 55° | ||
| all types of utensils | cold rinsing, intermediate cleaning |  | none Prerinse | |
Programme selection
You can select a suitable programme according to the type of utensils and degree of soiling.
Information for test institutes
Test institutes receive the information for comparability tests (e.g. according to EN60436).
These are the conditions for conducting the tests, however these are not the results or consumption values.
Request by e-mail to:
dishwasher@test-appliances.com
The product number (E no.) and the production number (FD) are required which you can find on the rating plate 34 on the appliance door.

Additional options
* depending on model
Additional options can be set with the buttons 9.

Express WashPlus/Speed PerfectPlus (rioSpeedPlus) \*
This function can reduce the running time by approx. 20% to 66% depending on the selected rinse programme. To obtain optimum cleaning and drying results at a reduced running time, water and energy consumption are increased.

Half load \*
If you have only a few items to wash (e.g. glasses, cups, plates), you can switch to “half load”. This will save water, energy and time. It is recommended to put a little less detergent in the detergent dispenser than for a full load.

HygienePlus \*
This function increases the temperatures and retains them for an extra long time to obtain a defined disinfection performance. Continuous use of this function increases the hygiene status. This additional option is ideal for cleaning e.g. chopping boards and baby bottles.

Intensive zone \*
Perfect for a mixed load. You can wash very soiled pots and pans in the lower basket together with normally soiled utensils in the upper basket. The spray pressure in the lower basket is intensified, the rinsing temperature is increased slightly.

High gloss drying \*
By increasing the amount of water during the rinse cycle and extending the drying phase, stains are prevented and the drying result is improved. There is a slight increase in the energy consumption. Rinse aid is recommended for the high gloss drying function (even when using combination detergents).

Energy Save \*
Water and energy consumption can be reduced with the “Energy Save” function. The running time is extended for optimum cleaning and drying results.

Operating the appliance
Programme data
The programme data (consumption values) can be found in the summary of instructions. They refer to normal conditions and the water hardness set value H:04. Different influencing factors such as e.g. water temperature or line pressure may result in deviations.
Aqua sensor \*
* depending on model
The Aqua sensor is an optical measuring device (light barrier) which measures the turbidity of the rinsing water.
The Aqua sensor is used according to the programme. If the Aqua sensor is active, “clean” rinsing water can be transferred to the next rinse bath and water consumption can be reduced by 3–6 litres. If the turbidity is greater, the water is drained and is replaced with fresh water. In the automatic programmes the temperature and running time can also be adjusted to the degree of soiling.
Zeolith drying
The appliance features a Zeolith container Zeolith is a mineral which can store moisture and heat energy and release them again.
During the washing step this heat energy is used to dry the mineral and heat up the rinsing water.
During the drying phase moisture from the washing compartment is stored in the mineral and heat energy is released. This released heat energy is blown into the washing compartment with dry air. This accelerates and improves drying.
These processes therefore save a great deal of energy.
Caution
Please ensure that the intake opening 25 is not obstructed and do not place any temperature-sensitive utensils in the lower basket at the rear right side above the blow opening 26.
⚠ Warning – Risk of injury!
Do not touch the blow opening [26] . The blow opening becomes hot and, furthermore, any damage will result in a chargeable callout by customer service.
Switching on the appliance
- Turn on the tap fully.
- Open the door.
- Switch on ON/OFF switch 1.
The Eco 50° programme display flashes. This programme remains selected if no other programme button 2 is pressed. The expected programme duration flashes on the digital display 3.
- Press the START button 10.
- Close the door.
The programme starts running.
Note
- for environmentally friendly operation of the dishwasher:
For ecological reasons the Eco 50° programme is preset whenever the appliance starts. This conserves environmental resources and not least saves you money.
The Eco 50° programme is a particularly environmentally friendly programme. According to EU regulation 1016/2010 it is the “Standard programme” which is the most efficient standard cleaning cycle for cleaning normally soiled utensils in terms of the combined energy and water consumption for cleaning these types of utensils.
Optical display while the programme is running \*
* depending on model
While the programme is running, an optical display is indicated on the floor under the appliance door.
If the base panel is pulled forwards or if the appliance is installed at eye-level with flush furniture front, the display is not visible.
Possible settings of the optical display:
5:00 The display is switched off.
5:01 Programme, timer programming, remaining time, end of programme and, if required, low water level are displayed.
5:02 Same as 5:01. Other programme information is also displayed, e.g. the symbol for half load 12 or glass protection system active ☎.
5:01 is set at the factory.
To change the setting:
- Open the door.
- Switch on ON/OFF switch 1.
- Hold down programme button A and press START button 10 until H:0.... is indicated on the digital display.
- Release both buttons. The illuminated display of the button A flashes.
- Keep pressing programme button □A until the previously set value, e.g. 5:01, is indicated on the digital display ▢3 5:0... (for the optical display).
- Keep pressing programme button C until the required value, e.g. 5:02, is indicated on the digital display 3.
- Press START button [10]. The set value is saved.
- Close the door.
©
Automatic switch off after end of programme or interior light\*
* depending on model
To save energy, the dishwasher can be automatically switched off 1 min or 120 min after the programme ends.
The setting can be selected from P:00 to P:02.
P:00 Appliance does not switch off automatically.
The interior light 20 comes on when the door is opened irrespective of whether the ON/OFF switch 1 is switched on or off. When the door is closed the light is off. If the door is open for longer than 60 min., the light switches off automatically. The interior light 20 is lit only when the set value P:00 is selected.
P:01 Appliance switches off after 1 min.
P:02 Appliance switches off after 120 min.
- Open the door.
- Switch on ON/OFF switch 1.
- Hold down programme button □A and press START button 10 until H:0... is indicated on the digital display.
- Release both buttons. The LED for button A flashes and the digital display 3 displays the factory setting H:04.
- Keep pressing programme button □A until the value P:0... is indicated on the numerical display 3.
To change the setting:
- Press programme button C. Each time the button is pressed, the set value increases by one level; when the value of P:02 has been reached, the display jumps back to P:00.
- Press START button 10. The set value is saved.
- Close the door.
Switching off the appliance
Short time after the end of the programme:
- Open the door.
- Switch off ON/OFF switch 1.
- Turn off the tap (not applicable if Aqua-Stop fitted).
- Remove the utensils when they have cooled down.
Note
When the programme ends, leave the appliance to cool down a while before opening it. This will prevent steam from escaping and causing long-term damage to your built-in furniture.
Interrupting the programme
- Open the door.
- Switch off ON/OFF switch 1.
The LEDs go out. The programme is saved.
If the door was opened on an appliance which has a warm water connection or is heated, first leave the door ajar for several minutes and then close. Otherwise, expansion (pressure) may cause the appliance door to spring open or water to run out of the appliance.
- To continue the programme, switch on the ON/OFF switch 1 again.
- Close the door.
Terminating the programme (Reset)
- Open the door.
- Press START button 10 for approx. 3 sec. The numerical display 3 indicates 0:0 1.
- Close the door. The programme sequence lasts approx. 1 min. On the digital display ☐ 3 is indicated 0:00.
- Open the door.
- Switch off ON/OFF switch 1.
- Close the door.
Changing the programme
When the START button 10 has been pressed, the programme cannot be changed.
The only way a programme can be changed is by Cancel programme (Reset).
Intensive drying
The final rinse uses a higher temperature which improves the drying result. The running time may increase slightly. (Caution if utensils are delicate!)
- Open the door.
- Switch on ON/OFF switch 1.
-
Hold down programme button A and press START button 10 until H:0.... is indicated on the digital display.
-
Release both buttons. The LED for button A flashes and the digital display 3 displays the factory setting H:04.
- Press programme button □A until the factory set value d:00 is indicated on the digital display □3.
To change the setting,
- Press the button C to switch the Intensive drying on d:01 or off d:00.
- Press START button [10]. The set value is saved.
- Close the door.

Cleaning and maintenance
A regular inspection and maintenance of your machine will help to prevent faults. This saves time and prevents problems.
Overall condition of the machine
■ Check spray arm for grease and limescale deposits.
If you find such deposits:
- Fill detergent dispenser with detergent. Start the appliance without utensils in the programme with the highest rinsing temperature.
Clean the appliance with detergents/appliance cleaners which are particularly suitable for use with dishwashers.
en
Cleaning and maintenance
■ To ensure that the door seal always remains clean and hygienic, regularly clean it with a damp cloth and a little washing-up liquid.
If the appliance is switched off for a prolonged period, leave the door ajar to prevent the formation of an unpleasant odour.
Never use a steam cleaner to clean your dishwasher. The manufacturer is not liable for any consequential damage.
Regularly wipe the front of the appliance and fascia with a damp cloth; water and a little washing up liquid are adequate. Do not use sponges with a rough surface or abrasive detergents, as these could scratch the surfaces.
Stainless steel appliances: To prevent corrosion, avoid using sponge cloths or wash them out thoroughly several times before using for the first time.

Warning – Health hazard
Never use other domestic detergents, e.g. containing chlorine!
Special salt and rinse aid
- Check the refill indicators 5 and 6. If required, refill salt and/or rinse aid.
Filters
The filters 29 keep large foreign objects in the rinsing water away from the pump. These foreign objects may occasionally block the filters.
The filter system consists of a coarse filter, a flat fine filter and a microfilter.
- After each washing cycle check the filters for residue.
- Unscrew filter cylinder as illustrated and take out filter system.

natural_image
Mechanical component diagram showing a rotating assembly with a central hub and fan base (no text or symbols)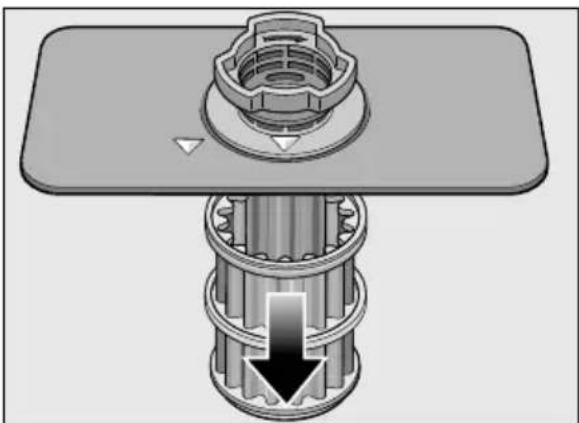
natural_image
Mechanical assembly diagram showing a bolted joint inserted into a cylindrical housing with a downward arrow indicating force or motion (no text or symbols present)- Remove any residue and clean filters under running water.
- Re-install filter system in reverse sequence and ensure that the arrow marks are opposite each other after closing the filter system.
Spray arms
Limescale and contaminants in the rinsing water may block nozzles and bearings on the spray arms 23 and 27.
- Check outlet nozzles on the spray arms for blockages.
- Unscrew the upper spray arm 23 .
- Remove the lower spray arm 27 upwards.

natural_image
Diagram of a mechanical device with two propellers and directional arrows indicating motion (no text or symbols)- Clean spray arms under running water.
- Re-engage or screw on spray arms.

Fault, what to do?
Experience has shown that you can rectify most faults which occur in daily operation yourself. This ensures that the machine is quickly available to you again. In the following overview you can find possible causes of malfunctions and helpful information for rectifying them.
Note
If the appliance stops during dishwashing or does not start for no obvious reason, first run the Abort programme function (Reset). (See chapter entitled “Operating the appliance”)

Warning – Don't forget: Repairs may carried out by technicians only. If a component has to be replaced, ensure it only original spare parts are used. Proper repairs or use of non-original are parts may cause considerable damage and put the user at considerable risk.
en Fault, what to do?
Waste water pump
Large food remnants or foreign objects which were not captured by the filters may block the waste water pump. The rinsing water will then be above the filter.
⚠ Warning – Risk of cuts!
When cleaning the waste water pump, ensure that you do not injure yourself on pieces of broken glass or pointed implements.
In this case:
- First always disconnect the appliance from the power supply.
- Take out top basket 22 and bottom basket 30 .
- Remove the filters 29.
- Scoop out water, use a sponge if required.
- Prise out the white pump cover (as illustrated) using a spoon. Grip the cover on the crosspiece and lift diagonally inwards. Remove cover completely.
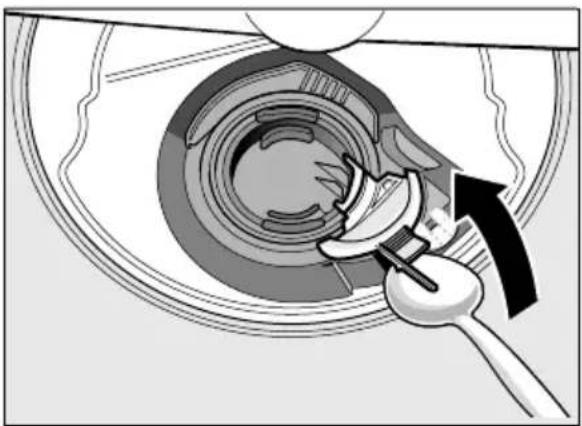
natural_image
Mechanical assembly diagram showing a tool interacting with a circular component (no text or symbols visible)- Check impeller wheel and remove any foreign objects.
- Place cover in the original position and press down until it engages (click).
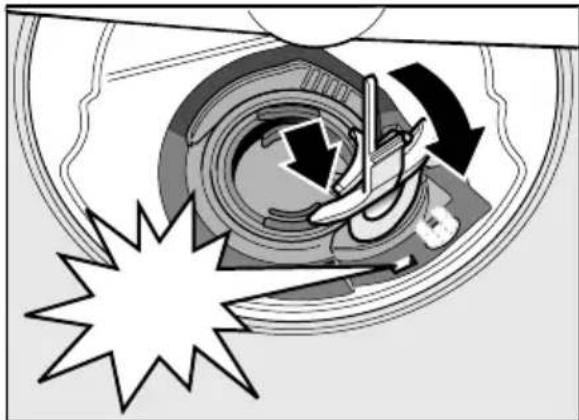
natural_image
Cross-sectional diagram of a mechanical device with arrows indicating motion or force direction (no text or symbols)- Install filters.
- Re-insert baskets.
Fault table
Fault Cause Remedial action
| "Check water supply" display 4 lights up. | Supply hose kinked. Install supply hose without kinks. | |
| Tap turned off. Turn the tap on. | ||
| Tap jammed or calcified. Turn the tap on. | ||
| Flow rate must be min. 10 l/min. when water supply is open. | ||
| Filter in the water supply blocked. Switch off the appliance and pull out the mains plug. Turn off the tap. Unscrew water connection. | ||
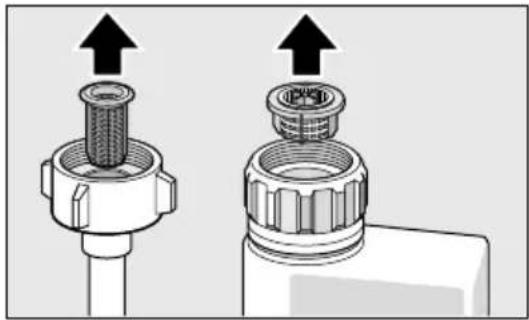 | ||
| Clean filter in the supply hose. Screw water connection on again. Check for leaks. Reconnect power supply. Switch on the appliance. | ||
| Error code E:07 is lit. | Intake opening (on right inside of appliance) covered by utensils. | Arrange utensils so that the intake opening is not obstructed. |
| Error code E:12 is lit. | Heating element calcified or soiled. | Clean appliance with dishwasher cleaning agent or descaler. Operate the dishwasher with water softening system and check the setting (see chapter "Water softening system/Special salt"). |
| Error code E:22 is lit. | Filters [29] are soiled or blocked. | Clean filters.(see "Cleaning and maintenance"). |
| Error code E:24 is lit. | Waste-water hose kinked or blocked. | Install hose without kinks, remove any residue. |
| Siphon connection still sealed. Check connection to siphon and open if required. | ||
| Cover on the waste water pump loose. | Lock cover correctly.(See "Waste water pump") | |
| Error code E:25 is lit. | Waste water pump blocked or cover on the waste water pump is not locked in position. | Clean pump and lock cover correctly. (See "Waste water pump") |
| Error code E:27 is lit. | Mains voltage too low. | Not an appliance fault, have the mains voltage and electrical installation checked. |
| Fault Cause Remedial action | ||
| A different error code is indicated on the digital display.(E:01 to E:30) | A technical fault has probably occurred. | Switch off appliances with the ON/OFF switch 1. After a short time restart the appliance.If the problem recurs, turn off the tap and pull out the mains plug.Call customer service and mention the error code. |
| Display flashes. Door not closed properly. Close the door. Ensure that no objects (utensil, fragrance dispenser) are protruding over the basket and preventing the door from closing. | ||
| Refill indicator for salt 5and/or rinse-aid 6 is lit. | No rinse aid. Refill rinse aid. | |
| No salt. Refill with special salt. | ||
| Sensor does not detect salt tablets. | Use different special salt. | |
| Refill indicator for salt 5and/or rinse-aid 6 is not lit. | Refill indicator switched off. Activation/deactivation (see chapter Water softening system/Special salt or Rinse aid). | |
| There is still enough special salt/ rinse aid available. | Check refill indicator, levels. | |
| Water is left in the appliance at the end of the programme. | Filter system or area under the filters 29 is blocked. | Clean filters and area underneath (see “Waste water pump”). |
| Program has not ended yet. Wait until programme ends or reset (see “Terminating the programme”). | ||
Fault Cause Remedial action
| Utensils not dry. No or too little rinse aid in the dispenser. | Refill rinse aid. | |
| Programme selected without drying. | Select programme with drying (see “Overview of programmes”, “Programme sequence”). | |
| Water collecting in depressions on the utensils and cutlery. | Arrange utensils in a sloping position, arrange affected utensils as sloping as possible. | |
| | |
| The combined detergent used has a poor drying performance | Use different combination detergent with better drying performance. Use of rinse aid also increases the drying performance. | |
| Intensive drying to increase drying not activated. | Activate intensive drying (see “Operating the appliance”) | |
| Utensils were removed too early or drying process had not ended yet. | Wait until program ends or wait until 30 min after program ends before removing utensils. | |
| The eco rinse aid used has a poor drying performance. | Use a proprietary rinse aid. Eco products are much less effective. | |
| Plastic utensils not dry. Special properties of plastic. Plastic has a lower heat storage capacity and therefore dries less well. | ||
| Cutlery not dry. Cutlery not arranged properly in the cutlery basket. | Separate cutlery if possible, prevent contact points. | |
| Cutlery not arranged properly in the cutlery drawer. | Arrange cutlery properly and separate if possible. | |
| Appliance interior wet after rinse cycle. | No appliance fault On account of the “Condensation drying” principle, water droplets are physically induced and required in the container. The humidity in the air condenses on the inner walls of the dishwasher, drains and is pumped out. | |
Fault Cause Remedial action
| Food remnants on the utensils. | Utensils placed too closely together, utensils basket overfilled. | Arrange utensils with adequate clearance between them ensuring that the spray jets can reach the surface of the utensils. Prevent contact points. |
| Spray arm rotation obstructed. Arrange utensils so that the spray arm can rotate without obstruction. | ||
| Spray arm nozzles are blocked. Clean the spray arm nozzles, (see “Cleaning and maintenance”). | ||
| Filters 29 dirty. Clean filters (see “Cleaning and maintenance”). | ||
| Filters 29 inserted incorrectly and/or not engaged. | Insert and engage filters correctly. | |
| Rinse programme too weak. Select a more intensive rinse programme. | ||
| Utensils precleaned too intensely; sensors therefore decide on weak programme sequence. Stubborn soiling cannot be completely removed. | Do not prerinse utensils. Remove only large food remnants. Recommended programme Eco 50° or Intensive. | |
| Tall narrow receptacles in corner areas are not rinsed adequately. | Do not place hollow receptacles too obliquely and do not place in the corner area. | |
| Top basket 22 on right and left not set to same height. | Set top basket to same height using side levers. | |
| Detergent residue. Detergent dispenser cover blocked by utensils and therefore does not open fully. | Detergent dispenser cover must not be obstructed by utensils. Do not place utensils or fragrance dispenser in the tablet collecting tray. | |
| Tablet must be inserted flat and not upright. | ||
| Tablets used in the quick or short programme. Dissolving time of the detergent is not reached in the selected short programme. Use a detergent powder or select a more intensive programme. | ||
| Washing effect and dissolving performance are reduced after a prolonged storage time or detergent is very lumpy. Change detergent. | ||
Fault Cause Remedial action
| Water stains on plastic parts. | Droplet formation on plastic surface is physically unavoidable. After drying, water stains are visible. | Use a more intensive programme (more water changes). Arrange utensils in a sloping position. Use rinse aid. If required, increase softening setting. |
| Washable or water-soluble coatings in the container or on the door. | Detergent substances are deposited. These coatings cannot usually be removed with chemicals (appliance cleaner, ...). | Change detergent brand. Clean appliance mechanically. |
| If there is a “white coating” on the container floor, the water softening system has been set marginally. | Increase softening setting and change detergent if required. | |
| Salt dispenser cover 28 not closed. | Close salt dispenser cover correctly. | |
| Only for glasses: Initial glass corrosion - can only apparently be wiped off. | See “Glass and utensil damage”. | |
| White, stubborn coatings; limescale on the utensils, container or door. | Detergent substances are deposited. These coatings cannot usually be removed with chemicals (appliance cleaner, ...). | Change detergent brand. Clean appliance mechanically. |
| Hardness range incorrectly set or water hardness greater than 8.9 mmol/l. | Set water softening system according to instructions for use or top up salt. | |
| 3 in 1 detergent or bio/eco detergent not effective enough. | Set water softening system according to instructions for use or use separate detergents (proprietary detergent, salt, rinse aid). | |
| Underdosing of detergent. Increase detergent dosage or change detergent. | ||
| Too weak rinse programme selected. | Select a more intensive rinse programme. | |
| Tea or lipstick residue on the utensils. | Too low rinsing temperature. Select programme with higher washing temperature. | |
| Too little or unsuitable detergent. Use suitable detergent at correct dosage. | ||
| Utensils precleaned too intensely; sensors therefore decide on weak programme sequence. Stubborn soiling cannot be completely removed. | Do not prerinse utensils. Remove only large food remnants. Recommended programme Eco 50° | |
Fault Cause Remedial action
| Coloured (blue, yellow, brown), difficult to remove to non-removable coatings in the appliance or on stainless steel utensils. | Film formation consisting of ingredients from vegetables (e.g. cabbage, celery, potatoes, noodles, ...) or the tap water (e.g. manganese). | Can be partly removed with machine cleaner or by mechanical cleaning. Coatings are harmless. |
| Film formation caused by metallic components on silver or aluminium utensils. | Can be partly removed with machine cleaner or by mechanical cleaning. | |
| Coloured (yellow, orange, brown), easily removable deposits inside the appliance (mainly in the floor area) | Film formation consisting of ingredients from food remnants and substances from the tap water (limescale), “soapy” | Check function of the water softening system (refill with salt) or, if using combined detergents (tablets), activate water softening system (see chapter “Water softening system/Special salt”) |
| Discolouration of the plastic parts inside the appliance. | Plastic parts inside the appliance may become discoloured during the service life of the dishwasher. | Discolouration is normal and will not impair the function of the dishwasher. |
| Plastic parts discoloured. Too low rinsing temperature. Select programme with higher washing temperature. | ||
| Removable streaks on glasses, glasses with metallic appearance and cutlery. | Too much rinse aid. Set rinse aid amount to lower setting. | |
| No rinse aid added or setting too low. | Add rinse aid and check dosage (recommended setting 4–5). | |
| Detergent residue in the final rinse programme section. Detergent dispenser cover blocked by utensils (cover does not open fully). | Detergent dispenser cover must not be obstructed by utensils. Do not place utensils or fragrance dispenser in the tablet collecting tray. | |
| Utensils precleaned too intensely; sensors therefore decide on weak programme sequence. Stubborn soiling cannot be completely removed. | Do not prerinse utensils. Remove only large food remnants. Recommended programme Eco 50° | |
Fault Cause Remedial action
| Initial or existing, irreversible clouding of glass. | Glasses not dishwasher-proof, only suitable for dishwasher. | Use dishwasher-proof glasses.Avoid long steam phase (standing time after wash cycle ends).Use wash cycle at lower temperature.Set water softening system according to the water hardness (if required one setting lower).Use detergent with glass protection component. | |
| Rust spots on the cutlery. Cutlery not adequately rust-resistant. Knife blades are frequently more severely affected. | Use corrosion-resistant cutlery. | ||
| Cutlery will also rust if rusting parts are rinsed at the same time (pan handles, damaged utensil baskets, etc.). | |||
| Salt content in the rinsing water too high, as salt dispenser lock not fastened firmly or salt was spilled while being refilled. | |||
| Appliance does not start. The mains fuse has tripped. Check mains fuse. | |||
| Power cord not inserted. Ensure that the power cord is plugged all the way into the back of the appliance and into the socket. Check that the socket functions. | |||
| The appliance door has not been shut properly. | |||
| Programme starts automatically. | You did not wait until programme ended. | Perform reset.(See “Terminating the programme”). | |
| The door is difficult to open. | Child lock is activated. Deactivate child lock. (See instructions for use at the back) | ||
| Door cannot be closed. Door lock has been activated. Close door with increased force. | |||
| Door cannot be closed due to installation. | |||
| Cover on the detergent dispenser cannot be closed. | Detergent dispenser or cover guide blocked by sticky detergent residue. | Remove detergent residue. | |
| Fault Cause Remedial action | |||
| Detergent residue in the detergent dispenser or in the tablet collecting tray. | Spray arms blocked by utensils, therefore detergent is not rinsed out. | Ensure that the spray arms can rotate freely. | |
| The detergent dispenser was damp when filled. | Pour detergent into the dry detergent dispenser only. | ||
| Appliance stops in the programme or programme is interrupted. | Door not closed properly. Close the door. | ||
| Do not place utensils or fragrance dispenser in the tablet collecting tray.Top basket presses against the door and prevents door from being closed securely. | Check whether rear panel is being pressed in, e.g. by socket or by hose holder which has not been removed. | ||
| Power and/or water supply interrupted. | Restore power and/or water supply. | ||
| Filling valves making striking noises. | Depends on domestic installation, as appliance is not defective. No effect on appliance function. | No remedial action possible. | |
| Knocking or rattling noise. | Spray arm strikes the utensils, utensils not positioned correctly. | Position utensils so that the spray arms do not strike the utensils. | |
| If there is a low load, the water jets strike the washing tank directly. | Load the appliance with more utensils or distribute the utensils more evenly in the dishwasher. | ||
| Light utensils move during the wash cycle. | Arrange light utensils securely. | ||
| Unusual foam formation. | Handwash liquid in the rinse aid dispenser. | Immediately refill rinse aid dispenser with rinse aid. | |
| Rinse aid spilled. Remove rinse aid with a cloth. | |||

Customer service
If you are unable to rectify the fault, please contact your customer service. We always find a suitable solution, even to avoid unnecessary visits by technicians. Contact information for your nearest customer service can be found on the back of these instructions for use or on the enclosed customer service list. When calling, please state the appliance number (E-Nr. = 1) and the production number (FD = 2) which can be found on the rating plate 34 on the appliance door.

Rely on the competence of the manufacturer. Contact us. You can therefore be sure that the repair is carried out by trained service technicians who carry original spare parts for your domestic appliances.
* depending on model

Installation and connection
The dishwasher must be connected correctly, otherwise it will not function properly. The specifications for the inlet and outlet as well as the electrical connected loads must correspond with the required criteria as specified in the following paragraphs or in the installation instructions.
Install the appliance in the correct sequence:
- Checking appliance on delivery
- Installing the appliance
- Waste water connection
- Drinking water connection
- Electrical connection
Product package
If you have any complaints, contact the dealer where you purchased the appliance or our customer service.
■ Dishwasher
■ Instructions for use
■ Installation instructions
Warranty*
■ Installation materials
■ Steam guard plate*
■ Rubber apron*
Power cord
* depending on model
Safety instructions
Please follow the safety instructions under "Installation".
Delivery
Your dishwasher has been checked thoroughly in the factory to ensure that it is in working order. This may cause small water stains. These will disappear after the first wash cycle.
Technical specifications
Weight:
max. 60 kg
Voltage:
220–240 V, 50 Hz or 60 Hz
Connected load:
2.0–2.4 kW
Fuse:
10/16 A (UK 13A)
Power input:
switched off 0.50 W
not switched off 0.50 W
Water pressure:
at least 0.05 MPa (0.5 bar), maximum 1 MPa (10 bar). At a higher water pressure: connect pressure-reducing valve ahead.
Inlet rate:
minimum 10 litres/minute
Water temperature:
cold water; hot water max. temperature 60^ C.
Capacity:
12–15 place settings (depending on model).
Installation
The required installation dimensions can be found in the installation instructions. Level the appliance with the aid of the height-adjustable feet. Ensure that the appliance is situated securely on the floor.
■ A built-under or integrated appliance which is installed subsequently as a free-standing appliance must be secured to prevent it from overturning, e.g. by screwing it to the wall or by installing it under a continuous worktop which is screwed to adjacent cupboards.
■ The appliance can easily be installed in a fitted kitchen between wooden and plastic walls.
Waste-water connection
-
The required work sequence can be found in the installation instructions. If required, fit a siphon with an drainage connection.
-
Connect the waste-water hose to the drainage connection of the siphon with the enclosed parts.
Ensure that the drainage hose is not kinked, crushed or twisted and that there is no cover plate in the drainage to prevent the waste water from flowing out!
Drinking water connection
- Fasten the drinking water connection to the tap according to the installation instructions using the enclosed parts. Ensure that the drinking water connection is not kinked, crushed or twisted.
- When replacing the appliance, always use a new water supply hose.
Water pressure:
At least 0.05 MPa (0.5 bar), maximum 1 MPa (10 bar). At a higher water pressure: connect pressure-reducing valve ahead.
Inlet rate:
Minimum 10 litres/minute
Water temperature:
Cold water; hot water max. temperature 60 °C.
Warm water connection \*
* depending on model
The dishwasher can be connected to cold or hot water up to max. 60 °C.
Connection to hot water is recommended if the hot water can be supplied by energetically favourable means and from a suitable installation, e.g. solar heating system with circulation line.
This will save energy and time.
The hot water setting R:01 allows you to adjust your appliance optimally to operation with hot water.
It is recommended to have a water temperature (temperature of the incoming water) of at least 40 °C and no more than 60 °C.
It is not recommended to connect the appliance to hot water if the water is supplied from an electric boiler.
Setting hot water:
- Open the door.
- Switch on ON/OFF switch 1.
- Hold down programme button □A and press START button □10 until H:0... is indicated on the digital display.
- Release both buttons.
The LED for button A flashes and the digital display 3 displays the factory setting H:04.
- Press programme button A until the factory set value R:00 is indicated on the digital display 3.
To change the setting:
- By pressing the C button, you can switch the hot water setting off R:00 or on R:01.
- Press START button 10. The set value is saved.
- Close the door.
Electrical connection
■ Connect the appliance to an alternating current only, ranging from 220 V to 240 V and 50 Hz or 60 Hz via a correctly installed socket with protective earth conductor. See rating plate for required fusing 34.
■ The socket must be near the appliance and freely accessible following installation.
If the plug is not freely accessible, an allpole disconnector with a contact opening of at least 3 mm must be fitted on the installation side to satisfy the relevant safety instructions.
■ The connection may be modified by technicians only.
■ A power cord extension may be purchased from customer service only.
en
Installation and connection
■ Use only a residual current operated circuit-breaker which features the symbol 📂. Only this extension guarantees compliance with the currently valid regulations.
■ The appliance features a water damage protection system. Please note the system will not function unless the power supply is connected.
Removing the appliance
Also observe
the sequence of worksteps here.
- Disconnect the appliance from the power supply.
- Turn off the water supply.
- Undo the waste water and drinking water connection.
- Loosen fastening screws for the furniture parts.
- If fitted, remove the base panel.
- Pull out the appliance, carefully pulling the hose behind.
Transportation
Empty the dishwasher and secure loose parts.
Drain the appliance according to the following steps:
- Turn on the tap.
- Open the door.
- Switch on ON/OFF switch 1.
-
Select programme with the highest temperature.
The expected programme duration is indicated on the numerical display 3. -
Press START button 10.
- Close the door. Programme sequence starts.
- Open door after approx. 4 minutes.
- Press START button 10 until 0:01 is indicated on the digital display.
- Close the door.
- Open door after approx. 1 minute.
The numerical display indicates 0:00.
11.Switch off ON/OFF switch 1. - Turn off the tap, disconnect supply hose and drain water.
Transport appliance upright only.
(This prevents residual water from running into the machine control and damaging the programme sequence.)
Protection against frost
If the appliance is in a room where there is a risk of frost (e.g. holiday home), empty the appliance completely (see Transportation).

text_image
Diagram showing two labeled components (① and ②) with arrows indicating movement or flow, likely illustrating a process or system.40

text_image
Diagram showing hands installing a component with numbered labels and directional arrows indicating process flow41

text_image
Diagram showing a hand pressing a button labeled with numbers 1 and 2 on a cabinet or drawer.42

natural_image
Diagram showing a kitchen appliance with a computer monitor and a close-up of its interior, illustrating the process of lifting or removing weights (no text or symbols present)
natural_image
Interior view of a kitchen appliance with a white rack unit and metal fixtures (no text or symbols visible)
natural_image
Composite image showing a washing machine with open lid and kitchen utensils, alongside a modern white corrugated dish (no text or symbols visible)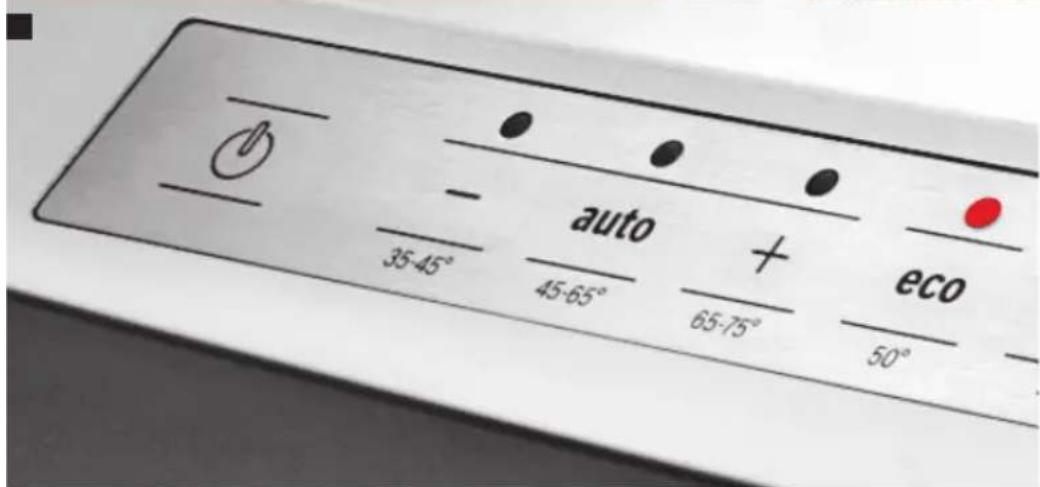
text_image
- 35-45° auto + eco 45-65° 65-75° 50°SM...
SB...

BOSCH

text_image
Diagram of a device control panel with labeled ports and digital display showing 108 and 24 microcontroller units
text_image
Diagram of a multi-chamber refrigerator with labeled internal compartments and external casingÍndice

natural_image
Illustration of a conveyor belt pouring granular material into a conical container on a stovetop, with a circular component and a magnified inset showing a curved arrow (no text or symbols)natural_image
Diagram of a device with an open lid and two arrows indicating directional movement (no text or symbols)natural_image
Illustration of a hand pouring liquid into a device with a droplet inside (no text or symbols)natural_image
Black-and-white illustration of a plastic crate filled with various kitchen utensils (no text or symbols visible)Nota
text_image
Diagram showing two scenarios of a pump or filter device with a cross symbol and a checkmark, likely illustrating a mechanical or electrical setup.Cacerolas
Cesto inferior 30

natural_image
Illustration of a shopping basket filled with various food items (no text or symbols visible)Consejo práctico
natural_image
Illustration of a kitchen appliance drawer with cutlery and utensils (no text or symbols)text_image
Technical diagram of a mechanical assembly with labeled components and directional arrows indicating motion or flow.
natural_image
Isometric technical diagram of a multi-level industrial or warehouse structure with no visible text or symbolsnatural_image
Technical diagram of a mechanical assembly with rods and a gear mechanism, showing motion direction (no text or symbols)natural_image
Illustration of a container with a hook attached to a grid-patterned surface (no text or symbols)natural_image
Hand pressing a button onto a device component (no text or symbols visible)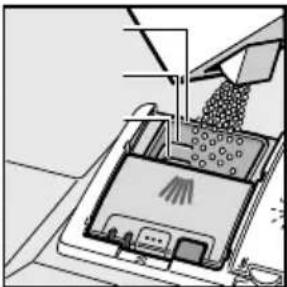
natural_image
Illustration of a robotic arm interacting with a device (no text or symbols visible)natural_image
Mechanical component diagram showing a rotating assembly with a central hub and fan base (no text or symbols)
natural_image
Mechanical assembly diagram showing a bolted joint inserted into a cylindrical housing with a downward arrow indicating force or motion (no text or symbols present)natural_image
Diagram of a kitchen appliance showing a propeller with directional arrows indicating rotation and assembly (no text or symbols)natural_image
Mechanical assembly diagram showing a tool interacting with a circular component (no text or symbols visible)natural_image
Cross-sectional diagram of a mechanical device showing internal components and motion arrows (no text or symbols)natural_image
Simple diagram of a rectangular box with internal blocks and a circle pointing to it (no text or symbols)
natural_image
Pure diagram of a rectangular block with three internal gray blocks and an external circle, no text or symbols present.text_image
Diagram showing two labeled components (① and ②) with arrows indicating movement or flow, likely illustrating a process or system.40

text_image
Diagram showing hands installing a component with numbered labels and directional arrows indicating process flow41

text_image
Diagram showing a hand pressing a button labeled with numbers 1 and 2 on a cabinet or shelf, indicating a step in a procedure.42

natural_image
Diagram showing a kitchen appliance with a computer monitor and a close-up of its interior, illustrating the process of lifting or removing weights (no text or symbols present)
natural_image
Interior view of a kitchen appliance with a white rack unit and metal fixtures (no text or symbols visible)

natural_image
Composite image showing a washing machine with open lid and kitchen utensils, alongside a modern white corrugated dish (no text or symbols visible)
text_image
- 35-45° auto + eco 45-65° 65-75° 50°SM...
SB...

BOSCH

text_image
Diagram of a device control panel with labeled ports and digital display showing 108 and 24 microcontroller units
text_image
Diagram of a multi-chamber refrigerator with labeled internal compartments and external casingInhaltsverzeichnis

Störung, was tun? 29
Abwasserpumpe....29
Störungstabelle. 30

Kundendienst 38

natural_image
Illustration of a conveyor belt pouring granular material into a conical flask, with a circular inset showing a rotating knob (no text or symbols)* je nach Modell
natural_image
Diagram of a device interior with arrows indicating movement or operation, no readable text or symbols present.natural_image
Illustration of a hand pouring liquid into a device with a droplet inside (no text or symbols)text_image
Diagram showing two scenarios of a mechanical device with a cross mark and checkmark, likely illustrating a safety or inspection concept.Töpfe
natural_image
Illustration of a shopping basket filled with various food items (no text or symbols visible)Tipp
natural_image
Interior view of a kitchen appliance drawer with open compartments containing kitchen utensils and cutlery (no text or symbols visible)natural_image
Isometric view of a mechanical assembly with grid-like components and directional arrows indicating motion (no text or symbols)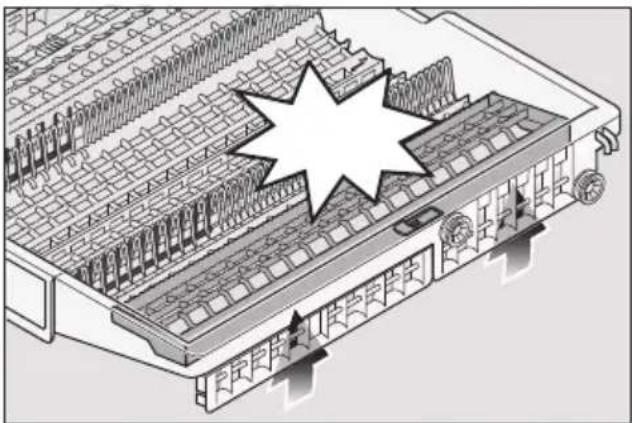
natural_image
Isometric technical diagram of a multi-level industrial or warehouse structure with no visible text or symbolsKlappstacheln \*
* je nach Modell
natural_image
Technical diagram of a mechanical assembly with rods and gears, showing motion direction (no text or symbols)Kleinteilehalter \*
* je nach Modell
natural_image
Illustration of a container being lifted by a hook, surrounded by coiled wires (no text or symbols)Korbhöhe verstellen
natural_image
Two-step illustration showing a hand pressing down on a device into a container, and a close-up of the container being inserted with a handle (no text or symbols visible)(VariousSpeedPlus) \*
natural_image
Mechanical component diagram showing a rotating shaft and housing assembly (no text or symbols)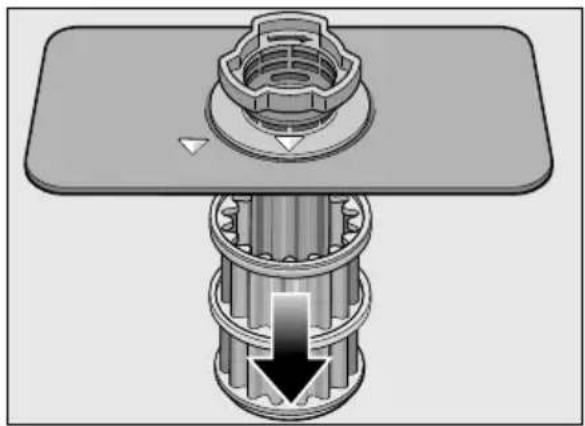
natural_image
Mechanical assembly diagram showing a bolted joint inserted into a cylindrical component with a downward arrow indicating force or motion (no text or symbols present)natural_image
Diagram of a mechanical device showing a propeller blade and a valve mechanism with directional arrows (no text or symbols)natural_image
Mechanical assembly diagram showing a rotating component with a tool interacting with it (no text or symbols visible)natural_image
Cross-sectional diagram of a mechanical device showing internal components and motion arrows (no text or symbols)natural_image
Simple diagram of a rectangular box with internal compartments and a circle pointing to it (no text or symbols)
flowchart
graph TD
    A["Start"] --> B["Process 1"]
    A --> C["Process 2"]
    A --> D["Process 3"]
Minimal 10 Liter/Minute
Wassertemperatur:
Minimal 10 Liter/Minute
Wassertemperatur:
text_image
Diagram showing two labeled components (① and ②) with arrows indicating movement or flow, likely illustrating a process or system.40

text_image
Diagram showing hands installing a component with numbered labels and directional arrows indicating process steps41

text_image
Diagram showing a hand placing a labeled object into a drawer with numbered arrows indicating steps ① and ②.42

natural_image
Diagram showing a kitchen interior with a computer monitor and a close-up of a food item, illustrating the process of lifting or removing (no text or symbols present)
natural_image
Interior view of a kitchen appliance with open drawer and metal rack (no text or symbols visible)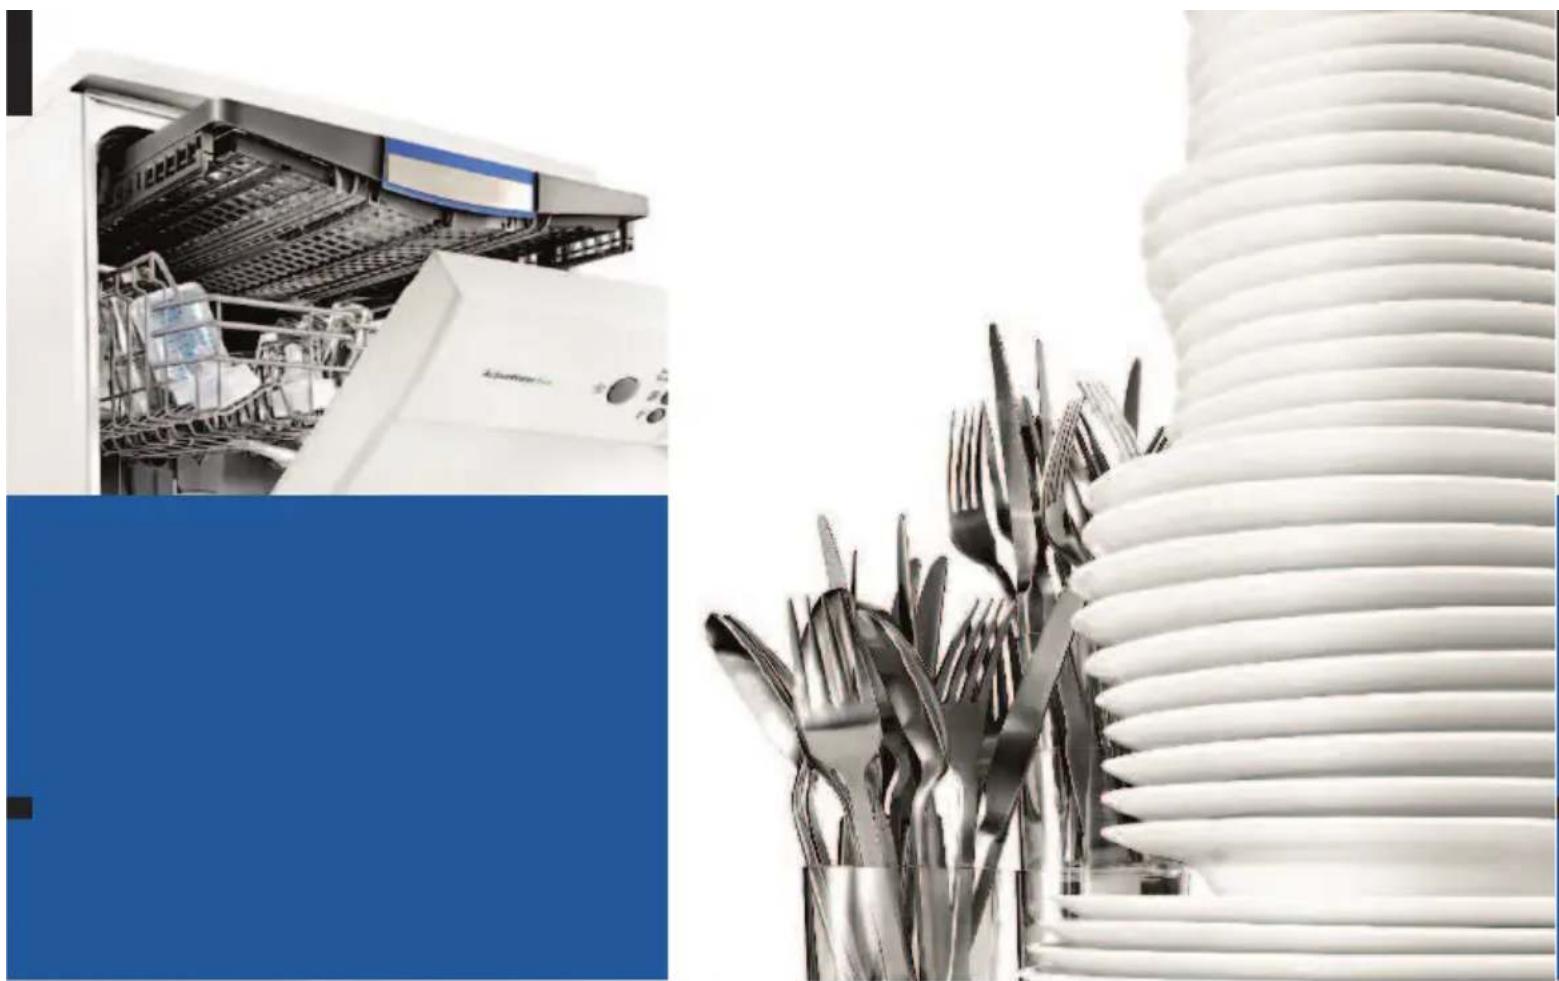
natural_image
Composite image showing a washing machine with open lid and kitchen utensils, alongside a modern white corrugated dish (no text or symbols visible)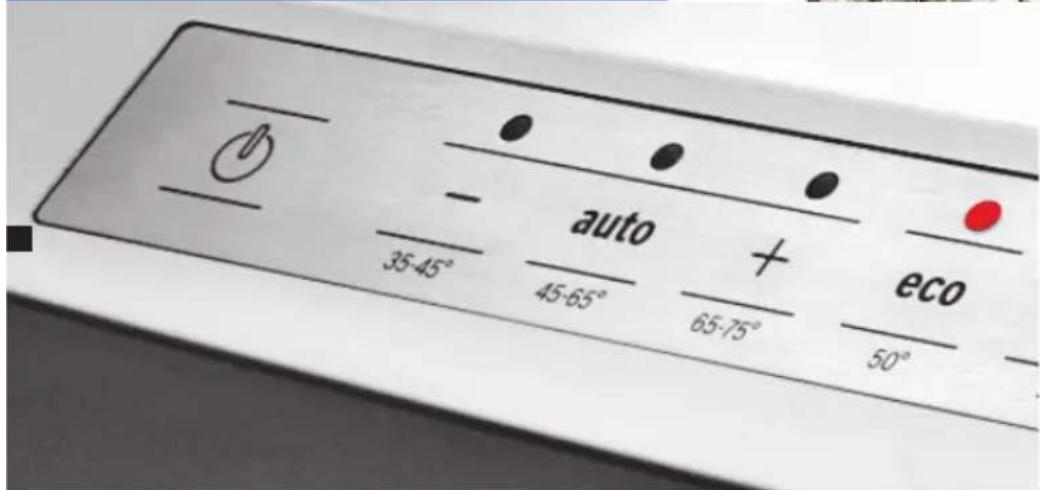
text_image
- 35-45° auto + eco 45-65° 65-75° 50°SM...
SB...

BOSCH

text_image
Diagram of a device control panel with labeled ports and digital display showing 108 and 24 microcontroller units
text_image
Diagram of a multi-chamber refrigerator with labeled internal compartments and external casingObsah

flowchart
graph TD
    A["Top Row: White Arrow"] --> B["Bottom Row: Black Box"]
    C["Right Row: Black Box"] --> D["Bottom Row: Black Box"]
natural_image
Illustration of a funnel pouring granular material into a conical container with a lid and directional arrow (no text or symbols)* podle modelu
natural_image
Diagram of a device with two arrows pointing to internal components (no text or symbols)natural_image
Illustration of a hand pouring liquid into a device with a droplet inside (no text or symbols)text_image
Illustration showing two scenarios of a container with a cross mark and a checkmark, likely illustrating a chemical or industrial process.Hrnce
natural_image
Illustration of a shopping basket filled with various food items (no text or symbols visible)Tip
natural_image
Interior view of a kitchen appliance drawer with cutlery and utensils (no text or symbols visible)natural_image
Isometric view of a multi-level industrial or warehouse structure with internal grid patterns and directional arrows indicating flow or movement (no text or symbols present)
natural_image
Isometric technical diagram of a multi-level industrial or warehouse structure with no visible text or symbolsSklopné trny \*
* podle modelu
natural_image
Technical diagram of a mechanical assembly with no visible text or symbolsnatural_image
Illustration of a container being lifted by a hook, surrounded by coiled wires (no text or symbols)natural_image
Illustration of a hand pressing down on a device component (no text or symbols visible)
natural_image
Illustration of a robotic arm interacting with a device (no text or symbols visible)natural_image
Mechanical component diagram showing a rotating assembly with a central hub and surrounding blades (no text or symbols)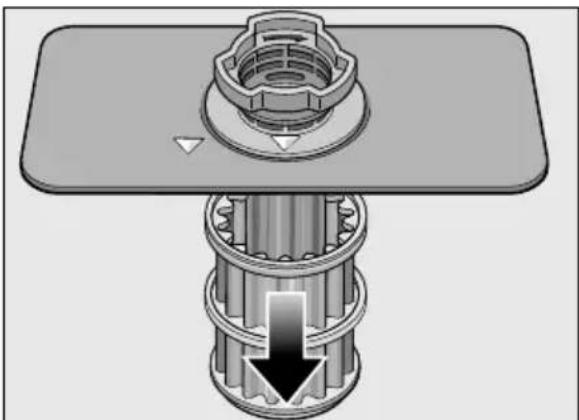
natural_image
Mechanical assembly diagram showing a bolted joint inserted into a cylindrical component with a downward arrow indicating force or motion (no text or symbols present)natural_image
Diagram of a kitchen appliance showing a propeller with directional arrows indicating rotation and assembly (no text or symbols)natural_image
Mechanical assembly diagram showing a tool interacting with a circular component (no text or symbols visible)natural_image
Mechanical diagram showing a gear and rotor assembly with motion arrows (no text or labels)- Namontujte sitka.
- Nasad'te znovu koše.
Tabulka poruch
text_image
Diagram showing two labeled components (① and ②) with arrows indicating movement or flow, likely illustrating a process or system.40

text_image
Diagram showing hands installing a component with numbered labels and directional arrows indicating process flow41

text_image
Diagram showing a hand placing a labeled object into a drawer with numbered arrows indicating steps ① and ②.42

natural_image
Diagram showing a kitchen appliance with a computer monitor and a close-up of its interior, illustrating the process of lifting or removing weights (no text or symbols present)
natural_image
Interior view of a kitchen appliance with white rack-mounted fixtures and a lid (no text or symbols visible)
natural_image
Composite image showing a washing machine with open lid and kitchen utensils, alongside a modern white corrugated dish (no text or symbols visible)
text_image
- 35-45° auto + eco 45-65° 65-75° 50°SM...
SB...

BOSCH

text_image
Diagram of a device control panel with labeled ports and digital display showing 108 and 24 microcontroller units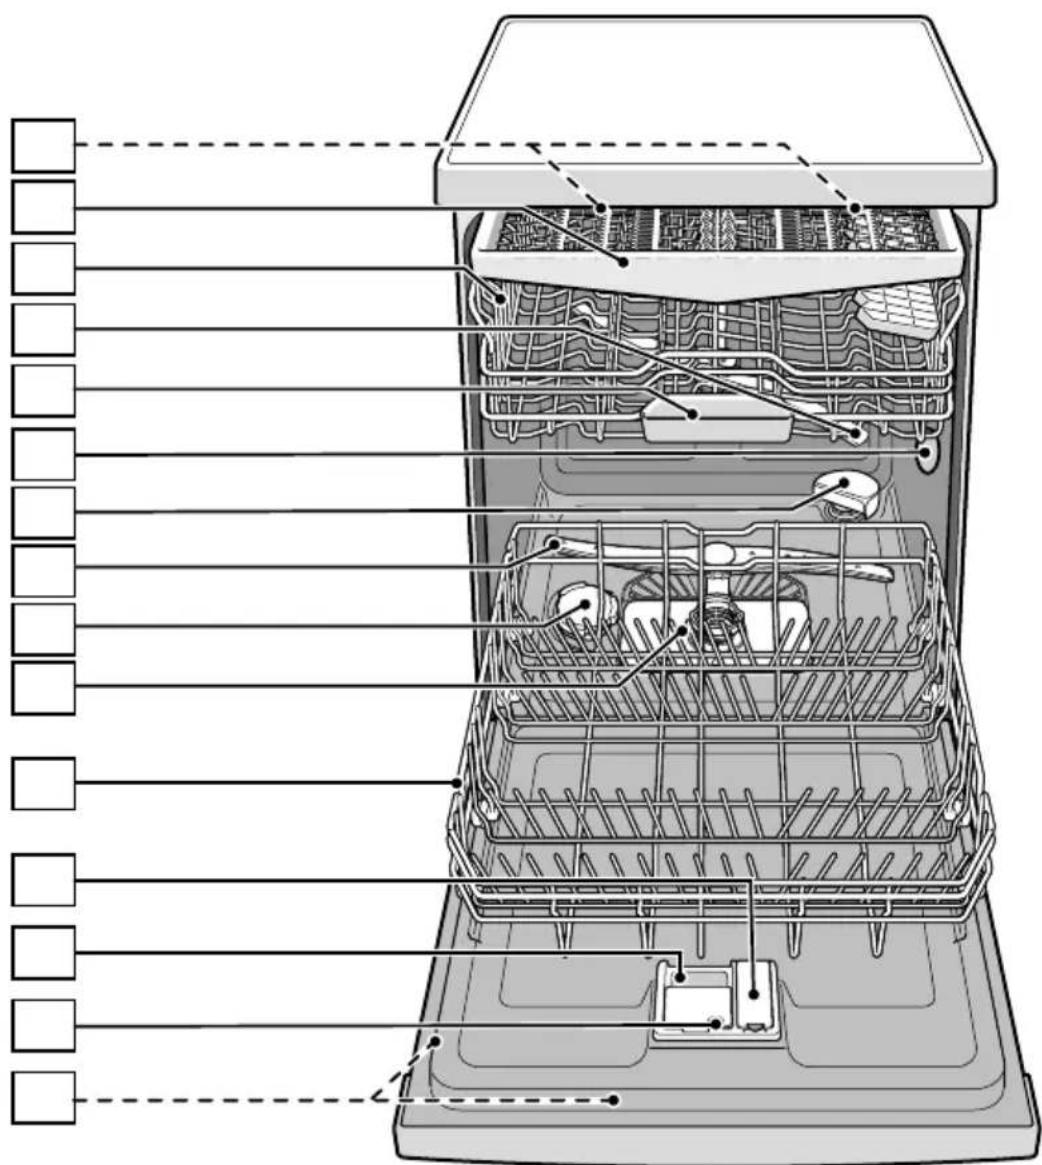
text_image
Diagram of a multi-chamber refrigerator with labeled internal compartments and external componentsTable des matières

Utilisation conforme .... 4

natural_image
Illustration of a conveyor belt pouring granular material into a conical container on a stovetop, with a lid and directional arrow symbol (no text or labels)* Selon le modèle
natural_image
Diagram of a device with two arrows indicating directional movement or assembly, no text or symbols present.natural_image
Illustration of a hand pouring liquid into a device with a magnified inset showing internal components (no text or symbols)natural_image
Illustration of a multi-tiered plastic crate filled with various kitchen utensils (no text or labels)fr Vaisselle
Remarque
natural_image
Two-panel illustration showing a container with a cross mark and a checkmark, no text or symbols present.Casseroles
natural_image
Illustration of a shopping basket filled with various food items (no text or symbols visible)Un conseil
natural_image
Interior view of a kitchen appliance drawer with cutlery and accessories (no text or symbols visible)natural_image
Technical diagram of a mechanical assembly with internal grid structure and directional arrows indicating motion (no text or symbols)
natural_image
Isometric technical diagram of a multi-level industrial or warehouse structure with no visible text, numbers, or symbols.natural_image
Technical diagram of a mechanical assembly with no visible text or symbolsnatural_image
Illustration of a container being lifted by a hook, surrounded by wavy lines (no text or symbols)natural_image
Illustration of a hand pressing down on a computer monitor with a starburst symbol (no text or labels)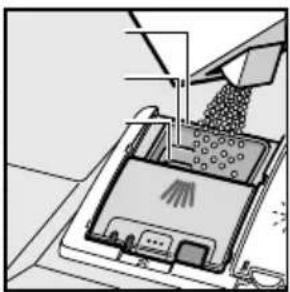
natural_image
Diagram of a kitchen appliance with a spoon and tray, showing no text or symbolsnatural_image
Mechanical component diagram showing a rotating assembly with a central hub and fan base (no text or symbols)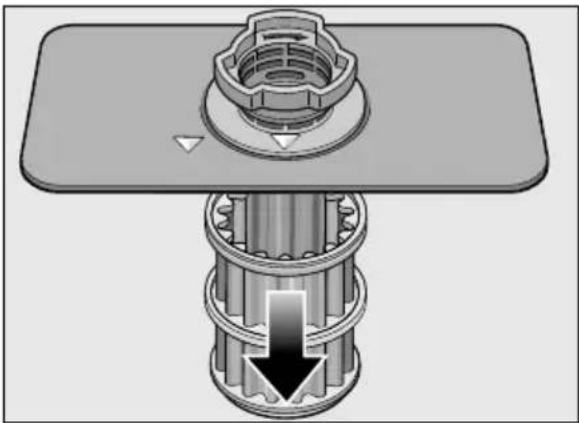
natural_image
Mechanical assembly diagram showing a bolted joint inserted into a cylindrical housing with a downward arrow indicating force or motion (no text or symbols present)natural_image
Diagram of a mechanical device showing a propeller with directional arrows indicating motion or force (no text or symbols present)natural_image
Mechanical assembly diagram showing a tool interacting with a circular component (no text or symbols visible)natural_image
Cross-sectional diagram of a mechanical device with arrows indicating motion or force direction (no text or symbols)natural_image
Simple diagram of a rectangular box with internal compartments and a circle pointing to the top-left corner (no text or symbols)
flowchart
graph TD
    A["Start"] --> B["Process Step 1"]
    B --> C["Process Step 2"]
    C --> D["End"]
    style A fill:#fff,stroke:#000
    style D fill:#fff,stroke:#000
text_image
Diagram showing two labeled components (① and ②) with arrows indicating movement or flow, likely illustrating a process or system.40

text_image
Diagram showing hands installing a component with numbered labels and directional arrows indicating process flow41

text_image
Diagram showing a hand placing a labeled object into a drawer with numbered arrows indicating steps ① and ②.42
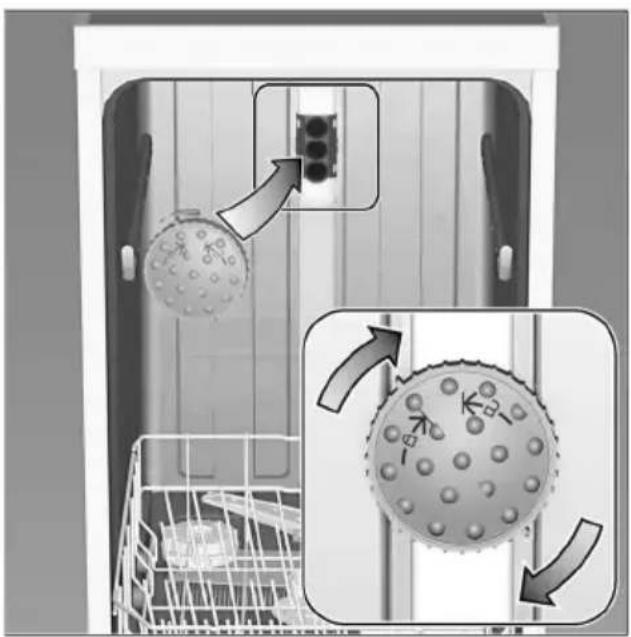
natural_image
Diagram showing a kitchen interior with a computer monitor and a close-up of a food item, illustrating the process of lifting or removing (no text or symbols present)
natural_image
Interior view of a kitchen appliance with a white rack unit and metal fixtures (no text or symbols visible)The image is too blurry to recognize any text content.

natural_image
Composite image showing a washing machine with open lid and kitchen utensils, alongside a modern white corrugated dish (no text or symbols visible)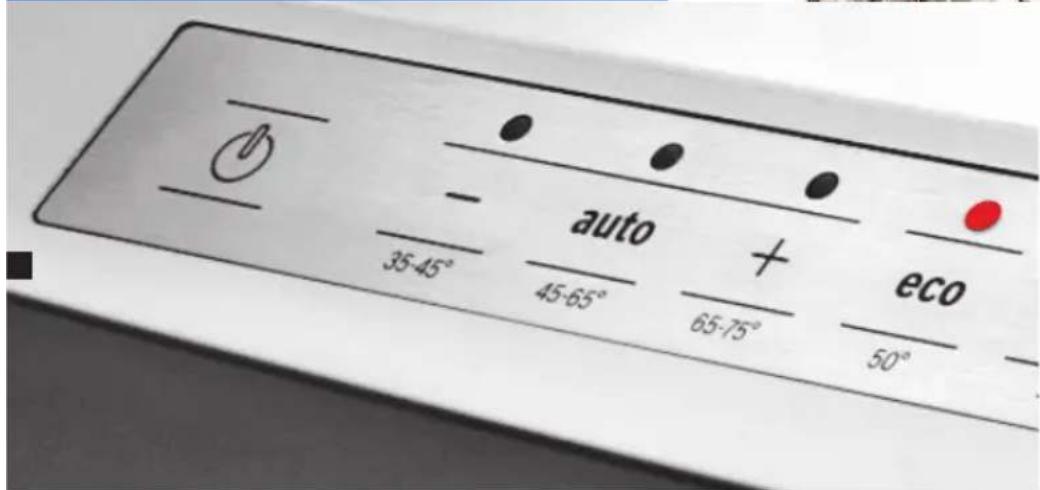
text_image
- 35-45° auto + eco 45-65° 65-75° 50°SM...
SB...

BOSCH

text_image
Diagram of a device control panel with labeled ports and digital display showing 108 and 24 microcontroller units
text_image
Diagram of a multi-chamber refrigerator with labeled internal compartments and external componentsSpis treści

natural_image
Illustration of a conveyor belt pouring granular material into a conical container, with a lid and directional arrow symbol (no text or labels)natural_image
Diagram of a device interior with arrows indicating movement or force, no readable text or symbols presentnatural_image
Illustration of a hand pouring liquid into a device with a circular label (no text or symbols present)text_image
Illustration showing two scenarios of a pump or filter device with a cross symbol and checkmark, likely illustrating a mechanical or electrical hazard.Garnki
natural_image
Illustration of a shopping basket filled with various food items (no text or symbols visible)Porada
natural_image
Interior view of a kitchen appliance drawer with open compartments containing kitchen utensils and cutlery (no text or labels visible)natural_image
Technical diagram of a mechanical assembly with internal grid structure and directional arrows indicating motion (no text or symbols)
natural_image
Isometric technical diagram of a multi-level industrial or warehouse structure with no visible text or symbolsnatural_image
Technical diagram of a mechanical assembly with no visible text or symbolsnatural_image
Illustration of a container being lifted by a hook, surrounded by wavy lines (no text or symbols)natural_image
Illustration of a hand pressing down on a computer monitor with a screwdriver (no text or symbols visible)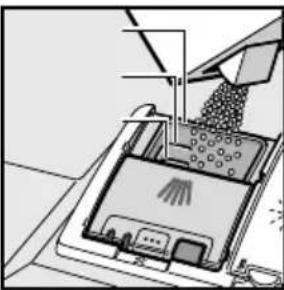
natural_image
Illustration of a kitchen appliance with a hand pouring granular material from a tray (no text or symbols visible)natural_image
Mechanical component diagram showing a rotating assembly with a central hub and fan base (no text or symbols)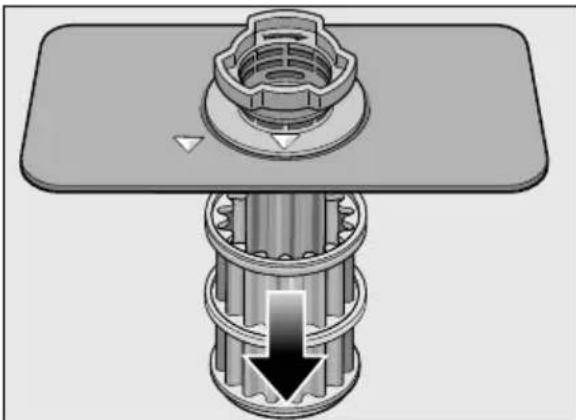
natural_image
Mechanical assembly diagram showing a bolted joint inserted into a cylindrical component with a downward arrow indicating force or motion (no text or symbols present)natural_image
Diagram of a kitchen appliance showing a propeller with directional arrows indicating rotation and assembly (no text or symbols)natural_image
Mechanical assembly diagram showing a tool interacting with a circular component (no text or symbols visible)natural_image
Cross-sectional diagram of a mechanical device with arrows indicating motion or force, no visible text or symbolstext_image
Diagram showing two labeled components (① and ②) with arrows indicating movement or flow, likely illustrating a process or system.40
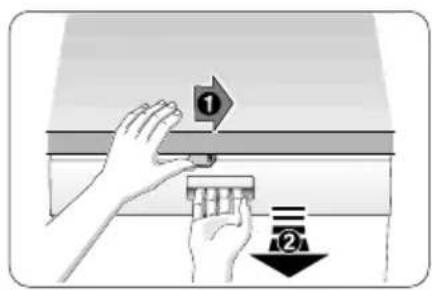
text_image
Diagram showing hands installing a component with numbered labels and directional arrows indicating process flow41

text_image
Diagram showing a hand pressing a button labeled with numbers 1 and 2 on a cabinet or drawer.42

natural_image
Diagram showing a kitchen appliance with a computer monitor and a close-up of its interior, illustrating the process of lifting or removing a ball (no text or symbols present)
natural_image
Interior view of a kitchen appliance with white rack-mounted fixtures and a cabinet (no visible text or symbols)
natural_image
Composite image showing a washing machine with open lid and kitchen utensils, alongside a modern white corrugated dish (no text or symbols visible)
text_image
- 35-45° auto + eco 45-65° 65-75° 50°SM...
SB...

BOSCH

text_image
Diagram of a device control panel with labeled ports and digital display showing 108 and 24 microcontroller units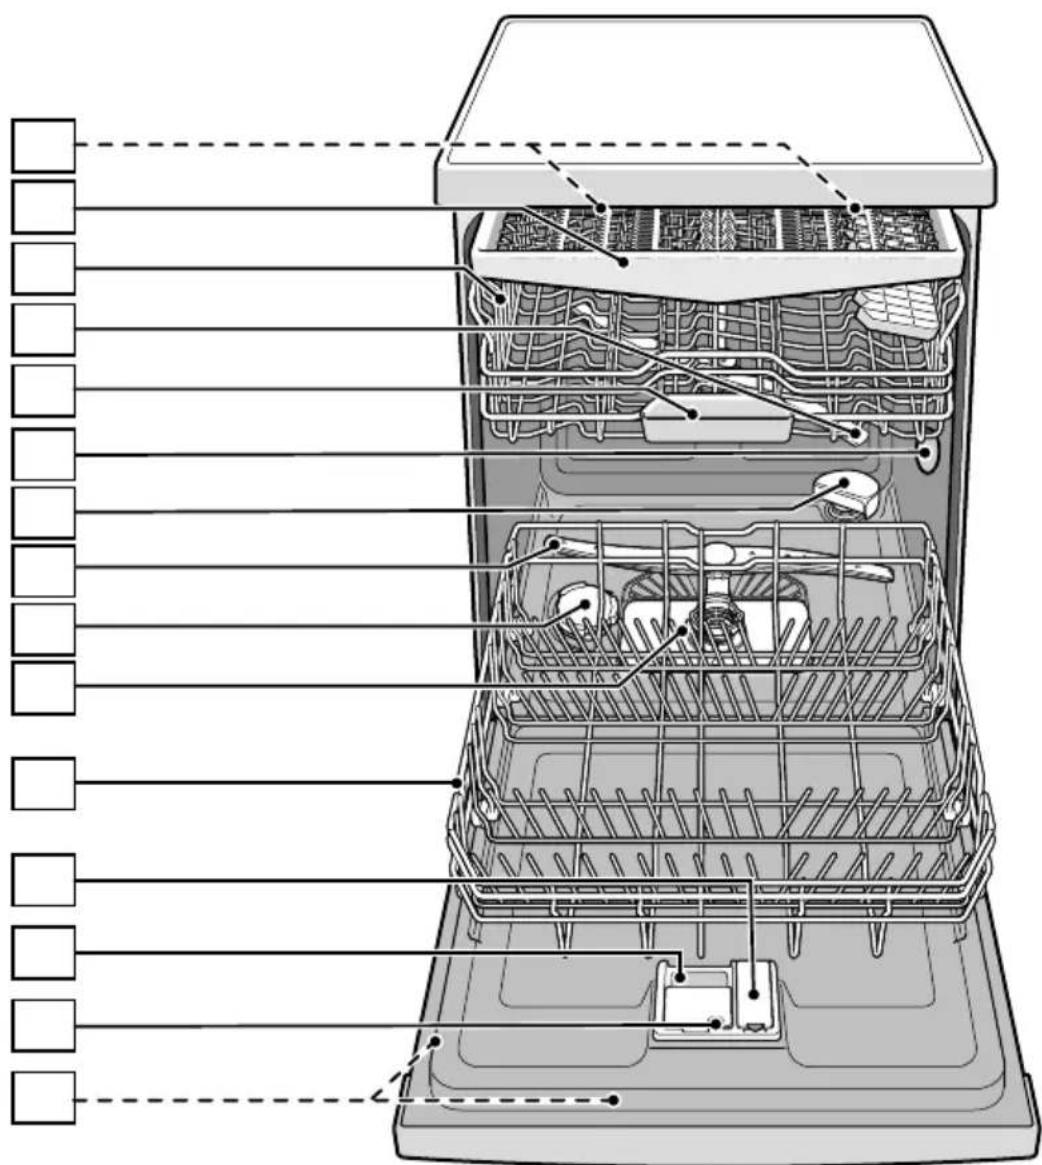
text_image
Diagram of a multi-chamber refrigerator with labeled internal compartments and external casingСодржина

natural_image
Illustration of a conveyor belt pouring granular material into a conical container on a stovetop, with a circular inset showing a magnified view (no text or symbols)natural_image
Diagram of a device interior with arrows indicating movement or operation, no visible text or symbolsnatural_image
Illustration of a hand pouring liquid into a device with a dropper, showing internal components (no text or symbols)natural_image
Illustration of a multi-tiered plastic basket filled with various kitchen utensils (no text or symbols visible)Напомена
natural_image
Two-panel illustration showing a container with a cross mark and a checkmark, no text or symbols present.Лонци
natural_image
Illustration of a shopping basket filled with various food items (no text or symbols visible)Совет
natural_image
Interior view of a kitchen appliance drawer with cutlery and utensils (no text or labels)natural_image
Technical diagram of a mechanical assembly with internal grid structure and directional arrows indicating motion (no text or symbols)
natural_image
Isometric technical diagram of a multi-level industrial or warehouse structure with no visible text or symbolsnatural_image
Technical diagram of a mechanical assembly with no visible text or symbolsnatural_image
Illustration of a container being lifted by a hook, surrounded by wavy lines (no text or symbols)natural_image
Illustration of a hand pressing down on a printer cover (no text or symbols visible)
natural_image
Diagram of a kitchen appliance with a tray and handle, showing material being inserted (no text or symbols)natural_image
Mechanical component diagram showing a rotating assembly with a central hub and surrounding blades (no text or symbols)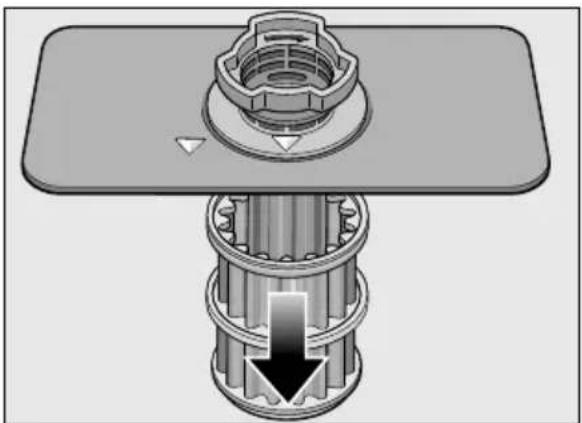
natural_image
Mechanical assembly diagram showing a bolted joint with a threaded shaft and gear mechanism (no text or symbols)natural_image
Diagram of a kitchen appliance showing a propeller with directional arrows indicating rotation and assembly (no text or symbols)natural_image
Mechanical assembly diagram showing a tool interacting with a circular component (no text or symbols visible)natural_image
Cross-sectional diagram of a mechanical device showing internal components and motion arrows (no text or symbols)natural_image
Simple diagram of a rectangular box with internal gray blocks and a circle pointing to it (no text or symbols)
flowchart
graph TD
    A["Start"] --> B["Process Step 1"]
    B --> C["Process Step 2"]
    C --> D["Process Step 3"]
text_image
Diagram showing two labeled components (① and ②) with arrows indicating movement or flow, likely illustrating a process or system.40

text_image
Diagram showing hands installing a component with numbered labels and directional arrows indicating process flow41
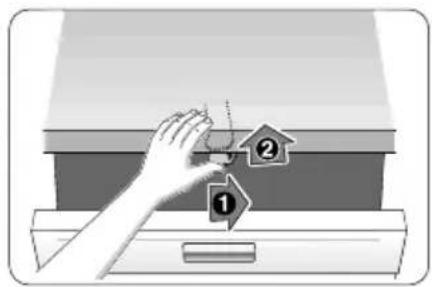
text_image
Diagram showing a hand placing a labeled object into a drawer with numbered arrows indicating steps ① and ②.42

natural_image
Diagram showing a kitchen appliance with a computer monitor and a close-up of its interior, illustrating the process of lifting or removing weights (no text or symbols present)
natural_image
Interior view of a kitchen appliance with a white rack unit and metal fixtures (no text or symbols visible)
natural_image
Composite image showing a washing machine with open lid and kitchen utensils, alongside a modern white corrugated dish (no text or symbols visible)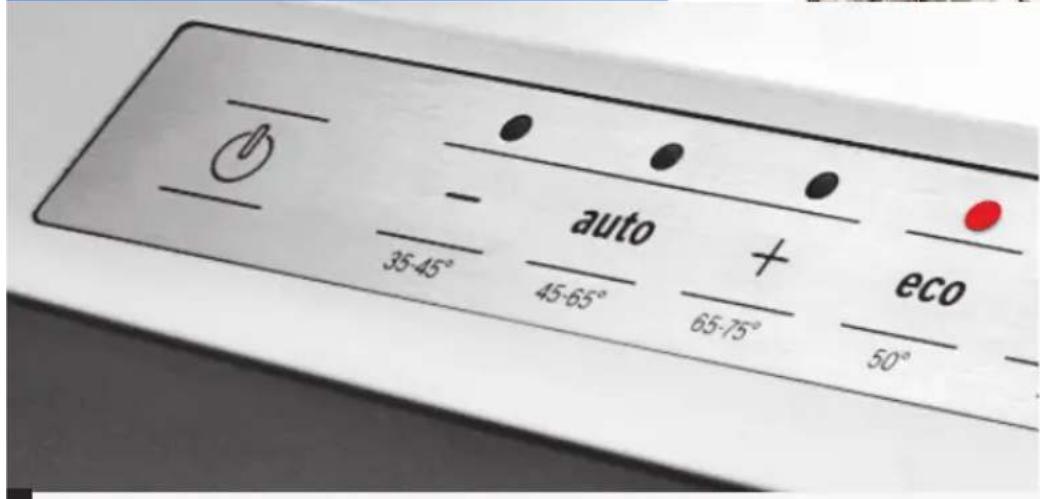
text_image
- 35-45° auto + eco 45-65° 65-75° 50°SM...
SB...

BOSCH
Obsah

Použitie k určenému účelu .... 4

natural_image
Illustration of a funnel pouring granular material into a conical container with a lid, no text or symbols present* podl'a modelu
natural_image
Diagram of a device interior with arrows indicating movement or operation, no readable text or symbols present.- Leštidlo opatrne nalejte do označenia max. plniaceho otvoru.

natural_image
Illustration of a hand pouring liquid into a device with a magnified inset showing internal components (no text or symbols)-
Veko zatvárajte, až kým počutel'ne nezaklapne.
-
Leštidlo vyliate pomimo odstráňte handričkou, aby pri d'alšom umývaní nedošlo k nadmernej tvorbe peny.
natural_image
Illustration of a plastic basket filled with various food items, no text or symbols present.Upozornenie
natural_image
Two-panel illustration showing a cooking pan with a crossed-out 'X' symbol and a checkmark inside, no text or symbols present.Hrnce
Dolný kôš 30
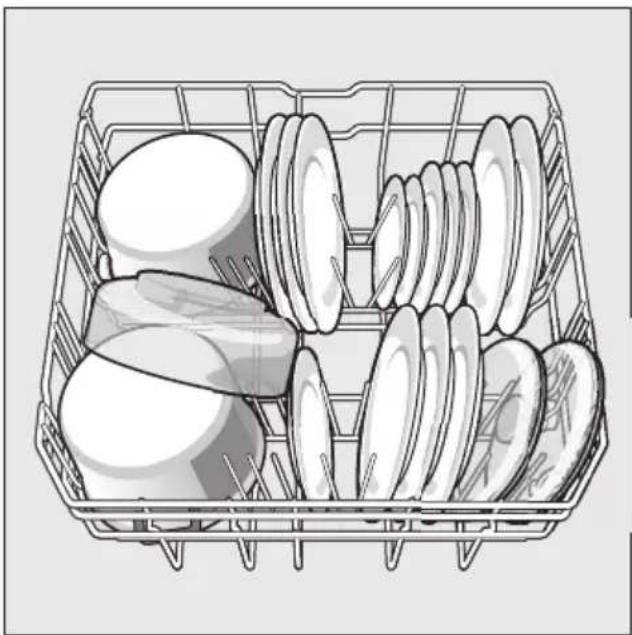
natural_image
Illustration of a shopping basket filled with various food items (no text or symbols visible)Tip
natural_image
Interior view of a kitchen appliance drawer with cutlery and utensils (no text or symbols visible)natural_image
Isometric technical diagram of a multi-level industrial machine with internal grid structure and directional arrows indicating flow or movement (no text or symbols present)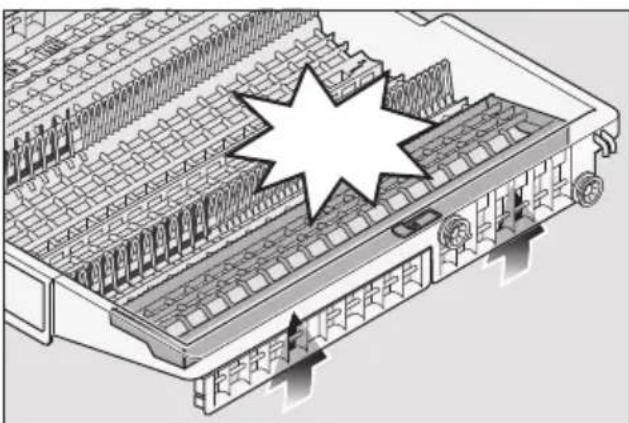
natural_image
Isometric technical diagram of a multi-level industrial or storage facility with a starburst overlay (no text or symbols)natural_image
Technical diagram of a mechanical assembly with no visible text or symbolsnatural_image
Illustration of a container with a hook attached to a grid-like structure (no text or symbols)natural_image
Illustration of a hand inserting a component into a device (no text or symbols visible)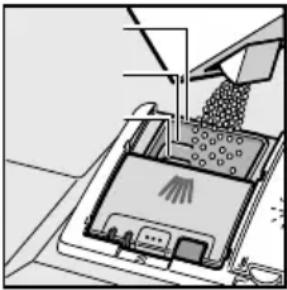
natural_image
Illustration of a robotic arm handling a device with a brush (no text or symbols visible)(VariousSpeedPlus) \*
natural_image
Mechanical component diagram showing a rotating assembly with a central hub and fan base (no text or symbols)
natural_image
Mechanical assembly diagram showing a bolted joint inserted into a cylindrical component with a downward arrow indicating force or motion (no text or symbols present)natural_image
Diagram of a mechanical device with two propellers and directional arrows indicating motion (no text or symbols)natural_image
Mechanical assembly diagram showing a tool interacting with a circular component (no text or symbols visible)natural_image
Mechanical diagram showing a gear and rotor assembly with motion arrows (no text or labels)natural_image
Simple diagram with a circle pointing to a rectangular box containing three gray rectangles, no text or symbols present.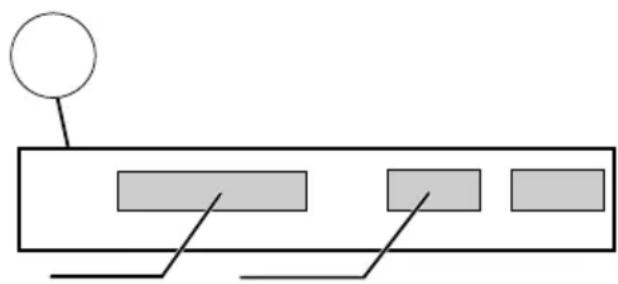
flowchart
graph TD
    A["Start"] --> B["Process Step 1"]
    B --> C["Process Step 2"]
    C --> D["End"]
    style A fill:#fff,stroke:#000
    style D fill:#fff,stroke:#000
text_image
Diagram showing two labeled components (① and ②) with arrows indicating movement or flow, likely illustrating a process or system.40

text_image
Diagram showing hands installing a component with numbered labels and directional arrows indicating process steps41

text_image
Diagram showing a hand placing a labeled object into a drawer with numbered arrows indicating steps ① and ②.42

natural_image
Diagram showing a kitchen appliance with a computer monitor and a close-up of its interior, illustrating the process of lifting or removing weights (no text or symbols present)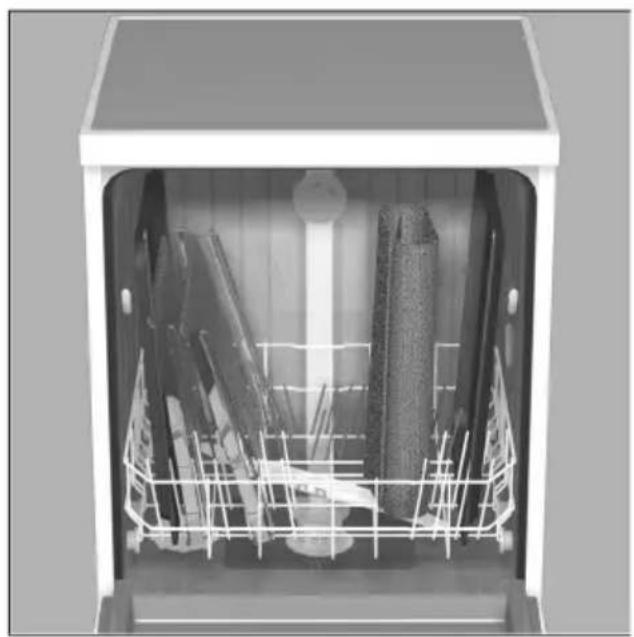
natural_image
Interior view of a kitchen appliance with a white rack unit and metal fixtures (no text or symbols visible)
natural_image
Composite image showing a washing machine with open lid and kitchen utensils, alongside a modern white corrugated dish (no text or symbols visible)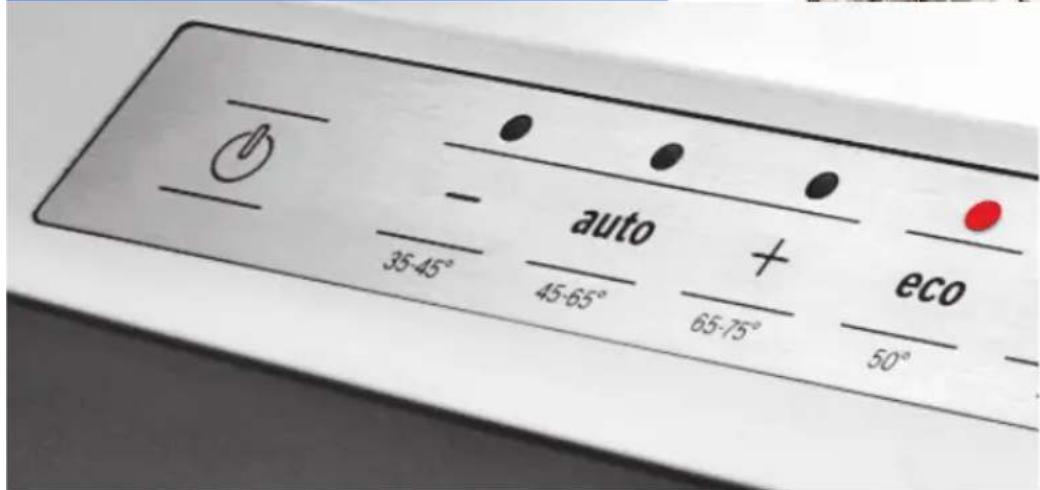
text_image
- 35-45° auto + eco 45-65° 65-75° 50°SM...
SB...

BOSCH

text_image
Diagram of a device control panel with labeled ports and digital display showing 108 and 24 microcontroller units
text_image
Diagram of a multi-chamber refrigerator with labeled internal compartments and external casingCuprins

Folosire conform destinatiei .. 4

flowchart
graph TD
    A["Top Row: White Arrow"] --> B["Bottom Row: Black Block"]
    C["Right Row: Black Block"] --> D["Bottom Row: Black Block"]
    E["Left Row: White Arrow"] --> F["Right Row: Black Block"]
natural_image
Illustration of a conveyor belt system with granular material inside, emitting powder from a funnel (no text or symbols)natural_image
Diagram of a device with two labeled components and directional arrows indicating movement or assembly (no text or symbols present)natural_image
Illustration of a hand pouring liquid into a device with a magnified inset showing liquid being poured into the container (no text or symbols)natural_image
Black-and-white illustration of a multi-tiered plastic crate filled with various kitchen utensils (no text or symbols visible)Indicatie
natural_image
Two-panel illustration showing a piston bucket and a tray with a cross symbol, no text or labels present.Oale și cratite
Coşul de vase de jos 30

natural_image
Illustration of a shopping basket filled with eggs and other plates (no text or symbols)Sfat util
natural_image
Interior view of a kitchen appliance drawer with cutlery and utensils (no text or labels visible)text_image
Technical diagram of a mechanical assembly with labeled components and directional arrows indicating motion or flow.
natural_image
Isometric technical diagram of a multi-level industrial or warehouse structure with no visible text or symbolsTepi rabatabili \*
natural_image
Technical diagram of a mechanical assembly with no visible text or symbolsnatural_image
Illustration of a container with a dollar sign attached to a wire rack, no text or symbols presentnatural_image
Illustration of a hand pressing down on a computer monitor with a starburst symbol (no text or labels)
natural_image
Illustration of a robotic arm interacting with a device (no text or symbols visible)natural_image
Mechanical component diagram showing a rotating assembly with a central hub and surrounding blades (no text or symbols)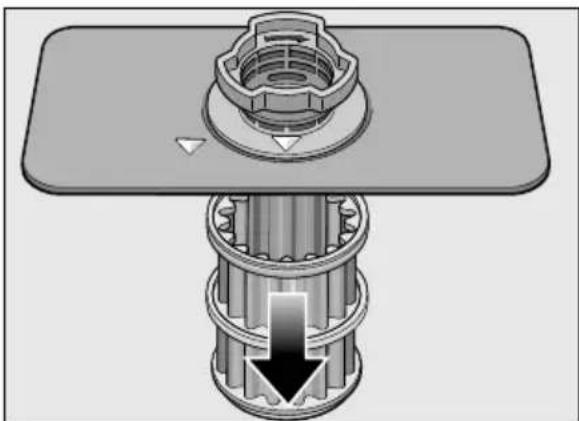
natural_image
Mechanical assembly diagram showing a bolted joint inserted into a cylindrical component with a downward arrow indicating force or motion (no text or symbols present)natural_image
Diagram of a mechanical assembly showing a propeller with directional arrows indicating motion (no text or symbols)natural_image
Mechanical assembly diagram showing a tool interacting with a circular component (no text or symbols visible)natural_image
Cross-sectional diagram of a mechanical device showing internal components and motion arrows (no text or symbols)natural_image
Pure diagram of a rectangular block with internal gray blocks and an external circle, no text or symbols present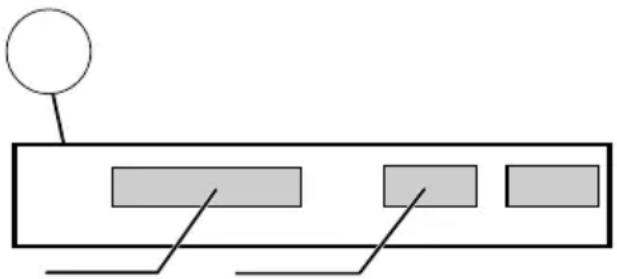
natural_image
Pure electrical circuit lines without any symbolstext_image
Diagram showing two labeled components (① and ②) with arrows indicating movement or flow, likely illustrating a process or system.40
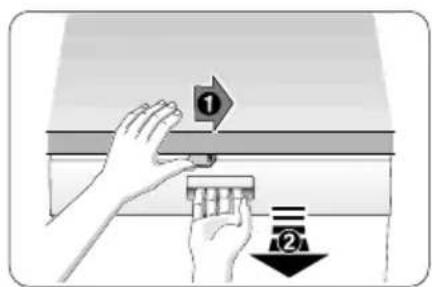
text_image
Diagram showing hands installing a component with numbered labels and directional arrows indicating assembly or inspection steps.41

text_image
Diagram showing a hand placing a small object into a drawer with labeled parts ① and ②, likely illustrating a procedure or installation.42

text_image
Diagram illustrating a food delivery or storage system with labeled components and directional arrows indicating flow or movement.
natural_image
Interior view of a kitchen appliance with a white rack unit and metal fixtures (no text or symbols visible)
natural_image
Composite image showing a washing machine with open lid and kitchen utensils, alongside a modern white corrugated dish (no text or symbols visible)
text_image
- 35-45° auto + eco 45-65° 65-75° 50°SM...
SB...

BOSCH

text_image
Diagram of a device control panel with labeled ports and digital display showing 108 and 24 microcontroller units
text_image
Diagram of a multi-chamber refrigerator with labeled internal compartments and external casingЗміст

flowchart
graph TD
    A["Top Arrow"] --> B["Bottom Arrow"]
    C["Right Arrow"] --> D["Bottom Arrow"]
    E["Left Arrow"] --> F["Right Arrow"]
natural_image
Illustration of a conveyor belt pouring granular material into a conical container, with a lid and directional arrow symbol (no text or labels)natural_image
Diagram of a device with two arrows pointing to internal components (no text or symbols)natural_image
Illustration of a hand pouring liquid into a device with a dropper, showing internal components (no text or symbols)natural_image
Illustration of a multi-tiered plastic basket filled with various kitchen utensils (no text or symbols visible)Вказівка
text_image
Diagram showing two scenarios of a mechanical device with a cross symbol and a checkmark, likely illustrating a correct or incorrect operation.Каструлі
natural_image
Illustration of a shopping basket filled with various food items (no text or symbols)Порада
natural_image
Illustration of a kitchen appliance with open drawer and cutlery (no text or symbols)text_image
Technical diagram showing a multi-level industrial or storage unit with labeled components and directional arrows indicating flow or movement.
natural_image
Isometric architectural diagram of a multi-level building with grid-like structure and a starburst overlay (no text or symbols)Складні штирі \*
natural_image
Technical diagram of a mechanical assembly with rods and gears, showing motion indicators (no text or symbols)natural_image
Illustration of a container with a hook attached to a grid-like structure (no text or symbols)natural_image
Illustration of a hand pressing down on a device component (no text or symbols visible)
natural_image
Illustration of a robotic arm interacting with a device (no text or symbols visible)natural_image
Mechanical assembly diagram showing a rotating component with directional arrows (no text or symbols)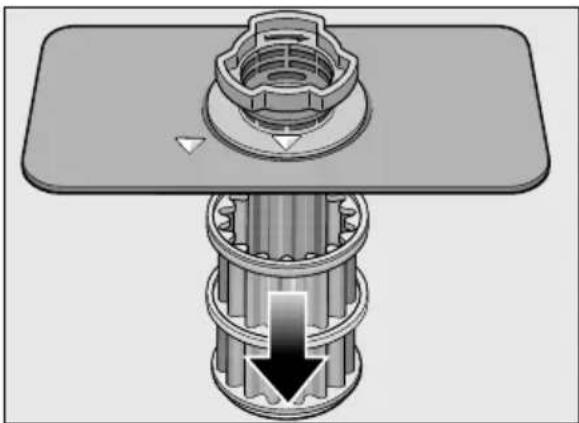
natural_image
Mechanical assembly diagram showing a bolted joint inserted into a cylindrical component with a downward arrow indicating force or motion (no text or symbols present)natural_image
Diagram of a kitchen appliance showing a propeller with directional arrows indicating rotation and assembly (no text or symbols)natural_image
Mechanical assembly diagram showing a rotating component with a tool interacting with it (no text or symbols present)natural_image
Cross-sectional diagram of a mechanical device showing internal components and motion arrows (no text or symbols)natural_image
Simple diagram of a rectangular box with two internal gray rectangles and a circle on the top (no text or symbols)
flowchart
graph TD
    A["Start"] --> B["Process Box"]
    B --> C["Process Block 1"]
    B --> D["Process Block 2"]
    B --> E["Process Block 3"]
text_image
Diagram showing two labeled components (① and ②) with arrows indicating movement or flow, likely illustrating a process or system.40

text_image
Diagram showing hands installing a component with numbered labels and directional arrows indicating process flow41

text_image
Diagram showing a hand placing a labeled object into a drawer with numbered arrows indicating steps ① and ②.42

natural_image
Diagram showing a kitchen appliance with a computer monitor and a close-up of its interior, illustrating the process of lifting or removing weights (no text or symbols present)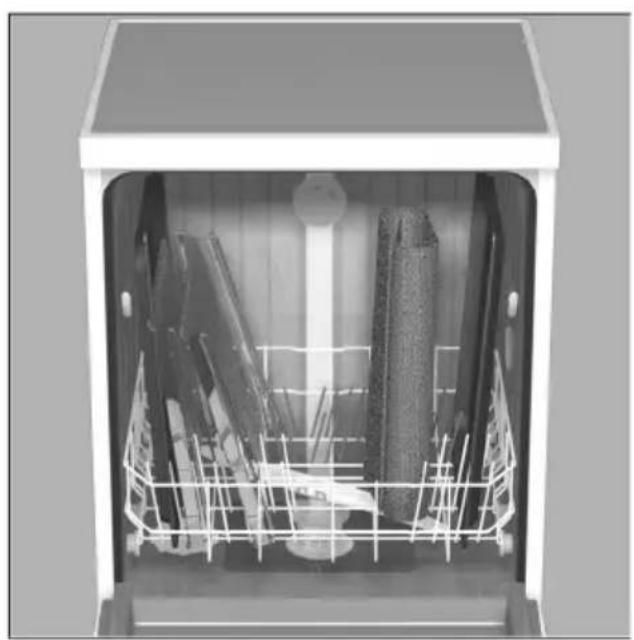
natural_image
Interior view of a kitchen appliance with white rack-mounted fixtures and a cabinet (no visible text or symbols)
natural_image
Composite image showing a washing machine with open lid and kitchen utensils, alongside a modern white corrugated dish (no text or symbols visible)
text_image
- 35-45° auto + eco 45-65° 65-75° 50°SM...
SB...

BOSCH
text_image
Diagram of a device control panel with labeled ports and digital display showing 108 and 24 microcontroller units
text_image
Technical diagram of a multi-chamber refrigerator with labeled components in ChineseTartalomjegyzék

natural_image
Illustration of a conveyor belt pouring granular material into a conical container on a stovetop, with a lid and directional arrow symbol (no text or labels)* modelltöl függöen
natural_image
Diagram of a device with two arrows pointing to internal components (no text or symbols)natural_image
Illustration of a hand pouring liquid into a device with a dropper, showing internal components (no text or symbols)natural_image
Illustration of a multi-tiered plastic basket filled with various kitchen utensils (no text or symbols visible)Utasítás
natural_image
Two-panel illustration showing a mechanical device with a cross mark and checkmark, no text or symbols present.Fazekak
natural_image
Illustration of a shopping basket filled with eggs and other eggs (no text or symbols)Javaslat
natural_image
Interior view of a kitchen appliance drawer with open compartments containing kitchen utensils and utensils (no text or labels visible)natural_image
Technical diagram of a mechanical assembly with grid-like components and directional arrows indicating motion (no text or symbols)
natural_image
Isometric architectural diagram of a multi-level building with grid patterns and structural elements, featuring a starburst overlay (no text or symbols)natural_image
Technical diagram of a mechanical assembly with rods and a gear mechanism, showing motion direction (no text or symbols)natural_image
Illustration of a container with a hook attached to a grid-like structure (no text or symbols)natural_image
Illustration of a hand pressing down on a device component (no text or symbols visible)
natural_image
Illustration of a robotic arm interacting with a device (no text or symbols visible)hu Mosogatószer
natural_image
Mechanical assembly diagram showing a rotating component with directional arrows (no text or symbols)
natural_image
Mechanical assembly diagram showing a bolted joint with a gear and shaft, no text or symbols presentnatural_image
Diagram of a kitchen appliance showing a propeller with directional arrows indicating rotation and assembly (no text or symbols)natural_image
Mechanical assembly diagram showing a gear and cam mechanism with no visible text or symbolsnatural_image
Cross-sectional diagram of a mechanical device with internal components and directional arrows (no text or symbols)natural_image
Simple diagram of a rectangular box with internal compartments and a circle pointing to the top-left corner (no text or symbols)
flowchart
graph TD
    A["Start"] --> B["Process Block 1"]
    B --> C["Process Block 2"]
    C --> D["Output Path"]
    style A fill:#fff,stroke:#000
    style D fill:#fff,stroke:#000
text_image
Diagram showing two labeled components (① and ②) with arrows indicating movement or flow, likely illustrating a process or system.40

text_image
Diagram showing hands installing a component with numbered labels and directional arrows indicating process steps41

text_image
Diagram showing a hand placing a labeled object into a drawer with numbered arrows indicating steps ① and ②.42

natural_image
Diagram showing a kitchen appliance with a computer monitor and a close-up of its interior, illustrating the process of lifting or removing weights (no text or symbols present)
natural_image
Interior view of a kitchen appliance with a white rack unit and metal fixtures (no text or symbols visible)
natural_image
Composite image showing a washing machine with open lid and kitchen utensils, alongside a modern white corrugated dish (no text or symbols visible)
text_image
- 35-45° auto + eco 45-65° 65-75° 50°SM...
SB...

BOSCH

text_image
Diagram of a device control panel with labeled ports and digital display showing 108 and 24 microcontroller units
text_image
Diagram of a multi-chamber refrigerator with labeled internal compartments and external casingSadržaj

Upotreba u skladu s odredbama 4

Sigurnosna uputstva ..... 4
Pre nego što aparat pustite u rad. . . . 4
Prilikom dopreme .... 5
Prilikom instalacije .... 5
U svakodnevnom radu ..... 6
Zaključavanje vrata. 6
U slučaju oštećenja .....6
Pri odnošenju na otpad ..... 7

flowchart
graph TD
    A["Top Row: White Arrow"] --> B["Bottom Row: Black Block"]
    C["Right Row: Black Block"] --> D["Bottom Row: Black Block"]
    E["Left Row: White Arrow"] --> F["Right Row: Black Block"]
natural_image
Illustration of a funnel pouring granular material into a conical container with a lid, no text or symbols present* zavisno od modela
Upotreba sredstava za pranje sa sonom komponentom
Kod upotrebe kombinovanih sredstava za pranje sa sonom komponentom može se uopšteno odreći specijalne soli do tvrdoće vode od 21° dH (37° fH, 26° Clarke, 3,7 mmol/l). Kod tvrdoće vode preko 21° dH i ovde je potrebna upotreba specijalne soli.
natural_image
Diagram of a device with two arrows indicating directional movement, no text or symbols present- Sredstvo za ispiranje i davanje sjaja pažljivo uspite do znaka max. na otvoru za punjenje.

natural_image
Illustration of a hand pouring liquid into a device with a droplet inside (no text or symbols)-
Zatvoriti poklopac tako da se čujno učvrsti.
-
Proliveno sredstvo za ispiranje po potrebi ukloniti krpom da prilikom sledeæeg ispiranja ne bi došlo do prekomernog stvaranja pene.
Podešavanje količine sredstva za ispiranje i davanje sjaja
Količina dodavanja sredstva za ispiranje i davanje sjaja se može podešavati od r:00 do r:06. Količinu dodavanja sredstva za ispiranje i davanje sjaja postavite na r:05 da bi se dobio vrlo dobar rezultat sušenja. Fabrički već je podešeno na r:05.
Količinu sredstva za ispiranje i davanje sjaja menjajte samo ako na posuđu ostaju muzge (podesiti niži stepen) ili mrlje od vode (podesiti viši stepen).
-
Otvorite vrata.
-
Uključiti prekidač za UKLJUČIVANJE / ISKLJUČIVANJE 1.
-
Programsku tipku □A zadržati pritisnutu i pritiskati tipku START □10 sve dok brojčani displej ne pokaže H:O....
-
Otpustiti obe tipke. Kontrolna sijalica tipke □A trepti, a na brojčanom displeju □3 svetli fabrički podešena vrednost H:04.
-
Programsku tipku □ A pritiskati sve dok se na brojčanom displeju □ 3 ne pojavi fabrički podešena vrednost r:05.
natural_image
Illustration of a multi-tiered plastic crate filled with various kitchen utensils (no text or symbols visible)Uputstvo
Pazite da se delovi posuđa ne nalaze iznad prihvatne posude za tablete 24. Oni mogu da blokiraju poklopac komore za sredstvo za pranje 32.

text_image
Two-panel illustration showing a container with a cross mark and a checkmark, likely illustrating a safety or inspection scenario.Lonci
natural_image
Illustration of a shopping basket filled with various food items (no text or symbols visible)Savet
Jako zaprljano posudje (lonce) bi trebalo staviti u donju korpu. Usled jačeg mlaza iz prskalice dobićete bolji rezultat pranja posudja.
Savet
Ostale primere, kako da optimalno punite svoju mašinu za pranje posudja, naći ćete na našoj Homepage kao besplatni Download. Odgovarajuću Internet-adresu vidite na poledjini ovog uputstva za upotrebu.
Fioka za pribor za ručavanje
Poređajte pribor za ručavanje u fioku za pribor za ručavanje 21 kao što je prikazano na slici. Odvojeno raspoređivanje olakšava vađenje nakon pranja.
natural_image
Illustration of a kitchen appliance with open drawer and side dishes (no text or symbols)text_image
Technical diagram of a mechanical assembly with labeled components and directional arrows indicating motion or flow.
natural_image
Isometric technical diagram of a multi-level industrial or warehouse structure with no visible text or symbolsPreklopne kandže \*
* zavisno od modela Kandže se mogu preklapati radi boljeg raspoređivanja šerpi, činija i čaša.
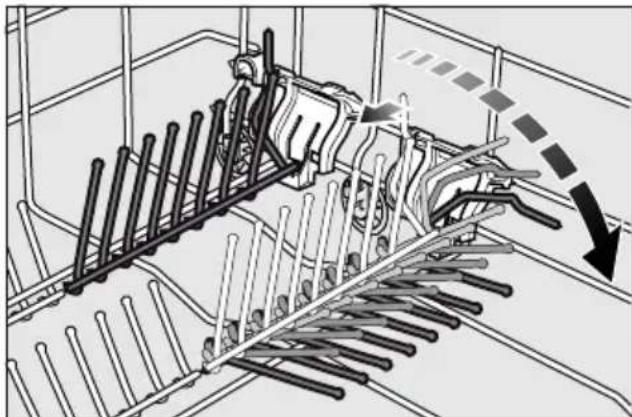
natural_image
Technical diagram of a mechanical assembly with no visible text or symbolsDržač za male posude \*
* zavisno od modela
natural_image
Illustration of a container with a hook attached to a grid-patterned surface (no text or symbols)Podešavanje visine korpe
Gornja korpa za posuđe 22 se po visini može podešavati u 3 stepena da bi se napravilo više mesta ili u gornjoj ili u donjoj korpi.
Visina aparata 81,5 cm
| Gornja korpa | Donja korpa | |
| Stepen 1 maks. ø 16 cm | 30 cm | |
| Stepen 2 maks. ø 18,5 cm | 27,5 cm | |
| Stepen 3 maks. ø 21 cm | 25 cm |
Visina aparata 86,5 cm
| Gornja korpa | Donja korpa | |
| Stepen 1 maks. ø 18 cm | 33 cm | |
| Stepen 2 maks. ø 20,5 cm | 30,5 cm | |
| Stepen 3 maks. ø 23 cm | 28 cm |
-
Izvucite gornju korpu za posuđe 22.
-
Radi spuštanja pritisnite prema unutra jednu za drugom obe poluge levo i desno na spoljašnoj strani korpe. Korpu pritom čvrsto držite sa strane za gornju ivicu da ne bi usled trzaja pala dole.
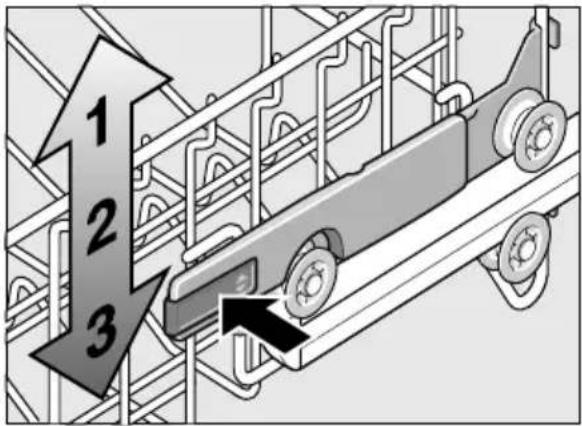
text_image
1 2 3-
Radi podizanja uhvatite korpu sa strane za gornju ivicu i podignite je.
-
Pre nego što ponovo umetnete korpu proverite da li sa obe strane naleže na istoj visini. U suprotnom vrata aparata neće moći da se zatvore i gornja prskalica neće imati kontakt s cirkulacijom vode.

natural_image
Illustration of a hand pressing down on a computer monitor with a starburst symbol (no text or labels)
natural_image
Illustration of a robotic arm interacting with a device (no text or symbols visible)- Poklopac komore za sredstvo za pranje zatvarati gurajući ga naviše dok se zatvarač ne učvrsti bez problema.
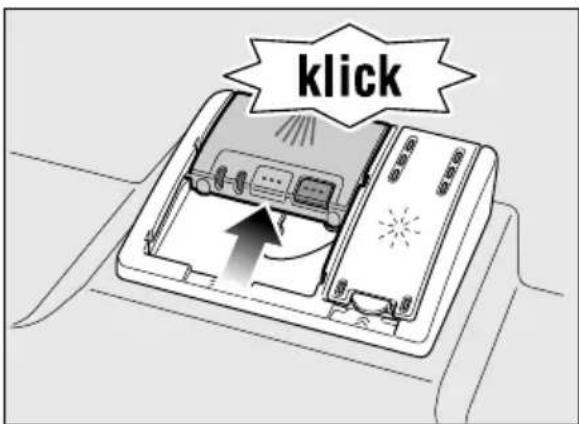
text_image
klicknatural_image
Mechanical component diagram showing a rotating assembly with a central hub and fan base (no text or symbols)
natural_image
Mechanical assembly diagram showing a bolted joint inserted into a cylindrical component with a downward arrow indicating force or motion (no text or symbols present)- Eventualne ostatke ukloniti a sita očistiti pod mlazom tekuće vode.
- Sistem sita ponovo ugraditi obrnutim redosledom i paziti na to da strelice za obeležavanje nakon zatvaranja stoje jedna naspram druge.
sr Smetnja, šta činiti?
Prskalice
Kamenac i nečistoća iz sapunice mogu blokirati mlaznice i ležajeve prskalica [23] i [27].
- Izlazne mlaznice prskalica kontrolisati u odnosu na začepljenja.
- Odvrnuti gornju prskalicu 23.
- Donju prskalicu 27 skinuti na gore.
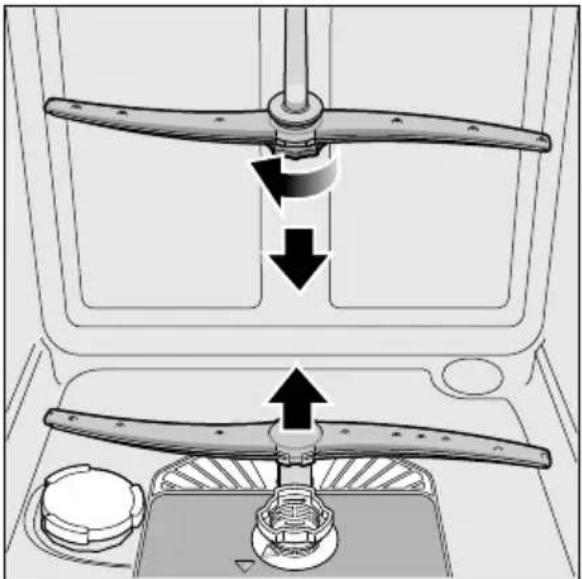
natural_image
Diagram of a mechanical device with two blades and a central hub, showing directional arrows indicating motion (no text or symbols)- Prskalice očistiti pod mlazom tekuće vode.
- Prskalice ponovo pričvrstiti odn. čvrsto zavrnuti.
natural_image
Mechanical assembly diagram showing a tool interacting with a circular component (no text or symbols visible)- Proveriti da li se na propeleru pumpe nalaze strana tela i po potrebi ih uklonite.
- Poklopac vratite u prvobitni položaj, i pritisnite na dole da bi potpuno ušao u ležište (klik).

natural_image
Cross-sectional diagram of a mechanical device showing internal components and motion arrows (no text or symbols)natural_image
Simple diagram with a circle pointing to a rectangular box containing three gray rectangles, no text or symbols present.
flowchart
graph TD
    A["Start"] --> B["Process 1"]
    A --> C["Process 2"]
    A --> D["Process 3"]
Imajte poverenja u kompetentnost proizvođača. Obratite nam se. Tako ćete biti sigurni da će popravku izvršiti obučeni servisni tehničari koji su opremljeni originalnim rezervnim delovima za vaše aparate za domaćinstvo.
* zavisno od modela

text_image
Diagram showing two labeled components (① and ②) with arrows indicating movement or flow, likely illustrating a process or system.40

text_image
Diagram showing hands installing a component with numbered labels and directional arrows indicating process flow41

text_image
Diagram showing a hand pressing a button labeled with numbers 1 and 2 on a cabinet or drawer.42
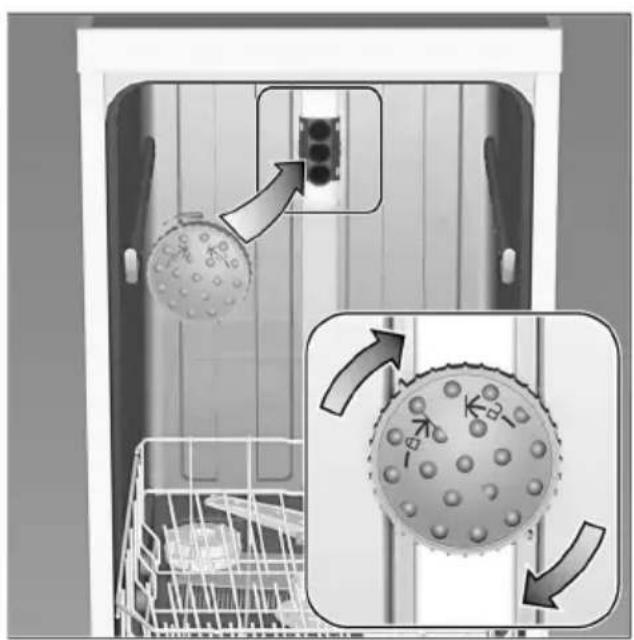
natural_image
Diagram showing a kitchen appliance with a computer monitor and a close-up of its interior, illustrating the process of lifting or removing weights (no text or symbols present)
natural_image
Interior view of a kitchen appliance with white rack-mounted fixtures and a cabinet (no visible text or symbols)
natural_image
Composite image showing a washing machine with open lid and kitchen utensils, alongside a modern white corrugated dish (no text or symbols visible)
text_image
- 35-45° auto + eco 45-65° 65-75° 50°SM...
SB...

BOSCH

text_image
Diagram of a device control panel with labeled ports and digital display showing 108 and 24 microcontroller units
text_image
Diagram of a multi-chamber refrigerator with labeled internal compartments and external casingInhoudsopgave

flowchart
graph TD
    A["Top Row: White Arrow"] --> B["Bottom Row: Black Block"]
    C["Right Row: Black Block"] --> D["Bottom Row: Black Block"]
    E["Left Row: White Arrow"] --> F["Right Row: Black Block"]
natural_image
Illustration of a funnel pouring granular material into a conical container with a lid, no text or symbols presenttext_image
Diagram showing a device with labeled components and directional arrows indicating movement or flownatural_image
Illustration of a hand pouring liquid into a device with a magnified inset showing internal components (no text or symbols)natural_image
Black-and-white illustration of a multi-tiered plastic crate filled with various kitchen utensils (no text or symbols visible)Aanwijzing
natural_image
Two-panel illustration showing a mechanical device with a cross mark and checkmark, no text or symbols present.Pannen
natural_image
Illustration of a shopping basket filled with various food items (no text or symbols)Tip
natural_image
Interior view of a kitchen appliance drawer with cutlery and utensils (no text or symbols visible)natural_image
Technical diagram of a mechanical assembly with grid-like components and directional arrows indicating motion (no text or symbols)
natural_image
Isometric architectural diagram of a multi-level building with grid patterns and structural elements, featuring a starburst overlay (no text or symbols)Omklapbare bordensteunen \*
natural_image
Technical diagram of a mechanical assembly with rods and gears, showing motion direction (no text or symbols)natural_image
Illustration of a container with a hook attached to a grid-patterned surface (no text or symbols)natural_image
Illustration of a hand pressing down on a device component (no text or symbols visible)
natural_image
Illustration of a robotic arm interacting with a device (no text or symbols visible)De fabrieksinstelling is 5:01.
natural_image
Mechanical component diagram showing a rotating assembly with a central hub and fan base (no text or symbols)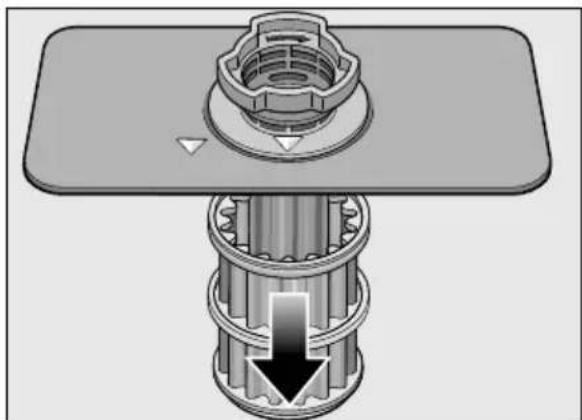
natural_image
Mechanical assembly diagram showing a bolted joint with a central shaft and gear mechanism (no text or symbols)natural_image
Diagram of a kitchen appliance showing a propeller with directional arrows indicating rotation and assembly (no text or symbols)natural_image
Mechanical assembly diagram showing a tool interacting with a circular component (no text or symbols visible)natural_image
Cross-sectional diagram of a mechanical device with arrows indicating motion or force direction (no text or symbols)text_image
Diagram showing two labeled components (① and ②) with arrows indicating movement or flow, likely illustrating a process or system.40

text_image
Diagram showing hands installing a component with numbered labels and directional arrows indicating process flow41

text_image
Diagram showing a hand pressing a button labeled with numbers 1 and 2 on a cabinet or drawer.42

natural_image
Diagram showing a kitchen appliance with a computer monitor and a close-up of its interior, illustrating the process of lifting or removing weights (no text or symbols present)
natural_image
Interior view of a kitchen appliance with a white rack unit and metal fixtures (no text or symbols visible)The image is too blurry to recognize any text content.

natural_image
Composite image showing a washing machine with open lid and kitchen utensils, alongside a modern white corrugated dish (no text or symbols visible)
text_image
- 35-45° auto + eco 45-65° 65-75° 50°SM...
SB...

BOSCH

text_image
Diagram of a device control panel with labeled ports and digital display showing 108 and 24 microcontroller units
text_image
Diagram of a multi-chamber refrigerator with labeled internal compartments and external componentsKazalo

Namembna uporaba...... 4

Varnostna navodila.... 4
flowchart
graph TD
    A["Top Row: White Arrow"] --> B["Bottom Row: Black Block"]
    C["Right Row: Black Block"] --> D["Bottom Row: Black Block"]
    E["Left Row: White Arrow"] --> F["Right Row: Black Block"]
Uporaba posebne soli
natural_image
Illustration of a conveyor belt pouring granular material into a conical container on a stovetop, with a circular component and directional arrow symbol (no text or labels)* odvisno od modela
natural_image
Diagram of a device with two arrows indicating directional movement or operation, no text or symbols present.sl
natural_image
Illustration of a hand pouring liquid into a device with a droplet inside (no text or symbols)natural_image
Illustration of a multi-tiered plastic crate filled with various kitchen utensils (no text or symbols visible)Opomba
text_image
Diagram showing two scenarios of a container with a cross mark and a checkmark, likely illustrating a selection or inspection process.Lonci
natural_image
Illustration of a shopping basket filled with various food items (no text or symbols visible)Nasvet
natural_image
Interior view of a kitchen appliance with open drawer and side table (no text or symbols visible)natural_image
Isometric view of a multi-level industrial or warehouse structure with internal grid patterns and directional arrows indicating flow or movement (no text or symbols present)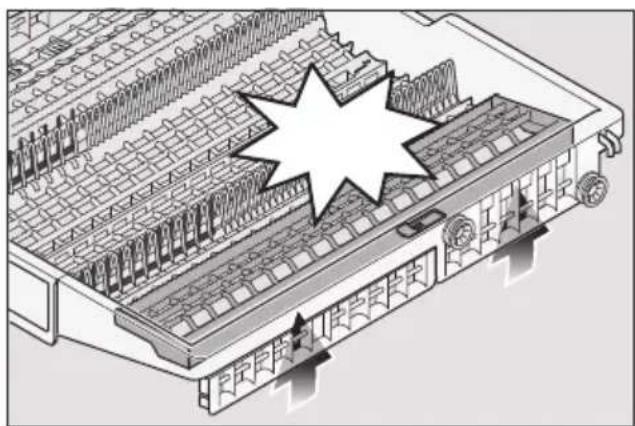
natural_image
Isometric technical diagram of a multi-level industrial or warehouse structure with no visible text or symbolsPreklopni zobci \*
* odvisno od modela
natural_image
Technical diagram of a mechanical assembly with rods and gears, showing no text or symbolsNosilec malih posod \*
* odvisno od modela
natural_image
Illustration of a container with a hook attached to a grid-like structure (no text or symbols)natural_image
Two-step diagram showing a hand pressing down on a device component and pouring granular material into a container (no text or symbols)- Pokrov prekata za pomivalno sredstvo zaprite tako, da ga porinete navzgor, dokler se zapiralo ne zaskoči brez problema.
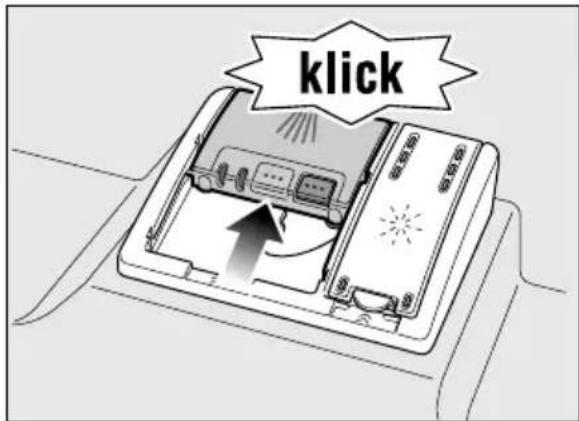
text_image
klicknatural_image
Mechanical component diagram showing a rotating assembly with a central hub and fan base (no text or symbols)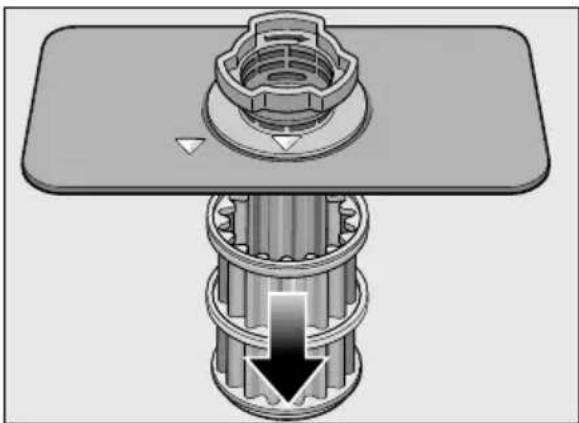
natural_image
Mechanical assembly diagram showing a bolted joint inserted into a cylindrical shaft with a downward arrow indicating force or motion (no text or symbols present)-
Morebitne ostanke odstranite, sita pa očistite pod curkom tekoče vode.
-
Sistem sit ponovno vgradite v nasprotnem zaporedju in pazite na to, da sta puščici po zapiranju ena nasproti druge.
Brizgalke
natural_image
Diagram of a mechanical device with two blades and directional arrows indicating motion (no text or symbols)- Očistite brizgalke pod curkom tekoče vode.
- Brizgalke ponovno pritrdite oz močno privijte.

natural_image
Mechanical assembly diagram showing a tool interacting with a circular component (no text or symbols visible)natural_image
Cross-sectional diagram of a mechanical device with arrows indicating motion, no visible text or symbols- Vgradite sita.
- Košare ponovno vstavite.
Seznam motenj
natural_image
Simple diagram of a rectangular box with internal compartments and a circle pointing to the top-left corner (no text or symbols)
natural_image
Pure electrical circuit lines without any symbolstext_image
Diagram showing two labeled components (① and ②) with arrows indicating movement or flow, likely illustrating a process or system.40

text_image
Diagram showing hands installing a component with numbered labels and directional arrows indicating process flow41

text_image
Diagram showing a hand placing a labeled object into a drawer with numbered arrows indicating steps ① and ②.42

natural_image
Diagram showing a kitchen appliance with a computer monitor and a close-up of its interior, illustrating the process of lifting or removing a ball (no text or symbols present)
natural_image
Interior view of a kitchen appliance with a white rack unit and metal fixtures (no text or symbols visible)
natural_image
Composite image showing a washing machine with open lid and kitchen utensils, alongside a modern white corrugated dish (no text or symbols visible)
text_image
- 35-45° auto + eco 45-65° 65-75° 50°SM...
SB...

BOSCH

text_image
Diagram of a device control panel with labeled ports and digital display showing 108 and 24 microcontroller units
text_image
Diagram of a multi-chamber refrigerator with labeled internal compartments and external casingPërmbajtje

Kursim kohe (VarioSpeedPlus) ..... 21
Mbushje e gjysmë 21
HigjienaPlus (HygienePlus) ..... 21
Intensiv Zone 22
Tharja me shkëlqim 22
Energy Save 22

Përdorimi i pajisjes .....22
flowchart
graph TD
    A["Top Row: White Arrow"] --> B["Bottom Row: Black Box"]
    C["Right Row: Black Box"] --> D["Bottom Row: Black Box"]
natural_image
Illustration of a conveyor belt system with granular material inside, emitting powder from a funnel (no text or symbols)text_image
Diagram showing a device with labeled components and directional arrows indicating movement or assembly.natural_image
Illustration of a hand pouring liquid into a device with a droplet inside (no text or symbols)natural_image
Illustration of a multi-tiered plastic basket filled with various kitchen utensils (no text or symbols visible)Udhëzim
text_image
Diagram showing two scenarios of a mechanical device with a cross symbol and checkmark, likely illustrating a safety or inspection process.Tenxhere
natural_image
Illustration of a shopping basket filled with various food items (no text or symbols visible)Këshilli
natural_image
Illustration of a kitchen appliance with cutlery and utensils (no text or symbols)text_image
Technical diagram showing a mechanical assembly with labeled components and directional arrows indicating motion or flow.
natural_image
Isometric technical diagram of a multi-level industrial or warehouse structure with no visible text or symbolsnatural_image
Technical diagram of a mechanical assembly with rods and gears, showing motion direction (no text or symbols)natural_image
Illustration of a container with a hook attached to a grid-like structure (no text or symbols)natural_image
Illustration of a hand pressing down on a computer monitor with a starburst symbol (no text or symbols present)
natural_image
Illustration of a robotic arm handling a device with a brush (no text or symbols visible)(VariousSpeedPlus) \*
natural_image
Mechanical component diagram showing a rotating assembly with a central hub and fan base (no text or symbols)
natural_image
Mechanical assembly diagram showing a bolted joint with a downward arrow indicating force or motion (no text or symbols present)natural_image
Diagram of a mechanical assembly showing a propeller with directional arrows indicating motion (no text or symbols)natural_image
Mechanical assembly diagram showing a tool interacting with a circular component (no text or symbols visible)natural_image
Cross-sectional diagram of a mechanical device showing internal components and motion arrows (no text or symbols)-
Rregulloni sitat.
-
Rivendosini koshat.
Tabela e çrregullimeve
natural_image
Simple diagram of a rectangular box with internal blocks and a circle on the top (no text or symbols)
flowchart
graph TD
    A["Start"] --> B["Process Block 1"]
    B --> C["Process Block 2"]
    C --> D["Process Block 3"]
text_image
Diagram showing two labeled components (① and ②) with arrows indicating movement or flow, likely illustrating a process or system.40

text_image
Diagram showing hands installing a component with numbered labels and directional arrows indicating process steps41

text_image
Diagram showing a hand placing a labeled object into a drawer with numbered arrows indicating steps ① and ②.42

natural_image
Diagram showing a kitchen appliance with a computer monitor and a close-up of its interior, illustrating the process of lifting or removing a ball (no text or symbols present)