
BS 1280 - Vacuum Cleaner CLATRONIC - Free user manual and instructions
Find the device manual for free BS 1280 CLATRONIC in PDF.
| Device type | Bagless cyclonic vacuum cleaner |
| Brand | Clatronic |
| Model | BS 1280 |
| Power supply | 220-240 V~, 50/60 Hz |
| Rated power | 1800 W |
| Maximum power | 2200 W |
| Protection class | II |
| Net weight | 5.9 kg |
| Filtration type | Cyclone + HEPA filter + motor protection filter |
| Tank capacity | Approx. 1.5 L (estimate) |
| Included accessories | Floor nozzle, upholstery nozzle, 2-in-1 crevice tool/brush, parquet brush |
| Features | Telescopic tube, air regulator, cable winder, power adjuster |
| Cable length | Approx. 5 m (estimate) |
| Tank maintenance | Empty after each use or when MAX level is reached |
| Filter maintenance | Clean the cyclone filter and motor protection filter regularly; wash with water every 3 empties |
| HEPA filter replacement | Every 6 months |
| Safety instructions | Do not vacuum liquids, hot ashes, sharp objects; do not use without filter |
| Warranty | 2 years (standard) |
Frequently Asked Questions - BS 1280 CLATRONIC
User questions about BS 1280 CLATRONIC
0 question about this device. Answer the ones you know or ask your own.
Ask a new question about this device
Download the instructions for your Vacuum Cleaner in PDF format for free! Find your manual BS 1280 - CLATRONIC and take your electronic device back in hand. On this page are published all the documents necessary for the use of your device. BS 1280 by CLATRONIC.
USER MANUAL BS 1280 CLATRONIC
Thank you for selecting our product. We hope that you will enjoy use of the appliance.
Symbols in these Instructions for Use
Important information for your safety is specially marked. It is essential to comply with these instructions in order to avoid accidents and prevent damage to the machine:

WARNING:
This warns you of dangers to your health and indicates possible injury risks.

CAUTION:
This refers to possible hazards to the machine or other objects.

NOTE:
This highlights tips and information.
General Safety Instructions
Read the operating instructions carefully before putting the appliance into operation and keep the instructions including the warranty, the receipt and, if possible, the box with the internal packing. If you give this device to other people, please also pass on the operating instructions.
- The appliance is designed exclusively for private use and for the envisaged purpose. This appliance is not fit for commercial use. Do not use the appliance outdoors. Keep it away from sources of heat, direct sunlight, humidity (never dip it into any liquid) and sharp edges. Do not use the appliance with wet hands. If the appliance is humid or wet, unplug it immediately.
- When cleaning or putting it away, switch off the appliance and always pull out the plug from the socket (pull the plug itself, not the lead) if the appliance is not being used and remove the attached accessories.
- Do not operate the machine without supervision. If you leave the room you should always turn the device off. Remove the plug from the socket.
- The device and the mains lead have to be checked regularly for signs of damage. If damage is found the device must not be used.
- Do not try to repair the appliance on your own. Always contact an authorized technician. To avoid the exposure to danger, always have a faulty cable be replaced only by the manufacturer, by our customer service or by a qualified person and with a cable of the same type.
- Use only original spare parts.
- Pay careful attention to the following "Special Safety Instructions".
Children and Frail Individuals
In order to ensure your children's safety, please keep all packaging (plastic bags, boxes, polystyrene etc.) out of their reach.

WARNING!
Caution! Do not allow small children to play with the foil as there is a danger of suffocation!
- This device is not intended to be used by individuals (including children) who have restricted physical, sensory or mental abilities and/or insufficient knowledge and/or experience, unless they are supervised by an individual who is responsible for their safety or have received instructions on how to use the device.
Children should be supervised at all times in order to ensure that they do not play with the device.
Special Safety Instructions
- Do not suck up liquids!
- Do not suck up hot ashes or pointed or sharp objects!
- Do not use the device in damp rooms!
- Never use without the filter. Check that the filter is inserted correctly!
- Hair, clothing and body parts away from the vacuum nozzle during use!
- Keep the vacuum cleaner away from sources of heat like radiators, ovens, etc.!.
Overview of the Components
1 Floor nozzle (with hook (not shown))
2 Release button for telescopic tube
3 Telescopic suction tube
4 Attachment holder
5 Air slide
6 Vacuum hose
7 Dust container handle
8 Dust container release button
9 Dust container
10 Cable winding button
11 Carrying handle
12 Motor speed setting
13 On/off switch
14 Button for opening/emptying the dust container
15 Hose connection
Accessories
16 Upholstery nozzle
17 Groove and brush nozzle
18 Parquet brush
Start-up

- Insert the connection head of the suction hose into the hose connection until it locks into place mechanically (Fig. A). In order to release the hose again, press the button on the connection head and pull the hose out.
-
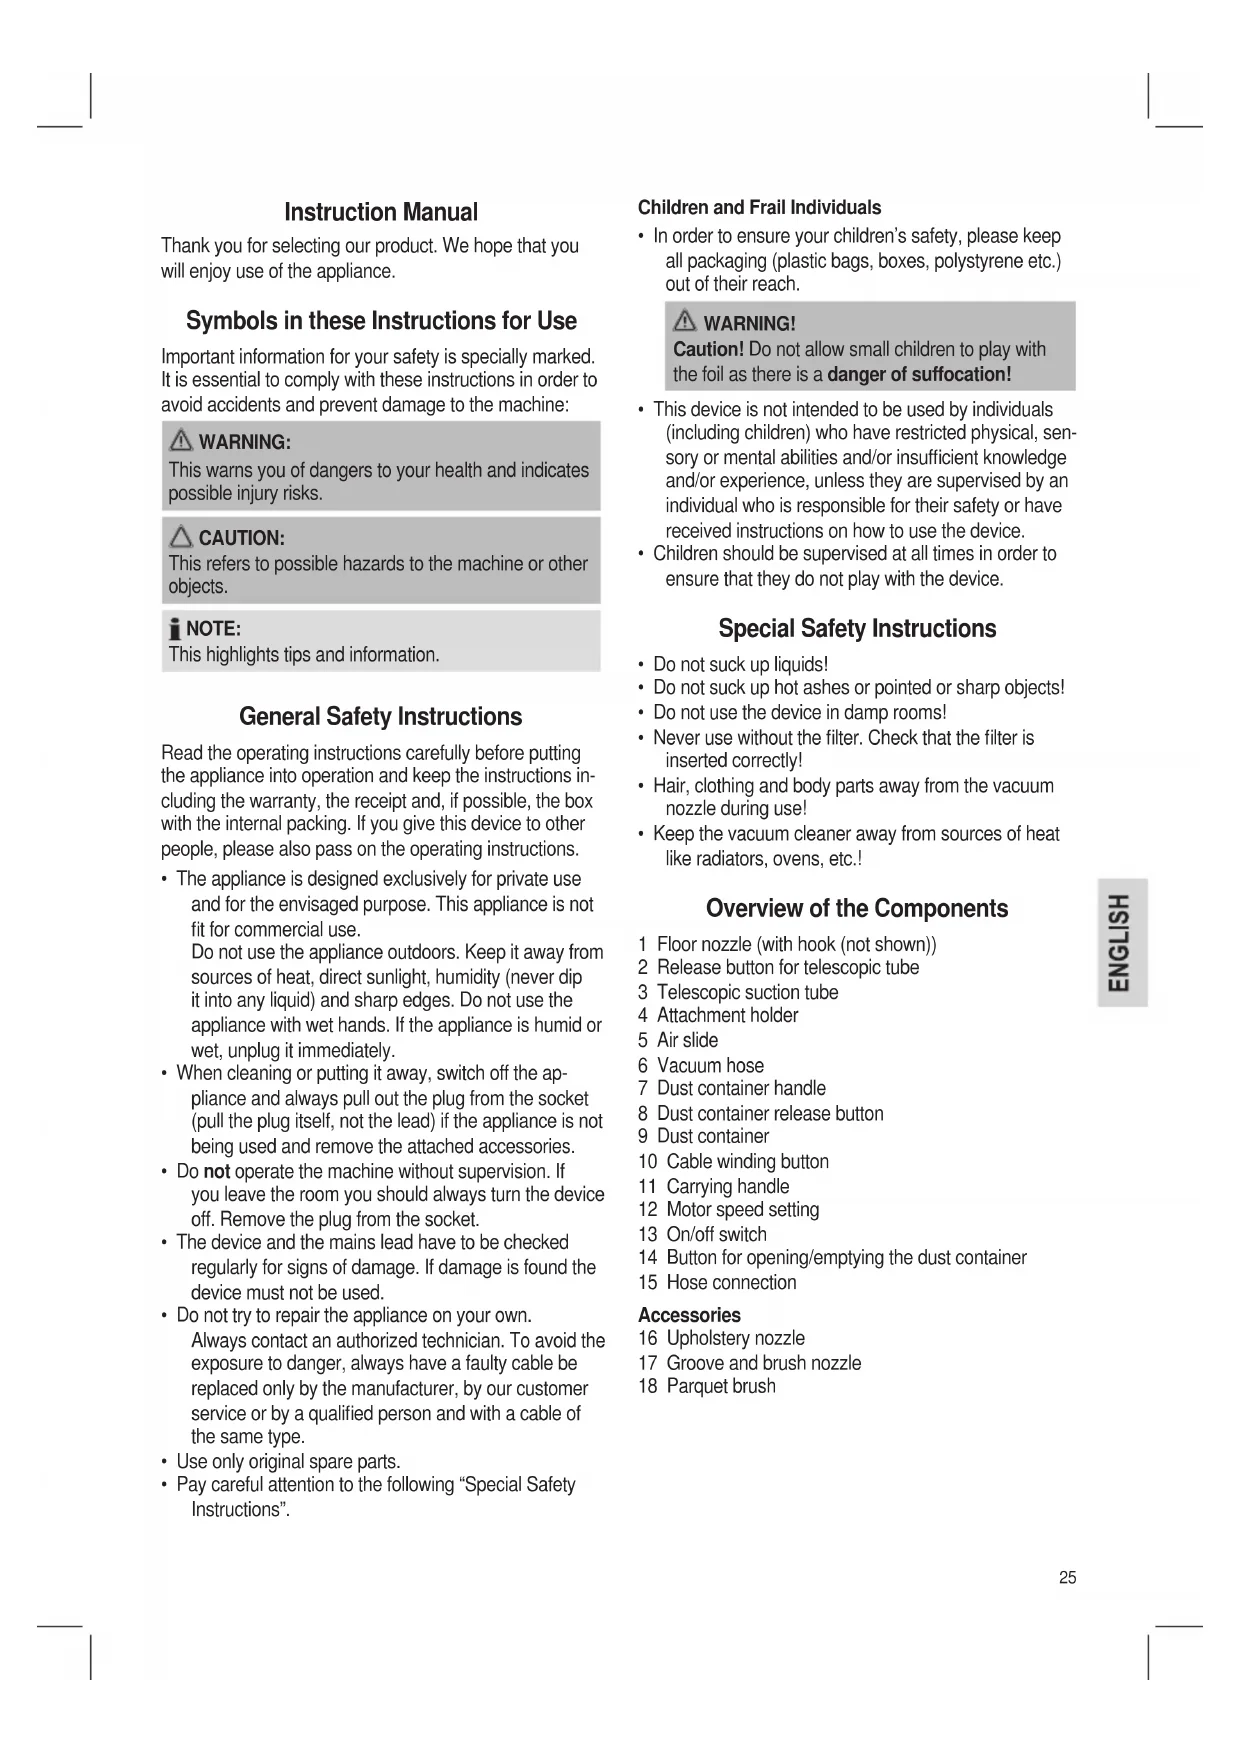
Insert the vacuum tube into the handle if required. (Fig. B)
-
Then assemble the floor nozzle and/or the accessories. (Fig. C)
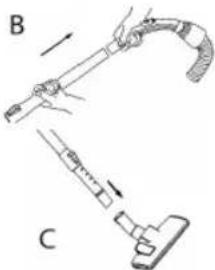
Telescope Vacuum Pipe (Fig. D)
The height-adjustable vacuum pipe enables individual alignment to your height. Unlock the coupling by pressing the key in the direction of the arrow. Slide the vacuum pipe to the desired length. To lock the device, release the key until you hear it lock in place.
Using the Appliance
- Unwind the length of cable you require.

CAUTION:
Pull out the cable up to the maximum length indicated with the yellow mark.
- Never pull the cable out up to the red mark as the cable winding can be damaged

NOTE:
If the red mark is visible, pull in the cable with the help of the cable winding button back to the yellow mark.
- Insert the mains plug into a correctly installed 230V 50 Hz power socket. Turn the vacuum cleaner on by pressing the on/off switch down with your foot.
- Set the vacuum power with the vacuum power regulator (MIN to MAX).
- Vacuum at a steady speed. There is no need to exert pressure.

CAUTION:
Pay attention to the range that can be covered with the cable length!
Vacuum power regulator
Low vacuum power: For curtains and delicate fabrics.
Medium vacuum power: For long-pile velour carpets and textile flooring.
High vacuum power: For sturdy rugs and floors.
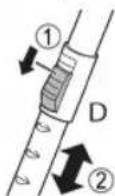
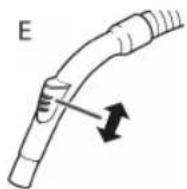
Air Slide (Fig. E)
Open the air slide on the hose handle in order to regulate the airflow or to clear any particles sticking to the nozzle.
Switching off and Winding up the Mains Lead
- Turn the vacuum cleaner off by the on/off switch and remove the plug from the socket.
- Keep the plug in your hand.
- Press the cable winding button and guide the cable. Hold the cable to avoid wrapping.
Nozzle Attachment
Crevice and jointed nozzle:
For vacuuming upholstery, curtains and in corners and crevices etc.

NOTE: "2 in 1" nozzle:
When this is folded together it can be used as a groove nozzle. If you would like to use the brush nozzle, pull the brush section in the direction of the arrow until it locks in place.
Upholstery nozzle: For cleaning upholstery, curtains etc.
Floor nozzle: The floor nozzle is fitted
with rollers for improved manoeuvrability.
To clean carpets or smooth surfaces.

Parquet floors: Press the lever back with your foot (Fig. F, Pos. 1). The brushes can not be seen.
Carpets: Press the lever
forward with your foot (Fig. F,
Pos.2).The
brushes are now retracted.
Parquet brush: The parquet brush is fitted with rollers for improved manoeuvrability. For large areas such as parquet, laminate or tiles etc.
Releasing the nozzles: Pull these off while turning slightly.
Maintenance
Filter
Your machine has four filter systems. The traditional dust bag system has been replaced by a transparent dust container. In this, coarse dirt particles and tiny particles floating in the air are swirled out of the suction air by the high speed of the air current.
It is therefore unnecessary to buy dust bags.
Emptying the dust container
Empty the dust container when the amount of dust reaches the "MAX" mark. Proceed as follows:
- Remove the mains plug from the socket.
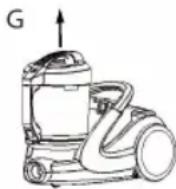
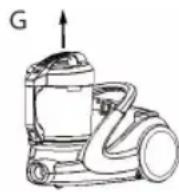
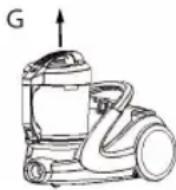
- Press the button (8) to release the dust container and remove the dust container (Fig. G).
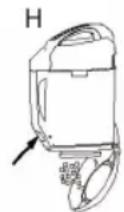
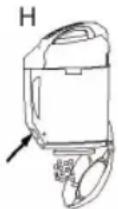
- Hold the dust bag over a rubbish bin. Empty the contents of the dust bag. To do so, press the release button for the dust container lid (14) (Fig. H).
- Close the base plate again so that it is heard to lock into place.
Motor protection filter (in the dust container) Cleaning the filter (Cyclone unit)
- Remove the mains plug from the socket.
- Press the button (8) to release the dust container and remove the dust container (Fig. G).
- Hold the dust bag over a rubbish bin. Empty the contents of the dust bag. To do so, press the release button for the dust container lid (14) (Fig. H).
- Close the base plate again so that it is heard to lock into place.
- Unlock the dust container lid by turning it a short way anticlockwise. Remove the lid.
-
Remove the motor protection filter and clean by tapping it.
-
Unlock the cyclone unit by turning it a short way anticlockwise. Remove the cyclon unit and clean it.
- Insert the cyclone unit back into the dust container and lock it by turning it clockwise.
- Insert the motor protection filter.
- Replace the lid and lock it by turning it clockwise.
- Replace the dust container until you hear it click into place.
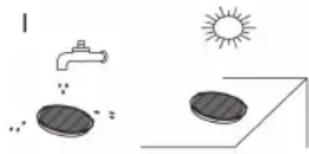
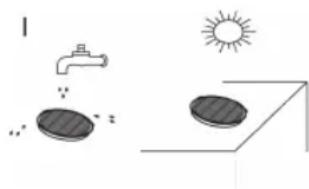
Every third time the dust container is emptied, or in the case of severe soiling, clean the filter by allowing water to flow through the filter fabric against the direction in which the vacuum cleaner blows.
The dust container should only be reinserted when it is completely dry!
CAUTION:
Never wash the filter in the washing machine, and please do not use a hairdryer to dry it.
HEPA filter
Your appliance also has a HEPA filter. You will find this filter under the filter cover on the back of the appliance. In order to ensure that the filter works correctly, we recommend that you replace it every six months.
- Remove the mains plug from the socket.
- Open the ventilation grille by pressing the "PUSH" button at the bottom on the ventilation grille.
- Remove the grille. Remove the filter and clean as described. Put the filter back in. Close the ventilation grille until you hear it click into place.
CAUTION: Important note!
Cleaning may become necessary after a shorter time, depending on the conditions of use, e.g. when vacuuming fine dust.
If the suction power of your vacuum cleaner diminishes please clean the filters as described.
If the suction power suddenly diminishes during operation this may be due to the filters being locked.
Cleaning & maintenance

WARNING:
Always remove the mains lead before cleaning!
- Under no circumstances should you immerse the device in water for cleaning purposes. Otherwise this might result in an electric shock or fire.

CAUTION:
- Do not use a wire brush or any abrasive items.
- Do not use any acidic or abrasive detergents.
Clean the casing with a dry cloth.
Storage
- Let the device cool down completely.
- Wind the cable completely.
- Please insert the hook of the floor nozzle into the parking assistant on the rear of the device.
Troubleshooting
The Device Does Not Work.
Remedy:
Check the connection to the mains.
Check the position of the switch.
The device does not suck up anything.
Possible Cause:
The suction power is set too low.
Remedy:
Check the position of the control switch.
or
Possible Cause:
The dust container or the filters are dirty.
Remedy:
Empty or clean the components.
or
Possible Cause:
There is a foreign body in the suction tube or the nozzle.
Remedy:
Check the accessories for foreign bodies.
Noise development
The sound pressure level in the ear of an operator (LpA) was measured according to DIN EN ISO 3744.
Sound pressure level detected: 80.0 dB(A) (no limit)
Technical Data
Model: BS 1280
Power supply: 220-240 V\~, 50/60 Hz
Power consumption:
Pnom: 1800W
Pmax. 2200W
Protection class: II
Net weight: approx. 5.9 kg
Subject to technical changes without prior notice!
This device has been tested according to all relevant current CE guidelines, such as electromagnetic compatibility and low voltage directives, and has been constructed in accordance with the latest safety regulations.
Disposal
Meaning of the "Dustbin" Symbol
Protect our environment: do not dispose of electrical equipment in the domestic waste.
Please return any electrical equipment that you will no longer use to the collection points provided for their disposal.
This helps avoid the potential effects of incorrect disposal on the environment and human health.
This will contribute to the recycling and other forms of reutilisation of electrical and electronic equipment.
Information concerning where the equipment can be disposed of can be obtained from your local authority.
Instrukcje obslugi
Regulator sily ssania
Niski stopien ssania: Do firanek, materialow delikatnych.
PeryIaTOp IHTeHCnBHOCTI BCMOKTyBaHH
HnKHa CTyniHb: dIa I MaTepiAIB, 10 JeKo MoXHa NOnKoDHTN.
CepenH CTynHb: DnB BnCOKOKICHORO KINMMOBOT NOKPTTR NiDnOrTa iHnx TEKCTNbHNX NOKPITb.
BncoKa CtyiHb: Ia Miunx Knnmib i nIIOr.
3acnIHka dna nobirp (MaN.E)

BikpnTre 3acnHKy dno nobitra ha puu wnaHry, uo6 biDpernyIIOBaTH NOBITRA a60 BuaNTIN npedMetn 3 conla.
YcTaHOBbKnpHnAaHa conNo
Conno nIaunH i conno 3 uitko:
Pn3HaayeTbCnI MAnKMeBIB,WTOP,KyTIB,LIINH TaIHwOro.
IINPIMITKA.Conno"2B1": BCKnaDeHomy BNrJdi ue connlo MOXHa BkOpNCTaTn DnYNCTK uINH. KkuO Bam NOTpi6Ha FyHKuH uTKn,NotHHTb 3a Uo Detanb B HAnpMky CTpinKDo ynpOy (NOKN He Nouyete KnaaAH).
HacaikdAJaM'Knx Me6nB:
IaOuHHeHHMaKnxMe6JIb, noptep ta iHoro.
PnD6aHHMiKIBI36opyCMITTAkHmYHOM He notpi6He.
UHHeHHKoHTeHepaDnA Hny
KIO KINbKiCTb Nnny DoCnHne No3NaChN "MAX",No-CTBe KOHTeHep dIaNNy.BNKoHaTe nOaHi daJI BkA3iBKn.
BNTaHITb BnIKy 3 po3ETKn eNEK- TPOXINBHeHH.
- Uo6 BnBInbHHTn i BiD'eHaTH KOhteHep nIy, HATNCHtB KhoNky (8) (MaI. G).
TpMaTe NIO36ipHnK HaI EMHCIO DnA CmTT. OHCITb KOHTeHep - NIO36ipHnK BiD CMITr. DnA LbOTo HATNCHTb KHOJKy BnBInbHeHHa KaNUsi KOHTeHep pa dnnn (14) (MaI.H).
3akpiTe pIaCTnHy Ha HNkHi CTopoHI TaKMM YHOM, UO6 BOHa BCTana Ha Micue.
ΦiNbTp 3axnCTy DnBryHa (B KOHTeHepi dny nnn) UneHHa fIbtpa (uKNOHHN)
- BintarHitb Bnky 3 p0eTkn eNeKToPQKnBHeHHA.
LIO6 BnBilbHHTN i BiD'cHaTH KOHTeHep dIa NmNy, HATNCHTb KHOkY (8) (MaI. G).
TpmaTe NIO36ipHn HaEMHCIOIa CMITTR. OcHCTtB KOHTeHep -NIO36ipHn BiD CMITTR.IIbOro HATNCiTB KHOKNy BnBiJIbHeHHHa KPNuI KoHTeHepa IINy (14) (MaI.H).
3aknTe nactHy Ha HnKHi CTOpOH TaKIM YHOM, 06BOHa BCTana Ha MlCe.
P036nokyIe KpUkky KOHTHeHepa IJNny, TPOxN NOBepHyBUN II npOTn rOdHHNKOBoi cTpiIKN. 3HIMITb KpUkKy.
3HIMtB pIbTp 3axncty DBNrhyHa Ta IerKo nOtpycitb Hm, uO6 NoCHNTn. - P036JIOkyIte UKIOHNN 6JOK, TPOXNI NOBEPHyBUN HNO IpoTn ROINHHKOBOI CTPIIKN. 3HIMITb UKNIOHN 6JOK i IONUCTBe HNO.
BCTABTE UKIOHm6IOK Ha3aJy KOHTeHep IJIYi 3a6IOkyte NOrO, NOBepHyBUn 3a rOHHNKOBHO CTPIKKO.
BCTaBTe pInbTp 3axncty DnBnryHa.
BCTaTe Ha Micce KpnIky i 3a6IokyIte ii, nobepHyB-1n 3a roHHNKOBIO CTPIKIO.
BCTABTe Ha Micce KOHTeHep DnI NnIy, DOnOKn BIn He Klaune Ha Micci.
PcKHO TpeBOrO OHUeHHa6o Prn HaRBHOCTi CInbHOrO 3abpyHHeHH OuHCTb fIbTp Ni d CTpyMeHem BOH, PnCHOMy NtIK BOHN Ma6 ByTH CNPRMOBaHIM IpOTN HAnpMky, B AKOmy Upe3 fIbTp npOdyBaETCBNOBITPAHNI OTIK iD Yac npaui npnilady.
ΦiNbTp CnID CTaBHTN Ha Micue TiIbKN NICJRA TORO, AKBINOBHCTIO npocoxhe!

YBAGA.
HikoHe MHTe FInbTp y npalbi MaunHi i He BHKOPhTaTe dna cyuKn Peh dna BONocr.
ΦinbtpHEPA
Baw npnna 6bnaHaHO fIpbTpOM HEPA. LcHfipb TMOKHa 3NaHTN pID KPNsKOo fIpbTa 3 TINbHOi CTOPOHN npnAyd. UO 3a6e3neuTH 6e3dOraHH npauo fIpbTy, MN peKOMeHdyEMO npOBoHtN HORO OUYENH KOKHi 6 MICAIB.
BNTaHITb BnIKy 3 pOeTkn eNeKtpoKnBneHna.
BikpnTe BeHTnlaHHy peWitKy:HaTncHt b KHonky "PUSH",IOBHNKHi YactHI BeHTnlaHJHOIpeWitKn.
3HIMITb peWITky. 3HIMITb fIbTp i noUcTbe TnoB B OINCAHN CnOci6. BCTaHOBITb fIbTp Ha Micue. 3akPInTe BEHTINrHu Iy peWITky, DOnOKn BOHa He KlaCHe Ha Micui.
yB7A.
PpHmIMtB do yBaH nIO BaXnHBy iHΦopMaio!
OuHHe MoKe 3HaIOBbTa paHIe HIX peKOMeHDoBaHO, 3aJIeXHO BiD yMOB eKcNpyataui, HApNKlaI, PnB CMOKtYBaHHi DyKe MlKOro NnIy.
Rkpo Bn noyuye, 10 no tyxhictb Baoworopnnococy 3MeHwnlacr, ouhcttb fIbtpB TaKni 3aci, kCe onncao Bnue.
Rkuo notyXHicb BCMOKTyBaHHa 3MeHunTbcra panTO BO nIac npaui, To ue moKe 6yTu HacnIikom 3aOpyD HenHHaipbpy.
OuHenni i 36epiranHH
PONEPENHEHHA.
3aBHHn BHTaryte BNky 3 po3eTKn eIeKtpoKHBJIeHH nepeD noaykOM OHIeHH!
3a6opohreTbcraOnyckatn npinaad y Body 3 MeTOHOro OunueHH. Lc MoKe np3BecTu Do eJeK-tpuHoro ynapy a6o do noxkei.
YBAGA.
He BnKOpHCTaIte DpoTHi UtiKn a6o iHsi npEmdTe, 003aJIiHaOTb NpOprHHN.
He BnKOpncTaIe iDki a6o abpa3nBHi 3ac06n dnn OuHcHn.
Kopnyc cnid ouuuaT M'koTO TKaHHOIO.
36epiraHHa
-Даитe npictpoNoBhictO oxoHouTH.
- Повсг IO BТгИb Kaбeиь B KОрпс 3a ДОпOMоH O
HamOTyBaUy.
- Faayok conla Ha dHni ci nD nobicntn Ha npnaDiHa 3aDhi cTOpOH npnaNy.
YcyHeHHa HeNoJaOK
- PpHnad He yhKcuioHye.
IOnomora:
Ipebeipte, uE nIOOC BKnIOueHm B MepeKy.
Ipebeipte noLoKeHHn nepemkauy.
- HNIOOC He BCMOKTyc CMTTA.
MOnJIbI npuHn: IHTeHCINBHicTb BCMOKTyBaHHBCTaHOBHeHa dyKe H3bKO.
Donomora:
IpepeipTe peryIaTOp iHTeHCINBHOCTi BCMOKTyBaHHa 60
Moxnbi nidaTabu:
KoHTeHep- nno36ipnHK a60 pfIbtpn 3a6pydHeHi.
Dionomora:
BudanitbcmTTa 60 ouhnttih haneKhi eemeHTN.
a6o
Moxnbi npuHH:
B WlaHry a6o B coJIi 3haxOHTbc8 ChyKOpiHNn npedMeT.
Donomora:
IpepeipTe nnooc Ha HnBhictb yxopidHnx npedMetiB.
Texhiu hi napametpn
Modenb: BS 1280
PoaHHJXHbJIeHHa: 220-240 B\~,50/60 T
CnoXKBaHHNnotyKHOCTI:
PHOM: 1800BT
PMAKc: 2200BT
Tpya eneKtpo6e3neuHocti:
Bara HeTTO: ..np6n.5,9K
3aIinaeMo 3a co6oIO npaBO HaTexhiHi 3MiH!
Cen npnad 6yno nepeBipeno 3riHNO Bcix BiINOBDHX, aKtyaIbHnx DnpeKTNB CE, HAnpNKnad 1oDo eNeKTPoMaHiTHOi CymichocTi Ta Hn3bKOBoTHOI DnpeKTNB, Ta 36ydoBaHO 3 a HOBiTHIMN NIOJXeHHrMn TexhIKs Be3- nek.
PykoBoDCTBO NO 3KcIpyatauH
BnaOapn3a nokny haWero n3denn. Mbl haneemC, YTO Bc yDOBoJIbCTBHeM 6yTe NOJb3OBaTbCm.
CnMBOJbl,NCNoJIb3YeMbIe B 3TNX INHCTpyKUHX
BaKnaI BAC INHΦoMaIaIbO63HaaycTcCneIaJIbHbIM 6pa3OM.Heo6xoIIMo co6IIOaTb 3TN INHCTpyKuIN NO I3- 6eKaHHe HeCuaTbIX CnyaEB NII NOBpeXdEHHn PpN6opa.

IPEyUNPEXDEHNE:
IpeDynpexDeHne 06 ONaCHOCTn IINBaJIeO3DOpOBBA IN yka3aHHe BO3MOXHBIX PNCKOB NOnyuEHN TpaBMbl.

BHIMAHNE:
06o3naaet Bo3MOxHbIe OaIChbIe ycIOBnI dIy npIb6opa nI IN OKpyKaIOUxN pPeIMTOB.

ПРМЕЧАЙ:
O6paIaETBHIMMaHHeHa peKOMeHdaIIN INHΦOpMaIIO.
06uHnHcTpyKmHnNoTexHnke6e3onachocTH
IpeepnOJIb3OBAHEm np6opbaHIMateJIbHO
IpoHTne IHCTpyKcnnIO 3KcIIyatauN INCOxpaHNTe
IHCTpyKcNN BMeTe C rapaHTne N KBHTaHcNeN, NO
BO3MOJHOCTN, yNaKOBky C BHyTpEHNM COdepKMlbM.
IprnpePaue np6opdaPyHM TAKKe nepepaTe
IHCTpyKcNN IO 3KcIIyatauN.
- Pnp60 npEHa3HaueH NCKHIOHTeBHO DnI HcNoB3OBAHnB 6bity n dny npEpyCMOTpeHHbIX ueJe. Oh He paccunTah Ha KOMMepueckoe HcNoB3OBaHne. He noIb3yTeCB IM BHe NOMeUeHn. PpEOxpaHnTe np6-bOp OT hCTOuHKnOB TeNla, npMbx COINHeuHbIX Lyuei, BO3DeIeCTBn BNaJHKoCTn (HkOrda He norpyKaIte B JNKIOCTb) n OCTpbix kPOMok. He paOtaIte C np6060m MOKpbIM pyKamn. Ecln np60b cTaHET BnaXHBIM INN MOKpbIM, HemeJInHo OTKIOHTe erO OT CETn.
-ДячNTKNIy60pKnHa xpaHHeNBe BbIKIOHTe np16op N BblbTe BnKU n3 po3eTkn (BbIHMaTe BnKU 3a Kopnyc,a He 3a npoBoD).EcIn np6Op He 6ydet HcNoJIb3OBAtbcR,OTCOEINHITe BCE pInHaJNeXHOCTN.
He octabnIte np6op 6e3 npncmTopa. EcnBb I BbIXOHTe n3 KOMHaTbI,TO BCERda BbIKHouaTe np6op.BbIHbTe BNkky n3 po3eKn. -
PeryIaRHO npOBepnTe np6Op n ceTeBoi Ka6eJIb Na np3HaKnIOBpeKJdeHn. PnO6hApUkeHn IOBpeKJde-Hn He NoJIb3yITecb np6Opom.
He nItaTeCbpeMOHTnPoBaTb np6Op camOCToTeIbHO.BceTa obpauaTeCb K cneuAncty.Bo H36eKaHHe ONaChbIX CnTyauCNBcERDa 3aMeHrTe NOBpeKdEHHb KabeNb TOnbKO y N3rTOBOTeJIa, B peMOHTHOcLyKBe HnN y CneuAnlnta Ha KaBeNb TOrO JKe TnPa. -
NcnoJIb3yIte 3aIaNChIbe DetanIOIbKO OTnI3rTOBInTeIa.
- Oco6eHNO co6nIoJaTe "CneuaJIbHbIe HNCTpyKcII INTO texHnke 6e3OnaChOCTn".
TeH NJIuca COrpaHnueHHbIMN BO3MOXHOCTaM
Дябз�ахочи Baux DeTeepKte Bce yanaKOBouHbIe MaTePnAbl (IIaTknOBbIe MeuK, KopoKn, NOINCTnOPI N.T.D.)B HeIOCTyHOM DЯ HIX MecTe.

IPEyIpyEKeJDEHNE!
BHHMaHHe! He pa3peuAte MaIeHbKIM DeTAM HrpaTb C PJIeH-KoI, TaK KaK CyUeCTByET Onac-HocTb ydyuHennia!
3TO yCTPOIcTBO He npEHa3HaueHO IIN HCNoIb3OBAHnI NuaMn (BKNIOUaY JeTei) C OrpaHueHHbIMN Hn3NuCeCKIMN,OC3aTeJIbHbIMN INI NCnxNueCKIMN CNOco6HOCTAMN n/INn HEoCTaOTHybIMN 3HaHNrIMN /nINn ONbITOM 6e3 Ha3Opa JInOM,OTBETCTBEHHbIM3a INx 6e3OaNACHOCTb,INn ECIN OHn HE NOJyNJINHCTpyKcUNo BCNOJIb3OBaHmN 3T0TO yCTPOIcTBa.
HeoXoJIMO NOCTOARHHO CJIeINTb 3a JeTbMn, YTOobI OHN He IrgpAIN C yCTpoiCTBOM.
CneuaJIbHbIe HNCTpyKcHn ITO TexHKe 6e3ONaCHOCTN
- He BCaCbIbAaTe XnIqKoCT!
He BCaBbAte Tepn nn OCTpOKHeHbI nn OCTpbI nePdMetbl! - He nCnoB3yIte yCTpoIcTBO BCbIpbx NOMEUeHnax!
HkoIgHa He HcNoIb3yIte yctPoIcTBO 6e3 FnIbIpa. IpoBeprTe, npaBnIbHO nI BCTaBNeH FnIbTp!
BoBpEMHNCIOb3OBAHHaEPKHTeBOLOcbl,OeJHy uactnTeIaNoaJIbUeOTBCaCbIBaOueroCOnla!
He np6nkaTe nbIeoc K nctOHHkam TeTnA, TAKIM KAK 6atapen OTOnJIeHn, Neu n T. d.!
O63op DeTanei npnbopa
1 HacaikaДЯнnoJA(cKpOuKOM(He noka3aH))
2 KhoNka ocbo6oJdeHn TeJeckOnuYeCKo Tpy6Kn
3 Teileckonnnecka BcacbBaioua Tpyka
4 Diepkatel hacaikn
5 POn3yHOK nIa 3anycka Bo3dyxa
6 BcaBbAIOUHnIuHaH
7PyuKa nIbIeScOpHnKa
8 KhoNka ocbo6oKdEHHnIbJInc6OpHnKa
9Пьлесборнik
10 Khonka cmOTkn Kaebna
11 Puyka dIJI nepeHocKn
12 Pernylantop ckopoctn Dbratela
13 PepeKIOUaTeJIb BKIIOUeHn/ByBkIIOUeHn
14 KhoNka dIry OTKpbITnOyCToWeHn IbIeScOpHnKa
15 CoeHnHTenb IaHa
PpHaJIeKHoCTN
PeryIaTOP MOUHOCTB BCACbIBAHN
Hn3ka MoOIOCTb ⅡIaTOP u TOHKx TkaHe. BcAcblBaHa:
CpeHnMoHocb IJIeBnHOpOBbIX KObPOB C BCaCbIBaHn: IINHHbIM BOPCOM NTKaHEbbIX NOKpbI.
BbICOKARMOHOCb IJIrTONCTbIXKOBPOBINIOOB. BcacblBaHH:
IOn3yHOKnna3anyckaBo3nyxa(Pnc.E)
IOn3yHOK dIa 3ayncKa BO3dyxa Ha pyuKe IHaHaRa OTKpbBaetc Ia perynpoBkn NOTOKa BO3dyxa IIN dIydaJIeHn 3aCTpRbUHX B COIIe IpeDMeTOB.
BbIKIOUeHHe n CMOTka cTeBOrKa6eJIa
- BbIKNoHTe nbIEcOC nepeKIOuAteJeM BKIOUeHn/ BbIKNoHcEHn N BbIHbTe BNJIky n3 PO3ETKn.
2.Дерхитевикуkaбелвpyke. - HaxMMTe KhoNkY CMOTK Ka6eIa HnPaBnaTe Ka6eJIb. PnpdePknBaTe Ka6eJIb, YTO6bl OH He 3a-KpyuBanca
PpHnlaeMbIe HacAn
LJIeJIeBaH hacaIka c conlOM:
IIYHCTKNO6NBKN,WTOP,yTNOB,ZeEnI N T.D.
I PIMMEUHIA: Hacadka 2B1 B CNOXeHHOM NIOXeHn OHa MOKET NcNtB3OBAbCn KaK Hacadka DnA uen. Korda Tpe6yETc Hacadka-TeKa, BbITRHTte Yactb Co UeTKoB B HanpaBHeHn CTpeKN Do ee FHKcau.
HacaikacnOBnBKn:IaYnCTKnOBnBKn,UTOp nT.
Hacadka nla nona: HacaKa Ina nola o6opydoBaHa pONIkAmn Ina lyuwei MaHeBpeHHoCTn.
IIYHCTKNOBPOB INrnaKnX NOIOB.

IapKeTHbIe noJIbI:HaKMMte Ha 3aHIOU qACTb pbl- yara HOrO (Pnc.F,no3. 1).LcETKn BbIDBnHyTcA.
KobpHa:HaKMite Ha nepeHIOU actb pbl- 2).Lcetkn BTaHTCra.
IapkeTHaJ 5eTKa: IapKeTHaJ 5eTKa o6OpyOboHa pOJIkAMN dJa lyUweM MaHeBpeHHocTn. Jn8 6oJIbXnx PLoUaDei, TaKx KaK npKeT, lamHnat, KepAMn- YecKaJ PIIITKA n T. d.
CHaTne HacaIOK: CHImaIte HacaIK, cIeRka noBopaayBa.
06cnyKmbHne
ΦnIbTp
YCTPOIcTBO HmEeT YeTbIpe CnCTeMbI FnHbTpOB. TpaDINUOHHa CNCTeMa C nbJIeBbIM MeLUKOM 3aMeHeHa Ipo3paHbIM nbIeSc6OpHNKOM. B daHOM cIyue KpyHbIE YaCTNuBi NBII IN MEIKne YAcTHCuB, B3BeUeHHbIE B BO3dyXe, 3akpyuBaHOrTCBbICOKOCKoPocTHbIM NOTOKOM BCacCbIAIOSeBO3dyxa.
Takm 06pa3OM, He HxKHO NOKyNaTb NblneBbIe MeWKN.
OnyctooHe nblnc6bOpnka
Onopokhnte nbilec6bOpHnK, KOrda konlueCTBO nbinn DoctnHET OTMeTKN MAX).BbInonHNTe cneDuOuuee:
BbHbTe CeTeByHO BnIKy n3 po3ETKn.
HaKMnTe KhoNky (8) nnaocbo6oKdEHHn PbIeC6OpHnKa nCHMnTe PbIeC6OpHnK (Pnc.G).
PacnoonKeTe nbIeNc6OpHnK HaJ yphoI Mycopa. BbITpHXnTe coepKHMoe nbIeNc6OpHnKa. 3TOHO HAKMITE KHOPIKy OCBO6OKeHEnKpbILIKn PbIeNc- 6OpHnKa (14) (Pnc.H).
3aKpoTe KpbIuKy nbIeScOpHN Ka, YTObI 6bl CblUeH UeJyOK FNKcaun.
3aunTHbI ΦnBtp DBnraTeJIa(B nbIe6OpHnke) OuncTHoI ΦnBtp (UNKNOHHbI 6JOK)
- BbIhTe ceteBvH BuNkU n3 po3eTkn.
HaKMMTe KHOIIky (8)ДIЯ OCSBO6OKeHJIeHJI NJIeC6OpHNka I CHIMMTe NJIeC6OpHNIK (Pnc.G).
PacnoJIOKHe nIleC6OpHN KaH yHOn dHa Mycopa. BItprXnTe coepKIMoe nIleC6OpHNka. JnT OTO HAKMTE KONKY OCBO6OHNk HnKn IbeC6OpHNka (14) (Pnc.H).
3aKpoIe KpbIuKy nbIeocbOpHnKa, YTO6bl 6blcbl- WEN UENOK FIKCaUN. - Ocbo6oJnte KpbIuKy nbIine6OpHnKa, noBepHyB ee HEMHOrO npOTNB yacOBoN cTpeJIKN. CHMnTe KpbIuKy.
BbHbTe 3aunTHbI ΦnltbTp DniratelaN Ouchnteero, noCTyKnBaNo Hemy. - Ocbo6oJnte uKIOHHbI 6JOK, NOBepHyB eRO HEMHO TpoTHB YACOBO B CTpeJIKN. CHIMITE UIKIOHHbI 6JOK N IOYNCHTe eRO.
BCTaBbTe UKNIOHbI BIOK B bIIeC6OpHN K 3aΦNKcpyte erO, NOBepHyB erO no yacOBn cTpeKe.
BCTaBBTe 3aunTHbI ΦnIbTp DBnIraTeIa.
3aKpoTe KpbIuKy 3aФNKcnpyIte, NOBepHyB ee no yacobO CTpeNke. - YctahOBHTe NbIeC6OpHnK TaK, YTO6bl OH 3aФнКCuPobBANc CO UeJIyKOM.

Pn KaJdOM TpeTbeM OnyctOWeHn Nblnc- 6OpHnKa HnB Cnyuae CNbHOrO CnHbHOrO 3aqr3HeHn npomOnTe FnIbTp CTpye BObl uepe3TKaHb FnIbTp a B HnpaBHeHn, npOTNbO- NOLOXHOM DytbIO B03- Dyxa B NblncOce.
YcTaHaBnBaIte nbJnc6OpHnK Ha MeCTO TOJIbKO nocne NOJHOro BbICbIXaHnI!
BHIMAHNE:
HnKOrJa He MoIte ΦNbTp B CTHpaNbHO MaunHe Hne HCNoJIb3yIte FEN IIN erO cyuKn.
Φnltp HEPA
Пьлесoc takke HeMeetФильtp HEPA.3TOTФильtp HaXODITcnoKpblIshKoN C3aIN Пьлесoc.a.ДЯOBecneueHnnpaBnHOn pa60bIФильТа erO peKOMeHnyETcMehATb KaKdIbe WeCTb MeCAUEB.
- BbHbTe BnIKy n3 p03eTKn.
- OTKpoIte BEHTINIAUHOHHyO peWSeTKy HaaKaTHEm KhoNKn "PUSH" Ha BEHTINIAUHOHHOpeWetke BHN3y.
CHMMITEpeETky.BbHbTeΦnIbTpNIOHCNTeero, KaK OINcAHO.BCTaBteΦnIbTpO6paTHo.3aKpOHTe BEHTINLAUHOHHyIO peETky TaK, YTO6bI OHa 3aUeHN KHyIacb.

BHIMAHHE: BaXHoe 3aMeaHHe!
HcTka MoKeT notpe6oBaTbCraYepe3 KOpOTKe BPeMBA 3aBNCIMOCTN OT yCIOBNI NCIOJIb3OBAHnA, HApPImepnn BCacBbAHm MeKoI PbII.
Bcnyae cHnKeHH MoHOCTH BcCabHaHIN NOHCNTe HbTpbl, KaONcaHO.
Bhe3aHHe cHKeHHe MOUHOCTN BCaCbHaHn IbIeCocA Bo BpempaOToM MoKet roBOpHT O 3acopeHnΦJIbTpOB.
UHCTKa H O6CJyKHBaHne

IPEyUNPEXJDEHNE:
Bcerda otknloaute ceteboi kaebI nepeid nictKOI!
HnB Koem Cnyuae He noRpyKaIte np6Op B Body nIaYnCTKn. 3TO MOKeT pINBeCTN K IopaxKeHHO 3NeKtpn-ueckm TOKOM NIN BO3rpaHHIO.

BHIMAHHE:
He nCnoJIb3yIte npOBOIoUHyIO UeTKy Ia6pa3Hb-Hbe cpeDCTBA.
He nCIOJIb3yIte KNCIOTHbIe IIN a6pa3NHBHbIE YnCTra-Ⅲne CpeIcTBA.
ПразираітіКорпунсухоTNkaHbI.
Xpahene
JaTe yctpoiCTBy NOJIHOCTbIO OCTbITb.
-ПОЛНСТБСМОТАЙТЕΚАБЕЛ.
BCTaBbTe KpHcOHK HacAnI Nla INoI B ero MeCTo IINXpaHeHH C3aDn YcTPOInCTBa.
Bo3MOHHbIe HEnCnPaBHOCTN x yCTpaHeHne
- YcTpoNCTBO He pa6oTaet.
DeyCTBNA:
IpoBepbTe IoKKnUoyHne K 3JeKtpopo3eTke.
PpOBepbTe nIOJKeHMe nepeKJIQUaTeIa.
- YcTpoIcTBo He BCacbIbAEr HUeRo.
Bo3MOxHaI npuHa:
MoHIOCTb BCaCtBaHnA CnIJKOM ana.
DeHCTBNA:
PpOBepeIeIOJKeHHe IepeKIOUaTeJIy npapBHeHn.
HNN
Bo3MOxHaI npuHa:
PTopeBnEma MoUHocTb:
PHOM: 1800BT
PMAK: 2200BT
Klacc 3aunTbI:
YnctbI BeC: ..np6n.5,9Kr
Texnueckne n3MeHHeBhOcTc8e3yBeDOMJIeHNA!
3To n3deJeHHe npOJIO BCE Heo6xOaIMbIe n aKtYaJIbHbIe npOBepKn, npEaHncaHbIe DnpeKTHBOI CE, K npM. Ha 3NeKTPo-MaHNTHyO COBMeCTHMOCt b N COOTBeTCTBne Tpe6o-BaHrM K Hn3KOBoIbTHoI TexHKe, OHO 6blNO TaKKe cKOH-CTpyuPObaHO n NOCTpoEO C yUeTOM NoCleDHnx Tpe6oBaHn I IO TexHKe 6e3OnaCHOCTH.

CLATRONIC
INTERNATIONAL GMBH
D-47906 Kempen/Germany - Industriering Ost 40
Internet: http://www.clatronic.de·email: info@clatronic.de

- Symbols in these Instructions for Use
- WARNING:
- CAUTION:
- NOTE:
- General Safety Instructions
- Children and Frail Individuals
- WARNING!
- Special Safety Instructions
- Overview of the Components
- Accessories
- Start-up
- Telescope Vacuum Pipe (Fig. D)
- Using the Appliance
- Vacuum power regulator
- Air Slide (Fig. E)
- Switching off and Winding up the Mains Lead
- Nozzle Attachment
- NOTE: "2 in 1" nozzle:
- Maintenance
- Filter
- Emptying the dust container
- Motor protection filter (in the dust container) Cleaning the filter (Cyclone unit)
- HEPA filter
- CAUTION: Important note!
- Cleaning & maintenance
- Storage
- Troubleshooting
- Noise development
- Technical Data
- Meaning of the "Dustbin" Symbol
- Instrukcje obslugi
- Regulator sily ssania
- PeryIaTOp IHTeHCnBHOCTI BCMOKTyBaHH
- 3acnIHka dna nobirp (MaN.E)
- YcTaHOBbKnpHnAaHa conNo
- UHHeHHKoHTeHepaDnA Hny
- ΦiNbTp 3axnCTy DnBryHa (B KOHTeHepi dny nnn) UneHHa fIbtpa (uKNOHHN)
- YBAGA.
- ΦinbtpHEPA
- yB7A.
- PpHmIMtB do yBaH nIO BaXnHBy iHΦopMaio!
- OuHenni i 36epiranHH
- PONEPENHEHHA.
- 36epiraHHa
- YcyHeHHa HeNoJaOK
- - PpHnad He yhKcuioHye.
- - HNIOOC He BCMOKTyc CMTTA.
- Texhiu hi napametpn
- PykoBoDCTBO NO 3KcIpyatauH
- CnMBOJbl,NCNoJIb3YeMbIe B 3TNX INHCTpyKUHX
- IPEyUNPEXDEHNE:
- BHIMAHNE:
- ПРМЕЧАЙ:
- 06uHnHcTpyKmHnNoTexHnke6e3onachocTH
- TeH NJIuca COrpaHnueHHbIMN BO3MOXHOCTaM
- IPEyIpyEKeJDEHNE!
- CneuaJIbHbIe HNCTpyKcHn ITO TexHKe 6e3ONaCHOCTN
- O63op DeTanei npnbopa
- PpHaJIeKHoCTN
- PeryIaTOP MOUHOCTB BCACbIBAHN
- IOn3yHOKnna3anyckaBo3nyxa(Pnc.E)
- BbIKIOUeHHe n CMOTka cTeBOrKa6eJIa
- PpHnlaeMbIe HacAn
- 06cnyKmbHne
- ΦnIbTp
- OnyctooHe nblnc6bOpnka
- 3aunTHbI ΦnBtp DBnraTeJIa(B nbIe6OpHnke) OuncTHoI ΦnBtp (UNKNOHHbI 6JOK)
- Φnltp HEPA
- BHIMAHHE: BaXHoe 3aMeaHHe!
- UHCTKa H O6CJyKHBaHne
- IPEyUNPEXJDEHNE:
- BHIMAHHE:
- Xpahene
- Bo3MOHHbIe HEnCnPaBHOCTN x yCTpaHeHne
Brand : CLATRONIC
Model : BS 1280
Category : Vacuum Cleaner