
CD-C600, CDC-600 - CD Player YAMAHA - Free user manual and instructions
Find the device manual for free CD-C600, CDC-600 YAMAHA in PDF.
| Product type | 5-disc CD changer player |
| Dimensions (W × H × D) | 435 × 116 × 405 mm |
| Weight | 6.2 kg |
| Power supply | AC 110-120 / 220-240 V, 50/60 Hz |
| Power consumption | 16 W (standby < 0.5 W) |
| Changer capacity | 5 discs (carousel) |
| Compatible discs | Audio CD, CD-R, CD-RW, CD-TEXT |
| File formats | MP3, WMA (disc and USB) |
| Connectivity | Stereo RCA analog output, digital optical output, iPod/USB port, RS-232C |
| PLAYXCHANGE function | Change discs without interrupting playback |
| Programmed playback | Up to 24 tracks (Audio CD only) |
| Repeat modes | Single track, entire disc, folder, A-B repeat |
| Random playback | Yes (except iPod) |
| PURE DIRECT mode | Improves audio quality (disables digital output and display) |
| Auto standby | After 30 minutes of inactivity (adjustable) |
| iPod compatibility | iPod classic, nano (2nd-4th gen.), touch (1st-2nd gen.) |
| USB devices | FAT16/FAT32, up to 32767 files, 256 folders |
| Frequency response | 2 Hz - 20 kHz (±0.5 dB) |
| Signal-to-noise ratio | 105 dB or more |
| Supplied accessories | Power cord, remote control, AA batteries ×2, stereo RCA cable |
| Cleaning | Clean dry cloth, no chemical solvent |
| Laser safety | Class 1 – do not open, refer to qualified technician |
| Warranty | 2 years (EEA and Switzerland) |
Frequently Asked Questions - CD-C600, CDC-600 YAMAHA
User questions about CD-C600, CDC-600 YAMAHA
0 question about this device. Answer the ones you know or ask your own.
Ask a new question about this device
Download the instructions for your CD Player in PDF format for free! Find your manual CD-C600, CDC-600 - YAMAHA and take your electronic device back in hand. On this page are published all the documents necessary for the use of your device. CD-C600, CDC-600 by YAMAHA.
USER MANUAL CD-C600, CDC-600 YAMAHA
VISIBLE AND INVISIBLE LASER RADIATION WHEN OPEN. AVOID EXPOSURE TO BEAM.
ADVARSEL
SYNLIG OG USYNLIG LASERSTRALING VED ABNING. UNDGÅ UDSÄTTELSE FOR STRÄLING.
ADVARSEL
SYNLIG OG USYNLIG LASERSTRÄLING NAR DEKSEL ÅPNES. UNNGÅ EKSPONERING FOR STRÄLEN.
WARNING
SYNLIG OCH OSYNLIG LASERSTRÄLNING NÄR DENNA DEL ÄR ÖPPNAD. BETRAKTA EJ STRÄLEN.
VARO!
AVATTAESSA OLET ALTTIINA NAKYVALLE JA NAKYMATTOMALLE LASER SÄ TEILYLLE. ALAKATSO SATEESEEN.
VORSICHT
1 To assure the finest performance, please read this manual carefully. Keep it in a safe place for future reference.
2 Install this sound system in a well ventilated, cool, dry, clean place - away from direct sunlight, heat sources, vibration, dust, moisture, and/or cold. For proper ventilation, allow the following minimum clearances.
Top: 2.5cm (1 inch)
Rear: 2.5cm (1 inch)
Sides: 2.5cm (1 inch)
3 Locate this unit away from other electrical appliances, motors, or transformers to avoid humming sounds.
4 Do not expose this unit to sudden temperature changes from cold to hot, and do not locate this unit in an environment with high humidity (i.e. a room with a humidifier) to prevent condensation inside this unit, which may cause an electrical shock, fire, damage to this unit, and/or personal injury.
5 Avoid installing this unit where foreign objects may fall onto this unit and/or this unit may be exposed to liquid dripping or splashing. On the top of this unit, do not place:
- Other components, as they may cause damage and/or discoloration on the surface of this unit.
- Burning objects (i.e. candles), as they may cause fire, damage to this unit, and/or personal injury.
- Containers with liquid in them, as they may fall and liquid may cause electrical shock to the user and/or damage to this unit.
6 Do not cover this unit with a newspaper, tablecloth, curtain, etc. in order not to obstruct heat radiation. If the temperature inside this unit rises, it may cause fire, damage to this unit, and/or personal injury.
7 Do not plug in this unit to a wall outlet until all connections are complete.
8 Do not operate this unit upside-down. It may overheat, possibly causing damage.
9 Do not use force on switches, knobs and/or cords.
10 When disconnecting the power cable from the wall outlet, grasp the plug; do not pull the cable.
11 Do not clean this unit with chemical solvents; this might damage the finish. Use a clean, dry cloth.
12 Only voltage specified on this unit must be used. Using this unit with a higher voltage than specified is dangerous and may cause fire, damage to this unit, and/or personal injury.
Yamaha will not be held responsible for any damage resulting from use of this unit with a voltage other than specified.
13 To prevent damage by lightning, keep the power cord disconnected from a wall outlet or the unit during a lightning storm.
14 Do not attempt to modify or fix this unit. Contact qualified Yamaha service personnel when any service is needed. The cabinet should never be opened for any reasons.
15 When not planning to use this unit for long periods of time (i.e. vacation), disconnect the power cable from the wall outlet.
16 Install this unit near the wall outlet and where the power cable can be reached easily.
17 Be sure to read the "TROUBLESHOOTING" section in this manual on common operating errors before concluding that this unit is faulty.
18 Before moving this unit, press to turn off this unit and then disconnect the power cable from the wall outlet.
19 The batteries shall not be exposed to excessive heat such as sunshine, fire or like.
20 VOLTAGE SELECTOR (Asia and General models only) The VOLTAGE SELECTOR on the rear panel of this unit must be set for your local main voltage BEFORE plugging into the wall outlet. Voltages are:
AC 110/120/220/230-240 V, 50 / 60Hz
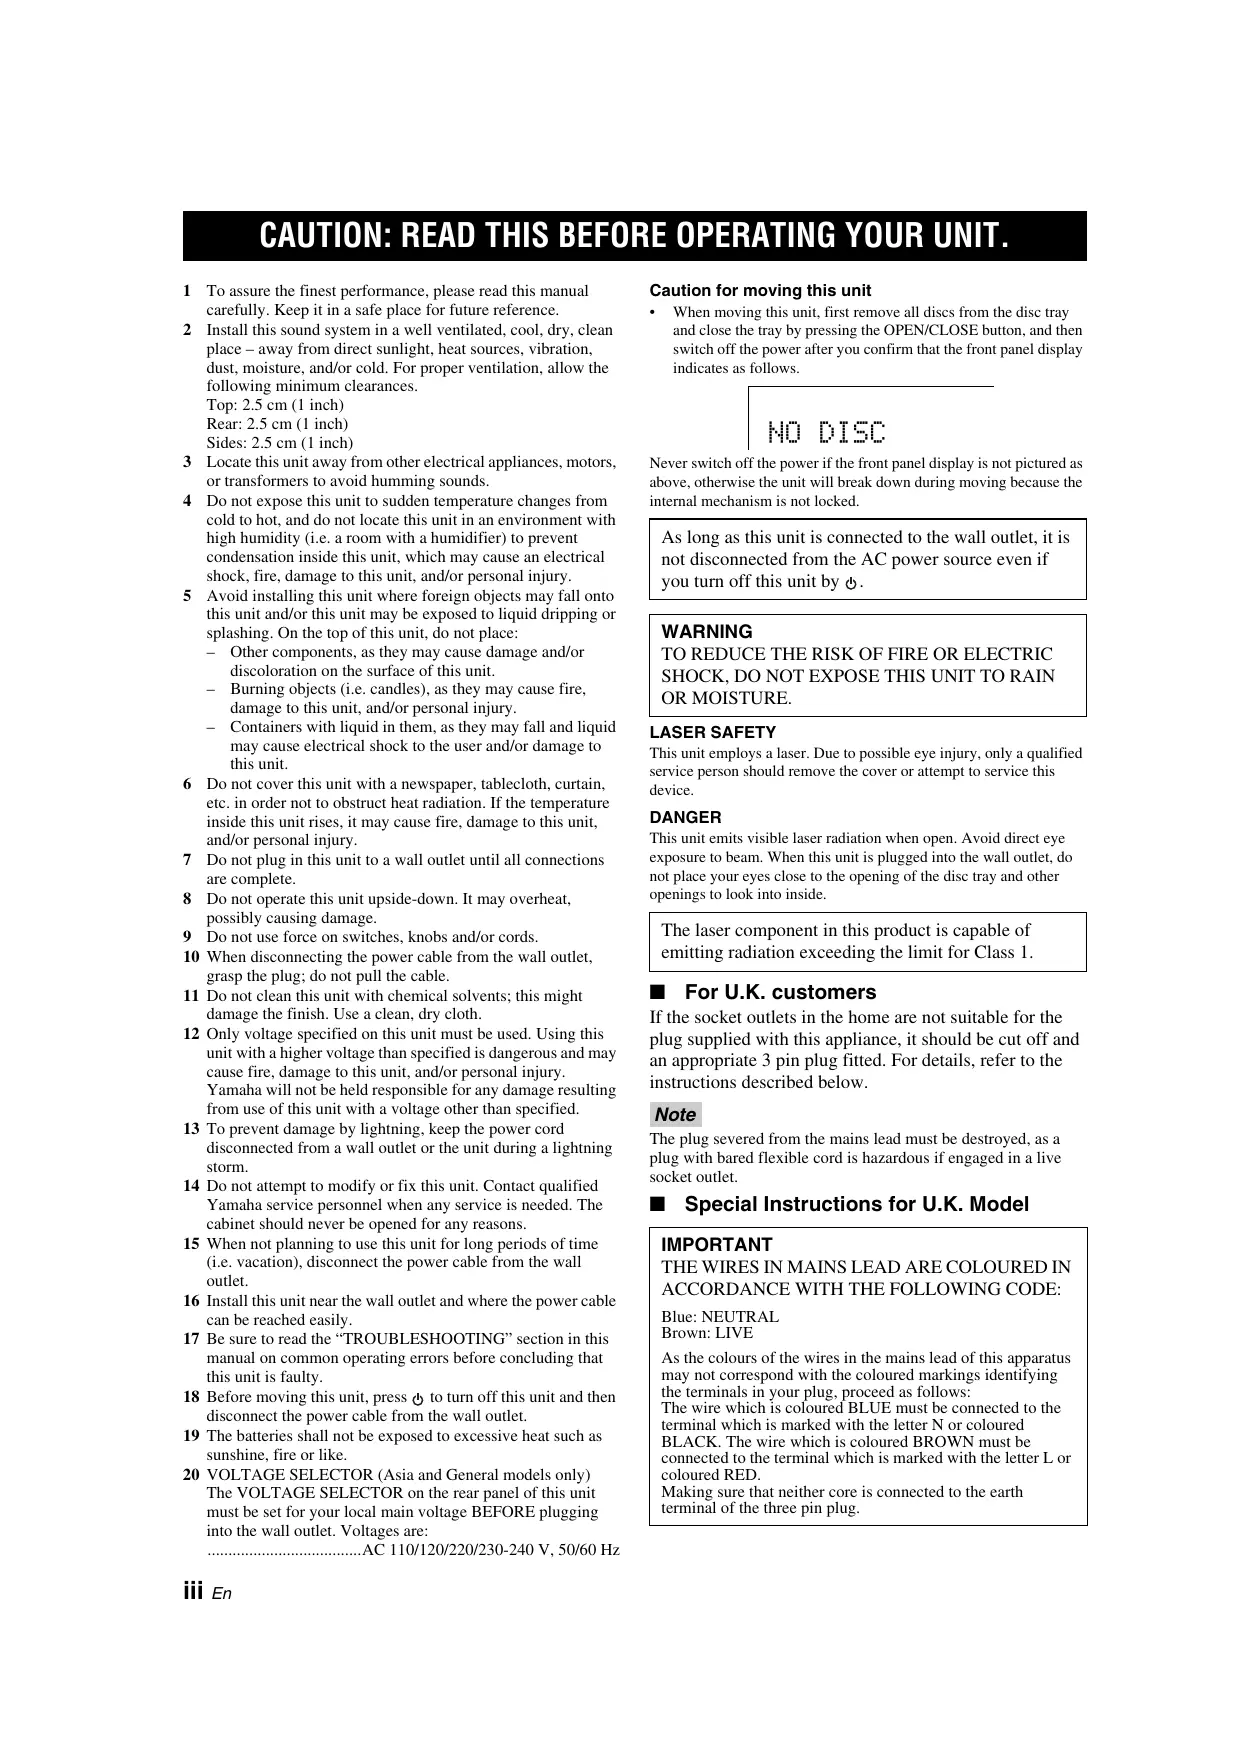
Caution for moving this unit
- When moving this unit, first remove all discs from the disc tray and close the tray by pressing the OPEN/CLOSE button, and then switch off the power after you confirm that the front panel display indicates as follows.
NO DISC
Never switch off the power if the front panel display is not pictured as above, otherwise the unit will break down during moving because the internal mechanism is not locked.
As long as this unit is connected to the wall outlet, it is not disconnected from the AC power source even if you turn off this unit by .
WARNING
TO REDUCE THE RISK OF FIRE OR ELECTRIC SHOCK, DO NOT EXPOSE THIS UNIT TO RAIN OR MOISTURE.
LASER SAFETY
This unit employs a laser. Due to possible eye injury, only a qualified service person should remove the cover or attempt to service this device.
DANGER
This unit emits visible laser radiation when open. Avoid direct eye exposure to beam. When this unit is plugged into the wall outlet, do not place your eyes close to the opening of the disc tray and other openings to look into inside.
The laser component in this product is capable of emitting radiation exceeding the limit for Class 1.
For U.K. customers
If the socket outlets in the home are not suitable for the plug supplied with this appliance, it should be cut off and an appropriate 3 pin plug fitted. For details, refer to the instructions described below.
Note
The plug severed from the mains lead must be destroyed, as a plug with bared flexible cord is hazardous if engaged in a live socket outlet.
Special Instructions for U.K. Model
IMPORTANT
THE WIRES IN MAINS LEAD ARE COLOURED IN ACCORDANCE WITH THE FOLLOWING CODE:
Blue: NEUTRAL
Brown: LIVE
As the colours of the wires in the mains lead of this apparatus may not correspond with the coloured markings identifying the terminals in your plug, proceed as follows:
The wire which is coloured BLUE must be connected to the terminal which is marked with the letter N or coloured BLACK. The wire which is coloured BROWN must be connected to the terminal which is marked with the letter L or coloured RED.
Making sure that neither core is connected to the earth terminal of the three pin plug.
CONTENTS
INTRODUCTION
CONTROLS AND FUNCTIONS 2
Front panel. 2
Rear panel connections 4
Remote control. 5
OPERATION
LOADING AND PLAYING DISCS 8
Program playback Audio CD 8
PLAYXCHANGE 8
PLAYING BACK iPod/USB DEVICE. 9
Connecting iPod/USB devices. 9
Playing back iPod 9
Playing back USB devices. 9
Disconnecting iPod/USB devices 10
Supported iPod/USB devices 10
ADDITIONAL INFORMATION
PLAYABLE DISC AND FILE FORMAT 11
USING THE ADVANCED SETUP 13
TROUBLESHOOTING. 14
SPECIFICATIONS. 15
Features
- 5-Discs Carousel Auto-changer
Full Opening Disc Tray for Changing 5 Discs at a Time - PLAYXCHANGE; Disc Changing Capability while Playing back Another
Optical Digital Output - CD-R, CD-RW Disc Playability (For details, refer to page 11.)
MP3, WMA Disc Playability - MP3, WMA File Playability Stored on USB Device (For details, refer to page 11.)
Supplied accessories
Please check that you have received all of the following parts.
Power cable
Remote control
- Batteries (AA, R6, UM-3) (× 2)
RCA stereo cable
About this manual
indicates a tip for your operation.
- In this manual, audio CDs are referred to as "Audio CD", MP3/WMA discs as "Data Disc", and MP3/WMA files stored on the USB device as "USB".
The Audio CD, Data Disc and USB icons indicate music data formats that can be used in the operation.
- This manual is printed prior to production. Design and specifications are subject to change in part as a result of improvements, etc. In case of differences between the manual and the product, the product has priority.
- iPod Playability
- Program Play (Audio CD only)
- Random-Sequence Play (except iPod)
- Single Track/File, Entire Disc/Folder/Whole device Repeat Play
- Repeat A-B Play (Audio CD only)
- Adjustable Display Information and Brightness
PURE DIRECT Function
Front panel

① Disc tray
Loads a disc.
② (Open/Close)
Opens or closes the disc tray. For loading and unloading discs, see page 8.
③ (Power)
Press inward to the ON position to turn on the power.

- The power indicator above lights up when this unit is turned on.
- You can turn this unit to a standby status with STNDBY/ON on the remote control.
- This unit is equipped with the Auto standby function. By turning on the function, this unit turns to the standby mode automatically when disc playback is stopped for 30 minutes. For details, see page 13.
④ Power indicator
Lights up as follows:
ON: Bright
Standby mode: Dark
OFF: Off
⑤ DISC (1-5)
Selects a desired disc and starts playback.
(6) PURE DIRECT
Turns on or off the PURE DIRECT mode to improve audio quality.

- The PURE DIRECT indicator lights up.
- The digital output is turned off.
- The front panel display is turned off during playback and only the minimum required indicators and messages are displayed during in the operation.
Note
Connect using the ANALOG OUT terminals when you use PURE DIRECT mode (refer to page 4).
⑦ Remote control sensor
Receives signals from the remote control.
⑧ iPod/USB port
Connect your iPod or USB device. See page 9 for details.
⑨ iPod/USB indicator
Off: CD mode is selected.
Orange: Connection ready.
Green: iPod/USB is connected and playable files have been detected (playback ready).
CD/USB
Switches between CD mode and iPod/USB mode. See page 9.

When the iPod/USB indicator is not lit, this unit is in the CD mode.
⑪ / (Skip/Search backward),
/ (Skip/Search forward)
/ : Skips to the next track.
: Skips back to the beginning of the current track.
( twice): Skips to the previous track.
Press and hold 一 一 / 一 一 or 一 一 /一 一 to search backward/forward.
(Play)/ (Pause)
Starts or pauses playback. Press / again to resume playback.
(Stop)
Stops playback.
14 PLAYXCHANGE
Opens the disc tray during playback without interrupting disc playback. See page 8 for details.
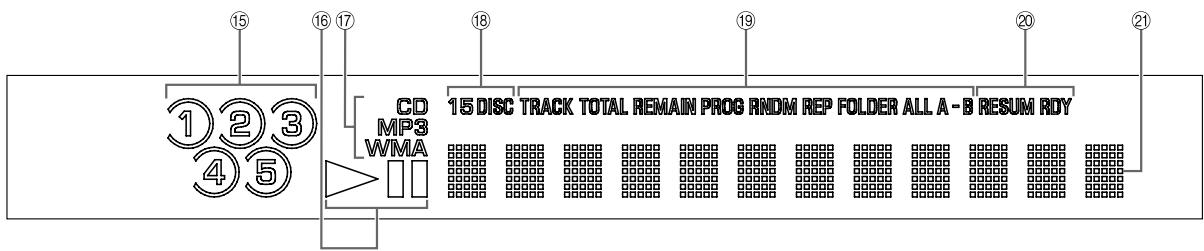
15 Disc select indicator
The numbers corresponding to the trays containing discs light up. The enclosed number indicates the currently selected disc.
Note
The number corresponding to an empty tray may light up before the tray is selected. When the disc tray is closed after loading/ replacing discs, this unit searches discs starting from tray 1. During the search, the tray numbers corresponding to empty trays go off. When a disc is detected, the searching finishes there and the remaining trays are left unsearched.
⑥ Playback status Indicator
Lights up when this unit is in the play or pause mode.
⑦ Source type indicator
Indicates the type of content being played back.
18 Play mode indicator
Indicates the selected disc play mode (1DISC or 5DISC). See "MODE" (page 5) for details.
19 Time and playback mode indicator
Indicates the current playback mode and the status of the time display (see pages 5 and 8 for playback modes, and page 6 for time display).
Advanced setup indicator
Indicates the enabled special modes. See "USING THE ADVANCED SETUP" (page 13) for details.
② Multi-information display
Rear panel connections
CAUTION
Before making any connection, switch OFF the power to the unit, the amplifier and any other component.
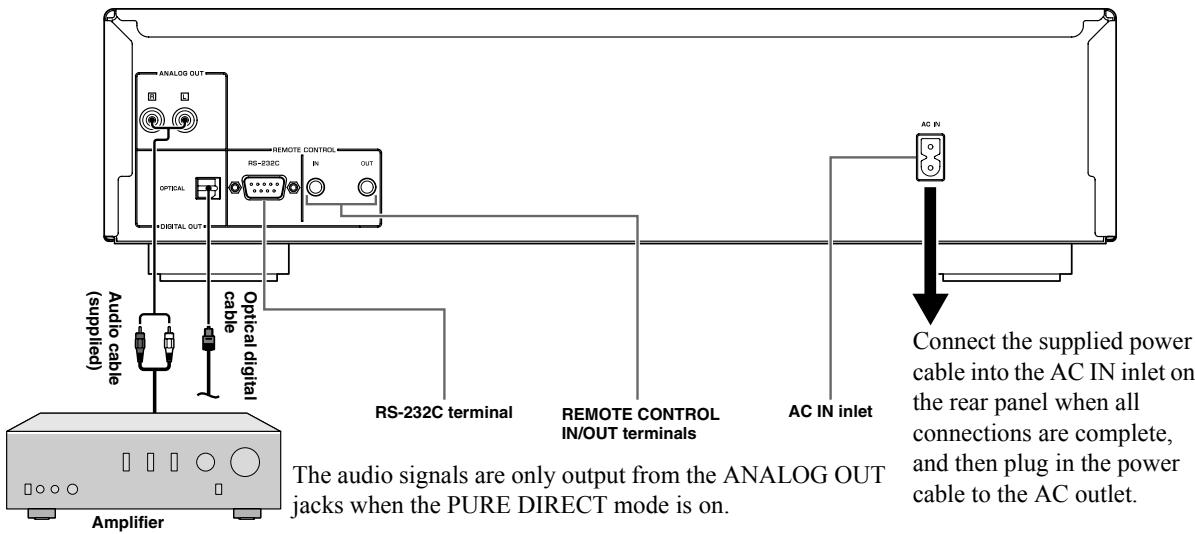
VOLTAGE SELECTOR
(Asia and General models only)
CAUTION
The VOLTAGE SELECTOR on the rear panel of this unit must be set for your local voltage BEFORE plugging the power cable into the AC wall outlet. Improper setting of the VOLTAGE SELECTOR may cause damage to this unit and create a potential fire hazard.
Rotate the VOLTAGE SELECTOR clockwise or counterclockwise to the correct position using a straight slot screwdriver.
Voltages are as follows:
AC 110/120/220/230-240 V, 50/60 Hz

For Custom Installer
■ REMOTE CONTROL IN/OUT terminals
These terminals are used for custom installation system. When this unit is connected to the components for custom installation system, you can operate this unit with the system remote control.
Connect the REMOTE CONTROL IN terminal of this unit to the output terminal of the central controller for custom installation system.
By connecting the REMOTE CONTROL OUT terminal of this unit to the input terminal for remote control of the other component, you can also operate it with the system remote control. In this way, up to 6 components can be connected in series.
■ RS-232C terminal
This unit is also equipped with an RS-232C terminal. Consult your dealer for details.
Remote control
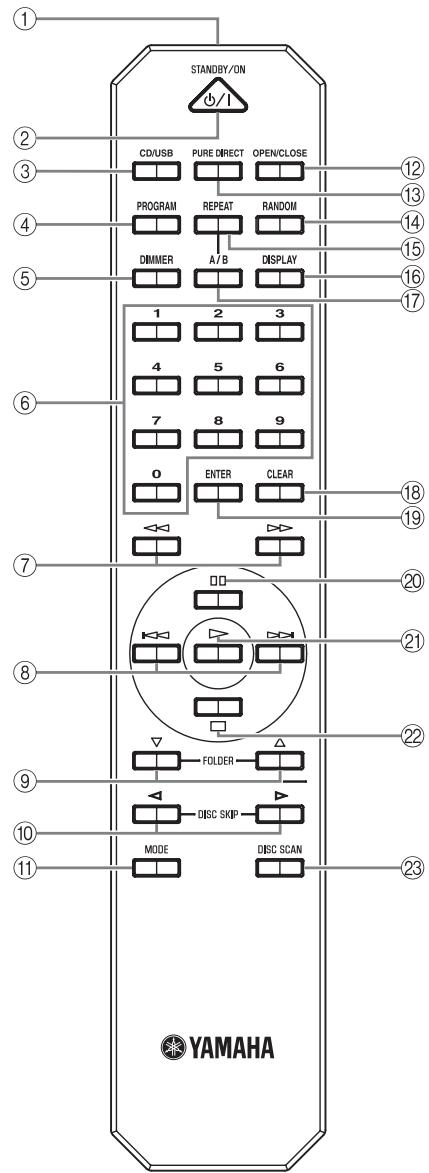
① Infrared signal transmitter
Sends infrared signals to this unit.
(2) STANDBY/ON
Turns this unit on or to the standby mode while (Power) on the front panel is pressed inward to the ON position.
Note
You can operate this unit only when the (Power) on the front panel is pressed inward to the ON position.
③ CD/USB
Switches between CD mode and iPod/USB mode (see page 9).
This setting is retained even if you turn off this unit.
(4) PROGRAM
Turns on or off the program playback mode. See "Program playback" on page 8.
⑤ DIMMER
Each time you press DIMMER, the brightness level changes by 4 levels.
中
This setting is retained even if you turn off this unit.
⑥ Numeric buttons
Use to select directly a track on the disc or a file in the current folder.
(Search backward), (Search forward)
Searches tracks backward/forward while the button is pressed.
⑧ (Skip backward), (Skip forward)
: Skips to the next track.
: Skips back to the beginning of the current track.
( twice): Skips to the previous track.
FOLDER (Folder down), (Folder up) Data Disc USB
: Skips to the previous folder.
: Skips to the next folder.
Refer to page 9 for details.
DISC SKIP (Previous disc), (Next disc)
Skips to the previous/next disc.
11 MODE
Switches the disc play mode between 1DISC mode and 5DISC mode.
In 1DISC mode, only the selected disc is played back. In 5DISC mode, all discs on the tray are played back in sequence.
12 OPEN/CLOSE
Opens or closes the disc tray. You can load or replace five discs at a time. See page 8 for details.
13 PURE DIRECT
Turns on or off the PURE DIRECT mode to improve audio quality. See page 2 for details.
This setting is retained even if you turn off this unit.
14 RANDOM
Turns on or off the random sequence playback mode.
Note
The random playback mode is canceled when the disc is ejected.
15 REPEAT
Repeats playback of a single track or all tracks. Each time you press REPEAT during playback, the repeat playback mode changes as follows:
- REP TRACK (single repeat playback): A single track is played back repeatedly.
- REP ALL (all repeat playback): All tracks (the entire disc) are played back repeatedly.
Data Disc USB
- REP FOLDER (folder repeat playback): All files (the entire folder) are played back repeatedly.

Repeat play also works with program play and random-sequence play.
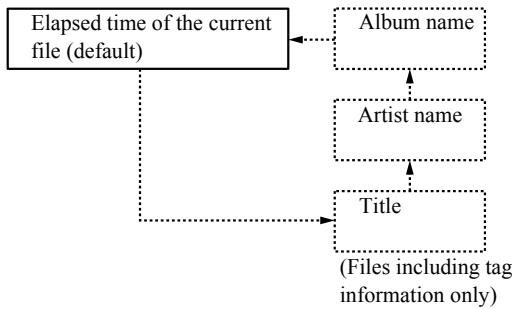
16 DISPLAY
Switches the time display. Each time you press DISPLAY during playback, the time display changes as follows:
Audio CD
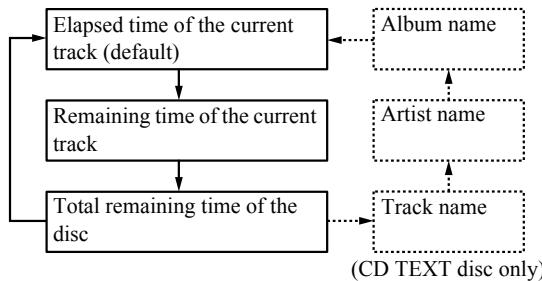
Data Disc USB
⑦ A/B Audio CD
Repeats playback of a specified section of a track. To set the starting and end points (A and B), press A/B twice during playback.
To cancel repeat A-B, press A/B again.
Notes
- You cannot set repeat A-B from one track to another track.
- You cannot set repeat A-B for Data Disc and USB.
- If you stop playback by pressing (Stop), repeat A-B is canceled.
- You cannot use repeat A-B when this unit is in the PURE DIRECT mode.
18 CLEAR
Erases the programmed track.
19 ENTER
Confirms a track number entered when you are programming tracks.
(Pause)
Pauses playback. Press or to resume playback.
(Play)
Starts playback.
(2) (Stop)
Stops playback.
23 DISC SCAN
Scans loaded discs and plays a section of 10 seconds in each disc, allowing you to search for a desired disc. To cancel scanning and switch to the normal playback, press DISC SCAN again or press (Play).
Notes
- While scanning, the disc tray number being played back blinks in the display. The number stops blinking and lights up when playing back the disc is finished.
- If the disc being played back has a long blank space between tracks, you will hear no sound during disc scan.
■ Installing batteries in the remote control
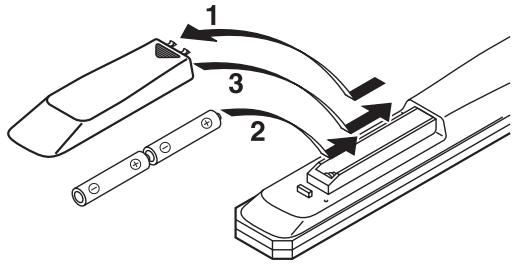
1 Press the part and slide the battery compartment cover off.
2 Insert the two supplied batteries (AA, R6, UM-3) according to the polarity markings (+ and -) on the inside of the battery compartment.
3 Slide the cover back until it snaps into place.
Using the remote control
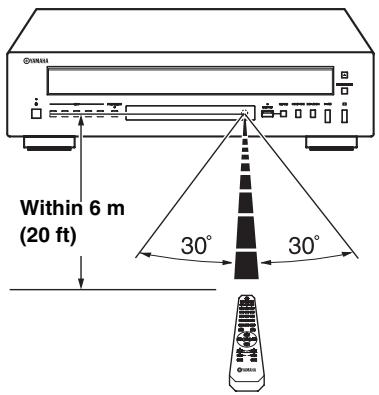
The remote control transmits a directional infrared beam. Be sure to aim the remote control directly at the remote control sensor on the front panel of this unit during operation.
Notes on batteries
- Change all of the batteries if you notice that the operation range of the remote control decreases.
- Use AA, R6, UM-3 batteries.
- Make sure that the polarities are correct. See the illustration inside the battery compartment.
- Remove the batteries if the remote control is not used for an extended period of time.
- Do not use old batteries together with new ones.
- Do not use different types of batteries (such as alkaline and manganese batteries) together. Read the packaging carefully as these different types of batteries may have the same shape and color.
- If the batteries have leaked, dispose of them immediately. Avoid touching the leaked material or letting it come into contact with clothing, etc. Clean the battery compartment thoroughly before installing new batteries.
- Do not throw away batteries with general house waste; dispose of them correctly in accordance with your local regulations.
Handling the remote control
- The area between the remote control and this unit must be clear of large obstacles.
- Do not spill water or other liquids on the remote control.
- Do not drop the remote control.
- Do not leave or store the remote control in the following types of conditions:
places of high humidity, such as near a bath
places of high temperature, such as near a heater or a stove
places of extremely low temperatures
- dusty places
- Do not expose the remote control sensor to strong lighting, in particular, an inverter type fluorescent lamp; otherwise, the remote control may not work properly. If necessary, position this unit away from direct lighting.
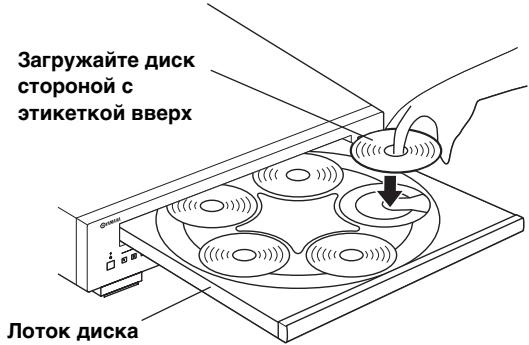
LOADING AND PLAYING DISCS
You can load or replace five discs at a time.
1 Press OPEN/CLOSE to open the disc tray and load discs.
Use the disc guides to align the discs correctly in the tray.
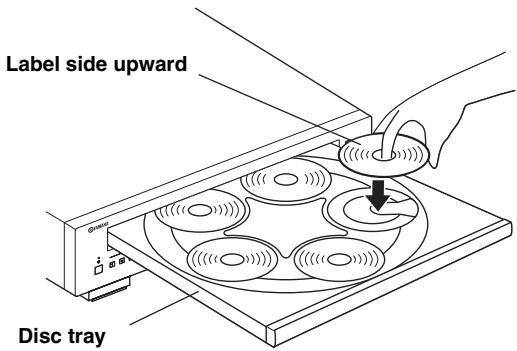
Note
To play back an 8cm (3 inch) CD, place it in the inner recessed area of the disc tray. Do not put a normal (12cm(5inch)) CD on top of an 8cm CD.
2 Press OPEN/CLOSE to close the disc tray.
3 Press MODE to select a desired disc play mode (1DISC or 5DISC) confirming it on the display.
1DISC: Only the selected disc is played back.
5DISC: All discs on the tray are played back in sequence.
4 Press (Play) to start playback from the first track or file of disc 1.
5 (If necessary) Select a desired disc by using DISC SKIP / , or a DISC (1-5) button on the front panel.
Program playback Audio CD
In the program playback mode, you can play back tracks in a programmed sequence.
Notes
- You can program and play back tracks in any order from all of the loaded discs (1-5).
- The programmed tracks are erased when the disc is ejected, this unit is turned off, or this unit is turned to the standby mode.
1 Press PROGRAM while playback is stopped. This unit is set to the program editing mode.
2 Select a disc with one of the DISC (1-5) buttons on the front panel or DISC SKIP / on the remote control.
3 Select a track by using the numeric buttons and ENTER.
4 Repeat steps 2 and 3 to program the next track.
You can program up to 24 tracks.

To cancel the programmed track, press CLEAR.
5 Press
Playback starts from the beginning of the programmed sequence.

To erase all programmed tracks, press CLEAR when the playback is stopped.
PLAYXCHANGE
PLAYXCHANGE is a function that allows you to replace discs during disc playback without interrupting it. Press the PLAYXCHANGE button on the front panel to open the disc tray and replace discs.
CAUTION
Never try to load a disc in the position marked x in the figure below. This may cause damage to the unit and the disc, because that is where the disc being played back is located.
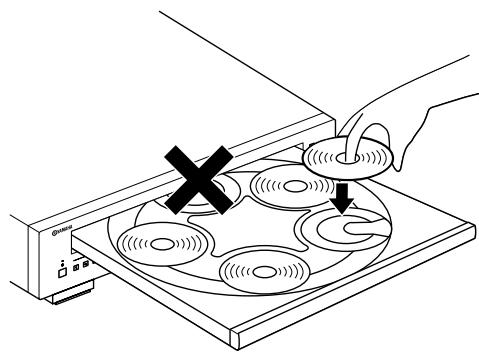
Note
DISC SKIP buttons do not work while the disc tray is open.
PLAYING BACK iPod/USB DEVICE
Connecting iPod/USB devices
Notes
iPod
- Use the USB cable supplied with your iPod. If no USB cable is supplied, purchase one from Apple Inc.
- Turn off your iPod.
- Do not use a USB hub.
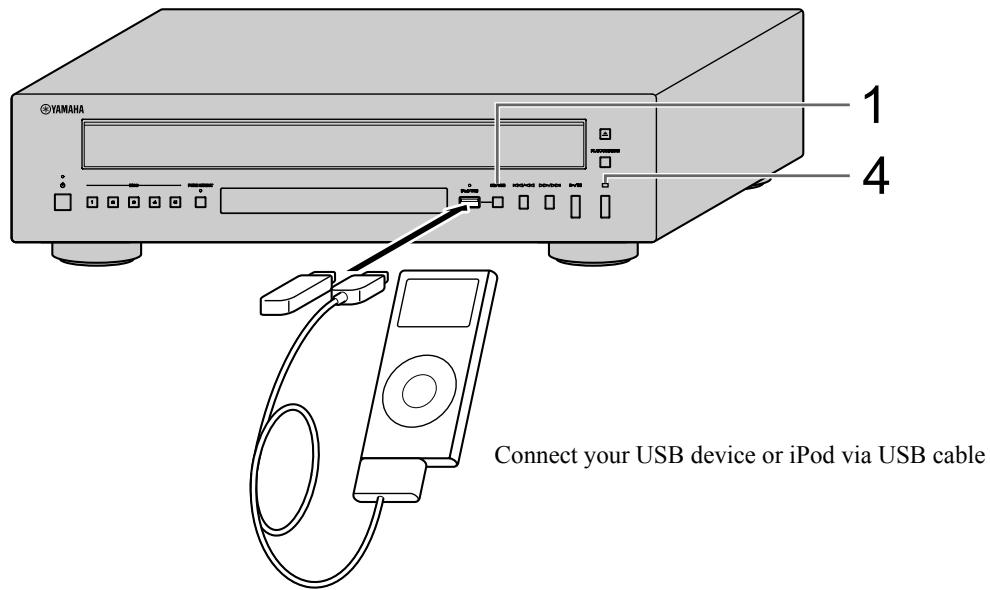
Playing back iPod
1 Press CD/USB to select the iPod/USB mode.
The iPod/USB indicator on the front panel lights up in orange, then changes to green when playback is ready.
2 Start playback.
Operate your iPod to start playback, select a track, pause, and stop playback.
中
You can also use the following buttons: (Playback), (Pause), (Stop), (Skip backward), (Skip forward), (Search backward), and (Search forward) on this unit or Remote Control.
Note
iPod may not function properly with this unit if software on iPod is not updated. Be sure to use the latest version of iPod software.
Playing back USB devices
1 Press CD/USB to select the iPod/USB mode.
The iPod/USB indicator on the front panel lights up.
2 Start playback.
Filename is displayed in the front panel display and playback starts automatically in order by date and time of creation if playable files are in the USB device.
3 Select a track.
Press FOLDER / on the remote control to select a folder, and then press or numeric buttons to select a track.
4 Stop playback.
Press (Stop).
See page 11 for more information on MP3/WMA playback.
Disconnecting iPod/USB devices
Stop playback, and then disconnect your iPod or USB device. It is recommended that you press CD/USB to switch to the CD mode, confirm that the CD/USB indicator goes off, and then disconnect your iPod/USB device.
CAUTION
Do not disconnect your iPod or USB device while playing back from the connected device, or while "USB READING" appears in the front panel display.
Supported iPod/USB devices
Supported iPod models
- iPod classic (including 120GB model)
- iPod nano (2nd, 3rd and 4th generations)
- iPod touch (1st and 2nd generations) (as of April 2009)
Notes
- iPod is licensed on the condition that individuals perform privately duplication and playback of uncopyrighted material or material legally approved of duplication and playback. Infringement of copyright is prohibited by law.
- Yamaha and suppliers accepts no liability for the loss of data saved on iPod connected to this unit. As a precaution, it is recommended that the files are made backup copies.
Supported USB devices
This unit supports USB mass storage class devices (e.g., flash memories, card readers or portable audio players) that use FAT16 or FAT32 format.
Notes
- Some devices may not work properly even if they meet the requirements.
- This unit does not support encrypted USB memory devices.
- Do not connect devices other than USB mass storage class devices: USB chargers, USB hubs, PCs, external HDD, etc.
- When you insert two or more memory cards at the same time into a card reader connected to the iPod/USB port on this unit, only one of the memory cards is recognized.
- Yamaha and suppliers accepts no liability for the loss of data saved on the USB devices connected to this unit. As a precaution, it is recommended that the files are made backup copies.
- Playability of and power supply to all kinds of USB devices are not guaranteed.
PLAYABLE DISC AND FILE FORMAT
■ Playable MP3 and WMA files (USB device and Data Disc)
MP3
| Format | Bitrate (kbps) | Sampling frequency (kHz) |
| MPEG 1 Audio Layer-3 | 32-320 * | 32/44.1/48 |
| MPEG 2 Audio Layer-3, 2 | 8-160 * | 16/22.05/24 |
| MPEG-2.5 Audio Layer-2 | 8-160 * | 8/11.025/12 |
- Variable bitrate is also supported.
WMA
Version 8
- Version 9 (Standard and variable bitrates are supported. Professional and Lossless are not supported.)
| Profile | Bitrate (kbps) | Sampling frequency (kHz) |
| High Profile | 32-320 * | 32/44.1/48 |
| Mid Profile | 16-32 | 16/22.05 |
- Variable bitrate is also supported.
Notes
- Playback for Data Disc starts in alphanumeric order.
- Playback for USB starts in order by date and time of creation.
Copyright-protected WMA (DRM) files cannot be played back by this unit. - The disc must be ISO 9660 compatible.
- Elapsed time may not be displayed correctly while playing back variable bitrate contents.
| Data Disc | USB | |
| Maximum file number | 999 | 32767 |
| Maximum folder number | 256 | 256 |
| Maximum file number per folder | 512 | 512 |
Playable discs
Use compact discs bearing the marks below.

... Compact discs (digital audio)

CD-R, CD-RW digital audio discs
- CD-R or CD-RW discs bearing one of the following phrases.
FOR CONSUMER
FOR CONSUMER USE
FOR MUSIC USE ONLY
- Finalized CD-R or CD-RW discs.

Note
This compact disc player may not be able to play some CD-R/CD-RW discs or discs on which recording was not made correctly.

... CD-TEXT discs
- The disc title, artist name, and track name are also displayed in addition to the time displays when playing back a CD with CD TEXT.
To play back an 8-cm (3-inch) CD
Place it in the inner recessed area of the disc tray. Do not put a normal (12-cm) CD on top of an 8-cm (3-inch) CD.
To prevent a malfunction of this unit:
- Do not use any nonstandard shaped disc (heart, etc.) available on the market because it might damage the unit.

- Do not use a disc with tape, stickers, or paste on it. If you use such a disc, the disc may get stuck in the unit, or damage to the unit may result.
Handling compact discs
- Always handle with care so that the playing surface is not scratched. Do not warp discs.
- To keep clean the playing surface, wipe with a clean, dry cloth. Do not use any type of disc cleaner, spray, or any other chemical-based liquid.
- Do not wipe with a circular motion; wipe straight outward from the center.
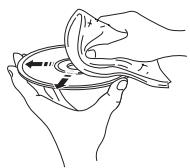
- Use a soft-tipped pen when writing on the label side of the disc.
- When a disc is not being used, remove it from this unit and store in an appropriate case.
- Do not expose discs to direct sunlight, high temperature or high humidity for a long time.
USING THE ADVANCED SETUP
This unit is equipped with the following four special modes, which may be useful for special purposes at stores or offices.
Note
The special mode functions are incompatible with iPod.
Play mode memory
Retains the current playback mode (REPEAT and
RANDOM) after turning off the power, saving the time of setting the playback mode again each time you turn on the power.
The track number is also retained so playback starts with the same track automatically when you turn on the power again.
The RESUM indicator in the front panel display lights up when enabled.
Ready mode
Pauses playback after each track, allowing you to start the next track at any desired timing.
The RDY indicator in the front panel display lights up when enabled.
RS-232C ON/OFF
Turns on or off the RS-232C terminal on the rear panel.
Turn it on when you use the RS-232C feature.
This mode is disabled with shipment.
Auto standby mode
When this function is enabled, this unit turns to the standby mode automatically if any of the following conditions lasts for 30 minutes:
1) CD playback is stopped while in the CD mode (including when no disc or unsupported disc is loaded).
2) CD playback is in a pause position.
3) No USB device is connected while in the iPod/USB mode.
4)Unsupported USB device is connected while in the iPod/USB mode (iPod/USB indicator remains lit in orange).
Note
This unit does not turn to the standby mode automatically when a supported USB device or iPod is connected (when iPod/USB indicator is lit in green).
To activate and configure Advanced setup, follow the steps below. Use the buttons on the front panel.
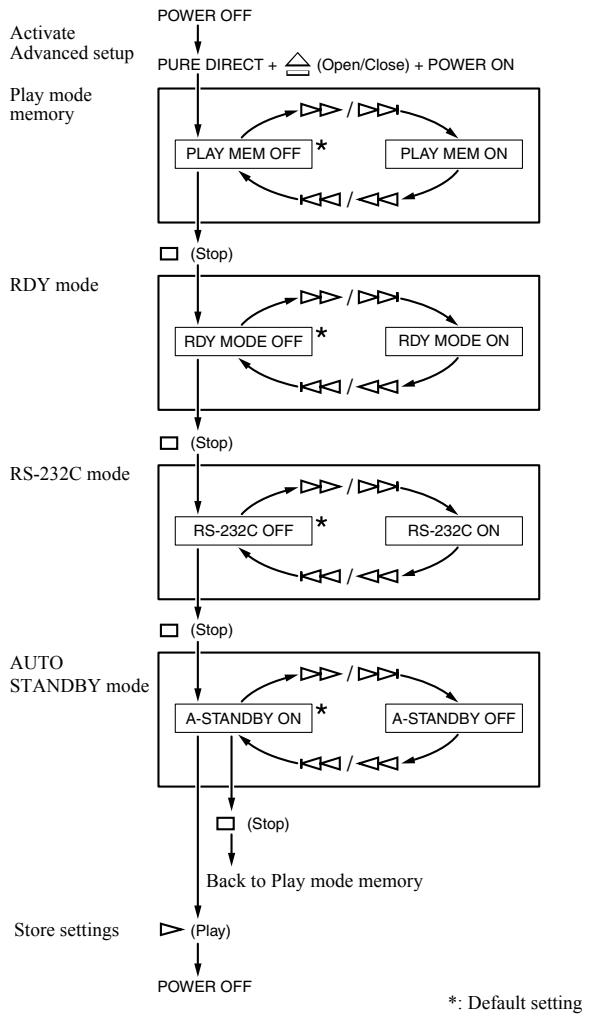
Next time you turn on the power, the unit turns on with the settings that you specified above.
TROUBLESHOOTING
If the unit fails to operate normally, check the following points to determine whether the problem can be corrected by the simple measures suggested. If it cannot be corrected, or if the problem is not listed in the Problems column, disconnect the power cable and contact your authorized Yamaha dealer or service center for help.
| Problems | Possible Causes | Solutions | Refer to page |
| This unit fails to turn on. | The power cable is not connected to the AC IN inlet on the rear panel or not plugged in the wall outlet. | Connect the power cable firmly. | 4 |
| This unit suddenly turns off. | Auto standby mode is set to on. | Set the auto standby mode to off. | 13 |
| The disc tray does not close completely. | A foreign object is obstructing the tray. | Carefully check the disc tray and remove the foreign object. | — |
| Disc playback does not start or a disc number does not light upon display. | The disc is damaged. | Check the disc carefully; replace it if necessary. | — |
| There is moisture on the laser pickup. | Wait 20 to 30 minutes after turn on this unit ON before trying to play back a disc. | — | |
| The disc is loaded upside down. | Reload the disc with the label side up. | — | |
| The disc is dirty. | Clean the disc. | 13 | |
| The format of the MP3 or WMA file is not compatible with this unit. | Replace the disc with a correctly recorded disc playable with this unit. | 13 | |
| The CD-RW (ReWritable) disc is not recorded correctly. | Replace the disc with a correctly recorded disc playable with this unit. | 13 | |
| The disc is a non-standard disc not playable with this unit. | Replace the disc with a correctly recorded disc playable with this unit. | 13 | |
| This unit is in iPod/USB mode. | Switch to disc mode by pressing CD/USB. | 2 | |
| iPod playback does not start though iPod is connected. | The connected iPod is not compatible with this unit. | Connect an iPod compatible with this unit. The compatible iPod are as follows: • iPod classic (including 120GB model) • iPod nano (2nd, 3rd and 4th generations) • iPod touch (1st and 2nd generations) (As of April 2009) | 10 |
| This unit is in disc mode. | Switch to iPod/USB mode by pressing CD/USB. | 9 | |
| USB playback does not start. | Improper USB device connections. | Connect the iPod/USB device again. | 9 |
| The format of the MP3 or WMA file is not compatible with this unit. | Replace the file with a correctly recorded file playable with this unit. | 11 | |
| This unit is in disc mode. | Switch to iPod/USB mode by pressing CD/USB. | 9 | |
| Playback is delayed, or begins at the wrong place. | The disc may be scratched or damaged. | Check the disc carefully; replace it if necessary. | 11 |
| No sound. | Improper output cable connections. | Connect the cables properly. If the problem persists, the cables may be defective. | 4 |
| Improper amplifier operation. | Set the amplifier controls to the correct input selection. | — | |
| Sound of a component connected to the DIGITAL OUT jacks is not played. | PURE DIRECT is turned on. | Turn PURE DIRECT off. Or make an analog connection. | 2 |
| Sound “skips”. | This unit is being subjected to vibrations or impacts. | Relocate this unit. | — |
| The disc is dirty. | Clean the disc. | 11 | |
| Sound “hums”. | Improper cable connections. | Securely connect the audio cables. If the problem persists, the cables may be defective. | 4 |
| Noise from a nearby tuner. | The tuner is too close to this unit. | Move the tuner and this unit farther apart or turn off this unit. | — |
| Noise from inside of the disc tray. | The disc may be warped. | Replace the disc. | — |
| The remote control does not work or function properly. | Wrong distance or angle. | The remote control functions within a maximum range of 6 m (20 ft) and no more than 30 degrees off-axis from the front panel. | 5 |
| Direct sunlight or lighting (from an inverter type of fluorescent lamp, etc.) is striking the remote control sensor of this unit. | Reposition this unit. | — | |
| The batteries are weak. | Replace all batteries. | 5 |
SPECIFICATIONS
Audio Section
Frequency response 2Hz - 20kHz,± 0.5 dB
- Harmonic distortion + noise (1 kHz) 0.003 % or less
S/N ratio 105 dB or more
- Dynamic range 96 dB or more
Output voltage (1 kHz, 0 dB) 2.0 ± 0.3V
Laser Diode Properties
Material. GaAlAs
Wavelength 790 nm
- Laser Output ..... max. 1.23 W^
This output is the value measured at a distance of about 200mm from the objective lens surface on the Optical Pick-up Block.
iPodTM
"iPod" is a trademark of Apple Inc., registered in U.S. and other countries.
"Made for iPod" means that an electronic accessory has been designed to connect specifically to iPod and has been certified by the developer to meet Apple performance standards.
Apple is not responsible for the operation of this device or its compliance with safety and regulatory standards.
General
Power requirements U.S.A. and Canada models.. AC 120 V, 60 Hz Australia model.. AC 240 V, 50 Hz Europe model.. AC 230 V, 50 Hz Asia and General models...AC 110-120/220-240 V, 50/60 Hz
- Operating temperature. +5^ to +35^ (+41^ to +95^)
Power consumption 16 W
- Standby power consumption. less than 0.5W
- Dimensions (W × H × D) 435 × 116 × 405 mm
Weight 6.2 kg
Please note that all specifications are subject to change without notice.
ATTENTION : VEUILLEZ LIRE CE QUI SUIT AVANT D'UTILISER L'APPAREIL.
Lecture programme Audio CD
REMOTE CONTROL IN/OUT Anschlüsse
⑦ (Sok bakat), (Sok framat)
- Alternatively, we can consider the following two conditions.
WMA
- Alternatively, we can also consider the following two types of variables.
Notas
iPod/USB-APPARATEN AFSPELEN
BO3MOXHbIE HENCIPABHOCTN
CNIOCObI INX YCTPAHEHIN14
TEXHUNECKNE
XAPAKTEPHCTIKH 15
④ MnDnKaTOp nTaHnA
3aIopaaTcyaKa3aHHbIM HnKe 06pa3oM:
BKJIIOUOHEHO:Jrko
PeXHM OXHuaHn: TycKJIO
BbIKJIIOUeHO: BBIKJIIOuaeTc
⑤ KhoNka DISC (1-5)
Bb6op Huxhoro nIscKa H BkJIIOueHHe BocIpOn3BeJeHn.
(6) PURE DIRECT
BkIOueHne HIN BbIKIOueHne peKHMa PURE DIRECT yIyUHeHHKaueCTBa 3ByuHaHH.
#
- 3aropaeTcHnDnKaTOp PURE DIRECT.
- ΠифpoBOB WbIXOн He pa6oTaE.
- Bo Bpemra BocnpoH3BeJeHHaHcHJIe IpeepHe Hn HbIKJIOUey H BO Bpemra BbIOJIHOHn OIIepaIH N OTo6paKaaeTcMHHMaJIbHoE KOJIueCTBO Tpe6yeMbIX HnHNkATOpOB H COO6IeHH.
PpmeaHne
ПОДКЛЮЧИТЕ, ИСПОЛБ3УЯ раЗБмБА ANALOG OUT, ecJIH ИСПОЛБ3YeTсЯ рекHM PURE DIRECT (cM. cTp. 4).
⑦ CechopДy
Pnem CnHaJIOB OT NylbTa IY.
⑧ NlopTiPod/USB
BbIKJIIOueH: BbI6paH peKIM CD.
OpaHKeBbI:IOJKJIIOUeHneYcTaHOBJeHO.
3eJIeHbIy:ycTPOJcTBIO Pod/USB IIOKJIIOyeHO, H O6HapUKeHbI qaJIbI, KOTOpBIE MOXHO BOCIIPOH3BeCTH (aIIIpaT rOToB K BOCIIPOH3BeJeHHIO).
CD/USB
IpeKJIIOUeHHe MeJxIy peXHMOM CD IIpeXHMOM iPod/USB.CM.ctp.9.
#
EcJIN HNIIHKaTOP iPod/USB He ropt, anInapat HaxOHTcB peKHe CD.
15 NHdNKaTOp BbIbopa dNcKa
3aropaIOTcIuΦpbl, COOTBeTcTBYIOJIne JLOTkaM, B KOTopbIX HaxOJIaTcIINCKN. O6BeIeHHaIuΦpa 06O3Naayet BbIbpaHHbI INCK.
Примеанne
IuΦpa, COOTBeTCTByIOJIaIyIycTOMy IOTKy, MoKETROPbI IO BbIbopa IOTka. IIIN3aKpbITHN IOTKa IIJIa IINCKOB IocJIe 3aIpy3Kn HIIIN 3aMeHbI INCKOB aIIIapA tOcUIIeCTBJIeT IIOHcK INCKOB, HauHHaC c IOTka 1. BO BpemI IOnCKa IIINPbI, COOTBeTCTByIOJIHe IIyCTbIM IOTkAM, rachyT. IocJIe O6HapUxJHHe INCKA IONCK B OCTaJIbHbIX IOTkax IIpeKpaIIaetc.
16 NHdkaTop COCTOHNBBOcnpOn3BeDeHnA
3aropaETc,ecJII aIInapaT pa6oTaET BpeXHMe BOCIIPOIN3BeJeHnI JInI NaY3bl.
17 HdkaTop Tnna nctOHHka
OTo6paJKeHHe TIIa BOCIpOn3BOIDMOrO coIepKHMoro.
OcTaHOBKa BOCIpOn3BvEeHnY.
DISC SCAN
CkaHnPOBaHHe 3aIpyJxEHHbIX IINCKOB H10-ceKyHdHoe BOCIIPOUN3BeDeHHe KaXIOO JINcKa IJI IOHcKa HUxHO JINcKa. YTO6bl OTMeHNtB peXHM cKaHnPOBaHnI IIpeKJIIOuHTbcR bpeXIM O6bIYHOBOcIIPOUN3BeDeHnI, IOBTOpHO HaXMMTe KHOINKy DISC SCAN IJIIN HaXMITE KHOINKy (BoCIPPOUN3BeDeHne).
Примеань.
- Bo Bpemr cKaHnpOBaHHn HOpE JIoTka IuCKa, KOTOpbI BOCIIPOH3BOIDTCsA, MhraET. PocJIe 3aBepHHeHH NBOcPOnH3BeJeHHn IuCKa HOpE IIpeKpaIaET MHRaTb IN HaunHaet Ropetb.
- EcIN Ha BOCINPOH3BOIDNMOM INCKe MeKJy KOMIO3HJNMR cyIeCTBYOT IINHHbIe HHTepBaJIbI, 3ByK BO BpeMcKaHnPOBaHnBocINPOH3BOIDtbcr He 6yJeT.
YctaHOBka 3JIeMeHToB NITaHnB nIyIbT dY

1 Haxmte yactb KpbIuKn OTceKa dnn 6aTaapeek n CdbHbTe ee.
2 BCTaBbTe DBa npHnaraeMbIX 3JIeMeHTa NITaHnA (AA, R6, UM-3), co6IIOJa IOnJIrPHOCt b (+ n -), yKa3aHHyIO Ha BHyTppeHHeY ChTn OTcKa dIra 3JIeMeHTOB NITaHnA.
3 CdBnHbTe KpbIshky Ha MeCTo.
IcnoJb3ObaHne npJbTa Dy
IyIbT IY Ipeepaet HApPaBJIeHHbIe HHppaKpaChbIe JIyH.
Pn yipabJIeHHcI IOMOIIbIO IIyJIbTa IY o63aTeJIbHO HApabJIte erO Ha ceHCOp IY, paIOJOKeHHbI Ha IpeJeHHe IIHeJIIN DaHHOro aIIIapata.

3AΓPy3KA I N BOCПОН3BEДЕΗΝΕ ДИСΚΟВ
MOxH0 OJHOBpeMeHHO 3aIpy3HTb HJIH CMeHHTb IITb IIACKOB.
1 OTKpoIte IOTOK dIJIa DnCKOB, HJaKAB KHOJky OPEN/CLOSE, n 3arpy3nte DnCKN.
Pa3MeIaIe IINCKN B JIoTKe IIpaBnJIbHO, IcIOJIb3yHaIIpaBJIIOIIne IJIA INCKOB.
Приимеане
YTO6bI BOCIIPOH3BcETN KOMIIaKT-ⅡHCK IHaMeTpOM 8 cm, YCTaHOBtE IIck BO HBYTpeHHIOU YfJyOJIeHHYo U cactb JIoTka IIJIA IIckA. He pacIOJIraIte O6bIYHIN KOMIIaKT-ⅡHCK (IHaMeTpOM 12 cm) IOBepx KOIIaKT-ⅡHcKa IHaMeTpOM 8 cm.
2 HaxmTe KhoNky OPEN/CLOSE, TTo6bl 3aKpbItb IOTOK dIJI dIcKOB.
3 HaxmTe KhoNky MODE Iy Bb6opa XeJaEMoTo peXIMa BocpOn3BeDeHn (1DISC nIi 5DISC). Pexim 6ydet NoTBePxJDeH Ha DcNJIee.
PexHM 1DISC:BocIpOn3BOJNTcToTJIbKO Bbl6paHHbI JINCK.
PexHM 5DISC:BOcIIPOH3BOJATcB BCE IINCKN Ha JIOTKe IIO OuepeIi.
4 4TO6bI HaataB BOCnpOn3BeDeHne nepBoi KOMNo3nCmN HJn FaiJa Ha DnCke 1, HaxMnte KhoNkY (BOcnpOn3BeDeHne).
5 Pn Heo6xOdmocTN BbI6epnte HxKhbl IINCK npn NOMOu KNOpKn DISC SKIP / 1 nKnONk DISC (1-5) Na nepedne naHeJI.
Прогамнhoe Воспpon3Вedlyнe Audio CD
BpeKHMpeIporpamMHOBOcIpOn3BeJeHnMoXHo BOCIpOn3BOJNTb KOMIO3HINB 3aIIporpamMnpoBaHHO IOcJIeIOBaTeJIbHOCTH.
Приимechаима
- MoXHo 3aIIpOrpaMMHpoBaT b BOCIpyON3BOJNTb KOMIO3HIOc BOCEx 3aIpyKeHHbIX dNcKOB (1-5) B JIO6OJI NOCIEIOBAtEJBHOCTh.
3AionporgamMnpoBOAHbkeKMOIO3HUNyJaIHOITcIIPIH N3BJeUeHHN DnCKa, BbIKJIOueHHn aIINHpata HJH eEOIpeKJIIOueHHN BpeXHM OxHNdHNN.
1 Haxmte KhoNky PROGRAM npn octaHOBHeHOM Bocpon3BeHn.
IJIa aIIIapara BbI6paH peKHM peJaKTnpoBaHHN IIpOgpaMMbl.
2 BbIbepnTe HUxHbI dNcK npn pOMoOn OJHOH n3 KHOJOK DISC (1-5) Ha nepeJeH naHeJIu NkHONK DISC SKIP Ha nyIbTe Dv.
3 C NOMOuBIO uΦpOBbIX KHOJOK BbI6epNTe HxKHyIO KOMNo3nUIO N HaXmTe KHOJKNY ENTER.
4 NOBTOPnTe onepaun 2 n 3 dny nporpammmpoBaHn cIeDyUoSei KOMNo3uHN.
Moxho 3aIIporpammmpoBaTb IO 24 KOMIO3HnI.
Длг OTмнь 3апрограMMрOBaHHОКOMПОЗИПиНЯЖМЛТЕ KHOИКу CLEAR.
5 HaxmTe KhONky
BocpoH3BeHeHHe HaHHaTeC hHaJa 3aIporpaMMHPOBaHHo IIocJIeIOBaTeJIbHOCTH.
中
IyuaJIeHnBex3aIporpamMnPOBaHHbIXKOMIO3HnHaKMITE KHOIIkyCLEAR IIprIOCTaHOBJeHHOBOCIIPOH3BeJeHH.
PLAYXCHANGE
PLAYXCHANGE - ΘTO Φύнкίи, ΜΟ三百吴四ⅡIa CmEHTb Μικην BO BpεM BOCπροN3BedeHn6e3 IIpepbɪBaHnν BOCπρoN3BedeHn ⅡNCKa.
HaxMnte KhoIky PLAYXCHANGE Ha IpeIHei IIaHeJIH, YTO6bI OTKpbITb JIoTOK IIJIa DnCKOB H CMeHHTb NcKN.
NPEDYNPEXXDEHNE
He IIbIaTteCb 3aIpy3ntb IINCK B IIIOJIOKeHHN, O6O3HaueHHOM "X" Ha pncyHke HnHex. 3TO MOKeT IIpNBecTH K IOBpeKJdeHHIO aIIIapaTa II INCKA, IOTOMY YTO IMeHHO B 3TOM IIIOJIOKeHHN HAXOINTcR BOICPON3BOIDMMbI JnCK.

PpMueaHne
KHOIIKN DISC SKIP He cyHKIIOHHPyOT IIpn OTKpbITOM JIoTKe IJIa IINCKOB.
BOCПОН3BEДЕΗΝΕ KOMПОЗИЦИС
iPod/YCTPOICTB USB
1 HaxmTe KhONky CD/USB, qTo6bI Bbl6paTb peXm iPod/USB.
HnIkaTop iPod/USB Ha IpeEHei IaHeJI3aIropHTcOpAHHKeBbIM CBeTOM,aIOTOM 3eJIeHBIM, KOrJa aIIIapat 6yET RotOB K BOCIpOH3BeJeHHIO.
2 3anyck Bocnpoun3BedeHna.
C IIOMOIbIyOCTpoHcTbI iPod MoKHO HaaTaB BOCIIPOH3BeJEHHe, Bb16paTb KOMIO3HIIO, IOCTaBHt Ha IIay3y, a TaKKe OCTaHOBHTB BOCIIPOH3BeJEHne.
MoKHO TaKaKe HcIOJIb3OBAtB TaKHe KHOIIKn: (BOcIPOnIH3BeHene), (Piay3a), (CTOnI), (IepeXoJ Ha3aI), (IepeXoJ BInpeI), (IIoNcK Ha3aI) I D>> (IIoNcK BInpeI) Ha aIInapaTe HIn IIyIbTe IY.
Примеане
YcTpoHCTBO iPod MoKet pa6oTaB c daHHbIM aIIIapaTom HeKOppeKTHO,ecJIN IpOrpamMHOe 06ceJeHne iPod He 6bIIO o6HOBJeHO.CJIeJyET HIOJIb3OBaTB IIocJIeHNIO BepChIO IpOrpamMHorO 06ceJeHnI aPod.
BocnpOn3VeJeHne c ycTroPoiCTB USB
1 HaxmTe KhoNky CD/USB, YTo6bI Bbl6paTb peXmIPod/USB.
3aropntca HnDnKaTop iPod/USB ha IpeIHei IIaHJI.
2 3anyck Bocnpon3BeJeHna.
HaJINCIIEeIpeDHeIIaHeJIHOTO6pa3HTcHaa3BaHHe aJIHaI,ecJIHHa yCTpOInCTBe USB HMeIOTe aJIbI, KOTOpBle MOxHO BOCIpON3BecTH Ha aIIIapaTe, BOCIpON3BeJeHHe NaHHeTcABTOMaTHueCKN C yUeTOM DaTbI H BpeMeHHoCo3JaHHaaiIOB.
3 BbI6Op KOMnO3nUu.
HaKMnTe KHOIIKy FOLDER / Ha IIyJIbTe IY, YTO6bI BbIbpaT baiKy, a IOTOM IJIa BBIO6pa KOMIO3HIN HaxMMTe KHOIIKy KIOIOH INIIN IOPOBbIe KHOIIKN.
4 OctaHOBka BOCpON3BeHnA.
HaKMHTe KHOIIKy (cTOnI).
Bocnpon3BODIMbIe NsCKN
IcIIIOJIb3yIte KOMIIaKT-ⅡHcKN C yKa3aHHOHNHKe MapKHPOBKOI.

...KomnaKT-dnCKN (uΦpOBoBie ayDnOndnKn)

CD-R, CD-RW (uHpObIe ayDnOuNcKn)

-ДиСКн CD-R HJIN CD-RW c yka3aHHbIMH HIXe 6o3HaueHnMn. FOR CONSUMER FOR CONSUMER USE FOR MUSIC USE ONLY
BO3MOXHbIE HENCINPABHOCTN IN CIOCObI INX YCTPAHEHnA
EcJIN B pa6oTe aIIIapata OTMeuaOTcH HeNCpabHocTH, IIPOCMOTPte CJIeIyIOIIHe IYHKTB. Bo3MOxHO, HeNCpabHocTb 6e3 Tpya ydaCTcR yctpaHTb C IOMOIIbIO IIpeIIOKeHHbIX CIOco6OB. EcJIN ycTpaHNTb HeNCpabHocTb He ydaETcra HIn cEJIe ee Het B cToJI6Ie "HeNCpabHocTb", OTCoeIHnHTe Ka6JIb IITaHnI N o6paHTteCt b 3a IIMOIIbIO K aBTOpH3OBAHHomy IINIEpy Yamaha HJIIN B cepBnCHbI ΒeHTp.
| HéncnpaBnOCTb | Возможны пpruchны | Способы устранения | Сm.стр. |
| Annapat Ne ВКлюаетс. | Кабел Пптань Ne ПОДсоединь Ne разьему AC IN Ha 3aДнe ПИЕЛи ИПОзTeК. | Вставы Ту Кабел ПпТань Дд КОнца. | 4 |
| Annapat Neохидано Выклюаетс. | ВКлючен АВТOMATЧУССКП реким Ожидано. | Одддддддддддддддддддддддддддддддддддддддддддддддддддддддддддддддддддддддддддддддддддддддддддддддддддд徳. | 13 |
| Лотok дscKobODа ЗakрьlaBaetcNe нолноств. | Пocstороннoi оБьekt MeIIaert MeILOHOMU ЗakрьlITNIO JLOTka. | ВнIMATEЛЮНО OSMOTРNTe ЛOTOK ДSCKOBODa и уддпгп.TОМСТОПНПОДБ БОсроидано | - |
| Восроида themselves Диска Ne нauthидас, Или Na дисплес Ne Загорадсг Homep Диска. | Диск Повржд. На LaЗернOM 3ByKOCHIMATEе образовская Кондсат. | ВнIMATEЛЮНО OSMOTPHTe ДSCK. Пprh НeoбхoДIMоCTN ЗамeHITe erO. | - |
| Диск 3aGrpyжен Верхнeй ссторони ВИИЗ. | ПОJOЖДITE 20-30 МИнТПОСLE ВКЛIOчЕНЯ aiПAPаТа, a 3aTeM ПОьltaIteь BOCIPON3BecTи ДSCK. | - | |
| Диск 3aGrpyжен Верхнeй ссторони ВИИЗ. | ЗагузITE ДSCK 3aHOB, ссторони с эТнkeТКОВВСР. | - | |
| Диск 3aGrpyжен. | ОчиртIDE ДSCK. | 13 | |
| Формат ФайLOВ МР3 Или WMA Ne ПОДержИаETСД AnHbIM aiПAPaTOM. | ЗамeHITe ДSCK Na prabINьо 3aПИСань ДSCK, KOTOPB можно BOCIPON3BecTи на ДANHOM aiПAPaTe. | 13 | |
| Диск CD-RW (пepe3aIIHsblBaembl) 3aIIHcAn HeIIpABINILBO. | ЗамeHITe ДSCK Na prabINьо 3aПИСань ДSCK, KOTOPB можно BOCIPON3BecTи на ДANHOM aiПAPaTe. | 13 | |
| ИсpoььуETСя НecTaHДapТнй ДSCK, КOTOPB NeIb3a BOCIPON3BecTи на ДANHOM aiIIaPate. | ЗамeHITe ДSCK Na prabINьо 3aПИСань ДSCK, KOTOPB можно BOCIPON3BecTи на ДANHOM aiПAPaTe. | 13 | |
| АППAPAT pa6OtaeТВ рекиме iPod/USB. | НаджMITE KHOIIKу CD/USB, чTOБ; пepeKJIIOYuHTb aiПAPATВ реким ДSCKa. | 2 | |
| He ydaetca Nauchatb Восроида themselves Cусторг央i iPod, нecмOTря Na To,ЧTo усторсьо iPod норklюсero. | ПОДКлJOчEHоу cYSTROCTBO iPod HecOBMeCTHMO C ΚТHM aiПAPaTOM. | ПОДКлJOчEHоу COBMECTHMOc C ΚТHM aiПAPaTOM yctroJSTBO iPod. Ножke ykazanbI COBMECTHMOe yctroJCTBA iPod: · iPod classic (ВКЛIOчЯ MОdEL b 120GB) · iPod nano (2-RO, 3-RO n 4-RO ПОКOLeHЯ) · iPod touch (1-RO n 2-RO ПОКOLeHЯ) (ПО с��аянho на anpeJIb 2009media) | 10 |
| АППAPAT haxOДITcR в рекиме ДSCa. | НаджMITE KHOIIKу CD/USB, чTOБ; пepeKJIIOYuHTb aiПAPATВ реким ДSCKa. | 9 | |
| He ydaetca Nauchatb Восроида themselves USB. | Нeнравиьно ПОДКлJOчEHоу cYSTROCTBO USB. | Задоу ДSCK ПОДКлJOчEHоу cYSTROCTBO iPod/ USB. | 9 |
| Формат ФайLOВ МР3 Или WMA Ne ПОДержИаETСД AnHbIM aiПAPaTOM. | ВocipINH3BOJITe ДуTGу, р亚INьно ЗАПСАньу phaJI, KOTOPB можно ВocipINH3BecTи на ДANHOM aiПAPaTe. | 11 | |
| АППAPAT haxOДITcR в рекиме ДSCa. | ЧTOБу ПepeKЛJOчIHb YAIHAPATВ реким iPod/USB, habKMITE KHOIIKу CD/USB. | 9 | |
| Восроида themselves ЗадерЖИаETСД Или нauthидаres He C TORO Mehta. | Возможно, ДSCК ПОДаПANAH INI ПОВржДeн. | ВнIMATEЛЮНО OSMOTPHTe ДSCK. Пprh нeбхODIMMOCTN ЗамeHITe erO. | 11 |
| Het 3byka. | Нeнравиьно ПОДКлJOчEH в bIXOДнOH ka6JIb. | Правиьно ПОДСоEDINHTE Ka6JIb.Если Прбilema Ne yctpaHeHa, ЭTO может SFbIb свзAZANO c ИсeП可靠вocTь Ka6JIeI. | 4 |
| Нeнравиьно pa6OtaeТУСИПЕЛ. | С пOMоьluу рergIJYTopOB усЛInteЯ правиьно укajКITE noctHOTy | - | |
| HeinstepaBnOCTb | Bo3MoXHbIe ПичHbI | CNooc6bI yctpaHeneH | Cm. cTp. |
| He BocPon3BovITc8 3ByK KOMIOHEnTа, PoiDoCoEHHenHOrO K rHe3dAm DIGITAL OUT. | ВКЛIOUeH peJxHIM PURE DIRECT. | БыклIOuHTe peJxHIM PURE DIRECT.Можно Тадже БыIOJIHInb T anaIorOboe coeДиHeneH. | 2 |
| 3Byk "sKauchet". | AIIIIapAT IoiBvpeRgAeTc8 Bo3dIeCTBnIO Bn6paIi NII IN TOJIYCOB. | ПерЕмecTe tse aIIIIapatВ ДугоMeCTo. | - |
| ДиСТЗагРЯЗн. | ОчИстп Te DnСК. | 11 | |
| Сльшен "Жужkaш" 3ByK. | HeIIpavHbIHO IoiDcoEHIHEnb Ka6JIiN. | Наджно IoiDcoEHIHIne aydnoKabJIi.Еслп пroбilema He yctpaHena, ЭTO может 6ытсвязАнс C HeNcIpaBnOCTbI O Ka6JIeIe. | 4 |
| Ш汞 OT 6bl3KopacnOLOJeH NOrTO TIOHepa. | Тюнep paICIoLOJeH cIINIIKOM bIIN3KO K anIIIapaTy. | Ра3MecTe TIOHer H aIIIIapat ПОДaJIbIe Дург OT dpyra Ил BыКIOUChte aIIIIapaT. | - |
| ИЗ ЛOTka DnSCa DoHOCITc8 shm. | ДиСТК Mожет 6ыТ ДeФОрMHropOBaH. | ЗamEHnte DnСК. | - |
| ПульТ DY pa6obTaET HeNaIaIeKaIzIMобразом. | ПиЛьТ ДУ habOДNTc8 сIINIIKOM JaJIeKO OT anIIIapaTа Ил сIINIIKOM сIJIbH O NaKJIOneH. | Можно осуilestВьг.TупраВLEнeс cПиOMOIIbI O IIy pIri HaxOJdeHIM Bпрелax 6 M OT anIIIapaTа И рri HakJIOne HIIJIbTa He 6oJIee 30 rgaIycob IO OTHOIIeHIO K OCS MeKdI IIyLTOM ИпepeДeH ПaHJIbIO. | 5 |
| П repMbIe coIJIeHcIbe JIyUn HII CBET (ot φЛуоресцHTои ЛamblIи ИнBERTPORHTo TIIHa I T.I.) IIIIaIaIOT Ha ceHcop DlДanHOrO aIIIIapaTа. | ИЗмEHnte IoiLOJeHne aIIIIapaTa. | - | |
| СлбБИЗЗарДЗБaTapeeK. | ЗамEHnte obe 6aTapeiKn. | 5 |
TEXHUNCHECKNE XAPAKTEPNUCTUKN
Pa3dJeN 3ByKOBbIX XapaKTePncTnK
- Yacrothnaja xapaKTepeHCTnka...ot 2 _ do 20~ _ ± 0,5 nB
- TapurMoHHueckHe NcKaXeHnI + IIyM (1 KΓI) 0,003 % HJIIM MeHbIIe
CoOTHOIIeHHe (CHHaJI-IIIyM) 105 Ib HIN6OJIbIe
-ДИнhamчecknДиаПа3OH... 96Б ИлбОЛьпe - NaipjKeHHe Ha bHyOe (1 kT, 0 nB) 2,0 ± 0,3 B
XapakTepcntKn IIOndHOIa3epa
MaTePhaJI. .raJIJIH aJIOMHH-apceHH
-ДлннавоЛьы 790HM
BbIXOHaMoIIOHocTbJa3epa...MaKc.1,23BT*
Y_ka3aHHa BBIXOJHnMoIHOCTb H3MepJIacHa paCCToHHIN IIpH6JIH3HTeJIbHO 200 MM OTIOBepXHOCTH JInH3bI O6BeKTHBa HA ONTHUeCKOM IIpHEMHOM 6JIOke.
iPodTM
"I Pod" JBIAE Tc TOBAPHBIM 3HaKOM KOPIopauHm Apple Inc., 3apeHCTPnPOBaHNbIM B CIIIA H npYHX cTpaHax. HaINscB "Made for iPod" O3NaHaet, YTO 3JIeKtPOHHoe yCTPOBCTBO CIEeHnAJBHO pa3pa6oTaHO JIIa IIOJKJIOUeHnK YCTPOBCTBy iPod n ceTHΦHnIPoBAHO pa3pa6OToHKOM JIra 06ecpeHnN COOTBeTCTBnR cTAHdApTAM KopIIopauHm Apple KOpIopauHm Apple He HeceT OTBeTCTBeHHocTH 3a pa6Oty 3TOrO yCTPOBCTBa H erO COOTBeTCTBHe yCTAHOBJIeHNbIM cTAHdApTAM H HopMaM 6e3OJaacHoCTH.
ObuIe texHnueckne xapaKtepncTtKN
Tpe6oBaHnI IO 3JIeKtropiHTaHHIO MoJIIN IJIIA H KaHaJIbI 120B IIepeMeHHoro TOKa,60Ig MoJIb IJIABCTpaIIHN ...240B IIepeMeHHoro TOKa,50Ig MoJIb IJIEBPoiBi 230B IIepeMeHHoro TOKa,50Ig MoJIIn IJI A3HH N O6IIHe MoJIIN 110-120/220-240 B IIepeMeHHoro TOKa,50/60Ig
- Pa6o7a TeMIIepaTpa oT. +5C 10 +35 C
-ПOTpe6JIeMaЯ MOIIHOCtB 16Вt
-ПOTpe6JIЯмая MOIIHOCt b B peKHMe OXHДaHHaMe Hee 0,5BT
- Γa6apntbI (III × B × I) 435 × 116 × 405 MM
Bec 6,2K
Ппмп Te K CBeДeHNo, YTO TexHnueckHe XapakTePrcNtKn MOrT 6bITb I3MeHHeI 6e3 IIpeBapHTeJIbHO rYBeJOMJIeHn.
Limited Guarantee for European Economic Area (EEA) and Switzerland
Thank you for having chosen a Yamaha product. In the unlikely event that your Yamaha product needs guarantee service, please contact the dealer from whom it was purchased. If you experience any difficulty, please contact Yamaha representative office in your country. You can find full details on our website (http://www.yamaha-hifi.com/ or http://www.yamaha-uk.com/ for U.K. resident).
The product is guaranteed to be free from defects in workmanship or materials for a period of two years from the date of the original purchase. Yamaha undertakes, subject to the conditions listed below, to have the faulty product or any part(s) repaired, or replaced at Yamaha's discretion, without any charge for parts or labour. Yamaha reserves the right to replace a product with that of a similar kind and/or value and condition, where a model has been discontinued or is considered uneconomic to repair.
Conditions
- The original invoice or sales receipt (showing date of purchase, product code and dealer's name) MUST accompany the defective product, along with a statement detailing the fault. In the absence of this clear proof of purchase, Yamaha reserves the right to refuse to provide free of charge service and the product may be returned at the customer's expense.
- The product MUST have been purchased from an AUTHORISED Yamaha dealer within the European Economic Area (EEA) or Switzerland.
- The product must not have been the subject of any modifications or alterations, unless authorised in writing by Yamaha.
- The following are excluded from this guarantee:
a. Periodic maintenance and repair or replacement of parts due to normal wear and tear.
b. Damage resulting from:
(1) Repairs performed by the customer himself or by an unauthorised third party.
(2) Inadequate packaging or mishandling, when the product is in transit from the customer. Please note that it is the customer's responsibility to ensure the product is adequately packaged when returning the product for repair.
(3) Misuse, including but not limited to (a) failure to use the product for its normal purpose or in accordance with Yamaha's instructions on the proper use, maintenance and storage, and (b) installation or use of the product in a manner inconsistent with the technical or safety standards in force in the country where it is used.
(4) Accidents, lightning, water, fire, improper ventilation, battery leakage or any cause beyond Yamaha's control.
(5) Defects of the system into which this product is incorporated and/or incompatibility with third party products.
(6) Use of a product imported into the EEA and/or Switzerland, not by Yamaha, where that product does not conform to the technical or safety standards of the country of use and/or to the standard specification of a product sold by Yamaha in the EEA and/or Switzerland.
- Where the guarantee differs between the country of purchase and the country of use of the product, the guarantee of the country of use shall apply.
- Yamaha may not be held responsible for any losses or damages, whether direct, consequential or otherwise, save for the repair or replacement of the product.
- Please backup any custom settings or data, as Yamaha may not be held responsible for any alteration or loss to such settings or data.
- This guarantee does not affect the consumer's statutory rights under applicable national laws in force or the consumer's rights against the dealer arising from their sales/purchase contract.
Information for Users on Collection and Disposal of Old Equipment and Used Batteries

These symbols on the products, packaging, and/or accompanying documents mean that used electrical and electronic products and batteries should not be mixed with general household waste.
For proper treatment, recovery and recycling of old products and used batteries, please take them to applicable collection points, in accordance with your national legislation and the Directives 2002/96/EC and 2006/66/EC.

By disposing of these products and batteries correctly, you will help to save valuable resources and prevent any potential negative effects on human health and the environment which could otherwise arise from inappropriate waste handling.
For more information about collection and recycling of old products and batteries, please contact your local municipality, your waste disposal service or the point of sale where you purchased the items.
[Information on Disposal in other Countries outside the European Union]
These symbols are only valid in the European Union. If you wish to discard these items, please contact your local authorities or dealer and ask for the correct method of disposal.
![YAMAHA CD-C600, CDC-600 - [Information on Disposal in other Countries outside the European Union] - 1](/content/2019/10/3546/images/2992990b9dc12497bc795ddab2f033aa54c0e8d35c93a47c35fea70ff3c1b4dc.jpg)
Note for the battery symbol (bottom two symbol examples):
This symbol might be used in combination with a chemical symbol. In this case it complies with the requirement set by the Directive for the chemical involved.