Arcitec RQ1085 - Shaver PHILIPS - Free user manual and instructions
Find the device manual for free Arcitec RQ1085 PHILIPS in PDF.

User questions about Arcitec RQ1085 PHILIPS
0 question about this device. Answer the ones you know or ask your own.
Ask a new question about this device
Download the instructions for your Shaver in PDF format for free! Find your manual Arcitec RQ1085 - PHILIPS and take your electronic device back in hand. On this page are published all the documents necessary for the use of your device. Arcitec RQ1085 by PHILIPS.
USER MANUAL Arcitec RQ1085 PHILIPS
Thank you for buying this Philips shaver. Please read this user manual, as it contains information about the wonderful features of this shaver as well as some tips to make shaving easier and more enjoyable.
Important
Read this user manual carefully before you use the shaver, the Jet Clean System and the Power Pod. Save the user manual for future reference.
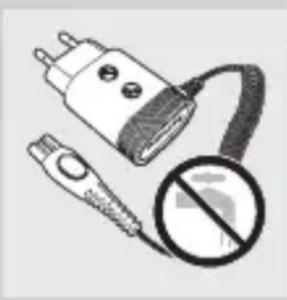
Danger
- Make sure the adapter does not get wet.
Warning
- Be careful with hot water. Always check if the water is not too hot, to prevent your hands from getting burnt.
- The adapter contains a transformer. Do not cut off the adapter to replace it with another plug, as this causes a hazardous situation.
- These appliances are not intended for use by persons (including children) with reduced physical, sensory or mental capabilities, or lack of experience and knowledge, unless they have been given supervision or instruction concerning use of the appliances by a person responsible for their safety.
- Children should be supervised to ensure that they do not play with the appliances.
Caution
- Do not use the shaver, the Jet Clean System, the Power Pod or the adapter if it is damaged.
- Charge and store the shaver at a temperature between 5^ C and 35^ C .
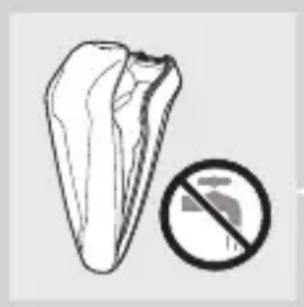
- Always put the protection cap on the shaver to protect the shaving heads when you are travelling.
- Never use scouring pads, abrasive cleaning agents or aggressive liquids such as petrol or acetone to clean the appliance.
- Only use the adapter supplied.
- If the adapter is damaged, always have it replaced with one of the original type in order to avoid a hazard.
- Only use the Jet Clean System with the original HQ200 cleaning fluid.
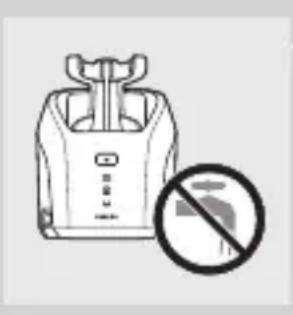
- Never immerse the Jet Clean System in water nor rinse it under the tap.
- Use and store the Jet Clean System at a temperature between 5^ C and 35^ C .
- Always place the Jet Clean System on a stable, level and horizontal surface to prevent leakage.
- Empty the cleaning chamber and clean it thoroughly by rinsing it with hot tap water every 15 days.
- Always place the Jet Clean System on a fluid-resistant surface.
- The Jet Clean System thoroughly cleans but does not disinfect your shaver, therefore do not share the shaver with others.
- The cleaning chamber of the Jet Clean System is not dishwasher-proof.
- When the Jet Clean System is ready for use, do not move it to prevent leakage of cleaning fluid.
- Never immerse the Power Pod in water, nor rinse it under the tap.
Compliance with standards
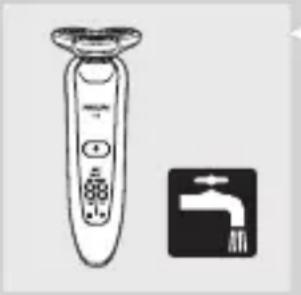
- The shaver complies with the internationally approved IEC safety regulations and can be safely cleaned under the tap.
- These Philips appliances comply with all standards regarding electromagnetic fields (EMF). If handled properly and according to the instructions in this user manual, the appliances are safe to use based on scientific evidence available today.
General
- The adapter transforms 100-240 volts to a safe low voltage of less than 24 volts.
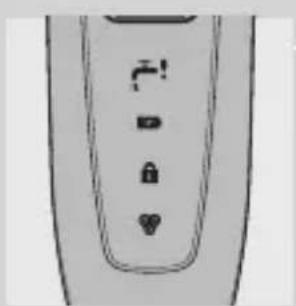
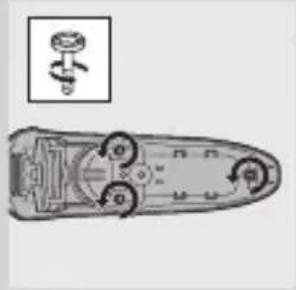
Overview (Fig. 5)
Protection cap
B Shaving unit
C Trimmer
D Trimmer on/off slide
E Shaver (RQ1090/RQ1062/RQ1060/RQ1052/RQ1050)
F Shaver on/off button
G Display
Shaver holder
Jet Clean System (RQ1005/RQ1000)
J Jet Clean System on/off button
Cleaning symbol
Drying symbol
M 'Cleaning chamber empty' symbol
N Cleaning chamber
Power Pod
Cleaning brush
Adapter
R Small plug
The display
Before you use the shaver for the first time, remove the protective foil from the display.
The five shaver types (RQ1090, RQ1062, RQ1060, RQ1052 and RQ1050) have different displays, which are shown in the figures below.
- RQ1090
- RQ1062/RQ1060
- RQ1052/RQ1050
Charging
- Charging takes approx. 1 hour.
- When you place the shaver in the Jet Clean System or in the Power Pod, the display automatically switches off after approx. 5 hours.
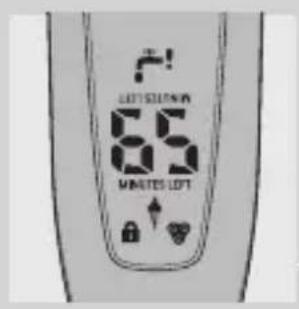
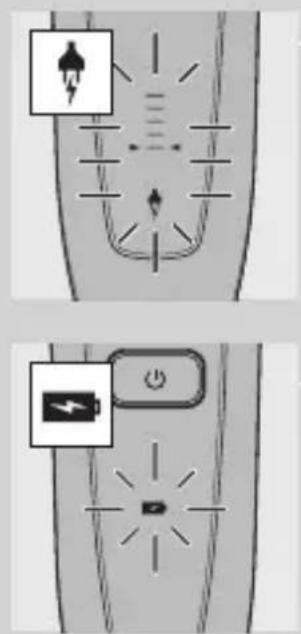
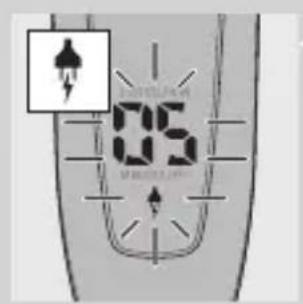
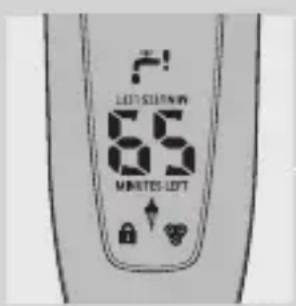
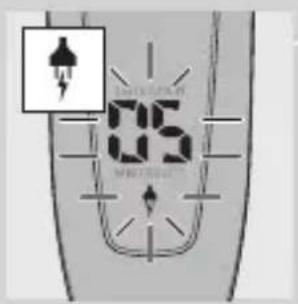
RQ1090
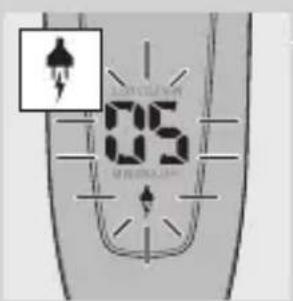
- When the shaver is charging, the minutes indication and the plug symbol flash.
- The shaving minutes increase until the shaver is fully charged.
ENGLISH10
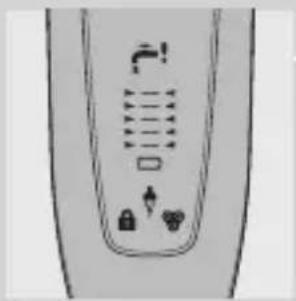
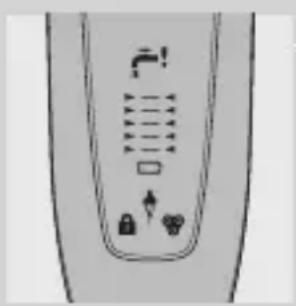
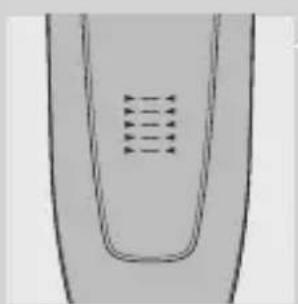
RQ1062/RQ1060
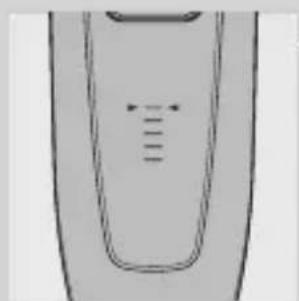
- When the shaver is charging, the plug symbol flashes.
- First the arrowheads of the bottom charge level flash, then the arrowheads of the second level flash, and so on until the shaver is fully charged.
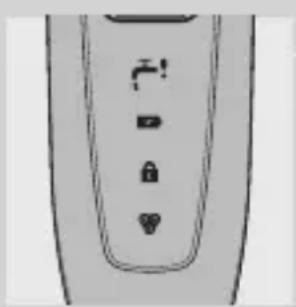
RQ1052/RQ1050
- When the shaver is charging, the battery symbol flashes blue.
Battery fully charged
RQ1090
- When the battery is fully charged, the minutes indication is visible on the display and the plug symbol disappears from the display.
RQ1062/RQ1060
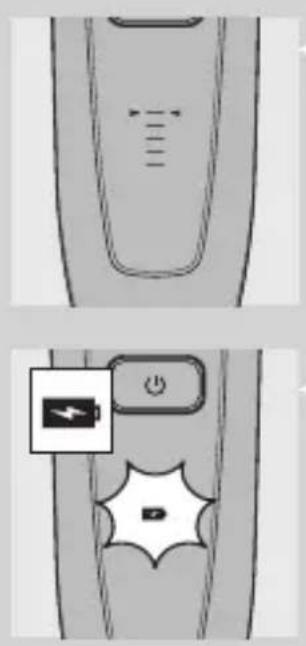
- When the battery is fully charged, all arrowheads and all charge level lights light up blue continuously and the plug symbol disappears from the display.
- When you remove the shaver from the Jet Clean System or the Power Pod, the arrowheads of the top charge level light up blue to indicate that the battery is full.
RQ1052/RQ1050
- When the battery is fully charged, the battery symbol lights up blue continuously.
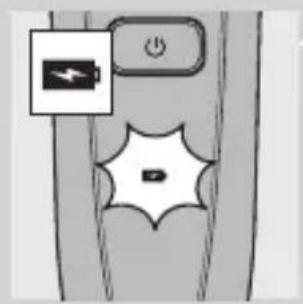
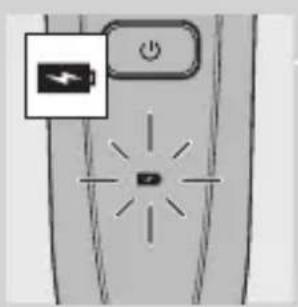
Battery low
RQ1090
- When the battery is almost empty (when there are only 5 or fewer shaving minutes left), the minutes indication and the plug symbol start to flash.
- When you switch off the shaver, the shaving minutes and the plug symbol continue to flash for a few more seconds. You hear a beep when there are no minutes left.
RQ1062/RQ1060
- When the battery is almost empty (when there are only 5 or fewer shaving minutes left), the battery symbol flashes red and the arrowheads of the bottom charge level flash blue.
- When you switch off the shaver, the battery symbol and the arrowheads of the bottom charge level continue to flash for a few seconds.
RQ1052/RQ1050
- When the battery is almost empty (when there are only 5 or fewer shaving minutes left), the battery symbol lights up red.
- When you switch off the shaver, the battery symbol starts to flash for a few seconds.
Remaining battery capacity
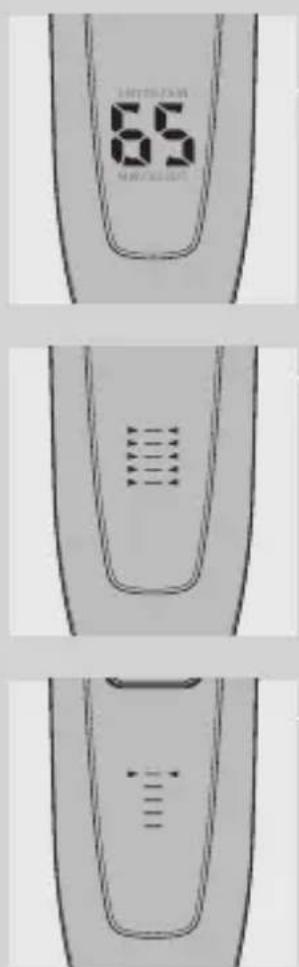
RQ1090
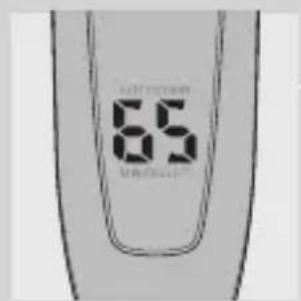
- The remaining battery capacity is indicated by the number of shaving minutes shown on the display.
RQ1062/RQ1060
- The remaining battery capacity is indicated by the flashing arrowheads of a particular charge level
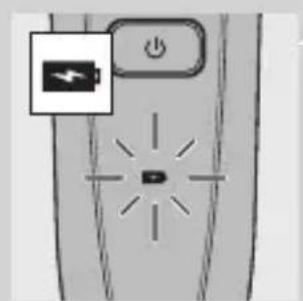
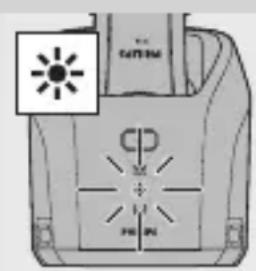
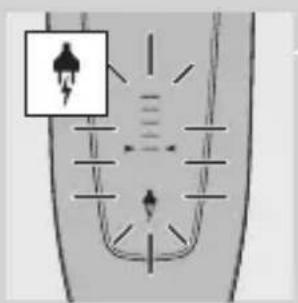
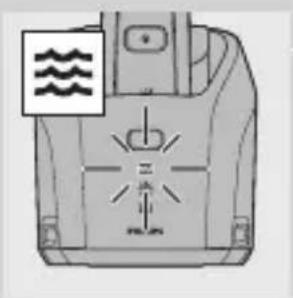
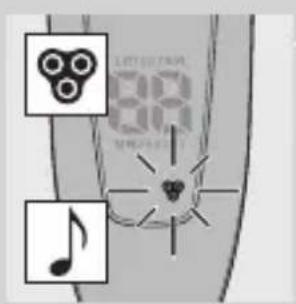
Clean shaver
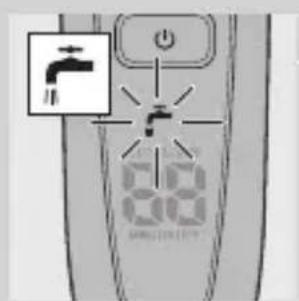
For optimal shaving performance, we advise you to clean the shaver after every use.
- The tap symbol flashes to remind you to clean the shaver.
Note: The displays of types RQ1062, RQ1060, RQ1052 and RQ1050 look different but show the same indication.
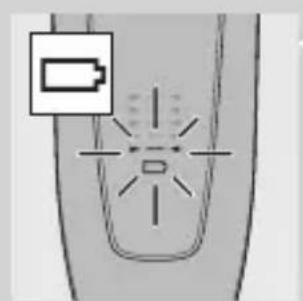
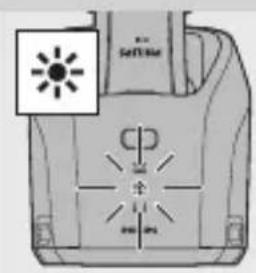
Replace shaving unit
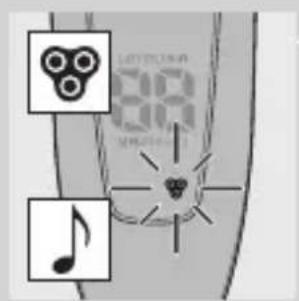
For maximum shaving performance, we advise you to replace the shaving unit every two years.
- To remind you to replace the shaving unit, the shaving unit symbol flashes (all types) and you hear a beep when you switch off the shaver (RQ1090 only). This happens at the end of 7 successive shaves to remind you to replace the shaving unit.
Note: The displays of types RQ1062, RQ1060, RQ1052 and RQ1050 look different but show the same indication.
Travel lock
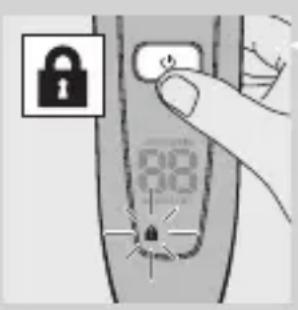
You can lock the shaver when you are going to travel. The travel lock prevents the shaver from being switched on by accident.
Activating the travel lock
1 Press the on/off button for 3 seconds to enter the travel lock mode.
The lock symbol appears on the display (all types) and you hear a beep (RQ1090 only) to indicate that the travel lock has been activated.
Note: The displays of types RQ1062, RQ1060, RQ1052 and RQ1050 look different but show the same indication.
Deactivating the travel lock
1 Press the on/off button for 3 seconds.
- The motor starts running to indicate that the travel lock has been deactivated.
The shaver is now ready for use again.
Note: When you place the shaver in the plugged-in Power Pod or Jet Clean System, the travel lock is automatically deactivated.
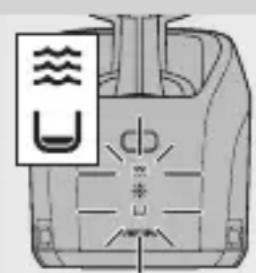
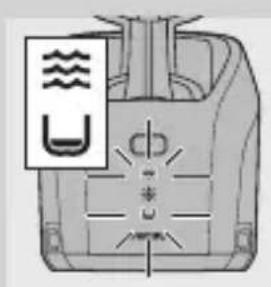
Blocked shaving heads
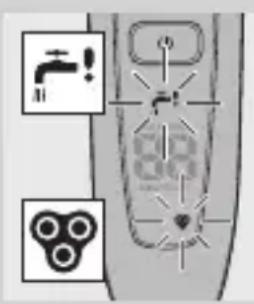
- If the shaving heads are blocked, the shaving unit symbol and the tap symbol with exclamation mark flash. In this case, the motor cannot run because the shaving heads are soiled or damaged.
Note: The displays of types RQ1062, RQ1060, RQ1052 and RQ1050 look different but show the same indication.
- When this happens, you have to clean the shaving unit or replace it.
- The shaving unit symbol and the tap symbol with exclamation mark continue to flash until you unblock the shaving heads.
Charging
Charging takes approx. 1 hour.
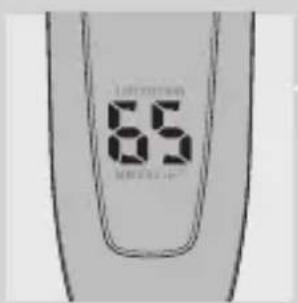
A fully charged shaver has a shaving time of up to 65 minutes, which is enough for approx. 21 shaves.
The actual shaving time is calculated by the shaver.
If you have a heavy beard, the shaving time may be less than 65 minutes. The shaving time may also vary over time, depending on your shaving behaviour and beard type.
Quick charge
After the shaver has charged for 5 minutes, it contains enough energy for one shave.
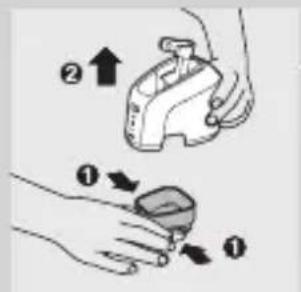
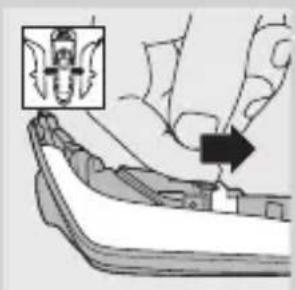
Charging in the Power Pod
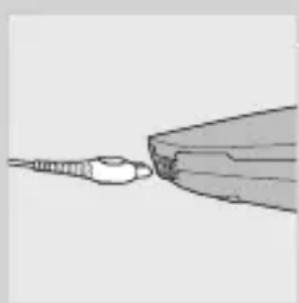
1 Put the small plug in the Power Pod.
2 Put the adapter in the wall socket.
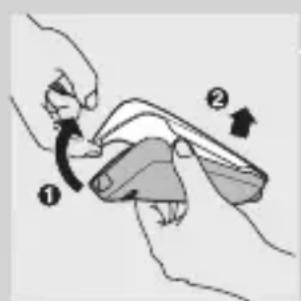
3 Pull at the top of the lid (1) and remove it (2).
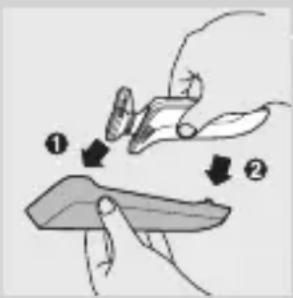
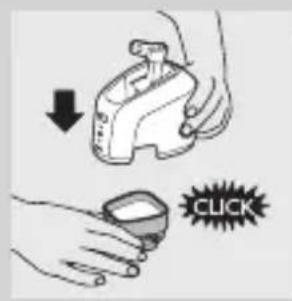
4 First insert the top of the shaver into the Power Pod (1) and then press the bottom part into the Power Pod (2).
Note: The shaver cannot be placed in the Power Pod when the protection cap is on the shaving unit.
The display shows that the shaver is charging (see chapter 'The display').
Charging in the Jet Clean System
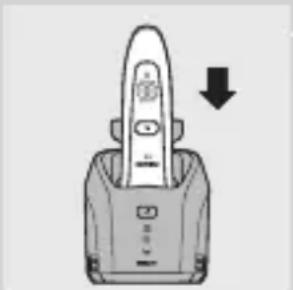
1 Put the small plug in the Jet Clean System.
2 Put the adapter in the wall socket.
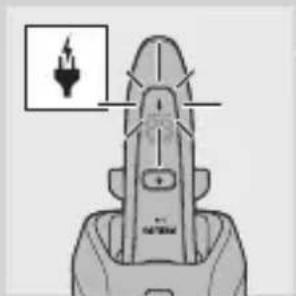
3 Place the shaver upside down in the holder with the display pointing towards the front of the Jet Clean System.
Note: RQ1090,RQ1062,RQ1060 only: when you turn the shaver upside down, the indications on the display are also turned upside down so you can still see the remaining battery capacity.
4 Press the shaver tightly into the holder to lock it into place.
Note: The shaver cannot be placed in the Jet Clean System when the protection cap is on the shaving unit.
The display shows that the shaver is charging (see chapter 'The display').
Using the shaver
Shaving
1 Press the on/off button once to switch on the shaver.
ENGLISH16
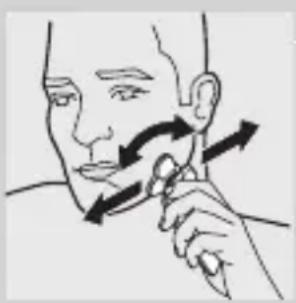
The display lights up for a few seconds.
2 Move the shaving heads over your skin. Make both straight and circular movements.
- Shaving on a dry face gives the best results.
- Your skin may need 2 or 3 weeks to get accustomed to the Philips shaving system.
3 Press the on/off button once to switch off the shaver.
- The display lights up for a few seconds and then shows the remaining battery capacity (RQ1090/RQ1062/RQ1060 only).
Trimming
You can use the trimmer to groom your sideburns and moustache.
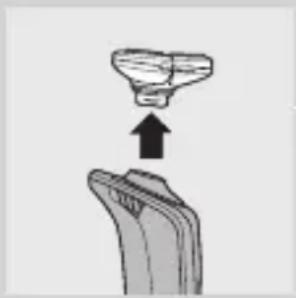
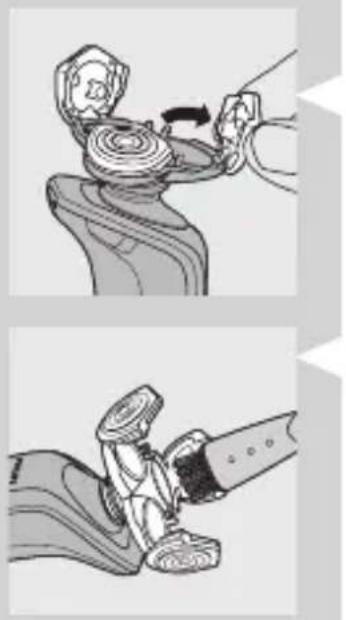
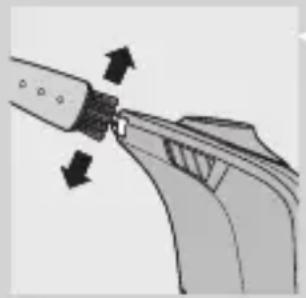
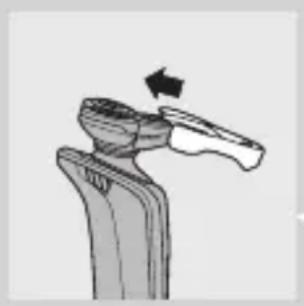
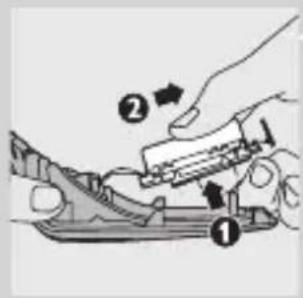
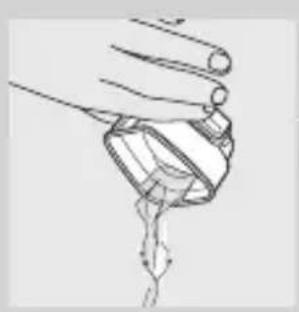
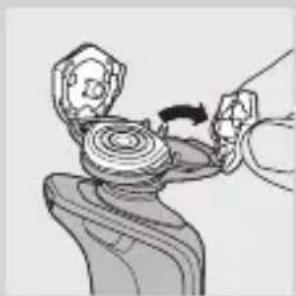
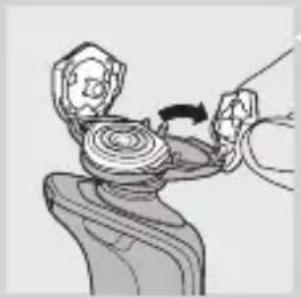
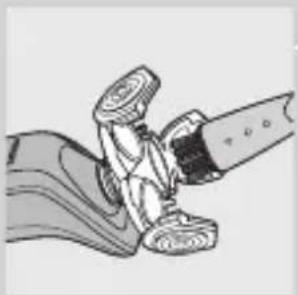
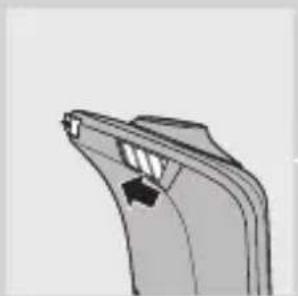
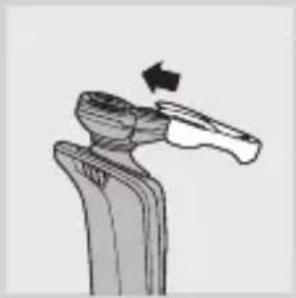
1 Pull the shaving unit off the shaver.
2 Press the on/off button once to switch on the shaver.
The display lights up for a few seconds.
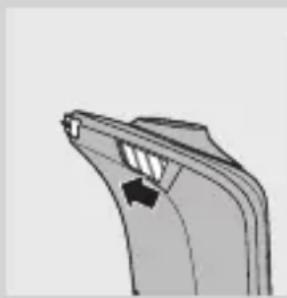
3 Press the trimmer slide forwards to slide out the trimmer.
4 You can now start trimming.
Press the trimmer slide backwards to retract the trimmer.
6 Press the on/off button once to switch off the shaver.
- The display lights up for a few seconds and then shows the remaining battery capacity (RQ1090/RQ1062/RQ1060 only).
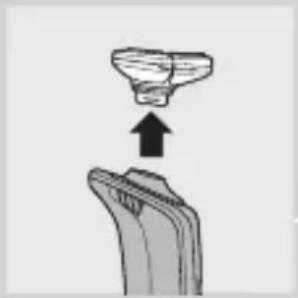
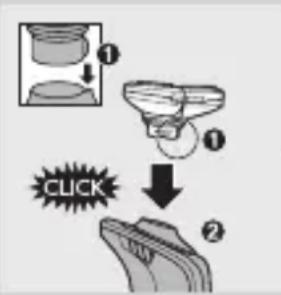
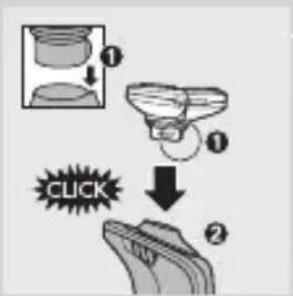
7 Insert the lug of the shaving unit into the slot in the top of the shaver (1). Then press the shaving unit downwards (2) to attach it to the shaver ('click').
Cleaning and maintenance
Never use scouring pads, abrasive cleaning agents or aggressive liquids such as petrol or acetone to clean the appliance.
- The best and most hygienic way to clean the shaver is in the Jet Clean System. You can also rinse the shaver under the tap or clean it with the brush supplied.
- Be careful with hot water. Always check if the water is not too hot, to prevent your hands from getting burnt.
- Clean the shaver after every shave for optimal shaving performance.
- You can clean the outside of the shaver with a damp cloth.
- Regular cleaning guarantees better shaving performance.
Cleaning the shaving unit in the Jet Clean System
The Jet Clean System has three cleaning programs: the eco program, the normal program and the intensive program. The shaver automatically chooses the appropriate cleaning program.
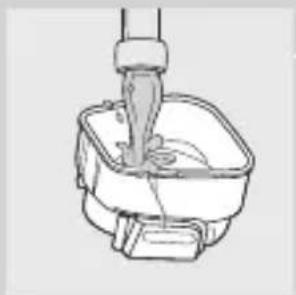
Preparing the Jet Clean System for use Fill the cleaning chamber before first use.
1 Put the small plug in the Jet Clean System.
ENGLISH18
2 Put the adapter in the wall socket.
The holder automatically moves to the highest position.
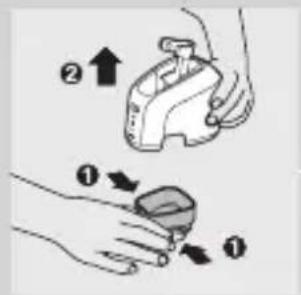
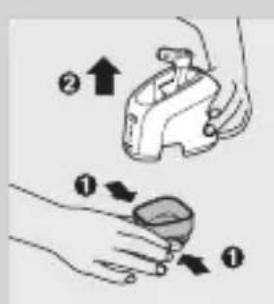
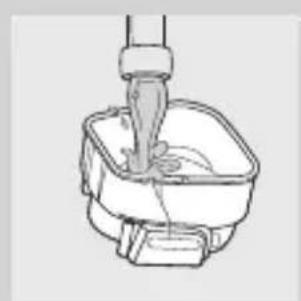
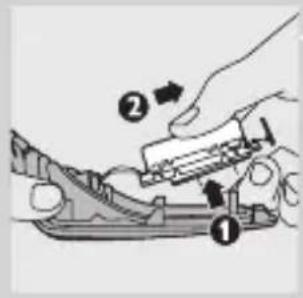
3 Simultaneously press the release buttons on both sides of the cleaning chamber (1). Then lift the Jet Clean System off the cleaning chamber (2).
The cleaning chamber remains behind.
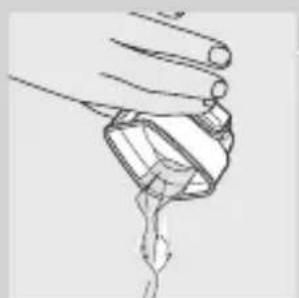
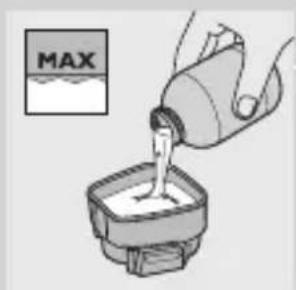
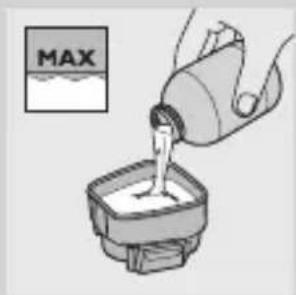
4 Unscrew the cap from the bottle with cleaning fluid and remove the airtight seal.
5 Fill the cleaning chamber with HQ200 cleaning fluid up to the MAX indication.
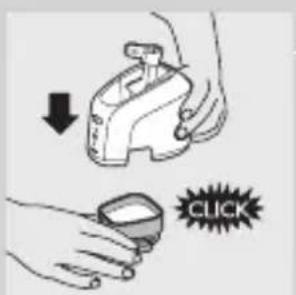
6 Place the Jet Clean System back onto the cleaning chamber.
Make sure the release buttons click back into place.
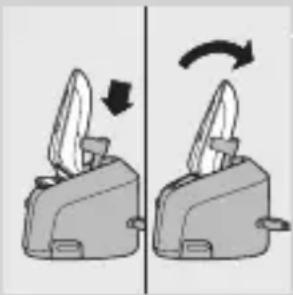
Using the Jet Clean System
1 Place the shaver in the holder.
The display shows that the shaver is charging (see chapter 'The display').
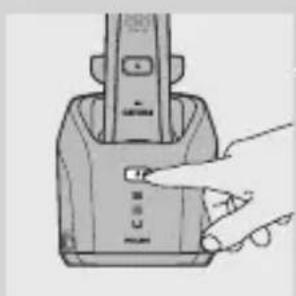
2 Press the on/off button on the Jet Clean System to start the cleaning program.
The shaver display stops showing the charging indication.
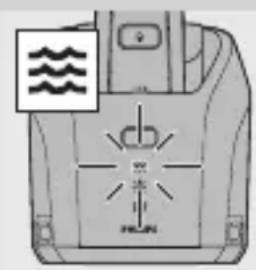
The cleaning light starts to flash and the shaver is automatically lowered into the cleaning fluid.
The cleaning light flashes throughout the cleaning program, which takes 4 to 6 minutes, depending on the cleaning program.
During the first phase of the cleaning program, the shaver automatically switches on and off several times and moves up and down.
During the second phase of the cleaning program, the shaver is placed in the drying position, indicated by a flashing drying symbol. This phase takes approx. 2 hours. The shaver stays in this position until the end of the program.
After the cleaning program, the charging indication appears on the shaver display (see chapter 'The display').
Note: If you press the on/off button of the Jet Clean System during the cleaning program, the program aborts and resets. In this case, the cleaning or drying light stops flashing and the holder returns to its starting position.
Note: If you remove the adapter from the wall socket during the cleaning program, the program aborts. The holder remains in its current position. When you put the adapter back into the wall socket, the holder moves to the highest position.
- When the fluid level drops below the minimum level, the cleaning light and the 'cleaning chamber empty' symbol start to flash and the holder returns to its starting position.
- If you use the washing machine to clean your shaver every day, you need to refill the cleaning chamber approx. every 15 days.
ENGLISH20

Cleaning the Jet Clean System
1 Simultaneously press the release buttons on both sides of the Jet Clean System (1). Then lift the Jet Clean System off the cleaning chamber (2).
The cleaning chamber remains behind.
Pour any remaining cleaning fluid out of the cleaning chamber.
You can simply pour the cleaning fluid down the sink.
3 Rinse the cleaning chamber under the tap.
The cleaning chamber is not dishwasher-proof.
4 Fill the cleaning chamber with HQ200 cleaning fluid up to the MAX indication.
5 Place the Jet Clean System back onto the cleaning chamber.
Make sure the release buttons click back into place.
- You can clean the Jet Clean System with a moist cloth.
- Clean the cleaning chamber every 15 days.
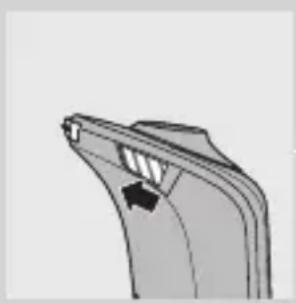
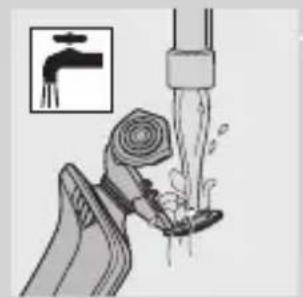
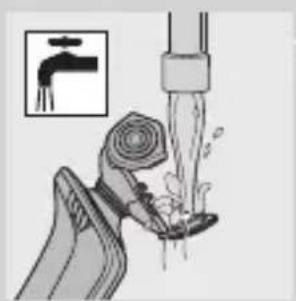
Cleaning the shaving unit under the tap
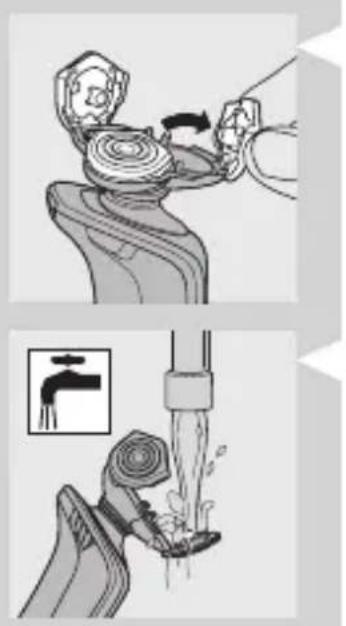
1 Switch off the shaver.
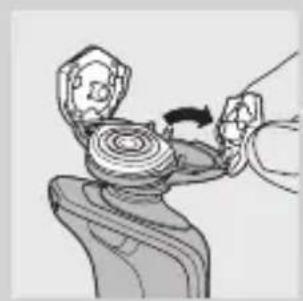
2 Pull open the three shaving heads one by one.
3 Rinse all three shaving heads and all three hair chambers under a hot tap for 30 seconds.
Be careful with hot water. Always check if the water is not too hot, to prevent your hands from getting burnt.
4 Carefully shake off excess water and leave the shaving heads open to let the shaving unit dry completely.
Never dry the shaving unit with a towel or tissue, as this may damage the shaving heads.
Cleaning the shaving unit with the brush supplied
1 Switch off the shaver.
2 Pull open the three shaving heads one by one.
3 Clean the shaving heads and the hair chambers with the brush supplied.
4 Close the shaving heads.
Cleaning the trimmer with the brush supplied
Clean the trimmer every time you have used it.
1 Switch off the shaver.
2 Press the trimmer slide forwards to slide out the trimmer.
3 Clean the trimmer with the short-bristled side of the brush supplied. Brush up and down along the trimmer teeth.
4 Switch the shaver on and off and repeat step 3.
Press the trimmer slide backwards to retract the trimmer.
Tip: For optimal trimmer performance, lubricate the trimmer teeth with a drop of sewing machine oil every six months.
Storage
There are two ways to store the shaver or to take it with you when you travel:
- put the shaver in the Power Pod or in the Jet Clean system. Make sure the protection cap is not on the shaving unit.
- slide the protection cap onto the shaving unit to prevent damage to the shaving heads.
Replacement
Replace the shaving unit when the shaving unit symbol appears on the display. Replace a damaged shaving unit right away.
For maximum shaving performance, we advise you to replace the shaving unit every two years. Only replace the shaving unit with an original RQ10 Philips arcitec Shaving Unit.

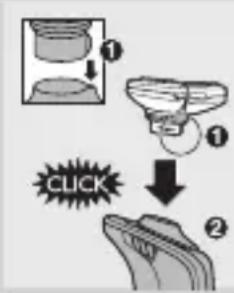
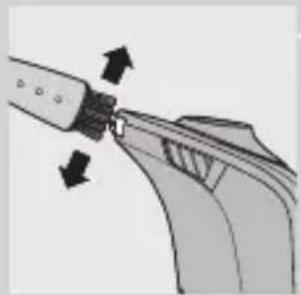
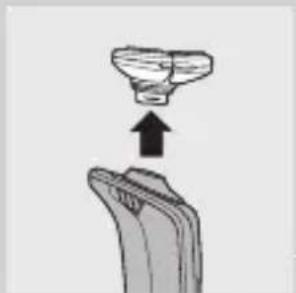
1 Pull the old shaving unit off the shaver.
2 Insert the lug of the new shaving unit into the slot in the top of the shaver (1). Then press the shaving unit downwards (2) to attach it to the shaver ('click').
Ordering parts
The following parts are available:
- HQ8500 adapter
- RQ10 Philips arcitec Shaving Unit
- HQ110 Philips Shaving Head Cleaning Spray (not available in China)
- HQ200 Philips Cleaning Fluid
Environment
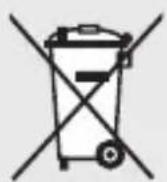
- Do not throw away the appliances with the normal household waste at the end of their life, but hand them in at an official collection point for recycling. By doing this, you help to preserve the environment.
- The built-in rechargeable shaver battery contains substances that may pollute the environment. Always remove the battery before you discard or hand in the shaver at an official collection point. Dispose of the battery at an official collection point for batteries. If you have trouble removing the battery, you can also take the appliance to a Philips service centre. The staff of this centre will
ENGLISH24
remove the battery for you and will dispose of it in an environmentally safe way.
Disposal of the shaver battery
Only remove the battery when you discard the shaver. Make sure the battery is completely empty when you remove it.
1 Remove the shaver from the Power Pod or the Jet Clean System.
2 Let the shaver run until it stops.
3 Pull the shaving unit off the shaver.
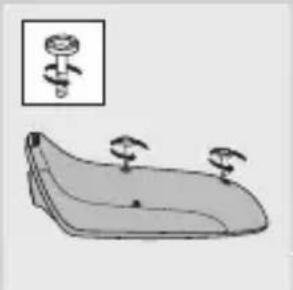
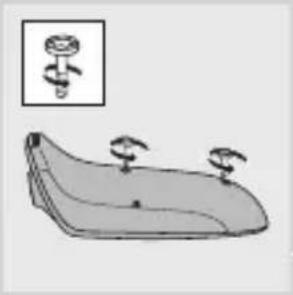
4 Undo the 2 screws on the back of the shaver.
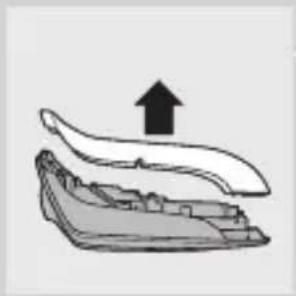
5 Insert a screwdriver between the front and back panel to open the shaver.
6 Remove the side panels.
7 Unscrew the 3 screws on the inside of the shaver and remove the back cover.
8 Pull the wires out of the motor unit and remove the battery.
Be careful, the battery strips are sharp.
Do not put the shaver back into the plugged-in Power Pod or Jet Clean System after you have removed the battery.
Guarantee & service
If you need information or if you have a problem, please visit the Philips website at www.philips.com or contact the Philips Customer Care Centre in your country (you find its phone number in the worldwide guarantee leaflet). If there is no Customer Care Centre in your country, go to your local Philips dealer or contact the Service Department of Philips Domestic Appliances and Personal Care BV.
Guarantee restrictions
The shaving heads (cutters and guards) are not covered by the terms of the international guarantee because they are subject to wear.
Frequently asked questions
Why doesn't the shaver shave as well as it used to?
-
The Jet Clean System may not have cleaned the shaver properly, because the cleaning fluid in the cleaning chamber is soiled or the cleaning fluid level is too low. Clean the shaver thoroughly before you continue shaving. If necessary, clean and refill the cleaning chamber (see chapter 'Cleaning and maintenance').
-
The shaving heads may be damaged or worn. Replace the shaving unit (see chapter 'Replacement').
2 Why doesn't the shaver work when I press the on/off button?
- The battery may be empty. Recharge the battery (see chapter 'Charging').
- The travel lock may be activated. Press the on/off button for 3 seconds to deactivate the travel lock.
- The shaving unit is soiled or damaged to such an extent that the motor cannot run. In this case, the shaving unit symbol, the tap symbol and the exclamation mark flash. When this happens, you have to clean the shaving unit or replace it.
- The temperature of the shaver may be too high. In this case, the shaver does not work and the exclamation mark on the display flashes. As soon as the temperature of the shaver has dropped sufficiently, you can switch on the shaver again.
3 Why isn't the shaver entirely clean after I cleaned it in the Jet Clean System?
-
The cleaning fluid in the cleaning chamber may be soiled. Empty and rinse the cleaning chamber.
-
The cleaning fluid level may be too low. If the fluid volume in the cleaning chamber drops below the minimum level during the cleaning program, the program aborts. The cleaning light and the 'cleaning chamber empty' symbol flash at intervals and the holder returns to its starting position.
Refill the cleaning chamber with cleaning fluid up to the MAX indication (see chapter 'Cleaning and maintenance').
- You may have used another cleaning fluid than the original Philips cleaning fluid. Only use HQ200 cleaning fluid.
4 Why doesn't the Jet Clean System work when I press the on/off button?
- The Jet Clean System may not be connected to the mains. Put the small plug into the Jet Clean System and put the adapter in the wall socket.
-
There may not be an electrical connection between the Jet Clean System and the shaver. Press the shaver tightly into the holder to lock it into place.
Why does the operating time of the Jet Clean System vary? -
The Jet Clean System has three cleaning programs: the eco program, the normal program and the intensive program. Each of these programs has a different operating time. The shaver automatically chooses the appropriate cleaning program.
Why is the shaver not fully charged after I charged it in the Power Pod/Jet Clean System?
- You may not have placed the shaver in the Power Pod/Jet Clean System properly. Make sure you press the shaver until it locks into place.
Introduction
Mengaktifkan travel lock
1 3.3.3.3.3.3.3.3.3.3.3.3.3.3.3.3.3.3.3.3.3.3.3.3.3.3.3.3.3.3.3.3.3.3.3.3.3.3.3.3.3.3.3.3.3.3.3.3.3.3.3
DukiStpReIeJiJiJiJiJiJiJiJiJiJiJiJiJiJiJiJiJiJiJiJiJiJiJiJiJiJiJiJiJiJiJiJiJiJiJiJiJiJiJiJiJiJiJiJiJiJiJi
1 週伊彌韻用號日半兒遍動园里,藏山
2 2
D DusLReIeE E E E E E E E E E E E E E E E E E E E E E E E E E E E E E E E E E E E E E E E E E E E E E E E E E E E E
3 3
漸詠用態是心記藥默記藻藻藻藻藻藻藻藻藻藻藻藻藻藻藻藻藻藻藻藻藻藻藻藻藻藻藻藻藻藻藻藻藻藻藻藻藻藻藻藻藻藻藻藻藻藻藻藻藻藻藻藻藻藻藻藻藻藻藻藻藻藻藻藻藻藻藻藻藻藻藻
4 HQ200 産専用の MAX 五丶が丶工専専的 都 産。
5 裹목목성목목목목목목목목목목목목목목목목목목목목목목목목목목목목목목목목목목목목목목목목목목목목목목목목목목목목목목목목목목목목목목목목목목목목목목목목목목목목목목목목목목목목목輿명상사고.
ellrmbrtniDsiJrRieHgctdtdtJtHahsitiO.
- 裹是朝元,到国,人斯被将长
- 陆戦駕用は15日まらド連線は息県。
水头量为 0.1~0.2m
1 用式
2 2
3 3 3 3 3 3 3 3 3 3 3 3 3 3 3 3 3 3 3 3 3 3 3 3 3 3 3 3 3 3 3 3 3 3 3 3 3 3 3 3 3 3 3 3 3 3 3 3 3 3 3
m = 311 ;
J Jet Clean System
K
L
M
N
Power Pod
P 16
Q 26661160
R
#
nntnnnnnnnnnnnnnnnnnnnnnnnnnnnnnnnnnnnnnnnnnnnnnnnnnnnnnnnnnnnnnnnnnnnnnnnnnnnnnnnnnnnnnnnnnnnnnnnnnnnnnnnnnnnnnnnnnnnnnnnnnnnnnnnnnnnnnnnnnnnnnnnnnnnnnnnnnnnnnnnnnnnnnnnnnnnnnnnn
- RQ1090
RQ1062/RQ1060
RQ1052/RQ1050
7
1 1
Jet Clean System Power Pod 5
RQ1090
1
( 0,12,0,14) ± 1
RQ1062/RQ1060
1
RQ1052/RQ1050
-
W
RQ1090
- 1
RQ1062/RQ1060
6 Jet Clean System nnnn nn nnnn nnnn
ηη Jet Clean System
1
Nnnaaannnnnnnnnnnnnnnnnnnnnnnnnnnnnnnnnnnnnnnnnnnnnnnnnnnnnnnnnnnnnnnnnnnnnnnnnnnnnnnnnnnnnnnnnnnnnnnnnnnnnnnnnnnnnnnnnnnnnnnn
2 nuiu/ Jet Clean System Waiu
1
H
ywnn nn nnnn nn nnnnnnnnnnnnnnnnnnnnnnnnnnnnnnnnnnnnnnnnnnnnnnnnnnnnnnnnnnnnnnnnnnnnnnnnnnnnnnnnnnnnnnnnnnnnnnnnnnnnnnnnnnnnnnnnnnnnnnnnnnnnn
n nn nnnnnnnnnnnnnnnnnnnnnnnnnnnnnnnnnnnnnnnnnnnnnnnnnnnnnnnnnnnnnnnnnnnnnnnnnnnnnnnnnnnnnnnnnnnnnnnnnnnnnnnnnnnnnnnnnnn
nunnnnnaaannnnn nnnnnn nn nnnnnnnnnae 1 nnnnnn nnnnnnnn nnnnnnnn nnnnnnnn nnnnnnnn nnnnnnnn nnnnnnnn nnnnnnnn nnnnnnnn nnnnnnnn nnnnnnnn nnnnnnnn nnnnnnnn nnnnnnnn nnnnnnnn nnnnnnnn nnnnnnnn nnnnnnnn nnnnnn nnnnnn nnnnnn nnnnnn nnnnnn nnnnnn nnnnnn nann
山
nwnnnn nn nnnnnnnnnnnnnnnnnnnnnnnnnnnnnnnnnnnnnnnnnnnnnnnnnnnnnnnnnnnnnnnnnnnnnnnnnnnnnnnnnnnnnnnnnnnnnnnnnnnnnnnnnnnnnnnnnnnnnnnnnnnnnnnnnnnnnnnnnnnnnnnnnnnnnnnnnnnnnnnnnnnnnnnnnnnnn
7777777777777777777777777777777777777777777
1
15
Jet Clean System
1 nJnJnJnJnJnJnJnJnJnJnJnJnJnJnJnJnJnJnJnJnJnJnJnJnJnJnJnJnJnJnJnJnJnJnJnJnJnJnJnJnJnJnJnJnJnJnJnJnJnJnJ
1
2 1
3 1
4 HQ200
5 Jet Clean System nnnn nn nnnn nnnn
- n 15
n nn nnnnnae an nulnnnne
1
2
3 1nnaaannnnnnaanennnnnnnnnnnnnnnnnnnnnnnnnnnnnnnnnnnnnnnnnnnnnnnnnnnnnnnnnnnnnnnnnnnnnnnnnnnnnnnnnnnnnnnnnnnnnnnnnnnnnnnnnnnnnn
W
4
1
2
3 n 7777777777777777777777777777
4
n nn nnnnnnnnnnnnnnnnnnnnnnnnnnnnnnnnnnnnnnnnnnnnnnnnnnnnnnnnnnnnnnnnnnnnnnnnnnnnnnnnnnnnnnnnnnnnnnnnnnnnnnnnn
n nn nnnnnnnnnnnnnnnnnnnnnnnnnnnnnnn
1
2
3 n nnnaa ananannnnaaunnnnnnnnnnnnnnnnnnnnnnnnnnnnnnnnnnnnnnnnnnnnnnnnnnnnnnnnnnnnnnnnnnnnnnnnnnnnnnnnnnnnnnnnnnnnnnnnnnnnnnnnnnnnnnnnnnnnnnnnnnnnnnnnn
4 1
5
nnaa: nnn nnneu u annuu uunnuuauuuu uuuu
m
mnnn nnnnnn nn nnnn nnnnnn nn nnnnnn nn nnnnnn nn nnnnnn nn nnnnnn nn nnnnnn nn nnnnnn nn nnnnnn nn nnnnnn nn nnnnnn nn nnnnnn nn nnnnnn nn nnnnnn nn nnnnnn nn nnnnnn nn nnnnnn nn nnnnnn nn nnnnnn nn nnnnnn nn nnnnnn nn nnnnnn
-
nnaa
1
nnaa
RQ10 Philips arcitec
1
2 1 (1) (2)
n
山
HQ8500
RQ10 Philips arcitec
Ht Ht Ht Ht Ht Ht Ht Ht Ht Ht Ht Ht Ht Ht Ht Ht Ht Ht Ht Ht Ht Ht Ht Ht Ht Ht Ht Ht Ht Ht Ht Ht Ht Ht Ht Ht Ht Ht Ht Ht Ht Ht Ht Ht Ht Ht Ht Ht Ht Ht Ht
Philips HQ200
aannnnn
- 1
1
nwnnnn nn nnnnnnnnnnnnnnnnnnnnnnnnnnnnnnnnnnnnnnnnnnnnnnnnnnnnnnnnnnnnnnnnnnnnnnnnnnnnnnnnnnnnnnnnnnnnnnnnnnnnnnnnnnnnnnnnn
nunnu
1 1nwnnnn Power Pod Jet Clean System
2 1
3
4 2
5 1
6
7 3
8
2
nwnnnnnae n Power Pod Jet Clean System
n
n
ww.philips.com wananaananaananaananaananaananaananaananaananaananaananaananaananaananaananaananaananaananaananaananaananaananaananaananaananaananaananaananaananaananaananaananaananaananaananaananaananaananaananaananaananaananaananaananaananaananaananaananaananaananaan ana ane ane ane ane ane ane ane ane ane ane ane ane ane ane ane ane ane ane ane ane ane ane ane ane ane ane ane ane ane ane ane ane ane ane ane ane ane ane ane ane ane ane ane ane ane ane ane ane ane ane an e nn nnnn nnnn nnnn nnnn nnnn nnnn nnnn nnnn nnnn nnnn nnnn nnnn nnnn nnnn nnnn nnnn nnnn nnnn nnnn nnnn nnnn nnnn nnnn nnnn nnnn nnnn nnnn nnnn nnnn nnnn nnnn nnnn nnnn nnnn nnne ne ne ne ne ne ne ne ne ne ne ne ne ne ne ne ne ne ne ne ne ne ne ne ne ne ne ne ne ne ne ne ne ne ne ne ne ne ne ne ne ne ne ne ne ne ne ne ne ne ne ne ne ne ne ne ne ne ne ne ne ne ne ne
yaaanrnu
n (uauuaaun) uauu uauuuu uuuu uuuu uuuu uuuu uuuu
a
1 65
Jet Clean System 7nwnnnn nnaa aannnnn nn nnnn anananaan anan anan anan anan anan anan anan anan anan anan anan anan anan anan anan anan anan anan anan anan anan anan anan anan anan anan anan anan anan anan anan anan anan anan anan anan anan anan anan anan anan anan anan anan anan anan anan
- 1
2 n 1n nnnnnnaaannnnnnae
77
- 3 3
- 1
- 1
- 1
TNN TNN TNN TNN TNN TNN TNN TNN TNN TNN TNN TNN TNN TNN TNN TNN TNN TNN TNN TNN TNN TNN TNN TNN TNN TNN TNN TNN TNN TNN TNN TNN TNN TNN TNN TNN TNN TNN TNN TNN TNN TNN TNN TNN TNN TNN TNN TNN TNN TNN TNN
-
4 n Jet Clean System nn nn nn nn nn nn nn nn nn nn nn nn nn nn nn nn nn nn nn nn nn nn nn nn nn nn nn nn nn nn nn nn nn nn nn nn nn nn nn nn nn nn nn nn nn nn nn nn nn nn nn nn nn nn nn nn nn nn nn nn nn nn nn nn nn nn nn nn nn nn nn nn nn nn nn nn nn nn nn nn nn nn nn nn
Lam sach may cao rau
Dé có hiêu suat cao tói uu, chung tói khuyen ban lam sach may cao rau sau miolân su dung.
- Bièu tuǒng vòi nuóc sē nháp nháy de nhác bàn lam sàch may cāo rǔ.
Luu y: Man hinh cua RQ1062, RQ1060, RQ1052 va RQ1050 co vê ngoài khac nhau nhung chung hièn chi bao giong nhau.
Thay bo phan cao
Lam Sach Hé Thóng Lam Sach Jet
1 Dong thai nhac cac nut tha tren ca hai benc cua Hc Thong Lam Sach Jet (1). Sau do nhac He Thong Lam Sach Jet ra khoi khoang lam sach (2).
m = 311 ;