
CMED2PRO - Media player CONCEPTRONIC - Free user manual and instructions
Find the device manual for free CMED2PRO CONCEPTRONIC in PDF.
| Product type | Media player with 2.5" screen and card reader |
| Dimensions | Approx. 150 x 80 x 25 mm (estimate) |
| Weight | Approx. 200 g (estimate) |
| Power supply | AC adapter 5V DC, 2.0A |
| Main functions | Video playback (AVI, MPG, DAT, VOB), audio (MP3, WMA, WAV), photo (JPG), subtitles .SMI/.SRT/.SSA; composite and component video outputs; PAL/NTSC compatible; card reader MS/SD/MMC/CF/Microdrive; USB mode for PC |
| Maintenance and cleaning | Avoid humidity, do not immerse, unplug if unused for long periods; replace remote control batteries with similar ones |
| Safety | Do not disassemble the adapter; avoid shocks; do not cover the device; use only FAT/FAT32 file systems |
| Spare parts and repairability | Contact your retailer or Conceptronic support (support@conceptronic.net). Remote control batteries replaceable. |
| General information | Brand: Conceptronic; Model: CMED2PRO; Category: Media player |
Frequently Asked Questions - CMED2PRO CONCEPTRONIC
User questions about CMED2PRO CONCEPTRONIC
0 question about this device. Answer the ones you know or ask your own.
Ask a new question about this device
Download the instructions for your Media player in PDF format for free! Find your manual CMED2PRO - CONCEPTRONIC and take your electronic device back in hand. On this page are published all the documents necessary for the use of your device. CMED2PRO by CONCEPTRONIC.
USER MANUAL CMED2PRO CONCEPTRONIC
Memorystick (MS), Secure Digital (SD), Multimedia Card (MMC), Compact Flash (CF), Microdrive (MD).
Congratulations on the purchase of your Conceptronic CMED2PRO.
This User Guide gives you a step-by-step explanation of how to use the Conceptronic 2,5" Media Player with Cardreader.
When problems occur, we advise you to go to our support-site (go to www.conceptronic.net and click 'Support'. Here you will find the Frequently Asked Questions Database.
When you have other questions about your product and you cannot find it at our website, then contact us by e-mail: support@conceptronic.net.
For more information about Conceptronic products, please visit the Conceptronic Web Site: www.conceptronic.net.
1. Introduction
Before operating the unit, please read this manual thoroughly and retain it for future reference.
1.1 Contents of the package
Before connecting the device to your TV or computer/monitor please check if the contents of the package are:
-1x Conceptronic 2,5" Media Player with Cardreader
-1x Remote Control with battery
-1x Power adapter (5V DC, 2.0A)
1x Audio/Video Cable (Composite, Yellow/Red/White RCA Jacks)
-1x Audio/Video (Composite) to SCART Adapter
- 1x Component Video Cable (Red/Blue/Green RCA Jacks)
-1x USB Cable
-1x Carry Bag for CMED2PRO
-1x Multi language User Guide
1.2 Features
- Auto switch between PC and Player Mode:
- When connected to the PC, the device acts as an USB Storage Device.
- When not connected to the PC, the device acts as a Media Player.
In PC mode:
Supports Plug-n-Play.
- Compliant with High Speed USB 2.0/1.1, 480Mb/s maximum data transfer rate.
ENGLISH
In Player mode:
Support for Internal HDD and memory cards.
- Multiple languages support: English, Dutch, Spanish, French, Italian, German, Portuguese (Hungarian and Turkish with Firmware upgrade)
Supports multiple HDD partitions (up to 4 Primary Partitions).
Media files previewing.
Supports text subtitle (.SMI/.SRT/.SSA) for MPEG4 (AVI), D1 resolution.
Supports AVI (MPEG4), MPG (MPEG1, MPEG2), DAT (VCD), VOB (DVD), WAV, WMA, MP3, AC3, JPG (Various Codec's supported).
- Outputs: Composite video/Component video/RCA audio.
Compliant with PAL/NTSC.
- Various repeat modes.
Viewing photos in various ways Slide show (slide photo play back) with background music.
14 transition modes; display interval changeable.
-
Zoom, rotation, move functions.
-
Files can be sorted by name/time/type.
1.3 Cautions
- Do not attempt to disassemble the included power adapter. This may cause high-voltage injuries. If the adapter needs to be fixed, please contact your dealer or the helpdesk of Conceptronic.
- Keep the device away from excessive moisture.
- Do not immerse or expose the device to liquids.
- Disconnect the power adapter if you do not intend to use the device for an extended period of time.
- Avoid using the device in a location near combustibles.
- Change the batteries of the remote control with the same kind when they are weak or dead. Dispose of the old batteries safely. Recycle them where possible. To avoid corrosion, remove the batteries if the remote is not to be used for a long time.
- Keep the remote away from excessive moisture; do not drop it.
- Do not operate the remote under intense sunlight.
-NEVER drop, shake or bump the device. - To prevent overheating, do not cover the device.
- The CMED2PRO only supports the FAT / FAT32 File system (NTFS is not supported).
Note: When you format the Harddisk to NTFS, it only functions as removable Harddisk for your computer. Reformat the Harddisk to FAT32 to activate the Media Player functionality.
- The data on the internal Harddisk and/or the connected device(s) can be fragmented. This affects movies play back. It is recommended that you defragment the Harddisk and/or the connected device(s) on your computer once in a while.
ENGLISH
2. Functionalities of the Media Player
2.1 Identify the parts of the CMED2PRO
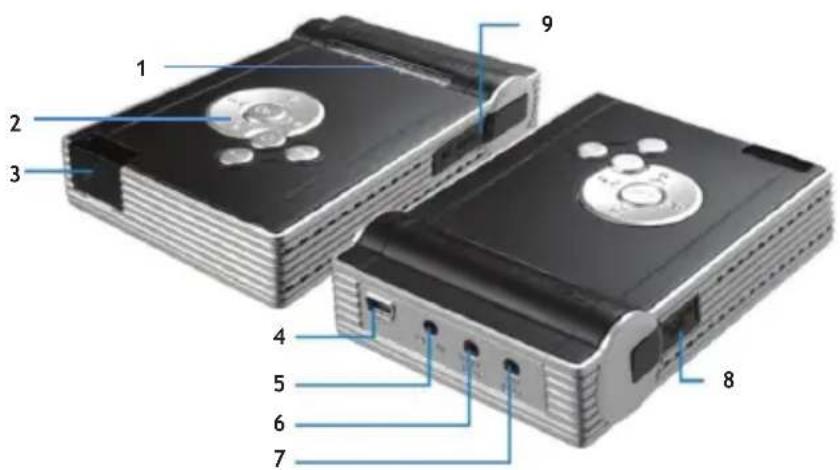
Description of the numbers:
- Status LED's (See Chapter 2.2)
- Control Buttons (See Chapter 2.3)
- Remote Control Receiver
-
USB Jack (To PC)
5.DC Input -
Component (YPbPr) Out
- A/V Out
- MMC/MS/SD Card Slot
- CF Card Slot
ENGLISH
2.2 Status LED's
The CMED2PRO has various status LED's to show the current state of the device.
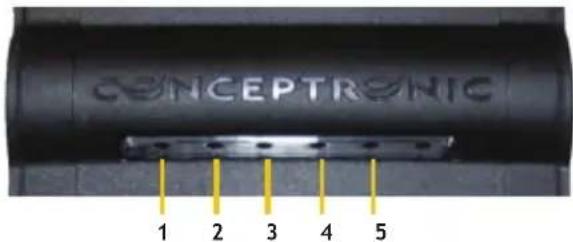
Description of the numbers:
-
Player Mode LED
-
Composite output active LED
-
USB Mode LED 5. YPbPr output active LED
3.HDDLED
2.3 Control Buttons
The CMED2PRO has various control buttons to operate the Media Player without a remote control:
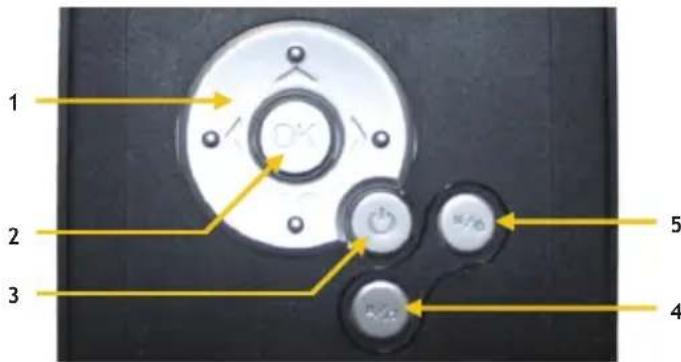
Description of the numbers:
- Navigation Buttons
- Stop / Music Mode Button (Long-Press for Music Mode)
- OK/Enter Button
- Menu /File Mode Button (Long-Press for File Mode)
- Power Button
Note: The Button control functions are the same as the Remote Control Functions. Detailed information about each button of the remote control can be found in chapter 3.
ENGLISH
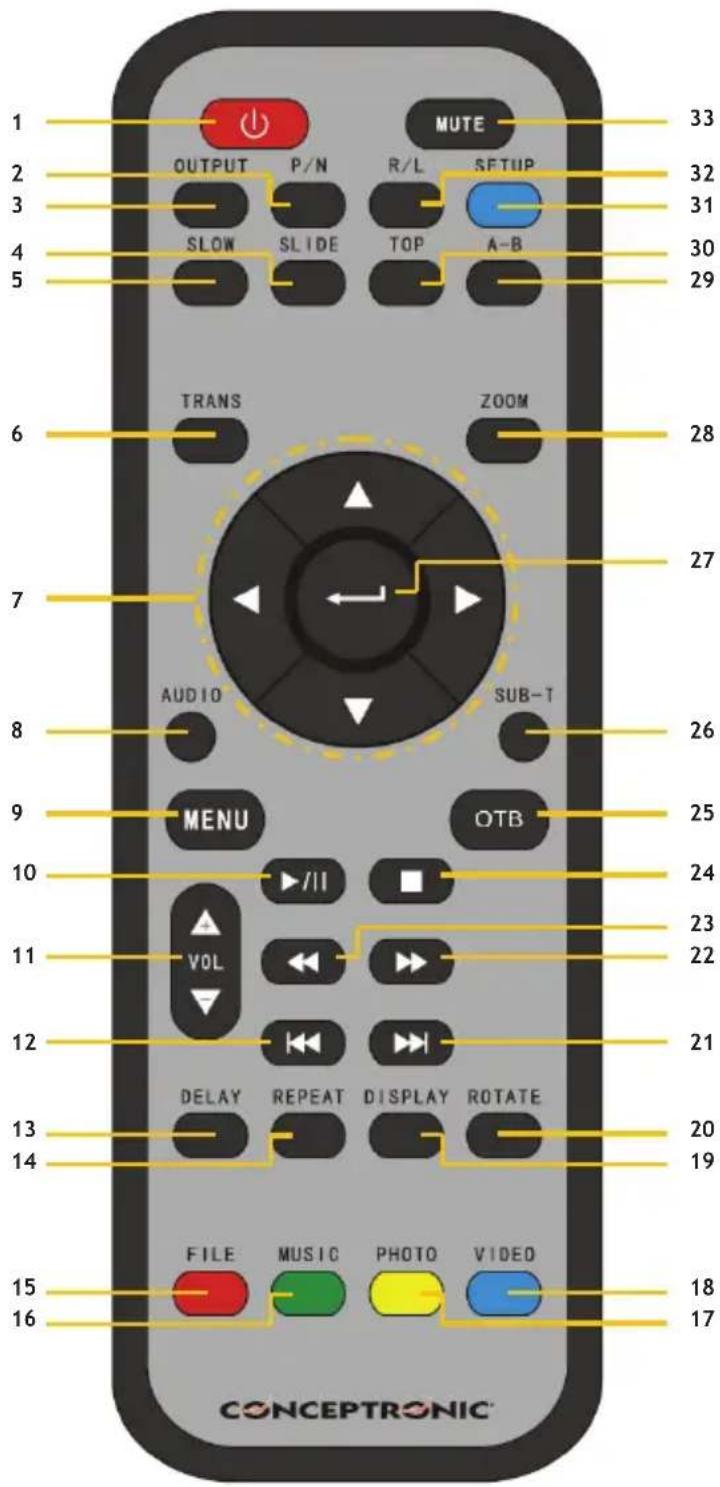
3. Explanation of the Remote Control
ENGLISH
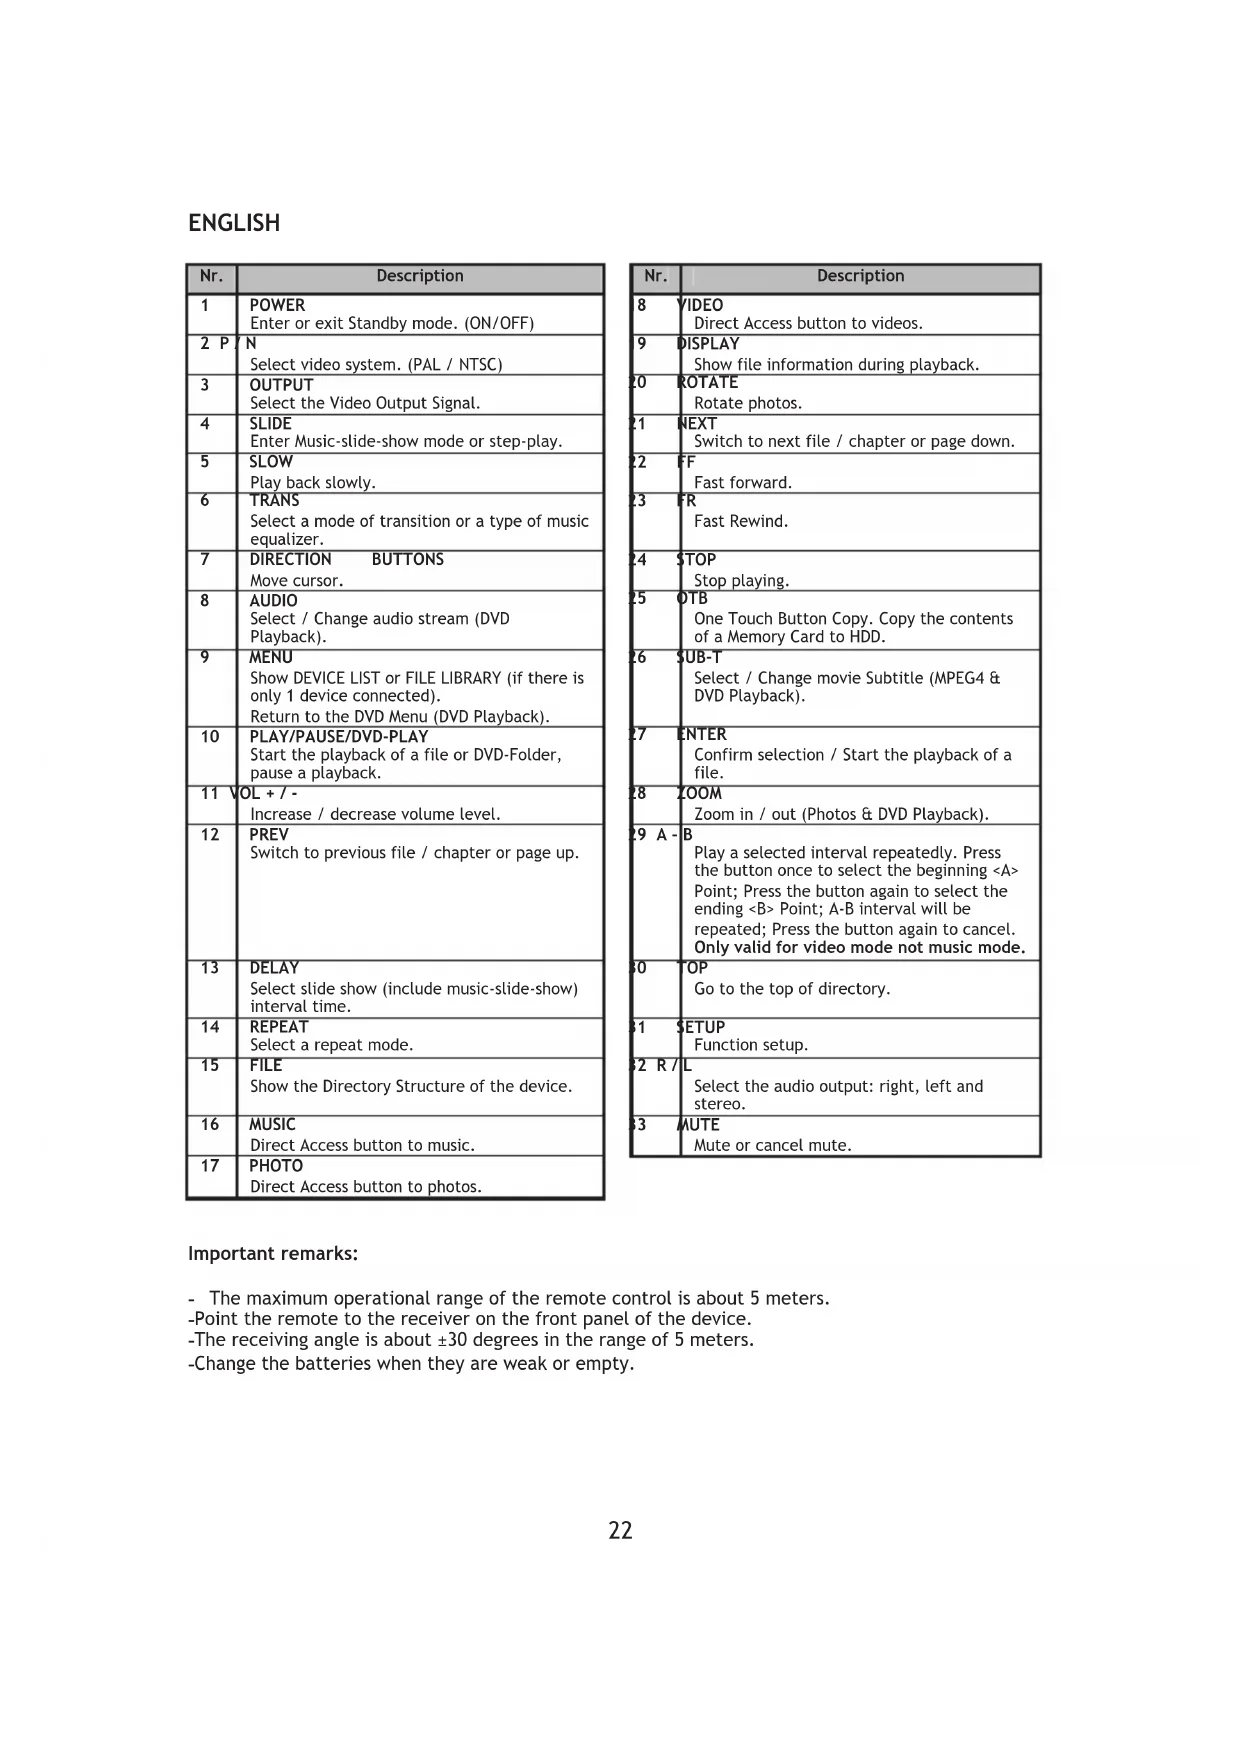
| Nr. | Description |
| 1 | POWER Enter or exit Standby mode. (ON/OFF) |
| 2 P | N Select video system. (PAL / NTSC) |
| 3 | OUTPUT Select the Video Output Signal. |
| 4 | SLIDE Enter Music-slide-show mode or step-play. |
| 5 | SLOW Play back slowly. |
| 6 | TRANS Select a mode of transition or a type of music equalizer. |
| 7 | DIRECTION BUTTONS Move cursor. |
| 8 | AUDIO Select / Change audio stream (DVD Playback). |
| 9 | MENU Show DEVICE LIST or FILE LIBRARY (if there is only 1 device connected). Return to the DVD Menu (DVD Playback). |
| 10 | PLAY/PAUSE/DVD-PLAY Start the playback of a file or DVD-Folder, pause a playback. |
| 11 | VOL + / -Increase / decrease volume level. |
| 12 | PREV Switch to previous file / chapter or page up. |
| 13 | DELAY Select slide show (include music-slide-show) interval time. |
| 14 | REPEAT Select a repeat mode. |
| 15 | FILE Show the Directory Structure of the device. |
| 16 | MUSIC Direct Access button to music. |
| 17 | PHOTO Direct Access button to photos. |
| Nr. | Description |
| 8 | VIDEO Direct Access button to videos. |
| 9 | DISPLAY Show file information during playback. |
| 20 | ROTATE Rotate photos. |
| 21 | NEXT Switch to next file / chapter or page down. |
| 22 | FF Fast forward. |
| 23 | FR Fast Rewind. |
| 24 | STOP Stop playing. |
| 25 | OTB One Touch Button Copy. Copy the contents of a Memory Card to HDD. |
| 26 | SUB-T Select / Change movie Subtitle (MPEG4 & DVD Playback). |
| 27 | ENTER Confirm selection / Start the playback of a file. |
| 28 | ZOOM Zoom in / out (Photos & DVD Playback). |
| 29 A-B | Play a selected interval repeatedly. Press the button once to select the beginning <A> Point; Press the button again to select the ending <B> Point; A-B interval will be repeated; Press the button again to cancel. Only valid for video mode not music mode. |
| 30 | TOP Go to the top of directory. |
| 31 | SETUP Function setup. |
| 32 R/L | Select the audio output: right, left and stereo. |
| 33 | AUTE Mute or cancel mute. |
Important remarks:
- The maximum operational range of the remote control is about 5 meters.
-Point the remote to the receiver on the front panel of the device. - The receiving angle is about ± 30 degrees in the range of 5 meters.
-Change the batteries when they are weak or empty.
ENGLISH
4. How to connect the Media Player
4.1 Connecting to your Computer
A. Turn on your computer.
B. Connect the powersupply to the CMED2PRO and to the power outlet.
C. Connect the USB Cable to the CMED2PRO and your computer.
The computer will automatically detect and configure the device, assign new drive letter(s), and then use it as a mass storage device. (Your drive is pre-formatted in FAT32 file system).
You can now add movies,music,photo's,etc.to the CMED2PRO.
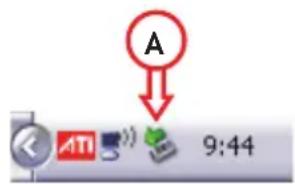
Disconnect the CMED2PRO from your computer
A. Single-click the "Safe Removal" icon on the systemtray.
B. Select "Stop USB Mass Storage Device" when prompted.
C. Wait for the message "Safe to remove Hardware".
D. Disconnect the USB cable.
4.2 Connection to your Television
The Conceptronic CMED2PRO can be used with a television.
You can connect to the TV with the following connections:
-Composite Video
-Component Video
Please check the manual of your TV to select to correct input channel to display the video output of the CMED2PRO.
Use the OUTPUT button on your remote control to change the VIDEO output signal of the CMED2PRO.
For the sound output of the Conceptronic CMED2PRO, you can use the analog RCA Jacks on the Composite A/V cable.
If you use the Component Video cable, you can use the Composite A/V cable for the sound output.
A. Plug the power adapter into a working electrical outlet and connect the other end of the adapter to the Media Player.
B. Connect one of the supplied video cables (Composite, Component) to the Media Player and to your TV.
C. Turn on the Media Player with the Power Button on the top, or the Power Button on the remote control. The Player Mode LED on top of the Media Player will turn blue when the device is turned on.
Note: Make sure there are no Memory Cards in the card slots of the Media Player during boot. This can cause a faulty initialization, which makes the Media Player unusable.
When this happens, turn off the Media Player, remove the Memory Card(s) and turn the Media Player on.
ENGLISH
After initializing, the device will be ready to use.
Notices
- Usually, it is not necessary to change your video system (PAL/NTSC), but if the TV only supports NTSC or PAL, you should use the P/N button to select a color system to match your TV system.
- Press one of the / buttons to move the cursor, and use the / ENTER button to confirm selection (enters media library, enters file folder, or starts playing files).
- Press the / STOP button button to stop playing and go back to FILE LIBRARY.
- Press the MENU button to show the DEVICE LIST or SELECTION MENU.
- Press the / POWER button to enter/exit standby mode.
- We advise you to disconnect the device from power if the device will not be used for a long time.
Selection Menu
If there are no Memory Cards connected to the CMED2PRO (only internal HDD present), the SELECTION MENU will appear on the TV screen when the Media Player is turned on.
If there are Memory Cards connected, the DEVICE LIST will appear on the TV screen instead of the SELECTION MENU. Use the buttons to move the cursor, and pressing the / ENTER button will go to the SELECTION MENU.
Note: It is possible that it will take a while until you can browse through the menu. Before the menu is displayed your connected device(s) will be indexed. On screen you will see: INITIALIZING... This means that all suitable files will be indexed and displayed in your menu.
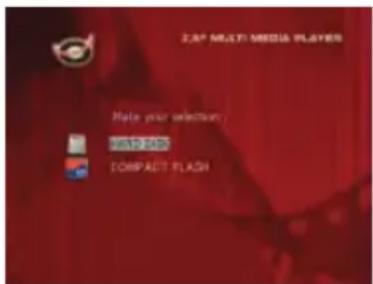
PARTITION LIST
SELECTION MENU
Change Device:
If there are more Memory Cards connected to the CMED2PRO, you can press the MENU button to go back to the DEVICE LIST and select a device by pressing button and the ENTER button.
ENGLISH
5. Playback of Movies, Music and Photos
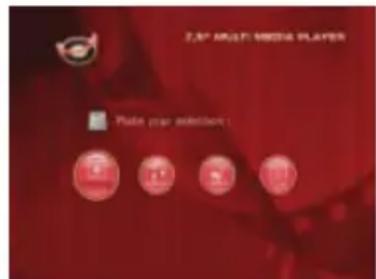
There are 4 options in the SELECTION MENU of the Conceptronic CMED2PRO
- Photo - Play & watch Photos on the CMED2PRO
Music -Play & listen to Music on the CMED2PRO
Video - Play & watch movies on the CMED2PRO
File -Browse and Play all files on the CMED2PRO
5.1 Options how to play & watch photos
Select the "Photo" button in the 'Selection Menu', or press the "Photo" Button on the Remote Control. The Media Player will show thumbnails of all the photo files on the Media Player.
Select a photo in the Photo Menu and press the / ENTER Button for a Slideshowhow.
Rotate Photos
While playing back photos, you can use the ROTATE button to turn around photos.
Change Transition
While playing back photos, you can use the TRANS button to change the transition between photos. Default transition mode can be set via "Setup Menu -> Slideshow Setup -> Transition".
MODE 01: FULL SCREEN
Press the ZOOM button to enter or exit ZOOM mode or change zoom ratio. When a photo is enlarged, you can use the / buttons to move it.
Music-slide-show (viewing photos with background music)
Select a photo and press SLIDE to start.
The photos will be played in a normal Slide Show, with background Music.
The Media Player will load MP3 files for background music from the first folder on the Harddisk which contains MP3 files.
You can stop viewing the photo by press PLAY/PAUSE button once (music is still playing). Press
PLAY/PAUSE again, the music will stop. Press the PLAY/PAUSE button to resume playing.
Note: If you prefer a list of background music, it is advised to create a folder on the Harddisk with a name starting with a "1" or "a" (for example: "1 - BGM Files") which contains your music, so this folder will be the first folder on the Harddisk.
Note: In this mode, ROTATE/ZOOM are not accessible.
Change Interval Time
You can set the interval display time between two photos by pressing the DELAY button. Default interval time is set via "Setup Menu -> Slideshow Setup -> Interval Time".
Repeat Photos
Press the REPEAT button to play back photos repeatedly.
ENGLISH
Single Folder/File Playback
When you press the "Photo" Button in the 'Selection Menu' or on the Remote Control, the Media Player will index all photos on the Media Player.
If you want to view a single folder with photos on the media player, press the "File" button in the 'Selection Menu' or on the Remote Control.
In the File Browser menu, you can open the folder with the photos you want to see. Select a photo and press the / ENTER Button to start the slideshow.
5.2 Options how to play & listen to the music
Playing Music
The Conceptronic CMED2PRO has various modes in which you can play music (WAV, MP3 and WMA is supported)
Select the "Music" button in the 'Selection Menu', or press the "Music" Button on the Remote Control. The Media Player will show a list of all the music files on the Media Player.
Select a music file and press the / ENTER Button to start the playback.
To Play Music files:
Press Menu and select the correct folder to play music files from. The song is displayed and you can select an equalizer setting (by pressing the TRANs button of your remote control)
If you want to repeat a song you can select:
Folder Repeat : All - Repeat the selected folder until you stop
Repeat : One: - Repeat the selected song until you stop
Shuffle: - Play the selected folder in shuffled order
Folder repeat :Off - Repeat Mode disabled
When playing back Music files, press button to adjust the play speed and press the PLAY/PAUSE button to return to normal speed.
Single Folder/File Playback
When you press the "Music" Button in the 'Selection Menu' or on the Remote Control, the Media Player will index all music files on the Media Player.
If you want to play a single folder with music on the media player, press the "File" button in the 'Selection Menu' or on the Remote Control.
In the File Browser menu, you can open the folder with the music files you want to play. Select a music file and press the / ENTER Button to start the playback.
ENGLISH
5.3 Options how to play & watch a movie
Playing movies
The CMED2PRO is supporting various video formats: MPEG2/1, MPEG 4 including (XVID, VOB format) including support for playing MP3, AC3, AAC and MPG1/2 audio tracks within video).
Select the "Video" button in the 'Selection Menu', or press the "Video" Button on the Remote Control. The Media Player will show thumbnails of all the video files on the Media Player.
Select a video file in the Video Menu and press the / ENTER Button to start the playback.
Repeat interval
To play a selected video interval repeatedly, press A/B.
Sound Channels
Press the R/L button on the remote control to play Mono Left, Mono Right or Stereo Sound.
Changing Audio Track
Some MPEG2/VOB files contains two or more audio streams in it, press AUDIO button to cycle through 1-1/8~1-8/8, 2-1/8~2-8/8, 3-1/8~3-8/8 (total 24 audio streams). If a video has no sound when playing, press AUDIO button to locate the proper audio stream.
If you switch MPEG2/VOB file, you can loose the audio if it is on another stream. To prevent this, press the SETUP button during playback to "Lock" the current audio stream. This option will keep the selected audio stream for all files.
Video Step Play
When playing back videos, press the SLIDE button to perform video step-play.
In this mode the Photos will be played continuously. When playing back videos, the button to play forward fast/ reverse fast, and press ENTER/ button to return to normal speed.
Single Folder/File Playback
When you press the "Video" Button in the 'Selection Menu' or on the Remote Control, the Media Player will index all video files on the Media Player.
If you want to play a DVD from your Harddisk, or use the extra video options of the Media Player, press the "File" button in the 'Selection Menu' or on the Remote Control.
In the File Browser menu, you can open the folder with the video files you want to play. Select a video file and press the / ENTER Button to start the playback.
Extra options for playing video (Only available through the 'File' Menu)
Support for playing MPEG4 video with text subtitles
The Conceptronic CMED2PRO can support .SMI, .SRT, .SUB or .SSA subtitle files.
If the subtitle file has the same name as the selected video file (only extension is different) the subtitle file will be loaded automatically when the MPEG4 file is played.
When the subtitle file has a different name than you need to select the subtitle file, press the SUB-T button on the remote control and then select the MOVIE file to be played. (The two files are associated). Press the / ENTER button to play the movie.
Note: Most Video Codec's are supported on the CMED2PRO (Like XviD, AVI, MPEG2, etc.) but it is possible that you have files that require a Codec, which is not included with the CMED2PRO. If you try to playback a file with a not supported Codec, you will see the message "CODEC NOT SUPPORTED".
ENGLISH
DVD Playback
The CMED2PRO plays DVD's from the hard disk as if they are a normal DVD. You can navigate through the DVD Menu, choose subtitles, change audio languages, etc.
Folder Setup
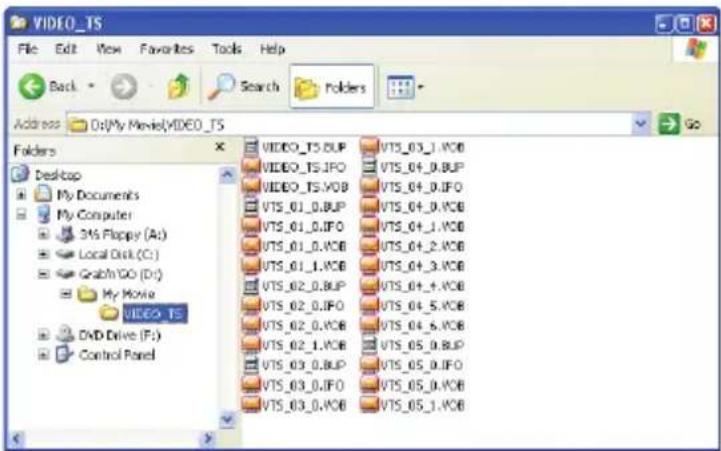
To play DVD's from your Harddisk, you need to setup the DVD folders on the CMED2PRO correctly.
Create a folder on the CMED2PRO Harddisk with the name of the DVD (i.e. "My Movie")
Copy the Video_TS Folder from your DVD to the created DVD folder on the CMED2PRO Harddisk. After copy is finished, it should look like below:
Disconnect the CMED2PRO from your computer and connect it to your TV. Turn on the CMED2PRO.
Play the DVD
Select the "File" button in the 'Selection Menu', or press the "File" Button on the Remote Control. The Media Player will open the File Browser Menu.
Use the navigation keys on the remote control to select the folder of your DVD in the menu (In the example: My Movie).
Press the PLAY/PAUSE button on the remote control to start the playback of the DVD.
Note: Don't use the / ENTER button in the CMED2PRO Menu. This will only show the files/sub folders and does not start DVD Playback.
Use the navigation buttons and the ENTER button to navigate in the DVD Menu. Use the / STOP button to end DVD Playback.
ENGLISH
5.4 Browse and Play all files
Select the "File" button in the 'Selection Menu', or press the "File" Button on the Remote Control. The Media Player will open the File Browser Menu.
In the File Browser Menu, you have the following options:
- Use button to select a file or folder; / (PREV/NEXT) button to page up/page down. If a photo or a video is selected, its preview and information will be shown on the right hand side of the TV screen. If a music file is selected, music will start playing while showing its information on the right of the screen.
- You can press TOP button to move cursor straight to the top of file list and change to another folder easily.
- Press the / ENTER button to enter full screen mode (if playing music files, MUSIC EQUALIZER screen will appear). Press the / STOP button to escape full screen mode.
- Press REPEAT button to select a repeat mode: Folder Repeat All / Repeat One / Shuffle / Folder Repeat Off.
- In STOP state, press the OTB button to copy the contents of the inserted Memory Card to the Harddisk of the CMED2PRO.
- You can copy files from 1 location to the other location, or delete files from the Media Player. In the File Browser list, highlight the file you want to copy/delete and press the button. The popup menu will allow you to Copy or Delete the highlighted file.
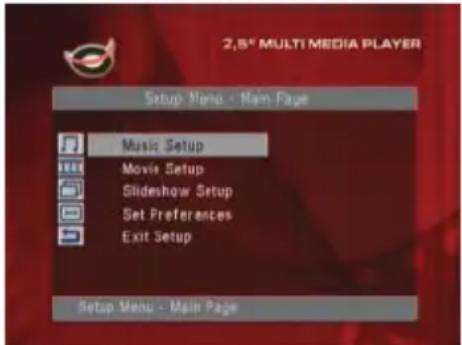
6. Setup Menu
In stop state, press SETUP button to enter the Setup Menu.
Press / button to move cursor, and press the / ENTER button to confirm your selection.
Setup Menu
Music Setup : Open Music Setup page
Movie Setup : Open Movie Setup page
Slideshow Setup : Open Slideshow Setup page
Set Preferences : Open Preferences Setup page
Exit Setup : Exit the Setup menu.
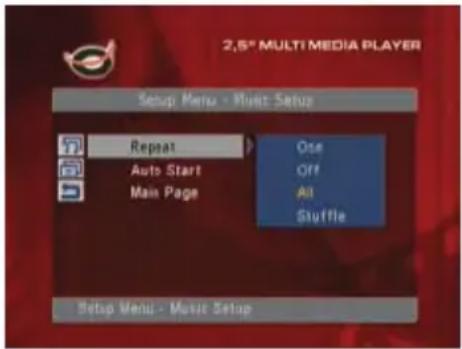
Music Setup page
Repeat : Set Repeat mode. One / Off / All / Shuffle
Auto Start : Auto start playback when a music file is highlighted in the menu.
Main Page : Return to the Setup Menu
ENGLISH
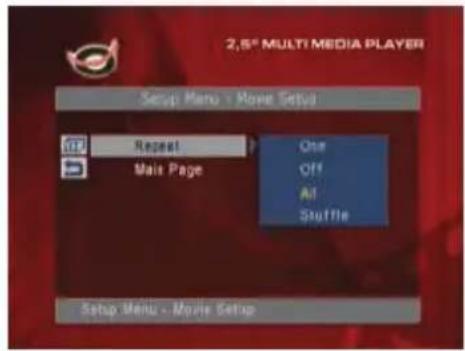
Movie Setup page
Repeat : Set Repeat mode.
One/Off/All/Shuffle
Main Page: Return to the Setup Menu
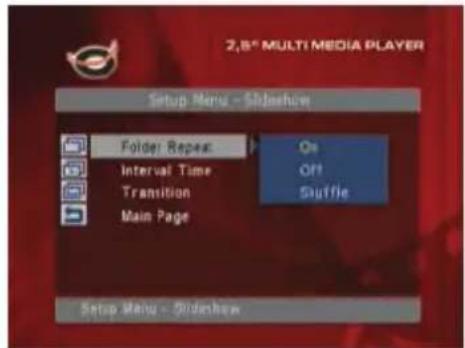
Slideshow Setup page
Folder Repeat : Repeat the contents of a folder. On / Off / Shuffle
Interval Time : Set the interval time of the slideshow.
Transition : Set a standard transition for the slideshow.
Main Page : Return to the Setup Menu
Preferences Setup page
TV Display : Set your TV Display size.
Tv Type : Set your TV Type: PAL / NTSC.
Video Output : Select the correct video output for the connected TV / Monitor.
OSD Language : Set the OSD Language of the Media Player.
Configuration : Reset the Configuration to the factory default settings.
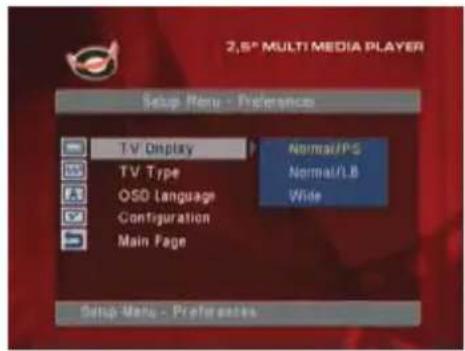
Main Page : Return to the Setup Menu
7. Tips & Troubleshooting
Use the tips below for troubleshooting when your CMED2PRO is not working properly:
The Power LED doesn't light up
- The power supply is not connected to the CMED2PRO. Reconnect the power supply to the CMED2PRO.
There is no activity on the display.
- The CMED2PRO is in standby state. Press the button on the remote control to activate it.
- The Wrong input source on your TV is selected. Change the input source.
- The Wrong video system selected. Press the OUTPUT button on your remote control to switch video system.
- The Video cable is not connected properly. Check if the Video Cable is connected correctly.
ENGLISH
There is no sound
- The Audio cable is not connected properly. Make sure the cable is connected correctly to your TV or amplifier.
- The CMED2PRO is connected with an amplifier, but the amplifier is turned off. Turn on the amplifier.
- The audio stream of the MPEG2 or VOB file is invalid. Press the AUDIO button on the remote control to adjust to the proper audio stream.
- The Mute function is on. Press the MUTE button on the remote control again to cancel mute.
- The CMED2PRO is functioning in FF/FR mode. Press the PLAY/PAUSE button on the remote control to return to normal playback.
The display is distorted
- The CMED2PRO is functioning in FF/FR mode. Press the PLAY/PAUSE button on the remote control to return to normal playback.
- A PAL movie is played at NTSC mode or vice versa. Press the P/N button on the remote to change the display settings.
When pressing the SLIDE button, the system freezes.
- There are too many photos or music in the current folder. It will take a long time to start Music-Slide-Show. Please wait for playback.
The Remote control doesn't work
- Point the remote control to the CMED2PRO receiver in about ± 30 degrees and directly.
- Use the remote control in the range of 5 meters.
The remote control battery should be replaced.
The subtitles of the played movie are not displayed
- An AVI file is played, but the subtitle file contains a different filename. See chapter 5.3 how to display the subtitles.
When trying to play video, the message "CODEC NOT SUPPORTED" is displayed.
The movie file is created with a not-supported codec for the CMED2PRO. Refer to the website, www.conceptronic.net for a list of supported codecs for the CMED2PRO.
The CMED2PRO does not display all HDD partitions / content.
- The partition on the HDD is not primary. Re-partition the HDD again and make sure all partitions are set to primary.
- The partition is not FAT32 formatted. Re-format the partition with FAT32 Filesystem.
- There are no mediafiles on the selected partition.
Which Memory Cards are supported by the CMED2PRO?
The CMED2PRO reads all major Memory Card families, like: Memorystick (MS), Secure Digital (SD), Multimedia Card (MMC), Compact Flash (CF), Microdrive (MD). Refer to the website, www.conceptronic.net for a list of supported Memory Cards for the CMED2PRO.
The DVD playback does not start when the Play/Pause button is pressed.
- Make sure you use the correct folder structure. The folder structure is described in chapter 5.3.
- The DVD Files are incomplete, corrupt or damaged. When this happens, the CMED2PRO does not start DVD playback.
During the intro-movies of the DVD, the screen goes blank.
- The current chapter ends with a blank screen or is too short to playback. Press / NEXT to switch to the next chapter.
My TV shows a black/white picture instead of colour.
- Your TV cannot handle the "Multi" TV-System of the CMED2PRO. Use the Setup menu to change the TV System to PAL. (See chapter 6). After changing the TV System, turn off and on the CMED2PRO.
ESPANOL
CMED2PRO de Conceptronic
Guía del usuario
DECLARATION OF CE CONFORMITY
El fabricante 2L International BV
Herman Looijen, Director de marketing
MODE 02: DALL'ALTO IN BASSO
MODO 09: DA SINISTA/DESTRA AL CENTRO
MODE03: DAL BASSO IN ALTO
MODO 10: DAL CENTRO A SINISTRA/DESTRA
MODO 04:DALL'ALTO/BASSO AL CENTRO
MODO 11: IMPLOSIONE
MODO 05: DAL CENTRO IN ALTO/BASSO
MODO 12: BLIND: DA SINISTRA A DESTRA
MODO 06: BLIND: DALL'ALTO IN BASSO
MODO 13: DISSOLVENZA INCROCIATA
MODO 07: DA SINISTRA A DESTRA MODO 14: CASUALE
Zoom Foto
Subject to change without prior notice.
Declaration of CE Conformity
Declaration of CE Conformity
The manufacturer 2L International BV
Address
Databankweg
3821
7
Amersfoort,
the
Netherlands
Hereby declares that the product
Type 3,5" MEDIA PLAYER + DISPLAY
Product CMED2PRO
Brandname Conceptronic
Complies with following directives:
2004/108/EEC EMC directive:
Electromagnetic Compatibility
73/23/EEC
Low Voltage Directive:
Electrical equipment designed for use within certain voltage limits
The following standards were consulted to assess conformity:
EN55022/9.98 Class B
EN55024/9.98
EN50081-1/1994
EN61000-3-2/3/4/1995
EN50082-1/1994
EN 60950/1995
The symbol confirms that this product conforms to the above named standards and regulations.

Place and date of issue: Amersfoort, July 27, 2007

Herman Looijen, Product Marketing Manager