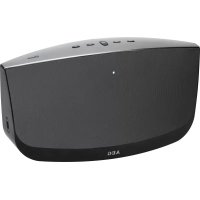
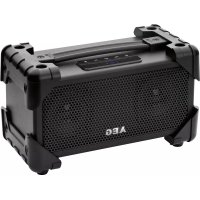
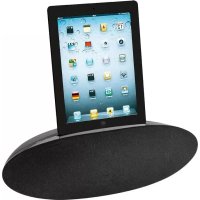
BSS 4807 - Docking station AEG - Free user manual and instructions
Find the device manual for free BSS 4807 AEG in PDF.

| Product type | Docking station |
| Brand | AEG |
| Model | BSS 4807 |
| Net weight | 0.408 kg |
| Power supply | DC 5 V, 100-120 mA |
| Built-in battery | Lithium-ion 3.7 V, 750 mAh |
| Battery life | Approximately 8 hours |
| Charging time | Approximately 4 hours |
| Wireless connectivity | Bluetooth V2.0 + EDR, range 15 m |
| Wired connectivity | USB port (type A), SD/MMC port, 3.5 mm audio input, mini USB for charging |
| FM radio | Yes, with automatic search and presets |
| Music player | Audio formats via USB and SD/MMC |
| Speaker | Built-in |
| Volume control | Buttons + and - (13) |
| Indicators | Charge indicator (1), mode indicator (15) |
| Included parts | USB charging cable (Type A to Mini-B), 3.5 mm stereo audio cable |
| Maintenance | Clean with a slightly damp cloth, without cleaning product |
| Safety | Do not expose to water or moisture, do not open, do not repair yourself |
| Reset | Reset button (2) to restore factory settings |
| Time setting | Yes, via menu |
| Compatible devices | Bluetooth A2DP devices, USB drives, SD/MMC cards |
| Auto standby | Screen dimming after 10 seconds |
| Certification | Compliant with EC directives |
Frequently Asked Questions - BSS 4807 AEG
User questions about BSS 4807 AEG
0 question about this device. Answer the ones you know or ask your own.
Ask a new question about this device
Download the instructions for your Docking station in PDF format for free! Find your manual BSS 4807 - AEG and take your electronic device back in hand. On this page are published all the documents necessary for the use of your device. BSS 4807 by AEG.
USER MANUAL BSS 4807 AEG
1Technical Data Page 71
2Disposal Page 71
27
Français
Sommaire
Listedes differentes
telémentsdecommande.. Page 3
Mode d'emploi Page
Cordless via Bluetooth
Slot memory card SD/MMC (6)
Thank you for choosing our product. We hope you will enjoy using the appliance.
Symbols in these Instructions for Use
Important information for your safety is specially marked. It is essential to comply with these instructions in order to avoid accidents and prevent damage to the machine:

WARNING:
This warns you of dangers to your health and indicates possible injury risks.

CAUTION:
This refers to possible hazards to the machine or other objects.

NOTE: This highlights tips and information.
Safety instructions
Read the operating instructions carefully before putting the appliance into operation and keep the instructions including the warranty, the receipt and, if possible, the box with the internal packing. If you give this device to other people, please also pass on the operatir instructions.
- The appliance is designed exclusively for private use and or the envisaged purpose. This appliance is not fit for commercial use.
- Do not use the device with wet hands.
- To minimize the risk of fire or electrical shock, subject the device neither to rain nor to humidity. Do not operate the device in the direct proximity of water (e.g. bathroom swimming pool.).
- Keep the device away from heat, direct sunlight and sharp edges.
- Keep the device away from naked flames.
- Do not subject the battery to a hard impact or pressure.
- Do not insert any metal objects into the device. Risk of short circuit!
- Do not use the device in an extremely humid or muggy environment.
- To avoid a static charge, do not utilize the device in an extremely dry climate.
- The device needs to be examined regularly for signs of damage or material fatigue. If damage is noticed, the device may no longer be used.
- Do not repair the unit yourself but contact an authorised specialist.
62 English
Children and Frail Individuals
In order to ensure your children's safety, please keep all packaging (plastic bags, boxes, polystyrene etc.) out of their reach.
WARNING!
Caution! Do not allow small children to play with the foil as there is a danger of suffocation!
Special safety instructions for this system
WARNING:
Avoid damage to your ears by turning the volume up too high.
CAUTION:
- Do not touch the loudspeaker membranes with your hands or with other objects as this will damage them.
- Do not overload the unit.
Overview of the operating elements
1 Indicator lamp (CHARGE)
2 Restore factory defaults (Reset)
3 Mini USB charger socket (DC 5 V)
4 3.5 mm socket (LINE IN)
5 USB PLAYER socket
6 SD/MMC PLAYER slot
7 Previous radio station/10 channel skip (10 + / CH - )
8 Next radio station/100 channel skip (100 + / CH+)
9 Next track/search forward(/SEEK+)
10 Previous track/search backwards (/SEEK-)
11 Play/Pause
12 Function selector(M)
13 Increase volume/Reduce volume (+ / - )
14 On/off switch (POWER/
15 Operating mode indicator lamp
Supplied parts (not shown)
1 Charger cable (Type A USB to Mini-B USB)
1 Audio cable (2x 3.5 mm stereo cinch connector)
Before First Use
- Charge the battery before first use. See details in chapter "Charge Integrated Battery".
Charge Integrated Battery
The player is powered by the integrated rechargeable lithium battery. Charge the batter as follows:
- Insert the Mini USB plug from the charger cable into the socket (3) of the unit. Connect the USB plug to a powered-on computer. The indicator lamp (1) will light up and the battery will be charged.
- When the battery has been fully charged, the indicator lamp will go out.
- Remove the charger cable from the speaker and PC. Do this when the computer is not switched on, since otherwise the device's battery will empty again.

CAUTION:
Never leave the unit unattended when it is charging.
NOTE:
The battery is only charged while the PC is switched on.
- Do not connect the player for a long period of time to a laptop computer disconnected from mains power. Otherwise the laptop computer's battery may be discharged.
The charging time varies according to battery use.
- Should you not use the device for longer than half a year, charge the battery at least every 6 to 12 months.
Location
Select a suitable location for the unit. A dry, even, non-slip surface on which you can easily operate the unit is suitable.
64 English General Operation
Switch device on/off
With the POWER button (14) you can switch the unit between standby and operating mode. When operational, the indicator lamp lights up in the POWER/ button.
Automatic dimming of the display
After approx. 10 seconds, the display's illumination switches off automatically. Press a button in order to switch the display on again for 10 seconds.
NOTE: The operating buttons only work when the display is illuminated.
Volume
By pressing the + / - button (13) you can adjust the desired volume.
Sound Settings
If necessary, change the EQ setting in your playback unit to create the best sound.
Muting (only in the FM/AUX/BT mode)
Press the button (11), in order to switch the sound off. The indicator of the current mode flashes on the display. Press again to cancel the function.
Function selection button (12)
Press the "M" button again in order to change between the various operating modes.
Resetting
Any faults that arise whilst operating the device can be eliminated by pressing the reset button.
- Always switch the device off and if it is connected, disconnect it from the computer before resetting it.
- With the help of a wire (or similar), press the reset button (2) in order to reset the electronic circuitry. In doing so, any settings you have made will be lost.
Setting the time
-
Press the "M" button (12) repeatedly until the " " symbol is shown in the display.
-
Press the button (11). The hours will start to flash.
- Set the hours using the /SEEK+ /SEEK- buttons (9/10).
- Press the button again. The minutes will start to flash.
- Set the minutes using the /SEEK+ /SEEK- button.
- Press the button once more in order to save the time.
i NOTE:
If the battery is completely empty, the time must be reset.
Radio mode
- Press the "M" button (12) repeatedly until "FM" is shown on the display.
- Automatically search for radio stations:
Keep the 10 + / CH- button (7) or the 100 + / CH+ button (8) pressed for approx. 2 seconds. The unit scans the complete frequency band for stations. The radio station found are stored in ascending order of frequency. The sequence cannot be altered later.
i NOTE:
Any preset radio stations will be overwritten.
To look for a radio station manually and preset it:
a) Select the channel location where you want to preset the station. You can select a channel location by briefly pressing the 10 + / CH- button (7) or the 100 + / CH+ button (8).
b) Briefly press the /SEEK/ /SEEK- button (9/10), until you have found the radio station which you are looking for. If you keep the button pressed, the device will keep searching up to the next and/or previous radio station.
c) Keep the button (11) pressed until the channel location is shown. The radio station is now preset.
- The aerial is built into the device. If the reception is too weak and the station that has been tuned into has interference, try changing the position of the device in order to improve the reception.
Select the preset radio station
Briefly press the 10 + / CH- and/or the 100 + / CH+ button (7/8) in order to select the preset radio station.
66 English Playing back music files
Using the device, you have four options to playback your own music files: with a mains cable, wireless via Bluetooth, via the USB port or the memory card slot.
By cable
- Connect the 3.5mm stereo RCA cable to an external audio source. If required, use a suitable adapter (not included).
- Insert the other end of the cable into the LINE IN jack (4) on the unit.
- Repeatedly press the "M" button (12) until "AUX" is shown on the display.
- Start the playback of your audio source. Listen to the sound playback via the speaker. You can adjust the volume using the +/- buttons (13).
- For the further procedure, please refer to the user manual of the external audio source.
i NOTE: If possible, adjust the volume of the external unit to a comfortable level.
Cordless via Bluetooth
Bluetooth involves a technology for wireless radio connection of devices over a short distance. Devices with Bluetooth standard are transmitting between 2,402 and 2,480 GHz in the ISM band (Industrial, Scientific and Medical). Interference can be caused for example by WLAN-networks, DAB radios, cordless phones, or microwave ovens which work on the same frequency band.
This device offers you the possibility to use a Bluetooth-enabled device. The functional radius is limited to approx. 15 metres depending on the surroundings and the unit used.
If your playing device supports the A2DP profile (Advanced Audio Distribution Profile) and has a music-player function, then you can also wirelessly transfer music to the device. The A2DP profile involves a multi-vendor Bluetooth profile. By streaming, stereo-audio signals are wirelessly transferred between the playing device (source) and the receiving device.
Due to the different device manufacturers, models, and software versions, a full functionality cannot be guaranteed.
- Logging on devices (Pairing)
Before you listen to music via the unit, you must pair the devices.
-
Ensure, that the Bluetooth function is activated in your player (e.g. mobile phone). For this, refer to the operation manual of your player.
-
Press the "M" button (12) repeatedly, until "BT" is shown on the display.

NOTE:
If you have connected an audio cable to the LINE IN socket (4), the device cannot be switched to BT mode.
- Chose the Bluetooth menu in your player and register the device in your player. For this, refer to the operation manual of your player. The device "BSS 4807" will show in your player as a selection.

NOTE:
Only one playback unit can be connected to the speaker. If the speaker is already connected to another playback unit, the speaker will not appear in the BT selection menu.
- Now enter the password "0000" in your player, depending on the device manufacturers, model, and software version.
If you have logged on successfully, a beep will sound.
For the further procedure, please refer to the user manual of the playback unit. If possible adjust the volume of the external unit to a comfortable level.

DTE:
Depending on the device manufacturer, you need to perform the registration (PAIRING) again to connect the devices
- The Bluetooth compatibility cannot be ensured for devices (e.g. mobile phones) getting released in the future.
- To ensure an optimal connection, make sure that the battery of your player is completely charged.
- Some of the mobile phone brands have an energy-saving mode. Deactivate the energy-saving mode as it can otherwise result in problems during the data transfer through Bluetooth.
- To be able to transfer audio data, Bluetooth needs to stay activated in your player. Observe the operation manual of your player.
- If a mobile phone on which you are playing music receives a call, the music will be interrupted. The sound however is not played back via the speaker. After you have ended the call, the devices are connected to each other again and playback continues. The volume increases slowly.
AVRCPs (Audio Video Remote Control Profile) are not supported by this device! As such, it is not possible to operate your player with the buttons of the loudspeaker.
68 English
USB port (5)
This device has been developed in line with the latest technical advances in the USB field. The wide range of different USB storage devices of all types which are currently on the market, unfortunately do not allow us to guarantee full compatibility with all USB storage devices. For this reason, in rare cases there may be problems in playing back files from USB storage devices. This is not a malfunction of the device.
- Connect a USB storage device directly into the USB port.
- If playback does not start automatically: Press the "M" button (12) repeatedly until "USB" is shown on the display.
- After a few seconds, the "READ" message appears. Playback then begins. The current title will then be shown briefly on the display. Following this, the time will briefly appear before the backlighting of the display switches off.
For operation, please refer to the section "Description of the USB/SD controls".
i NOTE:
- Always directly connect a USB storage medium to the USB port to prevent any malfunctions.
The USB port is not designed for charging external devices.
CAUTION:
Before removing the USB storage device, switch the device to another mode using the "M" button (12).
SD/MMC memory card slot (6)
This device has been developed according to the latest technical advances in the field of memory cards. Unfortunately, due to the large number of different memory cards on the market, the device cannot guarantee full compatibility with all memory cards. For this reason, in a few cases, there may be problems in playing back music from certain memory cards. This is not due to a fault associated with the device itself.
- Slide a SD or MMC memory card into the card slot with the contact facing downwards
- If playback does not start automatically: Press the "M" button (12) repeatedly until "SI" is shown on the display.
- After a few seconds, the "READ" message appears. Playback then begins. The current title will then be shown briefly on the display. Following this, the time will briefly appear before the backlighting of the display switches off.
For operation, please refer to the section "Description of the USB/SD controls".

CAUTION:
Before removing the storage device, switch the device to another mode using the "M" button (12).
Description of the USB/SD operating buttons

NOTE: Automatic dimming of the display
The operating buttons only work when the display is illuminated.
▶Pause (11)
- Briefly press the button to pause playback.
- Press the button again to continue playback.
Select Music (7/8/9/10)
- Press the 10 + / CH- button in order to skip forward by ten tracks. If there are fewer tracks on the storage device, the device skips to the first track.
- Press the 100 + / CH+ button in order to skip forward by a hundred tracks. If there are fewer tracks on the storage device, the device jumps to the first track.
- Press the I/SEEK+ button in order to select the next track.
- Press the /SEEK- button in order to select the last track.
Maintenance and Cleaning

CAUTION: Never immerse the unit in water!
There are no parts inside the device which can be maintained by the user.
- Clean the speaker with a slightly damp cloth without cleaning agent.
70 English Troubleshooting
| Symptoms Possible cause Solution | ||
| Cannot switch the speaker on | Battery empty Charge the battery (→Page 63 | |
| No audio signal during Bluetooth connection | Speaker is switched off Switch the speaker on. | |
| Speaker is not paired to the audio source. | Check whether the connection exists. If necessary, pair the speaker to the audio source again. | |
| Volume too low Increase the volume on the speaker | ||
| Increase the volume on the audio source. | ||
| Cannot connect speaker | Pairing does not work Check, whether the audio source supports the A2DP protocol. | |
| Audio source is turned off | Turn the audio source on | |
| Bluetooth is turned off on the audio source. | Turn the Bluetooth function on in the audio source. | |
| Bluetooth version is not supported. | Use another playback unit. | |
| Cannot connect to BT mode. | Audio cable is connected. | The Bluetooth connection is automatically separated when a cable is connected to the 3.5 mm plug. Remove the cable |
Technical Specifications
Model: BSS 4807
Audio connection: 3.5 mm stereo jack plug
Net weight: approx. 0.408 kg
Power supply: DC 5 V/100-120 mA
Battery: 3.7 V 750 mAh lithium-lons
Charging time: approx. 4 hours.
Operating time: approx. 8 hours.
Bluetooth
Bluetooth support: V2.0 + EDR
Range: approx. 15 meters
Transmitting frequency: 2.4 GHz
Protocols: A2DP
The right to make technical and design modifications in the course of continuous product development remains reserved.
This device complies with the relevant CE Directives and is designed in accordance with the latest safety regulations
Disposal
Battery disposal

The device has a rechargeable battery. Used batteries and accumulators do not belong in the household waste.
The batteries / accumulators must be removed before the product goes into the waste disposal. For this, consult qualified specialized personnel.
Environmental protection
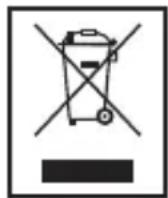
Do not dispose of the device at the end of its service life with normal household waste. Bring it to the official collection point for recycling. By doing this, you help protect the environment.
CTC Clatronic Sp. z o.o