SA1125 - Waffle Maker TRISTAR - Free user manual and instructions
Find the device manual for free SA1125 TRISTAR in PDF.
| Product type | Waffle maker |
| Brand | TriStar |
| Model | SA1125 |
| Power supply | 220-240 V ~ 50 Hz |
| Plate material | Non-stick coating |
| Indicator light | Yes (red) – indicates heating up |
| Cooking time | 6 to 8 minutes depending on batter |
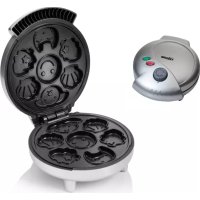
| Capacity | 2 waffles (or brownies) |
| Control type | Manual (no buttons) |
| Safety | Do not immerse; short cord; built-in thermal protection |
| Cleaning | Damp cloth; do not use abrasives; do not wash in dishwasher |
| Use | Household use only |
| Warranty | 24 months (Europe) |
| Included accessories | User manual with recipe |
| Weight | Approximately 1.5 kg |
| Dimensions (L x W x H) | Approximately 25 x 20 x 10 cm |
Frequently Asked Questions - SA1125 TRISTAR
User questions about SA1125 TRISTAR
0 question about this device. Answer the ones you know or ask your own.
Ask a new question about this device
Download the instructions for your Waffle Maker in PDF format for free! Find your manual SA1125 - TRISTAR and take your electronic device back in hand. On this page are published all the documents necessary for the use of your device. SA1125 by TRISTAR.
USER MANUAL SA1125 TRISTAR
Congratulations and thank you for purchasing this high quality product. Please read the instruction manual carefully so that you will be able to make the best possible use of the appliance. This manual includes all the necessary instructions and advice for using, cleaning and maintaining the appliance. If you follow these instructions you will be guaranteed of an excellent result, it saves you time and will avoid problems. We hope you will have a great deal of pleasure from using this appliance.
SaFeTy INSTRucTIONS
- Please read the instruction manual carefully before using the device. Please keep these instructions, the guarantee certificate, the sales receipt and, if possible, the carton with the inner packaging.
- This appliance is not intended to be used by persons (including children) with reduced physical, sensory or mental capabilities, or lack of experience and knowledge, unless they have been given supervision or instructions concerning the use of the appliance by a person that is responsible for their safety.
- By ignoring the safety instructions the manufacturer can not be hold responsible for the damage.
- To protect children against the dangers of electrical appliances, please make sure that you never leave the appliance unattended. Therefore you have to select a storage place for the appliance where children are not able to grab it. Make sure that the cable is not hanging in a downward position.
- This appliance is only to be used for household purposes and only for the purpose it is made for.
- The appliance must be placed on a stable, level surface.
- Do not touch hot surfaces. Use handles or knobs.
-
Never use the device unsupervised.
-
All repairs should be made by a competent qualified repair service(*)
- Make sure that the appliance is stored in a dry environment.
- It is absolutely necessary to keep this appliance clean at all times, because it comes into direct contact with food.
- Check if the voltage of the appliance corresponds to the main voltage of your home. Rated voltage: AC220-240V 50Hz. The socket must be at least 16A or 10 A slow-protected.
- This appliance complies with all standards regarding electromagnetic fields (EMF). If handled properly and according to the instructions in this user manual, the appliance is safe to use based on scientific evidence available today.
- Never move the appliance by pulling the cord and make sure the cord can not become entangled.
- Do not use this appliance outdoors.
- Do not wind the cord around the appliance and do not bend it.
- Allow the appliance to cool down before you clean or store it.
- To protect yourself against an electric shock, do not immerse the cord, plug or appliance in the water or any other liquid.
- Unplug the appliance from the socket when changing the spare parts or for maintenance.
- Do not use this appliance with a damaged cord or plug or when the appliance has malfunctions, or has been damaged in any manner. To avoid a hazard make sure that a damaged cord or plug will be replaced by an authorized technician ^(*) . Do not repair this appliance yourself.
- Do not use this appliance near direct heat sources.
- Unplug the appliance from the socket when you are not using it.
- Note: To avoid danger by accidental resetting the thermal protection, this appliance may not be powered through an external switching device, such as a timer, or connected to a circuit that regularly will be switched on or off.
- Make sure that the cord is not hanging over the edge of the table or counter, does not touch any hot surfaces or is coming directly into
contact with the hot parts of the appliance. Do not place the appliance underneath or close to curtains, window coverings etc.
- Make sure the cord does not touch the hot parts of the appliance.
- We advise to place a heat resistant coating between your table and the appliance (this way you don't get burns on your table or table cloth).
- Do not use this appliance in the bathroom or near a sink filled with water. If this appliance has fallen into the water do not under no circumstances directly grab this appliance, but first pull the plug from the socket.
- Competent qualified repair service: after sales department of the producer or importer or any person who is qualified, approved and competent to perform this kind of repairs in order to avoid all danger. In any case you should return the appliance to this repair service.
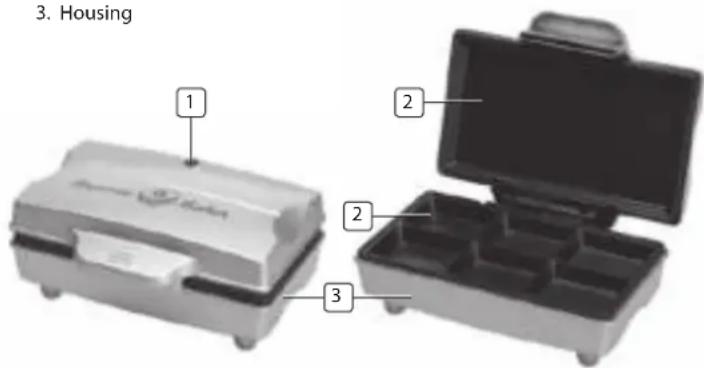
PaRTs DeScRlPION
- Indication light red
- Baking molds
- Housing
BeFORE The FIRST uSe
- Remove all packaging of the device.
- Check if the voltage of the appliance corresponds to the main voltage of your home. Rated voltage: AC220-240V 50Hz.
- Always place the device on a flat stable surface and allow at least 10cm free space around the unit. This device is not suitable for integration or outdoor use.
- The device may spread some smell and smoke at first use, this is normal.
uSe
- Pour a small ladle of batter into the centre of each baking mold. Filling must be done quickly, to ensure the brownies will brown equally.
- Close the lid of the appliance and press it firmly.
- The red indication light will switch on and off during the baking process, indicating that the correct temperature is being maintained.
- Depending upon the batter and the selected degree of browning, the baking time will vary between 6-8 minutes.
- Immediately after the baking process is completed, remove the brownies from the appliance. Use a fork or similar object. Place the brownies onto a wire grid to cool down.
- When using an inappropriate batter, for example with too many nuts or other types of fruit, the non-stick coating might get damaged. To prevent this, please use the recipe later in this manual. This recipe is well-tried and will not damage the coating.
- In case your brownie maker fails to deliver the desired results, there could be several reasons for it. You will find a number of useful tips in the paragraph 'Hints'.
HINTS
- The brownie mixture should be fairly thick, but fluid enough to drop off a spoon.
- When ready, do not pile the brownies on top of one another, as they will soften. Place them on a wire grid to cool down and, if desired, sprinkle them with icing sugar.
- If the brownies are spotty, perhaps the used ingredients had a different temperature. To ensure a consistent color and result, take all ingredients out of the refrigerator an hour before.
- If the mixture is too thin, try adding a few fine bread crumbs.
- Brownies are at their best when eaten warm. If you want to store them, use a mixture with a higher fat content and allow them to cool down before storing in an air-tight tin. Always store the brownies in the deep freezer.
- In case the brownies are not according to your wishes, please check if the device is properly used and whether the used mixture is suitable.
RECIPE
Basic recipe brownies
16 to 20 pieces
Ingredients
150 g dark or bitter chocolate
- 150 g butter
125 g sugar
125 g caster sugar (light brown)
- 1 tablespoon vanilla sugar
150g self raising flour
1/2 teaspoon salt
4 eggs (medium size)
Preparation
- Break the chocolate into pieces. Melt the chocolate and the butter in a small saucepan on low heat. Stir regularly.
- Remove the pan from the heat when the chocolate is completely melted.
- Add the sugar, the brown sugar and the vanilla sugar to the chocolate mixture.
- Add the flour and salt to the chocolate mixture.
- While stirring, add the 4 eggs to the mixture. Mix well.
- Pour a small ladle of batter into the centre of each baking mold. Filling the molds must be done quickly to ensure the brownies will brown equally.
- Close the appliance and press firmly for a short while.
- Depending upon the batter and the degree of browning selected, the baking time will vary between 6-8 minutes.
Tip: Add 50 grams of chopped pecans or walnuts and spread also over the top half pecans or walnuts.
CLEANING AND MAINTENANCE
- Remove the plug from the wall outlet and allow the device to cool with both halves opened.
- Clean the baking plates with a damp cloth or soft brush.
- Clean the exterior with a damp cloth. Never use harsh and abrasive cleaners, scouring pad or steel wool, which damages the device.
- Never immerse the device in water or any other liquid. The device is not dishwasher proof.
GuaRaNTee
- Tristar is not liable for damages occurred through: o In case the appliance has fallen.
o In case the appliance has been technically changed by the owner or another third party.
o In case of improper use of the appliance.
o In case of normal wear of the appliance. - By executing repairs the original warranty period of 2 years will not be extended, nor the right to a complied new warranty. This warranty is only legal on European soil. This warranty does not overrule the European directive 1944/44CE.
- Always keep your receipt, without this receipt you can not claim any form of warranty whatsoever.
- Damage caused by not following the instruction manual will lead to a void of warranty, if this results in consequential damages Tristar will not be liable.
- Tristar will not be liable for material damage or personal injury caused by improper use or if the safety instructions are not properly executed.
- Cleaning, as mentioned in this manual, is the only necessary maintenance for this appliance.
- When the appliance should be repaired, make sure that this will be performed by an authorized company.
- This appliance may not be amended or changed.
- If problems arise during the 2 years from the date of purchase, which are covered by the factory warranty, you can go back to the point of purchase to replace it for a new one.
- For questions or compliances please contact your retailer "point of purchase."
-
This appliance is covered with a 24 month guarantee starting on the date of purchase (receipt).
-
Only material or manufacturing defects are included in this warranty.
- If you wish to make a claim please return the entire machine in the original packaging to your dealer together with the receipt.
- Damage to accessories does not mean automatic free replacement of the whole appliance. In such cases please contact our hotline. Broken glass or breakage of plastic parts are always subject to a charge.
- Defects to consumables or parts subject to wearing, as well as cleaning, maintenance or the replacement of these parts are not covered by the guarantee and hence are to be paid!
- The guarantee lapses in case of unauthorized tampering.
- After the expiry of the guarantee repairs can be carried by the competent dealer or repair service against the payment of the ensuing costs.
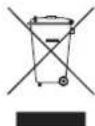
GUIDELINES FOR PROTECTION OF THE ENVIRONMENT
This appliance should not be put into the domestic garbage at the end of its durability, but must be offered at a central
point for the recycling of electric and electronic domestic appliances. This symbol on the appliance, instruction manual and packaging puts your attention to this important issue. The materials used in this appliance can be recycled. By recycling used domestic appliances you contribute an important push to the protection of our environment. Ask your local authorities for information regarding the point of recollection.
Packaging
The packaging is 100% recyclable, return the packaging separated.
Product
This device is equipped with a mark according to the European Directive 2002/96/EC on Waste Electrical and Electronic Equipment (WEEE). By ensuring that this product will be correctly processed into waste, it will help prevent possible negative consequences for the environment and human health.
EC declaration of conformity
This appliance is designed to come into contact with food and is designed in accordance with EC Directive89/109/EEC. This device is designed, manufactured and marketed in accordance with the safety objectives of the Low Voltage Directive "No 2006/95/EC", the protection requirements of the EMC Directive 2004/108/EC "Electromagnetic Compatibility" and the requirement of Directive 93/68/EEC.
Geachte klant,
ONDeRDeleNBeSchRIJVING
DeScRIcA O DaS PeCaS
5015 BH Tilburg, The Netherlands
www.tristar.eu
SA-1125