
Z68AGD65G3 - Motherboard MSI - Free user manual and instructions
Find the device manual for free Z68AGD65G3 MSI in PDF.
| Product Type | Motherboard |
| Brand | MSI |
| Model | Z68AGD65G3 |
| Chipset | Intel Z68 |
| CPU Socket | LGA1155 |
| Memory Type | DDR3 |
| Number of Memory Slots | 4 x DDR3 DIMM |
| Multi-GPU Support | AMD CrossFireX and NVIDIA SLI |
| Form Factor | ATX |
| Dimensions | 30.5 cm x 24.4 cm |
| Weight | About 1.2 kg |
| Power Requirement | ATX 24-pin + 8-pin CPU |
| SATA Connectors | 6 x SATA 3 Gb/s (Intel), 2 x SATA 6 Gb/s (Marvell) |
| USB 2.0 | 14 ports (6 rear, 8 via headers) |
| USB 3.0 | 2 rear ports |
| Network | Gigabit Ethernet Realtek 8111E |
| Audio | Realtek ALC892, 7.1 channels |
| Supported RAID | RAID 0, 1, 5, 10 via Intel Rapid Storage Technology |
| Compatible Operating System | Windows 7, Windows Vista, Windows XP |
| Special Features | Intel Rapid Storage Technology, OC Genie II, Control Center |
| Cleaning and Maintenance | Dust removal with compressed air, avoid liquids |
| Safety | Electrostatic discharge, turn off before servicing |
| Repairability | Spare parts available (CMOS battery, etc.) |
Frequently Asked Questions - Z68AGD65G3 MSI
User questions about Z68AGD65G3 MSI
0 question about this device. Answer the ones you know or ask your own.
Ask a new question about this device
Download the instructions for your Motherboard in PDF format for free! Find your manual Z68AGD65G3 - MSI and take your electronic device back in hand. On this page are published all the documents necessary for the use of your device. Z68AGD65G3 by MSI.
USER MANUAL Z68AGD65G3 MSI
This appendix will assist users in configuring and enabling RAID functionality and accelerating system on platforms.
The mainboard comes with the Intel RAID controller that allows you to configure SATA hard drives as RAID sets.
SATA hard drives deliver blistering transfer speeds up to 6 Gb/s. Serial ATA uses long, thin cables, making it easier to connect your drive and improving the airflow inside your PC. The most outstanding features are:
- Supports 3 Gb/s or 6 Gb/s transfers with CRC error checking.
- Supports Hotplug-n-play feature.
- Data handling optimizations including tagged command queuing, elevator seek and packet chain command.
Intel® RAID controller offers RAID level 0 (Striping), RAID level 1 (Mirroring and Duplexing), RAID level 5 (Block Interleaved Distributed Parity), RAID level 10 (A Stripe of Mirrors), Intel® Rapid Storage Technology.
RAID 0 breaks the data into blocks which are written to separate hard drives. Spreading the hard drive I/O load across independent channels greatly improves I/O performance.
RAID 1 provides data redundancy by mirroring data between the hard drives and provides enhanced read performance.
RAID 5 Provides data striping at the byte level and also stripe error correction information. This results in excellent performance and good fault tolerance. Level 5 is one of the most popular implementations of RAID.
RAID 10 Not one of the original RAID levels, multiple RAID 1 mirrors are created, and a RAID 0 stripe is created over these.
Intel® Rapid Storage Technology is the advanced ability for two RAID volumes to share the combined space of two hard drives being used in unison.
Intel® Rapid Storage Technology utilizes RAID 1 functionality to copy data from a designated Master drive to a designated Recovery drive. The size of the Master drive must be less than or equal to the size of the Recovery drive. When a Recovery volume is created, complete capacity of the Master drive will be used as the Master volume. Only one Recovery Volume can exist on a system. There are 2 methods of updating the data on the Master to the Recovery drive. They are Continuous Update Policy and On Request Update Policy.
Important
The least number of hard drives for RAID 0, RAID 1, Recovery or Matrix mode is 2. The least number of hard drives for RAID 10 mode is 4. And the least number of hard drives for RAID 5 mode is 3.
All the information/ volumes/ pictures listed in your system might differ from the illustrations in this appendix.
Using Intel Rapid Storage Technology Option ROM
The Intel Rapid Storage Technology Option ROM should be integrated with the system BIOS on all mainboards with a supported Intel chipset. The Intel Rapid StorageRapid Storage Technology Option ROM is the Intel RAID implementation and provides BIOS and DOS disk services. Please use <Ctrl> + <I> keys to enter the "Intel RAID for Serial ATA" status screen, which should appear early in system boot-up, during the POST (Power-On Self Test). Also, you need to enable the RAID function in BIOS to create, delete and reset RAID volumes.
Creating, Deleting and Resetting RAID Volumes:
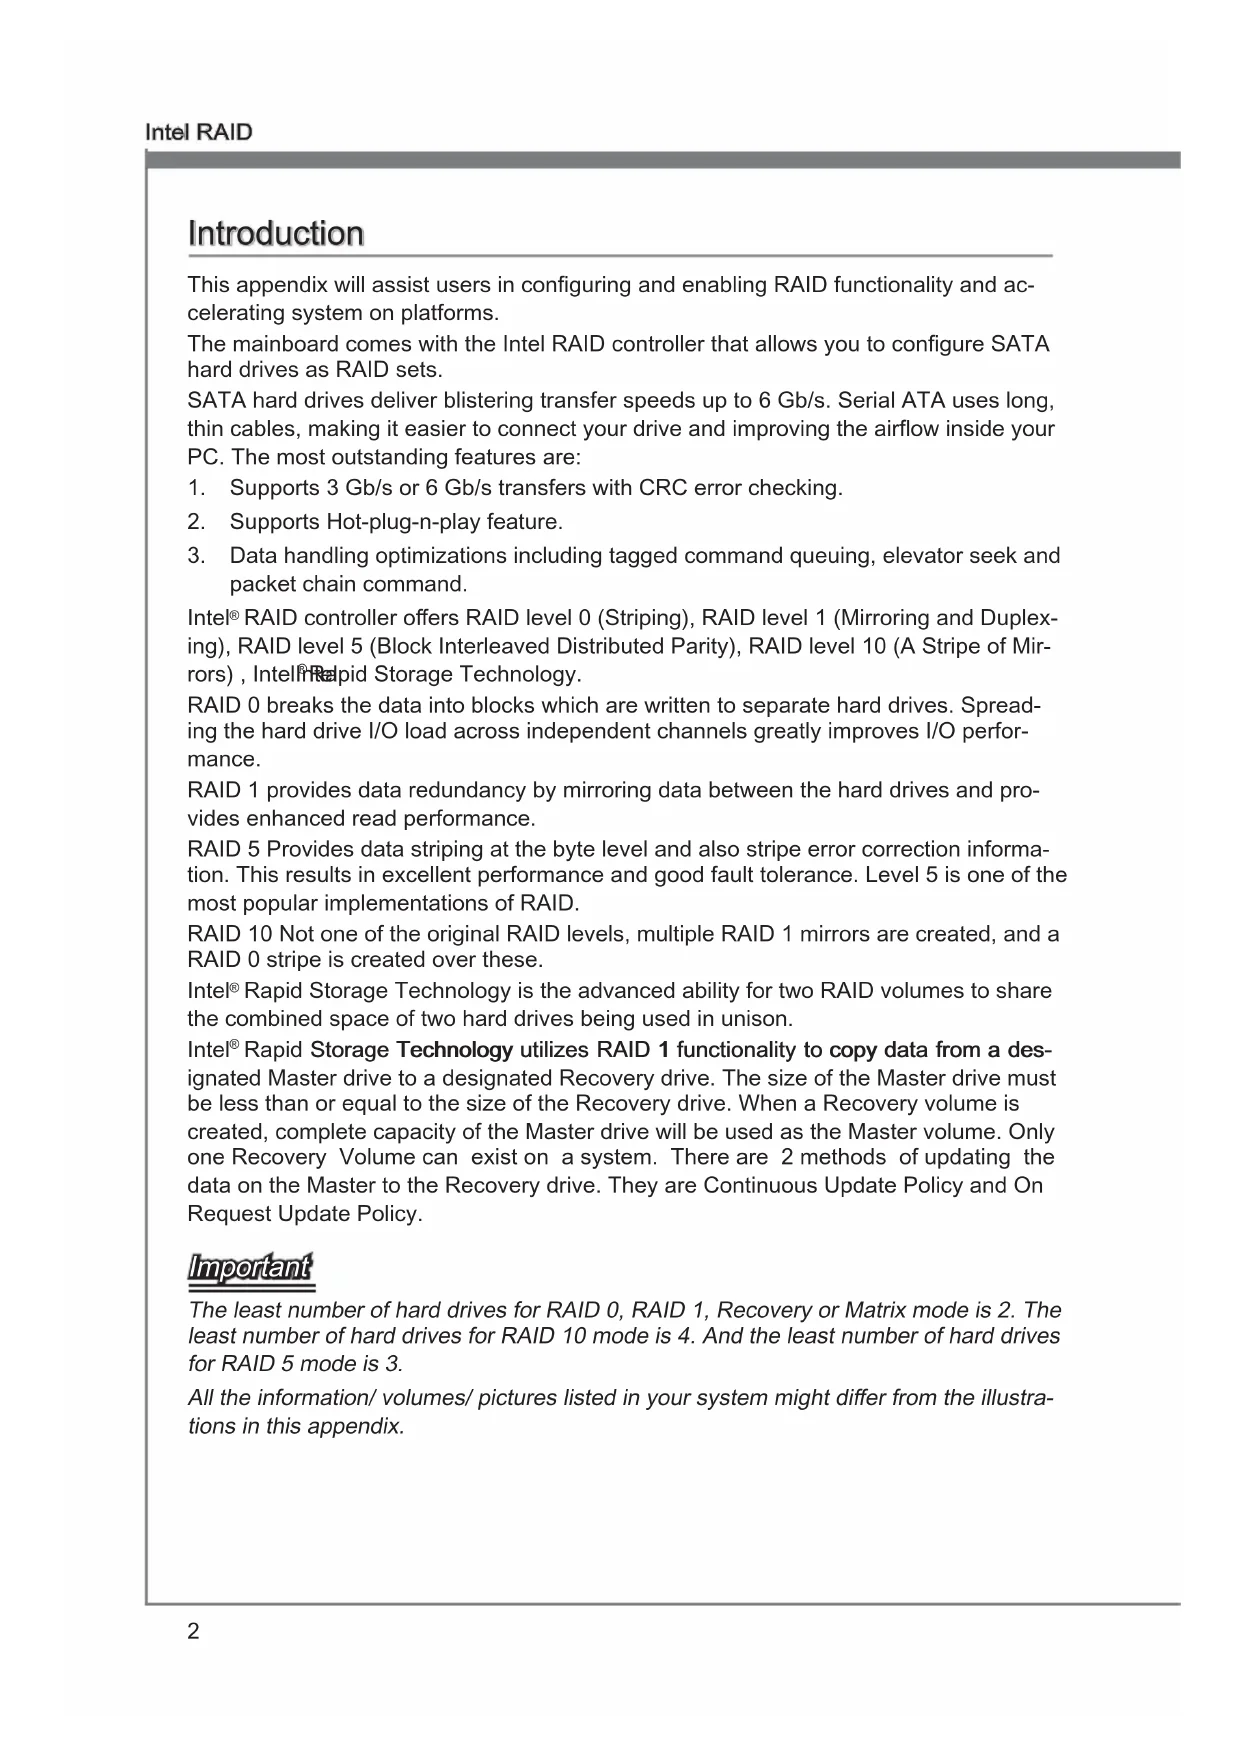
The Serial ATA RAID volume may be configured using the RAID Configuration utility stored within the Intel RAID Option ROM. During the Power-On Self Test (POST), the following message will appear for a few seconds.
Important
The "Device Model", "Serial #" and "Size" in the following example might be different from your system.
After the above message shows, press
Important
The following procedure is only available with a newly-built system or if you are reinstalling your OS. It should not be used to migrate an existing system to RAID.
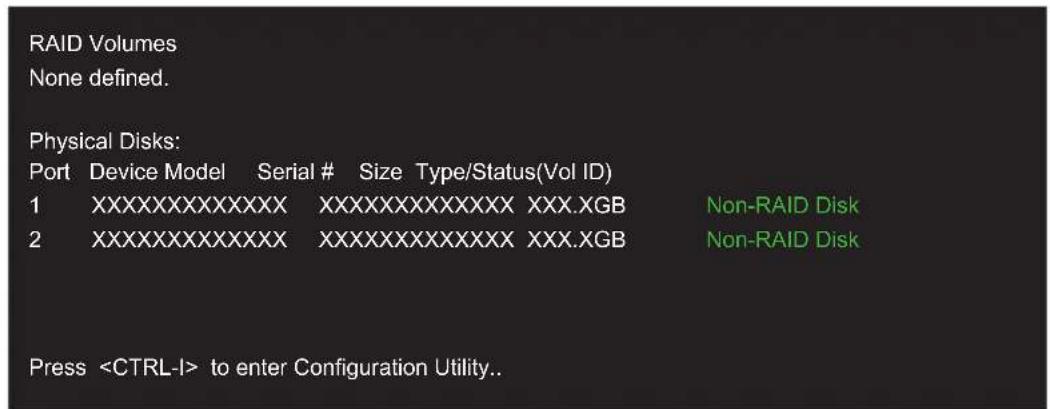
After pressing the <Ctrl> and <I> keys simultaneously, the following window will appear:
Create RAID Volume
- Select option 1 "Create RAID Volume" and press
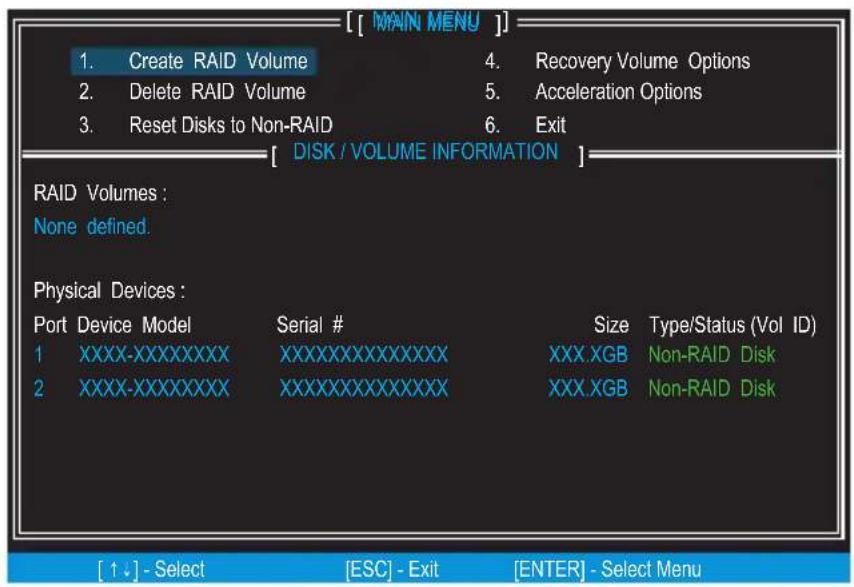
key. The following screen appears. Then in the Name field, specify a RAID Volume name and then press the or key to go to the next field. - Use the arrow keys to select the RAID level best suited to your usage model in RAID Level.
- In the Disk field, press
key and use key to select the disks you want to create for the RAID volume, then click key to finish selection. This field will become available according to the selected RAID level. - Then select the strip size for the RAID array by using the "upper arrow" or "down arrow" keys to scroll through the available values, and pressing the
key to select and advance to the next field. The available values range from 4KB to 128 KB in power of 2 increments. The strip size should be chosen based on the planned drive usage. Here are some typical values: RAID0 -128KB / RAID10 - 64KB / RAID5 - 64KB. This field will become available according to the selected RAID level. - Then select the capacity of the volume in the Capacity field. The default value is the maximum volume capacity of the selected disks.
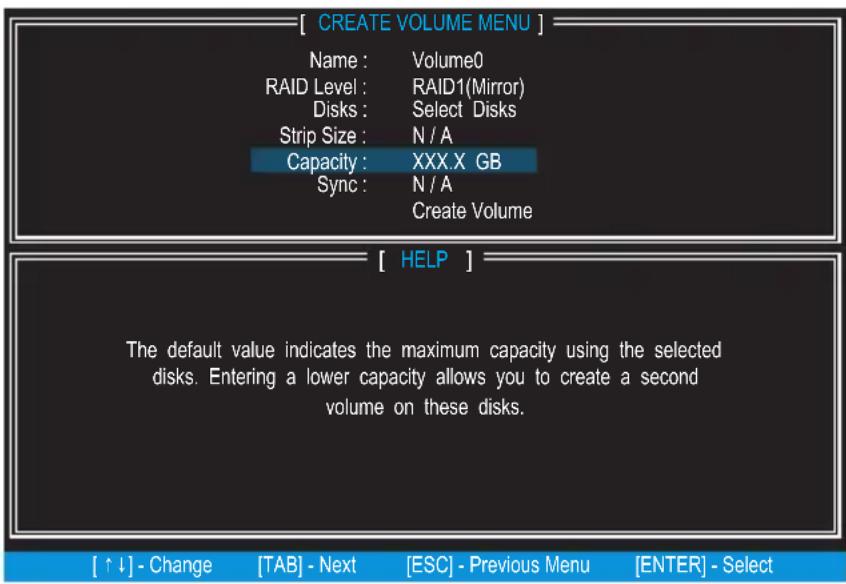
Important
Since you want to create two volumes, this default size (maximum) needs to be reduced. Type in a new size for the first volume. As an example: if you want the first volume to span the first half of the two disks, re-type the size to be half of what is shown by default. The second volume, when created, will automatically span the remainder of two hard drives.
- Go to the Create Volume field and press
, the following screen appears for you to confirm if you are sure to create the RAID volume. Press to continue.
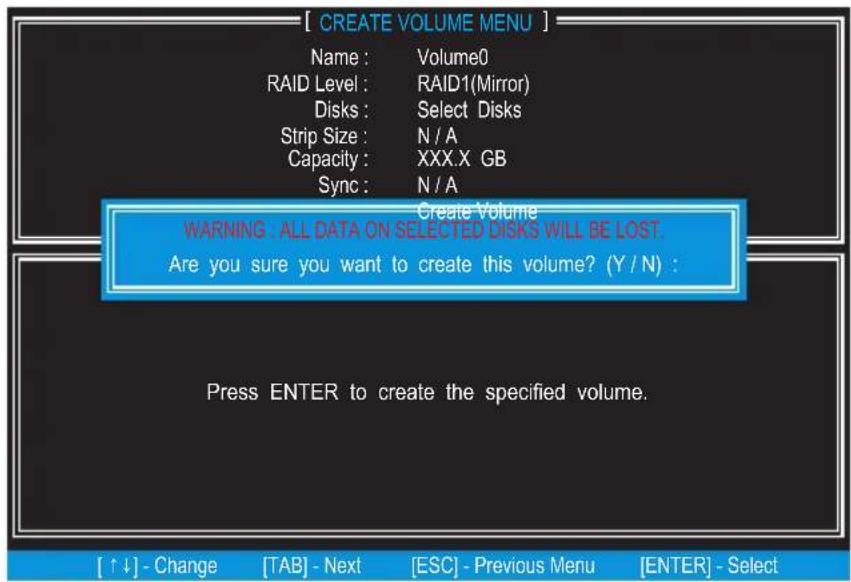
Then the following screen appears to indicate that the creation is finished.7.
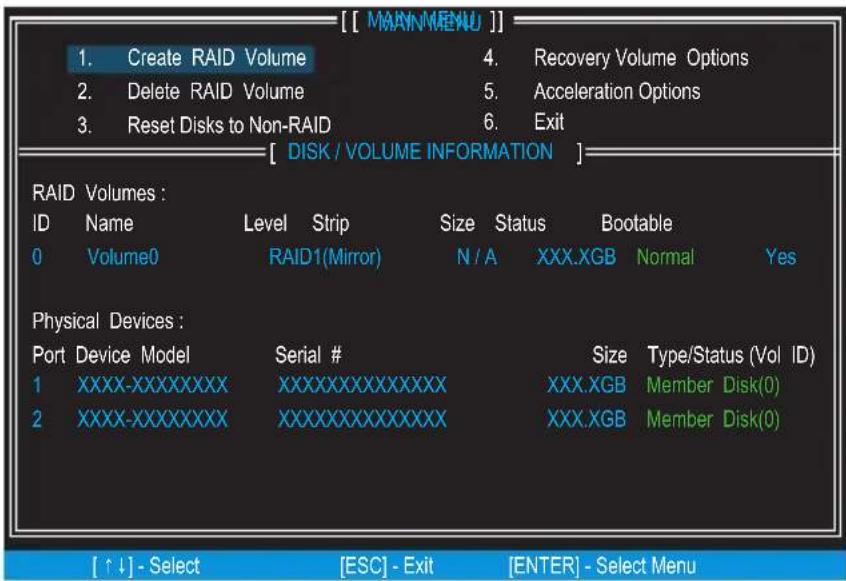
Delete RAID Volume
Here you can delete the RAID volume, but please be noted that all data on RAID drives will be lost.
Important
If your system currently boots to RAID and you delete the RAID volume in the Intel RAID Option ROM, your system will become un-bootable.
Select option 2 Delete RAID Volume from the main menu screen and press
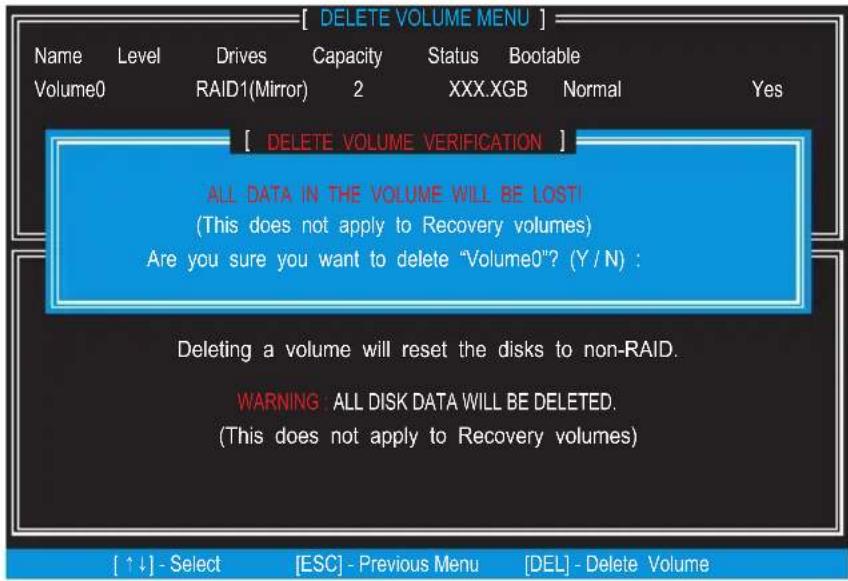
Press < Y> key to accept the volume deletion.
Reset Disks to Non-RAID
Select option 3 Reset Disks to Non-RAID and press
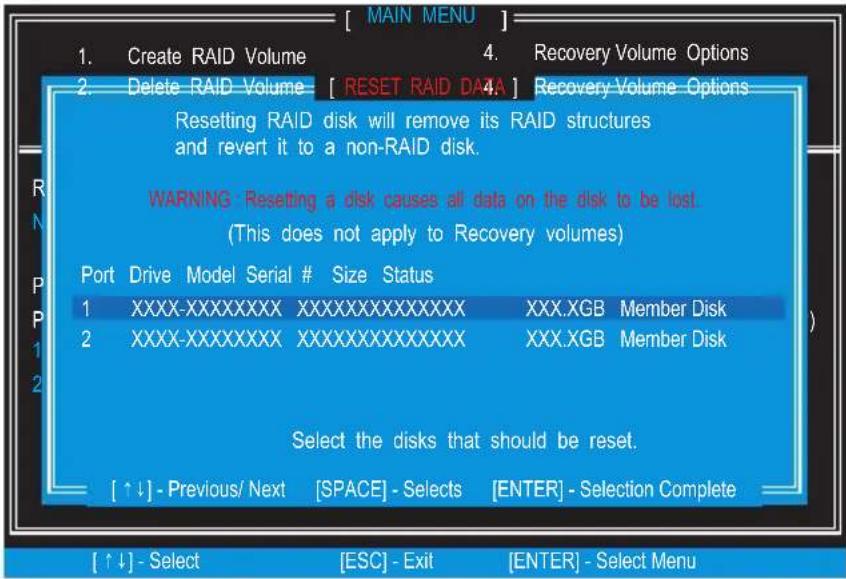
Use the
Important
- You will lose all data on the RAID drives and any internal RAID structures when you perform this operation.
- Possible reasons to "Reset Disks to Non-RAID" could include issues such as incompatible RAID configurations or a failed volume or failed disk.
Recovery Volume Options
Select option 4 Recovery Volume Options and press
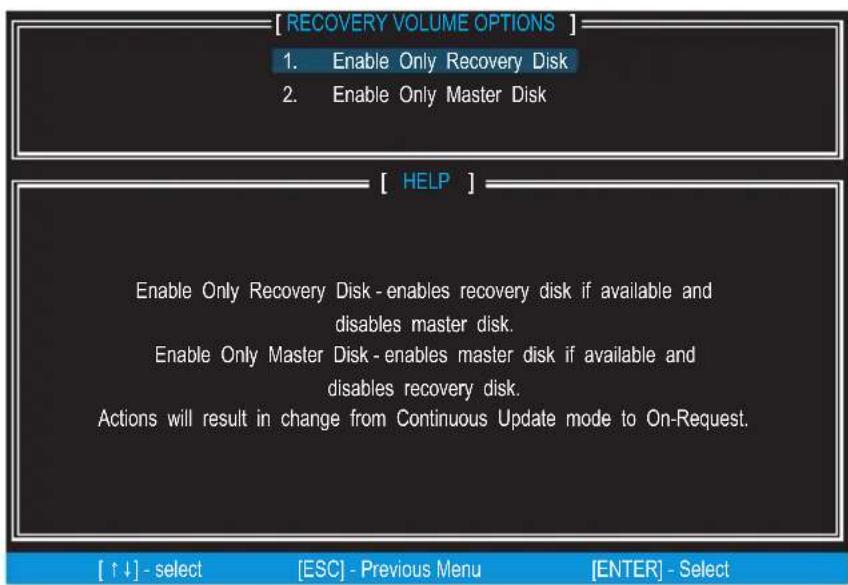
Recovery mode will change from Continuous Update to On-Request after you enable "Only Recovery Disk" or "Only Master Disk".
Installing Driver
New Windows 7/Windows Vista/Windows XP Installation
The following details the installation of the drivers while installing operating system.
- When you start installing Windows XP, you may encounter a message stating, "Setup could not determine the type of one or more mass storage devices installed in your system". If this is the case, then you are already in the right place and are ready to supply the driver. If this is not the case, then press F6 when prompted at the beginning of Windows setup.
- Press the "S" key to select "Specify Additional Device".
- You should be prompted to insert a floppy disk containing the Intel RAID driver into the A: drive.
Note: For Windows XP, you can use the USB floppy drive only.
For Windows Vista/Windows 7 you can use CD/DVD/USB drive.
Important
Please follow the instruction below to make an "Intel® RAID Driver" for yourself.
- Insert the MSI DVD into the DVD-ROM drive.
- Click the "Browse CD" on the Setup screen.
- Copy all the contents in \\Storage\Intel\PCH\f6fly-x86 or f6fly-x64 to a formatted floppy diskette.
-
The driver diskette for Intel® RAID Controller is done.
-
For Windows Vista/Windows 7:
During the Operating system installation, after selecting the location to install Vista / Windows 7 click on "Load Driver" button to install a third party SCSI or RAID driver. - When prompted, insert the floppy disk or media (CD/DVD or USB) you created in step 3 and press Enter.
- You should be shown a list of available SCSI Adapters.
- Select the appropriate Intel RAID controller and press ENTER.
- The next screen should confirm that you have selected the Intel 假 RAID controller. Press ENTER again to continue.
- You have successfully installed the Intel® Rapid Storage Technology driver, and Windows setup should continue.
- Leave the disk in the floppy drive until the system reboots itself. Windows setup will need to copy the files from the floppy again after the RAID volume is formatted, and Windows setup starts copying files.
Existing Windows Driver Installation
- Insert the MSI DVD into the DVD-ROM drive.
- The DVD will auto-run and the setup screen will appear.
- Under the Driver tab, click on Intel RAID Drivers.
- The drivers will be automatically installed.
Confirming Windows Driver Installation
- From Windows, open the Control Panel from My Computer followed by the System icon.
- Choose the Hardware tab, then click the Device Manager tab.
- Click the "+" in front of the SCSI and RAID Controllers hardware type. The driver Intel(R) SATA RAID Controller should appear.
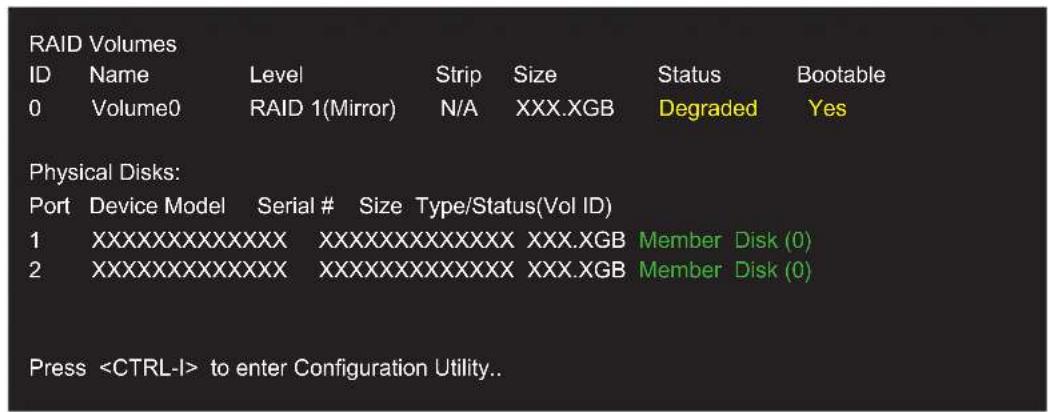
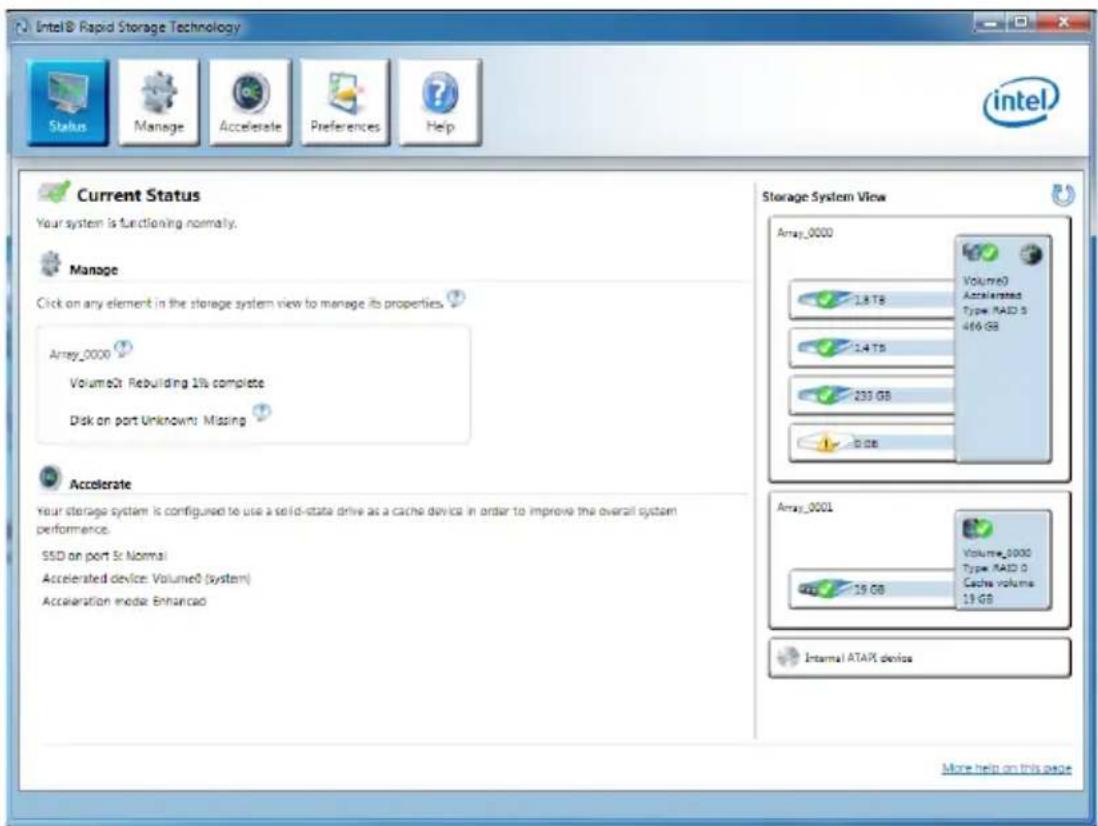
Degraded RAID Array
A RAID 1, RAID 5 or RAID 10 volume is reported as degraded when one of its hard drive members fails or is temporarily disconnected, and data mirroring is lost. As a result, the system can only utilize the remaining functional hard drive member. To re-establish data mirroring and restore data redundancy, refer to the procedure below that corresponds to the current situation.
Missing Hard Drive Member
- Make sure the system is powered off.
- Reconnect the hard drive.
- Reboot the system to Windows; the rebuild will occur automatically.
Failed Hard Drive Member
- Make sure the system is powered off.
- Replace the failed hard drive with a new one that is of equal or greater capacity.
- Reboot the system to Intel RAID Option ROM by press <Ctrl> and <I> keys simultaneously during the Power-On Self Test (POST).
Select the port of the destination disk for rebuilding, and then press ENTER.4.
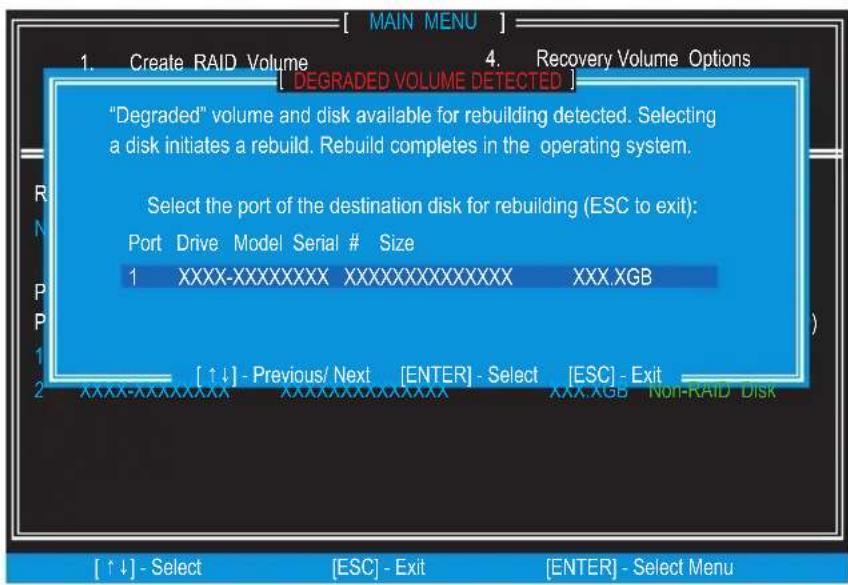
- Exit Intel RAID Option ROM, and then reboot to Windows system.
- When prompted to rebuild the RAID volume, click 'Yes'.
- The Intel Rapid Storage Technology application will be launched. Right-click the new hard drive and select 'Rebuild to this Disk'. The 'Rebuild Wizard' will be launched which will guide you through the process of rebuilding to the new hard drive.
System Acceleration
Intel® Rapid Storage Technology use a SSD as a cache. Which can store frequently used data without having to use a slow virtual disk or depend on RAM. The SSD cache with the advantages of high-speed read/write and non-volatile memory to accelerate the system performance.
Important
Check your SSD manufacturer's website, upgrade firmware in order to support Intel® Rapid Storage Technology.
Intel® Rapid Storage Technology can only work with RAID mode. Even though there is only one hard drive, you must set the SATA Mode to RAID in BIOS. The OS must be installed in the RAID ready disk in order to use the SSD caching.
Follow these steps to enable system acceleration. If Windows has been installed in RAID mode, skip to the step 5.
- Reboot and enter the BIOS steup.
- Set the SATA Mode to RAID in BIOS.
- Install Intel® RAID controller driver. Please refer to the section "Installing Driver".
- Install Windows operating system.
- Powered off.
- Connect the SSD.
- Reboot the system to Windows.
- Insert the MSI DVD into the DVD-ROM drive.
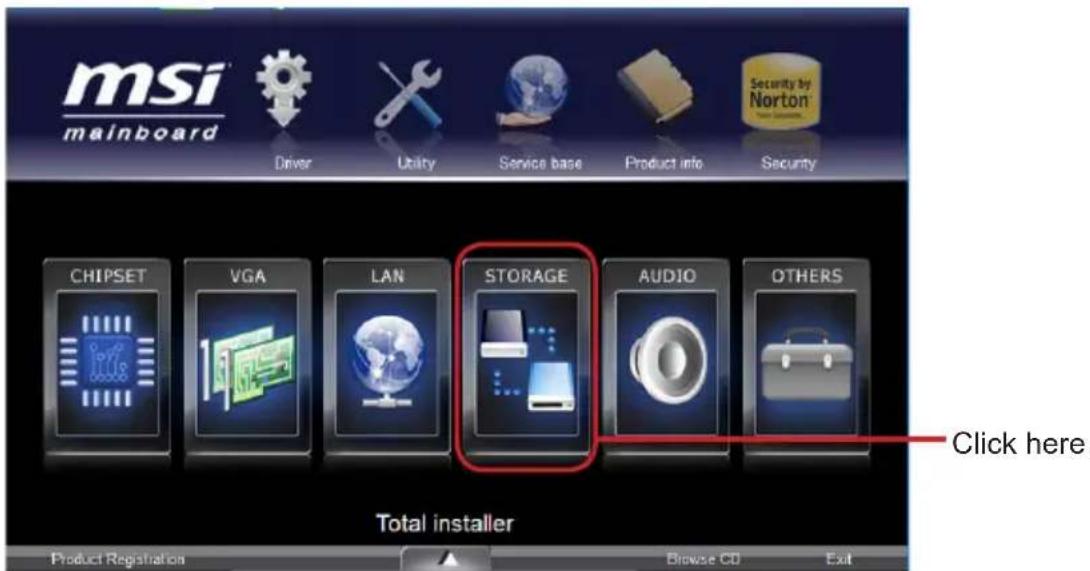
Click the "STORAGE" on the Setup screen.9.

Click the "Intel RAID Driver" to install Intel® Rapid Storage Technology application.10.
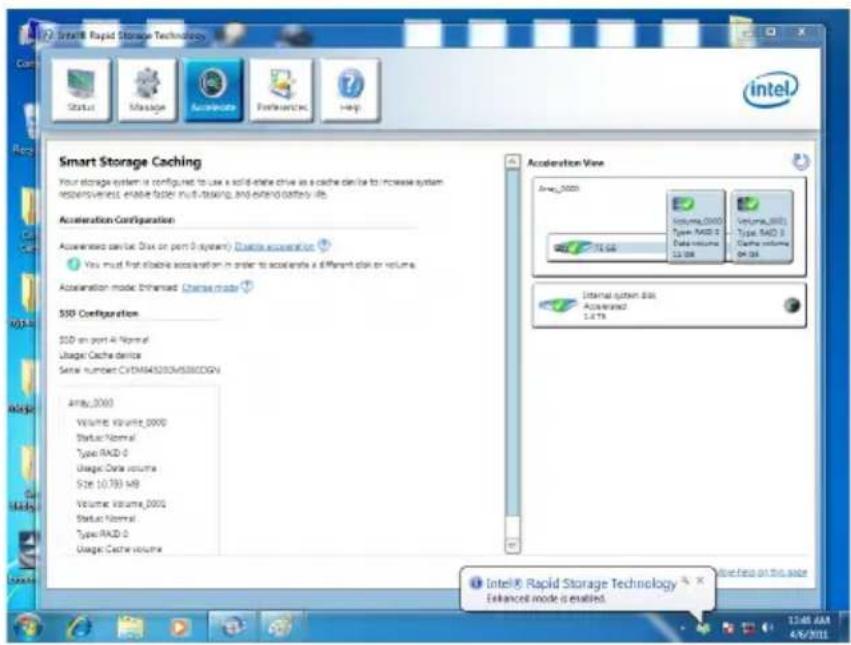
- Run Intel® Rapid Storage Technology application.
- Click "Enable acceleration" under Accelerate.

Select the acceleration options.13.
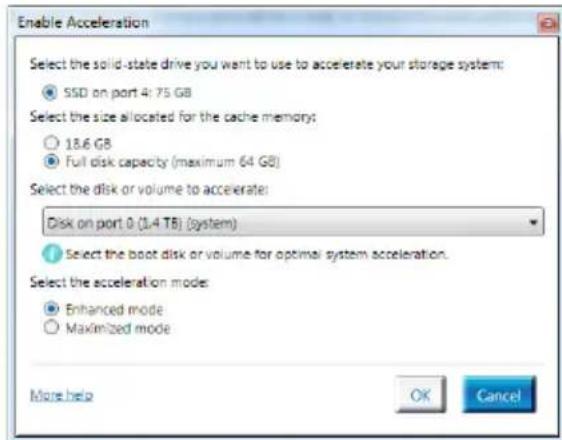
- Click OK and reboot the system.
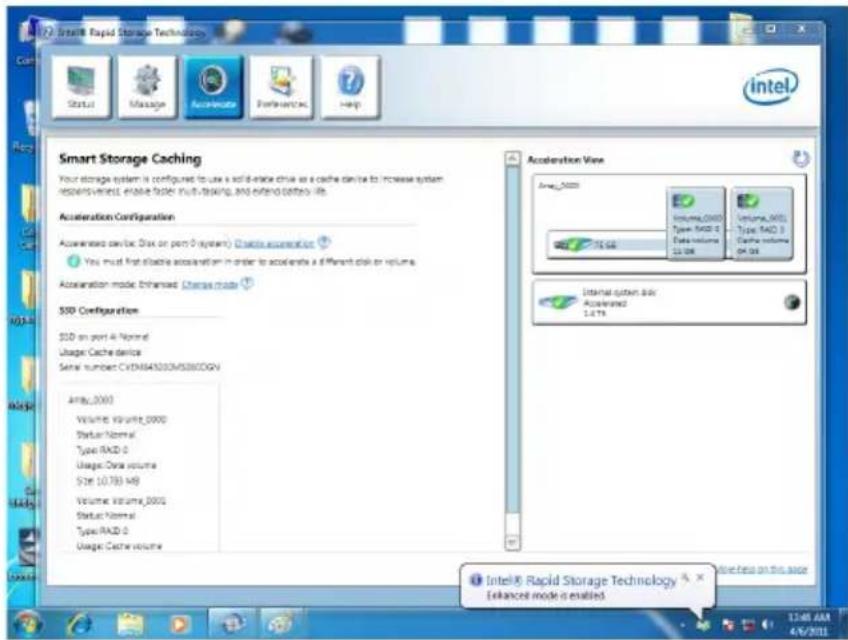
The page refreshes and reports the new acceleration configuration in the Acceleration View.
Important
You can click "More help on this page" or "More help" of the IniteRapid Storage Technology application to view more information.
RST Synchronization
If you are using Maximized mode as the Acceleration mode, the data on the hard disk is not always synchronized with the data in the SSD cache. In some situations, you may want to manually sync the disks for avoiding data loss.
Follow these steps to sync manually.
- Reboot system, during the Power-On Self Test (POST) press, press
and keys simultaneously to enter the Intel Rapid Storage Technology Option ROM. - Select option 5 "Acceleration Options" and press
key. The following screen appears.
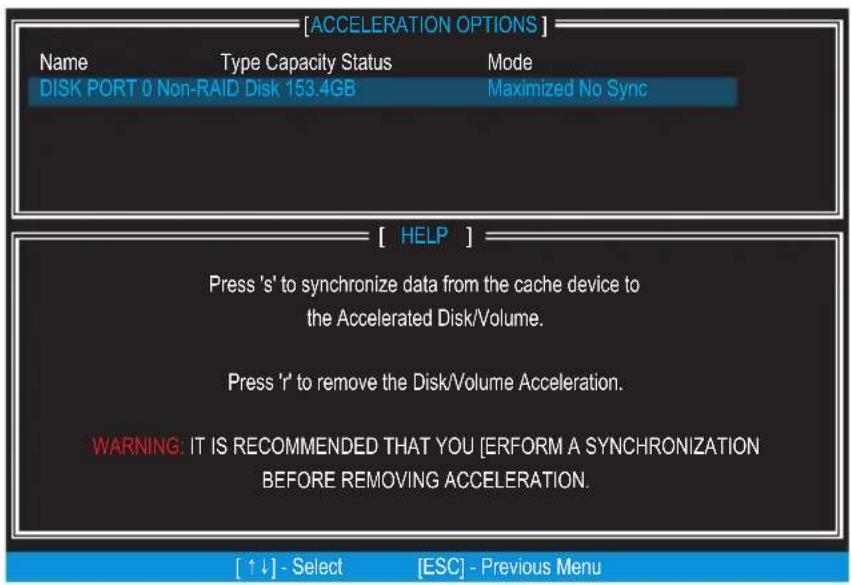
Press < S> to synchronize data.3.

When prompted, press
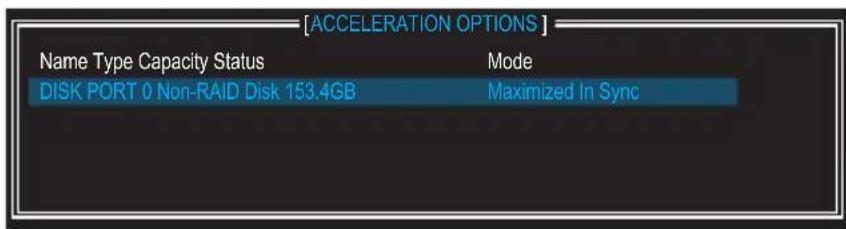
Once synchronization is complete, the status will change to In Sync.5.

Intel RAID
RAID RAID Kontrut Lefnrs RAID 0 (Striping), RAID 1 (Miroring and Duplexing), RAID 5 (Block Interleaved Distributed Parity), RAID 10 (A Stripe of Mirrors) & Inelte StoRiJrIgul to Jcogohnu.
Inel® HooN SToRlJI Gueh OngOuFroHgLmeHr "More help on this page" 721 "More help"
RST
国大海马德为有动云,山斯的SDD
| RAID Volumes None defined. | ||||
| Physical Disks: Port | Device Model | Serial # | Size | Type/Status(Vol ID) |
| 1 | XXXXXXXXXXXXXX | XXXXXXXXXXXXXX | XXX.XGB | Non-RAID Disk |
| 2 | XXXXXXXXXXXXXX | XXXXXXXXXXXXXX | XXX.XGB | Non-RAID Disk |
| Press <CTRL-I> to enter Configuration Utility.. | ||||