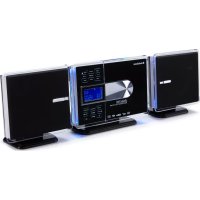
TXCD1536 - Hi-fi system AudioSonic - Free user manual and instructions
Find the device manual for free TXCD1536 AudioSonic in PDF.


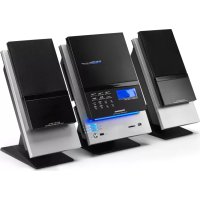
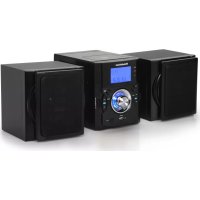
| Product type | Hi-fi system |
| Brand | AudioSonic |
| Model | TXCD1536 |
| Power supply | AC mains (power cable) |
| Playback media | Audio CD, CD-R/RW, MP3/WMA, USB, SD/MMC card |
| Radio | FM (stereo/mono) and AM |
| Auxiliary input | 3.5 mm jack socket (AUX IN) |
| Headphone socket | 3.5 mm stereo jack |
| Speakers | 2 passive speakers supplied (SPEAKERS R/L) |
| Wall mounting | Possible (template, wall plugs and screws supplied) |
| Remote control | Yes, with 2 AAA batteries |
| Display | Digital display window (time, information) |
| Output power | Not specified in the manual |
| Device dimensions | Not specified in the manual |
| Weight | Not specified in the manual |
| Special features | Dual alarm, sleep timer, equalizer (FLAT, CLASSIC, ROCK, POP, JAZZ), random/repeat playback, playlist programming |
| Maintenance and cleaning | Clean the cabinet with a slightly damp cloth |
| Safety | Do not open, avoid moisture, use an authorized service center for repairs |
Frequently Asked Questions - TXCD1536 AudioSonic
User questions about TXCD1536 AudioSonic
0 question about this device. Answer the ones you know or ask your own.
Ask a new question about this device
Download the instructions for your Hi-fi system in PDF format for free! Find your manual TXCD1536 - AudioSonic and take your electronic device back in hand. On this page are published all the documents necessary for the use of your device. TXCD1536 by AudioSonic.
USER MANUAL TXCD1536 AudioSonic
Basic safety Precautions
Follow these safety precautions for safe operation:
Before use, check the device for visible damage. Do not use a damaged device or if it has been dropped.
- Mains cable and connections must be serviced or replaced by an authorized service center.
This device is not intended for use by persons with reduced physical, sensory or mental capabilities, or lack of experience and knowledge, unless they have been given supervision or instruction concerning use of the device by a person responsible for their safety.
Children should be supervised to ensure that they do not play with the device.
- Repairs only by an authorized service center. Improper repairs can cause danger for the user. Improper repairs void the warranty.
Repair during warranty period only by service center authorized by the manufacturer, otherwise the warranty is voided.
Defective components must be replaced with genuine spare parts. Only these spare parts guarantee conformity with the safety requirements.
Protect the device from moisture and liquids.
Always take hold of the plug when disconnecting the mains cable from the wall outlet, do not pull the cable.
Do not use the mains cable as a carry handle.
- Do not let the mains cable hang down, danger of tripping and pulling the device down.
Avoid direct sunlight.
Do not operate the device in close proximity to open flames.
- Disconnect from mains power supply in case of malfunctions and during a thunderstorm.
| CAUTION | ||
| RISK OF ELECTRIC SHOCK DO NOT OPEN | ||
| The lightning flash and arrowhead within the triangle is a warning sign alerting you of "dangerous voltage" inside the product. | WARNING: To reduce the risk of electric shock, do not remove cover (or back). No user-serviceable parts inside. Refer servicing to qualified service personnel. | The exclamation point within the triangle is a warning sign alerting you of important instructions accompanying the product. |
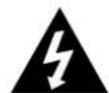
to reDuce tHe risK of fire or eElectric sHocK, Do not eXpose tHis aPPLiance to DriPPinG or sPLasHinG LiQiDs.

GrounDing or PoLariZation. tHe Precautions sHouLD be taKen so that He WiDer BLaDe of tHe ac PLuG Must Match tHe sLot in recePtacLe "Wall socket".
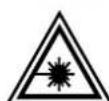
caution: inVisiBLE Laser raioation WHen oPen anD interLocKs DefeateD. aVoID eXPosure to BeaM.
note:CAUTION SYMBOLS ARE PRINTED ON REAR OF UNIT.PLEASE REFER TO INSTRUCTION MANUAL. note:YOU WILL FIND THE RATING LABEL FOR THIS PRODUCT LOCATED ON THE REAR OF THE UNIT.
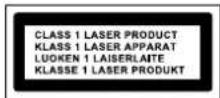
BATTERY USE INSTRUCTIONS
Warning! Danger through improper use!
Follow these safety precautions for safe battery use:
Do not throw batteries into fire.
Do not short-circuit batteries.
- Check the batteries regularly. Battery leakage can cause injuries (skin irritation) or damage to the device. Be very careful when handling leaking batteries.
- Store batteries out of reach of children. Immediately see a physician when batteries are swallowed.
- Remove the batteries from the remote control during longer periods of non-use.
INSTALLATION AND CONNECTION
Safety Precautions
Warning! There is a risk of injury and damage during start-up operation! Follow these safety precautions to avoid dangers:
Do not let children use packaging materials as toys. Danger of suffocation.
- To avoid injuries and damage, observe the requirements for location and connection.
Scope of Delivery and Inspection for Transport Damage
The device is supplied with the following accessories and components:
Music Center
Speakers (2x)
Remote control
Drilling template
Fasteners for wall mounting
- Stand for Music Center (2) with fastening screws
Stand for speakers (2x) with fastening screws
User manual
Note: Check the contents for completeness and visible damage. In case of transport damage please contact your dealer directly.
Disposal of Packaging Materials
The packaging materials protect the device from transport damage. The packaging materials are selected under environmentally friendly and disposal aspects and are recyclable.
Recycling of packaging materials saves natural resources and reduces the waste. Dispos of unwanted packaging materials according to local regulations.
Note: Keep the original packaging during the warranty period to package the device properly in case of warranty claim.
Location Requirements
For safe and trouble-free operation the location of the device must meet the following requirements:
- Place the device on a solid, level and flat surface or wall-mount the device.
- Keep sufficient space (min. 20cm) above the device to open the CD drive.
- Do not use the device in extremely hot, damp or humid locations or In close proximity to inflammable materials.
- The wait outlet must be easily accessible at all times to disconnect the cable from the mains power supply in case of emergency.
Install the device in such way that no air vents are blocked
Wall Mounting
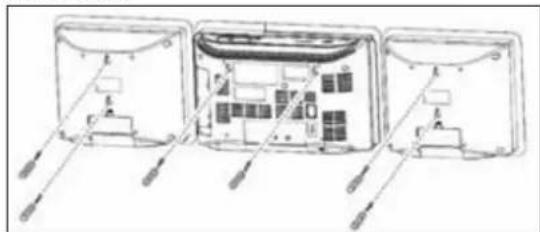
Level the drilling template horizontally and mark the drill holes for wall mounting.
Drill the holes with a 6mm drill bit.
Insert the wall plugs to the drill holes.
Screw in the fastening screws, but let them stand out approx. 4mm.
Hang up device and speakers.
Mount Desk Stand
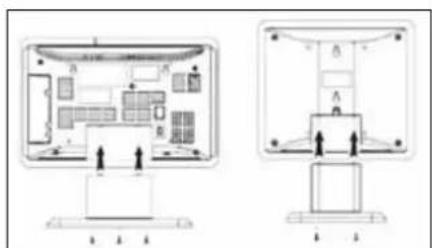
- Attach device and speakers to the corresponding desk stands and fasten with the supplied screws.
Connect Speakers
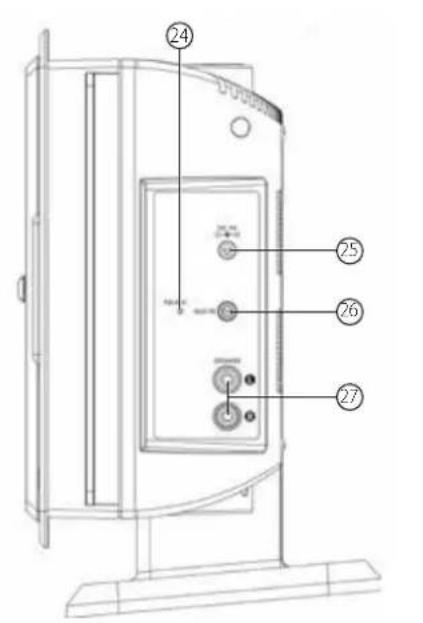
Connect the speakers to SPEAKERS R/L (27).
Connect Power
Follow these instructions for mains power connection for safe and trouble-free operation:
- Ensure that the mains cable is undamaged; do not rout the cable over hot surfaces or sharp edges.
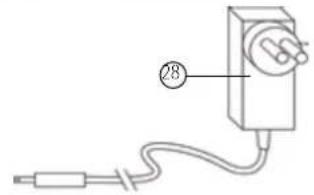
Do not tension the mains cable. - Connect the device to a properly installed wall outlet. The standby LED lights up and the time (0:00) is shown on the display.
REMOTE CONTROL
Insert Batteries
- Open the battery compartment at the rear of the remote control.
- Insert 2 batteries type R03 "AAA" 1.5V. Observe correct polarity as printed inside the battery compartment!
Note: Do not mix different battery types or fresh and exhausted batteries.
Remote Control Use Instructions
- Point the remote control towards the IR sensor (8) on the front panel.
Connect Headphones
For private listening use headphones with standard 3.5mm stereo jack and insert in earphones jack (16). The speakers are automatically muted.

AudioSonic
Instruction Manual
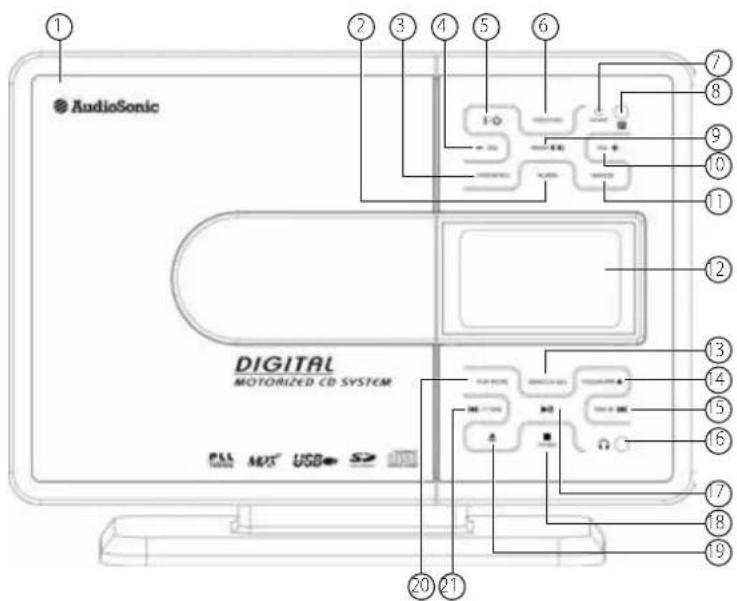
controlS
- CD drive
- ALARM
- DISPLAY/ID3
4.VOL
51/ - FUNCTION
- Standby LED
- IR sensor for remote control
- PRESETEO
- VOL
11.SNOOZE - Display
- MEM/CLK-ADJ
- FOLDER/PRE
15.TUNE+ - Earphones jack
- MT/MO
- pen/close CD drive
- PLAY MODE
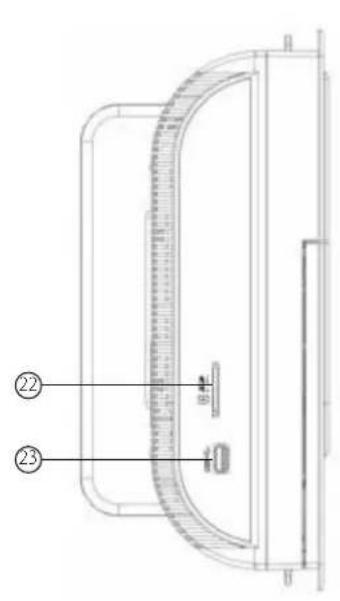
TUNE - SD/MMC card slot
- USB port
- FM ANT.wire antenna
- DC JACK
26.AUX-IN - SPEAKERS R/L
- Mains power cable
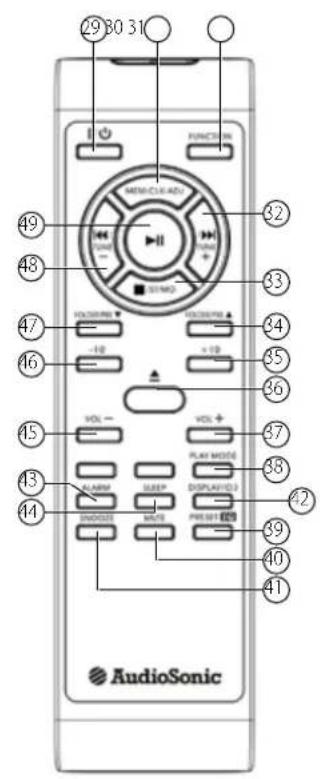
29.1/30.MEM/CLK-AD - FUNCTION
32.TUNE+ -
ST/MO
-
FOLDER/PRE
- +10
- Open/close CD drive
- VCI+
- PLAY MODE
- PRESET EG
- MLITE
41.SNOOZE - ID3
- ALARM
- SLEEP
45.VOL - -10
- FOLDER/PRE
- TUNE
49.
OPERATING INSTRUCTIONS
This chapter offers important instructions to operate the device.
Note: Most functions arc available via the buttons on the front panel as well as the remote control. This manual describes operation via the buttons on the front panel. Remote control buttons are expressly mentioned.
After 10 seconds idling the device returns to the previous mode.
On/Off
Press (5) to turn the unit on. The standby LED (7) turns off and the display (12) is activated.
Press (5) to turn the unit off (standby mode). The standby LED (7) lights up and the display (12) turns off. Only the current time is displayed.
SETTINGS
Set Current Time
Turn the device off.
Press and hold MEM/CLK-ADJ (13), until the display shows the time format (24H or 12H).
- Press TUNE+ (15) or /TUNE- (21) to toggle between 24-hour (24H) and 12-hour display format (12H). Press MEM/CLK-ADJ (13), the hour display flashes.
Note: For 12-hour display format the current time is displayed with AM or PM.
Press TUNE+ (15) or TUNE- (21) to set the hours. Press MEM/CLK-ADJ (13) to confirm; the minute display flashes.
Press TUNE+ (15) or /TUNE- (21) to set the minutes. Press MEM/CLK-ADJ (13) to save the current time.
Note: Power failure or disconnecting the device from mains power supply resets the current time to 00:00.
Set Volume
Press VOL + (10) or VOL - (4) to set the desired volume. Range: 0 (sound muted) to 30 (max. volume).
Set Alarm
Note: If you press no button for 10 seconds during alarm setting, then the alarm is activated with the current settings and the device returns to the previous mode.
You can set 2 different alarm times:
ALARM: At the set time the device turns on and starts playback of the selected source at the selected volume level. If the corresponding souls not inserted or connected the buzzer sounds.
- Press ALARM (2). The hour display flashes. For ALARM, playback source and volume level are displayed in addition.
Press TUNE+ (15) or TUNE (21) to set the hours. Press ALARM the minute display flashes.
Press TUNE+15) or TUNE(21) to set the minutes. Press ALARM (2). the corresponding alarm icon displayed.
Select Sound Scenario
Press PRESET EQ (9) to select EQ preset between FLAT, CLASSIC, ROCK, POP and JAZZ.
RADIO FUNCTIONS (TUNER)
Set TUNER mode
- Repeatedly press FUNCTION (6), until TUNER is displayed.
Auto Search
- Press and hold TUNE+15) or TUNE- (21) to start auto search. The search is stopped after a station is found.
Manual Search
Press TUNE+F or TUNE-(21) for 0.05 MHz (FM) or 9 kHz (AM) frequency steps, until the desired frequency is set.
Toggle Between Stereo and Mono Reception (FM only)
Press▶(17) to toggle between mono and stereo reception. During stereoreception (S) is played.
Save Radio Station to Memory
Note: The presets are deleted when disconnecting the device from mains power supply. You have 10 presets each for FM and AM.
Press MEM/CLK ADJ (13), the preset number flashes.
Press FOLDER/PREF14) to select the desired preset number.
Press MEM/CLK-ADJ (13) to save the radio station. The preset number is displayed.
Access Preset Radio Station
Repeatedly press FOLDER/PRE▲ (14) to select the desired station.
CD FUNCTIONS
Insert and Remove CD
Note: You can open the CD drive only in CD mode.
Repeatedly press FUNCTION (6), until CD is displayed.
Press (19) to open the CD drive.
Insert a CD with the label to the front and slightly push down until it locks in place.
- Presa19) to close the CD drive. TOC READ flashes on the display, then the total number of tracks and the playing time is displayed (Audio CD). For MP3/WMA CDs the total number of albums and tracks is displayed.
Note: If no CD is loaded or the data cannot be read, then NO DISC is displayed.
Press (19) to open the CD drive and remove the CD.
Start/Pause/Stop Playback
Note: MP3 or WMA is displayed during MP3 or WMA file playback.
Pres-11(17) to start playback. For Audio CDs the display shows track number and playing time of the current track, for MP3/WMA CDs the numbers of the current album and track are displayed.
In playback mode pres to pause playback. Press (1) gain to continue playback.
Pres/ST/MO (18) to stop playback.
Skip Track/Album
Press TUNE+ (15) to skip to the next track.
Pres/TUNE-21) to skip to the beginning of the current track.
Pres/TUNE- (21) again to skip to the previous track.
Press FOLDER/PRE (14) to skip to the next album.
Fast Forward/Reverse
Press and hold TUNE+or rewind mode.
/TUNE-(21) for fast forward or
Repeat/Random Playback
Repeatedly press PLAY MODE (20) to select the desired playback mode between the following settings:
No icon on display Normal playback. (icon flashes) The current track is repeated continuously.
All tracks in POLDERT album are repeated continuously (MP3/WMA CDs only).
The entire CD is repeated continuously. RAN All tracks are played in random
For MP3/WMA CDs; Random playback for all albums.
Play List
Note: Program the playlist in stop mode only. Program up to 20 tracks in your desired order.
Press MEM/CLK-ADJ (13), the display shows the following readouts: MEM Program play list activated.
001 (flashes) Current track number in first album.
001 (flashes) +
is displaFOLDERum number (MP3/WMA CDs only).
P01 Location on the play list.
- Repeatedly press FOLDER/PRE(14) to select the desired album, then press TUNE+/(15) or /TUNE-(21) to select the track.
Press MEM/CLK-ADJ(13) to save, The next location on the play list is displayed.
Repeat these steps until your play list is programmed.
Press MEM/CLK-ADJ (13) to finish programming.
Press MEM/CLK-ADJ (13) again to delete your program. MEM turns off on the display.
ID3 Tags (MP3/WMA Files only)
Note: With activated ID3 tag function the ID3 information in the file is read and displayed. If no ID3 tag information is included or the device does not support the format, and then NO TAG is displayed.
- Press and hold ID3 (42) on the remote control to activate the ID3 function, until "FILE - is displayed.
Press ID3 (42) on the remote control again to deactivate the ID3 function.
IMPORTANT
Note: Although this CD player can read CD-R, CD-RW and MP3 discs - in addition to normal CD's - the playability of CD-R, CD-RW and MP3 discs may be affected by the type of software that was used to create the discs, as well as the quality and condition of the blank media you are using. 100% playability cannot be guaranteed. This is not an indication of a problem with the player.
USB AND SD/MMC FUNCTIONS
Connect Media
- Ensure that the device is turned off.
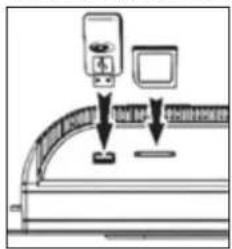
- Connect your USB device to the USB port (23).
Insert your SD/MMC memory card with the label to the front into the SD/MMC card slot (22) until it locks into place.
Disconnect Media
Ensure that the device is turned off.
- Disconnect your USB device from the USB port.
Carefully press down the SD/MMC memory card to unlock; then remove from the SD/MMC card slot.
IMPORTANT
The USB port of this product is fully compatible with the USB 1.1 and 2.0 standard. If MP3 players connected to this port are not written in compliance with the official USB 1.1 or 2.0 standard it may occur that those MP3 players do not work on this port. This is not a defective of this product. The MP3 player does not comply with the official USB 1.1 or 2.0 standard.
Playback
Repeatedly press FUNCTION (6), until or displayed.
TOC READ (read contents) flashes on the display, then the total number of albums and tracks is displayed.
Note: If no media is connected or inserted or no playable files are contained on the media, then NO USB or NO SD is displayed.
Playback operation is similar to MP3/WMA CD playback.
OTHER FUNCTIONS
Playback from External Audio Device
- Connect audio out on your external audio device via 3.5mm stereo jack to AUXIN (26).
- Repeatedly press FUNCTION (6). until AUX is displayed.
Start playback of your external audio device.
Sleep Timer
Activate the sleep timer to automatically turn off the device after a preset period of time.
Press SLEEP (44) to set the auto off time. Following settings are available: 90, 60, 30 and 15 minutes. During sleep timer activation the zzz icon is displayed.
To deactivate the sleep timer function repeatedly press SLEEP (44), until theZZ icon turns off.
Snoopze Function
Press SNOOZE (11) while the alarm is sounded. The alarm is interrupted for approx. 10 minutes.
Mute Function
- Press MUTE (40) on the remote control to mute the sound. Press MUTE again to unmute the sound.
CLEANING
Safety Precautions
Caution: Possible Damage. Ensure that no moisture penetrates the device during cleaning, as this can cause irreparable damage.
Cleaning
Clean the casing only with a slightly damp cloth.
TROUBLESHOOTING
This chapter offers important information about possible malfunctions and troubleshooting. Please note the warnings to avoid danger and damage.
Safety Precautions
Warning: Follow these safety precautions to avoid danger and damage:
- Repairs to electrical equipment are only to be conducted by specialists trained by the manufacturer. Improper repairs can cause severe danger for the user and damage to the device.
Troubleshooting
Please check with the following table if you can solve the problem yourself before contacting the service center.
| Problem Possible cause Solution | ||
| The device cannot be turned on. | •Mains cable is not connected to wall outlet. •Wall outlet has no power. | •Connect the mains cable to the wall outlet. •Check your fuses. |
| No sound. | •Volume level is set to minimum. •The sound is muted. •The speakers are not connected correctly. | •Increase the volume level. •The sound is muted. •The speakers are not connected correctly. |
| CD is not recognized. | •CD is inserted the wrong way round. •CD is dirty or defective. •CD format not supported by the device. •Error on burnt CD. | •CD is inserted the wrong way round. •Clean CD or insert a different CD. •Insert a different CD. •Check your home-burnt CD on a different player. |
| Remote control does not work. | •Distance between remote control and device too big. •Batteries are exhausted. | •The remote control has a range of 5 meters. •Change the remote control batteries. |
DISPOSAL

Disposal of Device
Do not dispose of the device with the household waste. This product must be disposed of according to EU directive 2002/96/EC-WEEE (Waste Electrical and Electronic Equipment).
Return the device to a collection point, Observe the applicable regulations. Contact your municipality, if in doubt.
Disposal of Batteries
Do not dispose of batteries with the household waste. Every user is bound by law to return batteries to a collection point or a retailer. This obligation serves an environmentally friendly disposal of batteries. Only return exhausted batteries.
aLGeMene VeilIGHeiDsMaatreGeLen
Follow these safety precautions for safe battery use:
Definir as Horas Actuais
Nacisnj przycisk MEM/CLK-ADJ (13);zacznie migac numer staci.
Press FOLDER/PRE (14) to select the desired preset number.
Press MEM/CLK-ADJ (13) to save the radio station. The preset number is displayed.
001 (miga) Current track number in first album.
Tag ID3 (solo file MP3/WMA)
INSTALLATION OCH ANSLUTNING
Sakerhetsinstruktioner
Spara radiostation i minnet
INSTALLATION AND CONNECTION
Bezpećnostné préventévne opatrenia
Upozornenie! Nebezpečenstvo zranenia a poranenia pri prvom zapojenil!
Prosim riadte sa tymitoPokynmi pre zabrachenie nebezpecenstva
Nenechajte deti hrat sa s obalovymi materialmi. Hrozi nebezpecenstvo udusenia.
- Aby ste zabrani zraneni alebo poraneni, nenechavaje pristroj zapnuty bez dozoru.
Rozsah dodávky a kontrola poškodenia pri preprave
Pristroje dedavany'symto prisluensstvmakomponentmi:
Hracia Jednotka
Reproduktory (2x)
Dialkovoyladanie
- Sablona pre vitanie
- Skrutky pre upevnenie na stenu
Stojan pri hraciu Jednotku (2) si skrutkami
Stojan na reproduktory (2x) si skrutkami
- Návod na použitie
Poznamka: Skontrolujte obsah, ci ziadna cast nechya a ci produkt nemá poškodenie. V pripeade, ze bol pristroj poškodený poças prepravy kontaktujte priamo svojho predajcu.
Start/Pause/Stop prehravania


- Basic safety Precautions
- BATTERY USE INSTRUCTIONS
- INSTALLATION AND CONNECTION
- Safety Precautions
- Scope of Delivery and Inspection for Transport Damage
- Disposal of Packaging Materials
- Location Requirements
- Wall Mounting
- Mount Desk Stand
- Connect Speakers
- Connect Power
- REMOTE CONTROL
- Insert Batteries
- Remote Control Use Instructions
- Connect Headphones
- AudioSonic
- controlS
- OPERATING INSTRUCTIONS
- On/Off
- SETTINGS
- Set Current Time
- Set Volume
- Set Alarm
- Select Sound Scenario
- RADIO FUNCTIONS (TUNER)
- Set TUNER mode
- Auto Search
- Manual Search
- Toggle Between Stereo and Mono Reception (FM only)
- Save Radio Station to Memory
- Access Preset Radio Station
- CD FUNCTIONS
- Insert and Remove CD
- Start/Pause/Stop Playback
- Skip Track/Album
- Fast Forward/Reverse
- Repeat/Random Playback
- Play List
- ID3 Tags (MP3/WMA Files only)
- IMPORTANT
- USB AND SD/MMC FUNCTIONS
- Connect Media
- Disconnect Media
- Playback
- OTHER FUNCTIONS
- Playback from External Audio Device
- Sleep Timer
- Snoopze Function
- Mute Function
- CLEANING
- TROUBLESHOOTING
- DISPOSAL
- Disposal of Device
- Disposal of Batteries
- aLGeMene VeilIGHeiDsMaatreGeLen
- Definir as Horas Actuais
- Tag ID3 (solo file MP3/WMA)
- INSTALLATION OCH ANSLUTNING
- Sakerhetsinstruktioner
- Spara radiostation i minnet
- Bezpećnostné préventévne opatrenia
- Rozsah dodávky a kontrola poškodenia pri preprave
- Start/Pause/Stop prehravania
Brand : AudioSonic
Model : TXCD1536
Category : Hi-fi system