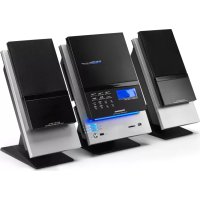
TXCD1530 - Hi-fi system AudioSonic - Free user manual and instructions
Find the device manual for free TXCD1530 AudioSonic in PDF.


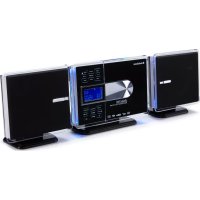
| Product type | Hi-fi system with CD/MP3 player, FM/AM radio, USB, SD card, auxiliary input |
| Brand | AudioSonic |
| Model | TXCD1530 |
| Power supply | Mains AC 230V~50Hz; backup batteries 2x AA (not included) |
| Output power | 2 x 5W RMS (estimated) |
| Connectivity | USB (compatible 1.1/2.0), SD card (max 1 GB), auxiliary input (RCA), subwoofer output, headphone jack, FM wire antenna |
| Supported audio formats | CD-Audio, CD-R/RW, MP3 (CD, USB, SD) |
| Radio functions | FM/AM with automatic and manual search, 30 FM presets, 10 AM presets, stereo/mono |
| CD/MP3 functions | Play, pause, skip, fast forward/reverse, programming (64 tracks), repeat (1/all/album), anti-skip (40s CD, 100s MP3), search by name (ID3) and by folder |
| Additional functions | Digital clock with programmable alarm and standby timer, sleep timer, preset equalizer (EQ), remote control |
| Dimensions (Main unit) | Approx. 250 x 140 x 220 mm (estimated) |
| Weight (complete system) | Approx. 3 kg (estimated) |
| Included accessories | 2 speakers, remote control, FM wire antenna, manual |
| Maintenance and cleaning | Unplug the device before cleaning; use a soft, dry cloth. Do not use abrasive products or liquids. |
| Safety | Do not expose to moisture; do not open the casing (risk of electric shock); invisible class 1 laser radiation. |
| Repairability | Spare parts available through after-sales service (contact the manufacturer). |
| General information | Compliant with CE standards; recycling at end of life (WEEE). |
Frequently Asked Questions - TXCD1530 AudioSonic
User questions about TXCD1530 AudioSonic
0 question about this device. Answer the ones you know or ask your own.
Ask a new question about this device
Download the instructions for your Hi-fi system in PDF format for free! Find your manual TXCD1530 - AudioSonic and take your electronic device back in hand. On this page are published all the documents necessary for the use of your device. TXCD1530 by AudioSonic.
USER MANUAL TXCD1530 AudioSonic
| CAUTION | ||
| RISK OF ELECTRIC SHOCK DO NOT OPEN | ||
| The lightning flash and arrowhead within the triangle is a warning sign alerting you of "dangerous voltage" inside the product. | WARNING: To reduce the risk of electric shock, do not remove cover (or back). No user-serviceable parts inside. Refer servicing to qualified service personnel. | The exclamation point within the triangle is a warning sign alerting you of important instructions accompanying the product. |



TO REDUCE THE RISK OF FIRE OR ELECTRIC SHOCK, DO NOT EXPOSE THIS APPLIANCE TO DRIPPING OR SPLASHING LIQUIDS.
GROUNDING OR POLARIZATION. THE PRECAUTIONS SHOULD BE TAKEN SO THAT THE WIDER BLADE OF THE AC PLUG MUST MATCH THE SLOT IN RECEPTACLE "WALL SOCKET".
CAUTION: INVISIBLE LASER RAOIATION WHEN OPEN AND INTERLOCKS DEFEATED. AVOID EXPOSURE TO BEAM.
CLASS 1 LASER PRODUCT
CLASS 1 LASER APPARAT
LUOKEN 1 LAISERLAITE
KLASSE 1 LASER PRODUKT
QUICK START!
- Connect the speakers & table stands
- Plug ac-cord into wall socket & unwrap the fm-antenna wire
-
Press "ON/OFF" key switch "ON" the unit
-
To listen to cd-player
-
press "function" key repeatedly until "cd" is displayed
- press "open/close" key
- insert a disc (cd audio or cd.mp3)
- press "play" key ( ) > start playing cd
-
adjust volume (vol+) or (vol-)
-
To listen to radio
-
press "tuner/band" key to switch to radio (tuner) mode
- press "tuner" key to switch to "fm" radio band.
- press "tuner" key again to switch to "am" radio band.
- press & release next to tune radio frequency up (1-step).
- press & release back to tune radio frequency down (1-step).
- "press & hold" next (2 secs.) to scan up (to seek next station).
-
"press & hold" back (2 secs.) to scan down (to seek prev. station).
-
Press "ON/OFF" key to OFF" the unit ("standby mode")

AudioSonic
Instruction Manual
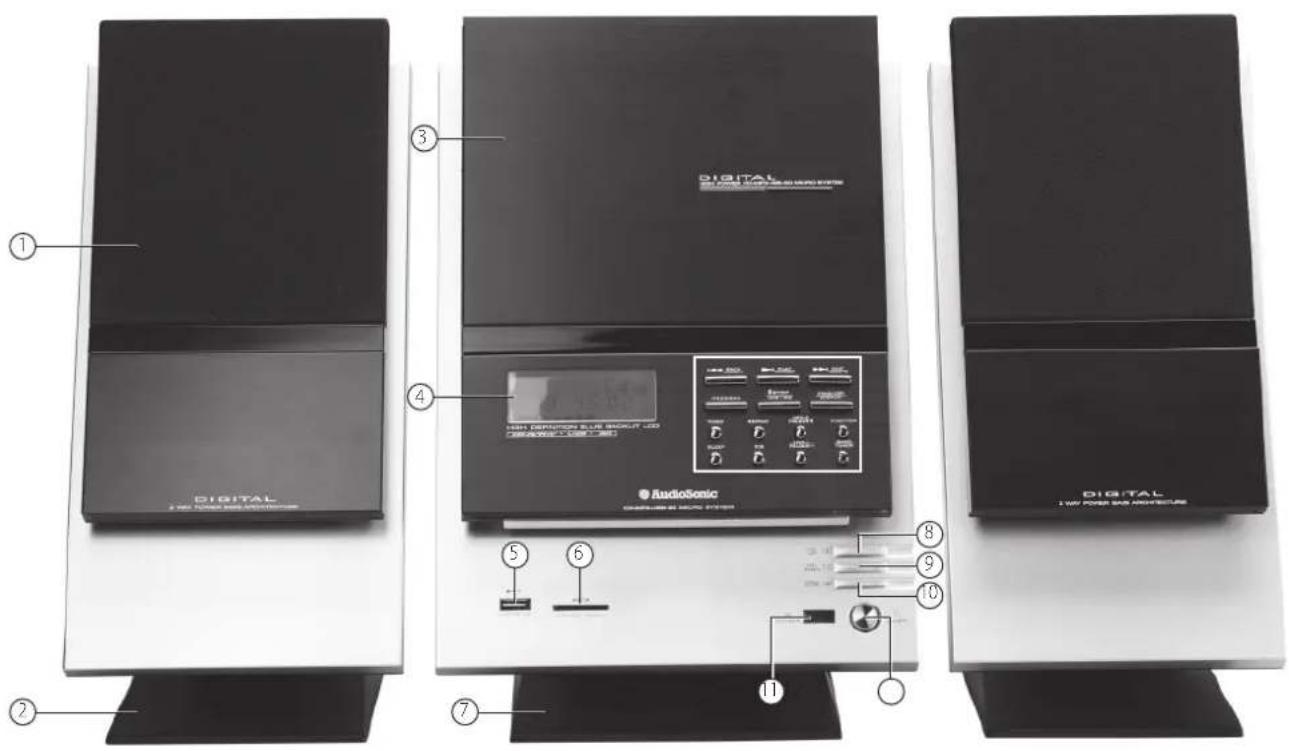
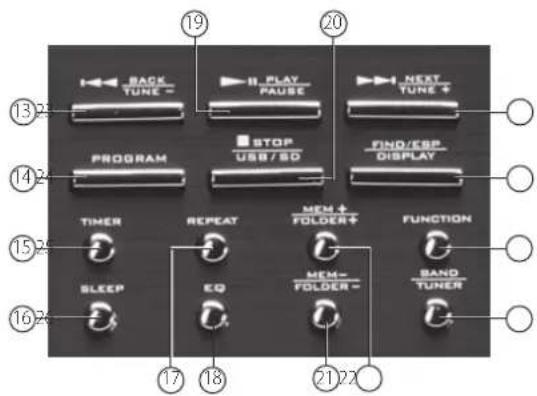
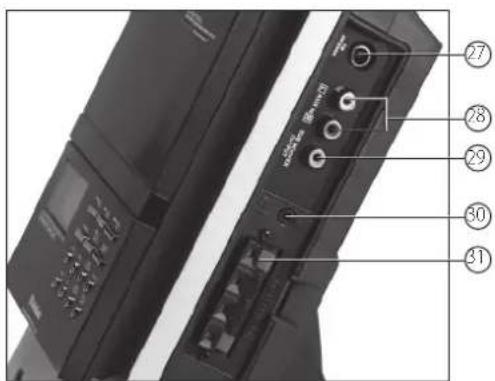
LOCATION OF CONTROLS
- Stands (for speakers)
- Speakers (left & right)
- Desk stand (for main unit)
- USB socket
- 5D and socket
- CD/clock/ radio digital multifunction display
7.CD don (motorized) - CD program key
- CD body tune-down key
- CD pay/puse key
11.C0 next/?urnet
12 CD stop/US8/SD-card key - Hnd/EBP display key
- Function key
15.Tuners/band key - Volume up key
- Volume down key
- Gpnt/ close key
19.TimerKey - Sleep key
21.CD repeat key
22.50 (equilizer) key - Mem(+)/folder+key
- Mem ( ) / talor key
25 Remote control sensors - On/Off key
- FM WIRE ANTENNA
- Audio line in socket [aux] (left & right)
24.1 sub wOoTe rOuTpe - Health/Home Jack
- Speakeer-cut socket ( n = n + n)
- Back up battery component (behind the unit)
- AC-cord & plug
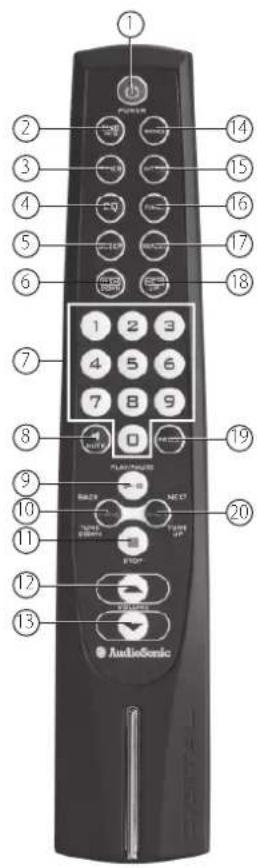
REMOTE CONTROL
- On/off button
- Find m/s key
- Timer key
- EQ key
- Stepkey
- Memory down key
- Band key
- Intrakey
- Function key
- Report key
- Memory up key
12 Direct keys (number keys) - Mulekey
- Memory/ Program key
- CD play Pause key
76.CD next/tune up key - ① back/tune down key
- CD stop key
- Volume up key
- Volume down key
POWER SUPPLY
- This set works on normal household ac-power.
- Make sure the set voltage of the unit matches your local voltage.
- Insert the plug of the ac-cord into a wall outlet with ac-power.
- Press the ON/OFF key to switch "ON" the unit.
IMPORTANT: how to tell if power is "ON"? when the power is "ON" the entire digital display will be lit up with a "blue" back-light. this indicates the hi-fi is switched "ON".
- This unit is designed to operate without ever being totally powered "OFF". It will either be "ON" or "standby mode".
- In standby mode, the blue back-light of the digital display will be switched off but the display will show the current time (clock function).
- When in standby mode, you can use the power switch (on remote control or on front panel of the main unit) to switch "ON" the unit.
- To conserve electricity, please switch the unit to "standby mode" when not listening to radio or cd music.
MEMORY BACK-UP
- Open the battery door at the rear of unit.
- Insert 2 pcs "aa-cell" (um-3/lr6 type) batteries in the battery compartment, these 2 batteries are for backup of the "real time clock" and "radio memory preset stations during brief power outages", please observe the correct polarities or the memory will not be properly maintained.
CONNECTION OF SPEAKER BOXES
- Unwrap the speaker-cords of both speaker-boxes.
- Please notice that each speaker's cord consists of 2 wires, one is "clear" and one has a black line.
- Insert the "clear" wire of the left speaker-box into the "red" (+) speaker connector beside the main-unit, which has the "L" indication (next to the speaker-connector).
- Insert the "black" wire of the left speaker-box into the "black" (-) speaker connector beside the main-unit, which has the "L" indication (next to the speaker-connector).
- Repeat the above 2 steps for the "right" speaker box, but this time, inserting them into the red & black connectors which have the "R" indication.
- When inserting each wire into a connector, press downwards on the connector's plastic knob (red or black part) & push the exposed metal end of the wire all the way into the hole above this knob.
- Place the speaker boxes as far apart as possible for best sound effect.
DIGITAL CLOCK FUNCTION
How to set correct time:
- The set has a built-in digital clock, which is displayed when the unit is in "standby mode" or when you press & hold program key for two seconds during cd or radio operation.
To set the correct time, follow this procedure:
- Switch unit to "stand-by" mode (display light = off)
- Press & hold program for 2 seconds
- Display shows hour or hou (flashing)
-
Press next or back to select 12-hour or 24-hour clock display system & press program to confirm your selection
-
Press next or back repeatedly to set the correct hour in the display & press program to confirm
- Press next or back repeatedly to set the correct minute in the display & press program to confirm
- Correct time is now set & will be shown in the display!
This set has a timer function to enable you to program the unit to automatically switch "ON" or "OFF" at preset times. This is useful as a morning alarm clock:
How to set timer
- Press and hold timer key. the symbol appears in the display.
- Press next or back to adjust the hour of the desired "power on" time and then press timer to confirm.
- Press next or back to adjust the minutes of the desired "power on" time and then press timer to confirm. Now the symbol in the display changes to show
- Press next or back to adjust the hour of the desired "power off" time and then press timer to confirm.
- Press next or back to adjust the minutes of the desired "power off" time and then press timer to confirm. Now the display will indicate the "wake up mode" (cd or radio).
- Press next to choose the desired mode & press timer to confirm
- The display then shows the "wake up volume level" (loudness), press back or next to decrease or increase the volume level to be used for the music to be played when the timer switches on the unit at the pre-set time.
- Press timer to confirm the unit will then automatically display all your settings in sequence:
"power on time"(201)
"power off time"(FF)
"power on mode" (cd or tuner)
- "power on volume level" (loudness)
- Finally the unit will return to the normal display, except that the symbol will be shown, to indicate that you have programmed a power on/off alarm setting.
- In case you wish to disable the timer, press timer & the symbol disappears.
Note: The automatic power on/off timer will switch on the unit as if you have manually pressed the "power" key. If you have selected "wake to radio", the preset radio band & station will become activated when power switches on.
Automatic power off sleep function
- This set has a special sleep timer function which can automatically switch off the unit. this is useful for sleeping to music at night.
- At any time while the unit is operating (cd player or radio), press sleep key repeatedly to choose the automatic power off time. (*off means sleep timer is deactivated)
ELECTRONIC VOLUME CONTROL
- This unit uses an electronic volume control (push button type)
- To increase or decrease the loudness of unit, press the volume up (vol+) or volume down (vol-) keys respectively.
- Release the key when volume level is at the desired loudness
- Sometimes, especially during listening to the radio, you may notice a "click-click-click" (repeating) sound when you are increasing or decreasing the volume. This is a normal condition & the sound will disappear when you release the volume key (when you reach the desired volume level!).
MUSIC EQUALIZER
Press "EQ" key repeatedly to choose the desired sound effect according to the music.
you are listening to : (*pass means equalizer is "by-passed" or "OFF")
PASS
CLASSIC
ROCK
POP
JAZZ
OPERATION OF RADIO
Press the "ON/OFF" key once to switch on the unit.
- Press the tune key to select the desired radio band.
- For mw (am) stations, rotate or reposition the set to improve radio reception.
To improve fm-radio reception, fully extend the fm-antenna wire and adjust it's position.
- Use the "m/s" key (on remote control) to select the desired mode (fm mono/stereo). In some cases, where reception is poor, it may be advisable to select "mono" mode, to improve clarity of the radio signal.
Manual frequency adjustment (scan mode)
- Press (and immediately release) the next key or back key to "scan" (manually adjust) the radio frequency "up" or "down" by 1-step at a time.
The radio digital display will indicate the exact frequency at each step's position. - When a desired frequency or station is reached, it can be saved into one of the "memory" positions. (see "radio memory" section).
Automatic frequency adjustment (seek mode)
-
Press and hold (for 2 seconds) the next or back keys
-
To "seek" (automatically adjust) the radio frequency "up" or "down" to the next available radio station.
The radio digital display will indicate the exact frequency of the next station that is found. - When a desired station is reached, it can be saved into one of the "memory" positions. (see "radio memory" section).
FM antenna
For best fm reception: fully extend the fm wire antenna or connect the external serial to the 75 ohm socket at the back of the unit.
Radio memory (station preset memory storage)
- At any time, the currently displayed station or frequency can be stored into one of the memory position.
Press program key once.
Press or M0eSelect desired memory position. (there are 10 memory positions for am band & 30 memory positions for fm band).
- Press program key once to save the selected station into the selected memory position.
To recall any saved memory, simply press 04+ th63ed radio-band will be recalled.
- To clear the memory of any position, simply save a new station to the same memory position.
INSERTION AND REMOVAL OF DISCS
Press the "function" key repeatedly until the display shows "cd", press the open/ close key to open the cd-door, carefully place a compact disc (cd or mp3 disc) onto the center spindle with the label side (printed side of disc) facing outwards (towards you). Press the "open/ close" button to automatically close the cd-door. The cd-display will show the total number of tracks on the disc after a few seconds. The cd is now ready to be played. To remove a disc, press the open/ close key. The door will open upwards allowing the removal of the cd inside.
Important: Always hold a cd by it's edges. avoid getting any finger-prints, smudges or dirtonto the surface ofadisc. in case this happens, use a special cd-cleaning cloth or cleaning kit to remove the dirt or smudges.
NORMAL CD OPERATION
- Press "ON/OFF" key to switch on the unit.
- Press the "function" key repeatedly until the display shows "cd"
- Press the "open/close" key & insertacadas described.
- Press play key. the disk will start spinning & the first
-
Song (track) will start playing. the display will indicate the current track no.
-
At any anytime during playback, press the play key
- To pause operation of the unit. press play key to resume operation at the same track & position.
- At anytime during playback, press the stop key to stop operation of the set, this will reset the set to the first track (if you press play after stop, the first track will always start playing).
- At anytime during playback, press and release the next or back keys to skip forward or backwards by one track, as desired.
- Any anytime during playback, press and hold the next or back keys to fast-forward (cue) or fast-reverse (review) the specific track, which is currently playing.
Programming the cd-player
The cd player can be programmed to play any sequence of upto 64 tracks, as desired.
Always press the stop key before starting the programming.
- Press the program key once, the display will show the "memory" symbol to indicate that the set is now in "memory programming mode".
For normal cd-audio discs:
- Press the next or back to select the track (song) number you wish to be stored in the current memory (program) position.
- Press the program key to confirm your selection.
- Repeat the previous 2 steps, each time selecting any track number of your choice to be stored in successive (program) positions.
After a maximum of 64 songs (or less) have been selected as described above, press program key, the display will now show memory to indicate you have saved a program-memory. - Press play key, the cd-player will playback the "saved sequence" in the program memory.
- To clear (cancel) the entire program which is stored in the memory, simply press stop key, this will reset the memory & clear the program.
For cd-mp3 data discs:
- Press the next or back to select the album (folder directory) number which contains the song you wish to select
- Press the program key to confirm your selection.
- Press the next or back to select the track (song) number you wish to be stored in the current memory (program) position.
- Press the program button to confirm your selection.
- Repeat the previous 4 steps, each time selecting any album and track number of your choice to be stored in successive (program) positions.
After a maximum of 64 songs (or less) have been selected as described above, press program key, the display will now show memory to indicate you have saved a program-memory. - Press play key, the cd-player will playback the "saved sequence" in the program memory.
To clear (cancel) the entire program which is stored in the memory, simply press stop key, this will reset the memory & clear the program.
What is MP3?
- MP3 (mpeg 2, layer 3) is a digital file format for audio (music).
- You can download mp3 songs from many websites on the internet (please observe the copyright regulations of your country).
MP3 songs are much smaller is memory size compared with normal cd-audio format songs. this is called "compression" & it allows much more recording time on a standard cd than the normal 74 minutes (for normal cd-audio).
The exact length of recording time depends on the "compression rate" of the mp3 song you have downloaded. - Compression rate is specified in "kbps" (kilobits per second). for example: "-28 kbps": the higher this number, the bigger the mp3 file size (the better the sound quality) and the lower the recording time on a cd-r. normally based on -28 kbps, you should have approx. 250-300 minutes of recording time on a cd-r.
-
MP3 songs can be recorded with some "text information" as part of the same file. It consists of (among other details):
-
file name (song name)
-
artist name
-
Your cd-mp3 player can locate ("find") asong on an mp3-cd disc from the "file name", therefore you should try to name all your mp3 files with the actual name of the song that it contains.
There are basically 2 ways to make an mp3- cd with your favorite songs : - Download mp3 songs from internet & burn them on a cd-r disc on your computer.
- Convert cd-audio files (from a normal music cd) onto your computer into mp3 format, using a kind software called "cd-ripper".(which is freeware/shareware on internet).
HOW TO PLAY CD-MP3 DISCS
- Press "ON/OFF" keyto switch on the unit.
- Insert an mp3 cd into the player and close the cd door.
- Press the play key.
- The disk will spin and then playback the first song (track), the display will indicate the current track no. ("00-" if it is the first track) as well as the playtime of that track in minutes and seconds.
- At anytime during playback, press play key to pause operation of the unit press play key to resume operation at the same track & position.
- At anytime during playback, press and release next or back to skip forwards or backwards byone track.
- At anytime during playback, press and hold next or back to review (fast rewind) or cue (fast forwards) the current track.
- At anytime during playback, press and hold fnd key for 1 second. the display will show the file name (song name) information.
USB-drive & sd-card mp3 playback
-
This unit is equipped with a usb socket which can accept and play mp3 files stored on standard usb flash drives (also known as "pen drives") which are for memory storage. (compatible with usb version 1.1 & 2.0).
-
This unit also has a built-in sd-card socket which can accept and play mp3 files stored on standard "sd" type flash memory cards (of maximum capacity = 1 gb) which are commonly available.
To utilize this facility, first insert either a usb drive or a sd-card into the correct slot (port) on the front of the unit as shown below: - Press the function key repeatedly until the display shows "card-usb".
- After about 5-10 seconds the display will indicate the number of mp3 songs found on the usb-drive or sd-card, and also the number of folders on the device.
- Press the folder key repeatedly to select the desired folder number.
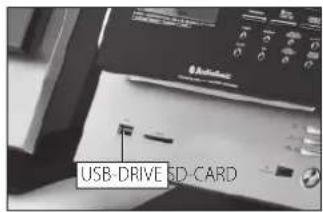
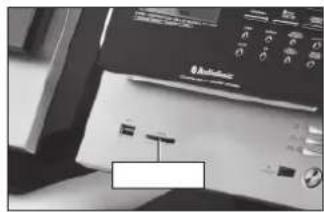
- Press next or back to skip forward or backwards to select the desired mp3 file in the selected folder.
- Press play to start play back of the selected song.
- All functions for usb-drive & sd-card mp3 playback are exactly the same as in cd mp3 mode (as previously described).

If a usb-drive & a sd-card are simultaneously inserted into both slots, the unit will automatically read the sd-card first and allow playback of the contents of the sd-card as usual. In such a case, to select the usb-drive, press and hold the "stop/usb/sd" key for 2 seconds to switch from sd-card to usb-drive.
- To switch back to sd-card, press and hold the "stop/usb/sd" key for 2 seconds again.
Note:
Although this product is fully compatible with usb 1.1 & 2.0 standards, a small percentage (about 5% ) of usb flash drives might not be readable, due to those usb drive manufacturers non-compliance with the full (official) usb 1.1/2.0 standards. the reading time for a usb-drive or sd-card varies depending on the speed of the memory device and the number of songs and folders. in some cases the reading time maybe as long as 60 seconds.
Important
always switch off the unit or change mode to "cd" or "radio" before removing a usb flash drive or sd-card, to prevent damage to your usb device or memory card.
TEXT DISPLAY MODE (ID3 DISPLAY)
This unit is capable of displaying the "text information" (id3 tag) of an mp3 song on the LCD display.
To switch on this function, simply press & hold the find key for 3 seconds.
- To switch back to normal display mode (to display track number, etc.), press & hold the find key again for 3 seconds.
Finding (searching) mp3 songs by song name (for cd-mp3 only)
- At stop or play modes, press find keyonce.
The "find" symbol will "flash" in the display, and the letter "a" will be shown. This is the "search alphabet". - Press next or back keys to advance the "search alphabet" () to select the desired search alphabet.
- At every selected "search alphabet" the lower part of the display will show the name of the first song beginning with that selected alphabet, on the disc.
Example:
- With any selected alphabet, there might be several songs on the disc (which begin with the same alphabet), to search for all songs beginning with a particular alphabet, press and "hold" the next or back keys (for 2 seconds) until the "find" stops flashing in the display.
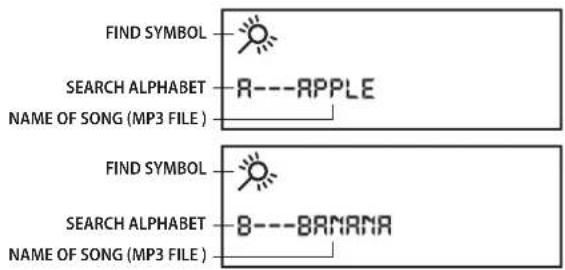
- Once the "find" symbol stops flashing, press the next key to display the next song starting with same alphabet. repeat until desired song is located.
- At anytime, when you have located a desired song (as shown on screen) just press "play" to listen to it.
To exit the "find" mode press the find key twice until the "find" symbol disappears from the display.
FINDING (SEARCHING) MP3 SONGS BY ALBUM (FOLDER) (FOR CD-MP3, USB-DRIVE & SD-CARD)
-
MP3 files (songs) can be organized into folders (directories) when you record them on to acd-r disc, each folder is called an "album" and you can (for example) organize your albums on a disc so that each album contains songs by a particular artist, or alternatively, by a different genre or type. You can organize songs & albums in any way you wish so that you can locate & play back those songs with greater ease & convenience.
To search for songs within a particular album:
for usb-drive & sd-card: press the find key once
for cd-mp3: press the find key twice
The "find"&"album" symbols will activate in the display, together with the number "1". This is the "album number" (it indicates the number of the folder on the disc). -
Press next or back to advance the album number ( ). the name of each album (the directory name) will appear in the lower part of the display for each selected album number.
Example:
| FIND ALBUM | ALBUM NUMBER -01 |
| NAME OF ALBUM | FRUITS |
| FIND ALBUM | ALBUM NUMBER -02 |
| NAME OF ALBUM | VEGETABLES |
| THIS WILL DIAPPEAR | ALBUM NUMBER -02 |
| AFTER 2 SECONDS | VEGETABLES |
| ALBUM NAME | |
| (WHICH YOU - WANT TO OPEN) | |
| FIND ALBUM | SONGNUMBER (WITHIN THIS SELECTED ALBUM -02 |
| NAME OF 1STSONG IN | VEGETABLES |
| THE SELECTED ALBUM |
- When the desired album name appears on screen, "press & hold" the next key (for 2 seconds) until the "album" symbol disappears. This will open the selected album & allows you to display all the songs contained inside that album so that you can select the desired song by using the next key & play it by using the "play" key.
To exit the "find" mode press the find key once until the "find" symbol disappears from the display.
Repeat playback fun
-
at anytime during playback:
-
press repeat key repeatedly to select
repeat 1 = to repeat the current track
repeat all = to repeat all track (full cd)
repeat album = to repeat all songs from currently selected album directory)
Anti-skip (antishock) function [esp]
- This unit has a built-in digital anti-skip function which prevents cd "skipping" when the unit is physically moved or subjected to vibrations for up to 100 seconds when playing cd-mp3 discs & upto 40 seconds when playing c-audio (cd-da) discs.
- Whenever any cd or cd-mp3 disc is played, the display will indicate a flashing ESP symbol for about 50 seconds. This means that the anti-skip memory is being filled up (but is not yet full). The anti-shock protection is already active (in use) at this time, but is not yet upto the maximum 100 seconds capacity.
Once the ESP symbol stops flashing, the anti-shcok memory is full & the unit now provides anti-skip protection for 100 (or 40) seconds of vibration. - Please note that the anti-skip function only protects against normal vibration or minor movement, severe or strong shocks/ vibrations to the unit may still cause skipping.
Using the audio line in connection (aux-input)
- You can connect the audio output of an external device
- To this unit, to listen to the sound of that device through the high quality amplifier of this music system.
- Switch the function "aux" using the function key.
- Switch on the power of the main unit and the external device
- Start playback of the external device and adjust the volume control of the main unit to the desired level.
- Remember to switch off the power of the music system (main unit) when you are finished using the external device.
When the electrostatic discharge occurs at the metal surface and button and port, the eut may be restarted or shutdown. So need you reset or restart it, then it can work normally again.
CONNECTING AN EXTERNAL POWERED SUBWOOFER (NOT INCLUDED)
- This unit has a built in subwoofer connection which can be connected to any standard powered subwoofer.
- By connecting to a powered subwoofer, the low frequency (bass sound) can be strongly enhanced to provice a much richer and deeper sound to your music.
- To use this facility, simply connect any standard powered subwoofer (easily available from most music equipment shops) using the rca jack on the rear panel of the main unit.
- Switch on the powered subwoofer.
- Play any music source (cd or radio or aux) as usual.
- You will immediately notice the deeper sound, which can be further enhanced by switching on the "equalizer" function on the main unit.
- Please note that the speakers should be connected as usual to the main unit, when using a subwoofer.
- Please note that "passive" (non-powered) subwoofoers will not work with this unit.
THE APPARATUS SHOULD NOT BE EXPOSED TO DRIPPING OR SPLASHING AND NO OBJECTS FILLED WITH LIQUIDS SHOULD BE PLACED ON THE APPARATUS.
THE MARKING AND RATING LABEL IS LOCATED AT REAR ENCLOSURE OF THE APPARATUS.
THE MAINS PLUG IS USED AS THE DISCONNECT DEVICE AND IT SHALL REMAIN READILY OPERABLE. TO BE COMPLETELY DISCONNECTED THE POWER INPUT, THE MAINS PLUG OF THE APPARATUS SHALL BE DISCONNECTED FROM THE MAINS COMPLETELY. THE MAINS PLUG SHOULD NOT BE OBSTRUCTED OR
SHOULD BE EASILY ACCESSED DURING INTENDED USE.
UNDER THE INFLUENCE OF ELECTROSTATIC PHENOMENON, THE PRODUCT MAY MALFUNCTION AND USER TO POWER RESET.
Important
Note : Although this cd player can read cd-r, cd-rw and mp3 discs - in addition to normal cd's - the playability of cd-r, cd-rw and mp3 discs may be affected by the type of software that was used to create the discs, as well as the quality and condition of the blank media you are using. 100% playability cannot be guaranteed. this is not an indication of a problem with the player.
INSTRUCTIONS ON ENVIRONMENT PROTECTION
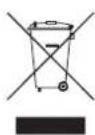
Do not dispose of this product in the usual household garbage at the end of its life cycle; hand it over at a collection point /cl for the recycling of electrical and electronic appliances. The symbol on the product, the instructions for use or the packing will inform about the methods for disposal. The materials are recyclable as mentioned in its marking, by recycling, material recycling or other forms of re-utilization of old
appliances, you are making an important contribution to protect our environment. Please inquire at the community administration for the authorized disposal location.
SySTEM SET UP PROCEDURE
As a "shelf system" (table top use)
- Included 1 pc stand for the main unit
- Included 2 pcs stand for the speakers
Fixing the base to the main unit:
- Place the stand under the main unit or speakers
- Slide the stand upward (see diagram below).

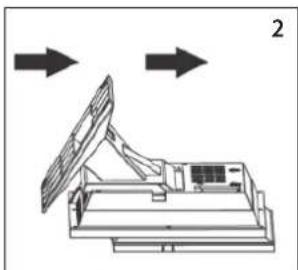
- Stop when the indicator mark on the stand is aligned with the lock symbol on the rear cabinet. (to release the stand from the main unit or speakers, slide the stand downwards (opposite direction) until it becomes released.
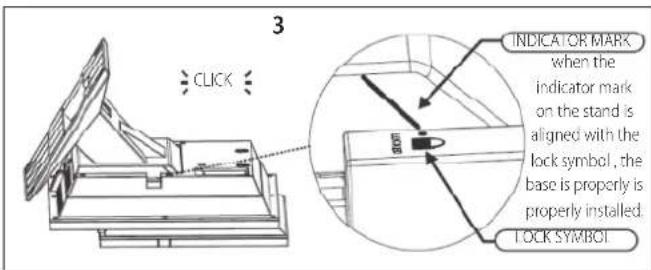
Voor de beste FM ontvangst dient u het meegeleverd antennne snoer zo good可想而知. maybe it is a good idea to have the patient in the room.
Radiogeheugen (Opslag Van Voorkeurzenders)
CONEXION DE UN SUBWOOFER EXTERNO (NO INCLUDEO)
CLASS 1 LASER PRODUCT
CLASS 1 LASER APPARAT
LUOKEN 1 LAISERLAITE
KLASSE 1 LASER PRODUKT
INICIO RAPIDO!
SONGNUMBER (WITHIN) THIS SELECTED ALBUM
VEGETABLES
WKLADANIEI WYJMOWANIE PLYTY
TRYB WYSWIWETLANIA TEKSTU (ID3)
CLASS 1 LASER PRODUCT
CLASS 1 LASER APPARAT
LUOKEN 1 LAISERLAITE
KLASSE 1 LASER PRODUKT
SNABBSTART!
ANSLUTNING AV EN EXTERN ELDRIVEN SUBWOOFER (INGAR EJ)


- QUICK START
- AUDIOSONIC
- LOCATION OF CONTROLS
- REMOTE CONTROL
- POWER SUPPLY
- MEMORY BACK-UP
- CONNECTION OF SPEAKER BOXES
- DIGITAL CLOCK FUNCTION
- HOW TO SET CORRECT TIME
- TO SET THE CORRECT TIME, FOLLOW THIS PROCEDURE
- HOW TO SET TIMER
- AUTOMATIC POWER OFF SLEEP FUNCTION
- ELECTRONIC VOLUME CONTROL
- MUSIC EQUALIZER
- OPERATION OF RADIO
- MANUAL FREQUENCY ADJUSTMENT (SCAN MODE)
- AUTOMATIC FREQUENCY ADJUSTMENT (SEEK MODE)
- FM ANTENNA
- RADIO MEMORY (STATION PRESET MEMORY STORAGE)
- INSERTION AND REMOVAL OF DISCS
- NORMAL CD OPERATION
- PROGRAMMING THE CD-PLAYER
- FOR NORMAL CD-AUDIO DISCS
- FOR CD-MP3 DATA DISCS
- WHAT IS MP3
- HOW TO PLAY CD-MP3 DISCS
- USB-DRIVE & SD-CARD MP3 PLAYBACK
- NOTE
- IMPORTANT
- TEXT DISPLAY MODE (ID3 DISPLAY)
- FINDING (SEARCHING) MP3 SONGS BY SONG NAME (FOR CD-MP3 ONLY)
- EXAMPLE
- FINDING (SEARCHING) MP3 SONGS BY ALBUM (FOLDER) (FOR CD-MP3, USB-DRIVE & SD-CARD)
- REPEAT PLAYBACK FUN
- ANTI-SKIP (ANTISHOCK) FUNCTION [ESP]
- USING THE AUDIO LINE IN CONNECTION (AUX-INPUT)
- CONNECTING AN EXTERNAL POWERED SUBWOOFER (NOT INCLUDED)
- THE APPARATUS SHOULD NOT BE EXPOSED TO DRIPPING OR SPLASHING AND NO OBJECTS FILLED WITH LIQUIDS SHOULD BE PLACED ON THE APPARATUS
- UNDER THE INFLUENCE OF ELECTROSTATIC PHENOMENON, THE PRODUCT MAY MALFUNCTION AND USER TO POWER RESET
- INSTRUCTIONS ON ENVIRONMENT PROTECTION
- SYSTEM SET UP PROCEDURE
- FIXING THE BASE TO THE MAIN UNIT
- RADIOGEHEUGEN (OPSLAG VAN VOORKEURZENDERS)
- CONEXION DE UN SUBWOOFER EXTERNO (NO INCLUDEO)
- INICIO RAPIDO
- WKLADANIEI WYJMOWANIE PLYTY
- TRYB WYSWIWETLANIA TEKSTU (ID3)
- SNABBSTART
- ANSLUTNING AV EN EXTERN ELDRIVEN SUBWOOFER (INGAR EJ)
Brand : AudioSonic
Model : TXCD1530
Category : Hi-fi system