E1 - Camera Aqara - Free user manual and instructions
Find the device manual for free E1 Aqara in PDF.

| Product Type | Indoor Surveillance Camera |
| Brand | Aqara |
| Model | E1 (CH-C01E) |
| Video Resolution | 2K (2304 × 1296p) |
| Viewing Angle | 101° (diagonal) |
| Video Codec | H.264 |
| Wireless Connectivity | Wi-Fi 6 (802.11 b/g/n/ax 2.4 GHz), Bluetooth 5.2 |
| Power Supply | USB-C, 5V-2A (adapter not included) |
| Local Storage | Micro SD card (up to 512 GB, class 4 or higher, not included) |
| Cloud Storage | iCloud (10 days with HomeKit, 50 GB/200 GB/2 TB plans) |
| Main Features | Pan and tilt, human tracking, two-way audio, night vision, privacy zone, motion detection |
| Compatibility | Apple HomeKit (HomeKit Secure Video), Aqara Home (iOS/Android) |
| Dimensions | 69 × 69 × 104 mm |
| Weight | Approximately 120 g (estimate) |
| Operating Temperature | -10°C to 45°C |
| Operating Humidity | 0 ~ 85% RH, non-condensing |
| Installation | On flat surface or on wall/ceiling with provided screw kit (optional wall mount) |
| Care and Cleaning | Clean with a soft, dry cloth. Do not use liquids or abrasive products. |
| Safety | Do not use outdoors, keep out of reach of children, do not repair yourself |
| Spare Parts and Repairability | Contact Aqara customer service. Repairs by a certified professional. |
| Box Contents | E1 Camera, USB-A to USB-C cable, plastic base, screw kit, user manual |
Frequently Asked Questions - E1 Aqara
User questions about E1 Aqara
0 question about this device. Answer the ones you know or ask your own.
Ask a new question about this device
Download the instructions for your Camera in PDF format for free! Find your manual E1 - Aqara and take your electronic device back in hand. On this page are published all the documents necessary for the use of your device. E1 by Aqara.
USER MANUAL E1 Aqara
Camera E1 is an intelligent product that supports Wi-Fi 6 and Bluetooth 5.2. It supports 2K (2304×1296p) resolution with pan & tilt, and other functions such as video intercom, human tracking, Micro SD card recording, NAS storage, and privacy zone coverage. In addition, its rich features can be used for automation applications to realize the functions such as home guard and smart control. It also supports HomeKit Secure Video.
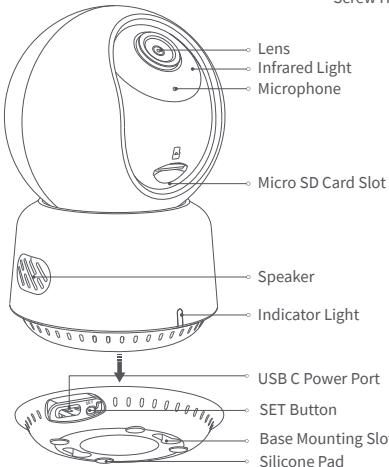

Description of button:
- Hold down the Set button for 5 seconds to reset the camera's network.
- Quickly press the Set button 10 times to restore the camera to its factory settings.
- Press the Set button once to turn off the alarm when the camera is sounding an alert.
Preparation Before Use
- A smartphone or tablet that supports Wi-Fi or a cellular network (with iOS or Android system) is required.
- Please ensure that there is a Wi-Fi connection and your internet connection is stable.
Quick Setup
1. Download the Aqara Home App
Search for "Aqara Home" in the Apple App Store, Google Play, Xiaomi GetApps, Huawei App Gallery, or scan the following QR code to download the Aqara Home app:

2. Power up and turn on the Camera E1
1 Select the Installation Location for the Camera
Ensure a stable connection between the camera and the router by avoiding any interference. Metal obstacles between the camera and the router, or near the camera, should be avoided.
Connect the Power
Locate the power interface at the back of the product. Plug in the USB-C Cable to connect the power adapter. When the Camera E1 is powered on, the status indicator will turn red and flash quickly. Ensure that the Bluetooth function on your mobile phone is activated.
3. Add the product to the Aqara Home App
Please open the Aqara Home app, tap "Home" and then tap "+" in the top right corner to enter the "Add Device (Accessory)" page, select "Camera E1", and add it according to instructions in the Aqara Home app. After a successful connection, the status indicator of the device will turn blue and keep the light constant.
4. Connect to Apple HomeKit
Open the Apple Home app, click “+” on the upper right corner, and then enter the "Add Accessory" page. Scan or manually enter the HomeKit Setup Code at the bottom of the camera to bind the camera to HomeKit.
Troubleshooting Adding the Camera to HomeKit:
- "Failed to add accessory". Due to multiple adding failures, the error information of the iOS cache cannot be removed. Please restart the iOS device and reset the camera;
- "Accessory already added". After restarting the iOS device and resetting the camera, you can manually enter the HomeKit setup code and add it again;
- "Accessory not found". Please wait for 3 minutes after resetting the camera. You can manually enter the HomeKit setup code and add it again.
If the device addition fails, please confirm the following points:
- The Wi-Fi name or password contains an unsupported special character, such as, @, #, %, -, $, etc., resulting in a failure to connect to the router. Please change it to a commonly used character and try again.
-
If the camera cannot recognize the QR code generated by the mobile phone. Please make sure that the screen size of the mobile phone is not less than 4.7 inches, and make sure that you don't use the backlight of the camera to shoot the QR code.
-
Check whether the router has enabled the Wi-Fi anti-squatter setting, which causes the camera to be unable to connect to the Internet.
- Check whether the router has enabled AP isolation, which leads to the failure to search the camera on the mobile phone in the LAN.
Product Installation
- Please make sure the camera is added successfully, and then install it onto the wall.
- You can place the camera on a horizontal surface, such as a desk, table, bookcase, and so on.
- There is a package of screw accessories inside the packaging, which you can use to fix the camera to the wall surface you want to fix.
- There is a base accessory in the package, which can be used to support the wall mount with a 1/4" screw size for the camera installation. Firstly, remove the 3M tape on the base accessory, then fix the accessory to the bottom of the camera according to the structure holes and apply pressure on the contact area between the base accessory and the 3M adhesive at the bottom of the camera to make the 3M adhesive stick firmly. At this point, the camera can be installed on the wall mount through the base accessory. Please note that the wall mount is not provided in the package and you need to purchase it separately.
Warnings:
- This product is NOT a toy. Please keep children away from this product.
- This product is designed for indoor use only. Do NOT use in humid environments or outdoors.
- Beware of moisture, do NOT spill water or other liquids onto the product.
-
Do NOT place this product near a heat source or strong electromagnetic interference sources.
-
Do NOT place it in an enclosure unless there is normal ventilation.
- Do NOT attempt to repair this product by yourself. All repairs should be performed by an authorized professional.
- This product is only suitable for improving the convenience of your home life and reminding you about the status of your devices. It should NOT be used as security equipment for homes, buildings, warehouses, or any other places. If a user violates the product use instructions, the manufacturer will NOT be liable for any risks and property losses.
- The design of this product is suitable for wall installation, in order to prevent falling off and possibly causing personal injury, we recommend that the installation of the device should be less than 2 meters.
- Please make sure the installation position is within the coverage range of the Wi-Fi and there is no obstacle around the device.
- This product does not come with a power adapter by default. Please purchase a separate adapter from a regular source.
The Bluetooth® word mark and logos are registered trademarks owned by Bluetooth SIG, Inc. and any use of such marks by Lumi United Technology Co., Ltd. is under license. Other trademarks and trade names are those of their respective owners.

Bluetooth
Description of Indicator Lights
| Indicator Light Status | Status Description |
| Red light is on steady | The camera is turning on/ Live video is in progress |
| Red light flashes quickly | Waiting to connect to the network |
| Red light flashes slowly | The camera is being resetting/OTA upgrading |
| Blue light flashes slowly | Wi-Fi network offline/ Device found successfully |
| Blue light flashes quickly | Connecting to the network |
| Blue light is on steady | Working properly |
| Purple light is on steady | Wi-Fi password error/Account binding failed |
| Off | The indicator is turned off/the device sleeps/the device is not powered |
Product Specifications
Camera E1
Video Coding: H.264
Model: CH-C01E
Ports: USB-C
Video Resolution: 1296p
Input Power: 5V = 2A
Viewing Angle: 101^ (diagonal)
Wireless Protocols: Wi-Fi IEEE 802.11 b/g/n/ax 2.4 GHz, Bluetooth 5.2
Dimensions: 69 × 69 × 104 mm ( 2.72 × 2.72 × 4.09 in.)
Operating Temperature: -10^ 45^ ( 14^ 113^ )
Operating Humidity: 0 85% RH, no condensation
Local Storage:
Micro SD card (not included). CLASS 4 or above is supported, up to 512 GB storage What is in the Box: Camera E1 × 1, User Manual × 1, USB-A to USB-C Cable × 1, Plastic Base × 1, Screw Kit × 1
For more details, please scan the QR code below to view the electronic version of
the manual

| Wi-Fi Operation Frequency | 2412-2472MHz |
| Wi-Fi Maximum Output Power | ≤20dBm |
| Bluetooth Operation Frequency | 2402-2480 MHz |
| Bluetooth Maximum Output Power | ≤13dBm |
Under normal use of condition, this equipment should be kept a separation distance of at least 20cm between the antenna and the body of the user.
Notice
Use of the Works with Apple badge means that an accessory has been designed to work specifically with the technology identified
in the badge and has been certified by the developer to meet Apple performance standards. Apple is not responsible for the operation of this device or its compliance with safety and regulatory standards.
A 10-day recording history from your Camera E1 is securely stored in iCloud and available to view in the Apple Home app on your iPhone, iPad, or Mac. You can add one camera to a 50 GB50GB plan, up to five cameras to a 200 GB200GB plan, or up to an unlimited number of cameras to a 2TB plan at no additional cost. Camera recordings don't count against your iCloud storage limit.
Communication between iPhone, iPad, Apple Watch, HomePod, HomePod mini, or Mac and the HomeKit- enabled Camera E1 is secured by HomeKit technology.
EU Declaration of Conformity

Hereby, Lumi United Technology Co., Ltd declares that the radio equipment type Camera E1, CH-C01E is in compliance with Directive 2014/53/EU. The full text of the EU declaration of conformity is available at the following internet address: https://www.aqara.org/Doc/
WEEE Disposal and Recycling Information

All products bearing this symbol are waste electrical and electronic equipment (WEEE as in directive 2012/19/EU) which should not be mixed with unsorted household waste. Instead, you should protect human health and the environment by handing over your waste
equipment to a designated collection point for the recycling of waste electrical and electronic equipment, appointed by the government or local authorities. Correct disposal and recycling will help prevent potential negative consequences to the environment and human health. Please
contact the installer or local authorities for more information about the location as well as terms and conditions of such collection points.
FCC ID:2AKIT-CHC01E
Federal Communications Commission (FCC) compliance statement:
- This device complies with part 15 of the FCC Rules. Operation is subject to the following two conditions:
(1) This device may not cause harmful interference, and
(2) this device must accept any interference received, including interference that may cause undesired operation.
- Changes or modifications not expressly approved by the party responsible for compliance could void the user's authority to operate the equipment.
Note: This equipment has been tested and found to comply with the limits for a Class B digital device, pursuant to part 15 of the FCC Rules. These limits are designed to provide reasonable protection against harmful interference in a residential installation. This equipment generates, uses and can radiate radio frequency energy and, if not installed and used in accordance with the instructions, may cause harmful interference to radio communications. However, there is no guarantee that interference will not occur in a particular installation. If this equipment does cause harmful interference to radio or television reception, which can be determined by turning the equipment off and on, the user is encouraged to try to correct the interference by one or more of the following measures:
Reorient or relocate the receiving antenna.
—Increase the separation between the equipment and receiver.
—Connect the equipment into an outlet on a circuit different from that to which the receiver is connected.
-Consult the dealer or an experienced radio/TV technician for help.
RF Exposure statement:
This equipment complies with FCC radiation exposure limits set forth for an uncontrolled environment. This equipment should be installed and operated with minimum distance of 20cm between the radiator and your body. This transmitter must not be co-located or operating in conjunction with any other antenna or transmitter.
IC:22635-CHC01E
IC NOTICE TO CANADIAN USERS
This device contains licence-exempt transmitter(s)/receiver(s) that comply with Innovation, Science and Economic Development Canada's licence-exempt RSS(s). Operation is subject to the following two conditions:
(1) This device may not cause interference.
(2) This device must accept any interference, including interference that may cause undesired operation of the device.
This Class B digital apparatus complies with Canadian ICES - 003.
This device complies with RSS - 247 of Industry Canada. Operation is subject to the condition that this device does not cause harmful interference.
This equipment complies with IC radiation exposure limits set forth for an uncontrolled environment.
This equipment should be installed and operated with minimum distance of 20cm between the radiator and your body.
This transmitter must not be co-located or operating in conjunction with any other antenna or transmitter.
Manufacturer: Lumi United Technology Co., Ltd.
Address: Room 801-804, Building 1, Chongwen Park, Nanshan IPark, No.3370, Lixian Avenue, Fuguang Community, Taoyuan Residential District, Nanshan District, Shenzhen, China
Online Customer Service: www.aqara.com/support
Email: support@aqara.com
Produkt Einführung
Online Kundenservice: www.aqara.com/support
E-Mail: support@aqara.com
Fabricant: Lumi United Technology Co., Ltd.
Ecnn kamepy He ydaonocb do6abntb HomeKit:
- « He ydaIocb do6abInb akccecCyap ». Пп добавлели n3-3a mHOrokpaTbix c6oeb INHΦopMaζηя 06 oωn6ke k3ua iOS He moKet 6bIt ydaJIeha. Пожауйста, nepe3anyctnte yctpoiCtBO iOS и nepe3arpy3nte kaMepy;
^ « Akcescyap yye Do6ablen». Посné nepezanycka yctpoičcba iOSи nepezarpy3kn Камеры Вы можete bprvhyю BBeCTN KoD yctahOBKN HomeKit и сCHOBA do6abNTb erO;
*Akucccyap He naHnDeH].IpoOJnte 3 MmHytI nocne nepe3arpy3kn KaMepbl. BbIO moKTe Bpyuhyo BBCTn KOD yctahOBKn HoneKit n ChOBA do6abNTb erO.
YbeDomneHne
IcnoIb3OboHne 3HaKa «Pa6oTaet C Apple» O3HaAeT, YTo Akceccyap 6bln pa3pa6oTaH cneuaJbNo dJa pa6oTbI cTexHOnIoNeY, yKa3aHHoHa 3HaUKe, I 6bln ceTpIhNupOBaH pa3pa6oTbNOM dJa COOTBETCTBnA CTaNdaptAm
pno3bOndteNbHocTn Apple. Apple He oTBeuaet 3a pa60Tu 3TO yCToynCTBa nI Iero cooTBeTCTBne Ctahdaptam Be3oNaChOCTn HOpmatNBbIM Tpe6OBAHnYm. 10-dHeBHnA hctopnla 3aNNc n Bawae Kamaepo E1 naEkeHO xpaHNTC B iCloud n DocTynHa dI pyocMToPa B npInLoKeHH Apple Home Ha Bawaem iPhone, iPad nIi Mac. Bbl moKTe DoabNt bOny Dna Kamaepy K tapnФHomy pIaNy 50 F,do nIaTn KaMep K tapnФHomy pIaNy 200 F, nIu do NeorpaHnueHnOro YncIa KaMep K tapnФHomy pIaNy 2 T6 be3doonlHntBhoN IpaTbI. 3aNNc c K aMepbI He yUHTbIAOTc npri OrpaHnueHn Bawaero xpaHnIIuza iCloud.
Взамоюства мени iPhone, iPad, Apple Watch, HomePod, HomePod mini ил Macи Камерс E1 с подержкй HomeKit зашицно Тхногий HomeKit.
Ecn do6ablenne yctpoiCtba He ydaetc, nojaknycTa, npobepbTe cIeJyUOHe nyHKtbl:
- Iмя палов Ni-Fi copejNKt HeNoJdepKmbaembl cneuaIbHbI cMbON, hAnpIMep, @, #, %, -, S n T. d, YTO pNBoNDt K c6OIO NOKIIHcHnE Hm K mApWpyTn3Atopy. IOnKaIyIcTa, n3MeHnte ero Ha o6UePnHbI b CMBON n nonpo6yIte e e pa3.
- Поберба, He вклочени на магшутmaTope napametap anHTn-cKBoTTepa Wi-Fi, n3-3a КOTOPORO kAmepa He можетп подклочьск ИntePHTety.
- Поберпг, Б,在 Вклочецни на Марштейзатою илядь точи достуна, стг поюдг К НЕВОЗМОЖНСТИ ПОИСКА KMЕрь на Мовиьном TeileфОе В lokaJBHOB CETN.
UctaHOBKa npOdyKta
Pa3peeHnE BnIeO:1296p
BxodnagMOuHoctb:5V-2A
KoDnipOBaHne BnIeO: H.264
BecnpobOnbIe npotoKoJIb: Wi-Fi IEEE 802.11 b/g/n/ax 2,4 ΓU, Bluetooth 5.2
PazmepbI: 69× 69× 104 MM (2,72× 2,72× 4,09 duOma)
Pa6oaya Tempepatya: -10°C - 45°C (14°F - 113°F)
Pa6oay BlaJxHocTb: 0 - 85% OTHOCHTeBHOB BlaJxHocTn, 6e3 KOHdeHcaun
JokalbHoe xpaHnInIe: KapTa Micro SD (He BXoDNT B KOMnIeKr). KJIACC 4 nnn
BbIe,do 512 Ib namrtn
CdelaHO B Kntae
Ppoun3Bovntel: Lumi United Technology Co., Ltd.
Aqpnc: nomeuehe 801-804, kopnyc 1,napk YHNBh, napk HnBshAnb, N# 3370, npocneKTJIoCraHb, o6uHa Φpyaun, knoiOn paon HToaohan, paon HnBshAnb, UHbXHb, KtTaiKmIeTCKa OHnAun-HcLy6a: www.aqara.com/support
A喙cənl.noptybI:support@aqara.com
新
Producent: Lumi United Technology Co., Ltd.
Cim: Room 801-804, Building 1, Chongwen Park, Nanshan iPark, No. 3370, Lixian Avenue, Fuguang Community, Taoyuan Residential District, Nanshan District, Shenzhen, Kina
Scan the QR code to bind the device to Aqara Home App