
DVF1200 / DVF1500 / DVF1800, DVF1200-UK / DVF1500-UK / DVF1800-UK - Electric fireplace DIMPLEX - Free user manual and instructions
Find the device manual for free DVF1200 / DVF1500 / DVF1800, DVF1200-UK / DVF1500-UK / DVF1800-UK DIMPLEX in PDF.

User questions about DVF1200 / DVF1500 / DVF1800, DVF1200-UK / DVF1500-UK / DVF1800-UK DIMPLEX
0 question about this device. Answer the ones you know or ask your own.
Ask a new question about this device
Download the instructions for your Electric fireplace in PDF format for free! Find your manual DVF1200 / DVF1500 / DVF1800, DVF1200-UK / DVF1500-UK / DVF1800-UK - DIMPLEX and take your electronic device back in hand. On this page are published all the documents necessary for the use of your device. DVF1200 / DVF1500 / DVF1800, DVF1200-UK / DVF1500-UK / DVF1800-UK by DIMPLEX.
USER MANUAL DVF1200 / DVF1500 / DVF1800, DVF1200-UK / DVF1500-UK / DVF1800-UK DIMPLEX
EN/NL/DE/FR/PL/IT/ES/TR
Consumer safety information: please read this manual before installing and operating this appliance. Failure to follow these instructions may result in a possible electric shock, fire hazard, and/or injury and will void the warranty.
To view the full range of Dimplex products, please visit out website. These instructions can also be downloaded from our company website.
CECCA
The product complies with the Required Product Safety, Electromagnetic Compatibility and Environmental Standards. This product is fully compliant with LVD, EMC,RoHs and Eco Design Directives.
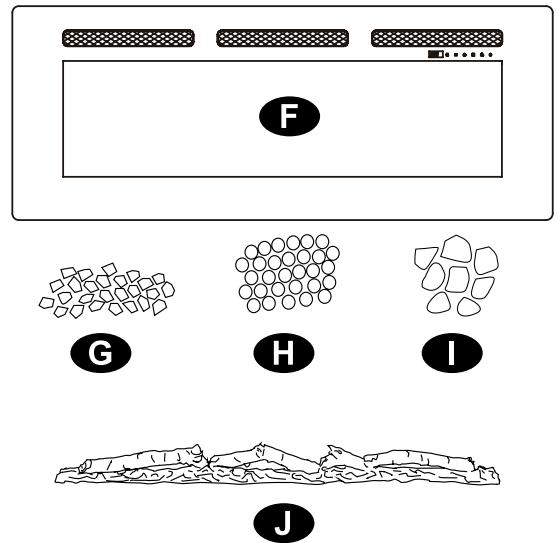
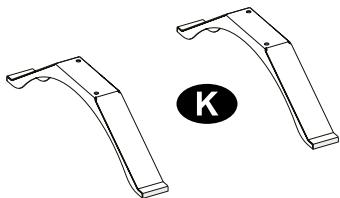
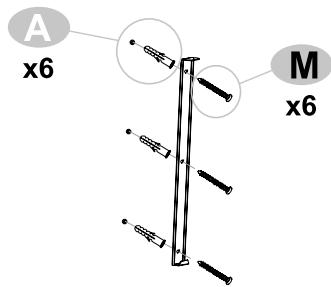
Package Contents
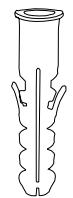
A x6
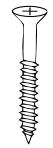
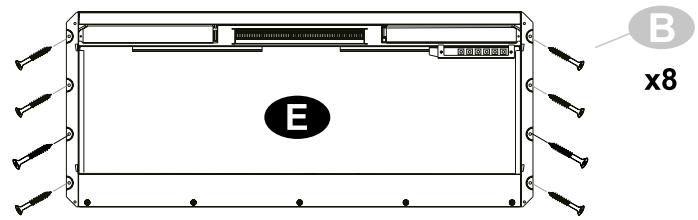
B x8
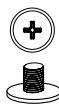
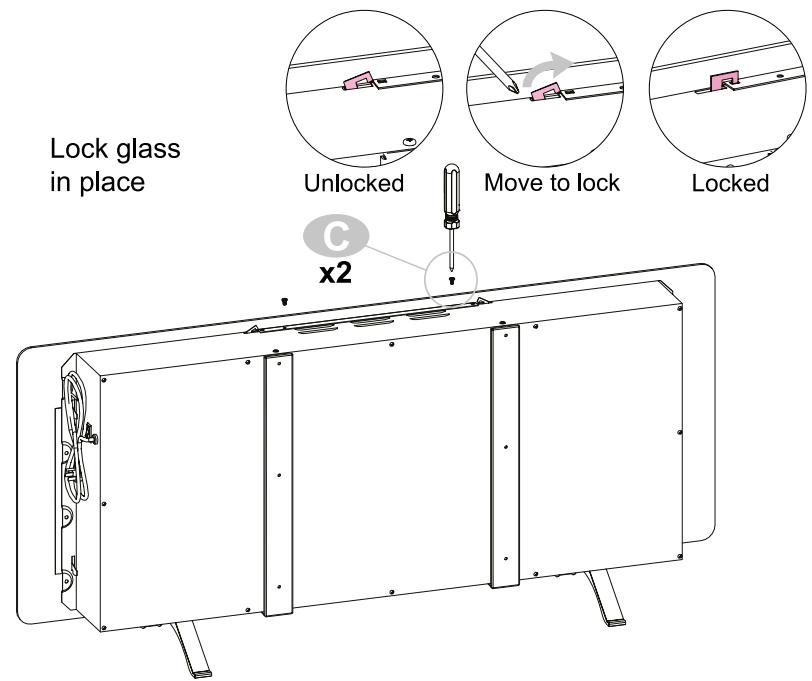
C x2
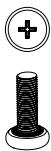
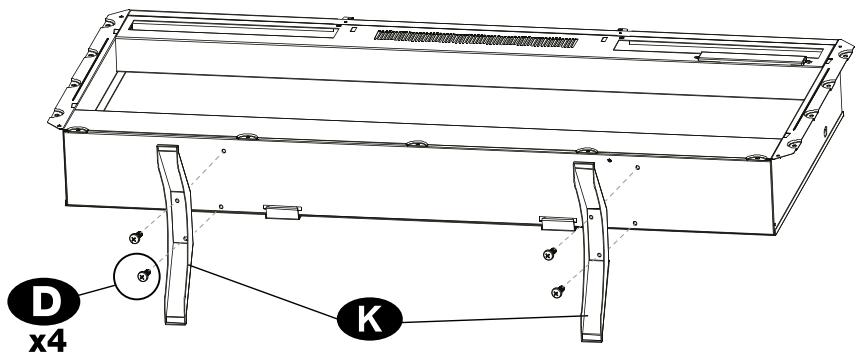
D x4
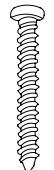
M x6
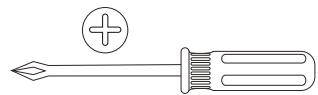
Tools required
L
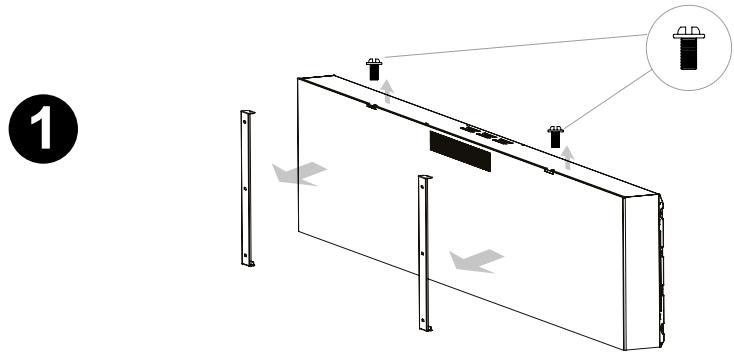
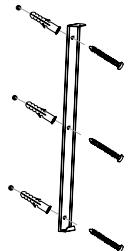
Installation
IN-WALL INSTALLATION
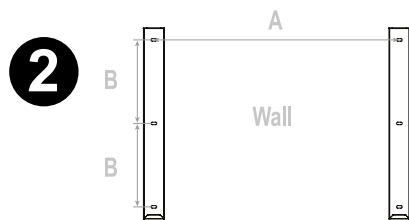
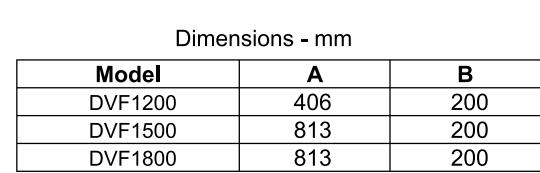
Cabinet - mm

| Model | A | B | C |
| DVF 1200 / Sierra 48" | 1057 | 165 | 470 |
| DVF 1500 / Sierra 60" | 1331 | 165 | 470 |
| DVF 1800 / Sierra 72" | 1636 | 165 | 470 |
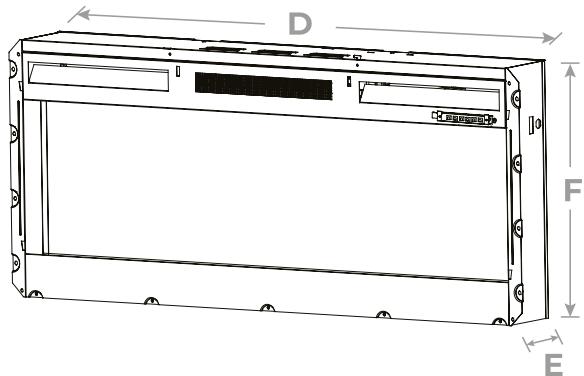
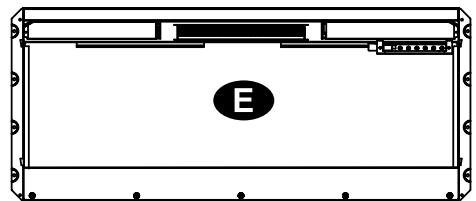
Firebox - mm
| Model | D | E | F |
| DVF 1200 / Sierra 48" | 1046 | 119 | 460 |
| DVF 1500 / Sierra 60" | 1318 | 119 | 460 |
| DVF 1800 / Sierra 72" | 1626 | 119 | 460 |
Installation
INSTALLATION HEIGHT
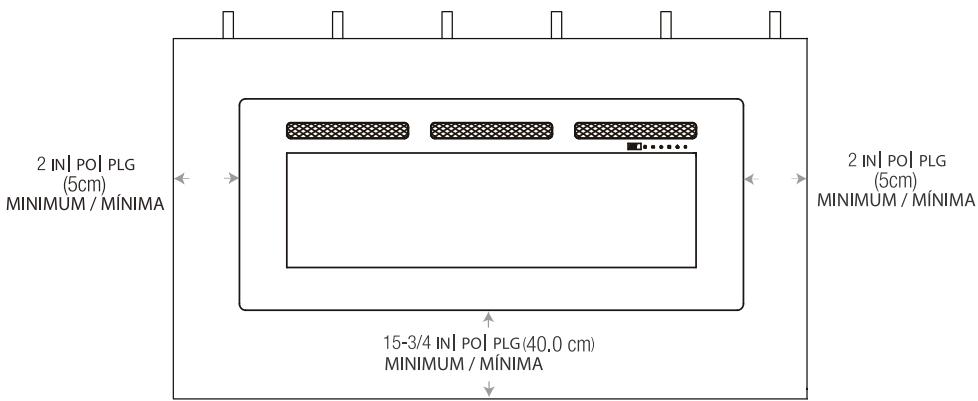
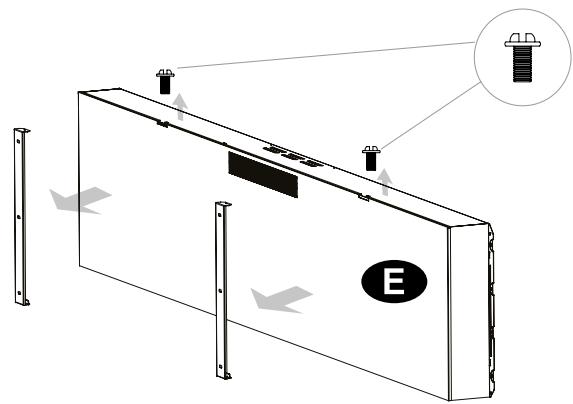
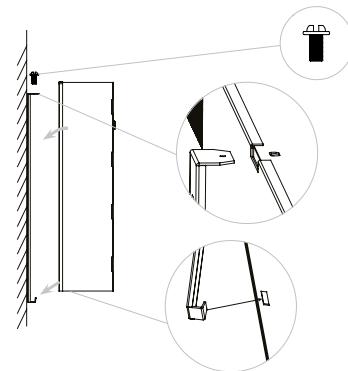
Installation (IN WALL)
IN-WALL INSTALLATION


Installation (IN WALL)
IN-WALL INSTALLATION


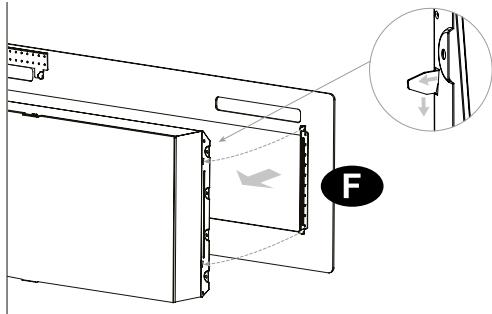

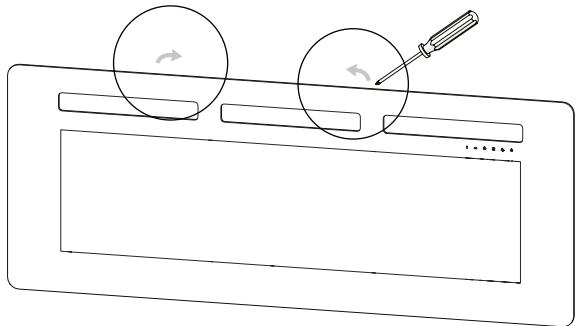
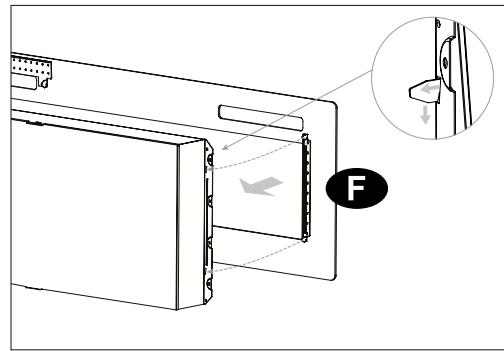
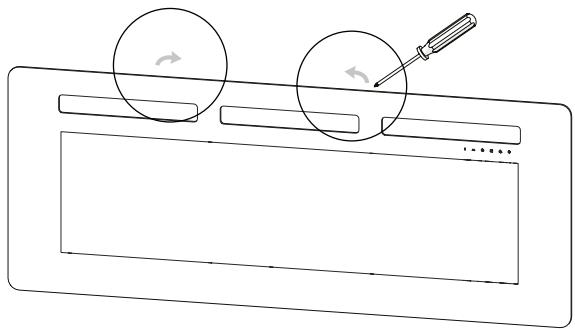
Lock glass in place
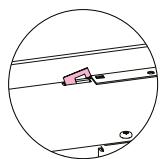
Unlocked
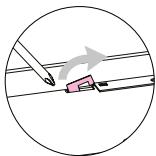
Move to lock
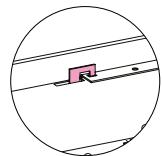
Locked
Installation (ON WALL)
ON-WALL INSTALLATION

Installation (ON WALL)
ON-WALL INSTALLATION


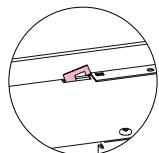
Lock glass in place
Unlocked
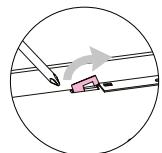
Move to lock
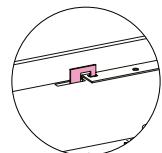
Locked

Installation
TABLE TOP INSTALLATION


Installation (ON WALL)
TABLE TOP INSTALLATION


Technical Information
| Heat Output / Warmteafgifte / Heizleistung / Production de chaleur / Moc cieplna / Potenza termica / Isi Çkışi | 230V | 240V | |||
| Nominal Heat Output / Nominale warmteafgifte / Nennwärmeleistung / Puisance calorifique nominale / Nominalna moc cieplna / Potenza termica nominale / Nominal Isi Çkışi | P_Nom | 1.46 | - | 1.59 | kW |
| Minimun Heat Output / Minimale warmteafgifte / Minimale Heizleistung / Puisance calorifique minimale / Minimalna moc cieplna /Potenza termica minima / Minimum Isi Çkışi | P_min | 1.26 | - | 1.44 | kW |
| Maximum Continuous Heat Output / Maximale continue warmteafgifte / Maximale Dauerwärmeleistung / Puisance calorifique continue maximale / Maksymalna ciaglua moc cieplna / Massima potenza termica continua / Maksimum Särekli Isi Çkışi | P_max, c | 1.47 | - | 1.68 | kW |
| Auxiliary Electricity Consumption / Extra elektriciteitsverbruik Zusatzstromverbrauch / Consommation d'électricité auxiliaire / Dodatkowe zužycie energii elektrycznej / Consumo ausiliario di elettricità / Yardimci Elektrik Tüketimi | |||||
| In standby mode / In de standby-modus / Im Standby-Modus / En mode veille / W trybie czuwania / In modalità standby / Bekleme modunda | elSB | 0.46 | - | 0.46 | W |
with electronic room temperature control
EN/NL/DE/FR/PL/IT/ES/TR
Consumer safety information: please read this manual before installing and operating this appliance. Failure to follow these instructions may result in a possible electric shock, fire hazard, and/or injury and will void the warranty.
To view the full range of Dimplex products, please visit out website. These instructions can also be downloaded from our company website.
Table of Contents
Welcome
IMPORTANT INSTRUCTIONS
Installation
Operation
Maintenance
Troubleshooting
Warranty
Technical Support
Conventions used in this manual:
NOTE: Procedures and techniques considered important to us.
CAUTION: Procedures and techniques which, if not carefully followed, will result in damage to the equipment.
WARNING: Procedures and techniques which, if not carefully followed, will expose the user to the risk of fire, serious injury, or death.
Welcome
Thank you and congratulations for choosing to purchase an electric fireplace from Dimplex, the world leader in electric fireplaces.
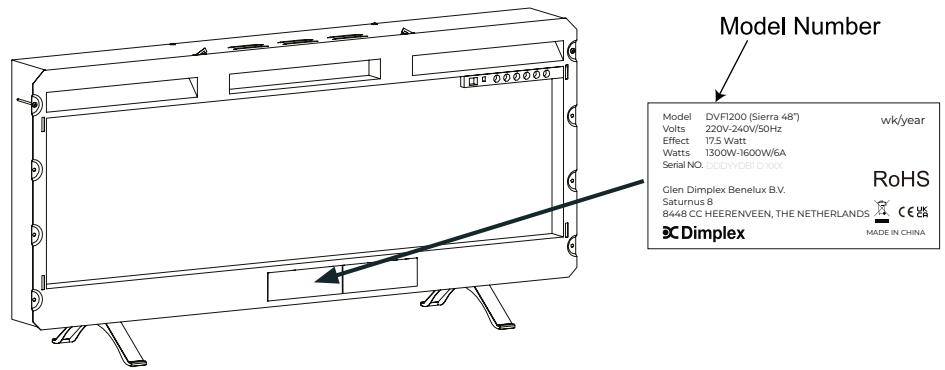
Please record your model and serial numbers below for future reference: model and serial numbers can be found on the model and serial number label of your fireplace.
CAUTION: Read all instructions and warnings carefully before starting installation. Failure to follow these instructions may result in a possible electric shock or fire hazard and will void the warranty.
Questions with operation or assembly?
Product Under Manufacturer's Warranty?
Contact your local retailer for Troubleshooting and Technical Support
IMPORTANT INSTRUCTIONS
Read this manual before attempting to install or use the electric fireplace. Always follow the warnings and safety instructions in this manual. When using electrical appliances, basic precautions should always be followed to reduce the risk of fire,electric shock or injury to persons, including the following:
Children of less than 3 years should be kept away unless continuously supervised.
- Children aged from 3 years and less than 8 years shall only switch on/off the appliance provided that it has been placed or installed in its intended normal operating position and they have been given supervision or instruction concerning use of the appliance in a safe way and understand the hazards involved. Children aged from 3 years and less than 8 years shall not plug in, regulate and clean the appliance or perform user maintenance.
- If the supply cord is damaged, it must be replaced by the manufacturer, its service agent or similarly qualified persons in order to avoid a hazard.
WARNING: In order to avoid overheating, do not cover the heater.
- Do not use this heater in the immediate surroundings of a bath, a shower or a swimming pool.
- The heater must not be located immediately below a socket outlet.
- Do not use this heater with a programmer, timer, separate remotecontrol system or any other device that switches the heater on automatically, since a fire risk exists if the heater is covered or positioned incorrectly.
- There is possible danger of installation close to curtains and other combustible materials.
CAUTION: Some parts of this product can become very hot and cause burns. Particular attention has to be given where children and vulnerable people are present.
- Do not use this heater if it has been dropped.
- Do not use if there are visible signs of damage to the heater.
- Use this heater on a horizontal and stable surface, or fix it to the wall, as applicable.
SAVE THESE INSTRUCTIONS
IMPORTANT INSTRUCTIONS
EN
CAUTION: In order to avoid a hazard due to inadvertent resetting of the thermal cutout, this appliance must not be supplied through an external switching device, such as a timer, or connected to a circuit that is regularly switched on and off by the utility.
- This appliance can be used by children aged from 8 years and above and persons with reduced physical, sensory or mental capabilities or lack of experience and knowledge if they have been given supervision or instruction concerning use of the appliance in a safe way and understand the hazards involved. Children shall not play with the appliance. Cleaning and user maintenance shall not be made by children without supervision. A disconnecting switch incorporated in the fixed wiring shall be provided.
WARNING: The appliance carries the Warning Symbol indicating that it must not be covered or has a Do not cover label. Do not cover or obstruct in any way the heat outlet grille located at the top of the appliance as overheating will result if the appliance is accidentally covered. Do not place
material or garments within 1m of the appliance, for instance curtains or furniture, as this could cause overheating and a fire risk. In the event of a fault unplug the heater. Unplug the appliance when not required for long periods. The supply cord must be placed on the right hand side of the heater away from the heat outlet underneath the appliance. Although this appliance complies with safety standards, we do not recommend its use on deep pile carpets or on long hair type of rugs.
WARNING: Do not use this heater in small rooms when they are occupied by persons not capable of leaving the room on their own, unless constant supervision is provided.
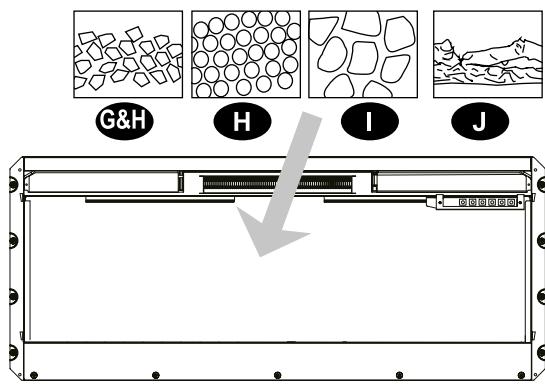
WARNING: Choking may be caused by swallowing small loose fuel bed media accidentally. Keep them away from children all the time.
WARNING: This appliance must be earthed. The use of an extension lead or multiplug adaptor is not advised when connecting this product to the mains. Connection through these devices could lead to a risk of overloading, overheating and even fire at the extension lead or adaptor due to inadequate connection quality. This heater must be used on an alternating current supply ( ) only and the voltage marked on the heater must correspond to the supply voltage.
WARNING: This heater must not be used for anything other than normal domestic household purposes in the country where it was purchased from a recognized commercial retailer.
- If the appliance is damaged, check with the supplier before installation and operation.
- Do not use outdoors
Specifications
CAUTION
RISK OF ELECTRIC SHOCK
DO NOT OPEN
NO USER-SERVICEABLE PARTS INSIDE
Electrical
Voltage: 220V~240V 50Hz
Watts: 1300~1600 Watts
Amps: 6-7 A
Wiring: Plug-In
Bulb Type: LED
Dimensions
Sierra 48"
Width: 1046 mm
Height: 460 mm
Height with feet: 547 mm
Depth: 133 mm
Depth with feet: 279 mm
Weight: 18.5 kg
Sierra 60"
Width: 1318 mm
Height: 460 mm
Height with feet: 547 mm
Depth: 133 mm
Depth with feet: 279 mm
Weight: 28.9 kg
Sierra 72"
Width: 1626 mm
Height: 460 mm
Height with feet: 547 mm
Depth: 133 mm
Depth with feet: 279 mm
Weight: 35.3 kg
Installation
GROUNDING INSTRUCTIONS
- This product is equipped with a cord that has grounding conductor and a grounding plug.
The plug must be plugged into an appropriate outlet that is properly installed and grounded in accordance with all local codes and ordinances. - This heater is for use on 220-240 volts.
A 13 Amp, 220-240 Volt circuit is required.
A dedicated circuit is preferred, but not essential in all cases.
WARNING: Electrical outlet wiring must comply
with local building codes and other applicable regulations to reduce the risk of fire, electric shock, or injury to persons.

WARNING: Do not attempt to wire your own new outlets or circuits. To reduce the risk of fire, electric shock or injury to persons, always use a licensed electrician.

WARNING: Ensure that the circuit on which the fireplace is to be installed had the power cut off at the service panel until installation is complete.
Operation
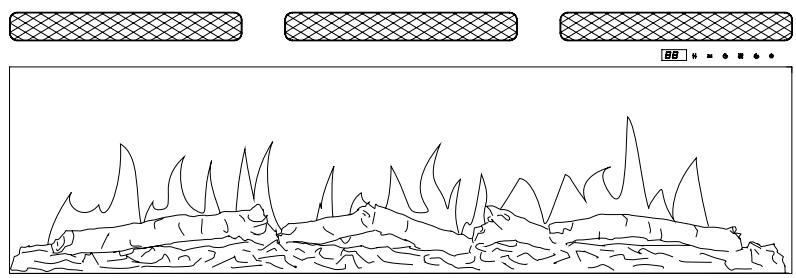
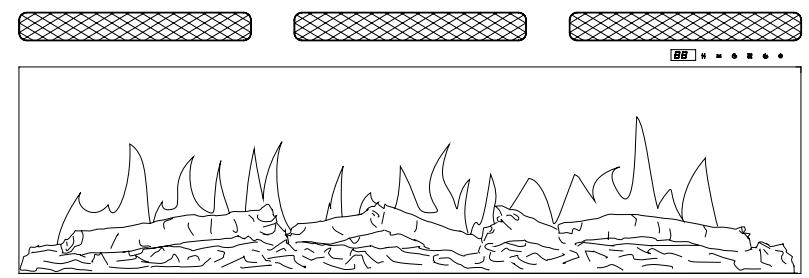
This fireplace can be operated by both a remote control and touchscreen controls. Once the fireplace has been properly connected to an earthed electrical socket-outlet ensure the manual On/Off switch, located on the right hand side of the fireplace, is in the 'ON' position.
! NOTE: Please make allowances when building the product into a wall to access this switch.
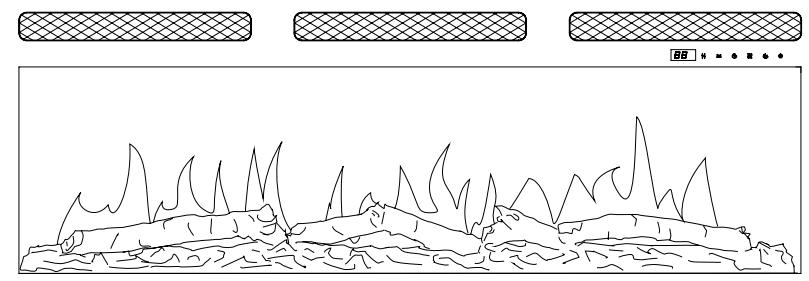
Once the fireplace is turned on the digital display and the control icons on the front glass will illuminate. If no button or icon is pressed within 10 seconds, the fireplace controls will deactivate by the digital display turning off first and then the icons. To reactivate the controls press any button on the remote or touch any icon on the front glass.
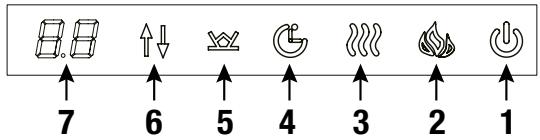
- Power ON/OFF
- Flame Control
- Heat ON/OFF
- Timer
- Ember Bed
- Level Selection
- Digital Display
NOTE: The heater on your fireplace may emit a slight, harmless odour when first used. This odour is a normal condition caused by initial heating of internal heater parts and will not occur again.
CUTOFF SWITCH
NOTE: There is a safety temperature cutoff switch (cutout) inside the heater. If the heater overheats, the cutout will shut off the supply power.
It can be reset by unplugging the unit and waiting 5 minutes before plugging the unit back on.
Operation
EN

POWER ON/OFF
POWER ON/OFF The ON/OFF button turns the fireplace ON and OFF. When the fireplace is OFF, pressing the ON/OFF button on the remote control or touching the icon on the front glass will turn on the fireplace. If the ON/OFF button is pressed again within 10 seconds, it will turn OFF the fireplace. With inactive controls, press twice to turn OFF the fireplace. The first press on the ON/OFF button lights up the touchscreen icons. The second press is nescary to activate the controls.
The fireplace has a built-in memory function. When the fireplace is turned back on, the display will show the last selected function and it will start at the last used settings (except timer). If the fireplace is disconnected from the main power source, it will restart at the default settings.

FLAME CONTROL
This button is used to turn flames ON, to alter the flame colour and to turn flames OFF. Press the Flame button multiple times to cycle through 7 solid colour options (L8, L7, L6, L5, L4, L3, L2), colour rotation option (L1) and flames OFF.
While L8, L7...or L2 is displayed, press the Level Selection button to change the brightness of the flames from the available options: 3- High, 2-Medium and 1-Low. Hold the flame icon for 5 seconds to turn the sound of flame burning ON or OFF.

HEAT ON/OFF
Pressing the Heat control turns the heater on and off.
With Heat ON and set temperature displayed, press the Level Selection button multiple times to cycle through the 11 temperature settings: 27^ C , ON, 18^ C , 19^ C , 20^ C , 21^ C , 22^ C , 23^ C , 24^ C , 25^ C , 26^ C .
'ON' means the heater operates continuously.
Operation
Heater Enable & Disable Function:
From the touchscreen controls touch and hold the Heat icon for 10 seconds. The Ember Bed will flash 6 times to indicate that the heater function is disabled. When the heat is disabled, pressing the Heat button will cause the Ember Bed to flash, but the heater will not operate. To enable the heater again, touch and hold the Heat icon for 10 seconds.
! NOTE: When the control panel is inactive, press it once to illuminate, now it is ready to action commands.
NOTE: This function cannot be set with the remote control.
APP PAIRING MODE
Hold the timer icon for 5 seconds and the heat icon flashes. At this time, TuyaSmart can connect the fireplace through Bluetooth. The Timer button is used to activate or deactivate the sleep timer.

TIMER CONTROL
Pressing the Timer turns the timer on and '8h' appears on the display. Pressing the Timer a second time within 10 seconds will turn the timer off. To set the time, use the Level Selection control to select the desired time from the following: 8h-1h-2h-3h-4h-5h-6h-7h.
The fireplace will shut off after the selected time period. Switching the fireplace OFF with the Power button will clear any timer setting.
EMBER BED
The Ember Bed button changes the Ember Bed by cycling through the seven colour options: colour rotation 'd1' and smoldering (fluctuating brightness) embers option 'd9'. With 'd8' through 'd2' displayed, the Level Selection button will adjust the brightness of the Ember Bed from 3- High, 2-Medium, and 1-Low.

LEVEL SELECTION BUTTON
The Level Selection button is used to adjust the heat setting, as well flame and Ember Bed brightness and timer setting. See relevant section for more details.
Operation
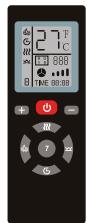
Remote control
Remove the battery cover on the back of the remote by sliding downwards and insert 2 x AA batteries ensuring that the batteries are fitted correctly. Refit the battery cover.
! NOTE: Please make sure the fireplace is plugged in and the ON / OFF Power Switch on the fireplace is in the ON position before set any function.
Below you will find an example of the steps how to set the 7-day timer.
NOTE: Firstly, you must set the time with the remote control (steps 1 to 3) before you can set the 7-day timer.
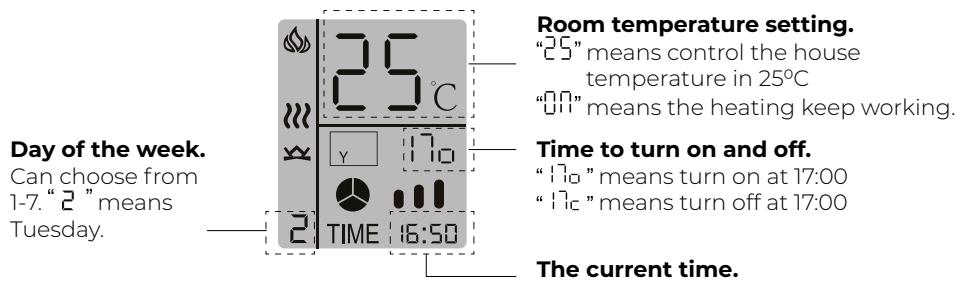
Example: The time is 16.50 on Tuesday and you would like the fireplace to turn on automatically at 17.00 on Tuesday and you also want to set the room temperature at 25C and to turn off at 18.00 on Tuesday.
! NOTE: Make sure the fireplace turns on flame and Ember Bed. Hold the remote handset and point to the front face of fireplace and the fireplace receives a remote signal, the Ember Bed will blink once.
Follow below steps to set the time with the remote control.
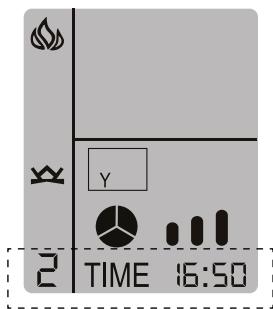
Step1: Press to wake up the remote handset.
Step 2: Hold 5 seconds to enter the current demo timer setting.
Step 3: When TIME DO:00 flash,
Press + or - to set today to Tuesday (example).
Press or to set the hour to 16.
Press or to set the minute to 50.
Operation
7 days timer setting
Step 4: Hold 5 seconds to enter the 7 days timer setting.
Step 5: When :c27 & 0 flash, press to set the automatically turn on Tuesday.
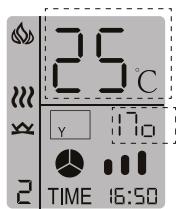
Step 6: Press to set the automatically turn on time at 17:00.
Press to set the room temperature to 25^ C .
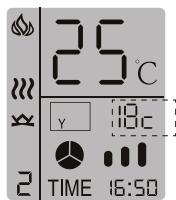
Step 7: Press to set the automatically turn off time at 18:00 on Tuesday.
Step 8: Turn off the fireplace by press
Step 9: Sit and wait and the fireplace will turn on automatically in a few minutes.
Step 10: fireplace will turn on automatically. Wait 1 hour, then the fireplace will automatically turn off.
You have now successfully set the 7-day timer
! NOTE: All the settings will be cleared when the fireplace is unplugged.
Operation
EN

This Power button turns the fireplace on or off. It has a memory function, pressing the Power button once to turn power on. Pressing the Power button again will turn the power off.

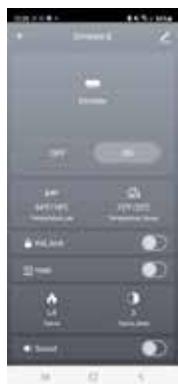
The Heater button turn the heat on or off. Pressing the Heater button once turns the Heat on, and will flash, press or button to set the desired temperature. 18-27 and ON is optional, ON means the heating keep working.

Pressing the Flame button once, and R B will flash, press or button to set the desired flame colour, the display on the remote control R y b will change accordingly.
Pressing the Flame button again, and will flash, press or button to set the desired flame brightness level. (High, Medium, Low). Hold the flame icon for 5 seconds to turn the sound of flame burning ON or OFF.

Pressing the Ember Bed button once, and G will flash, press or button to set the desired Ember Bed colour, the display on the remote control G will change accordingly.
Pressing the Ember Bed button again, and , will flash, press or button to set the desired Ember Bed brightness level.( High Medium Low).

Pressing the Timer button and will flash, press + or 0 button to set the desired timing. 1-8 hour and off is optional.

The seventh button turn the 7 day timer function on or off.
Operation
INSTALL TuyaSmart life
There are 2 ways to install TuyaSmart; Search for "TuyaSmart life" in the APP store on your phone, download and install or scan the QR code with your mobile phone.

Instructional video
Tuya app use - IOS
1 - Turn on the Bluetooth on your device

2- Create an account and login. This is not necessary, but recommended, so that you can more easily save your personal preferences.
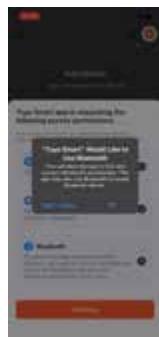
3 - Give the Tuya app access rights to use Bluetooth
4 – Your device asks permission by means of a pop-up that the app uses Bluetooth. Press ok to allow this.
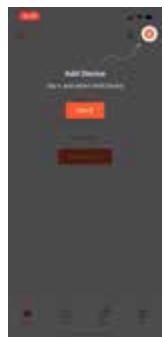
5- Then press add device.
6 – Your device asks for permission to use the local network by means of a pop-up. Press ok
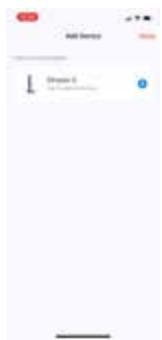
7 - Your fireplace is now searched by the app. Switch on the fire and press on the control panel of the fire for 5 seconds on G The m will flash.
8- Your fireplace is now shown with the found devices. Click on add
9 – A plus sign will now appear on the app screen next to the selected fireplace. When you press the plus sign, your fireplace is added.
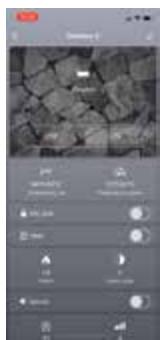
10 - When the fireplace has been added, the fireplace can be operated via the app.


Operation
Tuya app use - Android
1 - Turn on the Bluetooth on your device.
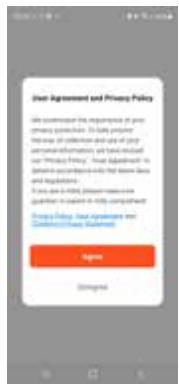
2 - Agree to privacy policy.
3 – Create an account and login. This is not necessary, but recommended, so that you can more easily save your personal preferences.
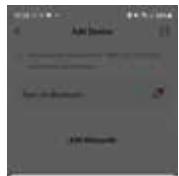
4 - Then press add device.
5 - The app asks for permission to use your location. Click continue.
6 – Your device asks for location usage. Choose here – while using the app
7 – The app will now search for the device. A pop-up for using Bluetooth will appear. Go to settings and adjust the permissions on nearby devices to allowed. Go back to the Tuya app.
8 – Your fireplace is now searched by the app. Switch on the fire and press on the control panel of the fire for 5 seconds G. The will flash.
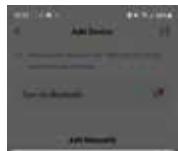
9 – Your fireplace is now shown with the found devices. Click on add
10 – A plus sign will now appear on the app screen next to the selected fireplace. When you press the plus sign, your fireplace is added.
11 – When the fireplace has been added, the fireplace can be operated via the app.
Instructional video


Maintenance
- Clean the metal trim using a water-dampened soft, clean cloth. DO NOT use brass polish or household cleaners as these products will damage the metal trim.
- The motors used on the fan and the flame generator assembly are prelimubricated for extended bearing life and require no further lubrication. However, periodic cleaning/ vacuuming of the fan/heater and air intake/output vents is recommended. The heater should be cleaned and inspected regularly, depending on conditions, and at least at yearly intervals.
WARNING: Any electrical repairs of this unit should be carried out by a licensed electrician in accordance with national and local codes.
WARNING: Disconnect power by unplugging the power and allowing heater to cool before attempting any maintenance or cleaning to reduce the risk of fire, electric shock, or injury.
! NOTE: When the heater is not in use, the heater should be stored in a dry location, away from possible damage. The power cord should be stored properly to avoid contact with hot or sharp objects.

Disposal ofused batteries
Batteries may contain hazardous substances that could be endangering to the environment and human health.
- This symbol marked on the battery and/or packaging indicates that used batteries shall not be treated as municipal waste. Instead they shall be left at the appropriate collection point for recycling.
- By ensuring the used batteries are properly disposed of, you will help prevent potential negative consequences for the environment and human health. The recycling of materials will help to conserve natural resources.
CAUTION: Do not use if the heater's mains power lead is damaged. Such use may cause a hazard. If damaged, the mains power lead must be replaced by the manufacturer or its authorised dealer.
Troubleshooting
For more information about collection and recycling of used batteries, please contact your local municipality, your waste disposal service or the point of sale where you purchased this item.
ENVIRONMENTAL PROTECTION
At the end of the electrical product's useful life, it is not to be disposed of with household waste. Please recycle where facilities exist. Check with your Local Authority or retailer for recycling advice in your country.
| Fault code | Fault Cause | Solution |
| E1 | The heater is overheating | Call technical support. |
| E2 | Thermostat is defective. | Call technical support. |
| E3 | The heater not working. | If the vents are dirty or clogged. Unplug the power, clean the dust and debris of the vent area. Wait for 5 minutes, plug in and turn on the heater. If the heater still don't work, please call technical support. |
Warranty
Two Year Limited Warranty
Products to which this limited warranty applies
This limited warranty applies to your newly purchased Dimplex fire. This limited warranty applies only to purchases made in Europe. This limited warranty applies to the original purchaser of the product only and is not transferable.
Products excluded from this limited warranty
Light bulbs are not covered by this limited warranty and are the sole responsibility of the owner/purchaser.
What this limited warranty covers and for how long
Products covered by this limited warranty have been tested and inspected prior to shipment and, subject to the provisions of this warranty, Glen Dimplex warrants such products to be free from defects in material and workmanship for a period of 2 years from the date of the first purchase of this product. The limited 2 year warranty period also applies to any implied warranties that may exist under applicable law. Some jurisdictions do not allow limitations on how long an implied warranty lasts, so the above limitation may not apply to the purchaser.
What this limited warranty does not cover
This limited warranty does not apply to products that have been repaired (except by Glen Dimplex or its authorised service representatives) or otherwise altered. This limited warranty does further not apply to defects resulting from misuse, abuse, accident, neglect, incorrect installation, improper maintenance or handling, or operation with an incorrect power source.
What you must do to get service under this limited warranty
Defects must be brought to the attention of the dealer you purchased the product from or use details in warranty section for your nearest Technical Services. Please have proof of purchase, catalogue/ model and serial numbers available when calling. Limited warranty service requires a proof of purchase of the product.
Warranty
EN
What Glen Dimplex will do in the event of a defect
In the event a product or part covered by this limited warranty is proven to be defective in material or workmanship during the 2 years limited warranty period you include , after warranty have the following rights:
1) Glen Dimplex will in its sole discretion either repair or replace such defective product or part without charge. If Glen Dimplex is unable to repair or replace such product or part, or if repair or replacement is not commercially practicable or cannot be timely made, Glen Dimplex may, in lieu of repair or replacement, choose to refund the purchase price for such product or part.
2) Limited warranty service will be performed solely by dealers or service agents of Glen Dimplex authorised to provide limited warranty services.
3) The purchaser is responsible for removal and transportation of such product or part (and any repaired or replacement product or part) to and from the authorised dealer's or service agent's place of business.
4) This limited warranty does not entitle the purchaser to on-site or in-home services. On-site or in-home services may be performed at the purchaser's request and expense at Glen Dimplex's then-current rates for such services.
5) Glen Dimplex will not be responsible for, and the limited warranty services shall not include, any expense incurred for installation or removal of the product or part (or any replacement product or part) or any labour or transportation costs. Such costs shall be the purchaser's responsibility.
What Glen Dimplex and its dealers and service agents are also not responsible for: In no event will Glen Dimplex, or its directors, officers, or agents, be liable to the purchaser or any third party, whether in contract, in tort, or on any other basis, for any indirect, special, punitive, exemplary, consequential, or incidental loss, cost, or damage arising out of or in connection with the sale, maintenance, use, or inability to use the product, even if Glen Dimplex or its directors, officers, or agents have been advised of the possibility of such losses, costs or damages, or if such losses, costs, or damages are foreseeable. in no event will Glen Dimplex, or its officers, directors, or agents be liable for any direct losses, costs, or damages that exceed the purchase price of the product. some jurisdictions do not allow the exclusion or limitation of incidental or consequential damages, so the above limitation or exclusion may not apply to the purchaser.
Warranty
Contact your local retailer for technical and troubleshooting support. Make sure you have your sales receipt, location of purchase, and the model and serial number of your product.
DC dimplex
EN/NL/DE/FR/PL/IT/ES/TR

! N.B.: Please make allowances when building the product into a wall to access this switch.
27^ ON, 18^ 19^ 20^ 21^ 22^ 23^ 24^ 25^ 26^
"ON" betekent dat de verwarmer continu in werkig is.
Bediening
EN/NL/DE/FR/PL/IT/ES/TR

EN/NL/DE/FR/PL/IT/ES/TR

Assistance technique
Watts: 1300~1600 watts
Courant: 6-7 A
Câblage: enchificant
MODE D'APPAIRAGE D'APPLICATIONS
EN/NL/DE/FR/PL/IT/ES/TR

EN/NL/DE/FR/PL/IT/ES/TR

EN/NL/DE/FR/PL/IT/ES/TR

EN/NL/DE/FR/PL/IT/ES/TR
7 days timer setting
Adim 4:7 gänluk zamanlayici ayarini girmek icin 5 saniye basili tutun.
Let Dimplex inspire you
In keeping with our policy of continuous
product improvement, we reserve the right to
make changes without notice.
©Glen Dimplex - 2022
GlenDimplex
BENELUX
www.dimplex-fires.eu
www.dimplex.co.uk