USER MANUAL 900 WT 24-4 STERWINS
2.8 RISQUES RESIDUELS
Símbolo de circulación de produits bajo la law of the law of the law of the law of the law of the law of the law of the law of the law of the law of the law of the law of the law of the law of the law of the law of the law of the law of the law of the law of the law of the law of the law of the law of the law of the law of the law of the law of the law of the law of the law of the law of the law of the law of the

10.1 A NOSSA GARANTIA
2.2 SYMBOLE NA PRODUKCIE

10.1 NASZA GWARANCJA
10.2 ELEMENTY NIE OBJECTGWARANCJA
Co6IIOJeHHe NTHx IHCTpyKcIy No3BOJNT OINTMm3nPoBaT cPOK CnyK6bI yctPoIcTBA.
2. ИНСТРУКЦИ NOTEXHИKE BE3ОПАСHOCTN
PNEpyPExKDEHNE. PpOHTaTe Bce npedynpeXeHnI INCTpyKcII NO TEXHKe 6e3OpacHOCTN. Heco6JIIODeHne 3TIX npEDynpeXeHnI INCTpyKcII MoXeT pINBeCTN K nopaxHeHIO 3JNeKTPnueCKIM TOKOM, POxApY I (uIN) TjXKeblm TpaBMam. CoXpaHIne Bce npedynpeXeHnI INCTpyKcII DJI NcNoJIb30BaHnI B 6yduSeM.
2.1 OBLIIE INPEIOCTEPEXEHNAOBONACHOCTN
-3anpeuaeTcI NCNoIb30BaHne npnbopa DeTbMn. He pa3peuaiTe DeTAM npOn3BODntb OunchKy n TexHnueckoe 06ClyxNbAHne. Detn He doJXhbl nrpaTb c npnbopom.
-Приборы могут Истовьагь Лиca C Oрразниевим
физниеским, ceHCOPнБIMn YmCTBeHHbIMN
cnooc6hOCTaMn, a TaKKe Iuca, He 0bIaIouIne DOCTaTOUHbIM OnbITOM N 3HaHnAMyN, eCIn OHn HaxOJaTcN IOI npncmOTpOM nIIN pOnyUnn INCTpykTaX OTHOCHTeJIbHO 6e3oNaChOrO nCNoJb3OBaHnI npNbopa N B03MOxHoi ONaCHOCTN.
-Перед установков, Демонохем и оочтков устор党中央 велег阴道 Влику ИЗ розгkn.
-He octablan Te np6op Ha yIuie B MOp03Hyo nOtoy. Pnp6op He 3aunueH OT Bo3deiCTBna XoIoDa.
- Ecni Ka6eIb PHTaHnI NOBpeJdeH, To BO N36exKaHne IopaxeHnI 3JIeKTPnueCKm TOKOM eRo DOJIxHeN 3aMeHnTb N3rOToBnTeJIb, eRo TEXHnueCKn IpeDCTaBnTeJIb INI dpyroJ KBaIINouPobAHhbl CPeUaJInst.
- Питане насoca должно падаВаТбя чepe3 поеклочаTeь 3aцИтBI OTперуЗКС HOMINHaJIbHbIM OCTaTOUHbIM TOKOM He 60ilee 30 mA.
3aPpeuaetcI nCNoIb30BaTb HAcOC, KOrda KTO-Jn60 HaxOДNTcR B BoIe.
- YCTaHOBka HAcOcA DoJIxHa BbIIOJIHЯTbcra B COOTBeTCTBmC
- PpIMeHMbIMn HaCuIOHaJIbHbIMn HopMaMn I PpaBUNaMn
- KOHKpeTHoN CTpaHbl.
- Дя поуеня бolyee podpo6noинфорmaци образпесь К спесиалисту.
-Перед установков, рergyларовков, Тхницек immобслужиBaHneM Илихраненem yctpoiCTBa OTCоeДиНITEэльКТрчeckn Ka6eIb OT pO3eTKN эльКТрocetn.
He noDBeprAte 3JIeKTpUeCKyIO BnIky Bo3JeCTBnIO BlaRn.
B HeKOTOpbIX pernoHax DeIcTByIOT HopMaTINBHbIe aKTbl, OrpaHnUBaIOUne IcNoJIb3OBAHHe yCTpoIcTBA B HeKOTOpbIX
2.7 IPEyIPEXJEHnI NO TEXHKe B3ONACHOCTn IPNI NcIOJIb3OBAHIN IOBEPXHOCTHO HACOCA

BHIMAHHE! Boda, nepekaunBaem naHHbIM yCTpoiCTBOM, He MoXeT NcNoIb30BaTbc4 KaK NITBeBaJ!
- He 3aɪnɪBaɪte B Hacoc arpeccBhblé XɪndKoCTn (XɪmɪyecKne BeɪeCTBa, YɪcTЯɪne cpeɪctBa) nɪn a6pa3ɪBhblé MaTePɪaJIbI.
He nCnoJIb3yIte HaCoC Ha MOpO3e.
- He BkIIOuAte HaHOC 6e3 BOdIbI.
- HNKoIa He nepeHocuTe HaCOC 3a Ka6eNb I He TAHnTe 3a Hero, YTO6bl OTCoeDHHHTb HaCOC OT 3JIeKTPocEtN.
- He MoDInΦuIpyuTe BHyTpEHHne YacTn HaCoca.
- Bo Bpemra pa60tbi Hacoca He npKacaiTecb K caMomy Hacocy, a TaKxke K npEiMeTaM, HaxOJaIIMcB KOHTaKTe C BOIoN (HaNPmEp, K npEiMeTaM B BoJe, nepuJAm n T. d.).
- Boda, nepekaunBaemaj daHHbIM yCTpOiCTBOM, He MoKeT nCIOJIb3OBaTbCRA KaK nITbEBAJ.
- He nepekauBaIe CMa3Kn, MaCJa n CoJeHyO BDoY.
- He nepekaunBaIte cToUHbI B0dbI n3 CaHy3JIOB n rpa3HyIO B0dy c 6OJIee Hn3KoI TekyueCTbI, Yem uNCTaI B0da.
- He nepekaunbaite Bovc tempepatypoiBbIe 35^
2.8 OCTATOUHbIE PNCKN
Дононгельнtie octaTochtie pncn, CB83aHHtie CnCNoIb3OBAHneM, 6cnyKmbAHmE m TpaHCnOpTnpOBKOДaHHOr N3dJIЯ, OTCyTCTBYOT.
3. TEXHnueCKNE XAPAKTEPNUCTIKN
Pa60aTne C yctpoNCTBOM TOBKO B DONyCTUMoe BpeM — He CNIuKoM paHO yTpOM n He CNIuKoM pO3dNo BeuepOM, YTObbl He 6ecnOKoNTb Dpyrnx IIOdei.
- He MoDnΦuNcIpyTe yCtpoIcTBo n He IcNoJIb3yIte Yactn i npHaJdJIeKHOCTn, He peKOMeHDoBaHHbIe npOn3BOaNTeJIem.

Ecni yctpoCTBO ynpano, noDBeprnoCb cnIbHOMy ydapu nnn Naayano aHOMaJIbHO BV6pnpoBaTb, HeMeJLeHNO octaHOBnTe erO nOCMOTPnTE Ha npedMet NOBpeKdEnn nnn ONpeDeNtte npunHy Bv6paun. B clyuae nobpeXdEnna KAKo-Im60 DeTALn ee Heo6xOIMo OTpeMOHTnpoBaTb HndJeXaUm 6pa30M nll 3aMeHNtB aABTOp3OBAHHom cepBnCHOM ceHTpe.
UcnoJIb3OBaHne HaCoca
- Bo n36exahané cyxoro xoja n neperpeBa yctpoiCTBa BCEgda cIeJnte 3a TEM, YTO6bI BCaCbIBaHounn shaanr 6bl noprpykeh B Body.
-ДиогаельзашишенOTперреввстореоньимтepmoctatom.ВслчaeперревытмocatabTomatueckn BbIKIOUHTHacoc.ПосleteoxlaackdeHnaHACOC abTomatuecknpepe3anucTcra.
OctaHOBka Haococa
-Bo n36exahanhe TpaBm Bcerda octaHaBnBaIte yctpoiCTBO:
-пегд оочисткй пл устранене мзасора;
-пегд установкови демонохим рпнадлжноcte;
- nepeed npoBepko, o6cnyxuBaHneM nI npMOHTOM yCTpoiCtBa;
-Bcnyae ue3Mepnoi Bn6paunu yctpoiCTBa (npoBepbTe He3aMeDInTeIbHO).
4.5OCObbieФYHKLIMN
ABTomatmecKaФyHKnna→PncyHOK 4.0
10.2 NCKJIIOUeyHnI TAPAHTIN
CyibkTbikTap MeH KaTbI 3aTTbI eHyiHeN KOpFay deHreI.
2.3 OcblHYCKAYIbIKTAFblBEJIITJIEP

3NeKtp TOrbHbH cOry Kayni: OcbI Kayin TypaIbI eCKepTydi caKTamay deHe JkapaKaTbHa Hemece 3Imre 3kenyi MymkiH.

Kayin typi khehe kei: Byn be nti oci eckptyi caKtamay caIaPbHaH KpypbIYbifa, Kopwafah optafa hemec 6acka Myikke 3akBIM Keny MymkiHirih KepceTei.

Eckptne: 6yn 6enri eHIMdi jxakcbi Tyciny uwiin MaHb3dbi aknapaTbI kepcTeidi.

HyckaynbIKbOkbl3: 6yI 6eIri naJaHaHyybI HyckaybIFbIH MyKnT Okbln bIfy Kepektirih 6inipedi.

KitaIshaHbIH cohbiHaFbI caikec cypetTI kapaHbI3.

Byn eHimdi Kaia Ta eHdye Bona. Byanb 6bna naaanaHy MmKIN 6oImaca, Ohbl KOKbICTb KedeE JapaTy opTaIbIfbHa anapbIb3.

Ka6eNb 3aKbIMdaIHaH Hemece KecinreH 60nCa, a7aHbI 3neKtp JeicHeH depey aKbipTaBhl3.
2.4 XYMbIC OPHbIH KAYINCI3IITI
- Baanap men 6eTne aamap naJaHaHy aMaFbHaH an JaWak typyk KaKTe.
- Copfbl 6accenHne naIdaIahyFa apHaImaFah, OHbl NFC15-100 opHaTy KaFIIaIapbIHa cOeC opHaTy XHe NaIdaIaHy kepeK. KocbIMsa Kehec any yuHIN KcicBn 3neKtp MaMaHbIHa xa6apnaCbHbI3.
4.3 BIPIHII KONDAHbIC

ECKEPTY!OcbI eHIMdi KOndaH6ac 6ypbIH,OCbI HcCKaylbIKTBiH 6acblnda «KAYINCI3IK HcCKAYIAPbl» 6eImiH,coHdai-aKa TaKbIPbIN actbIHdaftb 6apblk MToHdi Okbln WbIFbHbI3.
KpybIfblHb anfaa pet naiaanhyfa epeke Ha3ap ayapbIbI3: 6ap Ha3apbIbI3dbI ocbl 6ipHJI KOndaHbICKa ayapbIHbI3.
Copy shnahricin kafay
- CtaHapTbI KockblTapdbI copy KockblbHa bypaHdAmen 6eKtiH3.
- Copy wJnahriciH cTahdaptTbI Kockbl Wne H bickbl W kEmerIme H JnHaHb3. JnHaKTbH JxekTkiIKtI deHreJe TbIfb3 eKehdiirHe Ke3 XeTKi3H3, ce6eCi cyblkTbIFb JxblCTaTbH copy wJnahrici CydbH opHbHa, ayahb TaTbIn aanaB1.
Erep cy OHwa Ta3a 6oImaca, copy KocBbIb MeH copy WJaHrci apacbHa cy3riHi KoBiHbI3.

Copfbifa 3aKbIM KeIy Kayni 6ap!
Erep cy3rici3 60Jca: KaXeT emec 6eIWeKTeP (KYM, TAcTap XaHe T.6.) copfbifa 3aKbIM KeJItipyi MymKiH. OcbIHdaJ KcONMeH KeJItipinreH Ke3 KeIReH 3aIan 6i3diH KeINiNdiKke KipMeiDi»

Copfbira 3aKbIM Keny Kayni 6ap! Copy xHe aIay KockblTapbIHdaFb I IuaHr aIaITepeNepi KockblTapdbIH 3aKbIMdanybIH 6OJIbIPMac YwiH TEK KOJImeH 6eKemDenyi Kepek. Erep cy KockblTah aFBIn KEtce, OHda «Tyuicne KocblbICTbI TeΦIOH TaCnAmE (6epinMereH) TbIFbI3an JxabIcTBipbIH3.
- Copy wlaahricin cydbih copfbifa aftbih HkyteiciH Jxofapbl 60taibda etin ophaiaactbipbhl3. Copy wlaahricin copfbih yctihe opatnaht3, c6e6i 6y1 aya kennipwiktepiH h bifapblnyh Kewiktipedi xhe tonltpy npocecih Knihdatabl.
- Erep cy DeHreNi Tycin Ketce, copfbl KypfaK KyiHHe JyMbIc icTeMeHtiHiHe Ke3 JeTKi3y yuH, Tekcepy klanahbHbH cohcyda JxetkiJIkTI DeHreNe TeMeH 6oNybl Kepek.
CytbIKbIbKbJIbIcTaIbIH copy 1nHaRici cybIH opbHa, ayahbl tapbIn aIaIbI. KbiickblTbH dypbic6eKiITirHeHKe3 KeTki3iH3.
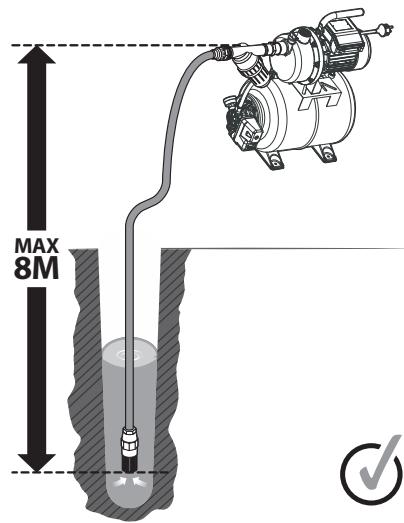
- Copfbltih 6niktiri 3 M-deh acatbih 6oIca, copy wnaHriciH 6ekitydi ycbHaMb3 (MbicaIb, oHbI afaW tipeke 6ekity). By copfbltbi copy wnaHriciH caImaFbIHan 6ocatabl.
Kipetih XeHe 5bIfaTbIH K6bIpIapDbI copFbl MexAHnKaIbIK, Kepeyre YMbipamaiTbHdae etin opHaTbHbI3.
CopfblHbToTbIpy 2.4f[2.6-cypeTep]
AnbimEn tontbipy Ke3iHne copfbldafblyaahbl bIbIapy ywiH, tontbipy TlfbihIN 6ypan aIbHbI3.
Aday KockblbApkblbCopfblbTa3a cyMeH tonTbipblb3.CopfblaFblyaahbItonlbfimEn
KeIpy yuiH, tonTbipy 6ary kypriizniyi kepek. Cy terinreHwe tonTbipbn, afbl3y tbfbihnOpbHa
caIbHb3. Byn e3diirHeH tonatbH copfbl 6oMaFaHbIKTaH, copy Ky6bipBn da tonTbipy KepeK.
TonTbipy Ke3iHne yaKbTTbYhemDey yliH copfblbKocnac 6ypbH, copy Ky6bipBn anBn TaCTan,
Ohb tiKeene tonTbipapa anacbi (Mbicnbl, copy Ky6bipBn cyFa 6aTbipy apKblbl).
Copy 6nikiri MeH copy 7nahriciHderi aya MnelaepiHe 6aJIaHbCTbI TOITbpy 1 MNHyTTaH 5 MNyTKa deIH CO3blNybl MyMKIH. Erep oan H KeN yaKbIT KeTeTih 6oJca, copfbHbI cyMeH TOITbpy KepeK.
3.3-cypet
Kaeta TOnTbIpcMac 6ypbH apdaHbIM aHaHbipo3eTKaadAn kbaPataHb!
4.4 ПАДАПАНУ
CopfbHb icke kocy 3.1 - 3.3-cypet
CopfblHbI NybpIc opHaIbIFaHbIHa XeHe TOnFaHbIHa Ke3 JeTki3iHi3, XofapblaFbI «Bipihii KOndaHbIC» Tapaybln Hkapahbl3.
Kyat Ka6eHIn KemHne 10 A caKaTahDbipFbIuHneN KopFaIaTbH Jepre TyuBkTaIHaFAN 220-240 B, 50 Tc Kyat Ke3iHe KocBbH3. AybcTbPbIN-KockBbITb6acBbH3. Ko3FaNTKbU WxMbIC icTeN TypFaH Ke3De, KocBbW uMAbJcKaHaDaBc. Copfbl TonFaHHan KeiH, cy aayd wlaHrcicn TeMeH TycpiH3.
Paindanahy kayinci3di 60bHna eceptyne
- ΘHimdi KonaJIbI CaFATTapda FaHa KOnJaHbIHb3 - TaHepte HepTe EMEc HEmce aJaMapdbH Ma3acbKaWaaTbHdai TyHde EMEc.
- ΘHIMRE eUkaHdai e3repic eHri36eHi3 Hemece eHidipyu iYcblH6aFah 6eIweKtepdi Hemece KepeKJapakTapdbI naJaIaNbHaB13.

Erep eHIM KUJAN KeTce, KaTbI COKkbIFa ymbipaca Hemece icKe KOcblbIN KeTce KaNbInCbI3 Tpype iipindece, eHIMdi Depey TOkTaTbIN, 3aKbIMdaHydbIH 6ap-KoFBIH TeKcepH3 Hemece iipinDi c6e6iH aHbIKTaHbI3. Ke3 KeJIreH 3aKbIMdbI yakiJeTTI KbI3MeT KepcTeY opTaNbIFbIHDa XeHney Hemece aybICTbIPy KepeK.
Copfblbniadaiany
KypbIfblHbIH KpyFAK KyiHHe JxMbIC icTeyIe XeHe Kbi3bln KeTyIe He Konl bepMey yuH, copy 7naHriciCy actbHa TpyFaHbHa Ke3 KeTki3iHi3.
- K03faNTKbIeH eHdpinreH tepMOCTa apKbIbI b KbI3bIn KeTydeH KopFaIHaH. KbI3bIn KeTy KaIaIbIHda, tepMOCTa aBtOMaTTbI TypDe copFbIHb I eWipeDi. Copfbl caNkbIHdaFaHHan KeiH, aBtOMaTTbI TypDe KaIbTa KcObIaDbI.
CopfbihbTOKTaTy
-
Kapakat any KayniH a3aHiY uH, ePdaiBIM KypbIFbHb1 TOKtaTbHb3:
-
Ta3anay Hemece 6iteIenreH Jepneri Ta3aJay Ke3iHne
- TipkemepepiopHaTnac Hemece aIbIn Tactamac 6ypbH
- eHIMi TeKcepy, TexHnKaJIbIK KbI3MeT Kepcety Hemece baca da Jxymblctap Jxprizy andbIHna.
- Erep Kypblfbl KaIbIncbI3 iipinien 6actaca (pepey TeKcepiHiz).
4.5 APHAиblФУнкцИЯJIAP
BTOMaTbI ΦyHKuH → cypeT (4.0)
- Cy Kɔлданынfaн Ke3ne, КьсьIM biptiHdTeMeHdEДi. КьсьIM MнHMaIДbl MэннEH TemeHdEce, copfbl aBTOMaTTbI Typde icke KocblaIbI
5. TACbIMAJIAY
5.1 KYPbIJIbIbI Hbl TAcblMAJDAy

HA3AP AYДAPbIHbI3 AnaTka Hemece XapaKaTTaHyFa JOK 6epMey yushi, TacbImaJIay Ke3iHne KypbIJFbIHbIH caJMaFbIH eckepiHi3 (TexHnKaJIbIK DepeKTePdi KapaHbI3).
CopfbHbApdaabimTacbImandayTytkacbHaHKeTepin,TacbImaandaHb3.0HIMdi Ke3 KeIreH aybp bKnpanhan Hemece Kek iuiHne TacbImaanday KeiHne naJa 6onyb MyMkiH KaTbI dipinDe H Kopfahb3.Erep KpbInfbHb KeiKte TacbImaandaFbHb3 KeNce, OHbl cbPfn KeTydeH Hemece dipinDen Koprahb3.0HIMHcBpfn Hemece Kynan KeTyine Jeonl beMpeyuHnOhiBekeTiH3.
6. KblCTAY
→ 6.1 - 6.5 - cypetTep
Copfbihb eupin, 6ocatbHb3.
TeMeHneri 一 C a _ 1 TaayTapaybHaFb6apblk HycKaynapdbOpbHdaHb3.
7. CAKTAY
7.1 KYPbIINFbIHb CAKTAY
TexnkaJIbIK, Kbl3Met KepeSy 6eIIMiHne KepeCetIInreH Nyckaynap caKtay anDbIHda opbIHdaIybi KepeK.
→ 6.1 - 6.3 - cypertep
- CopfbldaftbCyBbIKbIKbTb ToJIbIFbIMeH TcRIN TaTaHbI3, KypFaTbIHbI3 XHe eKIOckblw TbIFbIHbI KaTaNcblHbI3.
- Θhimdi, cy3rinepepi JxHe KepeK-JapaKaTapbI Ta3aNaHbI3
KypbIiFbIMeH OHbIH Kepek-KapaKaTapbIH My3JaTbImaHaJ XepDe CaKaTaHbI3.
KypblfblbApdaBIM balaapdbH KOnbl JKeTneTih Ta3a, Kpyra, JkaKcbJ KeIeTinetIH Kepde caKaTay Kepek. EHN Dpybcbl, KypblFbCaKaTaNaTbH 6emMeHH TemnepaTypacb4-24 ^ C apalbfHda bonybKepek.
KypblfblbIyNhyckalbIK KanTaMaCbHda TIK KyiHde caKtaydbI yCbHaMbI3.
8. TEXHINKALbIK Kbl3MET KOPCETY
KAYIN! Tok cofy, opt shblydaH xapaKaT any HeMece aybip XapaKaT any Kayni 6ap. Ohimpi pettey, TekcepY, ta3anay Hemece caKTay andbIHda eWipihi3.te erO.
8.1 TA3AJIAY
- Copfblhlb aXbipatblhl3
- ⅢbIbIc Kocblimbl6ypan aIbHbI3
- Copfbihh afb3bilaTbH 6eirih Ta3a Cymeh Ta3anaHbI3
- ΘηεΚTp KaδεπιH TyTαctbIfbH TeKερεπi3.
→ 5.3 - 5.4 -cypertep
Cy3ri MeH KIanaHHbIH Ta3a eKHeHdiriH TeKcepHi3. Ta3a 6oImaca, cypETte KepcTeINreHnei Ta3aHaHbI3.
8.2 TEXHnKAlbIK KbI3MET KOpCETY
2.2 CIMBOJN HA IPIPUCTPOI
C E EAC
BIDNObiJaE EByPoneeCbKIM CTAHApTAM: LcE CNMBON O3NaJaE, 10o Bnpi6 BiNIOBiaE qHHNM EByPoneeCbKIM DInpeKTbAm i BIn npoiWOB BNpO6yBaHHa H BIDNObiHicTB cIM DInpeKTbAm.
EINHn 3nak o6irny npodukui Ha pInkky kpaIH-nHeiB MtTHoro coIO3y.

UkpaHcBke MapkyBaHHa BIDNOBiaHocti.

He ytni3yte enektpnHi Bnpo6n pa3om 3 no6yTOBm CmTTam. BxnbAhi enektpnHi Bnpo6n Heo6xio 36napTu OKpemO Ta BiDnocuHa ytni3aio B cneiaJbHi nyHKtn 360py. 3a DoataKOBIO iHOpMaio uo Yoyni3aui 3BepHITbcdo Miuebux opraHb Vlaia n a6o do CBoro dinlepa.

Ipeed BnKopncTaNHm Bnpo6y npouHtaiTe Ta 3pOzMiiTe Bci iNcTpkykui, DOTpymuYteCg BCix nonepedKeHb Ta iNcTpkykui 10oTo texhikn 6e3neKn.

2.7 NONEPEIXEHHI OIO NOBEPXHEBOH HACOCA

YBAGA! Boda, sha nodaεTbcs 3a doNOMoroIO zuBOrO HacocA, He e NHTHO BOIOI!
- He 3aɪnbaɪte arpecuBhi piɪnɪn (xɪmɪchɪ npɔdʒn, 3aʊbɪ n ἀŋ yɪsɛhŋ) ta a6pa3uBhi mætepiʌn.
- He πιπάbaίτε Ḁας Βνήνγ by Mopo3y.
- He BnKOpncTObynte Hacoc 6e3 Boyn.
Hikon He nepenocbe Haoc 3a Ka6eIb, He TaHITb Ka6eIb, Uo6 BuHnTn BuNkY.
- He MoDnΦiKyIe BHyTpɪshHŋ YaCTnHŋ HaCocₐ.
- Koln hacoc npaioe, He TopkaTecra Ioro, a taKoJ npedMeTb, 10 KoHTaKTyIb 3 BOIOU (Hapniklaad. npedMeTu y BODi, npopyuToIo).
Boda,wa npdaetbcra 3a DOnomoroio cbo ro hacoca,He eniHTHOIO BOIOI!
- He nojaBaIte uepe3 Haoc MacTuHa, oJIi Ta coJeHy BOy.
He nodaBaIte uepe3 hacoc ctiuHb BOi i3 caHITapnix npmiiueHb Ta 3a6pydneHy BOy 3 MeHsOIO TkUicTIO, HIX p030pa BOJa.
- He nojaBaIte BODy, TempepaTpa JKOI cTaHOBntb 6JIbIe 35^
2.8 3AJIIMIKOBI PN3NKU
Hemaé HiaKnx DoaTKOBux 3aIIuSKOBx pU3NKiB, NOB'3aHNX 3 BUKOPNCaHHM, 06cIyROByBaHHM i TpaHCnOpTyBaHHM cboRo BnpOby.
3. TEXHIYI DAHI
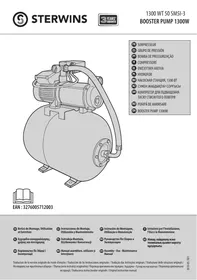
| Мосяль поерхhevого насoca | 900 WT 24-4 |
| HominaльнаnotyxнICTь | 900 Bt |
| Еlektropиона наруга / elektropиона частota | 220 - 240 B / 50 Г |
| Мaksumалын стум (на стари) | 12 A |
| Мaksumалын робочи стум | 3,8 A |
| Пapаметри КONDенCatopa (сменчы / Мaksumалын наруга) | 16 пФ/450 B |
| Клас iизяцii | F |
| Частota обертыня motopa | 2986 ob/xВ |
| Мaksumалha висota BCMOKтувань | 8 m |
| Bara 6pyтTO насoca | 16.6 кг |
| Maca netTO насoca | 13 кг |
| МaksumалынnotIK | 3800 п/юд. |
| Мaksumалын тиСКнагнITань | 4,3 6ap |
| Мaksumалha висota поадуi | 43m |
| Мakс. Temпepатура Bodи | 35 °C |
| Трубne з"едань | Ф1" 25 мВ |
| Клас IP | IPX4 |
| Гаразкований рIVENь звуковоіnotyxностi | 90 дБ (A) |
- Makcunmaßhni Tück HargitataHHa 4,3 6ap
Hacoc moze doocrhytu maKcunmaIbHoro TnCKy harHitaHHa 4,3 6ap. Odnak, yra moJeB oChaueHa peryIaTOpom TnCKy (3 pIBHmCnpaObYBaHHa Ta 3ynHKn harHitaHHa TnCKy Bi1 1,4 do 2,8 6ap), 06 3a6e3neuHTn Cta6ilbHn TnCK harHitaHHa. Ocb yomy MaHometp noka3yE TiIbKn pIBHi TnCKy Bi1 1,4 do 2,8 6ap.
4. CKIADAHN

PONPEДЖEHH! Ipeod noatkom po60tn cnid nobhictoCKnactu Bnpi6. He BnKOpNCTOByte Bnpi6, knyk cKnaDeHniIiNe uactkoBO a60 cKnaDeHni 3 nOwKOJXeHmN DeTaJIaMNI!BnKOnHyTe iHcTpyKzii 7Odo cKnaDaHnK KpOK 3a KpOKOM, BnKOpNCTOByUOu CynpoBIDHI 3O6paXeHHЯ KaHaOChepnlaJaI, i BN IerKo cKnaDeTe BeCb Bnpi6.
4.1 PO3IAKYBAHH
Fapantir He nooepbca Ha:
- Bnpi6,Якni BnKOpNCTOByBaBCa HeHaJIeXHIM YINOM,a6o
- Bnpi6, kyn 6yno noKoJKeHO BHaCnIok TpaHcNopTyBaHHa 60 HalaStYBaHHa, a60
- Bvpi6, jkni 6yb BiDpemOnTOBaHn a6o npBOOpJLac7aMiHa DeTaJIe CTOpOHHmN Oc6amn, a60
- Bnpi6, kmyo nozkdojeho BhaCniOk HeDoTpmaHHra npaBnI TexHikn 6e3neKn a60 iHcTpyKci 3 BnKOpnstAHn, a60
- Bupi6,якni po36upanu a6o Bidkpmbanu, a6o
- Bnpi6,якн Викорисовувався 3npoфсійHoIо MeToIо,а60
- Bπiδ, kπiπdαBcτ Tempeatypam, ξO BVxOaTb 3a Mεχi, BkaaH i Bpɔzini «36epiraHnH».
Bupi6 Maé BUKOPINCTOByaTncb y 3BvuaHnX yMObax ekCpNyaTcuii, a He dIy npofoeciHnx cIneJ. Tomy cyra rapaHTiye po3noBcUdKjEytbcRa H BuPo6n, IIO BUKOPINCTOByIOTBcR KOMNaHIMn 3 6laRooyctpoTo Ta O3eHeHHN, MiueBIMn oprHaAMn BlaDi, a TAKOX KOMNaHIMn, kI npOnohyIOb ONJaCyBaHm a60 6e3OpInaTHn pOKat 6bnDaHnn.
Y pa3i BnHnKHeHH np6bEmn a6o BnAByeHHa De6ekTy Heo6xIHO CnoaATy 3BepHTnc4 Do dJIlepa STERWINS. Y 6ilbIooCTi BnuaKIB came biN 3MOke BnpiuNTn np6bEmy a6o ycHyTu de6ekT. 36epiraTe paxyHOK-kaKtpy a6o KBntaHcIO, ockInbKn iX Heo6xIDHO 6yde nped'ABTu dJa O6p6Kn 6yb-aknx npTeEH3i.

Introducere
Thank you for choosing this product. Upon designing and manufacturing our products, we place all of our efforts into ensuring an excellent quality that meets the needs of the users. Following these instructions allow to optimize the lifetime
IMPORTANT! IN ORDER TO OBTAIN THE UTMOST SATISFACTION FROM THIS PRODUCT UPON SETTING IT UP, USING IT, AND MAINTAINING IT, WE RECOMMEND THAT YOU CAREFULLY READ THIS USER MANUAL BEFORE USING THE PRODUCT. PLEASE PAY ATTENTION TO BASIC WARNINGS RELATING TO SAFETY WITHIN THIS MANUAL, AND KEEP THE MANUAL FOR LATER REFERENCE.

IMPORTANT, KEEP THE MANUAL FOR LATER REFERENCE : READ CAREFULLY
Contents
- Intended use of auto surface pump 900W
- Storage
- Safety Instructions
- Maintenance
- Technical data
- End of life
- Assembly
- Warranty
- Transportation
- Wintering
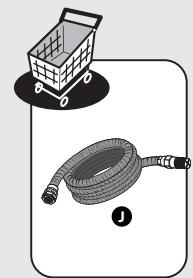
1. INTENDED USE OF AUTO SURFACE PUMP 900W
The product is mainly intended for home supply and irrigation. Do not use it for others purposes.
After unwrapping the packing, make sure that the product is complete with its accessories (if any). If the product is damaged or has any defect, please do not use it and bring back it to your dealer. If you give this product to another people, please give him also this instruction manual.

Note : This product is not suitable for continuous pump operation (e.g. continuous circulation in a pond) or as a stationary installations (e.g. lifting device, fountain pump).
Main purpose
- For domestic use around the house and garden
- For irrigation and watering of green areas, vegetable beds and gardens.
- For operation of lawn sprinklers.
- For drawing water (with pre-filter) from ponds, streams, rain barrels, rainwater cisterns and wells.
- For supplying water to the house.
Approved feed fluids
- Fresh water with very low particle content (size < 0.5mm ), free of chemicals or sand residues, such as rainwater, runoff or pond water.
How it works
The operating principle of the installation is based on create a movement of fluid, suck it and creating pressure due to centrifugal force generated by the movement of the impeller of the pump. When you turn on the pump, the liquid in the turbine is pushed from the center of the wheel to the periphery by centrifugal force, which leads to the creation of a flow, and to the periphery, increased pressure, the result is that the fluid in the pump begins to flow through the pump outlet
by centrifugal force, which leads to the creation of a flow, and to the periphery, increased pressure, the result is that the fluid in the pump begins to flow through the pump outlet.
The installation is controlled by a pressure switch. When the pump is turned on, the water enters the tank until the set upper pressure is reached on the pressure switch, the pump is stopped. The liquid is discharged without starting the pump until the liquid pressure in the tank reaches the lower mark of the pressure set on the pressure switch. Then the cycle repeats itself.

DANGER : Risk of injury, risk of damage! Caustic, slightly inflammable and other explosive substances (such as petrol, petroleum, diluted nitrogen), greases, oils, salt water and waste water from toilets as well as sludgy water that has a slower flow capacity than water, must not be transported with this pump. The temperature of the delivered fluid must be between 5^ and 35^ .
Please note that our equipment has not been designed for use in commercial, trade or industrial applications. Our warranty will be voided if the machine is used in commercial, trade or industrial businesses or for equivalent purposes. This product has been designed to be used over a period of 6 years (Expected lifetime).
Following these instructions allows to reach the lifetime.
2. SAFETY INSTRUCTIONS
WARNING : Read all safety warnings and all instructions. Failure to follow the warnings and instructions may result in electric shock, fire and/or serious injury. Save all warnings and instructions for future reference.
2.1 GENERAL SAFETY WARNINGS
- This appliance shall not be used by children. Cleaning and user maintenance shall not be carried out by children. Children shall not play with the appliance.
- Appliances can be used by persons with reduced physical, sensory or mental capabilities or lack of experience and knowledge if they have been given supervision or instruction concerning use of the appliance in a safe way and if they understand the hazards involved.
-
Always disconnect the appliance from the supply before assembling, disassembling or cleaning.
-
The appliance shall not be left outside during freezing weather conditions. The appliance is not protected against the effects of freezing.
- If the supply cord is damaged, it must be replaced by the manufacturer, its service agent or similarly qualified persons in order to avoid a hazard.
- The pump current must be supplied through an overload protection switch with a residual current response of 30 ~mA or less.
- The pump must not be used while any person is in the water.
- The pump must be installed in compliance with applicable national regulations of each country.
- Check with a specialist for further detailed information.
- Before installation, adjustments, maintenance, or storage, unplug the electric cable from the power outlet.
- Do not expose the electric plug to humidity.
- Some regions have regulations that restrict the use of the product in some operations. Check with your local authority for advice.
- Local regulations may restrict the age of the operator.
- Keep in mind that the operator or user is responsible for accidents or hazards occurring to other people or their property.
- Disconnect the plug from the power source from the product before making any adjustments, changing accessories, or storing it. Such preventive safety measures reduce the risk of starting the product accidentally.
-
Maintain the product. Check for misalignment or binding of moving parts, breakage of parts and any other condition that may affect the operation. If damaged, have the product repaired before use.
-
While operating the product, always wear substantial footwear and long trousers. Do not operate the machine when barefoot or when wearing open sandals. Avoid wearing clothing that is loose fitting or that has hanging cords or ties; they can be caught in moving parts.
- Check the fault current protection switch and the protective earth contact (earthing) for proper function at regular intervals
- Check the power cord with mains plug for damage before every use. If the power cord is damaged, please arrange immediately for the exchange by an authorized customer service or a skilled electrician.
- All electrical sockets should be fixed in an area that is protected against floods.
- Do not use the power cord to carry/ transport the machine.
- Do not scrape the power cord across sharp edges and ensure that it does not get pressed.
- The voltage indicated on the type plate must correspond to the voltage of the electrical source
- Always plug the power cable to an earthed 220-240V 50Hz power supply protected by a minimum 10-amp fuse.
- Pollution of the liquid could occur due to leakage of lubricants
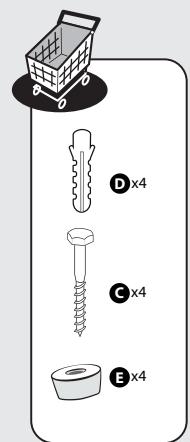
- If the product is already assembled, please make sure that all screws are tightly fixed before using it. If the product requires that you assemble it, please make sure upon opening the package that all the elements needed for setting up the product have been provided. If the product is damaged or has defects, do not use it and take it back to the nearest store.
2.2 SYMBOLS ON THE PRODUCT

Complies with European standards: This symbol means that this appliance is compliant with the applicable European directives, and a test of compliance with these directives has been performed.
Single mark of circulation of products on the market of the Member States of the Customs Union.
Ukrainian conformity marking
Electrical products should not be discarded with household products. Used electrical products must be collected separately and disposed of at collection points provided for this purpose. Talk with your local authorities or dealer for advice on recycling.
Read and understand all instructions before operating the product, follow all warning and safety instructions.
Guaranteed sound power level (tested according to Directive 2000/14/EC as amended by 2005/88/EC).
Protection index against intrusion of liquids and solids.
2.3 SYMBOLS IN THIS MANUAL
Electrical hazard : Failure to observe this warning may result in physical injury or death.
Type and source of the danger: This symbol indicates that damage to the appliance, the environment or other property may occur as a result of non-observation of this warning.
Note : This symbol indicates important information for better understanding of the product.
Read the manual: This symbol indicates that you need to read the user manual carefully.
Please refer to the corresponding illustration at the end of the booklet.
This product is recyclable. If it cannot be used anymore, please take it to waste recycling center.
Remove plug from the mains immediately if the cable is damaged or cut.
2.4 WORK AREA SAFETY
- Keep children and bystanders away from the area of use.
- The pump is not intended for use in a swimming pool, it must be installed and used in compliance with NFC15-100 installation principles. Check with your professional electrician to obtain further advice.
2.5 ELECTRICAL SAFETY
- WARNING! This product produces an electromagnetic field during operation! This field may under some circumstances interfere with active or passive medical implants. To reduce the risk of serious or fatal injury, we recommend persons with medical implants to consult their doctor and the medical implant manufacturer before operating this product!
2.6 PERSONAL SAFETY

CAUTION In order to prevent accidents or injuries, keep in mind the weight of the appliance during transport (see Technical Data).
- Use personal protective equipment when manipulating the product. Protective equipment such as gloves, eyes protections used for appropriate conditions will reduce personal injury.
- Dress properly. Do not wear loose clothing or jewelry when manipulating the product.
- Secure long hair so it is above shoulder level to prevent entanglement in moving parts.
2.7 BOOSTER PUMP SAFETY WARNINGS

CAUTION! Water that has been delivered with this appliance is no drinking water!
- Do not pour corrosive liquids (chemical products, cleaning products) nor abrasive material.
- Do not expose the pump to frost.
- Do not operate the pump without water.
- Never carry the pump by its cable, nor pull on the cable to unplug it.
- Do not modify the interior of the pump.
- While the pump is running, do not touch the pump, as well as objects in contact with the water (for example, objects in the water, railings, etc.).
- Water that has been delivered with this appliance is no drinking water
- Do not pump greases, oils and salt water.
- Do not pump waste water from sanitary facilities and silty water with a lower flowability than clear water.
- Do not pump water that has a higher temperature than 35^ C .
2.8 RESIDUAL RISKS
| Surface pump model | 900 WT 24-4 |
| Power rating | 900W |
| Electric voltage / Electrical frequency | 220V-240V / 50Hz |
| Maximum starting current | 12 A |
| Maximum working current | 3.8A |
| Capacitor parameters(capacity / maximum voltage) | 16 μF/450v |
| Insulation class | F |
| Motor rotation frequency | 2986rpm |
| Maximum suction height | 8m |
| Pump gross weight | 16.6 Kg |
| Pump net weight | 13 Kg |
| Maximum flow | 3800 L/h |
| Maximum discharge pressure | 4.3 Bar |
| Maximum delivery height | 43m |
| Max. water temperature | 35°C |
| Tube connector | Ø1” 25 mm |
| IP Class | IPX4 |
| Guaranteed sound power level | 90 dB(A) |
- Maximum discharge pressure of 4.3 bar
The pump can reach a maximum discharge pressure of 4.3 bar. However, this model is fitted with a pressure regulator (with triggering and stopping pressure levels between 1.4 bar and 2.8 bar) in order to provide a stable discharge pressure. That is why the manometer indicates only pressure levels falling between 1.4 bar and 2.8 bar.
4. ASSEMBLY

WARNING! The product must be fully assembled before operation! Do not use a product that is only partly assembled or assembled with damaged parts! Follow the assembly instructions step-by-step and use the pictures provided as a visual guide to easily assemble the product!
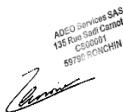
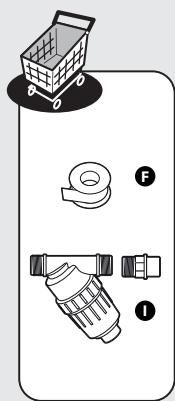
4.1 UNBOXING
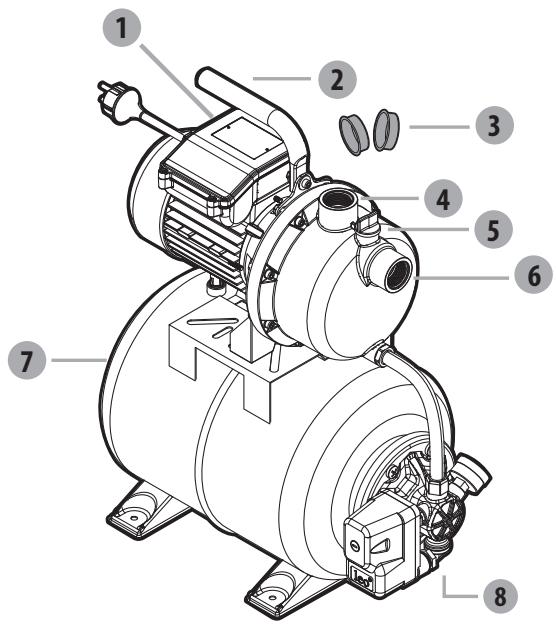
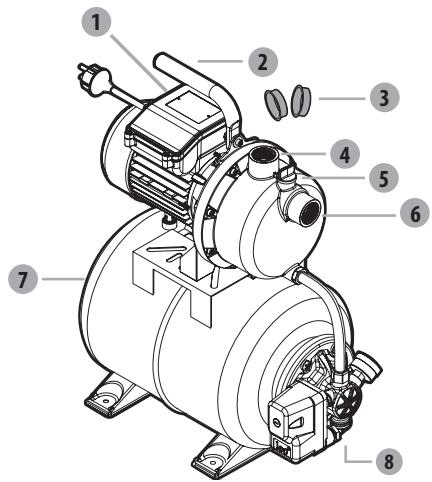
1.ON/OFF switch
2. Carrying handle
3. Connector caps
4. Discharge connector (output)
5. Filling plug
6. Suction connector (input)
7. Cover of the tank valve
8. Drainage plug
- Do not use any sharp tool (cutter, knife...) when unboxing, you may damage the product.
- When unboxing, take the pump with the carrying handle (2)
- Do not use the power cord to lift, carry or transport the machine.
- Do not scrape the power cord across sharp edges and ensure that it does not get pressed.
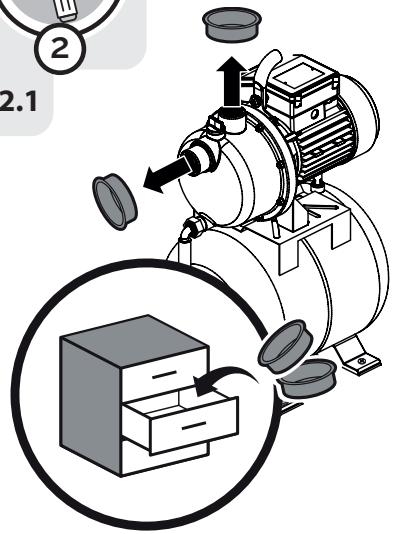
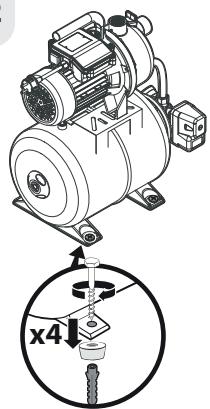
4.2 INSTALLATION
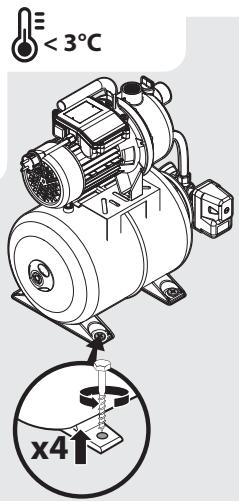
Tightly screw the pump illustration 2.2
Attach the pump to a flat level surface with suitable screws and silent blocks.

DANGER! Risk of injury due to electric shock. Warning! Do not plug in before installation is fully completed!

CAUTION! Always wear safety glasses and gloves during installation.
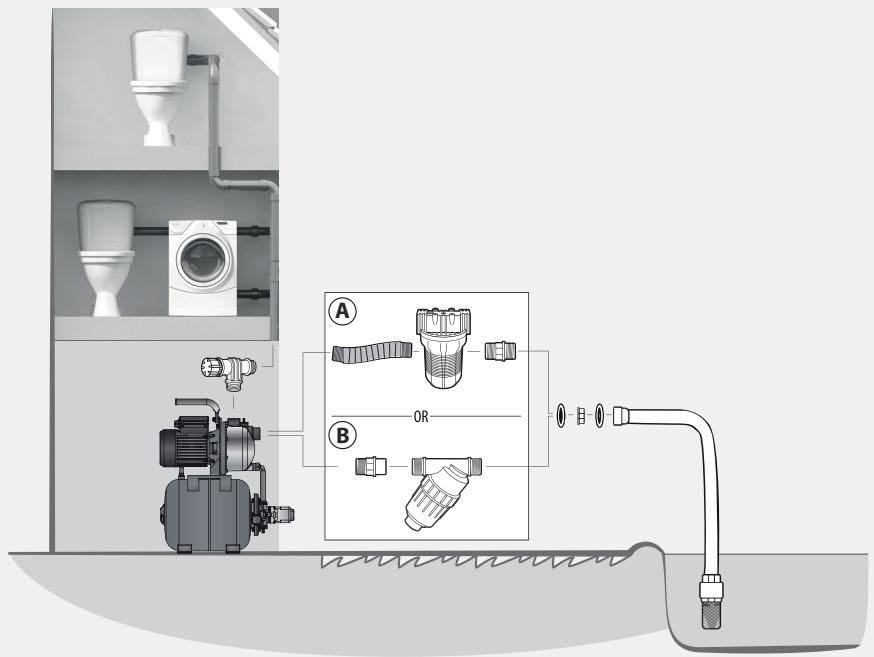
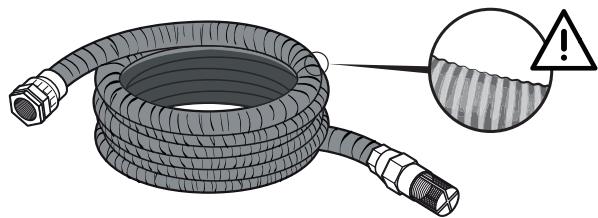
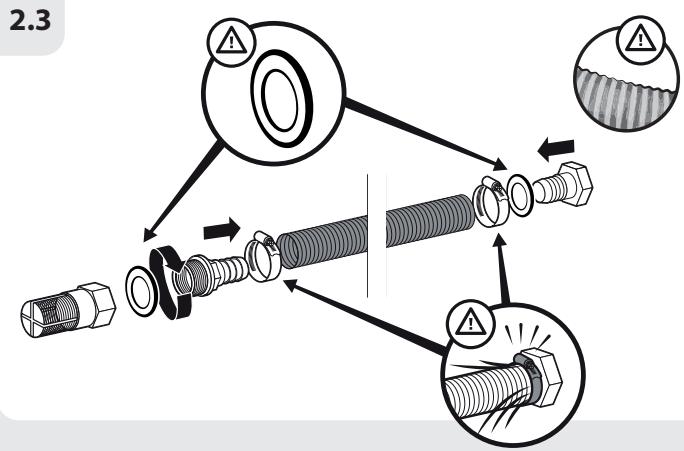
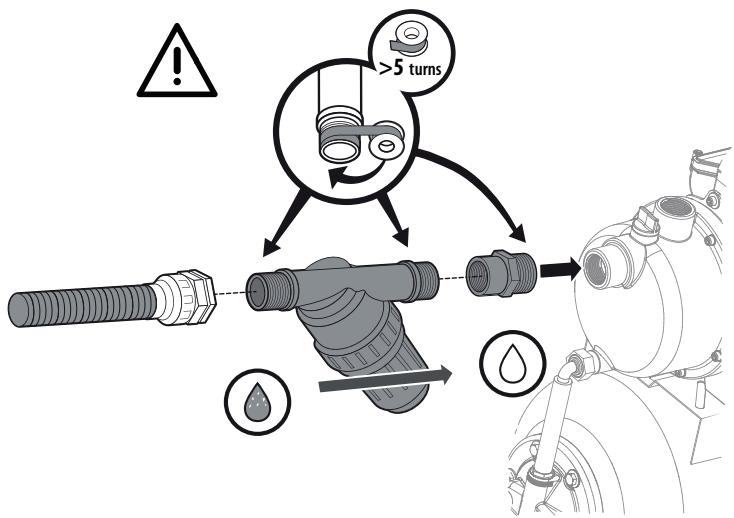
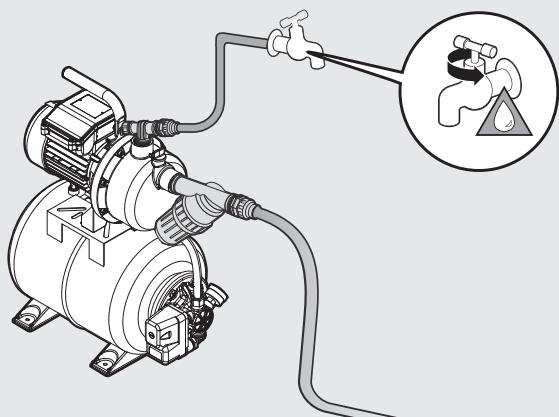
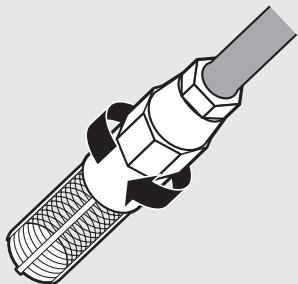
Connecting the suction hose illustration 2.3
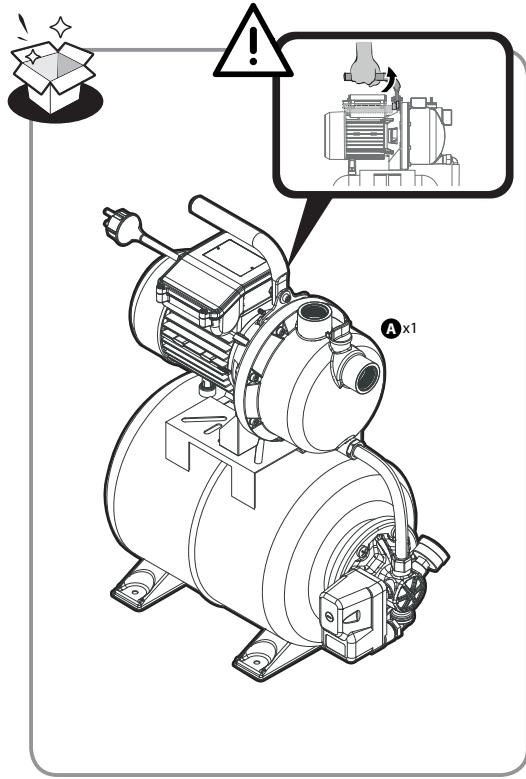
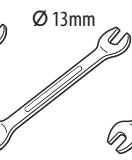
Assemble the different elements together according to the illustration. In case screw are necessary: tight it with appropriate tool.
- As a basic principle, we recommend using:
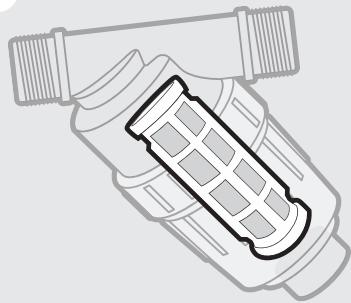
- A preliminary filter, in order to avoid unnecessary damage to the pump as a result of stones and solid foreign bodies.
- A suction-hose set with suction hose and an intake valve with a strainer (in order to prevent long priming periods).
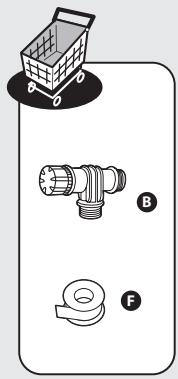
- If you cannot obtain a suction-hose set, please purchase :
-an 25mm(1^ ) intake hose
- an intake valve with a strainer
- 2 hose clamps 2 standard adapters (one for the suction hose, one for the discharge line) and assemble the suction-hose set yourself using a standard adapter and a clamp.
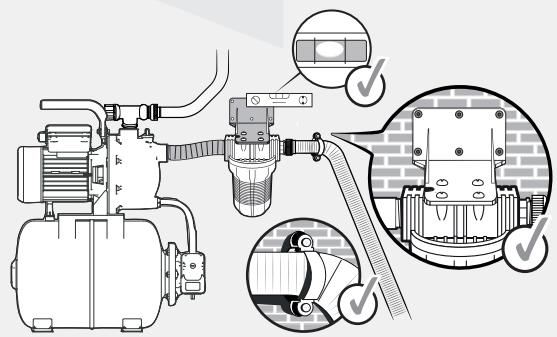
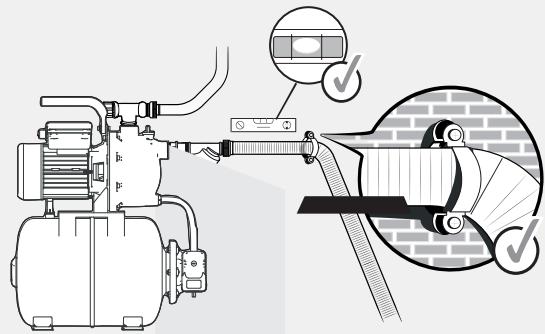
Attach the filter to the wall. Make sure that the vibrations of the pump do not damage this installation (flexible connection is strongly recommended)
4.3 FIRST USE

WARNING! Read the « SAFETY INSTRUCTION » section at the beginning of this manual including all text under subheading therein before using this product.
Pay particular attention using the machine for the first time : focus and dedicate all your attention to this first use.
Connecting the suction hose illustration 2.5
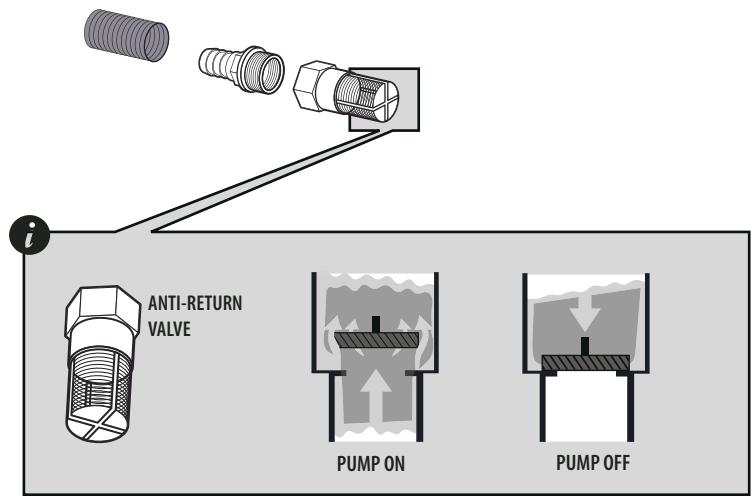
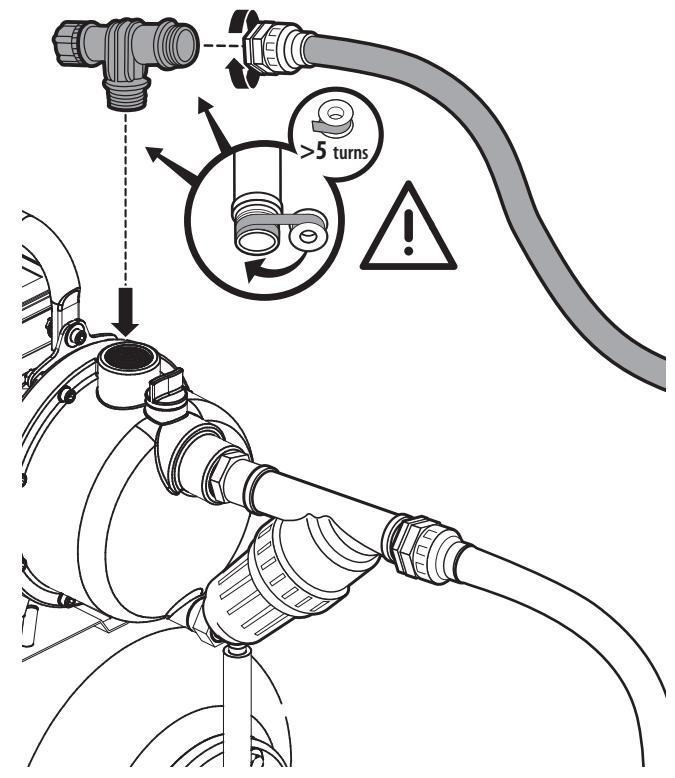
- Screw the standard connectors onto the suction connector.
- Assemble the suction hose using a standard connector and clamp. Make sure the assembly is tight enough as a leaking suction hose will draw in air instead of water.
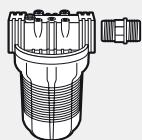
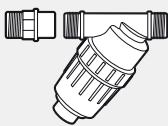
- If the water is not so clear, add a filter between the suction connector and suction hose.

Risk of damage to the pump!
If without filter: unwanted particles (sand, stones, etc.) will cause damages to the pump. Any damage caused in this way will not be covered under our warranty

Risk of damage to the pump!
The hose adapters on the suction and discharge connectors must only be tightened by hand to avoid damage to connectors. If water leaking at the connector, seal the joint with PTFE tape (not included).
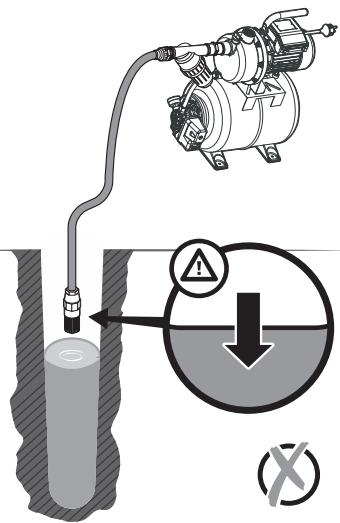
- Position the suction hose so that it rises from the water withdrawal point to the pump. Avoid positioning the suction hose higher than the pump, as this would delay the escape of air bubbles and impede the priming process.
- The end of the intake valve should be low enough in the water to ensure that if the water level falls, the pump will not run dry.
- A leaking suction hose will draw in air instead of water. Please make sure the clamp is properly tightened.
- For suction heights exceeding 3m we recommend securing the suction-hose (e.g. by fastening it to a wooden post). This relieves the pump of the weight of the suction hose.
- Install the intake and discharge lines in such a way that they do not place the pump under any mechanical strain.
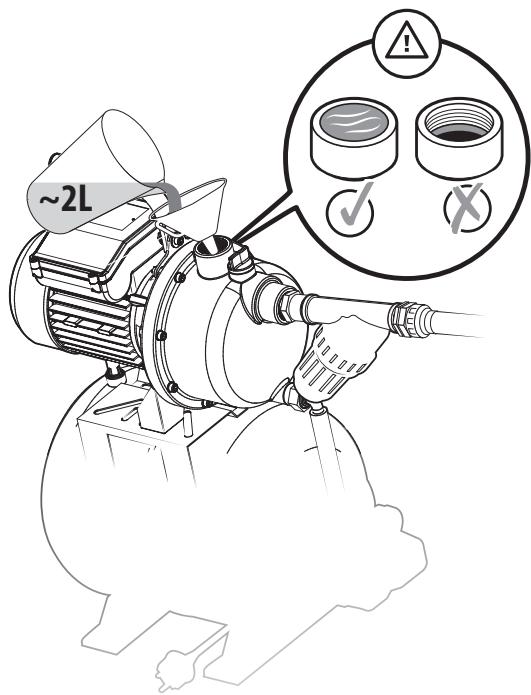
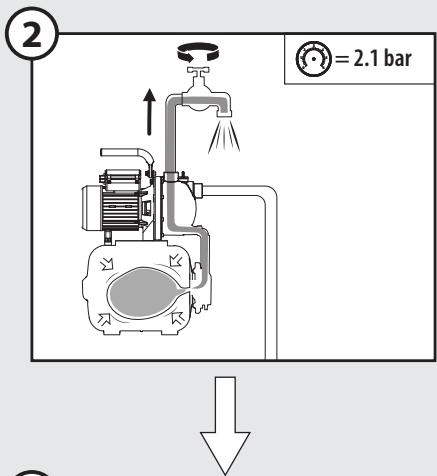
Priming the pump illustration 2.4 to 2.6
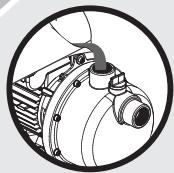
First, unscrew the filling plug to remove air from the pump during filling.
Fill the pump with clear water via discharge connector. Filling must be done slowly so that the air contained in the pump is completely expelled. Fill to overflow and put back the filling plug. As this is not an auto-priming pump, the suction pipe will also need to be filled. To save time when filling, you can detach the suction pipe set and fill it directly (by submerging the suction pipe in water, for example) before connecting the pump.
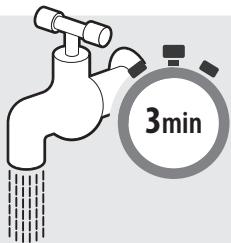
Depending on the suction height and the amount of air in the suction hose, priming can take anywhere between 1 minute to 5 minutes. If it takes longer than this, the pump should be refilled with water.
Illustration 3.3
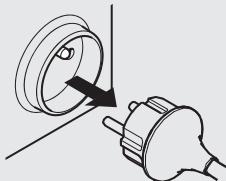
Always remove the plug from the socket before refilling!
4.4 OPERATION
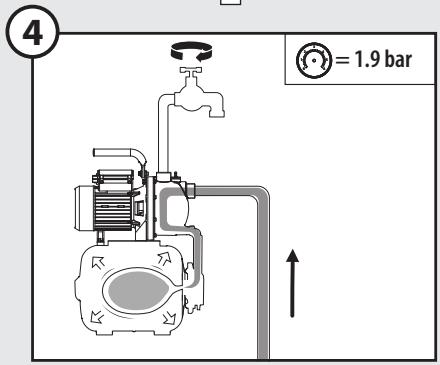
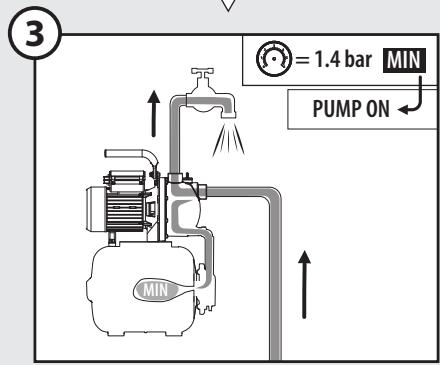
Start the pump illustration 3.1 to 3.3
Make sure the pump is correctly installed and primed, refer to chapter "first use" above.
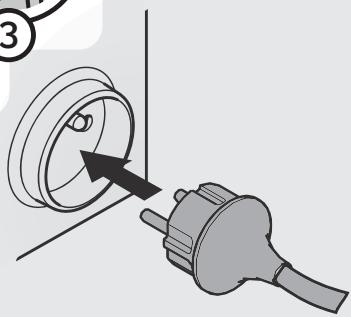
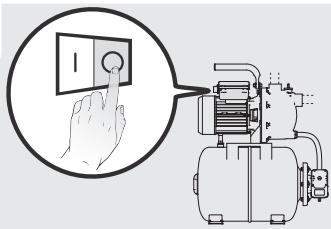
Connect the power cable to an earthed 220-240V 50Hz power supply protected by a minimum 10-amp fuse. Press the ON/OFF switch. The switch light will come on when the motor is running.
Operation safety warnings
- Operate the product only at reasonable hours – not early in the morning or late at night when people might be disturbed.
- Do not modify the product in any way or use parts and accessories that are not recommended by the manufacturer.

If the product is dropped, suffers heavy impact or begins to vibrate abnormally, immediately stop the product and inspect for damage or identify the cause of the vibration. Any damage should be properly repaired or replace by an authorized service center.
Operate the pump
- In order to prevent dry-running and overheating of the machine, always make sure that the suction hose is immersed under water.
- The motor is protected against overheating by an integrated thermostat. In the event of overheating, the thermostat will automatically switch off the pump. The pump will automatically restart after it has cooled down.
Stop the pump
4.5 SPECIFIC FUNCTIONS
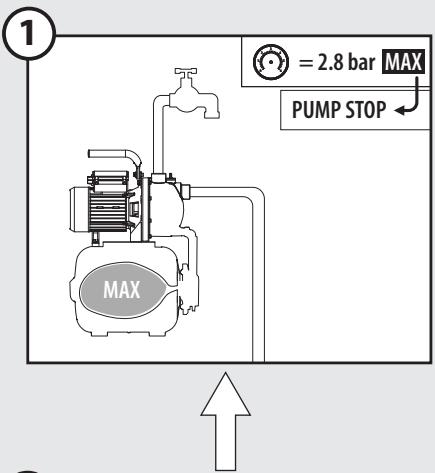
Automatic function illustration 4.0
Pressure will go down gradually as water is used. When the pressure falls below the minimum value, the pump will start automatically.
5. TRANSPORTATION
5.1 TRANSPORT THE MACHINE

CAUTION In order to prevent accidents or injuries, keep in mind the weight of the appliance during transport (see Technical Data).
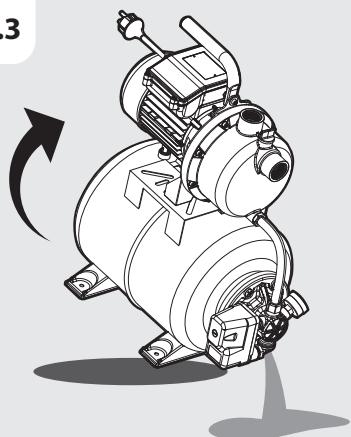
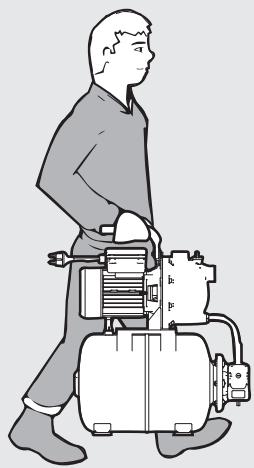
Always lift and carry the pump with the carrying handle. Protect the product from any heavy impact or strong vibrations which may occur during transportation in vehicles. If you want to transport the appliance on a vehicle secure it from slipping or vibrating. Secure the product to prevent it from slipping or falling over.
6. WINTERING
Illustration (6.1) to (6.5)
Switch off and empty the pump.
Follow all instructions given on chapter storage below.
7. STORAGE
7.1 STORE THE MACHINE
The instructions mentioned in the maintenance section must be carried out before any storage.
Illustration (6.1) to (6.3)
- Completely drain the pump, allow it to dry and put back the two connector caps.
- Clean the product, filters and accessories
- Store the unit and its accessories in a frost-free place.
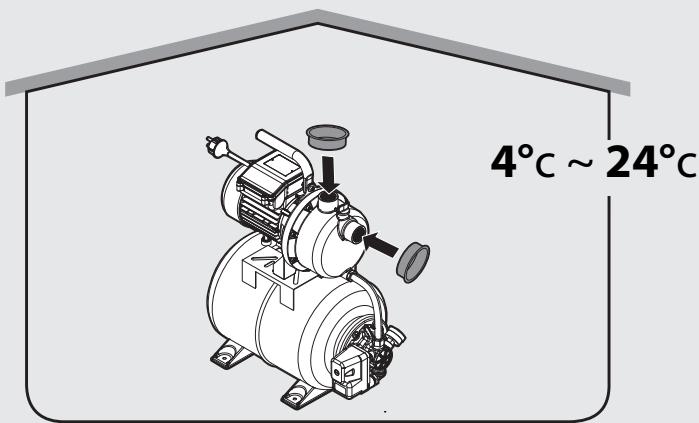
- The unit should always be stored in a clean, dry, ventilated place out of the reach of children. Ideally, the temperature of the room in which the device is stored should be between 4 and 24^ .
- We recommend that you store the unit in an upright position, in its original package.
8. MAINTENANCE
DANGER! Risk of injury due to electric shock, fire and/or serious injury. Switch the product before adjusting, inspecting, cleaning or storing the product.
8.1 CLEANING
- Disconnect the pump
- Unscrew the discharge connection
- Clean the discharge part of the pump with clean water
Check the integrity of the electrical cable.
Illustration 5.3 and 5.4
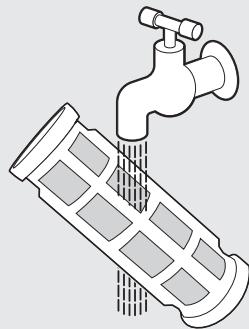
Check that the filter and the valve are clean. If not, clean them as shown in the illustration.
8.2 MAINTAIN
- Have your product serviced by a qualified repair person using only identical replacement parts.
This will ensure that the safety of the product is maintained.
- Have the product checked by a qualified professional and repaired, if necessary, before you use it again.
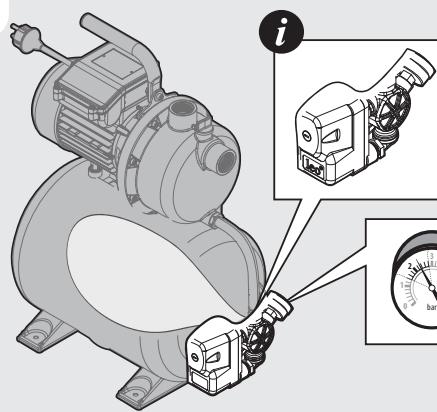
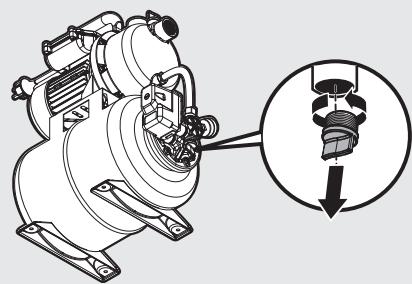
Regular checks Illustration (5.1)
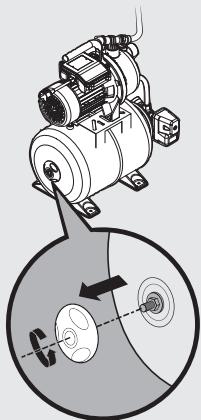
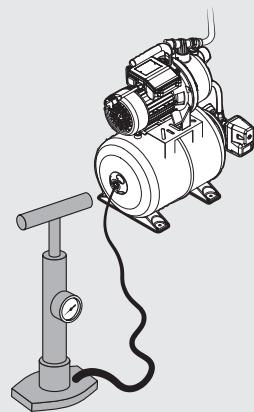
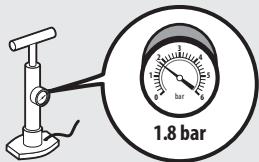
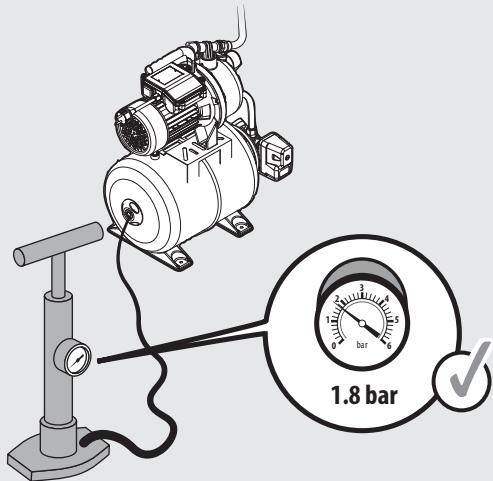
Check monthly the tank pressure using a manometer (not provided).
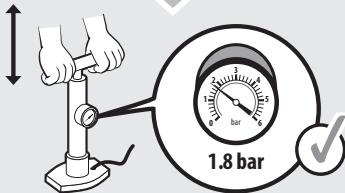
Inside the tank, there is a flexible membrane and an air compartment whose maximum pressure must be around 1.8 bar. Water under pressure causes the membrane to expand in such a manner that pressure in the air compartment increases until it reaches the stopping pressure. If the air pressure is too low, raise it by inflating the tank. In order to do this, unscrew the cover of the tank valve, then inflate the tank up to 1.8 bar using a manual pump fitted with a manometer.
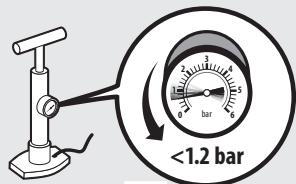
- If the pressure is lower than 1.2 bar: Inflate the tank to the right pressure.
- If the pressure is higher than 1.8 bar: Deflate the tank down to the right pressure. When inflating the tank, never exceed the pressure of 1.8 bar.

Before checking the tank pressure, make sure that all the discharge circuit valves are open in order to empty all the water that is under pressure, and thus obtain an exact measurement of the air pressure in the tank.
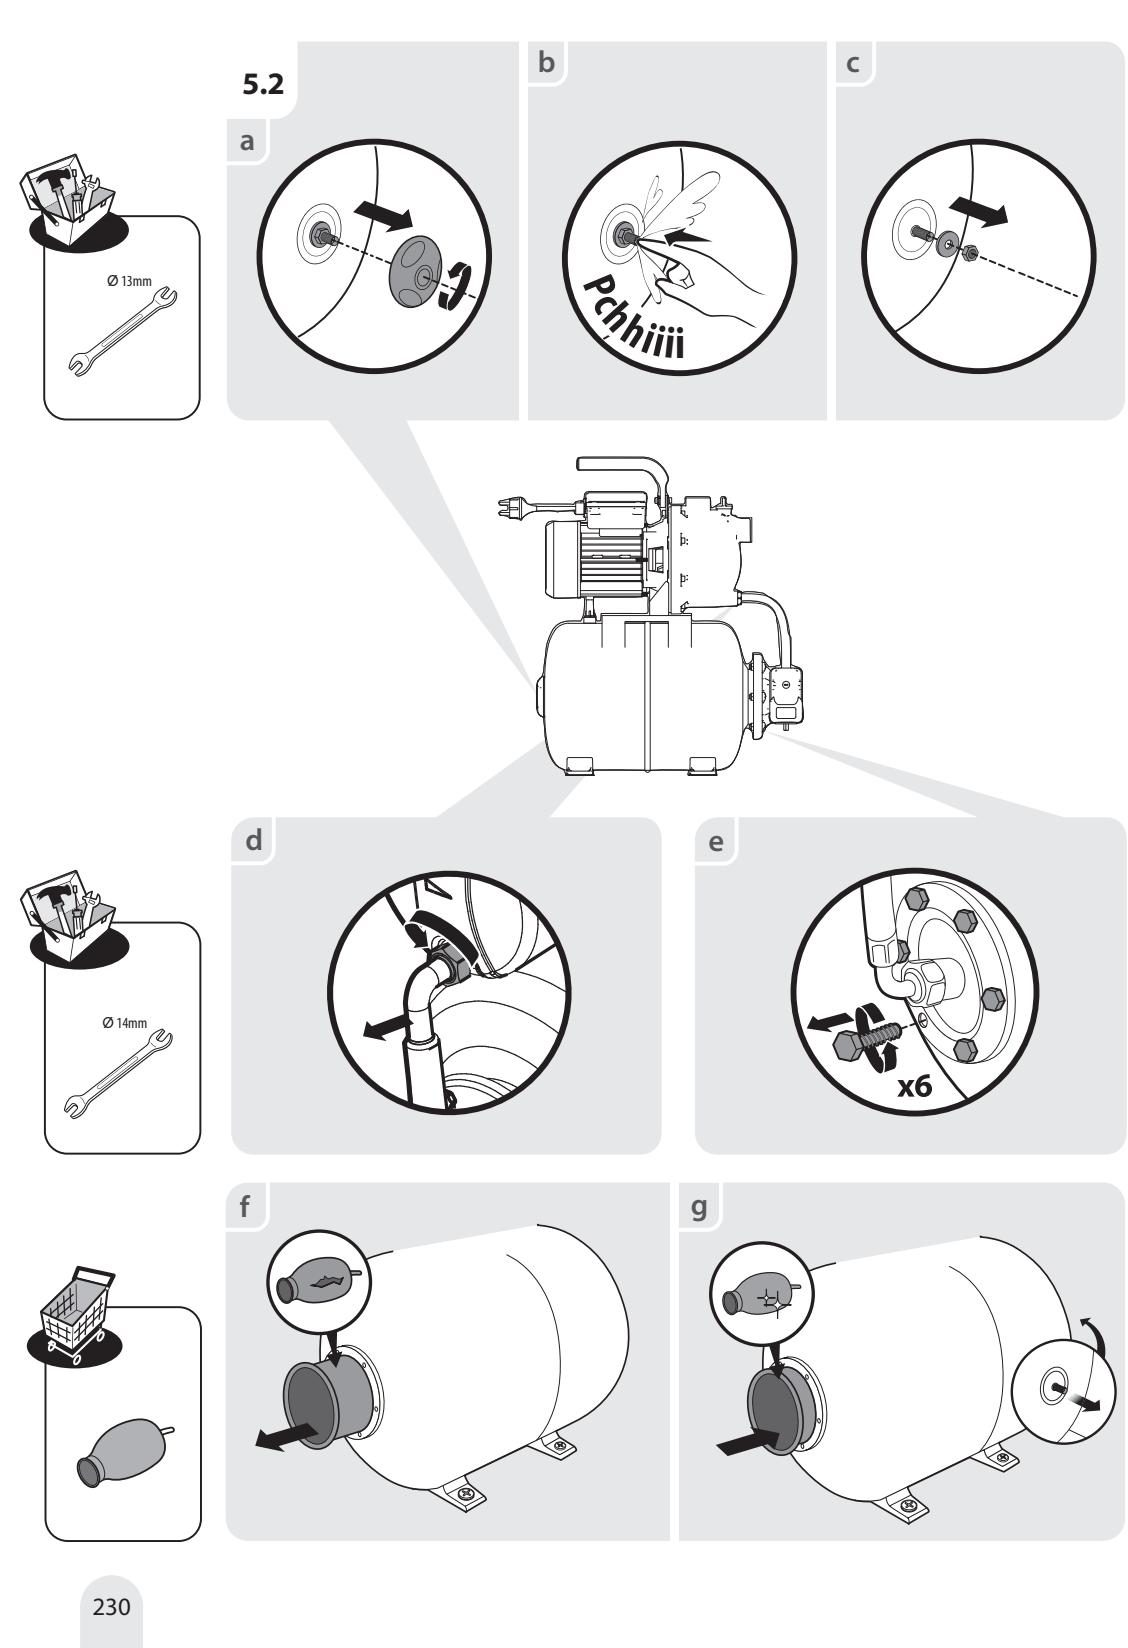
Changing the membrane Illustration (5.2)
After performing the checks indicated in the Troubleshooting section, if the membrane needs to be changed, proceed as follows: (it is strongly recommended to get some help from a specialist.)
8.3 EXPLODED VIEW
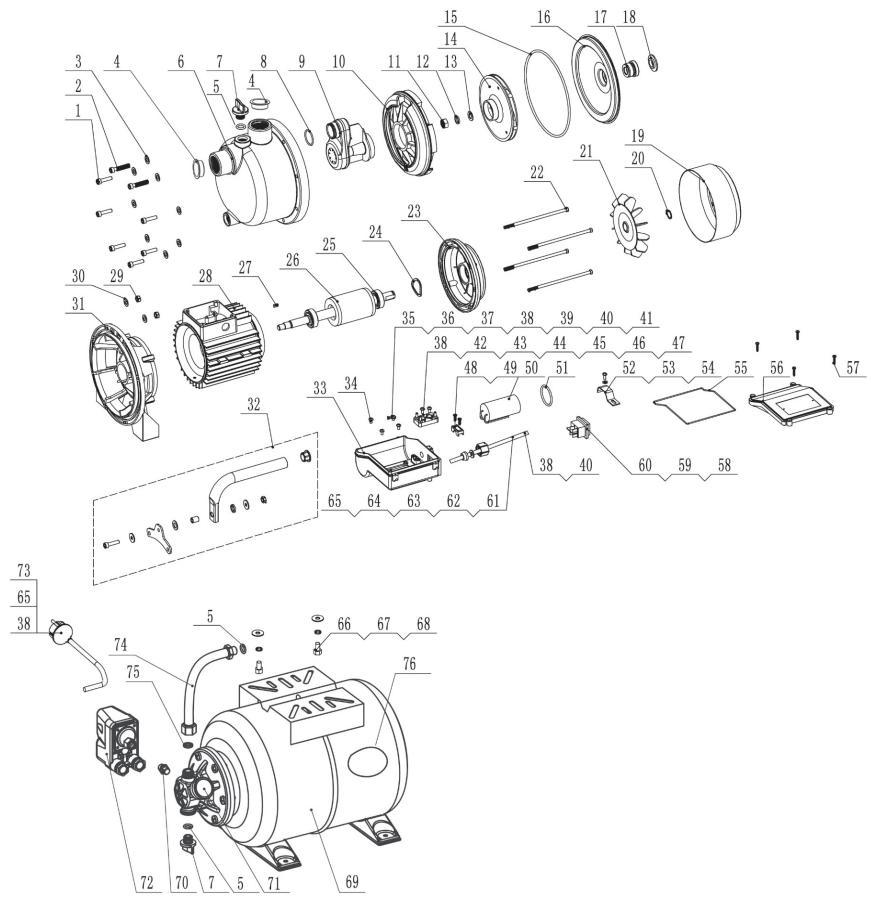
| POS | PART NUMBER | DESCRIPTION | NUM |
| 1 | 10001401 | Screw | 6 |
| 2 | 10001406 | Screw | 2 |
| 3 | 10015585 | Spring washer | 8 |
| 4 | 40005372 | Dustproof cover | 2 |
| 5 | 10000470 | O-sealing ring | 3 |
| 6 | 40029903 | Pump body | 1 |
| 7 | 40005921 | Drain & filling plug | 2 |
| 8 | 10000508 | O-sealing ring | 1 |
| 9 | 40012031 | Diffuser | 1 |
| 10 | 40023705 | Venturi tube | 1 |
| 11 | 10000300 | Hexangular nut | 1 |
| 12 | 10001429 | Flat Washer | 1 |
| 13 | 10001209 | Spring washer | 1 |
| 14 | 40012030 | Impeller | 1 |
| 15 | 10000493 | O-sealing ring | 1 |
| 16 | 10004088 | Bracket cover | 1 |
| 17 | 10001263 | Mechanical seal | 1 |
| 18 | 10000961 | Water proof gland | 1 |
| 19 | 10003650 | Fan cover | 1 |
| 20 | 10009307 | Spring collar | 1 |
| 21 | 40005415 | Fan | 1 |
| 22 | 10001377 | Bolt | 4 |
| 23 | 40005527 | End plate | 1 |
| 24 | 10004846 | Spring washer | 1 |
| 25 | 10001166 | Ball bearing | 2 |
| 26 | 40020385 | Rotor | 1 |
| 27 | 10001464 | Shaft key | 1 |
| 28 | 40019457 | Stator | 1 |
| 29 | 10001308 | Hexangular nut | 2 |
| 30 | 10006075 | Flat Washer | 2 |
| 31 | 40005530 | Pump support | 1 |
| 32 | 40030056 | Handle | 1 |
| 33 | 40038701 | Terminal box | 1 |
| 34 | 10001502 | Screw | 3 |
| 35 | 10001501 | Screw | 1 |
| 36 | 10001212 | Spring washer | 1 |
| 37 | 10001583 | Fixing washer | 1 |
| 38 | 10001122 | Cold compacting | 10 |
| 39 | 10001893 | Line | 1 |
| 40 | 10002538 | Heat shrinkable tuber | 2 |
| 41 | 10006161 | Connection | 1 |
| 42 | 10001005 | Wiring terminal | 1 |
| 43 | 10010179 | Screw | 2 |
| 44 | 10001312 | Hexangular nut | 6 |
| 45 | 10001445 | Flat Washer | 6 |
| 46 | 10002425 | Line | 1 |
| 47 | 10002428 | Line | 1 |
| 48 | 10004878 | Cord clip | 1 |
| 49 | 10001543 | Screw | 2 |
| 50 | 10018478 | Capacitor | 1 |
| 51 | 10005990 | O-sealing ring | 1 |
| 52 | 40006041 | Capacitor clip | 1 |
| 53 | 10001455 | Flat Washer | 1 |
| 54 | 10001480 | Screw | 1 |
| 55 | 10022576 | O-sealing ring | 1 |
| 56 | 40038700 | Terminal cover | 1 |
| 57 | 10001611 | Screw | 4 |
| 58 | 10001227 | Switch | 1 |
| 59 | 10001127 | Insert spring | 4 |
| 60 | 10002563 | Jacket | 4 |
| 61 | 40005290 | Nut the box cover | 1 |
| 62 | 10001042 | Seal sheath | 1 |
| 63 | 40005385 | Seal washer | 1 |
| 64 | 10020840 | Cable | 1 |
| 65 | 10000155 | Connection nob | 4 |
| 66 | 10001348 | Bolt | 2 |
| 67 | 10001447 | Flat Washer | 2 |
| 68 | 10001217 | Spring washer | 2 |
| 69 | 10030335 | Tank 24L | 1 |
| 70 | 10020729 | Connector | 1 |
| 71 | 10001603 | Pressure equipment | 1 |
| 72 | 10007524 | Pressure switch | 1 |
| 73 | 10001695 | Cable | 1 |
| 74 | 10030334 | Flexible tube | 1 |
| 75 | 10011930 | Adjustable joint gasket | 1 |
| 76 | 10021528 | Membrane | 1 |

DANGER! Risk of injury due to electric shock, fire and/or serious injury. Warning! Before any trouble shooting, switch off the product and keep other person away.
| Problems | Probable causes | Solutions | Qualification required |
| The Pump fails to Start up | There is no electric current | Ensure that the electric current is on | - |
| Pump shaft blocked. | Use a screwdriver to turn the motor fan bolt slightly |
| Pump does not suck water | Suction hose is not in water | Immerse suction hose in water | - |
| Pump head not filled with water | Fill with water (as explained on the chapter priming the pump) |
| Air in the suction hose | Make sure the suction hose is well sealed |
| Check valve dirty or leaks | Clean or replace the check valve |
| Strainer dirty or blocked | Clean the strainer |
| Max. suction height exceeded | Check suction height |
| Inadequate delivery rate | Suction height too high | Check suction height | - |
| Suction kit is dirty | Clean the suction kit |
| Pre Filter is dirty | Clean the filter |
| Water level falling rapidly | Immerse intake valve deeper and make sure intake line well sealed. |
| Hose diameter and/or hose length are not suitable with the installation | Use a larger hose diameter or a shorter hose length |
| The discharge head is too high or there are too many connected devices | Adjust the discharge head and the connected devices regarding the capacity of the pump (please refer to technical datasheet) |
| The pump stops during operation (Pressure switch turns off the pump) | A solid body is blocking the impeller | Connect discharge line to water line, disconnect suction hose, open the water line. Switch on the pump for several times for approx. 2 sec. | - |
| Water is too hot. | Ensure water temperature does not exceed 35°C. |
| Pump running dry | Immerse suction hose in water |
| The membrane inside the tank is punctured. | Change the membrane or the tank. |
| Inadequate pressure inside the tank. | Re-inflate the tank up to 1.8 bar. |
8.5Fatal CIRCUMSTANCES
| Problems | Action |
| Power consumption too high | Stop use and contact authorized service center |
| Performance reduced | Contact authorized service center |
| Leakage of the motor housing | Stop use and contact authorized service center |
9. END OF LIFE

Electrical products should not be discarded with household products. Used electrical products must be collected separately and disposed of at collection points provided for this purpose. Talk with your local authorities or dealer for advice on recycling.
10. WARRANTY
10.1 OUR WARRANTY
STERWINS products are designed according to the highest quality standards for products intended for the consumer market. This sale warranty covers a period of 3 years as of the date of purchase of the product. This warranty covers all defects in materials and workmanship: missing parts and elements, and damage occurring under normal use circumstances. Repair and replacement of parts do not lead to an extension of the initial warranty period. You must be able to provide proof of the purchase for this product and the date of purchase. Warranty coverage is limited to the value of this product.
10.2 WARRANTY EXCLUSIONS
This warranty does not cover problems nor incidents resulting from incorrect use of the product. The following items are not covered by warranty :
The product must be used under normal usage circumstances, and for non-professional purposes. Therefore, excluded from this warranty are products used by gardening companies, local authorities, as well as companies offering paid rentals or free loaning of equipment.
In the event of a problem or defect, you should first always consult your Sterwins dealer. In most cases, the Sterwins dealer will be able to solve the problem or correct the defect. Keep your invoice or your receipt: these documents will be requested upon processing any claims.
837377
Name and address of the manufacturer or his authorised representative|Nom et adresse du fabricant ou de son mandataires|Nombre y direction del fabricante o de su representante autorizzato|Nombre e endereço do fabricante o do seu représentante autorizzato
ADEO Services, 135 Rue Sadi Carnot - CS 00001 59790 RONCHIN - France
837377 - EAN Code: 3276000706182
Industrial Type Design Reference: 900 WT 24-4
STERWINS
SN SSSSSS XX DDMMYY nn PPPPPP (SN: Serial No., SSSSSS : Supplier code, XX : Factory ID, DDMMYY: Production date, nn: number of version of product, PPPPPP : Last six numbers of PO order)
Riferimenti alle pertinenti norme armonizate utilizzate o alle specifiche in relazione alle quali è chi diiera la conformità)Odolwania do odonsino norme zharmarizonychanew, ktró zastosowano, lub do specificifikaci, w odriesieniu do ktorych deklarowana jest zogodnosc;Mvela tvu oxynkvov evcpovopovtvo tpoimtvu tvn xpvomoiovivn f pvia tvu pnvodiyapov ov oxynot ntc otioae, dNkuvetanu o npoupokopr. Referente standarder alaronizate relevante folositse sui referinte specificaionl in legatura cu care se declarare conformancea.)
Dove applicable ' Il nome e il numero del laboratorio notificato che ha rilasciate la certificazione e il riferimento a documento|W stowstwywny przechadkach' 'notificfokanza na zia i numeriotorium, ktrde wydalocertifikat ora odienisie do documentodurOtroiyoxto' 'vyvuroamnjuvo ovova kai tov apiBuo tou pyaepniou tou fEvdoovu tvn mrotoiOnq' kai tvn avopao 0To EvypaoIunde este cazul ' numelei numarul de laborator notificare cat al eberlat certificarea si trimitirea la document
EN 60335-1:2012+A11+A13+A14+A14+A2+A15
EN IEC 60335-2:41-2021+A11
EN 62233-008
AFPS GS 2019:01 PAK
EN ISO 12100:2010
EK1 S27-12 Rev.2
ENIEC 55014-1-2021
ENIEC 55014-2-2021
ENIEC 61000-3-2:2019+A
EN 61000-3-3:2013+A1
ROHS 1.0 2011/65/EU
ROHS 2.0 2015/863/E1
EN IEC 63200:2018
IEC 63231-3:1-2013
IEC 63231-4:2013+AM
IEC 63231-5:2013
IEC 63231-7:1-2015
IEC 63231-7:2-2017
EN ISO 17075:1-2017
IEC 63231-6:2015
IEC 63231-8:2017
ISO 3744:2010
2000/14EC Annex V and 2005/88/EC
Measured sound power level: 87.74dB(A)
Guaranteed sound power level: 90dB(A)
Eric LEMOINE International Project Quality Leader
Ronchin France
20/04/2023


900W
220-240 V ~ 50Hz

90dB


A
+
80μ
B
100μ

2.1
2.2

2.3


OR
2.4

2.5
2.6
2.7
2.8

3.1

3.2
3.3

1~5min


+5min


4.0
AUTO START

Min:1.4 bar Max:2.8 bar


a
5.1
b
C

d
e
f


h
5.3
a
b
5.4
a
b


6.1
6.2
6.3
6.4
6.5
Ce produit est recyclable. S'il ne peut plus etre utilise, veuillez l'apporter dans un centre de recyclage de déchets.
Este producto es recicable. Si ya no se pueda usar, l'évelo a un centro de reciclaje de residuos.
Eeste produto e reciclavel. Se deixar de outilizar, entregue-o num centro de reciclagem de residuos.
17 Questo prodotto più essere ricericlato. Se deve essere smaltito, portaesso presso un centro de reciclaggio.
Auto to npoiov evai avakukkwio. Eav dev mnpei nleov va xnpoiopoioiOe, metapepe tnv oe kantoio kevtpo avakukkwon, anoppmuatwv.
10 Ten produkt poddawany jest recycklingowy, kiedy przystaje byc uzyteczny sązy dostarczy go do punkt zu zbiorny odpadów.
3TOT npodykT mojET nepepa6aTabbatc. Ecnn OH 60JIbe He npirodeH dna noIb3OBAHn, cdaTe erO B yTuIN3auOnHHbIeHTp.
byn eHim kaetaeHcyre keenei. Ohbi api konlahyfa 60maTbIH JkaFdaJa, OHbl KaTa eHneTih optaibKa TaNCbipybl3dbI etiHem3
A Κeɪ npódykt moxe nepepo6nTc. JkIoo BOHO 6iNbIe He c npndaTHe dIy BnKOpncTyBaHn, 3daIte Ioro BytniiauiHniu ceHTp.
Aceast produs est reciclabil. Daca nu mai poate ti folosit, va rugam sa il aducei intr-un centru de reciclare a deseurilor.
This product is recyclable. If it cannot be used anymore, please take it to waste recycling centre.


Cenaho B Ktae / Kbtaa JxacanFah / Made in China 2023
SN 103404 01 180322 01 374721

PAP