
UP20 BRUSHLESS - 20VCIS3-190BL.1 - Cordless circular saw DEXTER - Free user manual and instructions
Find the device manual for free UP20 BRUSHLESS - 20VCIS3-190BL.1 DEXTER in PDF.
| Product type | Cordless brushless circular saw |
| Brand | DEXTER |
| Model | 20VCIS3-190BL.1 |
| Rated voltage | 18 V DC / 20 V Max DC |
| No-load speed | 4200 rpm |
| Blade diameter | Φ190 mm |
| Blade arbor | 30 mm |
| Max cutting depth at 0° | 65 mm |
| Max cutting depth at 45° | 45 mm |
| Bevel cutting capacity | 0° to 45° |
| Sound pressure level | 77.7 dB(A) |
| Sound power level | 88.7 dB(A) |
| Vibration level (K=1.5 m/s²) | 1.008 m/s² |
| Weight (without battery) | 3.13 kg |
| Compatible batteries | 20VBA2-25.1, 20VBA2-50.1 |
| Compatible chargers | 20VCH1-3A.1, 20VCH2-6A.1 |
| Laser guide | Class II, 650 nm, 1 mW max |
| Dust extraction | Yes, with vacuum adapter |
| Cutting materials | Wood (rip cuts and cross cuts) |
| Warranty | 3 years |
Frequently Asked Questions - UP20 BRUSHLESS - 20VCIS3-190BL.1 DEXTER
User questions about UP20 BRUSHLESS - 20VCIS3-190BL.1 DEXTER
0 question about this device. Answer the ones you know or ask your own.
Ask a new question about this device
Download the instructions for your Cordless circular saw in PDF format for free! Find your manual UP20 BRUSHLESS - 20VCIS3-190BL.1 - DEXTER and take your electronic device back in hand. On this page are published all the documents necessary for the use of your device. UP20 BRUSHLESS - 20VCIS3-190BL.1 by DEXTER.
USER MANUAL UP20 BRUSHLESS - 20VCIS3-190BL.1 DEXTER
FR Scie circulaire Brushless sans fil
ES Sierra circular sin escobillas y sin cable
PT Serra circular sem escovase sem fios
IT Sega circolare brushless wireless
EL dioKoPiovo mntapiaac xwpic
PL Piila tarczowa bezszczotkowa akumulatorowa
RU AkkymyIaTOpHa 6ecuTeOuaH a npKpyIpaH a nla
UA AkymyIaTopHa 6e3uITKoBa cnRkynpaNnna
KZ AKKMyJyTOpNbIK 电TkAcbl3 aHnMaapa
R0 Ferastru circular fara fir, cu motor fara perii
BR Serra circular sem escova sem fio
EN Cordless Circular saw Brushless

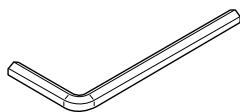
EAN CODE: 3276000697886
FR Mode d'emploi
EuyxepiiooObnyuw
U I HcTpykui 3 EKcnnlyauai
Thank you for purchasing this product. We recommend that you read the installation, user and maintenance instructions carefully. We have designed this product to ensure your complete satisfaction. If you require assistance, the teamat your retailer is on hand to help you.
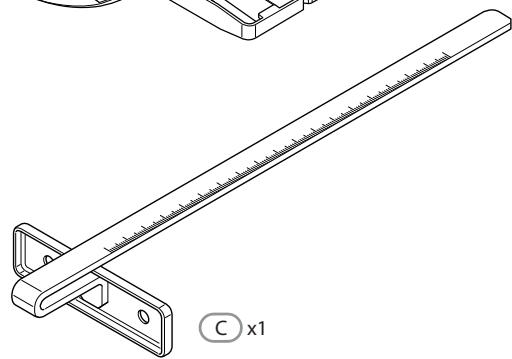
B x1
D x1
E X1

Attention danger / Atencion: Peligro / Atencion perigo / Attenzione pericolo / Ppooox'kivduvoC / Uwaga niebezpieczeiStwo / BnImaHne! OnPacno! / Ybara! He6e3neuHo! / AteNje, pericol / Caution danger

Hors tension / Apagado / Desligado da alimentacao / Fuori tensione / Ektoc taoç / Od胶囊enie zasilania / He nao haprjxeHem / He nizn Happyroo / Scoatere de sub tensiune / Power off

Mise sous tension / Puesta en tension / Ligação da alimentação / Messo除去 tensione / Σύνδεοη με το ηλεκτρικό δικτuo / Właczenia zasilania / Bкlioчения по handrajженье / Пл'd'едання niД的手руг / Punere sub tensiune / Power up

FR: Mentions Legales & Consignes de Sécurité
ES: Instrucciones Legales y de Seguridad
PT: Avisos Legais e Instruções de Seguranca
IT: Istruzioni Legali e di Sicureza
EL: Nopíkó σημείωμα και Μθηγίες ασφαλείας
PL: Uwagi Prawne i Instrukcja B ezpieczénstwa
RU: RykoBoDCTBO По ТхнIKE БezonaСноCTи ИпраВовим HOPмAM
KZ: ТхнIKEСБI БОИВИSHA НсКayЛьIFы
Kayinci3diKoKdHe KyKbIKTBiK KaMTaMAscbl3 etу
UA: KepiBnUcTBO 3 ТхнIKE БezпЕки I ПраВовIM HOpмAM
RO: Manual privind siguranta.sl aspectele juri dice
BR: Avisos Legais e Instruções de Seguranca
EN: Legal & Safety Instructions
6→391

FR: Montage / ES: Montaje / PT: Montagem / IT: Montaggio / EL: Συναρολόγηση / PL: Montañ / RU: C6opka / KZ: Moŋṭaŋkday / UA: 36ipka / RO: Montaj / BR: Montagem / EN: Assembly

FR: Utilisation / ES: Utilização / PT: Utilização / IT: Uso / EL: Xpíŋη / PL: Uzytkowanie / RU: История / KZ: Палдану / UA: Викорисань / RO: Utilizare / BR: Utilização / EN: Use
Directive Machine 2006/42/CE
EN 62841-1:2015
EN 62841-2-5:2014
EN 55014-1:2017
EN 55014-2:2015
IEC 62321-1:2013
IEC 62321-2:2013
IEC 62321-3-1:2013
IEC 62321-4:2013+A1:2017
IEC 62321-5:2013
IEC 62321-6:2015
IEC 62321-7-1:2015
IEC 62321-7-2:2017&ISO 17075-1:2017
IEC 62321-8:2017
Universal: Compativel apenas com Sterwins UP20, Lexman UP20 e Dexter UP20

PioviZeTe OE pOcoun K aKpia OTo TEaXIO ENEEpyaic.
Evwavetmu konoioutppeetao piovodioKoc.
H koni yivetai me otouwévo, koaŋuévo n λαθος ρισμενo προύδικο.
Ynootpiεteλθoc to teμaxio επΕξργαοία.
EeayakzTemu konn.
KoBETe OtpaBwUevn n Uypn EuaEia.
XepiciEeTe to epyaEio μe λaθoc tpɔnTo kakoietaxepiEeTe.
Tia eiow tonc nthavotntac kawtohataoc, aokouhoote Tc Enc npaktke caopalaic:
5. AEITOYPTFIA
DiatnpieTe Tov npiovodioKo 0tn owtn pOthion Baoou npiovodioKou.
Eepeite to Teaio Eeepyaoiac ia poocu npkopia npiv tnV konn.
Pnte mnu npiovicetoe pocn kappi.
Kavete eUthetaic konec. NavaTz npouonoiite evav o8nyo vOeiaacakunkata Tc konocvtounc.
EtoeumnodiZetaoutpoqn tou npiovdoikou.
Xpnoioe taqaouc, auiuouc kai ootau pvthetaovoc npiovodiokouc. Note mnv kavete konec oTouwovoc npiovodiokouc.
YnootpiEe kaataaann to Teayio eepyaaic npiv Eekivnoe Tmu konn.
'otav kavete mia konn, eapapocote otaepn, ooiopopn nieon. Note unv aokeite ueyaln duvaun kata tic konie.
MnV KOBETe OTRpaWUeN n Upyn Euaia.
Kpatate To npiovi opixta kai te ta duo xepia kai diatnpite tnv ioopponia tou owatoc oac etou wote va mopite va avtotathetae oe nepintwnkawtohmuato.
IPOEIOIOIHs: Otat xpooionoite to npioi, napaevete naVt oEvpyopon kai exetov EeYxo. Mny anoakpuve to npioi ao to Teayio eEepyaoic, evw kiveitai o piovodikoc.
TPIIONOIAZKOI
OkaIutepoi npiovodioki oev 0a Koouv anoteleauatika eav evnapeovu Kaapoi,aiunpoi kai ootpauiouevo. Xpoumonoiuvtc evav otouwveo piovodiok tietai eayao opoptio oTo npovi kai auavetai o kivuvoc kawtonatoc. Na exete navta diaheouc eninlov npiovodikouc. Koawdeic ouiec kai uapn iooa nou exuv ouknpuei otouc npiovodikouc enipaduvouv to npiovua.Anoakpvte tov npiovodioko anto T npovi kxnpouonoiote poiov apapeocon. koawdvov ouiwov kai uupnciaoa, kauro vpo n knpoCivn va va apapeoetae autc tic ouoowpeoeic.
Na xpoiounoiiete mvo npiovodikouc me enionuavon taoyntac ion n uynloTepn ano tny taxuteta nou avayapetai oTo epyaleio.
MH XPHZIMOIOIEITE BENZINH.
Xpnoiopoite t ovo tic diatepouc diokwv tnc DEXTER o oupwvia e to napakatw nivaka.
AoaiTeToeayioEeepyaoiaC.
BEZPIECZENSTWO W MIEJSCU PRACY
ABY WYKONAC CIECIE UKOSNE, NALEZY
SKALA DLUGOSCI CIECIA
EAN code: 3276000697886
PykoBODCTBO IO TEXHnke 6e3oNaChOCTN I npaBoOBbIM HopMaM
KeknHaRr 3neKtpnKaI 3nnIaIeHc Ko., IITNo.150 B3hnyH PoaI, IOcnHb TayH, HAnxu NCTpknT, L3ncH, Yk3z3H, Ktai
Cpok cnjx6b1 (r): 5 let
KoNIO cePTnΦNKATA COOTBcTCTBnI NII DeKlnapaun O COOTBcTCTBn HA daHbI TOBAP MOJHO nOlyuHTb Ha INΦopMaUOnHHc TcToke IIO60rO u3 Mara3INOB Jepya MePJIeN BoCTOK.
data ny6lnkaumn nHctpykunm: 09/2019
BhIMateIbHO npOHTaIte IHCTpyKcIIO NO EKcPnIyatauM N 3UHTe pImMeuaHra. DaHHa IHCTpyKcIINo3BOJAEOT O3HaKOMITbC B C yCTPOICTBOM, PpaBnAMN eO IcTIOJIb3OBaHnI INHCTpyKcIaMn IOTexNHke 6e30aNacOHTN. XpaHIne IHCTpyKcIIO B HAdEchiom MeTe dIg IcTIOJIb3OBaHnIB B 6dyuIeM.
UCIOBhbIE O603HAUYHNA

BHHMaTeIbNo IpoUHTaIte pyKOBoDCTBO.

3TOT cIMBONI ppeDynpexJaet O pncke NOBpeKdEnHn yctpoiCTBa nIN dpyrOOnMyueeCTBa, a TAKKe NOLyueHn TpaBM.

Icnojbl3yute 3aunthbte OOKN.

Icnobn3ynte cpeDCTBa 3aunTbI opraHOB cnlya.

IcnoB3yTe 3aunTHyo 0bYb.

IcnoIb3yIte 3aIuNTHbIe nepuATkn.

Hadebaite pecmnpaTop.

IcnoIb3OBAHnE NOBpeXJdeHHbIX OTe3HbIX KpyRO UIN KpyRO Dny cepHOBoI 6pb60Ku OueHb OnaCHO IN MOKeT CStb PtunHOn CEpe3HO TpaBMbl.

3anpeaetape3ka CbnaJhbIM OxJaXdHnEM.

UcTpoIcTB COOTBeTCTByeT DeIeCTBlyIOUM EbponeNcKIM DnpeKTbAM N 6blO OceHeHO B COOTBeTCTBm C DaHhbIM N DnpeKTbAMM.

Ebpaznckn 3HaK cooTBetCTBna.

CmboJ WEEJ (yTuIImaizna 3JeKtpuueckoro n 3JeKtpoHnHO o6OpydoBaHn).

Universal: coBmecTImOCTb Toblko C Sterwins UP20, Lexman UP20 n Dexter UP20

YkpanHckn 3HaK COOTBETCTBNA
KOMПЛЕКТ NOCTABКИ
- Na3NaueHne AkkymyIaTropHoB 6ecuTeOuHOn uKpyIaPno NIIbDexter
2.ИнструкциюТЕХИКЕбэзоносости - OncaHne
- Texnueckne xapaKtepncTkn
5.Исповьоваимe - 06cnykBaHnE
- YctpaHHe HEnoJaIOK
8.Утллзаци n nepepa6otka
9.「帕aHTnIa
10.Избрахени в раобарном вид e n спсok detajel
11.Декларачи COOTBETCTBИHOPмAM EC
1. HA3HAUHNE AKKUMYJATOPHOI ZNPKUYAPHOI PIIJIbI DEXTER
Blaoradapm 3a npno6peTHe nDaHnOro n3dEIny. BnMaTeIbHo npOuTnTe BCE nHcTpyKunu coxpaHnTe IN dJaIaJIbHeIJero IcNOnb3OBAHnI.
Lipkynpna nla npedha3aueHa I na nonepeuHoro npoDolbHoro npoNla dpeBecnbl Ha MaKcMaIbHyO rny6nHy 65 MM. NcHcTpymeT no3BOJraT BbIOJHraTb npAble npOnIbI nn pa3pe3bl c yILOm CKoca KpOMKn OT O 45 rpaJycOB. Ppi NcNoJIb3OBAHIn OCHOBHe 3TOrO INcHcTpymeTa DOJIXHO KOHTAKTIPOBaTb C 3aOTOBKO.
Iocne paacnakOBKn y6eHntecb, YTO BCE akceccyapbl (ecnn npedymOTpeHb) IMeHTCB Hannu. Ecn yctpoiCTBO NOBpeXdeHO IIN IMeET KaKNe-Im6o HeNCnpaBHOCTN, He NcPOnJIb3yTe erO IN BepHnTe o6pTaHNo pOpaBcy.
Pnpepeaue yctpoiCTBa dpym mIuam pepeabai Te TaKke n daHnoe pykoBODTBO.
3NEKTPOTEXHNUECKA BE30NACHOCTb
A. BnIka 3JNeKtpOnHCTpyMeHTa D0JXHa COOTBeTCTBOBaTb pO3eTke. HnkOrda He nepeDeIbIbAite BnIky. He nCnoIb3yIte HnKaKne nepexOndnKn DnBnOK 3JNeKtpOnHCTpyMeHToB C 3a3EmJeHNem. NcNoIb3OBAHHe OpUrHaJIbHbIX BnIOK IN COOTBeTCTByIOxN NM pO3eTOK
2.ИHCTPyKUЯ NO TEXHnke Be3OpACHOCTN
UMeHbIaET pIck NopaxKeHnI 3JIeKTpIueCKm TOKOM.
B. 368aTe npKocHOBeHn K 3a3eMJIeHHbIM 06beKTam, TAKIM KaK Tpy6bl, paHaTopbl, PInTbI N XoIoJNbHNKn. Pnck nopaxHeHn 3JeKtpuYeCKm TOKOM BblSe, KOrDa TeNo 3a3eMJIeHo.
C. He noDBepraIte 3JIeKTPoHnHCTpyMeHTbI BO3dEiCTBnIO DoXJa IIN BlaRn. PpI nOpaDahm BObl B 3JIeKTPoHnHCTpyMeHT yBEnuYBaETcR pNCK npopaxHeNIA 3JIeKTPuYeCKIM TOKOM.
D. 06paaTeCb c Ka6eIem aKKypaTHo. HkOrda He nepeHocHTe, He TAHnTE n He BbIKlOuaIte 3JeKTPoHnCTpymeHT 3a Ka6eJIb. DePxHtE Ka6eJIb NOaJIbIe OT NcTOUHNKOB TEIIa, MaCna, OCTpbIX PpeDMeTob IIN NDbNcxXcY qAcTei. NObpeJdeHHbIe IIN 3aNyTaHbIe Ka6eI INOBblAOT PNCK NopaxKeHnIe KETpUyeCKIM TOKOM.
E. Дя pa60ыcэнгспунгсмьнгингунгьунгьнгьнгь.претанhaueHHbДЯ 3TOrO ydlnHteIbHbI Ka6eIb.ИспльзOBaHne Ka6eI,poJxOJaIeroДЯ ИСПЛБ3OBaHnBnBHe nOMeHnH,CHIXaET pNCK npaXeHnAэLEKTPuYeCKM TOKOM.
F. Ecln nCnoIb3OBAHne 3NeKtpoHCTpymeHTa B cbipom MeCe HeN36ExHo, NODKIOUaIte erO uepe3 yCTpoiCTBO 3aunTHoro OTKIOUeHn (Y30). NcNoIb3OBAHne Y30 cHIXKaET pNCK nopaxKeHn 3NeKTPuueckm TOKOM.
JIiHJHABE3OJNACHOCTb
A. Ппusesнлбз0Вани элкtpоннстумени 6удte 6dnteHbbl, cneinte 3a CBOIMn DeiCTBnAMn n Cneiyte 3dpabOMy Cmblcny. He noIb3yItecb элкtpоннстумени, ecIn Bbl yctanu ninn haxoItecb NOD BO3deiCTBnEM HapKOtIKOB, anKOROJI ninn MeDnKaMeHToB.Дже КраTKOBpeMeHHaЯ HeBHMaTeJbHoCtB npN pa60Te c элкtponHcTpymenTom MoKet npUBeCTN K TjaKeJIbIM TpaBMam.
B. Исторы Стату Стату Исторы Стату Исторы Стату Исторы Стату Исторы Стату Исторы Cтату Исторы Cтату Исторы Cтату Исторы Cтату Исторы Cтату Исторы Cтату Исторы Cтату Исторы Cтату Исторы Cтату Исторы Cтату Исторы Cтату Исторы Cтату Исторы Cтату Cтату Cтату Cтату Cтату Cтату Cтату Cтату Cтату Cтату Cтату Cтату Cтату Cтату Cтату Cтату Cтату Cтату Cтату Cтату Cтату Cтату Cтату Cтату Cтату Cтат�п ТраВМ.
2.ИHCTPyKUЯ IO TEXHnKE B3OpACHOCTN
C. He donyckaite cnyauhoro 3anycka nHctpymehta. Npeed nodklouehnem nHctpymehta K cetn nHTaHna (mnn aKKymyIATopy) n peed ero nepehockoyubedntecb, qTO BblkluoateJIb haxoNTcB B BblkluoehHom nOLOKeHH. He depKITE naLeu Ha BblkluoateTe npi nepehocke 3leKTPounHCTpymeHTOB n He BkLIOuaTe BnIKy B p03eTKy, ecln 3leKTPounHCTpymeHT BkLIOueH. 3To moKET npINBeCTN K HecuaCTHM cyUaHO.
D. Пелед Вкlioуенем Эльктористорема симпес Hero perулpoBOчьи ИСТрмЕНы IraeHьile KIIOU. PerylnpoBOчьи ИСТрмЕNT ИИ RAeHьи KIIOU, OCTaBJIeHHьи Ha BpaIoUSeя саCTN эльктористорема, может CTaTb пиунов ТраВмы.
E. He TЯн'tecb. Bcerda coхpaйte yctoynBOe noLoxHeHne n paBHOBeCne. 3To pO3B0JIrT JIyUSe KOHTpOJIrpoBAt bJleKTPoINHCTpyMeHT B HEnpeDVBIDeHHbIX CITyaUHX.
F. OndeBaItecB haJIexKaUIM 6pa30M. He haIeBaIte CBo6OHyO odExdy u YkpaSeHnA. IepKInTe BOnocbl, odExdy n nepuAtkn Iopalbwe ot DBNcxqXcaTei. CBo6OHaJ oEJa, yKpaSeHnI INHHble BOLOcbl MOrT nonActb B DBNxUneCyaCTN.
G. Ппн Налчни устpoи CBДЯ OТБОДA И сбopa nbln y6eINTEcB, ChTo OHI NOДКЛIOЧЕНI IN PaBUNbHO pa6OtaIOT. IcnoJIb30BaHne NBIIeYnabNIBaIOUxN YSTPOJCTB CHIXKaET BpeI, pnpuHЯMbI NBInbI.
H.He IOnyckaIte He6peXHoCTn, KOtOpa MoKet BO3HNKHyTb n3-3a Yactoro NcNoIb3OBAHn HnCTpyMeHa n NobJeYb 3a C6oB camoyBepenHOCTb m HrHopnpoBaHne npabn 6e3OnaCHOCTn. HeocTopoJxHoe DeiCTBnE MoKet npuHHTb cepbe3HyTOpaBMy 3a DOni CEkyHdbI.
NcIIOJIb3OBAHNE N O6CJIyXJUBAHNE 3JEKTPOHHCTPYMEHTA
A. HeПрикладыВаITEКэльктponнсчрментуЧрзмерных услл. Исторьтей похдяшдя Валх Задачэльктponнсчрмент. Рабунов Вьбраньийэльктponнсчрмent 60лeeэфektubehи 6e3o napen npи НоминальногнагуЗke.
B.He nCnoIb3yIte 3neKtpoHnCTpyMeHT, cIe erO BbIKIOuataJIb HeNCppaBeH. 3neKtpoHnCTpyMeHTbl C HeNCppaBHBIM BbIKIOUaTeJEM
2.ИHCTPyKUЯ NO TEXHnke Be3OpACHOCTN
OancbHbI NIOJIeXaT peMOHTy.
C. Пелег рergyларьков, сменник akceccуаров лимхраненем OTКлочида Зелкторнстсрмент OT сети питань и (лим) ИЗВлекпес Akкулайтор, ecгл STO B03MOЖHO. Такne Мерbl п dedосторожноу MeньшадOT рисс Снычай HorO залуcke Зелкторнстсрм enta.
D. XpaHnTe HeNCNoJIb3YeMbIe 3JIeKTpOHnHCTpyMeHTbl B MeCTax, HeIOCTynhblIX IJIa DeTei, H He IOBepaIte 3JIeKTpOHnHCTpyMeHT IIuCaM, He 3HaKombblm C Hm N C 3TMM INHCTpyKcIaMn. 3JIeKTpOHnHCTpyMeHTbl ONaChbl B pykax HenoIroTOBleHHblx PoiJIb3OBAteJeI.
E. BbINHnHnTe TexHnueckoe 6cnyHnBaHne 3NEKtpOHnCTpyMeHTOB n npHaIaJIeXHoCTei. PpOBepbTe BbIPaBHnBaHne n cIeJIeHne NOBHXhIX DeTalei, HAIuHne NOLOMOK n IpOChy YCIOBnA, KOtOpblc MOrTy NOBmraTb Ha pa6OtY 3NEKtpOHnCTpyMeHTa. Ecn 3NEKtpOHnCTpyMeNT nobpeXdEn, nepeN cNoIb30BaHNemero Heo6xOJMo OTPeMOHTPOBaTb. HeIoCTaToUHbI yXoD 3a 3NEKtpOHnCTpyMeHTOM ABJIeTcPpUHHoMHOrNX HeCuaCThBX ClyuaEB.
F. XpaHnTepexuyuue HnCTpyMeHtBI B uNCTOTe 3aTOUeHHOM COCTOAHm. IpaBnIbHo o6cIyXnBaemble n XopoIo 3aTOUeHHbte pexuyuue INCTpyMeHTbI MeHbIe 3aklinHnBaIoT n LyuIe KOHTpOJIpyUToCra.
G.ИспользуиTe эл ekроннст римent,akceccyapbl,надки T.N.B COOTBETCTBnC 3TUMN INHCTpyKuzmaN, yuHTbIBaY cIobnI n CneUФИКУ BbIINHЯЕмо pa60tbl.IcnoIb3OBAHne эл ekроннст римета Дя BblINHHeHЯ HENpeDyCSMOTpeHHbIX Oпeрацm MOxET pInBecTN K ONaChbIM CITyaцmaM.
H. ClejeIte 3a Tem, yTo6bI pyKoTKn I NOBepXHOCTN 3axBaTa 6bln cyxIMn uHCTbIMn H Na Hux He 6blIO MaCna Hnn Cma3OuHoro maTePnAna. KcOJIb3Kne pyKoTKn I NOBepXHOCTN 3axBaTa H ne03BOJIAOT 6e3OpacHo NcOJIb3OBA Tb INHCTpyMeHT N KOHTpOJIuPoBA Tb erO B HenpeDbUdEHHbIX CITyaUnx.
NCSIOJIb3OBAHNE N OBCJIYJXUBAHNE INHCTPymeHTA C IINTAHNIEM OT AKKUMyIaTOPA
A. 3apjaTe aKKymyIaTOp TOnbKO cPOMOu 3apJHOrO yCTpoiCTBa,
2.ИHCTPyKUЯ IO TEXHnKE B3OpACHOCTN
yKa3aHHOrO u3rTOBtTeMe. 3apAHOe yCTpoiCtBO, npedHa3NaueHHe OJIra OJHO rTnIa aKKymyIaTOPbIX 6aTapei, MoKET cTaB pIpuHoiNoXapa Ipru NcPJIb30BaHN C dpyHM TINOM 6aTapei.
B.ИспользуITE электуонструмент ТOLTКо CO Cпeцально рedingианчыим Ддя Hero AkKymлгТорам.ИспользВане ЛбOTOДугOrO BnIa AkKymлгTOpHbIX 6aTapeM MoXeT CTaTb ПиЧИНов HeCuaCTHbIX ClyuAeB Илл NOЖара.
C. Korda akKymyIaTOP He nCNoIb3YeTcra, xpaHnTe erO OTeJIbHO OT MeTaJIInueeCKNX ppeIMeTOB — KaHcIeJIrpCKNX cKpeNOK, MoHeT, KJIouYe, rBO3JeB, BnHTOB n Dp. — OHN MOrYT COeINHITb KOHTaKTbl. KopOTkoe 3aMbIkaHne KOHTaKTOB akKymyIaTOPHO Batapeu MoXeT CTaTB npUHHoJ OKOroB IINI NOJkapa.
D. Пп He6laoropnraTHbIX 06ctOTeIbCTBax I3 aKKymyIaTopa MoKet noteYb 3neKtpoIIT. N36eraIte KOHTaKTA C Hm. Пп clyaHOM KOHTaKTe npomoiTE BODOI. EcII JxIDKOcTB nonala B rna3a, o6paTntecb K BpaUy. XuDKoCTb I3 aKKymyIaTOpHOn 6aTapeN MoKet Bbl3BaTb pa3dpaXeHne N OxKOrn.
E. He nCnoJb3yIe aKKymJIaTOp u HNCTpyMeHt, ecn OHN NOBpeXdHeblnn noDBepraIncb MoNΦnKaunm. NObedeHne NOBpeXdEHbIX mIMoINΦnUPOBaHHbIX aKKymJIaTOpOB MOKeT 6bITb HeIpedCKa3yeMbIM, yTO npNBeTe K BO3rOpaHnIO, B3pbIBy u PNCKY NOJIyEHn TpaBM.
F. He noDBepraTe aKKyMylTOpHyo 6aTapeu n HNCTpyMeHT BO3dIeCTBnIO ORHa N BbICOKo TEMpepatypbl. Bo3deIcTBne OrHa IIN Tempeatypbl Bblie 130^ MoKet npUBeCTn K B3pbBy.
G. Cnéduyute Bcem HNCTpykuznM no 3apJKe n He 3apJkaTe aKKymyIaTOp u HNCTpymeHT npu TempeaType, BbIXoJaSe 3a npedebl yka3aHHoro dnaana30Ha. Ecnu 3apJka BbIOJIHReTc HEnpaBnIbHO uIN B ycNoBnx HEnoJXoJaUe TEmpeaTypbI, 3TO MoKet npNBecTu K NOBpeKdEHNIO aKKymyIaTOpa N BO3rOpaHIO.
PEMOHT
A.PemOH T 3NeKtpOnHCTpyMeHT OJnxE HpOu3BOUntbCRA KBaHnΦnucPObAHhbIM CneuaHnCTOM C nCNoJIb3OBAHnEM TOJIbKO
2.ИHCTPyKUЯ NO TEXHnKE Be3OПACHOCTN
IeHTnHbIX 3aNaChbIX qacte. 3To o6ecneuT 6e3oNaChyO pa6oTy 3JIeKTPoINHCTpyMeHTa.
B. Hnkorda He BblOnHnIe 06cnyxnbAHne NOBpeXdeHHoro aKKymyIaTopa. 06cnyxnbAHne aKKymyIaTOpOB DoJIxHO BblOnHrTbCt TOJIbKO IpoU3BOIInTeIeM IIN B aBTOpN3OBAHHOM cepBnCHOM cHTpe.
HCHTPyKcIIN IO TEXHnke B30nAChOCTN IJIa IIJI JIOBOrTO TnPA
PACINJINBAHNE
A. ONACHO! 發χnte pykn noДalbwe ot MecTa pe3kn nПиьHoro dincka. BToPoi pykoJ deχntecb 3a BCnOMOraTeIbHyIO pykOaTKy nII KOpnyc DBuRaTeJI. Ppi ydeχNBAHm nIbl dBYMaPyKaMn noJUyeHne TpaBMbI B pe3yNbTaTe npoe3a HeBO3MOxHO.
B. CnéДиTe 3a Tem, qTo6bI HnUero He nonano noD 3arOTOBky. UHTOK He npeOxpaHЯET OT nIIbHOrO nIcKa noD 3arOTOBKoI.
C. Perynpye rny6nhy nponna B COOTBeTCTBm C ToIuHoi 3arotOBKn. 3y6bI NIIbI He DoJIxHbI NOJIHOCTbIO BbICTyNaTb I3-IOd 3aTOBKN.
D. HnKoIa He Depxnte 3arOTbky B pykax nHa KoneHx. 3akpenTe 3arOTbky Ha yCTOnyUBom OCHOBaHn. Heo6xoJIMO npaBnIbHO 3akpenTb 3arOTbky, qTO6bl yMeHbIHTb pNCK noJIyEHHa TpaBMbl, 3aKlinHbAHHa NIIbHOrO dNcKa IIN NOtepN ynpaBLeHHa.
E. Пи Вылолненп pa60T, B xOnde KoTOpbIX pexkyши јелемп может Касыся СкрытОй ЗлЕКТрОПВОДКИ, Дерхи te nHCTpymeNT 3a ИЗOLnPoBAHHbIe NOBepxHocTN. KacaHne npOBODа понарраженим может педаь наразжение на MeТаллчecКи DeТали ЗлЕКТрОПHCTpymeNTa, И опeраTOР noJyHT ydap TOKOM.
F. Bo Bpemr npoiohno pe3Kn Bcerda nCnoB3yIte HnnpaBraUOyIO pnaHky IIN yroIbHnK. 3TO IOBbIaEe TOnHOCTb paCNIIIBAHNIG UMeHbIaEe PNC 3aKJIINHBaHnI NIIbHOrO DnCKa.
2.ИHCTPyKUЯ IO TEXHnKE B3OpACHOCTN
G. Bcerda noIb3yIteCb nIbHbIM dNcKOM c MOHTaXHbIM OTBepCTHe m npabunbHoro pa3Mepa n φOpMbI (pom60BnHbIM nn KpyIbIM). NIIbHbIe DNCKN, KOtOpblé He COOTBeTCTByIOT KpeJIeHIO nIbI, 6dYt BpaAaTbcra KcUeHTpUHNo, YTO pINBeTe K IOTEpe KOHTpOJa HAD INHCTpyMeHToM.
H. Hukorda He nCnoIb3yIte IJI nnIbHO rO duCKa NOBpeJDeHHbIe IIN HeNoDxOJaIe 7ai6bl IIN 6oITbl IJI nnIbHO rO duCKa CneuajbHo pa3pa6OtaHbI IJI DaHHoI nnIbI N o6ecneuBAIoT ONImaJIbHyIO npOn3BOIDTeJIbHOcTB N 6e30NaCHOCTb.
ДОПОЛНТЕЛБHБIE UNHCTPyKцИ N O TEXHnKE B3OПАСHOCtI ДЯ BCEX ПИЛ
A. KpeNKo DePJKTe nHCTpymeHT oBeIMn pyKAMn, paCnoJoxNb pyKN Han6OJIee yD06HbIM 6pa3OM IЯ peakun Ha OTdauy. DePJKTe Nnly c IIO6oB CTOpOHbl, Ho He Ha ODHo JInHH
2.ИHCTPyKUЯ NO TEXHnke Be3OpACHOCTN
c TeIOM. B pe3yIbTaTe OTdauN Pnla MoXeT OTCKOuNTb Ha3aI, Ho OIepaTop MOxet KOHTpOIpOpBaTcNly OTdauN pPn co6JIoJeHn npaBn 6e3OpacHoCTn.
B. Ecnn Dnck 3aedaeT nHn Hxho npepBaTb pe3ky no IIO60n npuHHe, BbIKIouHTe NHCTpymeH n UdepXHBaTe erO HeNoDBNXHO B MaTePnaJIe BnIoTb Do NOnHO OCTaHOBKn DnCKa. He nbTaIteCb n3BVeYb NnU y 3aROtOBKn nNnNotAHyTb ee Ha3aD Bo BpeMg BpaSeHnN PnIbHOrO DnCKa, TAK KaK 3TO MOKeT npuBeCTN K Bo3HNKHOBeHnO OTdaHy. OcmOTpuTe MeCTo 3aJatNA n npumTe Heo6xoJIMbIe Mepbl, YTO6bl yCTpaHNTb npuHny.
C. Пп ВОЗБНОВЛЕHи раснлИВаHЯ 3aROTOBKN yCTaHOBNTe NlIbHbIДNCK B ueHTpe paCnHla n y6eINTeCb,чTO 3y6bЯ He 3aцENLNCb 3a O6pa6aTbIbAembl MaTePnAn. EcIn PnIbHbI JnCK 3aJkaT, OH MOnKet POnHЯTbcr NII PpNBecTn K BO3HnKHOBEHIO OTdauN рп ВОЗБНОВЛЕHи pa6OТы ПИnlbl.
D. 06ecneybTe noJdepKky 3arotobok 6oJbwoRa3Mepa, yTO6bl yMeHbIHTb pNCK 3axKaTnIINbHO rNcKa N BO3HNKHOBeHnO Tdaun. Iupokne 3arotOBKn MOryt npOBncatb noi co6CTBeHHbIM Becom. Poi 3arotOBKOJIeJeYt UcTaHOBNTb OOnpby C o6eHX CTOpOH — B6IInz IINHn pe3a n Y Kpa 3arOTOBKn.
E. He ncpoJIb3yIte 3aTyINBwneCnI INIOBpeJDeHHbIe NInbHbIE dNcKn. Iprn ncpoJIb3OBAHnN 3aTyINBweroCnI IN HEnpaBUNbHO yCTaHOJIeHHOrO NInbHOrO DnCKa paCnIJ POnUyaeTcY3KIM, YTO npINBOdIT K Upe3MepHOMy TpeHIO, 3aXKaTIO DnCKa IN BO3HNKHOBeHHIO OTdauN.
F. Ipeed pacnINIBaHneM 0JXHbI 6bITb HadeXHO 3aФнкИрOBaHbI 6IokpUoJne pbIur peryIIpOBKn rIy6InbI n yrna HaKIOHa PIIbHoro DnCKa. EcIn BO BpeM paCnINIBaHn C6NbaETc HAcTpoJka PIIbHoro DnCKa, 3TO MOKeT npINBeCTN K erO 3axATNU OJI N Bo3HNKHOBHeHIO OTdauN.
G. C6bIpaTe oc6yIO octopXHocTb npn paCnnIuBaHn CTeh
2.ИHCTPyKUЯ IO TEXHnKE B3OpACHOCTN
HIN Dpyrnx HnnpocMaTpnbAembix 06naCTeN. BbICTypaIOuI INJIbHbI DNCK MOKeT paCNIInTB IpeIMeTbI, KOToPbIE cNoCo6cTBYIO T BO3HNKHOBeHNU OITaUH.
He nCnoJIb3yIe npHaJnEJKHOCTn IJIa IIOaU BODbl.
A.ИспользуITE 3аЖIMbl Iллpyгп epncno6beHnЯ Дя phKcauN 3aROTOBKn Ha yCTOчINBOI nlaTΦopMe. EcIи DePkaTb 6pa6aTbIBaEMyIO DeTalb pyKaMn Iлл pRJxIMMaTb K TeIy, 3To MocKeT npNBecTN K IOTepe paBHOBeCnI N KOHTpOJI.
B.Держпгплуслio6оьсторны,но HeHaОнй Лини с TeлOM.B pe3yЛьтATE OTДАЧИ пILA может OTСКочNTь Ha3aI.
C. CṭapaǐTecb He 3aKpbIbA Tb BēHTnIaŋoHhIe OTBepCTnI yCTpOiCTBa. CbO6oJHàry OdexJa, yKpaIeHnI y DIIINHhIe BOIocbl MOrγT IOnaCTb B dBVxUηIeCeY qACTn.
D. Избeraite Говоздени рпс пашил. Перед павOSTОй роверьтешагOTOBКУ и удалие ИЗ Hee BCE Говоз.
PNEyPExEHE. B HeKOTOpbIX cIyayX nbIb, 6pa3yeMaB Bpe3yIbTaTe IINΦOBaHn, paCINJIbAHn, CBepJeHnY IN Dpynx BnIOB peMOHTbIX pa60T, COePKNT XIMNUeCKne BeIeCTBa, Bbl3bIBaIOuNe OHKOJOrNueCKne 3a6OBeBAHn, NaTOIOrn PoDOb IN Dpyne BnDbI HApUSeHn PEPoDyKTNBHO CnCTeMbI (no DaHHbIM Wtata KaIINΦOpHn). DaIee npVBedeHo HeCKoJIbKO pIpMEPOB TaIKX XIMNUeCKNX BeIeCTB.
CbuHneu,coepkauncB KpaCke Ha oCHOBe CBUNca.
Kbapu, coepkaunB Knpnuax, cemeHte n dpynx CtponteIbHbIX MaTePnaJax.
- Мышьк ихоми зхимочесн орба60Таньх пломатерпалов.
- PnCK Bo3DeiCTBnA 3aBnCnT OT yAcToTb BblIOJIHeHnA DaHHbIX BnDOb pa60t. T06bl CHn3nTb BnIaHnE 3Tnx XmMueCKNX IpOdyKTOB:
pa6oTaIe B XopoIo npOBeTpNBaEmbIx NOMEuHnX I nCNoJIb3yIte NaJIeJaUne CpeDCTBA 3aUHTbl, TaKne KaK peCnnpaTOP, cNeuaJIbHO
2.ИHCTPyKUЯ IO TEXHnKE Be3OПАCHOCTN
pa3pa6oTaHHbIДЯФINlbTpauuMmKpOcKnuecknx JaCTnU;
-ИЗбERAITEДЛТЕЛБНОКΟТАКТаСпьЛБЮ РИ ПИПОВAHIN, PACПИПВAHIN, CBерлеси И ДPyгИХ рЕМОТнБИХ pa6Otax.ΗΝΕВΑΙTE 3aΙΙΤΗΥΟ ΜΕχДУ И мΟΙTe OΤΚPBΙΤΙе МecTa BΟΙΟ C MБΙΝΟ. ПОпаданце пьлівот, Гla3a ИИн На КОЖу может ппВeстNi KВПИТБАИHIO ВpeДнБИх XИМУЧЕСКИX BeшUCTB.
ПылелУЛАВЛBAHИЕ
HnpeBaunbnaYcTaHOBKaIyBnHbI DnCKa;
pacnINIOBKA cyuKOB nI IN TB03deI, HaxOJaUHXCBA 3aTOBKe;
n3r6bHne nIbHOrO dNcKa BO BpeMa npOnnla;
BbIIOJIHeHne paCNIIOB TynbIM, 3a3y6peHHbIM IIN HeNpaBUNbHO OTepyNJIOpOBaHHbIM IINbHBIM DnCKOM;
HnpeBnBna HnoDepKs3aTOtOBK;
pnpknlaabibaHne 4pe3MepbIx ycnnn npu BbInonHeHH npoPiHa;
pacnIOBka DeOpMPOBaHNOI IN BlaXHOI DpeBeCINbI;
HnpeBaIbHoe IIN HeHaIeJexaIee IIOJIb3OBAHne IHCTpyMeHTa.
YtO6bI yMeHbIHTB BepoTHocTb OTdauN, cIeNyTe npuBeJeHHbIM HnKe HnCTpyKzIaM nO TexHke 6e30NaCHOCTn.
5.3KcIpyATAUIA
Bcerda nCnoIb3yIte npabInbHbIe NaCTpoIKn Ipy6bHbI dNcKa.
Ipeed pe3kOcMOtPitE 3aT0Bky Ha hAlnue cUyKOB u TBOzdei.
Hikorda He niiinTe cyuKn uynrBozdi.
BbIopHnIe npIbIe npOnIIbI. Bo BpEm npOIOJIbHO pe3Ku Bcerda nCpONJIb3yTe HaprabJIIOUyIO nnHky.
3To n03B0nItpneoTOBpArTb n3r6aHne nnIbHOro dNcKa.
IcnoJIb3yIte uIcTbIe, OcTpIe I npaBnIbHO yCTaHOBJIeHHble nIIbHbIe dIckN. HIKoIgDa He nnIMTe TynblIM NIIbHbIM dIckAmN.
Ipeed haayamop pa6o8tbi o6ceuebte npabunbnyo nOdoepkky 3a0ToBKN.
PE3KA CO CKOWEHHOH KPOMKOH
HacrpoTe JeKeJaembl yroI CKoCa KpOMKn B DnaHaZoHe o 0^ do 45^
PEYUNPOBKA YTJA CKOCA KPOMKU
OTkpyTnte pyky perynipOBKn yrna ckoca KpOMKn.
IopHmTe KOpNc DBrTaTeJI NIIbI Do DCtUxKeHn HuxHo 3NaueHn yrna ckOca KpOMKn Ha shkane.
Haedekho 3aTahnite pyuky perynipobKn yrna ckoca kpmkn.
I PNEUYPEXKDEHNE. IOnbITKa BbINOpHeHnpe3Kn CO CkOSeHHo KpOMKo 6e3 HaJeKHo 3aTJKKn OIKCaTopa yIgna cKOca KpOMKn MojTe npIBeCTN K cepBe3HbIM TpaBMam.
5.3KcPiJyATAUHA
PE3KA CO CKOWEHHOH KPOMKOH
Kpenko depjnte nny o6eHm pykamn. IomeCTne nepeHn KpaO ochOBaHna Ha 3arOTOBky. 3anyctne nny u doxndtecb, kOrda nIbHbI dNCK DOCTNRHT nonHOckopocn. HanpaBbTe nny B 3arOTOBKY u BblONHtpe paCnI. OTyCTne KypKObI nepeKIOUaTeNb N daIte nIbHomy dNCKy PNOHcTbIO OCTAHOBITcR. POnHMNTe nny C 3arOTOBKn.
IPOPE3AHNE YTLYBJEHNI
PNEpyNPEKJDEHME. Ppeep npope3aHnem yIy6bHeHn Bcerda yctHaBnBaIte yroI cKOcA KpOMKn 0°. IOnbITka npope3aHnry yIy6bHeHn B IIObOM dpYrO mIoJOxEHm MOKeT npIBeCTN K nOtepe KOHTPOHa Hd IIIOIo N cepBe3hBIM TpaBMam.
YctahOBtte yron ckoca KpOMKn 0^
Bcerda nCnoIb3yIte npabInbHbIe NaCTpoKn Ipy6bHbI dNcKa.
IopHnMMTe HxNkHm ⅢTOK mIIbHOrO dNcKa pnp nOMoOn pyKoRTKn.
PIMMEAHNE.Bo n36ekaHne TjKbIX TpaBM BcERda POnHMaTe HNKHn 1uTOK NlNbHO DnCKa Pn NiOMOUI pykoTKn. YdepKNaIe HNKHn 1uTOK NlNbHOrO DNCKa 3a pykoTky, He ybnparay pky c nepedneh pykoTkn. PpIXMITE nepedHIO uactb OCHOBaHn K 3aTOOBKe, npNoDnB 3aDHIOU cAcb tykoTkn TaKIM oBa30M, 4TObbl NlNbHbI dNCK He kacJcR 3aTOOBKn. 3aNyCTnte Nlny i DoXdntEcB, KOrDa NlNbHbI dNCK DOCTIHET NOLHO CKOPoCTn. HanpaBte Nlny B 3aTOBkU y BblONHIne paCmII.
PNEUPPEKDEHNE. Pnp npoe3aHn yrgny6leHn Bcerda deNaite paCnB HnnpabEnn ot c68. Pnp pe3ke B o6paTHOM HnPaBHeHH nHa moKe TOKa3aTbC BcEpy 3aTOBKN IN BepHyTBcB A CTOpOHy OepaTopa. OTnyCTte KypKOBbl nepeKluOaTeIb N daIte NIIbHOMy DnCKY nonHOCTbIO OCTAHOBITcB. POnHMInTE pNly C 3aTOBKn.
UKAJIA DINIHBI PE3AHNIA
M3BNeKIne aKKymyIaTOp.
YCTAHOBITE60KOBYIOHnPaBnIOUIOIINHKBYOTBepCTNBOCHOBAHM.
Otperynpyte 60koBvIu HnpaBIAIOU pIIaHky B COOTBeTCTBm C Tpe6yemoiuHnoi.
HadeXho 3aTaNHTe ΦNKcatop 6OKOBoH HnPaBnIooJIe pIaHNK.
5.3KcIpyATAUIA
IcnoIb3OBAHne 6OKOBH HapBaJIoue nnlaHKn
3aKpeHnTe 3aTOrTOBky, uTo6bI npEeIoTBpaTntb ee CMeueHne.
Ipeed 3aemeno nllbHoro dNcKa Bcerda n3BneKaate aKkyMnyTOp.
- C NOMOUII 3aXIMHOro BnHTa yCTAHOBITE rny6Hy pe3aHnB MmHImaJIbHOe nIOJKeHne (0 MM).
- ПовернITE спнтук пььно диска с пою рьчага блоровки и onустite сиркуярниу.
- Haxmte KhoNky 6IokpOBKn 7nHdEa (do 0nkcaun) n c nomoohu WectnrpaHHoro kIIOUa oTKpyTne 6oTn PIIbHorO dNcKa. 3aTeM n3BleKeNTe 6oTn PIIbHorO dNcKa n CHmnte BHeHnI naHeu.
- CHIMMITE nIIbHbI dNcK.
- UctahOBka NIIbHoro DnCKa BbIIOHHeTcB O6paTHOM NopJKe.
- Haxmte KhoNky 6noknpobKu nnHdJe (do oKcaun) n c nOoBtu WectnrpaHHoro KIoua 3aTaNHe 60nt PnIbHOro DnCKa N BHeuHn INaHeU.
- 8eDInTeCb, YTO NIIbHbI DNCK COOTBeCTByET YaCTe BpaUeHnI HNCTpyMeHTa.
6.06CJyKBAHNE
PNEUYPEKDEHNE. Ia CHNKeHn PnCKa NOnUeHn TpaBM Bcerda OTcoEHHte 3apdHoe yCTpoiCTBO nI3BNeKaIte aKKymJIaTOp n3 3apdHoro yCTpoiCTBa uIN INCHpMeHTa nepeD bblonHeHm EIObIX pa60I NO TexHmueckomy o6cnykuaHIO. HIKoRa He pa3bpaTe INCHpMeHT, aKKymJIaTOp n3apdHoe yCTpoiCTBO.
He nCnoB3yIte octpble npedMeTbI dIra OUcHcTKu yCTpoiCTBa. He doNyckaIte IonoJaHaNIA KaKoJI6o KnuKoCTn BHytpb UCTPOICTBa. 3To MoKet npNBecTn K nobpeKeJdeHIO uCTpoiCTBa.
Pergnlo Ounuau Te yctpoctBo, Jenaatelbno cpa3y nocle 3aBepweHn pa60tbl.
HnKOrJa He 3aKpbBaIte BeHTnJIaONHbIe OTBepCTna.
YdaiIe Te puiinuHuyo K npi60py uHnfoBaNbHyu nbIb c NOMOsbU eTkn.
TINTOK NINbHOrO DnCKa DOnJKeH BcERda CBo6OdHO NepemeUaTBcA N ABTOMaTneCck3aKpbIbA TbCB.
IOTOMy 0bKpy TcNtKa NnBHO DnCKa CneJeT BceJaCoepKaTb B nCTOTE.
YdJIte PbIb N cTpyKky C nOMOoiBIO CxAToTO B03dyxA nIeTKI.
OYNCTKA
OuHsAaTe BENTnIaIOHHbIe OTBepTNa OT bIIN 3aqr3HeHNI. CneIITe 3a TEM, YTObIpyKoRTKn 6bIIN cyXIMN uNCTbIMN n Ha HIX He 6bIINO MaCna IIN cMa3KN. IJIa ONUCTKN INCTpyMeHTa NcOJb3yUte TOJIbKO CnAbSbIyMbIbHbI paCTBOp IN BlaJxHyIO TKAhB, TaK KaK HeKOTOpBe UcTtIaue CpeCTBa n paCTBOpNTeIN MOrT NOBpeNTb PnactIKOBbIe I DpyrNe I30NilpoBaHHbIe YaCTN.
Bcerda ouhiaite oIbactb BOKpyu Tka nIbHoro DnCKa (ydaJIte nbIb n CtpyKky cnoMoIbO cKaTOro BO3duxa nn IeTK).
K taKIM BeUeCTBaM OTHOCaTc: 6eH3nH, cKnIuIap, pa3bAsBTeN IJaKa I KpaCKn, OUnsAIOUne pactBopnte C XLOPOM, HauaTaBpHbI CNPT N 6bITOBBe MOUOJIe CpeCDtBA, CoepJkaUne HauaTaBpHbI CNPT. He IcNoIb3yIte PraDM C HHTpyMeHTOM IerKOBocPiAmEHaJOUneCe IINrTopoue pactBopnte.
PEMOHT
I3roToBNeHOB Ronchin 18/10/2019
YBaJHNO pOoHTaIe Noci6HnK 3 EKcIIyatauTt Ta DToPmUyTeCA HabeDeHnx BkA3iBOK. LcNoci6HnK 3 EKcIIyatauTt DONoMOxte N03HaIOMuTnC3 3 PpOyKTOM, PpaBUNbHO HMM KOpNCrTyBaTnC Ta BxNTM Heo6xjNDHX 3axoJD 6e3NeKn. 36epiraTe uei Noci6HnK 3 EKcIIyatauTt B 6e3neHomy Micci dJa npoJaIbWoTO BRKOpNCTaHH.
CNMBOJI

YBaXHo npOuHTaIe Noci6HnK 3 ekCnIyataaII.

Lc nonepedjckenH npo He63neky 3acepiReA uOdo noikokxheb iHctpyMeHTa a60 iHwOrO MaHa, a60 oTpImaHHnΦi3uHnx TpaM.

HadairaiTe 3axnChi OkyIaRpi.

HadaaTe 3ac6b3axncty opranib cyxy.

HaJaTaIe 3axnche B3yTTA.

HadraaTe 3axChi pyKaBnui.

KopncTyntcB pecnipatopom.

BukopncTaHHn noKoJKeHnx dckb a60 dckb Iy qOpHOoi 6pO6Kn He6e3neuHo Ta MoKe npu3BeCTn Do TpaBMvBaHH.

He npn3naeHOnI pyi3aHHN 3 oxoJooKeHHNAM (MOKporo pi3aHHN).

Bupi6 Biinobidae cneiaJIbHM EbponeIcbKm DnpeKTuBaM; npoBeHa HopMaTUBHApnoeDpya ouiKn BiINOBIDHOCTi.

Ebpa3iibckn 3HaK BiIDnoBIDHocTi.

CmboJ WEEJ 0to ytni3aui.

Yibercalbny: cymichn tiIbkn 3 Sterwins UP20, Lexman UP20 ta Dexter UP20.

YkpaHcbKm3nakBIDnOBiDnHOctI.
3MICT
- Bvnkopnctaanha npin3naeHHa makymyIaTOpHOi 6e3uITKOBoi nnckDexter
- ПравILATeXHIXI6e3neKIN
- Onic
- Texhihi dahi
- Ekcnnyatauaia
- Texhuihe 06cIyroByaHHa
- UcyeHHe HecnpaBHOCTeI
- Ytniiazaia ta nepepo6ka
9.Гаразгия - 3o6paXeHnB pO3i6paHomy BnDi Ta cIncok DeTalei
11.Декларacia npo BiinobiHictb Stanapram EC
1. BUKOPUCTAHHЯ 3A ПИЗHAUYEHЯМ AKUMYJIATOPHOI БELITKOBOI ДИСКOBОI ПИЛКIN DEXTER
ДякуемВамз苹пдбаньцboro Виpo6у.ПрочитTe zuI INCTpyKuzITo Ta 36epeXitb II Ha Maib6yTHe.
ДиСКОВА ПИЛКа пИЗнacheЕWA ДЯ ПОпepeчHOrO рОзПИЮВаHHЯ DepeBиНI Do MaKcIMaJIbHoi rIb6nHn 65 MM. BOHA TAKOK може рОБиТи пямi a60 ckoшeHi рОзПИи BiD 0do 45 rpaJyciB. iCnI DвИКориCTOBуВaTи 3 OCHOBOU, сIo KOHTaKTuI O I 3arOtIBKOIO.
PocnaBHaHn yakOBKn nepeKoHaTeCBA HaaBHocTi BCbOTo npIaDJa, 0 BoXoNTb y KOMJIeKT (Ako Take c). Ako Bnpio noKoJKeHn a6o Ma6 bJyB-kyn DeΦeKt, He BnKOpNCTOBuYte Ioro Ta nobepHItb NOrO CBOcMy dInepy.
KuO Bu DaTe cei HcTpyment IHsIM NIOJAM, daTe IM TAKoX iO IHCTpykciio.
3Bephitb ybary, 0e Bnpi6 He npin3nauehen nla BnKOpncTahnB KOMepciHnx, ToproBnx a6o npomncobnx cijax. Iapantria 6yde anynboBaHa, kuo Bnpi6 BnKOpncTOByBaTHMeTbcB KOMepciHnx, ToproBnx, npomncobnx a6o cxoxnx cijax.
3 Tocn 30py 6e3neKn diTn, nDItKn BIKOM do 16 pokib Ta oco6n, 0o He 03Hauomnncs 3 cIm noci6HkOM 3 ekCnnyatauii He NobHHI KOpNCTyBaTnca ZmBnPo6om. Oc6n 3 6mExKeHMn fi3nHmna a6o po3ymOBmni 3dIbHOCTaMn NobHHI KOpNCTyBaTnca ZmBnPo6om TiNbKn iHaHraJdom BiNobiDaIbHooi o6oN.
2. Правлиа ТЕХИКи БЕЗPEKи
IHNBIDYALbHA TEXHIKA 6E3NEKIN
A.Пд час рботи 3 сектоинсту мьдгу ваджни,стху за сбоим дямп та мссіить розсydлно . He npацюгte 3 сектоинсту мьдгу вдомлени, поpe6уbaэт eпд дioc hapкотуннх рechови, ankorолю abo likib. HabiTb MHTEBA HeyВаЖнICTь пд час рботи 3 сектоинсту мьдгу вдом畴 Дд Вадж кд ТраBMN.
B. KopncTyIteCb 3ac06amn iHdNBIyalbHoro 3axncty. 3aBXJn Hndraite 3axnchi OKyIapn. BnkopncTaHH y BiNIOBIDHX yMOBAX TaKX 3axnCHNX 3ac06IB Jk npOTnIIIOBNI peCnPapTop, HeKOB3He 3axnche B3yTTT,
2. Правлиа ТЕХИКи БЕЗPEKи
JIOJOM-KaKaTa HaBByuHnKU DoNOMOKe 3MeHUnTn pU3NK TpaBMyBaHHa.
C. YHnkaTe BnnapKOBOrO 3anycky iNCTpymeNTa. NepH hIX nIdkNoUaTH eNEKtpoIHcTpyMeHT do MepeXi XnBLeHHa 60 akymylTopa, 6paTu a60 nepeHocHTu Ioro, nepeBipTe, uB CbTaHOBHeNo nepemKauy noIOxKeHHa «BIMKHeHo». Jkso nepeHocHTu ENEKtpoIHcTpyMeHT, TpImaOnu nnapeCb Ha nepeMnKaui XnBLeHHa, a60 nIdkNoUaTH noTo do Jxepena XnBLeHHa, KOJI nepeMnKaay XnBLeHHa nepe6yBaE B noIOxKeHHi «YBIMKHyTO», ue MoJc npU3BeCTn Do TpaBMYaHHa.
D. Першних увимкуне онлайн рсимпгльни Клиень ta raйкови лочи. Рожд залштп takни клоч на рухомій часни онлайн рсимпгльни. Дура ванни.
E. He dotarytecb 3 ihctpymeHOM B pykax. 3abxdn 36epiraTe ctiKe noloxhen Ta pibHObary. Ye dae 3mory kpaune KepyBaTu neKETPOIHCTpymeHOM y paazi BUNHKHeHHa HenepeD6auyBaHNxCtuaui.
F. Hada ra Te BIDNOBIDHn OJr. He hadra Te BINbHn OJr a60 npKpaCn. BOnoc, oJr Ta pyKaBnCi MaOTb 6yTu Ha 6e3neuHn BiCTaHI BIDpyXOMnx qactHn. BInbHn OJr, npKpaCn a6o DoBRE BOnoc MoKyTb NOTpAnITn B pYxOMi qactHn.
G.y pa3i HaaBhoCTi npnctpoIB dIa nIDKIOUeHHcNCTEMBiDBeHHe Ta 36upaHn IINy,ix cIa O6OB'3KOBO BCTAHOBHT TaBVKOpNCTOByBaTH 3a npn3HaueHHaM. BUKOpNCtAHn IpncTPOO dJIa 36upaHHn NIny MoKe 3MeHUnTI He6e3Neky, NOB'3aHy 3 INOM.
H. He Btpaayte yBaxhocti yepe3 qache TBKOpncTahnHa IHcTpymeHTa.
Ye He Do3BOJNTb Bam po3Cna6ntbcr Ta npoiirHopyBaTu npiuuNn
TexiKn 6e3neKn. Heo6epeXHi DII MOxUyTB MUTTEBO pnu3BeCTn DO
cepno3Hnx TpaBM.
BVKOPNUCTAHHЯ TА Доглд 3A ELEKTPOIHCTPYMEHTOM
A. He nepeBaHTaJyIe eJIeKtpoIHcTpymENT. BnKOpNcTobYIte HaneXHm eJIeKtpoIHcTpymENT BiIDNoBIdHO do noTpe6n. IpaBnIbHo niiIbpaHm eJIeKtpoIHcTpymENT DoIOMoJke KpaIe Ta 6e3neuHiue 3pObTu np60Tu 3i WbNdkicTIO, Jka DIIa HbOrO nepeD6aueHa.
B.He BnKOpncToBvIe eJekTpOiHcTpymeHT, JkUo nepemNkau He
2. ПРABИАТEXHIКБE3NEKIN
BMMKae a6o He BMMKae Noro. Yci eNeKtpoiHcTpymEHTn, kIMH HeMOxJIbBO KepyBaTu 3a DoNOMOIOI nepEMKaua, cTaHOBJIaTb He6e3neKy Ta Notpe6yIoTB pemOnTy.
C. BnIMtB BuKy 3 po3eTKa/a6o akymyJatop 3 iNcTpymeHTa, kkuo BIn 3HIMn, nepe Tm Jk 3miHOBaTH 6yd-aki HanaWtYBaHHa, 3amHrT KOMnEeKtyBaIbHi qactHn a6o nepe 36epirAHHM iNcTpymeHTa. Taki 3anO6ixHi 3axOdi TexHikn 6e3neKn 3MeHsUyToB pN3NK BnnaIkoBOrO 3anycky eNeKTpoIHcTpymeHTa.
D. 36epiraTe iHcTpymeHTn, 90 He BnKOpNCTOBtbcra, nOaJI Bi dITEe I He O3BOJnTe OC6am, Aki He MaOTb DOCBiPy po6OtN 3 TaKIMn iHcTpymeHTAmn a6o He 3HaIOMi 3 cIIMn iHcTpkyiaMn, KopncTyBaTncb eIeKtpoiHcTpymeHTom. EJeKtpoiHcTpymeHTn CTahOBJIaTb He6e3neKy B pyKaX HeIOcBiIueHnx KopncTyBaUIB.
E. EnektpoiHCTpymeHT Ta npnnaIaI naotpe6yIOb dOrrAly. NepeBipraIte Horo Ha npedmet 3miueHH a60 3aTnCKyBaHH pyxOMnx qactH, 3namaHnx qactHn Ta 6yd-b-aknx iHux yMOB, kki MOxytb BnInHyTu Ha po6oty IHCTpymeHTa. Y pa3i noXKOJxEHN eNektpoiHCTpymeHT cniD 3dATn B peMOHT, nepu hIX KOpNCTyBaTncs Hm. AcTo HeuaChi BnadaKn TpaIIaHTbcr BHaCNIIDOK HeHaJIeXHOro TexHiHOro 06cIyROByBaHH eNektpoiHCTpymeHTIB.
F. Tpmaite pixyu iHctpymntn roctpmm Ta uNCTUMn. Hanexhm yHOM doTnpyi pixyu iHctpymntn 3 roctpmm pixyumm kpaampiD6IokyOtbcra Ta HmN Ierwe KepyBaTu.
G. KopnctyTecra eNektpoHCTpyMeHTOM, akcecyapamu Ta hacaKamn Ia nhtpymeHa 3rIHO 3iEIO IHCTpyKciEIO, 3BaXaOuH Na po6oYi yMOBt apo60Tu, Aky cIa BnKOHaTu. BnKopncTaHHa eNektpoHCTpyMeHa He 3a npn3HaueHHa MOnKe CtaTn npnHiO BuHmKHeHHa He6e3neHnx CNTyaui.
H. Puykni iNCTpymeHa Ta nobepxhi 3axonPleHHa MaOTb 6yTu 3abXdnc cyxmmu, uNCTmU, 6e3 Jnpy Ta 6pyd. CIn3bki pyKu Ta nobepxhi 3axonPleHHa He 3a6e3neyuToB 6e3neueHe NOBdoXeHHa Ta KOHTpoIb iNCTpymeHa B HecnoiBaHnx CnTuayix.
2. ПРавILA TEXHIKи BE3NEKN
BVKOPUCTAHNA TAOJIA 3A AKUMYJIATOPHIM IHCTPYMEHTOM
A. 3apdkaTe Nwse 3a Donomoro 3apdHoro npctpoB, Bn3naeHoro Bnpo6nKOM. 3apdHn npcTpi, kynPiXoNDtB dny aKymyIaTopiB OndHO BnDy, MoKe cnpuHHTn pN3NK Ioxkxi y Bnuadky Ioro BnKOpCTaHH 3 iHsM aKymyIaTopOM.
B. 3 eNeKtpoiHcTpymeHTamn cnid BnKOpNCToBYBaTH nIwe npn3HaueHi dIy Hnx akymyIaTOPhi 6aTapei. BnKOpNCaHHN 6yDb-raKnx IHnXs akymyIaTOPiB MoKe npu3BeCTn Do TpaBMn a6o noJexki.
C. KOnn akymyIaTOp He BnKOpNCToBcTbCra, Ioro cnId TprMaTu OkpeMo BiD MetaIeBux npedMeTIB - 3aTnCKaUH nanepy, MoHeT, KInOuH, UBXiB, WypyniB Ta iHmNx dpi6Hnx npedMeTIB, Aki MOKyTu 3aMKNHTu Klemn. Kopotke 3aMnKaHHa Klem akymyIaTOp a MoXe cTaTu PnpuHIO onikB a60 noJexi.
D.у haTTo BaxKnx yMoBax ekCnIyatau3 akymyIaTopa MoKe BuTikatni piHa; He TopKaIteCb ii. KaIO BnApAdKOBO BV BCE K TopKhynnci II, ce Mlcue cnI npomTu BOIo. KaIO piHa notpanNu B oOi, cnI 3BepHyTc3 a MednUHO IOnOMoTO. PiHa, Ka BnCTynae 3 akymyIaTopa, MoKe cnPnuHHTn NOppa3HeHHa a6o onIKn.
E. He BnKOpNCToBvIe akymyIaTOp a6o iHcTpyment, kUO BOH nOwKOJxHei a6o MoNΦIKOBaHI. PoIshKoJxHei a6o MoNΦIKOBaHI aKymyIaTOpu MoKyTb MaTu HenepeD6aCyBaHy NObEdiHKy, 10 np3BOIDtB do noXexi, BV6xuy a6o pn3NUk TypABMyBaHHa.
F. 06epiraTe akymyIaTOp a6o IHcTpymeNT BiD BorHIO a6o HaMipHOI temnepaTyPn. DiY BOrHIO a6o TemnepaTyPn Bnue 130 ^ C MoKe BnKJIInKaTn Bn6yx.
G.ДotpymyItecIInCTpyKciI 7OIO 3apJxHnTa He 3apJxHaTe akymyIaTOp a6o InCTpymeHT 3a Mekam Diana3OHy Tempeatyp, 3a3HaueHnx BInCTpyKciI. HenpaBnJIbHe 3apJxHaHHa6o Tempeatypa 3a Mekam BkazHO DIAHA3OHy MoKe I0sKOHTN AkymyIaTOp i 36iNbHTn pINIK BUNHKHeHHI NOXeKi.
O6CJyTOBYAHH
2. ПРABИАТEXHIКБE3NEKIN
A. BidaBaIte cBi eNeKtpoiHcTpyment B peMOHT KBaIiΦiKOBaHomy
phiBueBi Ta BnKOpncTObuYte TIlbKn OpurHaJIbHi 3anachi YactHHN.
Ue 3a6e3neuHb HadiHy po6Otu iHcTpymenta.
B. Hikon He 06cnyrobyte noxkoJxehi akymyIaTOPn. 06cnyroByBaHHa akymyJIaTopiB MaIOb BIKOHyBaTN TIlbKN BInpo6HmK a6o ABTO3OBaHa cepBicHa MaICTepHra.
IHCTPyKciI ΣOIO TEXHIKN B3NEKN DJIY BCIX NII
PI3AHH
A. AHE6E3NEKA: Tpmaite pykn noaJI BiД 30Hn nIIaHHa Ta nnIbHorO dinCKa. Tpmaite npry pyky Ha doaTkoi pyuci a6o Ha Kopnyci motopa. RaKIO o6nDi pykn TpmaHOt b nnIky, BOHN He 6yduYb nopizahi.
B. He npotaryte pykn niid 3arotibky. 3axnchni uHTOK He 3MOKe 3axnCTNTi Bac BiD nIbHOrO dNcKa niD 3arotIBKoIO.
C. BīdperyIIOte rIb6HHy pI3aHHa 3aJIexHOb BID TOBcHn 3arotIBKn. 3-πiD 3arotIBKn Ma€ 6yTu BvIHN HeIOBn 3y6eCb IINbHOrO DnCKa.
D. Hikon He TpMaTe 3arotBky y pykax a6o Ha Ho3i. 3aikcyTe 3arotBky Ha ctaibHi nOBepxHi. BaxnBo NiTpmyBaTu 3arotBky HaneKHM YHOM, 06 3BeCTn Do MInmMy BnInB TiJa, 3aTnCKyBaHHa DnCKa a6o BtpaTy KOHTpOJIHO.
E.Якшо ріжuya komплковальна ча'tина мося пid ча ровтугу поховий повodки, Тримайе лесстспунгentздяпьовану рчky. Контакт з дотом пid нашию пиЗвдь до пяви нашиг вmetалевх ча'tинхах лесстспунгentа, со мося пиЗвспдурахенны коростувачaelесстспунм.
F.Для поздовхьоу розиюванну 3аькд Коричтecь
нарямно палково a60 npabnolom. Ле збпець
akypathicb розиюваньу та 3Meншпь ринк 3aTиCKУвань дИSCA.
2. ПРавILA TEXHIKи BE3NEKN
G. 3aBxDn BnKOpNCTOBuTe NlBHi DnCKn 3 npaBnIbHm pO3Mipom i φopMoIO (pOM6oNODi6HOIO a60 KpyrLoIO) nocAdKObIX OTBOpIB. NlBHi DnCKN, kki He BiIDNoBIaIoTB KpiINbHM DeTaNAM NII, 6yDuTb PpaUOBaTI eKCcEHTpNUHO, IIO npu3BeDe Do BTPaTI KOHTPOJIIO.
H. Hikon He BnKOpncToByTe noxkoJxeni a6o HenpaBnblhi 7aai6n ta 6oTn. 7aai6n ta 6oTn nnbHoro DnCKa po3pO6neHi CneiaIbHo Ira BaoiPi nnI dIra ONImaIbHOi po60Tu ta 6e3neuHoi EKcnnyataui.
- He hamaraiTecra peMOHTyBaTN Ja3epHn BkA3iBHNK CAMOCTiHNO.
HeHAMaraiTece3MiHHTN6yNb-kyIaTeaJIbJa3epHOrO Bka3iBHNka
3aBxN BmMkaIe Ia3ep, KOJIH Nm He KOpNCyIOTBcA.
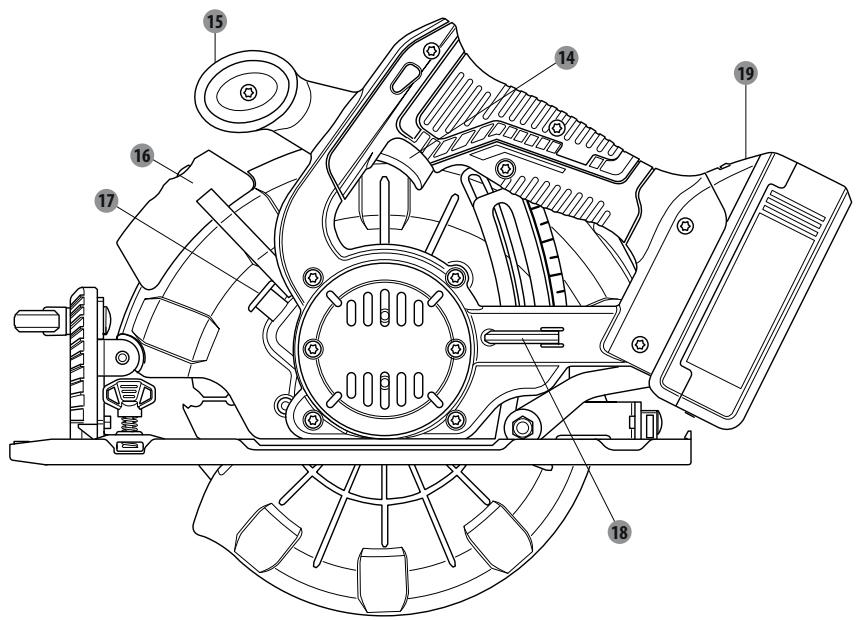
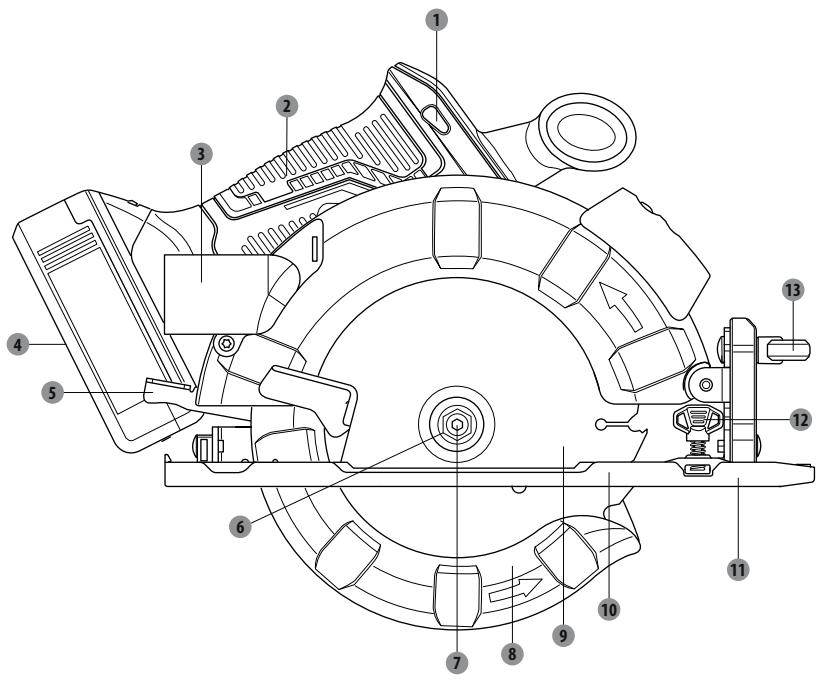
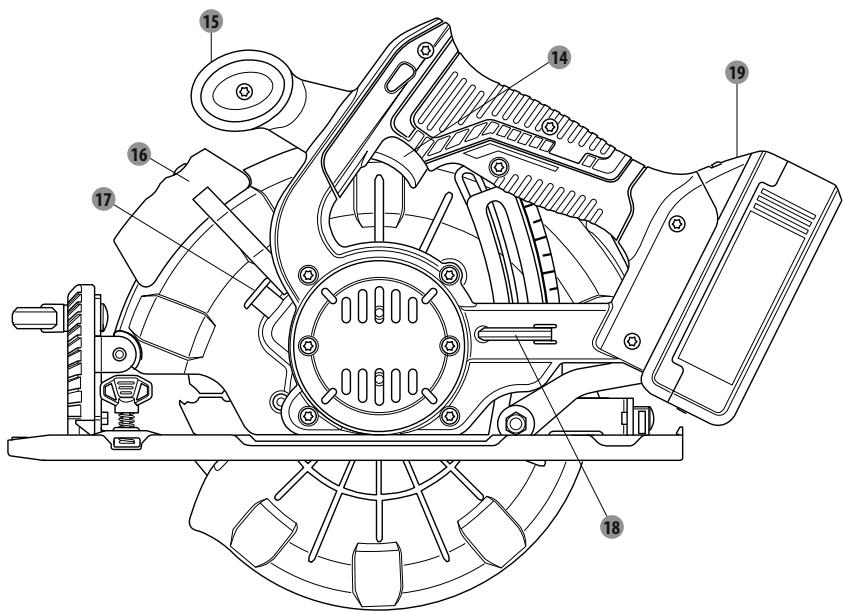
3.0NHC
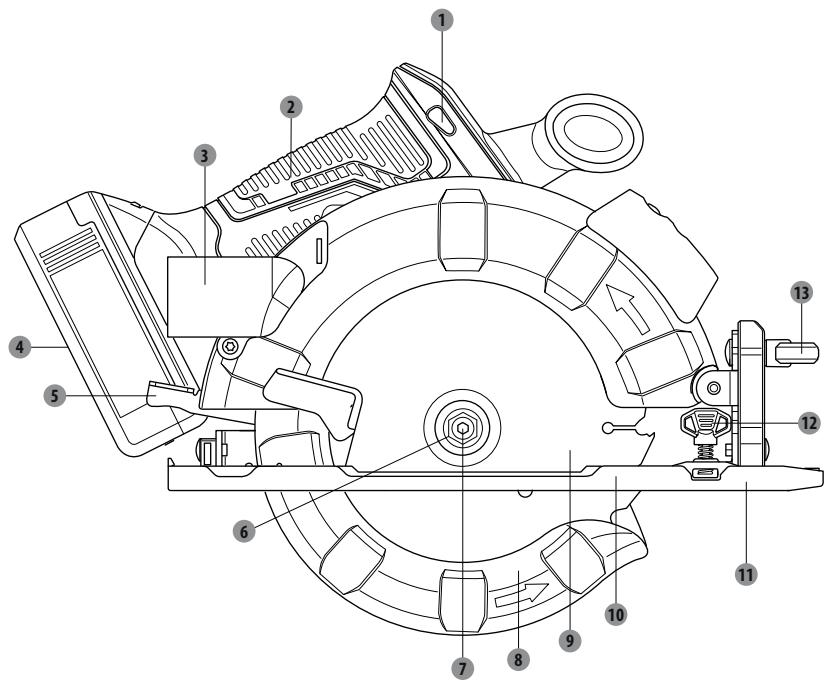
1 Khonka p036nokybaHHa
2 PyuKa
3 OTbip IaBnDanEnHnnny
4 Akymyntop*
5 BaxiNb 6mExeHHrIINHn
6 3oBhiHnHJIpaHeCb
7 BoNT KpInIeHn IINbHorO duNcKa
8 Huxkhi 06mexyBaay
9 Nnblnhnnck
10Ochoba
11 KpaioBa HnnpMaHa NiHnka
12 Pyuka-6apauhukn Hnapmhoi lihiikn
13Pyuka-6apaHnuk perynIOBaHHcKocy
3.0NHC
14 Tpurnepnni nepemnkaay
15Добадкова ручka
16 Na3ep
17 Khonka 6IokyBaHHa IIHHdJIa
18 Faikobni Klnou dny nnilbHoro dncka
19 Khonka 3BilbHeHHa akymyIaTopa*
- He BCE 306paxene a6o onicahe npinaanda BXOJntb y cTaHapTnKOMPJIeKT nOCTaHaHH.
4. TEXHIYHI DAHI
BnMItb akymyIaTOp,HaTnCHyBUn Ha KHOJKN pO36JOKyBaHHa AkymyIaTopi, Ta BnTARHITb akymyIaTOp.
Bka3iBkn 0do noBHOi 3apAKn DnB. y noci6HnKax 3 ekCnpyatauBaWoRo aKymyTopa Ta 3apAHorO npicrpoH.
KHONIKA P036JIOKYBAHH
KhONka po36NoKyBaHnHa pyuCi Na TpIurePnM nepemKaayem. Bam notpi6HO HATNCHTNa KhoNkY po36NoKyBaHHa, 0b6 yBIMKHyTn TpIurePnN nepemKaay. KhONka 3HOby 6NoKyETbC, KOIN Bn BiDnyckaTE TpIurePnN nepemKaay.
IPMMITKA: Bm mokehe hatahcytn khoNKy po36nokybaHH 3 JIboro a6o 3 npaboro 60ky.
TPNTEPHNIIEPEMKKAH
Ioo yBIMKHyT uIiOyBaJIbHy MaIHHy,HaTNCITb Ha KHOKNy pO36NoKYBaHnA a NOTIM HAHTNCHITb Na TpRrepHn IpeMnKa. UoB BmKHyT, BiDnyCtITb TpRrepHn BmNKaU.
BIDAA4A
Biddaay BnHKa€, KOJI NIIbHNI DnCK WbNtKO 3yINHЯTcR, a NIIka pyxAcTbCra HaaD Do BaC. 3ynHka DnCK BnKNKaTbc6 ByJb-RAKO IIeIO, JKA 3aTnCKA DnCK B DepeBnHi.
HE6E3NEKA: HeraiHo BiDnycitb nepemkauch, kIso DNCK 3aTnckAcTbcra a6o nIIka 3yHnAeTbcra. BiDaaya Moke BnKlnKaTu BtpaTy KOHTpOIO HaI nIIKOIO. BtpaTa KOHTpOIO MoKe CTATN pInuHOIO TpaBM.
106 y6eperTncsB iD BiDaui, yHnKaTe HacTynHnx di:
HnpeBaBbHe HanaIHTyBaHHraIINHPO3mIIIOBaHHa;
po3nnIIOBaHnHaCyKbA6oZbXiB BdepeBnHi;
NOBepTaHnI NIIbHOrO DnCKa NiI d Yac p03nJIIOBaHnI;
pO3NIIIOBAAHr TUYIM, 3a6bTmA 60 He npabIbHO BCTaHOBJeHM NJIbHIM DnCKOM;
HnpeBaBbHa nIeTpImKa 3aOToBk;
PnIMyCOBe po3nIIIOBaHna;
p03nIIIOBaaHH 3irHyTOro a60 BoIoloro nIIOMaTePiaIy;
HnpeBunbHa pO6oTa 3 IHcTpymeTOM a60 HnpeBunbHe BkOpncTaHH.
Ioo6 3mehunTu mOboipnict bviDaui, dOtpmuYteca nactynnX npabn 6e3neKn:
5. EKCIJIYATAUIA
3aBXnIpaBnIbHOHaJIaIbTOByIe TII6HnypO3NIIOBaHHa;
peedpo6oToIO nepeBipAte 3aotIBky Ha naBnHcIb cyuKb a60 zuBxib;
HikonHe p03nnIouTe cyuKa a6o zBxN.
Ppme p03nHOBaHHI pni p03nHOBaHHi 3aBxN bVbKOpncTObyIte kpaOby HapmHy lihiKy.
Lc donomoxe yHnKHyTN cKpyuBaHHa NIIbHOrO dNcKa.
BukopocToByuTe uChi, roctpi Ta npabunbHO BCTaHOBJIeHi NIIbHI dIckn. HikOI He po3nnIOte Tynm NIIbHM DnCKOM.
Ipeed nowatkom p03nuiobahna 3po6nb npabunbny niTprmky 3aotibk.
IiJ ac p03nIIIOBAHHa 3abXd n 3actocobyTe CTIKN, pIBHomipHn Tnck. He po6itb npmycobe p03nIIIOBAHHa.
Hepo3nHIOte 3irHytn a60 BOJolO nIINOMatepian.
Tpmaite nllky mIoHO o6Oma pykamTa Tpmaite pIBHOBary, 1o6 npOTnCToTn CInAM BiDau.
PONPEJXEHNA. PnBVKOpNCTaHHI NIKKn 3aBXKn 6yNbTe HAnorOToBi Ta KOHTpOJIHpepo6Ty. He BnMaIte NIKKy 3 MaTeiany, NOKn pyXaETbcra NNbHn DNCK.
NIIbHI DICKN
Haikpaizi nIbhi IaCKn He 6dytb po3nIOBaNt efeKTNBHO, kIo BOH He 6dyTB qNCTMMI, roCTpIMn Ta npabINbHO BCTAHOBHeHMn. BnkOpNCtAHn Tynoro nIbHOrO DnCKa CTBOPntB BeNIke HabaHTaxeHHa NIKy Ta 36IbWNTb He6e3NeKy BiJaChi. TpMaJTe DoaTKoBi DNCKn NiD pyKO, 06oRcTpi DickN 3aBXKn 6yIn B HaABHocTi.
3aTBePdIHa Ha NcKax DepeBHa JnBnua a6o CmOla 6yde CnoBInbHOBATn Pnky.3HIMITb PnIbHn IINCK 3nnk Ta BnDaiNtJxNBnUO a6o CMOny 3a DonomOrIO rapAoy BoND a60 racy.
BukopncToByTe TiIbKn Ti IINbHi DnCKN, WbNkictb knx E pIBHOo a60 nepeBnUyE WbNkictb, kka Bka3aHa Ha IHcTpymenti.
HE BKNOPUCTOBYTE BEH3NH.
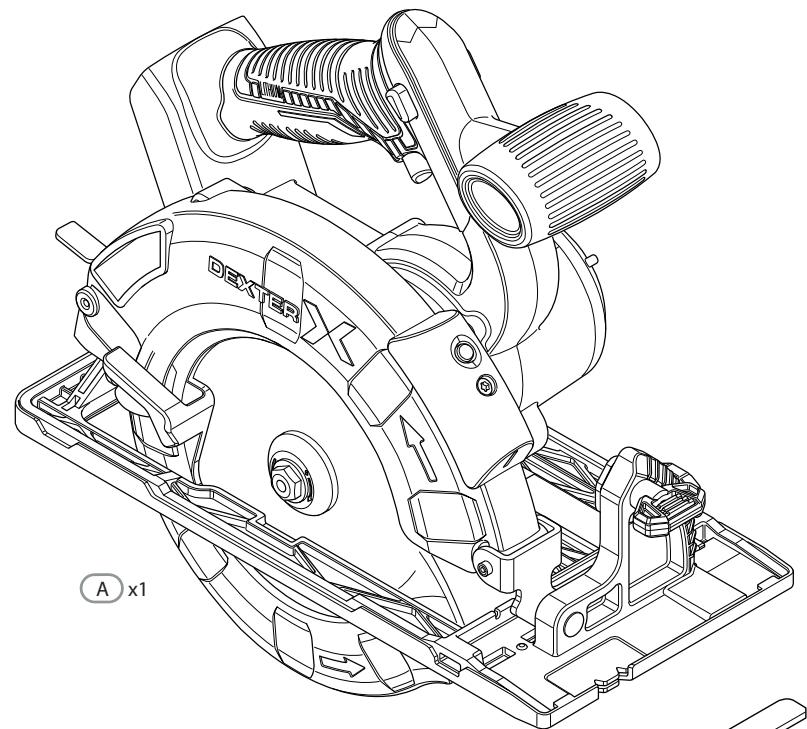
BukopocToByte tInbkn diametp(-) dNcKa DEXTER BiDnobiHNo do Ta6nui nHxue.
| ДIAMETР | Зубци |
| 190 MM | 24 |
3AXNCHA CNCTEMA NINlbHOrO DNCKA
HnKni 3axnchn 3uTOK, 3akpinneHn Ha nui ci, npin3naeHn Ia BaWoro 3axncty Ta 6e3neKi. He BHOcBe 3miHn 3 6yd-b-koipnunHn. Raio Bin 6ye nozkOJxHn, He BnKOpNCbTy Hnky, nokn 3axnchHn 3uTOK He 6yde BiDpeMOHTOBaHn Ta BCTaHOBNeHn Ha3ad. Pid qac BnKOpNCtAHn HnKn 3abXd n3aIIaIte 3axnchHn uTOK B pOboOmy nOIOKeHHi.
HE6E3NEKA: Pnp0znnIOBaHHi 3arotIBKn HxKHi 3axnCHn 3nTOK He 3akpNBa e nnBnI DnCK 3 HxKbOro 60ky 3arotIBKn. OckInbKn DnCK BiDkpNTn 3 HxKbOro 60ky 3arotIBKn, TpMaIte pyKn Ta naJIbci JAKOMORA dani BID 30Hn p0znnIOBAHN. Byd-ka YACTHa BAwOro Tina, ITO BCTynAe B KOHTAKT 3 o6ePTOBm NINbHM DnCKOM, MOnE 6yTN cepNo3HO nopaHea.
5. EKCNJYATAUIA
YB4A: Hikoi He BnKOpNCToBny Te NIKy, kIoo 3axncHni 1nTOK npaioe HnPaBnBHO. Ipeed KoxHM BnKOpNCtAHnM nepeBiprRe TnpabNbHy po6Ory 3axnCHoro 0ntKa. 3axnCnH 1nTOK npaIOc npabNbHo, kIoo Bin pyxaTeBcra BInbHO Ta Ierko nobepTaTeB CnKTae B 3akpnte noLoXeHH. Akso Bu yNyCTnII nINKy, nepeBipre HnKHi 3axncH niTOK i6ampeh Na HABHicTB nOxokDxHe h Baix HanaTuBaHNx rIn6Hn, peed nOdaJIbShm BnKOpNCtAHnM.
3AIIYCK/3UYNHKAДИСКOBOIПИКИ
LJI\PIaMaePo6OeOCBtIeHnA,AKyBMNaCaTbCpNHaTnCKaHHiTpIrePhOro nepEMnKaaTa BmNaCaTbC,KOJI TpIrePnI nepeMnKau BiDnyckaTbCra.
3ynnka nllkn:
HaTnCHiB KhoNky po36NoKyBaHna.
HaTnCHiB TpIreHnn NepemKau.
3aBxI DaIte NcKy DcOaTn CBOeI NobHOI WbNkOcTi, a NotIM oBepeXHo NiBEdiTb NmIKy Do 3aOrtBKn.
!NONEPEJXEHH.NINbHn DnCK, AKn BxOHTB KONTAKI3 3aOTIBKHO, nepu HiK DOcART NOBHOI WBNKOCTI, MOKe CTATN pnuHIO BIDaui NiKN Ta OTPMaHH TpaBMN.
3ynnka nnnk:
Bidnyctitb tpruepnh nepemkaq.
IicnB ViDnyckaHnT PnIrePhoro NpeMnKaaya daIte NIIbHOMy DNCKY NOBHcTIO 3ynHnTncb. He BInMaIte NnKy 3 MaTePiaJy, nOKi pyXaETbcra NIIbHn DnCK.
PEGYIIOBAHHI TINBHNN DNCKA
3aBxNn npaBnIbHO peryHIOte rIN6Hny po3nnIOBaHHa. IpaBnIbHe BCTaHOBneHHra IN6HNn INbHOrO nNcKa dJa 6yNb-koRo po3nnIOBaHHa He MoKe IpeBnUyBaTn BiDCTaHI BiD 6,35 MM do 65 MM HIXKHe MaTePiaNy, 10 po3nnIOeTBcA.
BctahOBenneH 6ilbwoi rnn6HH 36ilbwye moKJIbICtB BiJaChi Ta pni3BODnTb Do 06DnpaHn.
Iy 6ilbwoi ToohcTi rnn6HH po3nnIOBaHH e Kkana Ha BepXhBOMy 3axnCHOMy uNTky.
Ocna6te Baixilb 6nokyBaHHraIi6BnHn,piHABuN noRo BBepx BiD ochOBn.
Bn3haTe 6aKaHny rIn6bHy po3nHOBaHH. Bn3HaHTe rIn6bHy kpaIoboi HanpAmHOJI liiIKu Ha 3aIbOMy 6oCi BePHbOro 3axICHOrO 5tTKa.
Ppntncihb ochoby do nobepxhi 3arotibn ta niiHimaTe a6o onyckaTe nnky, noKn no3HaKa ha KpoHwteHi He 36iratmtebcra 3 na30m Ha 3axCHOMy uNTky.
HadiiNo 3aTgHtB BaxjIb 6JokyBaHHra JIN6HN, ONyCTNBn NiO Ro BHnD OCHOBN.
EKCJIYATAZIДNCKOBOIПИКИ
BaxJIbO BvBHTn npaBnIhI Ta HnpeBaBnIhI cnoC6n NOBdoJeHHN3 nIKoK.
Ioo6 oTpmaTn HaiKpaun MOxNHBn pe3yNbTaT, DoTpmyTeca uX KOpncnX nikka3ok:
5. EKCIJIYATAUIA
MiunO trpmaIte pnilky o6oma pykam.
CtapaaTecra He KnaCTn pyky Ha 3aOrTOBky nID qac pOZmIIIOBaHHA.
Iidtpmmyte 3aotibky taK, 06 p03pi (p03nn) 6yB 3aBxJn 3 Baaworo 60ky.
ПдгимуITEЗагOTIBKБинькdo розиу.
Bukopustobuyte 3atnckayi a60 iHsi npaktuHi zac6n, 1o6 3aikcyBatn 3arotibky, 1o6 BOHa He pyxalacniuc pO3nnIOBaHH.
IpoBeiTb HnpanmHy niiHIO B3doBx 6axaHO iHII pOznnIOBaHH nepei o6oToIO.
PONIEPEUHPO3NIIIOBAHH/IO3IOBHXHEPO3NIIIOBAHH
Bukohyqui npame nonepeuehe po3nuiuBaHna a6o nO3doOBxHe p03nuiuBaHHa BupiBnTe liio p03nuiuBaHHa 3 na30m HaprrMaHoi DaNCKa 0^ Ha oChOBi.
3BaJauOuHa Te, 10 TOBUnHa NINbHOro DnCKa KOINBaETbcra, CnIz 3aBXn BIKOHyBaTn npo6He pO3NIIIOBAHHa Ha BiXdoax B3DObX HApPAMHOi liHii, 106 Bu3NaHTn, HACKlbKn, kXo ce notpio6Ho, cnid 3MICTTu HApPAMHy IInIO JnO JnO TOpMaHHaTOHOro pO3NIIIOBAHHa.
INPIMITKA: BiDcTaHb BiD liHii po3nHIOBaHHo Do HaprMHOi liHii - ce BeJIuYHa, Ha kky Bn NOBHHI 3MiCTHTn HaprMHy liHiy.
3aφikcyte kpaoyb HapnMy niHky Do 3arotibkny 3a Donomoroi C-noi6hns ctpy6un.
P03nIIOte B3D0Bx KpaI0BOi HaprrMaHoi IIniKiN, 106 oTprMaTu PpAmn po3pi3.
NPMITKA: He 3aTnckaIte nck B po3pii.
KpinnenHHOTbOpyIINBuaJIeHHnnny
BnmiMbakymyTApOp.
ПдимитьнхкгзхснчNTOK.
3opoIeHTyIe nepexiHnK, 0o6 BIn BCTaBnBCa B OTBip IINIO36ipHnKa Ha BepxHbOMy 3axnCHOMy IuNTky.
3aφikcuyTe nepexiDnK rBInHTamN 3 KOMPneKtY.
Cymntb 0tBip nIy BnDAJIeHn IINy 3 nIDBeHOIO KpaIKOIO Ha nepexiHNky Ta 3aIeHNITb H Micui npu BnKOpCTaHI IINaHra dny INIOBnDAJIeHn.
3AMIHA NINbHOrO INCKA
Ipeed 3amioo pnilbHoro dNcKa 3aBxDn BnMaTte akymyTTop!
- BctahOBiB rIi6Hny pO3nIIIOBaHHa (3a DOnOMoTO CToNOpHOro TBnHTa) Ha MihimalbHe noJoxKeHHa (0 MM).
- BiKnHbTe 3axncn HauTOK Ha3ad 3a donomorO BaxeJra 3BilbHeHH Ta onyctntb DnCKOBy nnky.
- Hatncitb Ha KhoKy 6nokyBaHHa 7nnHdna (nOKn BOHa He 3aikcyTbc) Ta 3a donomoro 1eCTnrpaHHo KIOUa BIDKpyTb 6oJt DnCKa. Notim BnIMtB 6oJt DnCKa Ta 3OBHI Hi naHeub.
- 3HIMITb NINbNHN DnCK.
- BctahOBHeHnI nnbHorO ncka 3iiChIOeTbcy y 3BOpOTHomY nopAky.
- Hatnchtb Ha KhoNky 6IkyBaHnHa 7mHdEa (nokn BOHa He 3aikcyTbca) Ta 3a DOnomorOo 8ectirpaHHoro KInOy a3aTgHtB 60Jt NcKa Ta 30BhiHni fnaHe.
- IpekeohaiTec, 0n nnblHm Dnck BiDnOBiAe WbNkOkti o6epTaHHa iHCTpyMeHa.
6. TEXHlUHe ObCJyTOBvBAHn
!NONEPEXHEH:Ioo3n3HTn pni3NK OTPMaHH TpaBMn,3aBKnB ViKJIIOuaiTe 3apdHn npucpti Ta BnMaIte akymyIaTOp 3 hOro a6o IHcTpMeHTa nepeD 6yd-b-AkIM texHnicm o6cnyTObAHnHm. He po3bupaite IHcTpMeH, akymyIaTOp a6o 3apdHn npucpti. He BnKopncTObUyTE roCTpi npedMeTn IyaUeHNHaHcTpMeHTa.HikOn He donyckaIte notpapanHn piDnH BCEpeDInHy IHcTpMeHTa.lhakwe IHcTpMeH 6yeNoSKoJKeHo.
Pergnpho nictb hctpyment, 6aaxho Bida3y nicra 3abepeHH po60tn.
Ynctitb Kopnyc cyxio raHupkoH, HIKOJI He BnKOpNCTOByTe 6eH3IN, PO3uHHNKn a60 MmHi 3ac06n, Aki MoKyTb nooKOdTu nIpaTnik.
BumkhHtB dNCKOBy nIky Ta BmMiTb akymyIaTOP.
36epiraTe DnCKOBy PnIKy Ta II npINaIy TEmHOMy, CyXOMy, TeNLOmy i rapho npObitpHObAHOMy Micui.
3aBxD 36epiraiTe NsCKOBy PnIKy y HeoocTyHOMy dIa Ditee Micu. IdeaIbHa TempepaTpya dIra 36epirAHr cTaHOBtB bId 10 do 30^
Длгзберигань Мп pekomeндуем BOKOPICTOBYaTN opriHajbHy ynaKOBky a60 HaKpNbATN DnCKOBy nIKNy BiINOBiDHO TKAHNHO a60 KOpO6KOIO, u6o 3axnCTnT II BiD nIpy.
TPAHCIOPTYBAHH
BumkhHtB dNCKOBy NnKy Ta BmMItb akymyIaTOp.
3axnCTnTb nIckOBy nnKy BiD BaxkNx yApiB a60 cnIbHnx Bi6paui, kKi MoxyTb BnHKHyTn NiD ac nepeBe3eHHB TpAHCnOpTHOMy 3ac0bi.
3aφikcyte Dnckoby nllky, 106 3anobirn ooro naHIO a6o 3ickOB3yBaHHIO.
7. YCYHEHHA HECNPABHOCTEIN
7. YCYHEHHA HECNPABHOCTEIN
| Пюоблеса | Можимва рочина | Усунения |
| ДиSC obMexу€, спobiльно€ a60 Зупня€ пILКу. | ЗагotíВka 3miiú€tbcя a60 üi кiNsī He пIDтprIMyóTbя. | МатерIAN nobiHEN leXkatNi ПLOСКо Ha CTOLi, sciIbHo приягати Do лIHиКи ТА Мати пIDтprIMKу Ha обox kINцяx. |
| МатерIAN ВОlogи, Зав rudенHi a60 ВИКористову€tbcя Нерiodatни ПИльни ДиSC. | Перевіріte.stan MATEpiaIу Ta nepebipte ВidnobiДиHic'tь ДИSCKa Do MATEpiaIу. | |
| Motop пaцIo€, ale ДиSC He оберTa€тбя. | ПробIVднii ремиь ВИйшов 3 landy. | Зberhітбяdo ceRbivichoro ZeHTpy. |
8. YTNJI3AUJIA TA INEPEPO6JIENH

YnakOBKaMiCTNtB ekOJIorIHy ChCTi MaTePIaII. II MOxHa BnKUdaTn B MlCeBi KOHTeHepn dIy ytnl3aui.

YB4A! 1eBnpi6 n03NaHeO cMBOJOM, 10 CTocyETbcra yTNI3aQii BiXoDIB eNEKtpOHOro Ta eNEKtpuHOrO 6bnaHaHH. 1e O3NaAc, 10 ceBn Bp6 3abOpOHcBcB BnIaTn pa303 N6byTOBmN BIXOaMn, BIn Ma 6ytN doCTabNeHn Do CNTemn 360py, Jka BIDNOBaE BmORam DnpeKtNBv EbponeCkoR coO3y WEE. 3a doatkOBHO iΦopMaqiE IO DO yTuINi3aui 3BepHITbcra do MlceBxN oprAHIB BnAin a60 B Mara3HN. Notim Bnp6 6ynde nepepo6LnHn a60 pO3ibpaHn, 106 3MeHUnTn BnINb Ha DobKIIJI. ENEKtpUHHe Ta eNEKtpOnHe 6bnaHaHH MoKe 6ytN He6e3neHm DnI DOBkIIJI Ta 3dOpOB'a IIOHN, OCKIbKn BOHO Mtntb He6e3neHi peOBNH.

YBAGa! He BnKuJaIte 6aTapei y BOROnb a6o pa3om 3 nO6yToBmN BiJxOJaM.
3AXUCT IOBKINJIJI
He Bnndaite BiDnpaucbObaHi eNektpnHi Bnpo6n pa30m 3 no6yTOBmB iDxOaMn. 3riJHO 3 CbponecBkoIO DnpeKTHBOIO 2006/66/EC HeCnpabHI a6o 3noohei akymyIaTOpn/ 6atapei NOBHHI 6tyn 3ibpaHIO OKpemTo y tynlizOBaHI ekONorioHO 6e3neuHMI cnooc6om. BiDaBaAte Ha BtopINHe nepeop6lenHry BviNOBIDHI 3aknaIa. 3BepHITbcra 3a nopaoIOU 7oO to ytnlizauII do MicueBHX oprAHIB Bnadi n a6o pO3dp6HNx npOdaubciB. Iotim Bnpi6 6yde nepeop6lenHn a6o pO3i6paHn, uO6 3meHUnTI BnIMNB h DoBkInn. AkymyIaTOpn/ 6atapei MoKyTB 6tyn He6e3neuHmN dJI Na HbKOnuHbOrO cepeOBuHa Ta 3dOpob'ra LiouHHI, OCKlbKn BOHn MiCTaRb He6e3neuH peOvBHH.
9. TAPAHTI
IIPEEMOBA
KEPI COKKbl CESENTPEI XHE OFAH KATbICTbl ECKEPTyJIeP
.Kepi cokbl - apa Jy3iHIn KblcblbIn KaIybHbH, Hemece Knaaw KecyiHIn 0cepineH KeHeTTe TybHdaNtBnPeakun, HOTXKeciHde backapyaan 7bIfbIn KeTKeH apa OHJeTeIH 6yibmHaH KeTepiin, onepaTopfa Kapai 6aftTalaDb;
. Oиьiktbl JxankaHda apa Kx3i KaTTbl KbICbIbIN Hemece KblCTbIPbIbIN KaIraH Ke3de, apa Kx3i TOKTaIbI JxHe MOTOP peakcuiCbl KypblfblHbl XblIaM apTka Opeatopfa Kapai Kypri3eDi;
. Apa kcyi kecy jepinhe kncaiTbIn Hemece Kfau Kece, OHbIn apTKbl Jkafblndafbl TicTepi aflTbH yCTiHri 6etHe eHedi, 6yI e3 Ke3erHne apa kyy3iHn OblKTan llbIfbn Ketin, onepatopfa kappa apTKca cekipyih Tydbipadbl.
KEPI COKKbl APAHbl IYPbIC PAIJaJIAHbAY XHE/ HEMECE KATE JYMbIC PPOUcEDyPAJIAPbIHbIH HOTNXECIHDe TYbIHDAIbI JXHE TOMEHDETI
2. KAYINCI3IK TEXHnikAcbIHbIH HYCKAYAPbl
CAKTbIK ⅢAPAJIAPbIH OPbIHdAY APKblbl OHbIH AJDbIH AJYFA BOJaDbI:
A.ApaHBi eki KOnbIHbI36eH Kepi COKKbIFa Kapcbl Tpya aIaNbIaNkYIeMbIKtan YCTaHbI3. DeHeHIzI apa Jy3ImeH bip KaTapda emec, OHbIH bip XaFBbIHda YCTaHbI3. Kepi cokbl apaHbIH apTKa kapa cekipin KeTyIH TydbIpbyIMymkIH, bipak caTBik 7apanapbl Tnicti Typde caKTaIaNbIH 6oIca, onepatop kepi cokkbI KywTePiH backapa aIaNbl.
B.Apa KENTEIN KaIraH Ke3De Hemece Kecy KaHdaJ da 6ip ce6enke 6aJIaHbICTb1 TOKtaN KaIraH Ke3de, KockbIuTbI 6ocatbIHbI3 XHe apa Kyzi TOnbIKTaI TOKtaFaHwa apaHbI eHIMDe KO3fAITnai YCTan TypbIHbI3. Apa Kyzi Ko3rAIn TyPraHda EwKaWah apaHbIH KymbcIH TOKtATyFa Hemece apaHbI apTKa Kapai TapTyFa OpeKeTTeH6eH3, aHTnece cepnilic opbIH anybIMyMKiH. Apa KyziHN KUcaIO ce6eBH anbIKtan, OHBI XOIO yShIH TY3eTy OpeKeTIH opbIHDAHbI3.
C.ApaHBI eHdJIeTIH 6yMbIMda KaHTa icKe Kockan Ke3de, apAHbIH ticTepi MaTePnAIFra iINiHIN KALmaybI ywiH apa Jy3i OByIKTBiH optcBHa KeNTipiHi3. Apa Jy3i KeNTenIn KaJCa, apa KaHTa icKe KocBIfan Ke3De ON eHdJIeTIH eHIMRE KaTbI KipIN Hemece cepniin Tycyi MymKiH.
D.Apa Jy3iH KbcBilbIn KaJy XHe Kepi cokKbI Kayin H a3aHTy ysiH YkKeH KcIeMdi NaHbdePti TipeH. YkKeH NaHeJIbDep e3 caImaFbHa 6aJIaHbICTbl eHKeIo MymKiH. TipeKTePdi NaHeJIbDiH actbHfbl eKi XaFbHa, keCy cb3bIfbHa XHe NaHeJIbDiH WeTIHe XaKbH KOHO KaXeT.
E. Θтneɪtɪn Hemece 3aKbIMdαJIfah apa Jy3depi naiDαIaH6aHbI3. YStaJIMaFAH Hemece Dypbc OPhaTbIImaFah apa Jy3depi Iwamadan TbIC yIkeJicke, apa
2. KAYINCI3IJK TEXHNIKACbIHbIH HYCKAYAPbl
Jy3iHn KeTEni KaIybHa XHe cepniicke ce6en 6oNaTbIH Tap OYbIKTap XacaIdbI.
F. Kecydi opbHdAmac 6ypbH, apa Jy3iHn TepeHdiRi JxHe KnaFaw Kecydi peTteyDIn Kynblntay nIHtipeKtepi TbIfbi3 XHe bepik 6onybI KepeK. Erep kecy KezHne apa Jy3iHn petTey apeketi JxblXbIn KeTce, on KeNTeInn KaLyfA JxHe cepnilicke Akenyi MymkiH.
G. Ka6bipraIapdbI Hemece 6aCKa KeiH6eTIn 6eTTepdi apanaFAn Ke3de aca cak 60nbIb13. 7bIfbIn TpyfAn apa Jy3iHIn Kepi COKbIHbI TyDbipatbH 3aTTapdbI Kecyi MymKih.
TOMEHIGCAKTAHdbIPfbIiXKAEBbIK FyHKcnaCbl
A.əp naɪdaɪaɪny aɪdɒbɪnʌ TəmeHri caKTaNɒbɪpɒbɪw Xa6ɒbɪkTbɪN ἀþbɪc Xa6ɒbɪnfaɪhɒbɪfɒbɪN TeKcepɪni3. TəmeHri caKTaNɒbɪpɒbɪw Xa6ɒbɪnfaɪbɪ epkɪN Ko3faɪmɑca XəHe 6ipɛhen Xa6ɒbɪnmaʊ c aρaʌbɪ N aɪdaɪnʌhɒbʌbɪ3. TəmeHri caKTaNɒbɪpɒbɪwTbɪ eʊ yaKbɪTTa aʌbɪk Kyɪnde 6ekɪtneɪi3 Hemece 6aɪnʌmʌbɪ3. Erep apa Ke3deɪcoK Kʌlaŋ Ketce, TəmeHri caKTaNɒbɪpɒbɪw Xa6ɒbɪnfaɪbɪ MaɪbɪCybl MymkiN. TəmeHri caKTaNɒbɪpɒbɪwTbɪ TapTbɪnʌTbɪN TyTKaCbiHaH yCTan Kæterpiɪi3 XəHe Onbɪn epkɪN Ko3faɪnʌTbɪn bɪn āpi 6apNbI K 6þbʌn πeH kecy tepɛŋdiːrɪnDE apa JxʒiMeH JxhaɪcʌnʌTbɪn H TKcepɪni3.
B.TemeHri caKaTaNDbipfblw cepinnecinH xymbcih TekcepiH3.CaKtAHdbipfbIw nen cepinneci dypbc xymbcic ictemece, onapra naJaIahy aIbIHda Kbi3MeT Kepcety KaKeT. BJIweKTePiH 3aKbIMdaJyBuHaH, Xabckak KaBaATbIH naJa 6OlybHaH HeMece KOkbiCTapDbH XINHaJyBuHaH TemeHri caKtAHdbipfbIw akbpbH xymbc icteyi MymkiH.
C.Tomehri caKaTahDbipfbIiXa6dbIKtbl "Oybin Kecy" XeHe "KipekeCy" CnAKTbl apHaBb I Kecy Typnepi ywiH fAna
2. KAYINCI3IK TEXHnikAcbIHbIH HYCKAYAPbl
KoJMeH aIbHybl Kepek. TeMeHri caKaTaNbIpfbIbIbI TyTkacbHaH TapTbIn KeTepiH3, apa yz3i MaTepnalFa eHreHHen KeiH, TEmeHri caKaTaNbIpfbIbIbI bOcTaBnbl3. BaCa keCy texNkaIapbl ywiH TeMeHri caKaTaNbIpfbIbI abTOMaTTbl Typde xMblic ICTey I Tnic.
D.ApaHbI opbIHdbIKKa Hemece eJeHre Koimac 6ypbH, TEmeHri caKtAHdbIpfbIw Xa6DbIfbl apa Kyz3i XaybIn TypFaHdbIfbln ApaiaM KaJaFalaHbI3. KopraMaHaH, INepzna 6oBbIHwa Ko3faJIbICTaBl apa Kyz3i apaHbIn e3iHJ KOnbIHaBbI bapNbIK 3aTTapDbI Kecin, apTKa Kapa JxypiHe ceBen 6oNaDbI. AybICTbIPbIN-Kockbl W BocatblfHaH coH, apa Kyz3iHIn TOkTaybl 6enrini Biip yaKbIT aJaTaBHIn ecKepiH3.
Дэнгелек APAFA APHAЛFAH KOCbIMWAAPAHыI KAYINCI3ДIK HYCKAYJIAPbl
ECKEPTY: A6pa3nBti dHreKeTepdi Hemece Ky3eepi naJaHaHaBbI3.
Cydbl6epy KOHdbipMaIapbIH naJaIaHa6aHbI3.
A. Θнделетин 6уьимды орныкты паллформага 6ekity hemecetepey yшин КбICьштарды hemecе backa TmIMdi ědicti naДаанынbl3. Θнделетин 6уьимды кOLмен hemecedeneHeH3re Kapcbl yctan Typy baskapydbl JOKaNTbIN anlyfara kKeJyI Mymkin.
B.ДeнeнiЗdi apaЖузimen bip kaTapda emec,ОьbH bip JkaFbIHda yCTaHbI3. KEPI COKKbl apaHbH apTka kapa Kecipin KeTyiH TydbIpYbIMyMKiH.
C. ΘДeTTe, JxelIeTkiIi CaHbIayIapbl JxblJXbIMaJIbI 6eIWeKTePdi Jxaybln TypaIbI, COHdbIKTaH cOJ XepIepre
2. KAYINCI3IJK TEXHNIKACbIHbIH HYCKAYAPbl
KoJamay KaKeT. KeH KIm, aWeKeH HeMeCe Y3bIH 7aU XbIJIbIMaIbI 6eJIweKTepre iIniHn KaIybl MymKiH.
D. Werelepe men 6ypaHdaIapdbI KeCneHj3. Araa MaTePnaIbI kecyden 6ypbH TeKcepin, Oanah Wereleepdi aIbIn TaCTaHbI3.
ECKEPTY: MexaHnKaIbIK aXapNay, Kecy, TericTeY, Tecy XaHe backa KpyblbcpekeTepi HtNxceiHne naJa 6oJFaH ShaHbIH KypamblHa KaIINcOpHn HaTaTBHa KaTepli icK, Tya 6itKeH aUpynap TydipatbH HeMeCe backa Da penpOdyKTnBTi 3nH KeTIpeTih XmMraBik 3aTtap petIne 6enrini 3aTtap 6ap. OcbI XmMraBik 3aTtapDbH Ke6ip MbIcaIdApbl:
.KopfaCbH Herizinderi 6oaydAn ShbIfaTbH KopFaCbH,
.KipniuTepeH, cEmeHTteH xHe backa tac eHimdepiHbIfaTbIH KpncTajll KBapcbl,
XIMINJIbIK XOJMEH eHdJIreH aFaI MaTePnJIbIHAn IbIFaTbIH KUShEN MeH xpom.
.朱MbICTbIHOCbI TyPiH KaHsAJIbIKTbI XnI opbIHdaIbIHbIbI3Fa 6aJIaHbICTbI OCbl XIMNIAbIK 3aTTapdAn THeTIH Kayin aptypni 6oJaDbI.OCbl XIMNIAbIK 3aTTapDbIH ecepIH a3aInTu ywiH:
.Жakсыжелдетілетінжерджмьс icTeHi3 xəHe MmKpOcKoNnIbIk 6eIshekTepdi cy3riiney yuH apHaBbI daIbIHaIaNfAH IaHNaH KOpfaIbIh MaCKaIap CnAKTbIMaKyIdaHFaH kayinci3dk JxabIbIKTapbIH naJaIaNbI IN JxMbcIC icTeHi3.
. MexahnkaIbI k aJapay, kecy, terictey, tecy xhe backa Kypblbc apekeTepi HtNHexcHne naJa da 6onfAH shaHdbI optada y3ak JyMbIC icTeMeHi3. KopFaHbIsh KniIMiH KniHiz XHe IaH actbHa KaJIFaH DeHe 6eJIrIH caBbH XHe Cyme HxybH3. Sha an aybI3fa, Ke3re eHce HeMece tepire KOHca, 3nHdI XIMnIbIK 3aTTap DeHere ciHIn KeTyI MymKiH.
2. KAYINCI3IK TEXHnKAcbIHbIH HYCKAYAPbl
LWAH, WbIFAPY
Kypaanda shaHTapTkbls cahblay 6oana.
AfaTbI Kecken Ke3de, 7aH 7bIfapyfa KaTbICTbI KOJaHbICTaBfI DnpeKTHBaJapra cai kacalFah 7aHCopfbITbI naJaTaHbIHbI3. Kntereh 7aHcOpfbIHTapdbH, 7aH, copy 7laHrInepi 7aH, 7bIfapy Tytikke dən keJeDi.
ECKEPTY:ПаДаланбаган Ke3de,сурин Нemece KUay Kayinb6oIbIpMay yushi,ДeHreIek apaHbI aIfblMeH bepik 6etke KoibHbI3.Бatape8blorby yJKeH Kei6ip Kypalnap 6batape8blOByHa TIK KyiHne TypaDbI,6ipak Olanap OhaiayadapblIn ketyi MymKIn.
JIa3EPФункцясbl
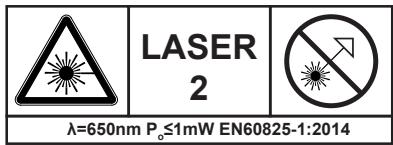
Kypaanda naДанынган ЛаэрьttaybIbIMakcmaIbI 605Hm bOJaTbH II-ki KnaCka JataDbI. JIaэрьttaybIbI aDeTTe ONTnKaIbIK KATEp TydIpMaIdbI, bipak cayner KaparAH Ke3dIH KePmei KaIybiHa eKEN COFybl MymKiH.
AБАЛAHьI3: Бул пазер eнимimеон ONТИКалык Кураздарыпайдалиу кe3re DeReH KayinTi apTbIpaДbl.
.Ja3ep cəyneciHe tike kapaMaHbI3.
. Na3ep eHdiPywi HycKaynapbHa cAkec paJaIaIaNbIybl XHeTexHnKaIbIK KbI3MeT KOpCetiIyi KepeK
.Caynehi eIkaaah aamra Hemece OHeJeTeiH OHIMHeh baca
2. KAYINCI3IJK TEXHNIKACbIHbIH HYCKAYAPbl
3aTka 6afblTTamaHbI3
Ja3ep cayneciH, wafblbictbipfbl 6eTepi xok oHdeJeTIn OHIMRe 6afttanaFbHa aPdaiBIM Ke3 XeTKi3iH3. rHN aFaI Hemece epecken Xabibhl bap 6etep japaMdbI. XapkbH Wafblbictbipfbl 6ET Hemece cofan YKcac 6etep Ja3ep naJdaIahy ywiH xapamcb13, ce6ebi wafblbictbipfbl 6ET Ceyleni KaIta onepatopfa 6afttaybl MymKiH.
Ja3ep cayleciH jnHaBbH backa TypimeH e3reptneH3.Ke3 KeIReH XeHDey XyMbICTapbH Ja3ep EHNipuyiCi Hemece Kbl3MeT Kepcety OkiPiOpbHdaybl KepeK.
.Ja3ep6aftbTTaybIbH e36eTiHi36eHNxHNeyre apeKeTTeh6eHi3.
Ja3ep 6aftaybHbIHKe3 KeIreH 6eIweriH aybcIbyra apekeTTeh6eHi3.
.Падаланбаган Ke3de Na3epdi āрдыIM eшipin KoibHbI3.
3.CNATTAMACbl
1 Kyjblntan 6ocaty Tymecci
2 TyTka
3 甲hdbI sbHfapy npTbI
4 BaTapea 6Iorbl*
Tepehdiikti KynbInTay DeHrein
6 CbIptKblФlaHeu
7 Kγ3 6oNTbI
8 TemeHri caKtahDbipfbiIi
9 Apa kyy3i
10 Tipeyiui
11 WeTTiH 6aftiTaftbIu TaKtaWacbl
12 WeTTiH 6aftTAtfbi KynblTay TyTKacbl
13 Kufaw kecydi peTtey TTKacbi
*CunnattanHan HeMece KepcetinreH KepeK-Xa6dbIKTapdbIH 6apnbIFb 6ipdei CtaHapTTbl JeTkiim XInHaftBa HkIpMeiDi.
3.CHATTAMACbl
14 Abyictbipbin-Kockbiil
15 KocbIMua TtTKa
16 Μλαερ ΦαMb
17 ⅢnHdIbI KynblTay Tymeci
18 Xy3 kini
19Баразяблогьинбocaty Tymeci*
*Cunatattanfah Hemece KepcetinreH KepeK-xa6dbkTapdbH, 6apnbfbi 6ipdei ctaHdapTTbI XeKti3iim XHaftbHa KipMeiDi.
4. TEXHnKAJIbIK DEPEKTEP
KYJbINTAH BOCATY TYIMECI
Kyblntah bocaty Tymeci aybictbipbin Kockbiwtbin yctihderi Tykada ophanaacka. Aybictbipbin Kockbiwtbin tapty usiH Kyblntah bocaty Tymecin bacy kepek. Byn Kyblntetikti bocatkan caBH KaIIbHa KeItipineDi.
ECKPTIe: KyIbITaH bocaty TymeciH cOJ kAKTah Hemece OH kAKTah bacyfa 6oana.
AYbICTblPbIN-KOCKblu
Uapkaipkbl Kocy yuih andbimeh Kybintah bocaty TuMecin, coadaH keiH aybictbipbnKockbwblbacykepE. OHbeipin,aybcIbipbn-Kockbwblb6ocatbHb3.
KEPI COKkbl
Apa kyy3i KeHET ToKtAn, apa ci3re Kapai kyyprhen Ke3eKepe cokkbl naJa 6oJaBl. Apa kyy3i aFaTa KbcjBnI KaJFaH Ke3e, apa kyy3i ToKtAn KaJaBbl.
KAYIN: Apa kyy3i KeTEniK KaNca Hemece apa TokTan KaNca KockbIHTbI Depey Xi6epiH3. Kepi cokkbl CanDapbIHan apaHbI backapa anMaJ KaIyblb3 MymKiH. KypalDbI baskapa aImay aybp Dehe JxapakatbHa eKeIyI yMmKiH.
Kepi cokkbiadn Kopfany yuih, Kelenci epeketepdi opbHdaMaHb3:
Apa kyy3iHIN TepeHdiRIN Dypbic opHaTnay.
HnIeTeiH oyIbIMbIH TViINepiH Hemece WreIepin Kecy.
Kecy ke3iHne kyy3di bypay.
TneHIn, Iac Hemece Dpybc OPHaBtImMaFaH Jy36eH Kecy.
HdeneTin 6ymbdb Tnicti Typede Tipemey.
Apara Kyu Tycipin Kecy
Maibickah Hemece bInfai aafWtkecy.
KypaPmEn dypbc Kymbc icTeMeey Hemece KpaIdbI dypbc naIdaanbay.
Kepi cokkbl Mymkiinirih a3aity yuih, Keleci Kayincizdk epekeTepin opbHdaHb3:
Opkaaan Jx3 TepehdiirH IN dypbic napameptin caKaTahbI3.
Kecy andbihda eHdenetin bHybImda TyniHep MeH weereneepin 6ap-koFBIn TekcepiH3.
EiKaawan TyniHdi Hemece Weerehi KecneHiz.
Ty3y erin keciin3. Boiina Kecken Ke3de epaanbIM TKI WETK 6aftayibTbnaJaalaHbHbI3.
5. Пайдалану
БулЖузднБуразлувнБолдьрмayfaКЕмектесidi.
Ta3a, etkip xehe dypbIC opHaBtbnfAH kY3depNi naJaIaNbHbI3. OTeiTih kY3depMeH kecneH3.
Kecy aIbHnda eHdeneTih bIMdb Tiicti Typed tipeH3.
Kecy KeiHne 6ipKeIki, 6ipKaIbIbITb KbcIbIMdbI naJaIaHaHbIHbI3. KeCKeHne Kyu TycipMeHiz3. MaBicAH HeMece bIraJ aFaWbI keCpeHiz3.
ApaHb i eki KOnblHbI36eH MbIKtan YCTaHbI3 XHe Kepi COKKbIfa KapcbI Tpya aNaTbIHdai DeHeHizdi TeNe-TeHdikTe YCTaHbI3.
ECKEPTY: ApaHbI naJaIaNHaH Ke3Je, yHemi abai 6oJIbHbI3 JxHe apaHbI 6aKbIaI TpybHbI3. Ky3 Ko3FaIbICTa 6oJFaH Ke3Je oHdEnTeIH 6yBIMHaH apaHbI aImaHbI3.
APA JY3JDEPI
En y3dk apanap ta3a epi etkip boimaca Jhe nypbic opnatbimafanbo nimdi kecneid. ETKIP emec kyy3i naiaIahraHda apara aybip kkykteme Tycin, kepi cokkb kayni aptaib. ETKIP kyy3epdi HyHemi konjketimdi kepde bonybl ywiH, KocbIMwa kyy3epdi KaKbIH kepe caKTahbl3.
Apa Jy3depHne 7aBip KHe aRaKapambI KaTbIN Kanca, 6yn apaHb 6aynataDbI. Apa Kyz3In apaHa nAbln, OcbxNHaJIbN KaTfAH KOkbiCTbI any yWIn 7aMblpDbl XHe KapamadBt KetipeH KypbIbHbI, bICTbIK CydbI Hemece KePOCHNi naDaanahbIb3.
Kypanda 6eRrIneHRe HxblnDAMbIKKa TeH Hemece OaH XOFapbl XblnDAMbIKTbI apa Ky3depin naIdanaHbIbI3.
BEH3INHДI PAIДАЛAHSAHbI3.
TemeHderi kectere caikec,tekDEXTERapa kyy3i dnaMeTp(lep)iH naJaIaIbIbI3.
Ky3 kaTahDblpFbIbEpkiH KO3faBbIn, ABTomaTTb Tpye Jka6blJbIkeK.
CoHbIKTaH XyCaKaTaNbIpbfblbHbIH aHaJaacBbI Ta3a YcTaHbI3.
KbcjIfaH aya Hemece KblJwaKneH WaH MeH XkaHaKahbI aJbnTacTaHbI3.
TA3AJIAY
Kenndekkiw caHbIaynapbIHdaFb IaH MeH KObICTapdbI Ta3anaHbI3. TykanaPdbI Ta3a, Kpyak XHe MaM MeH MaNfaBbITapdAn Ta3a yCTaHbI3. Ta3aIay yuH INe Kymcak c6bH epitihici MeH DbIMkbI WybepeKTI naDanaHbHbI3, ce6eBi Kei6ip Ta3anaFbI 3attap nlaactmacca MeH backa Da OKwaynaHaRan BJIweKeTepre 3nHbI.
OpkaIah Ky3 CaKaTaNbIpbfblbHbI aHaHaNacBbI Ta3a YcTaHbI3 (KbICblFaH aya Hemece KbJIaakneH IAH MeH KaHkaHbI aIbn TactaHbI3).
OnapbIH KeBipeyIe 6eH3nH, TepneHTnH, NaK cyblNTkbIbbl, CbIP cyblNTkbIbbl, XlOpnaHaFah epitkiW 3aTtap, aMMnak KHe aMMnak KocblfAH TypMbICTbIK JxYbIi 3aTtap KaTaIbI. KypalDbIH KaHbIHda OHaI TyTaHbI W Hemece KaHbIw epitKiW Tepdi eUkaWan naJdanaH6aHbI3.
XOHHEY XMYMBICTAPbl
KHeDey KymblcTapbl yuHn KypanDb, 6ataper 6nOrbH Xahe 3apraTafbl KypanDb eH KaBbH KbI3MeT KepeTy OpTaIbIFbHa KaTapbHbI3.
CAKTAY XOHE KÖDEFE XAPATY
Dhenrenek apaHb eipin, 6atapeHb aIbIn TactaHb3.
IeHreIek apa XeHe OhBIn KepeK-KapaKTapbIn KapaHfbl, KypFak, My3daTbJIMmaFaH XeHE KaKcbl KeNdetiTeH JepDe CaKaTaHb3.
Дeнгелек apаны epдайбIM balaanapdIN KOЛь кетпгИн керд ecKaTahI3.Ен Kapamdbi caKtay tempepatypacbi 10^ XeHc 30^ apaJIbIFHnda.
Bi3 DeHreIek apaHbI cakTay yuHIn TynHycka opamDbI KOJaHaYfA HeMece Ohbl ShaHah Kopray yuHJXapamDbI MaTaMeH HeMece KaabHmeh KaobyeKeHc 6epem3.
TACbIMANDAY
Dhenrenek apaHb eipin, 6atapeHb aIbIn TactaHb3.
IeHreKeApaHbI Ke3 KeIReH aybIp bIknJaIaH HeMece KeIiK iWiInDe TaCbMaIaNay Ke3iHne NaJda BoIybl MyMkiH KaTbI dipiNde H KopFaHbI3.
IeHreKeApaHbIn cBipfbn Hemece Kynan KeTyine JcN bepMey yuHIn OHb6ekitH3.
KOPUJAFAH OPTAHbI KOPFAY
3JNekTpNIK eHIMdepDIN KANDbIKTapbIH TYPMbICTbIK KOkbIcKa Tactayfa 6OImaIbI. EyponabIK batapeaIapra KaTbICTbI DnpeKTNBArCa cKeKC, aKaybI bap Hemece naIaIahbIraH batape 6NOKTAPbIH/6aTapeapardbI 6eNEK xHAn, KopuaHaOptra 3IHN KEITIPMeTIH KONMeH KOkbICKa Tactay KaKET. KaDEe JkapaTyFa apHaHaapanbI MEkeMepebCa, KpAaNb KaDeE JkapaTbHbI3. KeDeE JkapaTy BoBbHa keHeC any yuH jKeprilikti ekinetti OpraHapFa Hemece caVa opBbHa XabApacbIbI. Onbl KOPsaHaoptraF Kepi ecepH TIRi36ey uHi KaHTa eHdei Hemece 6oIWeKeTei. Batape 6nOrbIHbIH/6aTapeapardbIH KpyamblHa Kayinti 3aTtap 6oNaTbIHbIKTaH, onap KopuaHaopTa MeH aIaM DeHcaylbfHa KayIn TEHdpYIMMKIH.
9. KENJIJIK
KIPICNE
Ocbl eHimdi taHaTaRaHbHb3ra paKMeT. HImdepdi Xo6anay XeHe daBbHday bapbcHda 6i3 naaDanaHyblJapdbH KaKeTTIJIkTePi KaHaFaTTaHbPaTBn XOFApbl CanaHb KaMTamacbl 3 ety yuHbIK Kyu-xirepiMi3i canaMbI3.
MAHbI3DbI! OCbl ΘHIMDI ΠΑΙДΑΙΑΝΥΑΙΙΙΑ OCbI HΚΚΑΥΙΙΚΤbl OKblIT ΜυIFbIHbI3, HEI3ΓI KAVINCI3ДΙΚ ECKEPTYJIΕPIH KAPAΗbI3 XΟΗ MΚΙΑRT CAKTAHbI3.
OpambH aWKaH coH eHIMdi KypacTbipy yuHIN KaKeTTi 6apNbIK 3JIeMeHTTepDIn XINHaKTa KaMTbIrlFaHbHa Ke3 KeTKi3reH XeH.
Erep 3aKbIMdaIraH HeMece bip3 akaynapb6ap bOJca, ObI naIdaIaHaBbI3 XHeEH KAbH DyKeHRe KaITapbHbI3.
OcbI eHIM cbIpTtFaHa naIdaIaHyf aPhaIFaH XeHe eI XaFdaIa FImapat iHiHde naIdaIaNbIMaybl Tnic.
ΘHIMДI FIMapat iushi He KOIO YsIH COHfbl peT NaIdaJIaHraH coH eKI cFaTka cbiptTa KaIDbipy KepeK.
Ctbn anfahbHb3fa paKmet. Bi3dn eHimdi uriniririhre naDanaHbIb3.
Пikрпериздд ДуkeнИH Be6-СaNTbIHa KaHaHa-KyHaKa6bIДaMbI3.
Keninik
DEXTER eHIMepi JkannbI HapBikKa apHaIaNFaH eH iMdepre KoBilNaTbIH eH Kofapbl Cana CTaHdapTTapbHaCseKec Xacan bIrapbIraH.
Tkyupeci deHrenek apaHbIn (n° 20VCIS3-190BL.1) KeniDik Mep3imi - catbIn aIbIHraH KyHHeH bactan 3 KblN. OcbI KeniDik bapIbIK eHdipicTik Hemece MaTePnaIbIK akayIapDbI KaMTIDbl.
ΘHIM cIbIIN kaIraH JxafdaIa 6pOuHopaIbI aKayIbIKTapIbI XoIO (McSeIeIep MeH weiimdep) 6etIH KapaIbI3; ereP Mecene IeWIIImCe, ci3re eH JxakBn opHaIaCKaH dyKeHe TeKcepiH3.
Dykehii3 Mocenehi wuyu yuih ekahanda akbl anMaybTnic.
KHeey kane boliikterdi aybictbyb6actankki KeniinDik y3akTbfbH y3aptnaiDbI.
KanblntbTo3ydaH HeMece eHIMdi Kate XoImeH naIaHaHydah TybHaar 3aKbIMap KeniDik aCsbHa JatnDa. Onapra, cohBIme H katap To3fAH kayincizdk axbipatkbu bXeHE Ko3faNTkbltap KaTAbI.
Benrini bip endep yin aipbikwa keinikik wapTtapbihb bp eekndirin eckepiiz.
KydikTeHreH xaafdaaJa dyKeHHj3e TeKcepiHj3.
Ha3ap ayadabjIybl Tnic kenildkke KaTbIcIb IwafBIMdap yuiH TeMeHderinep TaIan etiJei:
9. KENIIJIK
.CatbnianydbI daneJeTIN KkaTtBkepcTeY
Белковушитаппени Кендемereин Кэне/Hemecе aybictbplmafaын Керсету.
. Mocene KaIbIITbI To3yDah TyIHdAmafahBHy dJIenJeY.
Kajetti TexnikabIK Kbl3MeT KepeTy XaHe XeHDey XyMbICapbl Dypbc OpbHdaIFaHbIH KepeTy.
Kap6HpaTopdbi KaTe KOJImHepeTteyUdEeIkaHdaTo3yOpbIaIMaFaHbIH Kepcety.
KyuIeH JxMlbc icTeTy, KaTe JxOJIMeH KOnJaHy, pyKCaTcbI Ⅲ naIaIaNHy Hemece Jx3aTaIbIM OKIFaJIapDbIh JxOK bONFaHbIH KePcTeY.
JKeIeTeKlHi 6IbnH Kabyan KaTbI Kbl3yfa 6aIbnHbIcTb 3aIan 60nMaFaHbIH KepeTy.
. ΘHimde 6iikci3 Tynfa TaapanbHaH XyMbIC opbIHdaImaFaHbIH XeHe KaTe JcJImeH XeHJeY apeKeTepiHIN opbIHdaImaFaHbIH KepCety.
KypaI/6aTapey/3apTafblkpybIb6eJIeKTeHBeRHeH HeMece aIbIMaHaBbH Kepcety.
KypaI/6aTape/3apraIaTbIu Kypblfbl bllrfaIbI opTaIa (IbIK, XaHbIp, cyfa 6aTbIpy...) 60maraHbIN KepeTy
To3yfa ce6enii 6oIraH DEXTER KOMnHaNcBly YcbIHbFaH KaTe 6eJIkTepDInKoIaHbIJMaFaHbIH KePcety
Kypan Dpybc Emc naDanaHbIMaHaBH IN KepcTe (KypanFa apTbIK XyKtEme Tycipy Hemece MaKyIdaHbSaH KepeK-JkapAkapTapbl NaIdaIaHy).
. CbIpyKbl acepnpden Hemece Kym/Tac cnaykTbi 6eIde 3aTTapdaH 3akbIM naJaB 6oJMaHaBHyKePcety.
. Kayincizik Keheceptipin KHe naIaIaHy XeHiIerI HycKaynapdbI opbIaMaydAn 3aKbIM naIda 6oImaHaBIn Kepcety.
HIM kaIbITbIXyMbIC 7apTAPbIHdaXeHE Kc6Bn EMEc MaKcTAPMeH NaJaIaHbIybl Tnic. CoNbIKTaH OcbI KeiJndik ece6iHeh KergaIdaHdbIpymeH aHaNbICatbIH KOMNaHnIap, XeprilkTI eKIMuIiK XeHE Xa6bIKbIaKbIbI HeMece AkbcI3 XaIra 6epTeIH KOMNaHnIap naIaNanHaTbIH eHIMdep 7bIFapbladbl.
10. БОЛIKTEР TI3IMI БОИБIHSHAЕXFEN-TEXFENJI KÖPIHIC
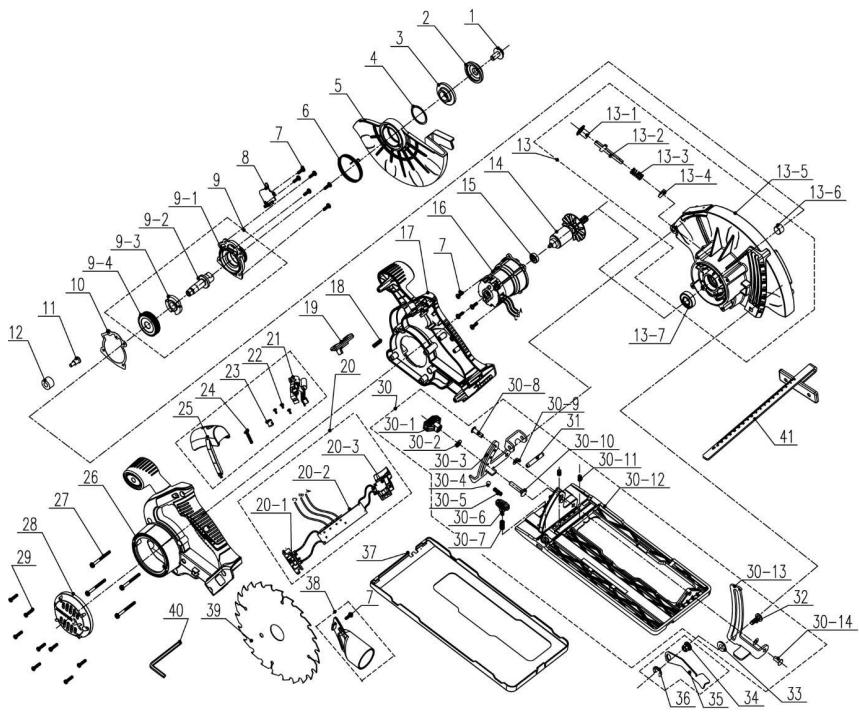
10. БОЛIKTEР TI3IMI БОИБIHSHAЕXFEN-TEXFENJI KÖPIHIC
| POS | СИПATTAMACБI | POS | СИПATTAMACБI | POS | СИПATTAMACБI |
| 1 | БолТ | 13-5 | Бектілгін сактындірьlli HEMECE когары сактындірьlli | 30 | Байланыісты рушы палень кинагы |
| 2 | СырTKы Флaineц | 30-1 | Түка кинагы | ||
| 3 | İшкі Флaineц | 30-2 | Жалпak šаібалap | ||
| 4 | Сакиналы куллп | Төлcke | 30-3 | Барытаблітap | |
| 5 | Козflа оалатын сактындірьlli Темені сактындірьlli | 13-7 | Моьынтірек | 30-4 | Балat shap |
| 14 | Potop кинагы | 30-5 | Серпne | ||
| 15 | Моьынтірек | 30-6 | Түка кинагы | ||
| 6 | Айналу серіпесi | 16 | Статор кинагы | 30-7 | Серпne |
| 7 | 4x12 MM-nik буразда | 17 | Он жak корпuc | 30-12 | Темені плістиha |
| 18 | Серпne | 30-8 | Буразда | ||
| 8 | Май ТыflыЗдірьlli | 19 | Ту\"me 6уfasтан шыгару Түмeci | 30-9 | Тыflыдірьlli |
| 9 | Уш кayларын Жинагы | 20 | эл\'як'tрон'dыk Курам'dacstap Жинагы | 30-10 | Болт |
| 9-1 | Уш кayлары | 20-1 | Байланыс ictirini Жинагы | 30-11 | Орnatу Бүранды |
| 9-2 | Шыflыс bіліk | 30-13 | Барытаблітap | ||
| 9-3 | Өздіrinен Кулblntалытbingлблok | 30-14 | Буразда | ||
| 31 | Ictik | ||||
| 9-4 | Унken тereршik | 20-2 | PCB | 32 | Болт |
| 10 | Май ТыflыЗдірьlli | 20-3 | Ау\'ьістырьл-кOCKьlli | 33 | 1-TEREPшік{TECSi |
| 11 | Буразда | 21 | эл\'як'tрон'dыk Курам'dac lasepi | 34 | Сын |
| 12 | Демпсирпeyшi сакинla | 22 | Буразда | 35 | ТetiK |
| 23 | Ту\"me | 36 | Е тәрізdi сакиналы Куллп | ||
| 13 | Жогары сактындірьlli | 24 | Буразда | 37 | Та\'ьан плactинасынын Кaynaflы |
| 25 | Кaynaр | 38 | Ваду'mык addanterp | ||
| 13-1 | Ту\"me | 26 | Со\"л\"ж\"а\"КорпUC | 39 | Ара кузii |
| 13-2 | Ictik | 27 | Буразда | 40 | Ал'tы Кыр'lы кілт |
| 13-3 | Серпne | 28 | Мотор кayларын Кe\"iH | 41 | Б\'елікт\'ehen shkaena |
| 13-4 | Жун кіз | 29 | Буразда |
11. EK CÖÜNKECTIK DEKLAPAUÇUÇBİ
ADEO Services 135 Rue Sadi Carnot - CS 00001 59790 RONCHIN - Фразця
Tkykseci dənrenek apa Ynri: 20VCIS3-190BL.1
TemeHderi DnpeKTHBaHbH, epexenep MeN CTaHapTTap TanaabHa cKeKc KeJeI:
3MY DnpeKtmbacbI 2014/30/EU
ROHS DnpeKtNbAcbl (EU) 2015/863 e3reptiIReH DnpeKtNbBa 2011/65/EU
MaunHa KypacTbpy DnpeKtNbAcbI 2006/42/EC
EN 62841-1:2015
EN 62841-2-5:2014
EN 55014-1:2017
EN 55014-2:2015
IEC 62321-1:2013
IEC 62321-2:2013
IEC 62321-3-1:2013
IEC 62321-4:2013+A1:2017
IEC 62321-5:2013
IEC 62321-6:2015
IEC 62321-7-1:2015
IEC 62321-7-2:2017&ISO 17075-1:2017
IEC 62321-8:2017
CepnIbIK Ng: AptKbl Mykaba 6etih Xehe acnantbH 3aytltbIK TaTaNlaCbH KapaHbI3.
CE 6eIiici KoiBilran XblnBih coHbEki caHbI:19
随年变
Eric LEMOINE
Ko6a canacbHbH xaIbIkapabIbK eIb6acwbIcbl
ADEO Services 135 Rue Sadi Carnot - CS 00001 59790 RONCHIN - Фразцяя
POnHn KaIacbIa Da JacaIaIbI 18/10/2019
REGLAREA UNGHIULUI INCLINAT
Please read the operating instruction carefully and observe the notes given. Use these operating instructions to familiarise yourself with the product, the proper use and the safety instructions. Keep these operating instructions in a safe place for future uses.
SYMBOLS
| Read instruction manual carefully |
| This danger notice warns of damage to the appliance or others properties, or may cause physical injuries. |
| Wear safety glasses |
| Wear ear protection |
| Wear safety shoes |
| Wear protective gloves |
| Wear a dust mask |
| Using damaged cutting or roughing discs is dangerous and may cause serious injury. |
| Not approved for wet cutting |
| The product complies with the applicable European directives and an evaluation method of conformity for these directives was done. |
| Eurasian conformity work. |
| Weee symbol for recycling operation. |
| Universal:compatible only with Sterwins UP20, Lexman UP20, and Dexter UP20 |
| Ukrainian Conformity Mark |
CONTENTS
- Intended use of Dexter Cordless circular saw brushless
- Safety instructions
- Description
- Technical data
- Operation
- Maintenance
- Trouble shooting
- Disposal and recycling
- Warranty
- Exploded view with part list
- EC Declaration of conformity
1. INTENDED USE OF DEXTER CORDLESS CIRCULAR SAW
Thank you for purchasing this product. Please read through these operating instructions and keep them for future reference.
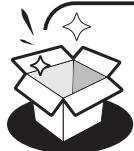
The circular saw is intended to rip cross cutting of wood up to a maximum depth of 65~mm . It can make straight or bevelled cuts between 0 and 45 degrees. It is to be used with the base of the tool in contact with the workpiece.
After unwrapping the packing, make sure that the product is complete with its accessories (if any). If the product is damaged or has any defect, please do not use it and bring back it to your dealer.
If you give this tool to another people, please give him also this instruction manual.
Please note that our equipment has not been designed for use in commercial, trade or industrial applications. Our warranty will be voided if the machine is used in commercial, trade or industrial businesses or for equivalent purposes.
For safety reasons, children and young people under the age of 16, as well as people not familiar with these operating instructions, may not use this product. Persons with reduced physical or mental abilities may use the product only if they are supervised or instructed by a responsible person.
2. SAFETY INSTRUCTIONS
GENERAL POWER TOOL SAFETY WARNINGS

WARNING: Read all safety warnings, instructions, illustrations and specifications provided with this power tool. Failure to follow all instructions listed below may result in electric shock, fire and/or serious injury.
SAVE ALL WARNING AND INSTRUCTIONS FOR FUTURE REFERENCE.
The term "power tool" in the warnings refers to your mains-operated(cored) power tool or battery-operated(cordless) power tool.
WORK AREA SAFETY
A. Keep work area clean and well lit. Cluttered or dark areas invite accidents.
B. Do not operate power tools in explosive atmospheres, such as in the presence of flammable liquids, gases or dust. Power tools create sparks which may ignite the dust or fumes.
C. Keep children and bystanders away while operating a power tool. Distractions can cause you to lose control.
ELECTRICAL SAFETY
A. Power tool plugs must match the outlet. Never modify the plug in any way. Do not use any adapter plugs with earthed (grounded) power tools. Unmodified plugs and matching outlets will reduce risk of electric shock.
B. Avoid body contact with earthed or grounded surface, such as pipes, radiators, ranges and refrigerators. There is an increased risk of electric shock if your body is earthed or grounded.
C. Do not expose power tools to rain or wet conditions. Water
2. SAFETY INSTRUCTIONS
entering a power tool will increase the risk of electric shock.
D. Do not abuse the cord. Never use the cord for carrying, pulling or unplugging the power tool. Keep cord away from heat, oil, sharp edges or moving parts. Damaged or entangled cords increase the risk of electric shock.
E. When operating a power tool outdoors, use an extension cord suitable for outdoor use. Use of a cord suitable for outdoor use reduces the risk of electric shock.
F. If operating a power tool in a damp location is unavoidable, use a residual current device (RCD) protected supply. Use of an RCD reduces the risk of electric shock.
PERSONAL SAFETY
A. Stay alert, watch what you are doing and use common sense when operating a power tool. Do not use a power tool while you are tired or under the influence of drugs, alcohol or medication. A moment of inattention while operating power tools may result in serious personal injury.
B. Use personal protective equipment. Always wear eye protection. Protective equipment such as dust mask, non-skid safety shoes, hard hat, or hearing protection used for appropriate conditions will reduce personal injuries.
C. Prevent unintentional starting. Ensure the switch is in the off-position before connecting to power source and/or battery pack, picking up or carrying the tool. Carrying power tools with your finger on the switch or energising power tools that have the switch on invites accidents.
D. Remove any adjusting key or wrench before turning the power tool on. A wrench or a key left attached to a rotating part of the power tool may result in personal injury.
E. Do not overreach. Keep proper footing and balance at all times.
2. SAFETY INSTRUCTIONS
This enables better control of the power tool in unexpected situations.
F. Dress properly. Do not wear loose clothing or jewellery. Keep your hair, clothing and gloves away from moving parts. Loose clothes, jewellery or long hair can be caught in moving parts.
G. If devices are provided for the connection of dust extraction and collection facilities, ensure these are connected and properly used. Use of dust collection can reduce dust-related hazards.
H. Do not let familiarity gained from frequent use of tools allow you to become complacent and ignore tool safety principles. A careless action can cause severe injury within a fraction of a second.
POWER TOOL USE AND CARE
A. Do not force the power tool. Use the correct power tool for your application. The correct power tool will do the job better and safer at the rate for which it was designed.
B. Do not use the power tool if the switch does not turn it on and off. Any power tool that cannot be controlled with the switch is dangerous and must be repaired.
C. Disconnect the plug from the power source and/or remove the battery pack, if detachable from the power tool before making any adjustments, changing accessories, or storing power tools. Such preventive safety measures reduce the risk of starting the power tool accidentally.
D. Store idle power tools out of the reach of children and do not allow persons unfamiliar with the power tool or these instructions to operate the power tool. Power tools are dangerous in the hands of untrained users.
E. Maintain power tools and accessories. Check for misalignment or binding of moving parts, breakage of parts and any other condition that may affect the power tool's operation. If damaged, have the power tool repaired before use. Many accidents are caused by poorly maintained power tools.
2. SAFETY INSTRUCTIONS
F. Keep cutting tools sharp and clean. Properly maintained cutting tools with sharp cutting edges are less likely to bind and are easier to control.
G. Use the power tool, accessories and tool bits etc. in accordance with these instructions, taking into account the working conditions and the work to be performed. Use of the power tool for operations different from those intended could result in a hazardous situation.
H. Keep handles and grasping surfaces dry, clean and free from oil and grease. Slippery handles and grasping surfaces do not allow for safe handling and control of the tool in unexpected situations.
BATTERY TOOL USE AND CARE
A. Recharge only with the charger specified by the manufacturer. A charger that is suitable for one type of battery pack may create a risk of fire when used with another battery pack.
B. Use power tools only with specifically designated battery packs. Use of any other battery packs may create a risk of injury and fire.
C. When battery pack is not in use, keep it away from other metal objects, like paper clips, coins, keys, nails, screws or other small metal objects, that can make a connection from one terminal to another. Shorting the battery terminals together may cause burns or a fire.
D. Under abusive conditions, liquid may be ejected from the battery; avoid contact. If contact accidentally occurs, flush with water. If liquid contacts eyes, additionally seek medical help. Liquid ejected from the battery may cause irritation or burns.
E. Do not use a battery pack or tool that is damaged or modified. Damaged or modified batteries may exhibit unpredictable behavior resulting in fire, explosion or risk of injury.
F. Do not expose a battery pack or tool to fire or excessive temperature. Exposure to fire or temperature above 130^ may cause
2. SAFETY INSTRUCTIONS
explosion.
G. Follow all charging instructions and do not charge the battery pack or tool outside the temperature range specified in the instructions. Charging improperly or at temperatures outside the specified range may damage the battery and increase the risk of fire.
SERVICE
A. Have your power tool serviced by a qualified repair person using only identical replacement parts. This will ensure that the safety of the power tool is maintained.
B. Never service damaged battery packs. Service of battery packs should only be performed by the manufacturer or authorized service providers.
SAFETY INSTRUCTIONS FOR ALL SAWS
CUTTING PROCEDURES
A. DANGER: Keep hands away from cutting area and the blade. Keep your second hand on auxiliary handle, or motor housing. If both hands are holding the saw, they cannot be cut by the blade.
B. Do not reach underneath the workpiece. The guard cannot protect you from the blade below the workpiece.
C. Adjust the cutting depth to the thickness of the workpiece. Less than a full tooth of the blade teeth should be visible below the workpiece.
D. Never hold the workpiece in your hands or across your leg while cutting. Secure the workpiece to a stable platform. It is important to support the work properly to minimise body exposure, blade binding, or loss of control.
E. Hold the power tool by insulated gripping surfaces, when performing an operation where the cutting tool may contact hidden wiring. Contact with a «live» wire will also make exposed
2. SAFETY INSTRUCTIONS
metal parts of the power tool «live» and could give the operator an electric shock.
F. When ripping, always use a rip fence or straight edge guide. This improves the accuracy of cut and reduces the chance of blade binding.
G. Always use blades with correct size and shape (diamond versus round) of arbour holes. Blades that do not match the mounting hardware of the saw will run off-centre, causing loss of control.
H. Never use damaged or incorrect blade washers or bolt. The blade washers and bolt were specially designed for your saw, for optimum performance and safety of operation.
FURTHER SAFETY INSTRUCTIONS FOR ALL SAWS
KICKBACK CAUSES AND RELATED WARNINGS
- Kickback is a sudden reaction to a pinched, jammed or misaligned saw blade, causing an uncontrolled saw to lift up and out of the workpiece toward the operator;
- When the blade is pinched or jammed tightly by the kerf closing down, the blade stalls and the motor reaction drives the unit rapidly back toward the operator;
- If the blade becomes twisted or misaligned in the cut, the teeth at the back edge of the blade can dig into the top surface of the wood causing the blade to climb out of the kerf and jump back toward the operator.
KICKBACK IS THE RESULT OF SAW MISUSE AND/OR INCORRECT OPERATING PROCEDURES OR CONDITIONS AND CAN BE AVOIDED BY TAKING PROPER PRECAUTIONS AS GIVEN BELOW.
A. Maintain a firm grip with both hands on the saw and position your arms to resist kickback forces. Position your body to either side of the blade, but not in line with the blade. Kickback could cause the saw to jump backwards, but kickback forces can be controlled by the operator, if proper precautions are taken.
2. SAFETY INSTRUCTIONS
B. When blade is binding, or when interrupting a cut for any reason, release the trigger and hold the saw motionless in the material until the blade comes to a complete stop. Never attempt to remove the saw from the work or pull the saw backward while the blade is in motion or kickback may occur. Investigate and take corrective actions to eliminate the cause of blade binding.
C. When restarting a saw in the workpiece, centre the saw blade in the kerf so that the saw teeth are not engaged into the material. If a saw blade binds, it may walk up or kickback from the workpiece as the saw is restarted.
D. Support large panels to minimise the risk of blade pinching and kickback. Large panels tend to sag under their own weight. Supports must be placed under the panel on both sides, near the line of cut and near the edge of the panel.
E. Do not use dull or damaged blades. Unsharpened or improperly set blades produce narrow kerf causing excessive friction, blade binding and kickback.
F. Blade depth and bevel adjusting locking levers must be tight and secure before making the cut. If blade adjustment shifts while cutting, it may cause binding and kickback.
G. Use extra caution when sawing into existing walls or other blind areas. The protruding blade may cut objects that can cause kickback.
LOWER GUARD FUNCTION
A. Check the lower guard for proper closing before each use. Do not operate the saw if the lower guard does not move freely and close instantly. Never clamp or tie the lower guard into the open position. If the saw is accidentally dropped, the lower guard may be bent. Raise the lower guard with the retracting handle and make sure it moves freely and does not touch the blade or any other part, in
2. SAFETY INSTRUCTIONS
all angles and depths of cut.
B. Check the operation of the lower guard spring. If the guard and the spring are not operating properly, they must be serviced before use. Lower guard may operate sluggishly due to damaged parts, gummy deposits, or a build-up of debris.
C. The lower guard may be retracted manually only for special cuts such as "plunge cuts" and "compound cuts". Raise the lower guard by the retracting handle and as soon as the blade enters the material, the lower guard must be released. For all other sawing, the lower guard should operate automatically.
D. Always observe that the lower guard is covering the blade before placing the saw down on bench or floor. An unprotected, coasting blade will cause the saw to walk backwards, cutting whatever is in its path. Be aware of the time it takes for the blade to stop after switch is released.
ADDITIONAL SPECIFIC SAFETY INSTRUCTIONS FOR CIRCULAR SAW
WARNING: Do not use abrasive wheels or blades.
Do not use water feed attachments.
A. Use clamps or another practical way to secure and support the workpiece to a stable platform. Holding the work by hand or against your body leaves it unstable and may lead to loss of control.
B. Keep your body positioned to either side of the blade, but not in line with the saw blade. KICKBACK could cause the saw to jump backwards.
C. Air vents often cover moving parts and should be avoided. Loose clothes, jewelry or long hair can be caught in moving parts.
D. Avoid cutting nails. Inspect for and remove all nails from lumber before cutting.
WARNING: Some dust created by power sanding, sawing, grinding, drilling, and other construction activities contains chemicals known to
2. SAFETY INSTRUCTIONS
the State of California to cause cancer, birth defects or other reproductive harm. Some examples of these chemicals are:
- Lead from lead-based paints,
- Crystalline silica from bricks and cement and other masonry products,
- Arsenic and chromium from chemically-treated lumber.
- Your risk from these exposures varies, depending on how often you do this type of work. To reduce your exposure to these chemicals:
- Work in a well-ventilated area, and work with approved safety equipment, such as those dust masks that are specially designed to filter out microscopic particles.
- Avoid prolonged contact with dust from power sanding, sawing, grinding, drilling, and other construction activities. Wear protective clothing and wash exposed areas with soap and water. Allowing dust to get into your mouth, eyes, or lay on the skin may promote absorption of harmful chemicals.
DUST EXTRACTION
A dust extraction port is supplied with your tool.
Always use a vacuum extractor designed in compliance with the applicable. Directives regarding dust emission when sawing wood. Vacuum hoses of most common vacuum cleaners will fit directly into the dust extraction spout.
WARNING: When not in use, place circular saw on a stable surface, shoe side down, where it will not cause a tripping or falling hazard. Some tools with large battery packs will stand upright on the battery pack but may be easily knocked over.
LASER FUNCTION
2. SAFETY INSTRUCTIONS
The laser guide used in the tool is Class II with maximum output 1mW and wavelength 650nm. The laser guide do not normally present an optical hazard, although staring at the beam may cause flash blindness.
CAUTION: The use of capital instruments with laser product will increase eye hazard.
- Do not stare your eyes to the laser beam.
- The laser shall be used and maintained in accordance with the manufacture's instructoion.
- Never aim the beam at any person or an object other than the work piece.
- Always ensure the laser beam is aimed at a sturdy work piece without reflective surface. i.e. wood or rough coated surface are acceptable. Bright shiny reflective sheet or the like is not suitable for laser use as the reflective surface could direct te beam back at the operator.
- Do not change the laser light assembly with a different type. Any repairs must only be carried out by the laser manufacture or authorized service agent.
- Do not attempt to repairs the laser guide by yourself.
- Do not attempt to change any parts of the laser guide.
- Always switch off the laser when not used.
3.DESCRIPTION
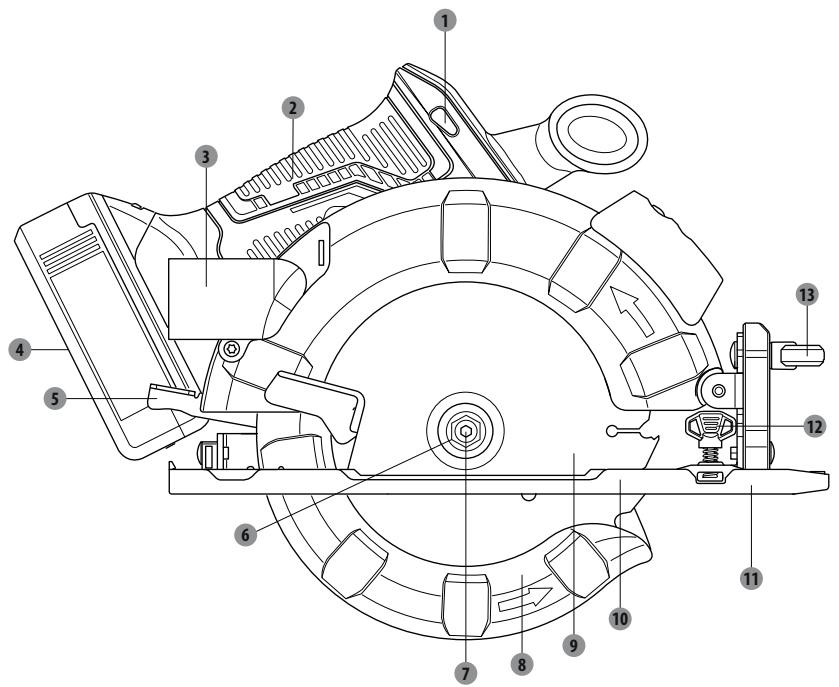
1 Lock-off button
2 Handle
3 Dust extraction port
4 Battery pack*
Depth lock level
6 Outer flange
Blade bolt
Lower guard
9 Blade
10 Shoe
11 Edge guide fence
12 Edge guide lock knob
13 Bevel adjusting knob
*Not all the accessories illustrated or described are included in standard delivery.
3.DESCRIPTION

14 Switch trigger
15 Auxiliary handle
16 Laser light
17 Spindle lock button
18 Blade wrench
19 Battery pack unlock button*
*Not all the accessories illustrated or described are included in standard delivery.
4. TECHNICAL DATA
| Model: | 20VCIS3-190BL.1 |
| Rated voltage: | 18V d.c. 20V Max d.c. |
| No load speed : | 4200/min |
| Blade size: | Φ190mm |
| Arbor: | 30mm |
| Max depth of cut of 0°: | 65mm |
| Max depth of cut of 45°: | 45mm |
| Sound pressure level: | 77.7dB(A) |
| Sound power level: | 88.7dB(A) |
| Vibration level(K=1.5 m/s2) | 1.008 m/s2 |
| Machine weigh (not included battery pack) | 3.13kg |
| Compatibilities with cAhangers | 20VCH1-3A.1 |
| 20VCH2-6A.1 | |
| Compatibilities with batteries | 20VBA2-25.1 |
| 20VBA2-50.1 |
5. OPERATION
WARNING: Always remove battery pack before changing or removing accessories. Only use accessories specifically recommended for this tool. Others may be hazardous.
INSTALLING/REMOVING BATTERY PACK
To install:
Insert the battery pack.
Push battery pack into the bottom of the handle and that battery pack is secured in the product before beginning operation.
To remove:
Depress the battery pack unlock button and by pulling the battery pack out.
For complete charging instructions, see the operator's manuals for your battery pack and charger.
LOCK-OFF BUTTON
The lock-off button is located on the handle above the switch trigger. You must depress the lock-off button in order to pull the switch trigger. The lock resets each time the trigger is released.
NOTE: You can depress the lock-off button from either the left or right side.
SWITCH TRIGGER
To turn the grinder ON, depress and hold lock-off button, then depress the switch trigger. To turn it OFF, release the switch trigger.
KICKBACK
Kickback occurs when the blade stalls rapidly and the saw is driven back towards you. Blade stalling is caused by any action which pinches the blade in the wood.
DANGER: Release switch immediately if blade binds or saw stalls. Kickback could cause you to lose control of the saw. Loss of control can lead to serious injury.
To guard against kickback, avoid dangerous practices such as the following:
Set blade depth incorrectly.
Saw into knots or nails in workpiece.
Twist the blade while making a cut.
Making a cut with a dull, gumed up, or improperly set blade.
Support the workpiece incorrectly.
Force a cut.
Cut warped or wet lumber.
Operating the tool incorrectly or misusing the tool.
To lessen the chance of kickback, follow these safety practices:
Keep the blade at the correct depth setting.
Inspect the workpiece for knots or nails before cutting.
5. OPERATION
Never saw into a knot or nail.
Make straight cuts. Always use a straight edge guide when rip cutting.
This helps prevent twisting the blade.
Use clean, sharp, and properly set blades. Never make cuts with dull blades.
Support the workpiece properly before beginning a cut.
Use steady, even pressure when making a cut. Never force a cut.
Do not cut warped or wet lumber.
Hold the saw firmly with both hands and keep your body in a balanced position so as to resist the forces if kickback should occur.

WARNING: When using the saw, always stay alert and exercise control. Do not remove the
saw from the workpiece while the blade is moving.
SAW BLADES
The best of saw blades will not cut efficiently if they are not kept clean, sharp, and properly set. Using a dull blade will place a heavy load on the saw and increase the danger of kickback. Keep extra blades on hand, so that sharp blades are always available.
Gum and wood pitch hardened on blades will slow the saw down. Remove saw blade from the saw and use gum and pitch remover, hot water, or kerosene to remove these accumulations.
Use only saw blades that are marked with a speed equal or higher than the speed marked on the tool.
DO NOT USE GASOLINE.
Only use DEXTER's blade diameter(s) in accordance with the chart below.
| Diameter | Teeth |
| 190mm | 24 |
BLADE GUARD SYSTEM
The lower blade guard attached to the circular saw is there for your protection and safety. Do not alter it for any reason. If it becomes damaged, do not operate the saw until you have the guard repaired or replaced. Always leave guard in operating position when using the saw.

DANGER: When sawing through work, lower blade guard does not cover blade on the
underside of work. Since blade is exposed on underside of work, keep hands and fingers away from cutting area. Any part of your body coming in contact with moving blade will result in serious injury.
5. OPERATION
CAUTION: Never use saw when guard is not operating correctly. Check the guard for correct operation before each use. The guard is operating correctly when it moves freely and readily returns to the closed position. If you drop the saw, check the lower blade guard and bumper for damage at all depth settings before reuse.
STARTING/STOPPING THE SAW
This saw is equipped with a worklight that will turn on when the trigger is depressed and will turn off when the trigger is released.
To start the saw:
Depress the lock-off button.
Depress the switch trigger.
Always let the blade reach full speed, and then guide the saw into the workpiece.
WARNING: The blade coming in contact with the workpiece before it reaches full speed could cause the saw to "kickback" towards you resulting in serious injury.
To start the saw:
Release the switch trigger.
After you release the switch trigger, allow the blade to come to a complete stop. Do not remove the saw from the workpiece while the blade is moving.
ADJUSTING BLADE DEPTH
Always keeps correct blade depth setting. The correct blade depth setting for all cuts should not exceed between 1/4in.(6.35mm) and 2.56in.(65mm) below the material being cut.
More blade depth will increase the chance of kickback and cause the cut to be rough. For more depth of cut accuracy, a scale is located on the upper blade guard.
Loosen the depth lock lever by lifting it upward away from the base.
Determine the desired depth of cut. Locate the depth of edge guide fence on the back of the upper blade guard.
Hold the base flat against the workpiece and raise or lower the saw until the indicator mark on bracket aligns with the notch on the blade guard.
Tighten the depth lock lever securely by pushing it downward toward the base.
OPERATING THE SAW
It is important to learn the correct and incorrect ways for handling the saw.
5.OPERATION
To make the best possible cut, follow these helpful hints:
Hold the saw firmly with both hands.
Avoid placing your hand on the workpiece while making a cut.
Support the workpiece so that the cut (kerf) is always to your side.
Support the workpiece near the cut.
Use clamps or other practical ways to secure the workpiece so that the workpiece will not move during the cut.
Draw a guideline along the desired line of cut before beginning your cut.
CROSS CUTTING/RIP CUTTING
When making a straight cross cut or rip cut, align the line of cut with the 0^ blade guide notch on the base.
Since blade thicknesses vary, always make a trial cut in scrap material along a guideline to determine how much, if any, you must offset the guideline to produce an accurate cut.
NOTE: The distance from the line of cut to the guideline is the amount you should offset the guide.
RIP CUTTING
Use a guide when making long or wide rip cuts with the saw.
Secure the workpiece.
Clamp a straight edge to the workpiece using C-clamps.
Saw along the straight edge to achieve a straight rip cut.
NOTE: Do not bind the blade in the cut.
BEVEL CUTTING
Adjust the angle of the cut to any desired setting between 0^ and 45^ .
If making a 45^ bevel cut, align the line of cut with the 45^ blade guide notch on the base.
Make a trial cut in scrap material along a guideline to determine how much you should offset the guideline on the cutting material.
ADJUSTING THE BEVEL SETTING
Loosen the bevel adjusting knob.
Raise the motor housing end of the saw until you reach the desired angle setting on the bevel scale.
Tighten the bevel adjusting knob securely.

WARNING: Attempting a bevel cut without having the bevel lock knob securely tightened can
result in serious injury.
5. OPERATION
TO BEVEL CUT
Hold the saw firmly with both hands. Rest the front edge of the base on the workpiece. Start the saw and let the blade reach full speed. Guide the saw into the workpiece and make the cut. Release the switch and allow the blade to come to a complete stop. Lift the saw from the workpiece.
POCKET CUTTING
WARNING: Always adjust bevel setting to 0^ before making a pocket cut. Attempting a pocket cut at any other setting can result in loss of control of the saw possibly causing serious injury.
Adjust the bevel setting to 0^
Set the blade to the correct blade depth setting.
Swing the lower blade guard up using the lower blade guard handle.
NOTE: Always raise the lower blade guard with the handle to avoid serious injury. Hold the lower blade guard by the handle while keeping your hand on the front handle. Rest the front of the base flat against the workpiece with the rear of the handle raised so the blade does not touch the workpiece. Start the saw and let the blade reach full speed. Guide the saw into the workpiece and make the cut.
WARNING: Always cut in a forward direction when pocket cutting. Cutting in the reverse direction could cause the saw to climb up on the workpiece and back toward you. Release the switch and allow the blade to come to a complete stop. Lift the saw from the workpiece.
LENGTH OF CUT SCALE
The saw is equipped with a length of cut scale on its base. It is parallel with the saw blade and can be used to measure the distance into the material the blade cuts.
NOTE: Six inches is the maximum length of cut that you can measure. Also, it is accurate only when the depth of cut is set at full maximum depth.
OPTIONAL EDGE GUIDE FENCE
To assemble edge guide fence:
Remove the battery.
Place edge guide fence through slots in base.
Adjust edge guide fence to the width needed.
Tighten edge guide lock knob securely
To use edge guide fence:
Secure the workpiece to prevent movement.
Position the face of the edge guide fence firmly against the edge of workpiece.
5. OPERATION
Guide the saw along the edge to achieve a straight rip cut.
NOTE: The guiding edge fence of the workpiece must be straight for the cut to be straight. Use caution to prevent the blade from binding in the cut.
OPTIONAL DUST EXTRACTION PORT
You have to use the dust extraction port before using the circular saw. The adaptor fits over the dust chute which is located on the upper blade guard. The dust extraction port attaches to the adaptor.
NOTE: If you use the dust extraction port, you should always connect it to a standard vacuum hose and wear a dust mask yourself.
To attach dust extraction port:
Remove the battery.
Lift lower blade guard.
Orient adaptor to fit into the dust chute opening on upper blade guard.
Secure adaptor with screw provided.
Align hole in the dust extraction port with raised lip on adaptor and snap into place when using a vacuum hose.
CHANGING THE SAW BLADE
Always remove the battery pack before changing the saw blade!
- Set the cutting depth (using the locking screw) to the minimum position(0 mm).
- Swing the blade guard back using the release lever and put the circular saw down.
- Press the spindle lock button (until it engages) and use the hex key to release the Blade bolt. Then remove the blade bolt and the outer flange.
- Remove the saw blade.
- Fitting a saw blade is carried out in the reverse order.
- Press the spindle lock button (until it engages) and use the hex key to tighten the blade bolt and the outer flange.
- Ensure that the saw blade is suitable for the rotational speed of the tool.
6. MAINTENANCE
WARNING: To reduce the risk of injury, always unplug the charger and remove the battery pack from the charger or tool before performing any maintenance. Never disassemble the tool, battery pack or charger.
Do not use any sharp objects for cleaning the appliance. Never allow any liquids to penetrate inside the appliance. Otherwise the appliance could be damaged.
Clean the appliance regularly, preferably immediately after completion of the work.
Clean the housing with a dry cloth—do NOT use petrol, solvents or cleaners which can attack the plastic.
A vacuum cleaner is required for thorough cleaning of the appliance.
Ventilation openings must never be obstructed.
Remove any sanding dust stuck to the appliance with a brush.
The blade guard must always move freely and close automatically.
Therefore, keep the area around the blade guard clean at all times.
Remove dust and chips by blowing them out with compressed air or with a brush.
CLEANING
Clean dust and debris from vents. Keep handles clean, dry and free of oil or grease. Use only mild soap and a damp cloth to clean, since certain cleaning agents and solvents are harmful to plastics and other insulated parts.
Always keep the area around blade guard clean (remove dust and chips by blowing out with compressed air or with a brush).
Some of these include gasoline, turpentine, lacquer thinner, paint thinner, chlorinated cleaning solvents, ammonia and household deter- gents containing ammonia. Never use flammable or combustible solvents around tools..
REPAIRS
For repairs, return the tool, battery pack and charger to the nearest service center.
STORAGE & DISPOSAL
Switch the circular saw off and remove the battery.
Store the circular saw and its accessories in a dark, dry, frost-free, well-ventilated place.
Always store the circular saw in a place that is inaccessible to children. The ideal storage temperature is between 10^ and 30^ .
We recommend using the original package for storage or covering the circular saw with a suitable cloth or enclosure to protect it against dust.
TRANSPORTATION
Switch the circular saw off and remove the battery.
Protect the circular saw from any heavy impact or strong vibrations which may occur during transportation in vehicles.
Secure the circular saw to prevent it from slipping or falling over.
7. TROUBLESHOOTING
| Problems | Probable causes | Corrective action |
| Device doesn’t start. | The battery is less power. | Check the battery and charge it. |
| The charger is broken. | Repair by customer care. | |
| On/off switch may be defective. | ||
| Engine faulty. | ||
| Device operates sporadically or at low power. | The battery is less power. | Check the battery and charge it. |
| Worn or cracked Carbon Brushes. | Check Carbon Brushes. Replace if damaged or worn. | |
| Wood burns at ends when cut. | Dirty Blade. | Clean Blade using blade cleaner or mineral spirits. |
| Material is binding. | Check position of work material on Table. Material must be flat, flush against Fence and supported on ends. | |
| Material frags or chips out. | Finished side is down. | Keep finished side of material up or facing operator. Bottom and back side are prone to chip out. |
| Blade chipped or dull. | Check for damaged teeth. Sharpen or replace blade. | |
| Blade inappropriate for material. | Check blade manufacturer’s recommendations for material being cut. For cross cutting hard wood and for precision cuts use a thin kerf blade with 60 or more teeth. | |
| Material is unsupported. | Use a thin piece of scrap material, such as 1/4" plywood, underneath or behind the material to support the edges of the material as it is being cut. |
7. TROUBLESHOOTING
| Problems | Probable causes | Corrective action |
| Blade binds,slowing orstopping saw. | Material ismisaligned on thesaw or ends are notsupported. | Material must be flat on table, flush against thefence and supported on both ends. |
| Material is wet,contaminated orinappropriate bladeis being used. | Check condition of material and checkcompatibility of blade to material. | |
| Motor runs butblade doesnot turn. | Drive belt has failed. | Have qualified technician service tool. |
8. DISPOSAL AND RECYCLING

The packaging consists of environmentally friendly material. It can be disposed of in the local recycling containers.

CAUTION! This product has been marked with a symbol relating to removing electric and electronic waste. This means that this product shall not be discarded with household waste but that it shall be returned to a collection system which conforms to the European WEEE Directive. Contact your local authorities or stocks for advice on recycling. It will then be recycled or dismantled in order to reduce the impact on the environment. Electric and electronic equipment can be hazardous for the environment and for human health since they contain hazardous substances.

CAUTION! Do not dispose of batteries in your normal household waste!
ENVIRONMENTAL PROTECTION
Waste electrical products must not be disposed of with household waste. According to the European Battery Directive, defective or used battery packs/batteries, must be collected separately and disposed of in an environmentally correct manner. Please recycle where facilities exist. Check with your local authorities or retailer for recycling advice. It will then be recycled or dismantled in order to reduce the impact on the environment. Battery pack/ batteries can be hazardous for the environment and for human health since they contain hazardous substances.
9. WARRANTY
PREFACE
Thank you for choosing this product. Upon designing and manufacturing our products, we place all of our efforts into ensuring an excellent quality that meets the needs of the users.
IMPORTANT! PLEASE READ THIS MANUAL BEFORE USING THIS PRODUCT, FOLLOW THE BASIC SAFETY WARNINGS WITHIN, AND KEEP IT CAREFULLY.
As soon as you open the packaging, we recommend that you check to ensure that all elements required for assembly of the product have been included.
If the product is damaged or has some defects, please do not use it, and bring it back to the nearest store.
This product is intended for outdoor use only, and must not be used inside a building under any circumstances.
This product can be placed inside a building only after having rested for two hours after the last use. We thank you for your business and hope that you will be totally satisfied upon using our product. We will be happy to receive all of your remarks on our online store web site.
Warranty
DEXTER products are designed based on the most rigorous quality standards for products intended for the general public.
The bare brushless circular saw (Model n° 20VCIS3-190BL.1) is covered with a warranty of 3 years starting from the date of purchase. This warranty covers all manufacturing or material defects.
In the event of a breakdown, please refer first to the troubleshooting page (problems and solutions) in the brochure; if the problem persists, please check with the nearest store.
Your store shall spare no effort in resolving the issue.
Repairs and change of parts do not extend the duration of the initial warranty.
Breakdowns resulting from normal wear and tear or from improper use of the product are not covered by the warranty. This includes, among others, the switches, the safety circuit breaker and the motors, in case of wear.
Please note that there are specific warranty terms for certain countries.
In case of doubt, please check with your point of sale.
For claims relating to the warranty to be taken into account, the following is required:
9. WARRANTY
Providing proof of purchase
- That no repairs and/or change of parts have been performed by a third party.
- That the issue is not a matter of normal wear and tear.
- That required maintenance and repair works have been performed correctly.
- That no deterioration has taken place as a result of incorrect setting of the carburetor.
- That there has been no forcing, improper handling, unauthorized use, or accidents
- That no deterioration has taken place due to overheating, resulting from clogging of the ventilator block.
- That no work has been done on the product by an unskilled person, and no incorrect repairs have been attempted.
- That the tool/battery/charger have never been disassembled or opened.
- That the tool/battery/charger have never been in a wet environment (dew, rain, submerged in water...)
- That no incorrect parts have been used, parts not made by DEXTER, whereas they prove to be the cause of deterioration
- That the tool has not been used improperly (overloading the tool, or use of non-approved accessories).
- That no damage has resulted from external causes, or foreign bodies such as sand or stones.
- That no damage has resulted from non-compliance with safety recommendations and use instructions.
The product must be used under normal usage circumstances, and for non-professional purposes. Therefore, excluded from this warranty are products used by landscaping companies, local authorities, as well as companies offering paid rentals or free loaning of equipment.
10. EXPLODED VIEW WITH PART LIST

10. EXPLODED VIEW WITH PART LIST
| POS | DESCRIPTION |
| 1 | Bolt |
| 2 | Outer Flange |
| 3 | Inner flange |
| 4 | Circlip |
| 5 | Movable guard Lower guard |
| 6 | Torsion spring |
| 7 | Screw 4x12mm |
| 8 | Oil seal |
| 9 | End cap assembly |
| 9-1 | End cap |
| 9-2 | Output shaft |
| 9-3 | Self-locking block |
| 9-4 | Big gear |
| 10 | Oil seal |
| 11 | Screw |
| 12 | Damping ring |
| 13 | Upper guard assembly |
| 13-1 | Button |
| 13-2 | Pin |
| 13-3 | Spring |
| 13-4 | Wool felt |
| 13-5 | Fixed guard OR upper guard |
| 13-6 | Bushing |
| 13-7 | Bearing |
| 14 | Rotor assembly |
| 15 | Bearing |
| POS | DESCRIPTION |
| 16 | Stator assembly |
| 17 | Right housing |
| 18 | Spring |
| 19 | Button unlocking button |
| 20 | electronic components assembly |
| 20-1 | Contact pin Ass'y |
| 20-2 | PCB |
| 20-3 | Switch |
| 21 | Electronic component laser |
| 22 | Screw |
| 23 | Button |
| 24 | Screw |
| 25 | Cover |
| 26 | Left housing |
| 27 | Screw |
| 28 | After the motor cover |
| 29 | Screw |
| 30 | Backplane assembly |
| 30-1 | Knob assembly |
| 30-2 | Flat Washers |
| 30-3 | Guides |
| 30-4 | Steel ball |
| 30-5 | Spring |
| 30-6 | Knob assembly |
| 30-7 | Spring |
| POS | DESCRIPTION |
| 30-12 | Bottom plate |
| 30-8 | Rvet |
| 30-9 | Gasket |
| 30-10 | Bolt |
| 30-11 | Set screw |
| 30-13 | Guides |
| 30-14 | Rvet |
| 31 | Pin |
| 32 | Bolt |
| 33 | Gear pad 1 |
| 34 | Nut |
| 35 | Lever |
| 36 | E-shaped circlip |
| 37 | Base plate cover |
| 38 | Vacuum adapter |
| 39 | Saw blade |
| 40 | Allen wrench |
| 41 | Graduated scale |
11. EC DECLARATION OF CONFORMITY
ADEO Services
135 Rue Sadi Carnot - CS 00001
59790 RONCHIN - France
Declare that the circular saw brushless. Model : 20VCIS3-190BL.1
Is in conformity with the requirements of the following Directive, regulations and standards :
EMC Directive 2014/30/EU
ROHS Directive(EU)2015/863 amending Directive 2011/65/EU
Machinery Directive 2006/42/EC
EN 62841-1:2015
EN 62841-2-5:2014
EN 55014-1:2017
EN 55014-2:2015
IEC 62321-1:2013
IEC 62321-2:2013
IEC 62321-3-1:2013
IEC 62321-4:2013+A1:2017
IEC 62321-5:2013
IEC 62321-6:2015
IEC 62321-7-1:2015
IEC 62321-7-2:2017&ISO 17075-1:2017
IEC 62321-8:2017
Serial No: Please refer to the back cover page and rating label of machine
Last two numbers of the year CE marking applied: 19 随年变
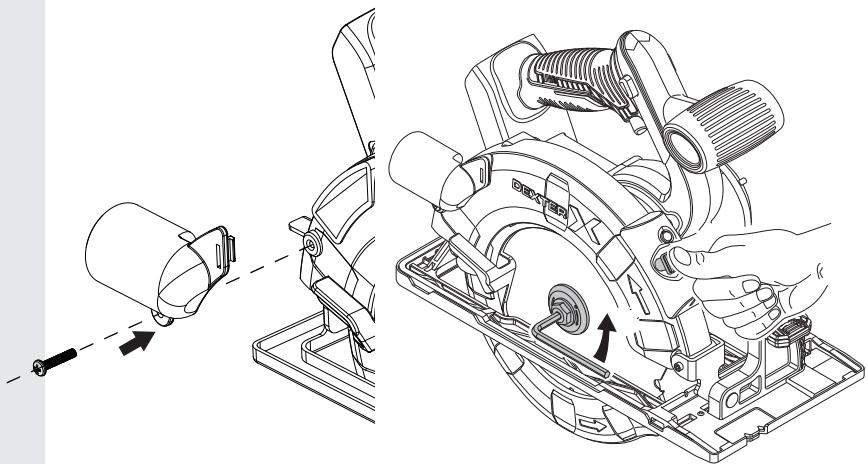
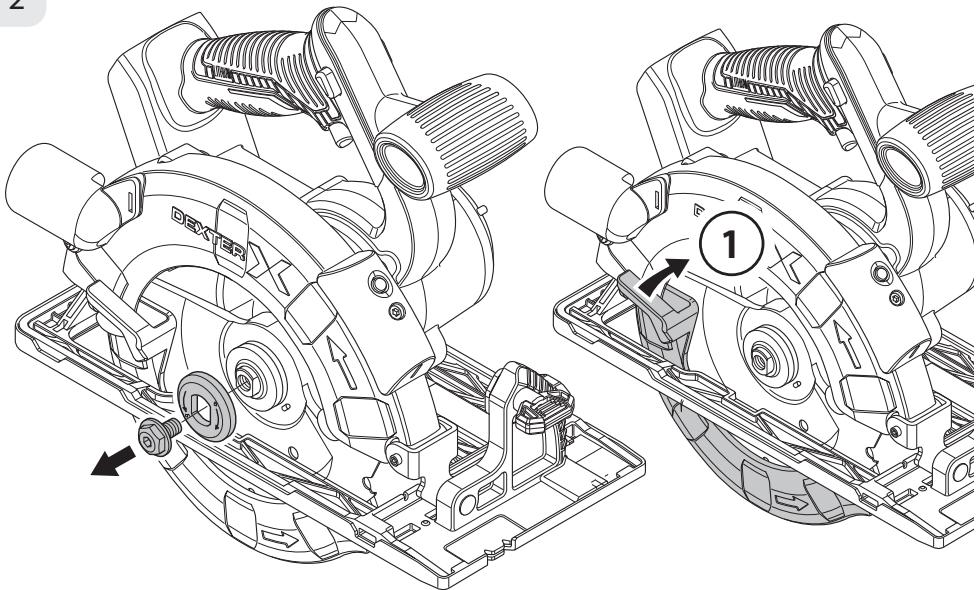
2
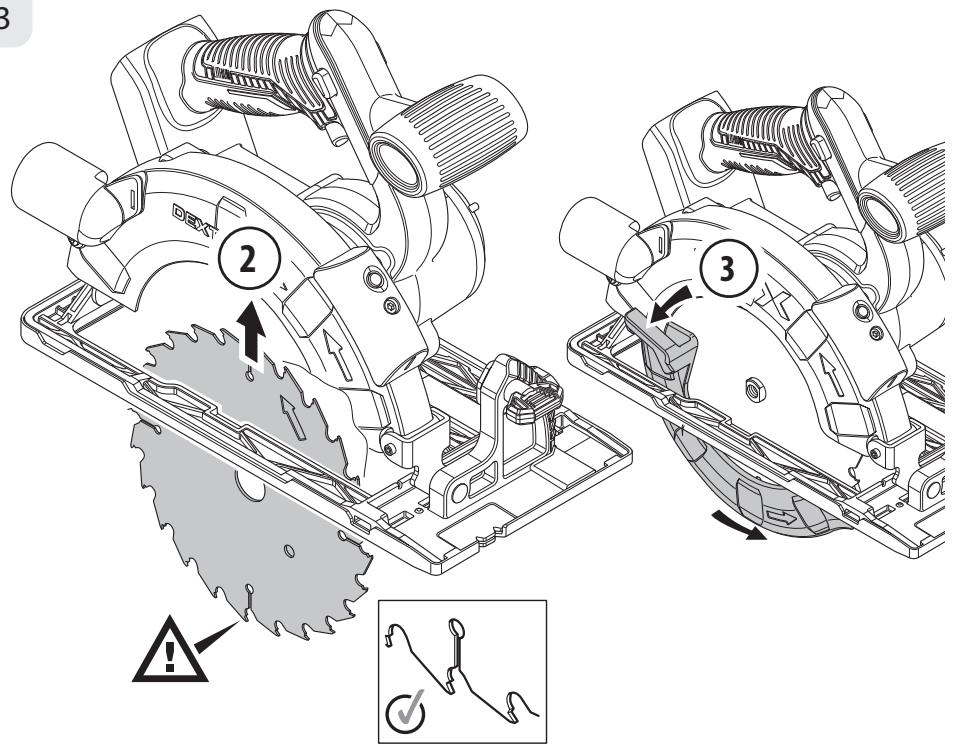
3
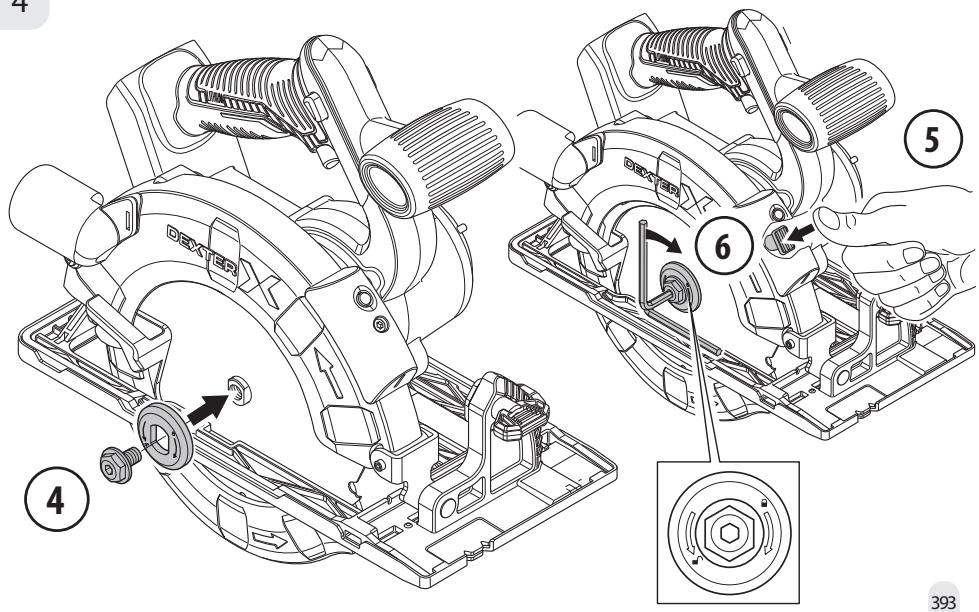
4
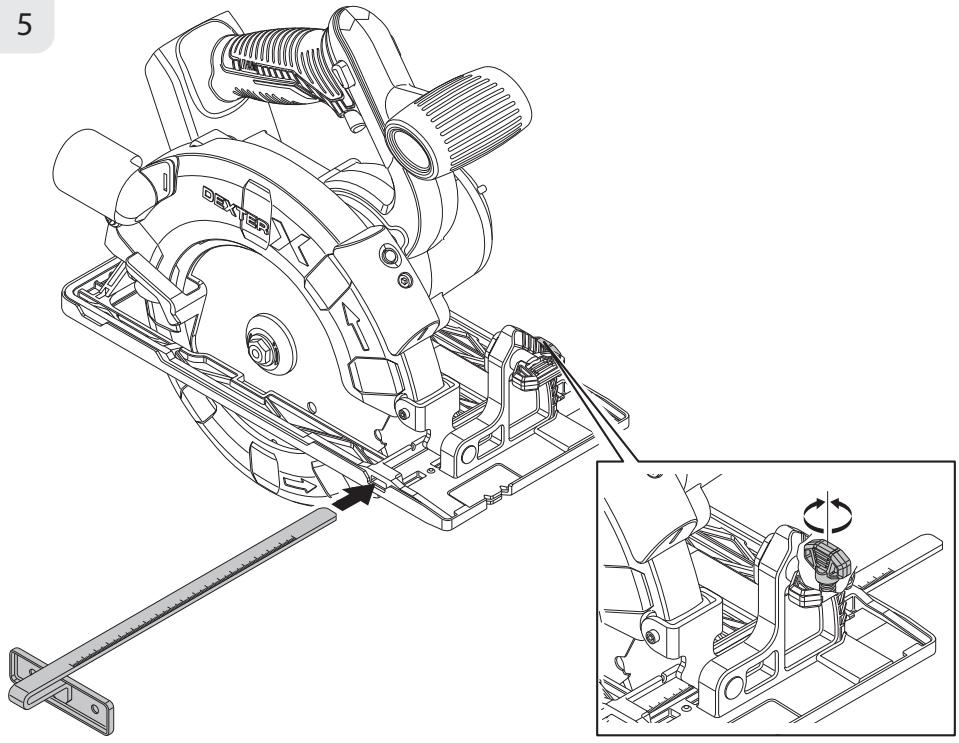
5
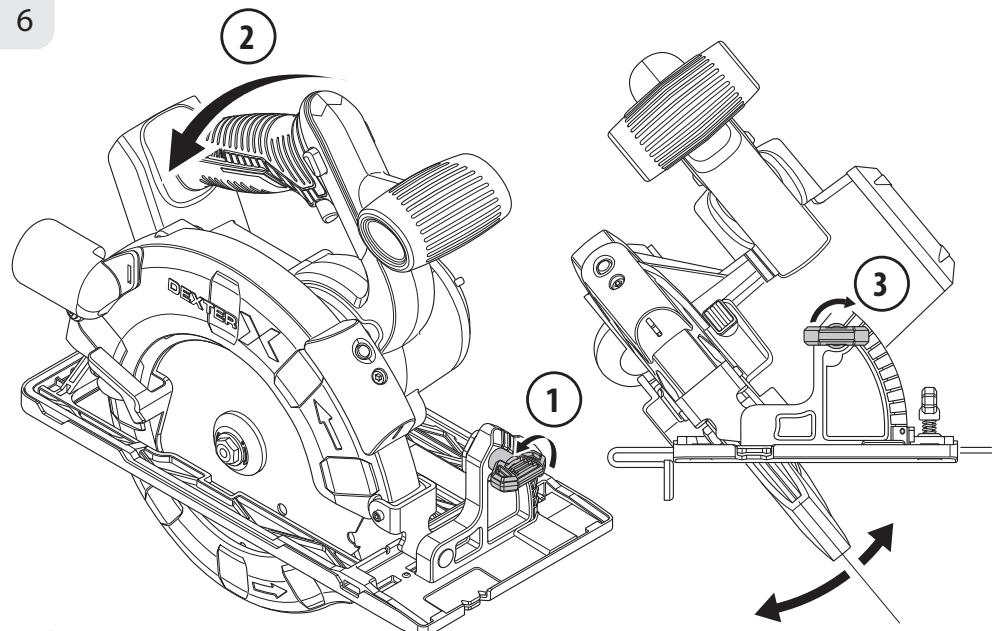
6
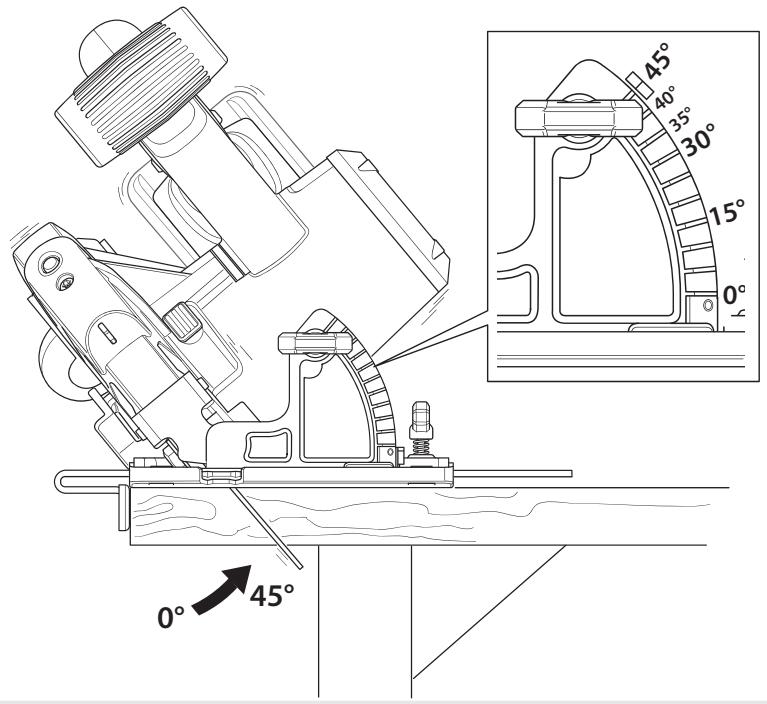
7
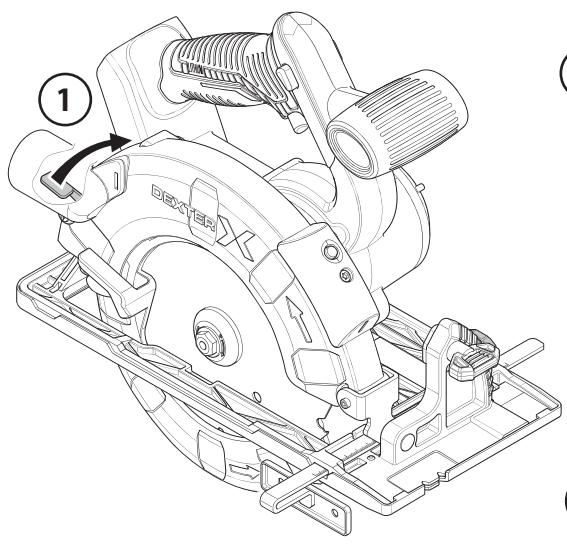
8
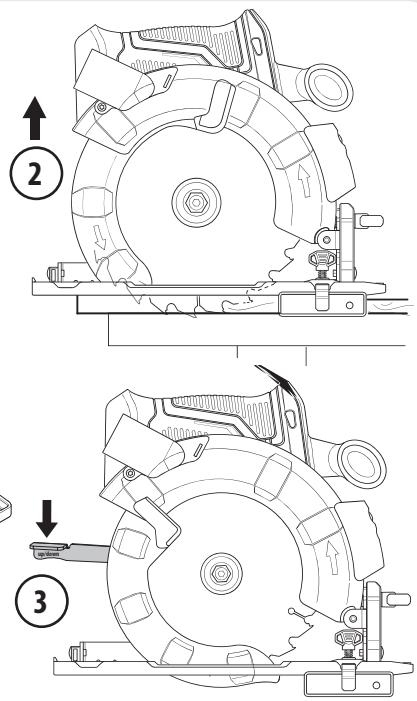
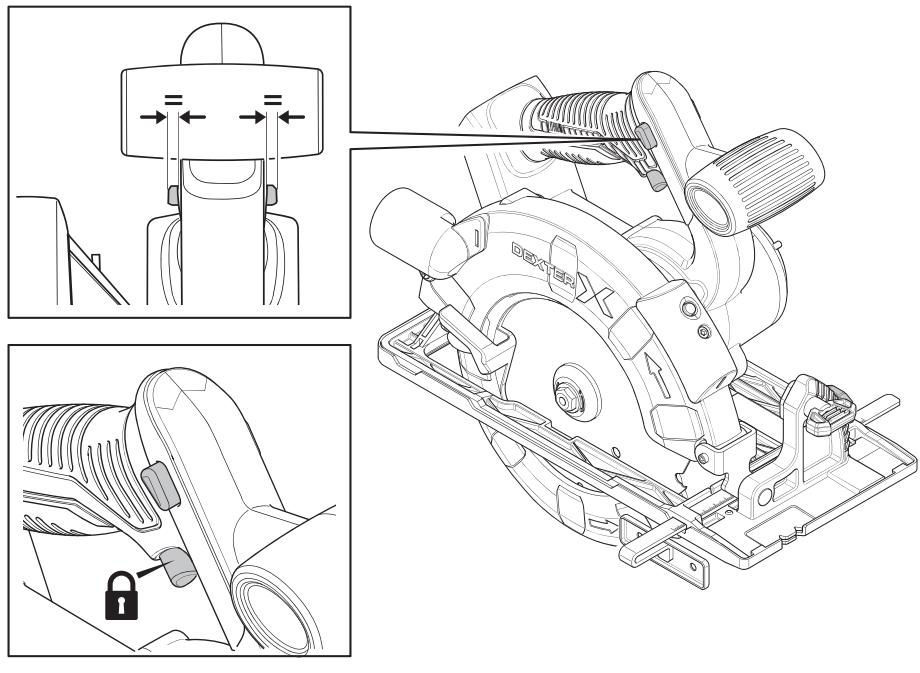
9
10
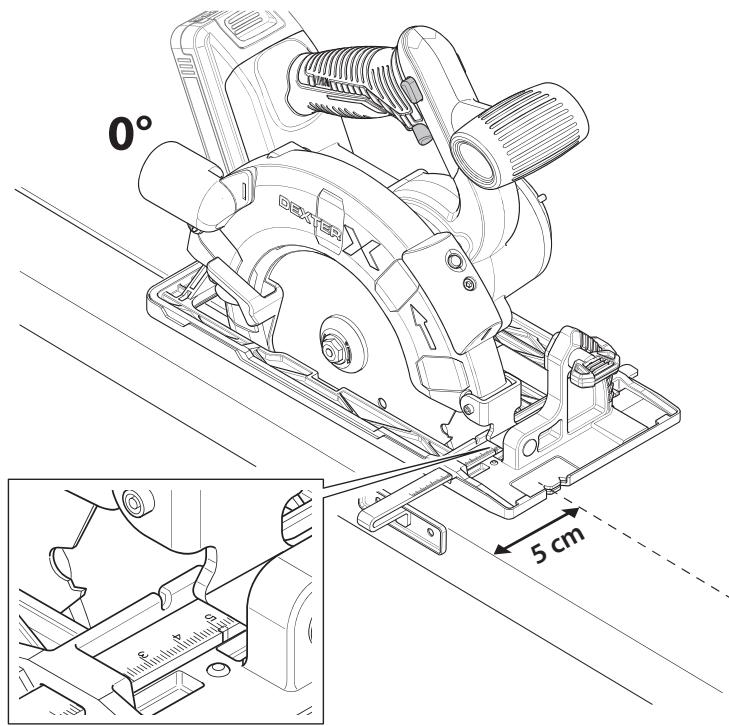
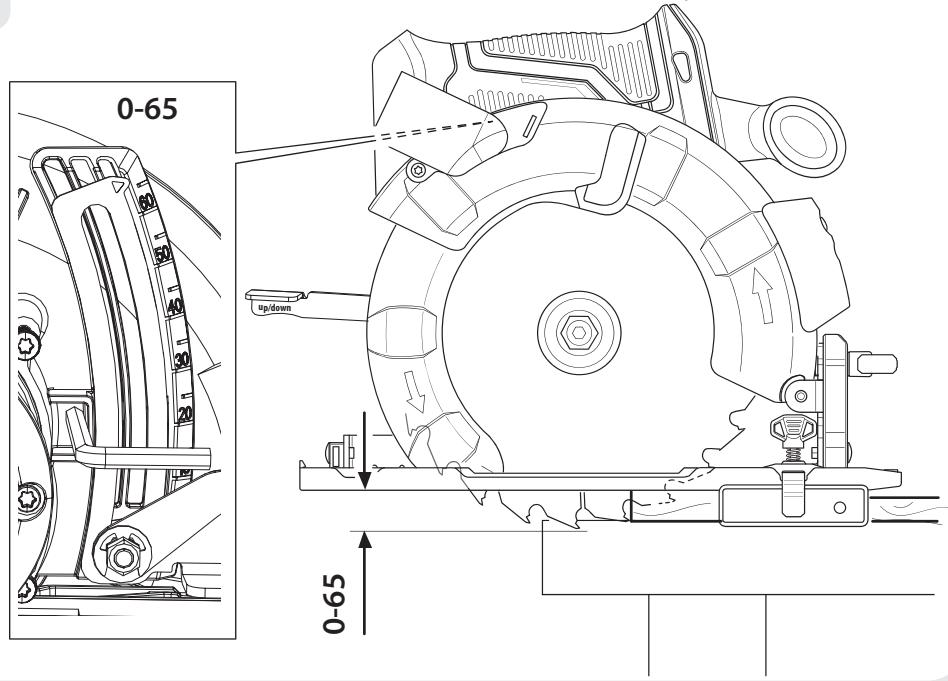
11
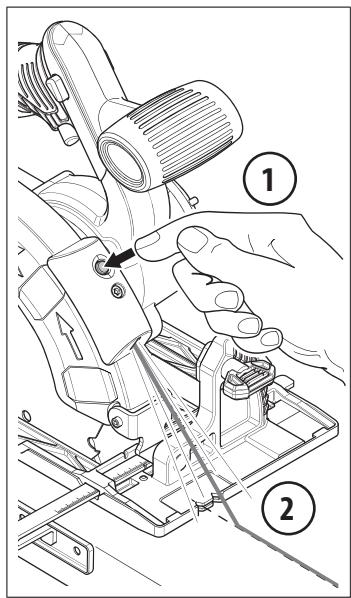
12
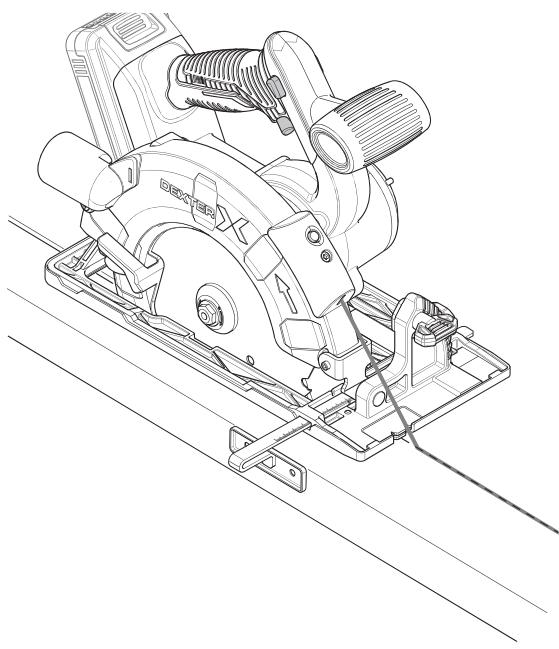
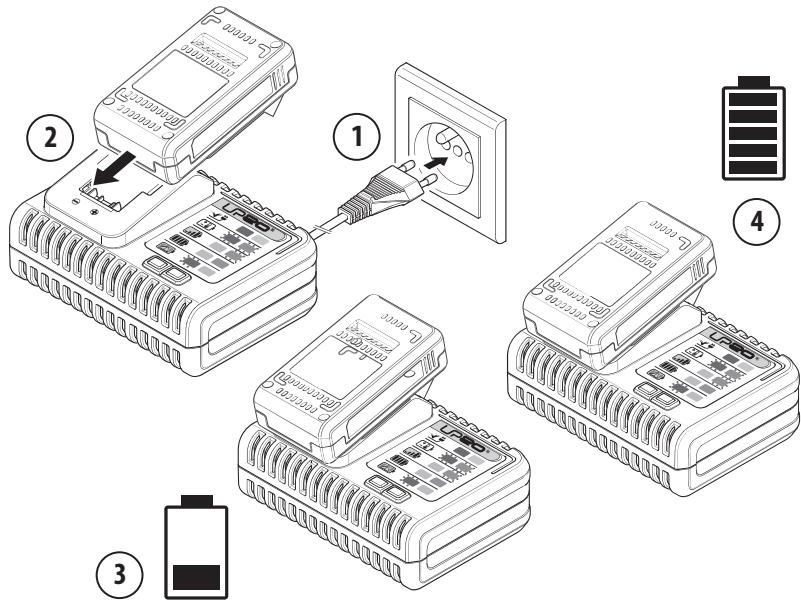
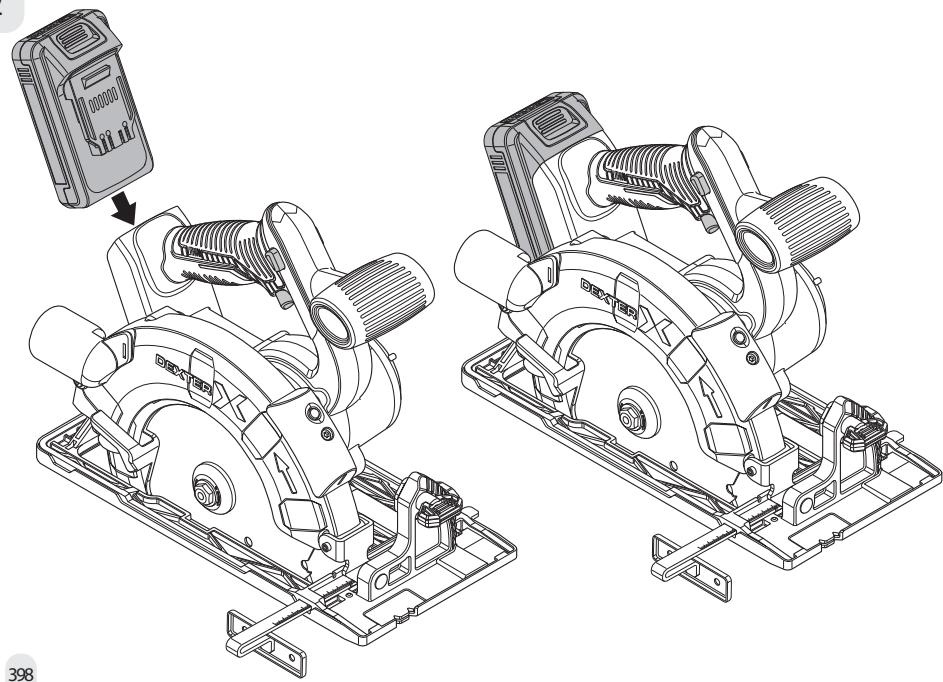
2
FR Ce produit est recyclable. S'il ne peut plus etre utilise, veillez l'apporter dans un centre de recyclage de déchets.
ES Este produit es reciclable. Si ya no se pueda usar, llévelo a un centro de reciclaje de residuos.
PT Este produits e reciclavel. Sedeero outilizar,entregue-oo num centro de reciclagem de residuos.
IT Questo prodotto più essere ricolato. Se deve essere smaltito, portalo presso un centro de reciclaggio.
EL Auto to npioov eivai avakukwioiu. Eav devi monei neov va xnoi moonoi the, metaapepe tnv o kanoio kevtov aavukkuaan anoppmuatuw.
PL Ten produkt poddawany jest recyclungowy, kiedy przystaje byc uzyteczny nalezy dostarczy go do punktu zbiórkó odpadów.
RU 3TOT npOdyKT moKet nepepa6aBbAbaCb. cEn h 60IbIe He npIroDcH dI IIOb3oBaHn, cIaJIte ERO B yTINImaIauHbI CEHTP.
K7 byn eHm kai Ta hndye TKeJeDi. Ohbyi KOnlaHaTbOJMaIbIbIaJa, Oh bai Ta HdTeHOpTaIbKaTaNcIbpyIbI3bl etHeMIs.
UJ Lel npodnykTo mepeopobnTcra. Jko BOHO 6bIue He c pndaTHe IaB MOKOPCTYBaHHa, 3aai Te Ioro B yTuNl3aunHm CEHTP.
RO Aceast produs este recicabil. Dacu nu mai poate t foosit, vugam sa i aducei t intr-un centru de reciclare a deseurilor.
BR Este produits e reciclavel. Se não puder mais ser uso, descarte em um centro de reciclagem de resíduos.
EN This product is recyclable. If it cannot be used anymore, please take it to waste recycling centre.


C∈EAC


Made in P.R.C. 2019
Imported by Adeo South Africa (PTY) LTD T/A Leroy Merlin
Leroy Merlin Greenstone Store
Corner Blackrock Street and Stoneridge Drive, Greenstone
Park East 2, Edenvale, 1610 Johannesburg, Gauteng, South Africa
「Jepya Mepen HKA3KCTHn XUJI K3A3KTHn Pecny6nIbAc50000,AmNAtbK, KOaehA KUoeiC,77,'ParkView'50,6,o.07ff
- AEITOYPTFIA
- TPIIONOIAZKOI
- MH XPHZIMOIOIEITE BENZINH.
- BEZPIECZENSTWO W MIEJSCU PRACY
- ABY WYKONAC CIECIE UKOSNE, NALEZY
- SKALA DLUGOSCI CIECIA
- PykoBODCTBO IO TEXHnke 6e3oNaChOCTN I npaBoOBbIM HopMaM
- UCIOBhbIE O603HAUYHNA
- KOMПЛЕКТ NOCTABКИ
- HA3HAUHNE AKKUMYJATOPHOI ZNPKUYAPHOI PIIJIbI DEXTER
- 3NEKTPOTEXHNUECKA BE30NACHOCTb
- 2.ИHCTPyKUЯ NO TEXHnke Be3OpACHOCTN
- JIiHJHABE3OJNACHOCTb
- 2.ИHCTPyKUЯ IO TEXHnKE B3OpACHOCTN
- NcIIOJIb3OBAHNE N O6CJIyXJUBAHNE 3JEKTPOHHCTPYMEHTA
- NCSIOJIb3OBAHNE N OBCJIYJXUBAHNE INHCTPymeHTA C IINTAHNIEM OT AKKUMyIaTOPA
- PEMOHT
- 2.ИHCTPyKUЯ NO TEXHnKE Be3OПACHOCTN
- HCHTPyKcIIN IO TEXHnke B30nAChOCTN IJIa IIJI JIOBOrTO TnPA
- PACINJINBAHNE
- ДОПОЛНТЕЛБHБIE UNHCTPyKцИ N O TEXHnKE B3OПАСHOCtI ДЯ BCEX ПИЛ
- 2.ИHCTPyKUЯ IO TEXHnKE Be3OПАCHOCTN
- ПылелУЛАВЛBAHИЕ
- 5.3KcIpyATAUIA
- PE3KA CO CKOWEHHOH KPOMKOH
- PEYUNPOBKA YTJA CKOCA KPOMKU
- 5.3KcPiJyATAUHA
- IPOPE3AHNE YTLYBJEHNI
- UKAJIA DINIHBI PE3AHNIA
- IcnoIb3OBAHne 6OKOBH HapBaJIoue nnlaHKn
- 6.06CJyKBAHNE
- OYNCTKA
- CNMBOJI
- 3MICT
- BUKOPUCTAHHЯ 3A ПИЗHAUYEHЯМ AKUMYJIATOPHOI БELITKOBOI ДИСКOBОI ПИЛКIN DEXTER
- Правлиа ТЕХИКи БЕЗPEKи
- IHNBIDYALbHA TEXHIKA 6E3NEKIN
- BVKOPNUCTAHHЯ TА Доглд 3A ELEKTPOIHCTPYMEHTOM
- ПРABИАТEXHIКБE3NEKIN
- ПРавILA TEXHIKи BE3NEKN
- BVKOPUCTAHNA TAOJIA 3A AKUMYJIATOPHIM IHCTPYMEHTOM
- O6CJyTOBYAHH
- IHCTPyKciI ΣOIO TEXHIKN B3NEKN DJIY BCIX NII
- PI3AHH
- 3.0NHC
- TEXHIYHI DAHI
- KHONIKA P036JIOKYBAHH
- TPNTEPHNIIEPEMKKAH
- BIDAA4A
- y6eperTncsB iD BiDaui, yHnKaTe HacTynHnx di:
- EKCIJIYATAUIA
- NIIbHI DICKN
- HE BKNOPUCTOBYTE BEH3NH.
- 3AXNCHA CNCTEMA NINlbHOrO DNCKA
- EKCNJYATAUIA
- 3AIIYCK/3UYNHKAДИСКOBOIПИКИ
- 3ynnka nllkn:
- 3ynnka nnnk:
- PEGYIIOBAHHI TINBHNN DNCKA
- EKCJIYATAZIДNCKOBOIПИКИ
- PONIEPEUHPO3NIIIOBAHH/IO3IOBHXHEPO3NIIIOBAHH
- KpinnenHHOTbOpyIINBuaJIeHHnnny
- 3AMIHA NINbHOrO INCKA
- TEXHlUHe ObCJyTOBvBAHn
- TPAHCIOPTYBAHH
- YCYHEHHA HECNPABHOCTEIN
- YTNJI3AUJIA TA INEPEPO6JIENH
- 3AXUCT IOBKINJIJI
- TAPAHTI
- IIPEEMOBA
- KEPI COKKbl CESENTPEI XHE OFAH KATbICTbl ECKEPTyJIeP
- KAYINCI3IK TEXHnikAcbIHbIH HYCKAYAPbl
- CAKTbIK ⅢAPAJIAPbIH OPbIHdAY APKblbl OHbIH AJDbIH AJYFA BOJaDbI:
- KAYINCI3IJK TEXHNIKACbIHbIH HYCKAYAPbl
- TOMEHIGCAKTAHdbIPfbIiXKAEBbIK FyHKcnaCbl
- Дэнгелек APAFA APHAЛFAH KOCbIMWAAPAHыI KAYINCI3ДIK HYCKAYJIAPbl
- KAYINCI3IK TEXHnKAcbIHbIH HYCKAYAPbl
- LWAH, WbIFAPY
- JIa3EPФункцясbl
- 3aTka 6afblTTamaHbI3
- 3.CNATTAMACbl
- 3.CHATTAMACbl
- TEXHnKAJIbIK DEPEKTEP
- KYJbINTAH BOCATY TYIMECI
- AYbICTblPbIN-KOCKblu
- KEPI COKkbl
- Kepi cokkbiadn Kopfany yuih, Kelenci epeketepdi opbHdaMaHb3:
- Kepi cokkbl Mymkiinirih a3aity yuih, Keleci Kayincizdk epekeTepin opbHdaHb3:
- Пайдалану
- APA JY3JDEPI
- BEH3INHДI PAIДАЛAHSAHbI3.
- TA3AJIAY
- XOHHEY XMYMBICTAPbl
- CAKTAY XOHE KÖDEFE XAPATY
- TACbIMANDAY
- KOPUJAFAH OPTAHbI KOPFAY
- KENJIJIK
- KIPICNE
- MAHbI3DbI! OCbl ΘHIMDI ΠΑΙДΑΙΑΝΥΑΙΙΙΑ OCbI HΚΚΑΥΙΙΚΤbl OKblIT ΜυIFbIHbI3, HEI3ΓI KAVINCI3ДΙΚ ECKEPTYJIΕPIH KAPAΗbI3 XΟΗ MΚΙΑRT CAKTAHbI3.
- Keninik
- KENIIJIK
- БОЛIKTEР TI3IMI БОИБIHSHAЕXFEN-TEXFENJI KÖPIHIC
- EK CÖÜNKECTIK DEKLAPAUÇUÇBİ
- ADEO Services 135 Rue Sadi Carnot - CS 00001 59790 RONCHIN - Фразця
- REGLAREA UNGHIULUI INCLINAT
- SYMBOLS
- CONTENTS
- INTENDED USE OF DEXTER CORDLESS CIRCULAR SAW
- SAFETY INSTRUCTIONS
- GENERAL POWER TOOL SAFETY WARNINGS
- WORK AREA SAFETY
- ELECTRICAL SAFETY
- PERSONAL SAFETY
- POWER TOOL USE AND CARE
- BATTERY TOOL USE AND CARE
- SERVICE
- SAFETY INSTRUCTIONS FOR ALL SAWS
- CUTTING PROCEDURES
- FURTHER SAFETY INSTRUCTIONS FOR ALL SAWS
- KICKBACK CAUSES AND RELATED WARNINGS
- KICKBACK IS THE RESULT OF SAW MISUSE AND/OR INCORRECT OPERATING PROCEDURES OR CONDITIONS AND CAN BE AVOIDED BY TAKING PROPER PRECAUTIONS AS GIVEN BELOW.
- LOWER GUARD FUNCTION
- ADDITIONAL SPECIFIC SAFETY INSTRUCTIONS FOR CIRCULAR SAW
- DUST EXTRACTION
- LASER FUNCTION
- 3.DESCRIPTION
- TECHNICAL DATA
- OPERATION
- INSTALLING/REMOVING BATTERY PACK
- To install:
- To remove:
- LOCK-OFF BUTTON
- SWITCH TRIGGER
- KICKBACK
- To guard against kickback, avoid dangerous practices such as the following:
- To lessen the chance of kickback, follow these safety practices:
- SAW BLADES
- DO NOT USE GASOLINE.
- BLADE GUARD SYSTEM
- STARTING/STOPPING THE SAW
- To start the saw:
- ADJUSTING BLADE DEPTH
- OPERATING THE SAW
- 5.OPERATION
- To make the best possible cut, follow these helpful hints:
- CROSS CUTTING/RIP CUTTING
- RIP CUTTING
- BEVEL CUTTING
- ADJUSTING THE BEVEL SETTING
- TO BEVEL CUT
- POCKET CUTTING
- LENGTH OF CUT SCALE
- OPTIONAL EDGE GUIDE FENCE
- To assemble edge guide fence:
- To use edge guide fence:
- OPTIONAL DUST EXTRACTION PORT
- To attach dust extraction port:
- CHANGING THE SAW BLADE
- MAINTENANCE
- CLEANING
- REPAIRS
- STORAGE & DISPOSAL
- TRANSPORTATION
- TROUBLESHOOTING
- DISPOSAL AND RECYCLING
- ENVIRONMENTAL PROTECTION
- WARRANTY
- PREFACE
- IMPORTANT! PLEASE READ THIS MANUAL BEFORE USING THIS PRODUCT, FOLLOW THE BASIC SAFETY WARNINGS WITHIN, AND KEEP IT CAREFULLY.
- Warranty
- EXPLODED VIEW WITH PART LIST
- EC DECLARATION OF CONFORMITY
Brand : DEXTER
Model : UP20 BRUSHLESS - 20VCIS3-190BL.1
Category : Cordless circular saw