USER MANUAL UP40 - 40 VLM2 - 36P.1 STERWINS
Illustration 6.1 a 6.8
Illustration 6.1 a 6.9
10.1 A NOSSA GARANTIA
oAec tic npoeiobonoioeic kai tic odnyiec yia eAlovtikn
2.1 TENIKEZ OADHIEE AΣΦAΛEIAZ
Mn 8eTe OE ioupyia to npoiov kovt a e yuaiivouc neippayevouc xwpoc, autokivnta, optnya, owtaywouc, xwpoc napadoonc k.l. xwpic va exi puthetai oomega o toxoc eodou.
Mny epiapuvete n unepwpotwve to npoiov. To npoiov tha exi kautepn kai aopaaetepn ano doon otav xpoiuonoietai otnv taxutnta yia tnv onoa exei oxediaotei va aeitoupye.
Eav to npoiov exi nOn ouvapuoloyntheta, eaoaiaote oI oLc oI bioc eouov owixte kala npiv tn xphon. Eav to npoiov npenei va ouvapuoloyntheta i ano eoac, eaoaiaote kata to avioyma tnc ouokevaaic otnpexovtaol a ta eaptntmuata nov anaitouvtai yia tn ouvapuoloynon tou npoiovtoc. Av to npoiov exei nmuec n Eaattwmuata, mnu to xpnoipoiinoeKai enotpepTE to 0TO nnoiieoTepo kataoTma.
- 0 opoc «ηλεκτρίκο εργαλείο» στις προειδοποινεις αναφέρεται στο ηλεκτρίκο ας εργαλείο που λειτουργεί είτε με σύνδεση στην πρίζα (με καλώδιο) είτε με μιπατapiες (χωρίς καλώδιο).
10.1 H E I Y H Σ H M A Σ
Ta npoiovta tnc STERWINS i ovt aE Tc uNlOTepe npo8iaypaefc noIOTnTac yia tnV katavaawtki nyopá. H napouoaa yyyunon nwnlonnc kaluntie mnaepiodo 3 etwv ano tv nuepounvia nwnonctou npoiovtoc. H napouoaa yyyunon kauutnte ola ta ealattwmuata oe ulika kai kataokueu: Eapntmuata kai otoixia tou aeinoukui nucnpuokuttou uno quiolooyke ouvthetake xpnoc. OI eniokeuec kai naivkataaotaen eapntmuatwve dvouenayovta npatao ntc apxiknc nepiobou eyyunoc. Pnei va mnpoeite vnapexetaneo6eien tnc ayopac autou npoiovtoc kai tnc oxetiknc nuepounviac. H kaluyn tnc yyyunon npiopiicetai otnv aiauto tou npoiovtoc.
10.2 EIAPESEIE TH ΕΓΥHΣH
H npouo aeyunon 8ev kaunpti npoBnaata n oumuavta nou opeilovtai elambdaovn xpnon tou npoiovtoc.
Ta napakatw eio8 dev kaluntovta a o tv yyyunon:
-To epyaieo exei xpoiioiogei ie aovtpo n
-Exouv npokuieic nmuec kat a th metapopa n tyn ykataota auto tou npoiovtoc n
Eoxuv kTealeoTei ano tpiouc epyaoic EIOKEuNC /kai avtikataotaeic n
-Exi npokanEi nmu ano Eomegaoc npayovtec n Eva ouata, onwc amoc n tpec n
-Exou npokuiei cniuec aon un oumopwpwn e tic odnyie cospalac kai xphonc n
To epyaIeio exei anoouvapuOIoyno i n aoixTei n
-To epyaiao _i _i oE uypo nepiBaalov (uypaia, bpoxn, buToon ovepok.
-To epyaIeio exi xpnoiouointheta iia enayyemaikocoko n
- To εργαλειο ἐχει έκτεθείσε μία θερμοκρασία εκτός του καθορισένου εύρους στο κεφάλαιο «Aποθήκευση»
To npoiov npenei va xpnaiopnoieitai uno kavovikc ouvthetakec kai yia un etayvelambdaikooc okoouc. Suvenoc, ano autn tvv eyyunon ecaipouvtai npoiovta nou xnpoiopoiouvta ano etaipieec diapopwocn kntw, toniKec apxec, kaowc kai ano etaipiec nou voikiaouv napaxwpovdomegaev Egonlaio.
International Project Quality Leader
ADEO Services
135 Rue Sadi Carnot
CS 00001 59790 Ronchin, France
2.2 SYMBOLE NA PRODUKCIE

10.1 NASZA GWARANCJA
10.2 ELEMENTY NIE OBJECTE GWARANCJA
Cpok cnjx6b1 (r):5net
KoNIO cepTnOikata COOTBeTCTBnI NII DeKnapauIN O COOTBeTCTBnI Ha DaHHbI TOBAP MOXHO
IOnyUHTb Ha INHΦOpMaζIOHNo CToIe IIO6Oro n3 MaIa3INOB Iepya MepIeN BocTOK.
Data ny6mkaunn nHctpykuun: 09/2019
Blaqoapum 3a npno6peTHe HeAeOu3dEInn. Pnpa3pa60ke n3rOToBLeHn Hawei npOdyKmMb HnpaBnem Bce yCnInna Ho oecneueHne npebocxodHoro KaeeCTBa, KOtope OTbeeaet NtPe6HoCTM nIb3OBateJe. Co6IIOeHne 3TNX INCTpyKUn IONBOINOT ONIMUNPOBaT cPOK Cnyk6bl yCTPoIcTBa. BAXHO! DJII NOUYEHNMAKCIMALbHO YOBJETBOPEHHOCTN OT DAHHORO N3DEInn IPN HACTPOIKe, 3KCIyATAUHN IOBCLYKBAHMN Mbl PEKOMEHNyEM BHIMATEJbHO IPOHTATb DAHHOE PYKOBODCTBO IPEED NCIOJIb3OBAHMEM YCTPOIcTB.AOBPATITE BHIMAHNE HA OCHOBHbIE IPEyIPKEJDEHN OTHOCITEJbHO BE3OJACHOCTN, CODEPKAunEeCB B DAHHOM PYKOBODCTBE, IN COXPAHNT ERO dIra IIOCEyIOUeEO IcNOJIb3OBAHN.

BAJXHO! COXPAHNTE DAHHOE PYKOBODCTBO IJI YIPOCSLEYIOUSEO ICNOJb3OBAHNA. INPOVTNE BHIMATEJIbHO.
Copepkanme
- Ha3haueHne aKKymyIaTOpHoi ra3OHOKOcJKN 36 cm
2.Инструкеля no Текниke 6e3oNaChocHTN
- TexHnueckne xapaKTePncTtIKN
- C6opka
-
TpaHcnopTnpOBka
-
Copepkahan 3nmoi
- XpaHeHne
- 06cnykBaHne
- OkohuaHne cpoKa cnJx6bl
10.「apaHTnIa
11.Деклараци COOTBETCTBNY HOPMaM EC
1. HA3HAUHHENAEKKUMYJATOPHOI RA3OHOKOJIKN 36 CM
3To yctpoiCTBO npedha3HaeHO TolbKO DnI NCpONb3OBAHnHa OTKpbITOM BO3dyXe Hn npin KaKnx YcNOBHX He DoJxHO NcPONb3OBAtbc BByTpN NOMeUeHn. AkkymyIaTOpHna ra3OHOKocuika npedha3HaueHa DnI NCpONb3OBAHnTObKO B cyuxn X xopoSo OCBeUeHHbIX MeCTax. DaHHaRa3OHOKocuika npedha3HaueHa TObKO DnI CkaUNBaHn TpaBb I DomauHnx CaJax. He nCpONb3yIteYcTPOCTBO DnI dpyrnx ZeJe. YcTPOICTBO He npedha3HaueHo DnI NCpONb3OBAHn DeTbMn IIN IInIaMm COrpaHnueHHbIMnΦn3UeCKMN, YMCTBeHHbIMn INI CEHCOPbIMn BO3MOXHOCTAMN.
Iocne paacnakokBKN y6eDntecb, YTO BCE akceccyapbl (ecnnpedymOTpeHbl) IMeOTCB HaJIuHm. Ecnn yCtpoiCTBO NOBpeKdEHO IIN IMeET KaKNe-JIn6o HeNCnPabHocTn, He NcPOnb3yIte erO n BepHnTe o6paTHo npodabuy.
Ppi nepedaue yctpoiCTBa dpyrnm liuam nepedaBaiTe taXke i daHnoe pykoBOdCTBO.
POMHnTe, yTo haWe o6OpydoBAHne He npEHa3NaHeO dIg NcNoIb3oBaHnB KOMMepuecknx, ToproBbIX nII npOmblNeHHbIX cIeJx. TapaHTn 6ydt aHHyInpOBaHa, eCNI INCTpyMeHT nCNoIb3yeTcB KOMMpeUeCKnx, TopROBbIX nII npOmblNeHHbIX cIeJx nII dJI NOo6hIx HjXd. DaHHoe ycTpoCTBO paccuTaHO h EKcNlyatauIO B TeueHne 6 JeT (OxNuIaembl cPoK cIyXkbI).
2. ИНСТРУКЦИ NO TEXHINKE БEЗПАСHОCTN

PPEyPExEHN. IpoTuTae Bce PpeynpeXeHnI INCTpyKuI NO Texnke 6e3OpacHOCTN. HecO6JIIODeHne 3TNX PpeynpeXeHn I INCTpyKuIM MoKeT npINBeCTN K nopaxKeHIO 3JleKtpnueckm TOKOM, noxapU (nn) TAgKeBIM TpaBMam.
CoxpaHnte Bce npedynipexdEHHN HnHCTpyKcN dIy nCpOJIb30BaHnB 6yduem.
2.1 OBJIIE INPEIOCTEPEXEHNIOB ONACHOCTN
- He nCnoB3yIte yCTpoiCTBO B6IIm3n CTekJIaHHbIX OrpaXdEHI, aTOMo6Unei, rpy3OBuKOB, OKOH, KOIOJcEВ, NOIbe3IOB I T.Д. 6e3 COOTBeTCTByIOSeH NaCTPOIK HAnpaBHeHn Bbl6pOca.
- He npinara Te Upe3Mepbix ycniln n He nepeperpkaite TprMMep. YcTroiCTBO pa60taet lyuwe n 6e3oNachee B TOM pexmme,ДЯ KOtOpO OHO ppeHa3NaheNo.
- Ecni yctpoiCTBO yxe co6paHO, nepei nCnOJIb3OBAHHeM y6eIITecB, YTO BCE BInHTbI NaDeJXHO 3aKpeIIeHbI. EcNI yCTpoiCTBO Tpe6yET c6OpKn, PnB BCKpbITmU yNaKOBKn y6eIITecB, YTO BCE 3JIeMeHbI, He06xOIMMbIe IJN yCTaHOBKn yCTPOICTBa, IMeIoTcB HAnuH. EcNI yCTpoiCTBO NOBpeJXdeHO mnn ImeeT HeNCpABHOCTN, He nCNoJIb3yIteero N BepHnte 6oPaTHO B MaRa3HN.
- TepMNH «элкtpoHcTpymeHT»Впрдунржденях O3нчаetэлкtpuYeCKn INHcTpymeT CпNTaHnEM OT cETN(cKa6eNem)ИЛNэлкtpuYeCKn INHcTpymeHT CпNTaHnEM OT aKKyMylЯTopa(6e3 Ka6eN).
2.2 CIMBOJIbI HA YCTPOICTBE

COOTBETCTBYET eBPOneiCKM CTaHdApTAM. 3TOT CmMBOJ O3Haayet, YTO DaHHoe yCTpOietBO COOTBETCTBYET DeIeCTBYUoIM eBPOneiCKM DnpeKTINBaM I 6bJIIO npOBepHo HA COOTBETCTBNE 3TIM DNPEKTIbAM.

EINbI 3nak o6paueHn IpoDyKuHn Ha pblHke roCyapCTB-HeHOB TaMoXeHHoro co103a.

YkpaHnckn 3HaK COOTBCTBNA.
He bIb6paBbAaTe 3eKtpnueckne n3dJIIN BMeCTe C 6bTObIMN OTXoAMN.
UcNoIb3OBaHbIe 3eKtpnueckne n3dJIIN DOJNXbI cO6nPaTcB OTeJbHO u
yTNIn3IPoBaTaCBy BnyHKtax c6Opa, npdeYcMTopeHHbIX dJIy 3TxN ceJeI. IJIy PONyEHHa
peKOMeHdaIaII NO yTNIn3aIuN o6paTntEcB MeCThBe OPraHbI BnactNI INI B MaRa3IH.


Ipeed nCIOJIb3OBAHnEM I3dEINNA BHNMaTeJIbHO IpOHTaJIe BCE INHCTpyKcIMn IN CNeJyTe BCem npEynPepXDeHnM INpabNAM texHKn6e30NaCHOCTn.

*Universal: coBmecTmocTb Tólbko C n3děnmaMn Sterwins UP40, Lexman UP40 n Dexter UP40.
IPX1
Knaac 3aunTbI OT BlaH

TapaHTnpOBaHHbIyPOBeHb 3ByKOBoMooHocTN (PpOBepeH B COOTBeTCTBm C DnpeKtBuBo 2000/14/EC B peJaCun 2005/88/EC).

He noDBepraIte yCTpoiCTBO BO3dEiCTBIO IOJxIy IIN BLaJxHocTn.
Bybte octopokhbl npn obaeHN C octpbIMn pekyuMM nIeMeHTAMn. Iocne OTKIOUeHnY DVBrAteNlpekyuNt neIeMeHTbI npOOnJkaOT BpaaTbcry. N3BNeKeITe BVILKy n3 pO3ETKn PpeD BvINONHeHnEM 06cnykuaHn.
He noDnyckaIte 6nI3Ko noCTopoHnIX.
He donyckaIte koTakTa rIbKoro Ka6eI nIaTHnC pexJuImm NlemeHTAMM.
2.3 YCJIOBHBIE OBO3HAUENBAHNOHM PYKOBOIDCTBE

TnN nIcToUHnK onaCHOCTn. HecO6JIIOeHHe daHHoro npeDynpexJdeHn moKeT npuBeCTn K cepbe3hBIM TpaBMam IIN CMEptn.

TIN N INCTOUYHK ONAChOCTN. 3TOT CUMBOL Yka3bIBAET Ha TO, YTO Hec6NIIOJeHNE daHHOROpnpdyIpexJdeHnMAoKeT npNBcETN K NOBpeKdHnU yCTpOJCTBa,HaHeceHnU yuepe6aOKpyjuaIoSe cpeDe nn DpyrOmy mMyuiceCTBy.

Примочаим.ЭТOTСИМВОЛобOSTHAчaelВaxKHyIO INHΦOPMaциДЯлушero NOHIMAHNA pa6Oы yCTpoIcTBa.

IpouHTaTe pyKOBOdCTBO.3OT CmB0J yKa3bIbAeT Ha TO, YTO Heo6XoIMO BHNMaTeJIbHO npOHTaTb pyKOBOdCTBO NOJIb3OBAteJIa.

Cm. COOTBETCTBYUOUI pncyHOK B KOHcE 6yKJIeta.

I3BneKaIte akkymyIaTOp BO Bpem TpaHcnpTIpOBKn, xpaHeHn, pMoHTa n OChCTKn.

3eHaeTouka.Ytunl3aunyynakOBKn.

3To n3dJIe NpIeJNt Nepepa6OKe. EcIn OHO 60JIbIe He npriroHOn IJa IcNoJIb3OBAHnA, cdaIte erO B ceHTp nepepa6OTKn OTXoIDOB.

Bpa3nIbckn 3KoIognueckn 3HaK: yTnnI3npyTe daHHe n3dene.
DESCARTE SELETIVO

Bpa3nIbckn 3KoJorHueckn 3HaK: yTnIuN3npyTe yNaKOBky n3dennia.
2.4 6301ACHOCTb PA6O7E0 MECTA
106yueHne
- BHIMaTeIbHo IpoUHTaIte INHCTpyKcIu. OcBoITecb c opraHAmn yIpaBHeHna HauYtEc b IpaBnIbHo nOJIb30BaTbCBy UCTPOICTBOM.
- HNKoRJa He I03B0JaiTe I0JIb3OBAtbcr yCTpoiCtBOM DeTAM NII JIOdAm, He 3HaKombim C 3TUMN INHCTpykUmaM. MeCThBiE HopMbI MoryT OpraHnUbaTb B03paCT onepaTopa.
He nCnoB3yIe yCTpoIcTBO,ecn pAdom haoJraTcIIOi (oco6ehHO neTu) nnXIBOTbIe.
- ПомнITE, чTO onepaTop ИИ Вlaадел ec HeCyT OTBETCTBEHHOCTb 3a HeCuaCThIe ClyuAIn yUepe6,HaHeceHHbI dpyrIM IIOdAm IIN INx IMUseCTBy.
2IoJroTobKa
-Дя pa60tby c yctpoiCTBOM BcERda HaIeBaIte npOHy 06yBb I dIINHbIe 6pIOKn. He pa60taIte c yctpoiCTBOM 6ocIKom nII B OTKpbIbIX caHaJnx. He haIeBaIte CBO6OHyIOIINHHyO OJeKdy, a TaKx e OJeKdy CO CBnCaIOUIMM 3aB3KaMn IIN peMHrMn.
TuaTeIbHO OCMOTPnTe yUaCTOK, Ige 6yET nCnOlb30BaTbCra 6obpyoBaHne, n ydaJInte BCE npEMeTbl, KOToPbIe MOrYt 6bITb Bbl6poWeHbl MaunHoN.
- Параюв Всматпав TeЯ3BVE, ero 60NTbI N BeCb y3eJЯ3BnHa Na HAnuHpe npuzHakOB u3HOca uNIOBpeXdEHN. 3aMeHЯTe u3HOseHbIe INOBpeXdEHbIe KOMNoHeHTb Cpa3y KOMPJIeKToM, YTObI He HapUaTb 6aJaHCupOBky. 3aMeHЯTe NOBpeXdEHbIe N Hepa36OpuHBIe 3TNKeTKI.
- Паранлрабы поверпькабь питани удинтельнь кабь на нашие поврждени иизюса.В сныае повржденя кабь питань BO Врем рабы немедлени OTоCoEDINHTe BILky OT nctOchnka питаня. HE ПИКACAJTECb K KABELIOПITAΗ, KOrDA OH HAXODITcЯ ПОД HAPRJXEHEM. He nspoIb3yte yctpoiCTBO, ecni Kaбь поврждени иnmMeET npu3HaKn 3Hoca.
3Исповьогане
Pa6oTaIeToIbko npu IHeBHom CBTe nIIN XOPOWeM NCKYcCTBeHHOM OCBeUeHIn.
- He nCnoJb3yIte ra3OHOKocuNKa HbIaJXHO TpaBe.
- Ha ckNoHax Bcerda Cnejte 3a TeM, YTO6bI HAXOJNbCBy BYCTOJNUBOM NIOJXeHN.
-Передвига'tecьшаг,небergа'te.
-ДИВИАЙТЕСТOLЛБКО ПОЕРК ПОВЕХNOCHTССКLOHOB,a He BBePx N BHN3.
-Будыоченихныпи пелемеHa npabaileняДвижени поСклоу.
- He Kocnte Ha CnIIuKOM KpyTbIX CKJIOHaX.
- Bydte npedeIbH0 octopoxHbI, DBnraCb 3aHIM XoIOM IIN nepemeuca yctpoiCTBO no HappaBneHIO K ce6e.
- Прждуем Накноит bустpoиctBO Дя Транспортувки чез HeТравянstый учадок Или поимecтntb сонloroобразываимо учадка на другов, OCTaHOВNTe Врашюшиеса ржшце щлелментbl.
He nCnoB3yIte yCTpoIcTBO,ecnIOBpeXJeHbI uNTKN,aTaKxE ecn He yCTaHOBJIeHbI 3aUHTbIe OrpaXdEHHN (uIN) KOHTeHep dIra c6Opa TpaBbl.
- BkIIOUHTe IIBURATEIb B COOTBECTBm C INHCTpyKuIeH. HOrn DoJIxHbI HaxOJNTbcra Ha 6e30aNCHOM pACCTOAHM OT peKyuux əJIeMeHTOB.
- He haKIOHJIte yCTPOIcTBO npu BKIOUeHIM DBNrATeJIa, ecNI npOeDpya 3anycka 3tOrO He Tpe6yET. B 3tOM cIyuae haKIOHJIte yCTPOIcTBO B CTOPOHу OT Ce6Y IN He BblIe, Yem Tpe6yETc.
- He 3anyckaite yctpoiCTBO, cTOr nepeI pa3rpy3OHybIM OTBepCTnEM.
-Держinte pyknиноги падьшо ot Bpaaiouxcxd deTaJIe. HNKoIa He cToite Bo3ne pa3rpy30uHoro OTBepCTnIa.
- He BBINOJIHЯIe TpaHCnOptInpOBky yCTpoiCtBa, NOKJIIOUeHHOro K IcTOnHInKy NITaHn.
- OctahOBIne yCtpoiCTBO n N3BNeKIne BnKy n3 po3eKn. B cIeNyIoXnCnyaX Heo6xOJIMo DoJDaTbCn POnHoi OCTaHOBKn BCex DnJxUxxCra YAcTe:
- OctaHOBnTe yCtpoiCTBO nI3BnEKeNte oTKJIouHaOuSe e yCtpoiCTBO. B cIeNyUoXnCSlyaX He06XoIMo DoJDaTbCn POnHO OCTaHOBKn BCex DnKxUxxCs qAteY:
-KOrIaOTXoIuTEOTyCTPOIcTbA;
-пегд очinctко засореньи и оочстков pa3rpy3ochnoro кениба;
-пегд поверков, оочстков улл обслухиванем устюctва;
- NOCS TE CToJKNHOBeHnC NocToPOHHm PpeDMeTOM. IpeD IOBTOPbIM 3aIyCKOM n EKcJIpyaTaUneOcmOTpnte yCTpoiCTBO Ha NaJIuYne NOBpeXdHn IN npN Heo6xOdImOCTn OTpeMOHTnpuYTe;
B Cnyae Upe3MepHoi Bn6paunu yctpoiCTBa (npoBepbTe He3aMeIInTeIbHo);
- npOBepeHaHaJIuHneIOBpeXdEHH;
- 3aMeHInTe IJIN OTpeMOHTpyIte IOBpeXdEHHbIe DeTaJI;
-Проберын лимуче плохо зakpenлених частей и при необховимости 3атянITE IX.
4.06cnyxmbaHne n xpaHeHne
CneiTe 3a Tem, yTo6bI BCE raIKN, 60NTbI IN BnHTbI 6blIN PIIOTHO 3aTAYtB1 — 3TO 06ecneuT 6e3OanchyU pa60Tu yctpoiCTBa.
- Perylaryphno npoBepyIe KOHTeHep dJa c6opa TpaBbI Ha HaNuYne npn3HaKOB n3HOca nnIOBpeXdEHH.
- Co6JIIOJaIte octopOxHocTb npu nCNOJb3OBaHm MOJeIe C HeCKoJIbKIMn peXyUIMM 3JIeMeHTaMn, TAK KAK BpaIeHne OndHO rpeXyUeTo 3JIeMeHTa MoXeT cNoC06CTBOBaTb BpaIeHIO OCTaJIbHbIX.
- Co6JIIOaIte octopoxhoCTb BO BpeMpeRyIInpOBKn yCTpoiCTBa, YTO6bl NaIbCuI He 3aCTpAIM MekDy BpaAioUcIMnCpeKyuImN 3JeMeHTAmN IN HeIOdBNXHbIMN qACTMaN yCTpoiCTBa.
- Парадnomeшемустpoиства нахранец BCERда дожидайтесь,пoka OHO OCTbIHET.
- Пи Вьлолнени сервс Horо облужина ржунх даме MTOB nOMHITE,чTO OMH MOrTy npodolkaTb BpaaTbca Даме NOcIe OTKIOUeHn ICTOCHNk PNTaHn.
BceJx 6e30nacHOCTN 3aMeHnIte n3HOuEHHbIe I NOBpeXdEHHbIe DeTALN.
IncnoJIb3yIte TOnbKO opurHaJIbHbIe 3aIuaCTN aKCEccyapbl.
- 06ecneuthe nictoty u oCbeueHHoctb pa6ooyero Mecta. 3arpomoxdeHHbIe I pIoXO OCBeueHHbIe MeCTa CnykAT npuHNOH HeCuaCThBIX CnyuaEB.
He
- IcnoJIb3yIte 3JKeKtpOnHCTpyMeHTbl BO B3pbIBOOpaChbIX MeCTax, HapPIMep B6JIu3N IropUCHX JnDkoCTe, ra3OB nII nBJIIN. 3JKeKtpOnHCTpyMeHTbl rHepepuyOT NCKpbI, KOTOpBle MOrYT BocPiMaMeHtB PbIb nII INCnapEHHa.
- He no3B0JIe TETAM N NOCTOPOHnM HaxOuTbCBA6bIaIOUeTo əJIeKTPoIHcTpymEHTA. OTBLeKaIOUe ΦaKTopb MOrTy PnIBecTn K IOTepe KOHTpOJIa.
2.5 ΘJEKTPOTEXHnueCKA BE3OnACHOCTb

IPEdYPEXKDEHNE! 3To yCTpOiCTBO co3daet BO BpeMa pa60tbl3JIeKtpOMarHnHTHOeNoJIe!3To1oJIeNpOINpeDeJIeHHbIX 06CTOaTeJIbCTBax MOKeT BnIaTb Ha pa60Ty aKTNBHbIX IINI naCCMBbIX MedUcHckNX UMMNaHTaTOB. YTO6bl COKpaNTb PnCK cepBe3HbIX IINI CMEpTeJIbHbIX TpaBM, nepeI NcPOJb3OBAHHeM 3TOrO yCTpOiCTBa IInca C MedUcHckIMN MMIIaHTaAMN DoJIxHbI IPOKOHcyJIbTIpOBAbTcC BpaQOM I pON3BOdITeJIem MedUcHCKOTO IMNlaHTaTa.
- He noDBepraTe əJIeKtpOnHCTpyMeHTbI BO3dEiCTBnIO DoJxJa NII IN BlaRn. IprI nonaHaHn BObl B əJIeKtpOnHCTpyMeHt yBéJIuHNaEtCra pNCK nopaxeHnA əJIeKtpnueckm TOKOM.
2.6 JIuHABe3OJNACHOCTb
- Пи ИСПОЛБЗВАИМ 3ЛЕКТРОИНСТРУМЕТА 6уДte 6ДИТЕЛБнБИ, СLEДпTE 3a CBОИМДеICTBWAIMN ИСLEДУМЕЗДРавOMY CMыICNY. He ПОЛБ3уTecь 3ЛЕКТРОИНСТРУМENTOM, ECSI Bbl UCTaJI NII HAXODITCEb ПОД BO3ДeJCTBnEM HApKOTIKOB, aIKOFOJI NII MEДИКAMENTOB. Ддж КраТКOBpeMeHHЯ HeBHUMaTeЛьHOCtB рп рабOTe C 3ЛЕКТРОИНСТРУМENTOM может ппВЕСТС K TяЖЕЛБМ TpaBMam.
- IcnoIb3yIte cpeCTBa INHINBnDyalbHOJ 3aunTbI. Bcerda nCnoIb3yIte 3aunTHbIe cpeCTBa IJIra Tla3. IcnoIb3OBAHne 3aunTHoro 6OpUdoBAHn, TaKOrO KaK npOTNBOJIeBAar MaCKa, HeCKoJIb3KaJ pPeIOxpaHITeJIbHaJ 06yBb, JecTKaJ KAcKa NIIu YCTpoIcTBa 3aunTbI opRAHOB CnyxA B COOTBeTCTByUQnx YcNoBHX UMeHBsAet PnCK TpaBMnPOBaHn.
- He donyckaite HepeBndeHbIX 3aynckOB. Npeep noKluyeHneM nHcTpymHa K cTeN pHTAHIA (nnn akKmnyATopy) npeep ero nepenockoy6eNTecb, YTO BbIKNoaTeJIb HaxOINTCB B BbIKNoeyHHom noloxeHN. He depXIne naIeuc Ha
BbIKIIOuAteNe npn IpeHocKe 3JIeKTPoINHCTpyMeHTOB n He BkIIOuaIte BUNKy B pO3eTKy, ECIN 3JIeKTPoINHCTpyMeHT BKIOUeH. 3TO MOxET npNBECTN K HecCaCTHOMy CInyaHO.
- He tānntecb. Bcerda coxpañyte yctoynBOe noLoXeHne n paBHObecne. ΘTo no3BOJNT lyuIe KOHTpOJInpOBAtB əJIeKTpOINHCTpyMeH T HEnpeDBInDeHHbIX CNTyaIaIax.
- Пелег вклочецим лектуонстумента снготуrelуширьочны Инстумены и гаechные клочи. Perуширочны INHCTPUMENTИRL RAECHNYK, OCTaBLeHHbI Na Bpaaioошся чASTN lneKTPOINHCTPUMENTa, MoXeT CTaTb npuHNoT TpaBMbl.
- He npiklaabIbaiTe K 3neKtpOnHCTpyMeHTy Upe3MePnbix ycuiu. IcnoIb3yIte PoiXoJaIiDnI BaIiXx 3aDaay 3neKtpOnHCTpyMeHT. IpaBilbHO Bbl6paHHbI 3neKtpOnHCTpyMeHT 6oJIe e 3phiKtUBeH n 6eOanCeH npi HOMHaJIbHOHarpy3Ke.
- IcnoIb3yUte 3JIeKTPoHnCTpyMeHT, aKCECCyApbl, HacaIKN T. N. B COOTBeTCTBUN C 3TUMN INHCTpyKUZMAH, yuNTbIBaY UcIOBNA IN CpezINΦUky BbyIOJHReMOJ pa60TbI. IcnoIb3OBAHHe 3JIeKTPoHnCTpyMeHT dJa BbyIOJHHeHry He npEpyCMOTpeHHbIX OepaCNI MOKeT pInBecTI K ONaChbIM cTuTaZmaM.
- OndeBaIteCb HndJexaUIM o6pa3OM. He HandeBaIte CbO6oHny OJexdy uYkpaUeHnA. DepeXtBe BOLocbl, OJexdy n nepaTkn NpOaNbIe OT DBrNcxCyaCTe. CbO6oHna OJexda, yKpaSeHnA IN DInHHbIe BOLOcbl MOrTy IOnaTb B DBrNcxNeecr YaCTn.
2.7 INCIOJIb3OBAHHe N O6CJyXKUBAHHe 3JEKTPOHCTPymeHTA
B HeKoTOpbIx perNoHax DeiCTbYIOt HopMaTHBhIe aKTbI, OrpaHmUBAIOuIe IcnoJIb3OBAHHe yCToIcTbA B HeKoTOpbIX pIoceccax.ДЯ nOlyueHnДОpONHTeHOBn IHΦOpMaun O6paTITecb B MeCTHbI OprAhbl BlaCTN.
- He no3B0JaIte nCNoJIb3OBAbT daHHOe yCTpoIcTB OTeaM, IuCaM C NOHIXeHHbIMN fI3nueckmM, ceHCOPbIMN UIN YMCtBeHHbIMN CnOC6HoCTaM NIN IMeIOUIMN HeIOCTaOHTbI ONbIT INI 3HaHIna JIoDAM, He 3HaKOMbIM C 3TImN INHCTpyKzmaM. MeCThIbe HopMbI MOrYt ORpaHUnVBaT B03pact onepataop.
- ПомнITE, чTO onepaTop ИИ Вlaадел ec HeCyT OTBETCTBeHHOCt b 3a HeCuaCTHbIe ClyuAи ушерб, наhecehнь ДругIM ЛюдЯ ИИ NIX IMUseCTBy.
- Посторонни Люд, Дети и львOTье дожны на paстони He Mehee 15 M ot знblпьзOBAHЯ усточа. Рп пояВлени на учаске посторони LXIUC octahOBITE uсточBO.
Pa6oTaIe C yCTPOiCTBOM B IIOUHoi O6yBn I DIIHHbIX 6pIokax. He pa6oTaIe C yCTPOiCTBOM 6OcIKOM IIN B OTKpbITbIX CaHdAJIaX. He HAnEBAiTc CBO6OJHyIO DIIHHyO ODeJy, a TAKKe ODeJxO Co CBuCAHOUM 3aB83KaMn IIN peMHrMn, TaK KaK OHN MOrTy PONAcTb B DIBHXUmeCyaCTN.
- He nadeBaIte n3nIshne CBo6oDHyIO OJeXy nIyUkpaSeHnA, TAK KaK IX MoJKeT 3aTAYb BO BnYCKHoe OTBepCTne.
-ДиHHbIe BOIOcBi 3aKoJIInTe NaI yPoBHeM PIIeU, YTObI OHI He IIOJaI N B DnJxUHceC YaCTN.
- Bcerda haideBaIte cpeCTBa 3aIuTbI opraHOB clyxa npn IcnoJb3ObaHIn yctpoiCTBa. N3dJIne cnIbHO uymIT, YTO MOxET CTAb IIpUHIO Heo6paTMOrO IOBpeJdeHn clyxa npn HecO6JIIOeHm INHTpyKcIIN OOrpaHueHIO BO3JeICTBnA, CHIXKeHIO UyMa n HOseHIO cpeCTB 3aIuTbI opraHOB clyxa.
Bcerda naideBaTe cpeCTBa nolno 3aunTbI rna3 npn nCNOJb3OBAHnn yctpoiCTBa. Ipon3BOJntJIb HactoTaeJIbHO peKOMeHnyet nCNOJb3OBAtB MaCKy dJIa JInca aINI nnHOCTbIO 3aKpbITbIe OcKN. 06bUHbIe INN coINHe3aUnTHbIe OcKN He YBIAHTcA doCTaTOHoi 3aunToI. MouHa B03dUshHa Ctpy MoKeT B JIO6oM MOMENT OT6pocNTb IIpeDMtebl Ha BbICOKO CKOpOCTn, IN OHN MOrY OTCKOHTb OT TBepdbIX NOBepxHOCTeB CTOPOHy ONepaTopa.
- Пара Кадын И сплььзовием поверяп, чт Все орразь упраьеня и 3ацntные устюг STBa pa6оТаOT павиьно. He И сплььзуITE nHCTpymTeT, ecn BblKJIIOUaTeIb ПИТанЯ He OCTaHaBnIBaET erO pa60Tu.
-Пелед кадыIM ИСпОЛьЗОВHAнEM BCERДа прOBерЯITE КорпUC Ha HAnuYe
Повразден.у6eДИТecb,чTO UNTKиpyKOrTKN yCTaHOBJIeHbl ИнаджHo
3akpenIeHbl.
- IcnoIb3yIte rpa6n m MeTny, UTO6bl y6paTb Mycop nepei nCNoIb3OBAHneM B03dYxOdyBKN.
- Пекд Кождьим Испльзоваиме Oчишaite 6обрабываиму уастOK.Удалптукгпрдметы,Кak KaMHN,ОСКОЛКИ CTeКЛА,ГВОЗДИ,ПЮВОЛОКУ ИИ ВЕРБКИ, KOTOpbie MOrYt 6bITb OTбpoшени на 3HAЧИТьнhoe paCCTOЯHme CINlbHbIM NOTOKOM B03dUxHa ИИ NOKOpbie MOrYt 3aNYTaTbСВВЕHTINJITope.
- He klaɪnTe yctpɔɪCTBO Ha Mycop nɪn pədOM C hɪm.
He nCnoIb3yIte 3JektpOnHCTpyMeHT, cEnI erO BbIKJIouaTeIb HeNCpPaBeH. 3JektpOnHCTpyMeHTblc HEnCnpaBhIM BbIKJIouaTeIeM ONaChbl NIOJLeKxAT peMOHTy.
- Парад руліровко, смени принаджности xpaheHMe M OTKIQUHITe эльктponнсгчмent OT aKKymлятора. Такne Меры п dedoctopoxhoCTN yMeHBsaHOT pSCСCityaHOrO 3aanyckaэльктponнсгчмentsa.
XpaHNTe HEnCNoJIb3yEmBle 3JKeKtpOnHCTpyMeHTb B MeCTaX, HeNoCTynHbIX JIaeTei, I He IOBePraIte 3JKeKtpOnHCTpyMeHT JIuCaM, He 3HaKOMbIM C HUM I C 3TUM INCHTpYkUmaM. 3JKeKtpOnHCTpyMeHTb ONaChbI B pyKaX HeNoDroTOBJeHHbIX IOpJIb3OBATeJIe.
- Bыллгийт texнчecкoe obcnyxuBaHne элктponHCTpymeHTOB. Провьт БырвнВаHne n cцелпсne NOДВИЖнБIX DeTaJIe, habичne ПОLOMOK n поче уСLOВЯ, KOTOPbIe MOrY T NOBnIaTb Ha pa6OTo YэлктponHCTpymeHTA.ЕсиэлктponHCTpymeHT NOBpeXdEn,пepED ИСПОЛьЗВаHиEm erO Heo6xOДIMO
OTpEmoHTnpOBaTb. HeNoctaToUHbI yXOd 3a 3JIeKTpOHnCTpyMeHtOM YBnEeTCr pInuHHo MHOrHX HeCuaCThBIX ClyuAeB.
2.8 INCIOJIb3OBAHNE I OBCJUYKINBAHNE INHCTPMEHTA C IINTAHHEM OT AKKYMJITopA
- 3apjkaite akymyIaTOpbI TOnbKO C NMOuBIO 3apJHOrO yCTpoiCTBa, yKa3aHHOrO n3rTOBNTeIeM. 3apJHoe yCTpoiCTBO, npEJa3HaueHHe OJIra OJHO rTnA aKymyIaTOpbIX 6aTapei, MoKeT CTaTB pNpUHoi NOXapa pN uCNoIb3OBAHIN C dpyrIM TInOM 6aTapei.
- IcnoIb3yIte 3JIeKTPoHnCTpyMeHT T0lbKO CO CNEuaJIbHO IpEHa3HaueHHbIMN dIy Hero aKKymJYTopaMn. IcnoIb3OBAHne IIO6Oro DpyrOro BNuIaKKymJYTophBIX 6batapeM MoXET CTaTb PnUHNO HeCuaCThBIX CnyAeB INI Noxapa.
- KOrda aKcymyIaTOp He nCNoJIb3yeTcX, xpaHIne erO OTdIeBHO OT MeTaIIuYeCKNX npEIMTeOB — KaHcIeIaRcKnx cKpeNOK, MOHeT, KJIoueH, rBO3JeB, BnHTOB n Dp. — OHI MOrYT CoeINHtB KOHTaKTbI. KopOTKoe 3aMbIkaHne KOHTaKTOB aKKymyIaTOpHO batapeM MoKeT cTAb II pUChINOH oKoTOROB nIIN IOxapa.
- Пи He6laonpnaTbIX 06CTO8TeNbCTBax n3 aKKymyIaTopa MoKTe noteYb
эльктpoIIT; n36e8aIte KoHTaKtacnHIM. Пи clyuayHom KOHTaKTe npOMoIte BDOJ.
Ecln JxNdkocTb nonana B rIa3a, o6paTInTeCb K Bpauy. JxNdkocTb n3 aKKymyIaTopHo
6batape mOKeT Bbl3BaTb pa3dpaKeHne n OxKOrn.
2.9 IPNABUNIA TEXHUKN BE3OINACHOCTNI PN INCIOJIb3OBAHINAKKUMYJLTOPHOH RA3OHOKOULIKN
-ИспόЛьзуйTe Данhoe yстpoиCTBO TOLьКО B COOTBETCTBIM C erO 06NaCTbIO npIMHeHnI.
-ИЗВЕКАТеakумларTop BO ВремТраHCnOPTnOвКи Иханеня.
XpaHnTe ra3oHOKocuNky B nomeueHnn. KOrda ra3oHOKocuNka He nCnoIb3yeTcra, ee HEO6xOJIMO XpaHnTB BCYOM u 3aKpbITOM MeCTe, HeIOCTyHOM dIra DeTei.
2.10 PEMOHT
- PemOH 3JNEKTPoHnCTpymeHTa DOJIxHcEBbIIOJHrTbCkBAJIINΦUncPobAHhbIM CNEuAnCTOM C NcIPOb3OBAHnEM TOJIbKO IJeHTNUHbIX 3aNaChbIX qAcTe. 3To 06ecneuHT 6e3OnaChyU pa60Tu 3JNEKTPoHnCTpymeHTa.
- IopuyuTe npOBepky uCTpoiCtBA KBaIINphiNUPoBaHOMy CneuaJIncTy n npn Heo6XoIMOCtN OTpeMOHTnpyIe Do NOBTOpHO BBOJa B 3KcPnyatauio.
2.11 OCTATOUHbIE PNCKN
- 03HaKoMbTeCb C npaBnlaMn NcNoB3OBAHnE 3TOrO yCTpoiCTBa B HAcToIeM pykoBoDCTBe.3aONMHte INHcTpykUuN Po TexHnke 6e3OnaNacHOCTN I TOHn CO6HouJaTe uX.3TO nOMoKet PpeIoTBpaTntb Pnck N ONaChbIe CNTyaUuN. PpN iCNoB3OBAHnN 3TOrO yCTpoiCTBa 6yDbTe BHNMaTeJIbHbI, UTO6bl CBOeBpeMeHHO ONpeDeHtB N yCTpaHHTb
pnuCKn. BbICTpoe BMeIaTeIbCTBO MOJcET npEIOTBpaITb cepbe3HbIE TpaBMbl NnHaHeceHne MaTePnaJIbHO yUepe6a. Ipn BO3HmKHOBeHN NIO60H HeNCpPaBHOCTN BbIKJIuOaIte INCHTpymeHT NOTcoEINHЯTe aKKyMylTOp.
-Даже пи стPOROM co6JIIODeHIM BCex INHCTpyKcIy CsuIeCTByOT HeKOtOpblc foAKTopbl, KOtOpblc MOrY TpINBecTn K pNCKaM, TaKne KaK:
- OTo6paCbIbAeMbIe YaCTn 3aTOrTOBKn;
-Bn6paunHbIe TpaBmbl:NCNoJIb3yInTe CneuNaIbHbIe pyKoTKn I CTapaiTeCb COKpaNTb BpeMa pa60tbl N BO3dEiCTBnB Wn6paun;
- TpaBmbl, Bbl3BaHHbIe 7yMOM: HadeBaIte CpeCTBa 3aIITbl yIeN COKpaIaITe Bpemra60TbI n BO3DeICTBnA 7yMa;
BdbIxAHHe PbINN MeKNX YactNU
- TpaBmbl OT O6paCbIbAembIX pexyUIM 3JIeMeHToM IpeIMeTob. Bcerda naDeBaIte 3aIHThle OcKN.
Ecnn npn nCnoB3OBAHn yCTpoiCTBa npoABTcKaKHe-Im60 n3 3Tnx foakTopOB, HeMeJeHHO OCTaHOBHTe yCTpoiCTBO n o6paTntecb K BpaCy.
- TpaBmbl MOryT 6bITb BbI3BaHbI nIIu yCyry6JIeHbI dIINTeJbHbIM NcNoJIb3OBAHnEM INHCTpyMeHTa. Iprn IcNoJIb3OBAHm IIO6oR O INHCTpyMeHTa B TeueHne dIInTeJbHOrB BpeMeHn He06XoIMO DeJaTb peYIaRPhIe nepepbIBbl.
3. TEXHNUECKNE XAPAKTEPNUCTUKN
O KIIOye 6e3oNaCHOCTN
KJIIOU 6e3OJACHOCTI YBJIAETCOT KJIIOUaHIOUM yCTPOINCTBOM IJI ppeIOTBpaIeHn HENPeIHamepeHHORO 3aNYCkA r3OHOKOcNIKN.
He n3Bnekaite KIOU npHn HOpMaIbHOM IcNOJb3ObaHHN, KIOU 6e3ONaCHoCTN He JABJIaTc YcTPOIcTBOM ynpaBLeHHN, KOtOpoe peryIuPyeT pa60Tu pexJuXx 3JeMeHTOB. BcerJa n3Bnekaite KIOU 6e3ONaCHoCTN, ecIIra3OHOKocIIkA ocTaetca 6e3 npICMOTpa.
IcnoIb3OBAHHe yCtpoIcTbA: pncyHKn c 3.12 no 3.14

BHUMAHIE! Bcerda NaheBaIte 3aunTHbIe OUY, npOHyIO6yBb nДINHHbIe 6pIOKn. Pn pa6OTe B nbIbHbIX ycNoBnx Bcerda NaheBaIte ΦnIbTpUoUyO Macky. TaKxpeKoMeHdyETcNcOJIb3OBA Tb NOxDoxJaune nepuATkn.
Bo Bpemra60bI bcerda KpeKIO depKInTeCb 3a pyKoTky oBeHmny pKaMn. He nbTaiTeCb cpe3aTb DnHHyU TpaBy 3a OINn pa3. BmecTo 3TORO cTpRInTe ra3OH B HeCKoJIbKO npoxoOB. DeNaIe nepepbIBbB I OINn INI Da NTH Mekdy CkaINBaHNMy, UTObi TpBa H ra3OHe cTAJa paBHomePBO KopoTKo. PnC kAunBaHnn no Kpaam pa3BepHIne yCTpoJCTBO JeBOI CTOpHOH K KpaIO, a 3aTeM NaHIne nepemeuaTbe BDoJI KpaI.
PNEyPEXKDEHNE! Ecyn yctpoiCTBO CToIKNHyIocb C NoCTOpOHnIM PpeMToM, BblKIOUHTeBvIaTeIb. N3BLeKIne KJIou 6e3oNaChOCTN. Ipeep NOBtorpHbIM 3aYCKOM N kCpIyatauue OCMOTpIte ra3OHOKoCNIky Ha HAIuYne NOBpeKDeHm N ppr Heo6XoDMOCtN OTPMOHTnpyIte. CINbHa BIV6paCnIg KOsIKn BO BpeMa pa60Tb YBIAETcR npzHAkOM NOBpeKDeHn. F3oHOKoCNIka DOnxHa 6bITb He3aMeDIInteBHO nPoBepeHa N OTPMOHTnpOBaHa.

OctpbI peKyuIeJIeMeHr I03BOJNT 3HaUHTeJIbHO IOBbICNTb IpON3BOJNTeJIbHOCTb Ra30HOKOCUNK, OcO6EHNO npu pe3Ke BblCOKoTpaBbl.
BbIKIOHTe INCTpyMeHTn IN3BNeKInTe aKKyMnyTOp.
Ipehenocite nHCTpymeHT toBko 3a pykOaTky. 3aunuauTe yCTpoiCTBO O T CnIbHbIX BO3deiCTBm IIN Bn6paun, KOTOpBie MOryT BO3NKnHyTb npn nepeBo3Ke TpaHcnpTbIMn CpeCTBaMn. 3aKpeInTe yCTpoiCTBO, YTO6bl ppeoTbPaTntb COckaJIb3bIBaHne IIN paDeHne. He noDBepraTe yCTpoiCTBO BO3deiCTBnIO COJHeuHoro CBeta.
5.2 TPAHCIOPTUPOBKA JIITNEBbIX AKKUMYJATOPOB
6. COIDEPKAHNE 3NMOI
PucyHok 6.9
I3BNeKeNTe aKKyMnyTOp I3 3JIeKtpOnHCTpyMeHTa.
Ipeep dntelbHbIM xpaehnem ybeintecb, yTO yPOBeH 3aPraJa aKKyMjTopa COOTBcTByET IHCTpyKUJAM, npBedeHHbIM B pyKOBOcTBE NO erO kCNplyaTaun. CneyuTe BcEM IHCTpyKUJAM, npBedeHHbIM Hxke B pa3dene «XpaehnEe'. PekomeHnyetcra NcNoJIb3OBaTb dNJa xpaHeHry opuHaHaJIbHyIO yNAKOBY uIN HaKpbIBaTb yCTPOIcTBo NODXODaJe TKAHbIO uIN YexlOM dNJa 3aUHTbI OT NblIN.
7. XPAHEHNE
XpaHnTe yCTPOINCTBO n aKKyMnIaTOp TOLbKO B UcNCTOM, CyXOM, nPoBeTpBaEMOM MecTe npi TeMnepaTpe 4 do 24 °C. HakpbBaIne ero dno obeCneueHn DOnOHNtBHO 3aunTbI. PeKomeHnyeTcN CnOJb3OBaTB dJa XpaHeHnO nprInHaJIbHyO uNaKOBky nII HAkpbBaTB yCTPOINCTBO NOxOJaEe TKaHbIO nIIu YexNOM dJa 3aunTbI OT nbIIN. HaedekHO 3aΦNKcnpyIte yCTPOINCTBO nepeD TpAHCnOpTNPOBkoN.
7.1 XPAHEHNE YCTPOINCTBA
PucyHKc 6.1 no 6.9
I3BnkeKeIte aKKymyIaTOp I3 3NeKtpOnHCTpymeHTa. BHNMaTeIbHO npOBepbTe yCTpoiCTBO Ha HAnuIe I3HOWeHHbIX, pIoXo 3akpePneHHbIX nII NOBpeXdEHHbIX dTeaIe. OChCTnte yCTpoiCTBO nepeI xpaHeHem. He noDBepraiTe yCTpoiCTBO BO3DeiCTBIO COInHeuHoro CBeta. CNeDITe, YTO6bl I3DeJIne BcERda 6bIto 3aunuEHO OT XOLOda I BLnXHoCTn.
Y6eIntecb, yTO yCTpOINCTBO HAXoINTCB I ROpIN3OHTaIBHOM NIOJoxeHN.
-Передnomeшенимустpo�свахраненеВcerdadoЖидайTeCb,пOKаОноctbIHET.
7.2 XPAHEHNE JNTINEBbIX AKKUMYJATOPOB
PucyHok 6.9
y6eDntecb, yTO yPOBeH 3aJa aKKymIaTOpA COOTBcTCTByeT peKomeHIOBaHHOMY B pyKOBOdCTBE no erO eKcnPlyatauIN. IJI NaJUeyHn IOnpO6Ho INΦOpMauN O3HaKOMbTeCb C pyKOBoDCTBOM NO KcNPlyaTaunn AKKymIaTOpA.
8. OBCJNYKINBAHNE

Ipeed peryunpoBko, npOBepko, ouncTkO nnxpaHeHem yctpoiCTBa Bcerda n3BVeKaite aKKymyJrTOp.
8.1 OUHCTKA
pucyHok 5.1
TapaHTnHa He paacnpocTpaHareTc Ha cIeIyUoIne cIyuaan:
- INHCTpymEHT INCNOJb3OBAJcR HENpaBnJIbHO;
- NOBpeKdEHH B03HKnI npT TpaHCnOpTnpOBKe IJI MOHTaJke I3DeJIY;
- peMOHT n (nJIn) 3aMeHa YacteY UcTPOINCTBa IPOBOIDINICb TpeTbIMN LInCaAM;
- NOBpeKdEHHI BO3HKnI BcIeCTBHe BHeUHIX aKTOpOB IINI BO3JeICTBnI NOCTOpOHnIX IpeMeTOB, TaKnx KAK NecOK IINI KaMHN;
- NOBpeKdEHHa BO3HKnB pe3yIbTaTe HecO6JIoDeHHa INcTpyKcN IO texHnke 6e3OpacHOCTu INcNoJIb3OBaHnIO;
- INHCTpymeT pa36npancN nnBCKpbIbAnc;
- INHCTpymeHT POnDBepraIcB OZdEInCTBnIO BbJaxHoN Cpebl (PocA,doXDb, nOprpyKeHne B BoDy);
- INHCTpymeHT NcONb3OBAJcB INpoΦeCCNOHaNbHbIX ΚeJIAX;
- INHCTpymEnT NOBBepralc B03dEiCTBnIO TeMpepaTypbI, BbIXoJaIe 3a npedeJIbI DnAna3OHa, yka3aHHoro B pa3dJe «XpaHeHne».
UcpoCTBO Heo6xOIMO 3KcnpyATnPOBaTb B HopMaIbHbIX ycIOBnIX N He IcNOJIb3OBaTb B npocceCOnHaIbHbIX cenJX. PoTOMy daHna rapaHTnHe paCnpocTpAraTeTc Ha yctPoIcTBA, IcNpOJIb3yeMbte caOBOdYeCKmM KOMNaHnMn, MeCThblMn OprAHaMn BlaCTn, a TaKxe KOMNaHnMn, IpedlaRaIoUImn PIIaTHyIO apEndy nII beCnPaIthbI pOKaT o6OpyDoBaHnI.
B clyuae Bo3HKnHOBeHn np6IeMb IIN nO6HApyKeHn DeΦeKa Hc6xOdmo npexJe Bcero 06paTntbCk K dIlepy KomnaHm Sterwins. B 60nbHnCTBe clyuaeb
KacbIJ wen6ep: KaTAmaHb KaTaNt eHnDey.

BvI eHmDi kaTaNtAeHndeYe 6oanaBb. BvAn h6bnai naJaIaHy MymKIn 6oJMaCa, OHbl KOKbICTb KaDeRe XapaTy opTaIbIfbHa anapbIb3.

2.10 Kbl3MET KOPCETY
- Θлкг Кралын KaI3Met Kepcety XyMbICbH 6iNkTi MAmah TeK TynHcyKa 6eIweKtepdi NaIaIaNbIn JxacaybI Tnic. ByI aIeKtp KpAlbI Kayinci3dirHin CakTaIyblH KaMTaMaCbI 3 eTeDi.
- Θнимді кайтɑколданap aʌдында онbli bɪŋkTi MɑməhfaTekceptɪn, kɑжетболганЖаФДaɪdaЖeHdEи3.
2.11 KALДыКAYINTEP
-
Ocbl naIaIaNHy HcyayIbIbIHbH KEmerMeH Ocbl eHIMdi naIaIaNHy KOblImeH TaIbIbI IbIbIHbI3. Kayinc3dk bOyibHwa HcckaynapdbI ecH3de caKTan, OIapDbI ToIbIKTaOpbIHdaHbI3. BykKayTeHydIn aIbIH anyFa KEmeKTeCeDi. KayInTepdi epte baKay xHe aIbIH aNy yuHIOcbl naIaHaFAn Ke3de apadaiM cak 60nbHbI3. Xblam apanacy aybp japaKaT aNy MeH MylkiTH 3akBIMaIyBaHa xoJI bepMeiDi. Akaynap opbIH anca, kpaIbIeipin, BaatarpeCblHaN axbipatbIHbI3.
Tinti bapblk Hucaynap KaTaH Type opbHdaJca Da, Kayin TydbpybI MymkiH eJI de Keibip fakTopnap bap:
-
Θнделетин Буйыm Балшекерін Лактурьлів.
- Dipinre 6aHnHaBtbyHnFaH XapaKaTap: apHaBt TTKaIapDbI naDanahbHb3 XHe JxMbIC yaBtMeH dipin DeHreIH a3aTbIn KePiH3.
- 5yfa 6aIbIbIcTbI TybIHdaIaH JapaKaTTap: KylaKka apHaIraH KOpFaHbIu KpaJIbIH TaBbIbI3 XHe XyMbIC yaBtBi MeH 5y DeHReiH a3aIbHbI3.
- IshaH meH 6eJIweKTePmeH dem any.
- ΘeKtp KyaPahlbHIn Ky3depiHeH yUkAan 3aTapAn h6oNaTbH JapaKaT. KopFaHbI W Ke3iDipirih YHemTi TaBn KypiHi3.
AcnantbI KOndaHcy Ke3iHne OcbI paKTopnapdbH Ke3 KeJreHi TybHdaCa, acnantbI TOkTaTbIn, dApirepre Depey xa6apnaCbHbI3.
XapakaT KypaIbI y3ak naJaIaNydaH naJa 6onybl Hemece HaIapnaybl MyMKIn. KypaIbI y3ak yaKbIT 6oBbl naJaIaNraH raH Ke3de, TypaKTbI Tpype Y3iNic Xacan TpybIHb3.
3. TEXHnKAJIbIK DEPEKTEP
| Yntrici | 40 VLM2 - 36P.1 |
| Hominahdby Kepehy (B) | 36 B TT |
| Курылбы салмавы (батаря бlorьин кosa anfaraда) | 12.69 кг |
| Кенидik Беріnettін дыбіс Куатындін Deh'reи (ДБ(A)) | 96 ДБ(A) |
| Еcentелген дыбістык Куат Deh'reи (ДБ(A)) | 92,21 ДБ(A)
К=0,724 ДБ(A) |
| Жуmbіс Тогі | 9-12 A |
| Мakсимал'dы ТOK | 22 A |
| Усынылaitын Корганыc | Артык ТOKтан Корray |
| Шen XXИнавыш Кал'tын сыйымділь'tы | 35 л |
| Kecik ehi | 360 MM |
| Кесik биiktiri | 25-75 MM |
| Жуztдін оныктамасы | 5130 TT |
| Жукумecіз жылданьік(MMH-1) | 3500 |
| Дірій дінг'reій (K=1,5 M/c2) | Сол чak түлүхасы = 0,759 M/c2
Он чak түлүхасы = 0,940 M/c2 |
Dipin Mmimdeireh jannb Mhi cTanapTb cbHak adici 6ohu anaue He xhe OHk ypanapdbip bip-bipimeh caibcby uhi naiandahyfa 6oana. Dipin mamidren hannb MHH dipin acepiHde 6ony wamacbi H andbi H ana 6faray uhi de naiaandahyfa 6oana. 3neKtp kpaibnHn Kahtb kondaHbcB ke3iHderi dipin 7bfbicb KpaanDbn naiandahy aictepiHe 6aHaNbHCTb Mmimdenre Hxnnb MmHenn e3rewe 6ony MyMKIN; Xane onepatopdb Kopfay MaKcatbHda HacTb kondaHy XarDaBHdaFb dipin acepiHde 6ony dba faray HerizHne (KpaanDbn Ewipyni yaBtBi Me icke Kocbiny yaBtBHa KocbIMsa 6oc Kypic Ke3eHi CnAeTb 6apnbik JyMbIC ictey zukndepin ecepe oTbpIn) Xeke kayincdik wapanapabn anbiktay kaxet 6ony MyMKIN.
Batape KaKnaFbH KeTepiH3. Batape 6nOrbHdaFb6ocaty TuMecih bacIn, BatapeHHbIbIrapbIn aJIbIHbI3.
3apayay TpaBb ToIbIK HcyKaynap any ysiH, 6atapee 6nObl MeH 3apraTafbl KpaIbIb3Fa apHaanfah 6atapee MeH 3apraTafbl KpaIbIb3dbH naIdaIaHybl HcKayIbIKTapbH KapaHbI.
4.3 BiPIHUI KOJDAHbIC
БатAPEнbl TeKcepiH3: 3.8-cypet

ECKEPTY ! Ocbl eHIMdi KOJIaHa6ac 6ypbIH, Ocbl HUCKayIbIKTBiH bAcbIHda «KAYINCI3DIK HYCKAYIAPBI» 6OJIIMIH, COHdA-n-aTakblpBn aCTbIHDAfbl 6apNbIK MToHIDI OKbl IN sbIRbIHbI3.

CAtbIn any Ke3iHne 6bTapeT OToBk 3aprTaImaIbI.
OHiMdi anfaw pet naJaIaNbAc 6ypbH 6bTaapeHbI
3aprTaftbIw KypaNfa CAnbIn, TOlbIfbIMeH 3aprTaHbI3.
KypbIbIbIbI aIraa pet naJaIaHaYfapeekwe Ha3ap aydaPbHbI3: 6ap Ha3apbHbI3blc0cbiipHui KOnDaHbIcKa aydaPbHbI3.Kepepri Xane KOpuaFAn optaHbI 6eJWeKTepi JOK boc KehictkTe biPiHsi cbHaK XacaHbI3
4.4 έΑΙДΑΝΑΗγ

ECKEPTY! Kərān ʌwnkbiwtbɪc bɪpTTa fHa nai dənaHya foIaIbɪ, fɪmapat iwiHnde nai dənaHya KaTaN TblbIM caIbɪhaIbɪ. Kərān ʌwnkbiwtbɪf mɪmapat iwihe kipri3bec 6þbɪh, kæmiHnde eki caraTka cbiPTTa kaɪdbyp fy KepeK.
HIMdi icke Kocy: (3.8) - (3.11) -cypet

ECKEPTY! OTkip JbIJIbIMaJIb Jy3. AybIP JapaKaT OpbIH anybl MymKIn 6oJFaHdIbIKTaH, OcbI Kockbl WHe CaKaTahDbIpBbI W KiNT JyNecIH eWkaShan OwIpMeHi3.

ECKEPTY! Motop ewiipinreH Ke3de, keckiW bipHewe ceKyHd 60bI JxMbIC ICTen TypaIbI. COHdbIKTah KeckiW TOKTaMaFaHaHa, KOraJI WAnKbIUtBIn aCTbIHfbl XafBiHa TnicHeH3.
ToIbIK 3aprAaTJFaH 6atapeRnHbXaIHaBbI3. AyIcTbIpBn-KockblW TyMeHi 6acBn TpyBbI3. Keran 7aankblwI cKe Kocy ywiH ayIcTbIpBn-KockblW icTKiT tyTkafAp kapan TaptBn, ayIcTbIpBn-KockblW tyMeHi xibepiH3. Keran 7aankblwTb TOkTaTy ywiH ayIcTbIpBn-KockblW icTKiT xibepiH3. Keran 7aankblwTA Ke3 KeIreH petteyNep opbIHday anDbHda Jx3 ToIbIK TOKtaHaHwa KyTIH3.
CaKaTaNDbIbPfblkJITTypaJIb:
CaKaHDbipBbIi KInr KeRan WAnkbIbTbIH a6aIcbI3da KocBJIbYbIH 6oJIbIpMaTbIH eIiy KypbIbFbcI. KaIbIbTI KymBc Ke3iHne KInTTI TaPtnaHbI3, CaKaHDbipBbIi KInr KeCKIi KypaIapDbIH KymBicIH backapaTbIH backapy KpyblfbcIeMec.KeRan WAnkbIbKapayCbI3 KaIca, CaKaHDbipBbIi KInTIT yHemi IdbIapbIin KypiH3.
HIMDi naiDanaHaNy: 3.12-3,14-cypetTep

ABAHJIAHbl3! KopraHbI W Ke3iJdpik, 6epik aK KIM MeH y3bH wan6ap KIn JypiH3. WaH KEN WbIrTaBtH Kymbc Ke3iHne cy3rJeywi 6et MackacbH KniH3. TnicTi KONFaNTbI NaNdalaHy da YcBiHbIaDbl.
Ia6y ke3iHne TTKaHb eki KOnbHb36eH mbkTan ycTaHb3. Ekyin 3bIn hentip 6ip apeKeTneh kecyre apekeTHe6eH3. OhbIn opHbHa KeranDb Kaam BoBbHwa 7ab6bHb3. Keran bipKeJIK bICKa 6onFaHsa 7a6y apacbHda bip HeMece eki KYN KaNDbIpbHb3. Keran XnEriHde wankah Ke3de acnantbH cOJ XaFbH XnEkeKepaTbIn, codAn KeiH acnantbI xnEe BoBbIme XblXbTy KaXeT.
ECKEpy: 6e3aTbI ypbIn aIcHbI3, MOTOpbl TOKTaBbIbI. CaKaTHdbPbIw KIITTI anbIn, Keran WaIKbIbTBIn 3aKbIMdaImaHaBH TObIKTa TeKcepiH3 XHe Ke ran WAnkbIbTB KaTAt KOcbIn, Xymbic ICTemec 6byh 3akbIMdbXeHdeH3. Xymbic Ke3iHpe Ke ran WAnkbIbTBn WAmadah TBic dipinDey1 3akBMhBn BeNrici BOnbIn KeJeI. Ke ran WaANkbIbTB TeSipeK TeKcepin, XeHdeY kaxet.

Ötkip Jy3 KeraJI WankKbIUtBIn ΘHIMdiNirIH XaKcapTaIbI, acipece y3bIH wENTI Kecken Ke3de.
KofapblXaHe TEmeH emec,ehic betiHe kece-KaIdeHeHjHeH 1a6bIb3.
- Ehicte 6aftbTTb e3repKeH Ke3Je a npbIKwa CaKtBt Ka TaHbTbHbI3.
-TeIyfbIeHicTe 7a6yfa 6oJMaIybl.
- Acnantbl ə3iH3re kapaJ XbIjXbIy Hemece TaPty Ke3iHne aIpbikwa caKtbk TaHbITbIHbI3.
- ΘиIMdi eHKeIy KaKet 6oIca, acnantbI TOKTaTbI, Jy3(DEp)DiH TOKTaHaBHy KytiH3 (KeranDah backa beTepdi KnbIe tKeH Ke3de XHe acnantbI NaJaIaNbIaTbIH aMakKa xHe aMakTaH tacImaJday Ke3iHne). ΘHIMdi āPdaiBIM TTKacBHaH YCTAN TacImaJdaHbI3.
- MotopdkoKcKaH Ke3e, acnAnTbI eHKeiTneHj3.
- AcnantbI sbIFapy caHbJIaybIHbIn aNdbIHda TypbIn iCe KocnaHb3.
- Kon He aяктуаинмалыбліктердханында hemece actbHda yctamaHbI3. ьу rapу caылayынан erpaйыm anшak TypbHbI3.
- ΘΗΜΙΝΑΚΟΙΑΝΙβι εαταταργα ΑνΑΗ ΚΟΙΑΝΑΒΙΝΙβι - Βαθερτης ερτε εΜΕς ελαδμάρπιν Μαλας Μαλαταβίνησου Στυχόνε ΕΜΕς.
- ΘΗΜΙς καρβίλις κayπi δαρ σρτάνη παιδαπaHδαHbɪ3.
- Θнимdi колаись3 aya paыл ke3iHde, ecipece haia3afer Tucy kayni 6ap ke3de naДаланбafan dypbc. Θнимdi haшар xapbiktahdbipbInfah kepde naДаланбанbI3. bIKTImaJI kayinTepdi anbiktay ywiH, onepaTopfa JyMbIC aMarmblHbIH HaKtbl KepiHici KaKet.
KyaKa apHaIfah KOpFaHbIC KpaIbI NaIaIaHy eCKeTpnePdi (daybIcTap MeH daBilapbl) ecTy KaJIteTIN TeMeHDeTeDi. Opeatop Kymbc AImaFbIHnA He 60JI IN JATKaHbHa epeKHe Ha3ap aydApbyI Kepek. BaCa HOrpcenePre KeHIn BeJIMeH3 XOHe ePaIbIM TaNcbIpMaF 3eiH caIbH3.
XaKbH JxepDe yKcac KypaIapDbI NaIaIaHy ecty KaIeIiH 3aKbIMay KayPiH XHe KymbIC aMafBHa backa aamadapdbH Kipy bIKTImaIbIfbH apTbIpaDbI.
- TypaKtbI KaJIbITa TypbHbI3 XeHE TeNe-TeHdIKTi CaKaTaHbI3.
KaTbI KyuXyMCaMaHbI3. KaTbI KyuXyMCay TeNe-TeHdiKTI KOraNTyFa eKeJyIMyMkiH. EHeIcTe apdaiBIM KaamdpabHy3ra Ha3ap ayapabHy3.
- Bary kypihi3, eshaan kypripmei3. Bapbik dehe mywenepihi3di ke3 keIreH kblkblmaJIb 6eJweKTepeH aJwaK yCTaHbI3.
- ΘΗΜι ΣΤισί Σχαδύνικ δεκίτιλημε ἐχκαλαης Κόσηλής.
- Θниме ewkahanda e3repic enri3beHiz hemece eHdpuyu ycbiHbafan 6eJIweKteprDi hemece kepek-xapaKtapdbI naJaHaHbAHy3.

Erep eHIM KUlan KeTce, KaTbI COKKbIFa YMbIPaca Hemece dipiIne 6actaca, eHIMdi Depey TOKtaTbIN, 3aKbIMdaIyDbIH 6ap-JXOFbIH TeKcepHi3 Hemece dipiIniH ce6eBn AhbIKTaHbI3.Ke3 KeJIreH 3aKbIMdbI yKiJeTTi KbI3MeT KOpCETy opTaIbIFbIHDa XOHDey Hemece aybICTbIPy KepeK.
-
AиhalmaJIbI 6eJIseKTePdiN TIn KeTyiHe 6aIIaHbICTbl TybIHdaFaH JapaKaT any KayniH a3aHTy yuIN, KeNeci XaFdaiJapda ePdaBIM KypbIbHbI TOkTaTbIN, 6aTape 6bnfBn anBn, 6apbIK XblnxbImaBbI 6eJIseKTePdiN TOkTaHaBbHa K03 JeTKi3iH3:
-
Ta3aJay Hemece 6iteJIreH JxepIeRi Ta3aJay Ke3iHne
- ΘHiMДi KapayCbI3 KaJIdIbIpFaH Ke3De
-TipkeMeIepiOpHaTnacHemeceaBbITacTaMaC6ypbH
- eHIMdi TeKcepy, TexHnKaIbIK KbI3MeT KepCeTy Hemece backa da JxMblCTap Kxpr3y aIdbIHda
- erep kypblfbl Kaiblc3iDipindeBactaca (pepy TekcepiH3)
Батарянblаыт tacayхэнзapядай:6.1-cypet xэнбьа tarapeинbl naДалану HycKaynlbfl
- BaTapeHbIH KOFapfbl OpTacblHaFbl KyIbInTay TyMeciH bAcbln OHbl eHIMHeH bCblpbl aIbIn TaCTaHbI3.
- BaTape 6IorbIH 3apraTafbiKypaIHa KYbInTaNFaH KyiHe CbIPT etIN TcKeHHe CbIPfBiTBiHbI3.
- JacbIy TycI yAMhBIn XbIbJIbIKTaybI 6aTapeHbIN 3aprTaIbIN KaTkaHbIN 6iJdpEi. Erep JacbIy TycI yAM 6yDah 6blnai XbIbJIbIKTamaca, 6yn 6aTapeHbIN ToIbIKTain 3aprTaIaNfAHbIN 6iJdpEi.
5. TACbIMAJDAY
KypbIbHbHHeMece 6batapeHb TaCbIMaIay eniH3re TENBENRIi bip TaanTAPFa caBOnyblH3dbI Taan eTy MyMkiH. TaanTAPDbH 6apbIbHbOpbIHay yuH, eniH3iIN, Ekinetti opraHaDpaHbXabapnacBn, OnapbIH opbIHdaIHaBHa Ke3 KeTki3iH3. TaCbIMaIay ke3iHderi TemnepaTpA «CaKtay» TaaybHa 6epinren TemnepaTpA aykbmbHah eKaawah TBIC WbIKnaTbHBHa Ke3 KeTki3iH3
5.1 KYPbIJIfBiHbI TAcbIMAJAY
6.1-6.8 -cypeTtep
9. Kbl3MET ETY MEP3IMIHIN AAKTALYbl

3JNeKtpnik 0HIMdepdi TpyMbICtbIK 0HIMdepMeH bipre KOkbicKa Tactayfa 6oImaHdbI.
PaindaNaHbInFaH 3JKeKtpnik 0HIMdepdi 6eNEk XuHaN, Ocbl MaKcat yuHbEepiInReH KOkbic
XuHaY opbHapbHa Hxibepy KaKeT. KaTa eHDey BoBbHa a KeHe c any yuH In JxepriNkTi
EkiJIeTTi oprAnDapra HeMece dInlepre xaBapnacbHbI3.
10. KENIIJIK
10.1 Bl3dIH KENJIINIK
STERWINS eHIMdepi TtbyHn HapbfbHbH eHIMdepine ahpHaflanf ane hKofapbca nca cTaHdpTapbHa
cAkec kacanfaH. ByI caty KeniJdi rHimDi catbn anfah KynHeh 6actan 3 kbl 6oBbl japaMdbI.
ByI kenilik matepnaIadap meH canaFa 6aIIaHbICTb 6apbIK akaynapfa KOndaHbIaDbI:
Keticneitih 6eIweKTepeMn 3IeMeHTTepre, coHdai-ak KaJIbITb I naDanaHy KafDaHbIda
6oIaTbH 3aKbIMapra. XeHDey xhe 6eJIwEeKterpi aybiCTbIPfAHn H 6actankbI kenilik Ke3eHi
y3apMaIdbI. Ciz 6yH eHIMdi catbn any TypaIb pactaydbI XeHe catbn any KyHIn ycbHa anybIb3
Kepek. KeniJdk ocbl eHIMHH KybImeh weKeTenei.
10.2 KEJIJIДIКTE KAMTbIMAJTBH JAFDAJLAP
HIMdi DpybIc naiDanaHbaydah TybIHaTbIH aKayIbIKTap Hemece OKrFaIap OcbI KeiJIdkTe KaMTbImaIdbI.
KeIeci 3IeMeHTep KeIJIdkneH KaMtbImaIbI:
- Kypan Dypbc naiDanaHaNbHbJMaFaH; Hemece
-6yI eHIMdi TaCbImaJday Hemece OPhaTy Ke3iHne naJa 6OJaTbIH 3aKbIM; Hemece
- 6eIeKepiXeHdey XaHe/Hemece aybICTbpy KymbICTapbl YuHni Tapannen Xy3ere acbplla; HeMece
-cbiptKbI pakTopnap Hemece Kym, Tactap CnAkTbI 6eIge 3aTTapdaH TybIHdaFaH 3aKbIM; Hemece
- Kayinci3dk TexHnKacbI MeH naJaHaHy HycKayapbIH caKTamay caJapbIHah 60nfaH 3aKbIM; Hemece
-Kypan6eIweKeTeJireH Hemece aUbInFaH; Hemece
-biIraOpTaNaJaHaHbIrfan (bIK,kaH6bp,cyfa 6aTbipblfAn...) KpaJ; Hemece
- Kəci6n MaKcaTTa naiDanaHbInfah KypaJI; Hemece
- «Cakay» TapaybHda KepcetinreH ayKbIMHaN TbC TemnepaTypa acepiHe yubpaFah KypaI
ΘHIM KaIbIITbI JxMbIC ⅢapTtapBHaJa XaHe Kc6iB emec MaKcaTTapMeH naJdaJhaBlybTnic. CoNdbIKtaH oCbI KeiJnDik ece6iHe 8ay-6akwamE H aHaJIbIcaTbH KOMpaHnIap, JepriJIkTi AkiMsiIik XaHe Ja6dblKtbl aKblbl HeMeCe aKbcbl3 JaJFa 6epetIH KOMpaHnIap naJaIaHaTaBH EHImdep ⅦbIfapblNaIbI.
Moeene HeMece aKay TybHaFaH XaFdaJa, ePdAByIM aIDbImeH Sterwins dunepiHe xa6apIacy KepeK. Ken XaFdaJa
Sterwins dInlepi macehi wseyre Hemece akaydbI ty3eTyre kaibineTti 6oana. JKeHenTne KxKaTbI Hemece Ty6ipTeHHi3di caTaHbI: 6yI KyKaTTap WafbIM kacaFah Ke3e KepeK 6oana.
11. CE CÖNEYKECTIK XÖHINDEI DEKLAPAÇΥCBCI
Ehdpuyi: ADEO Services
135 Rue Sadi Carnot
CS 00001 59790 Ronchin,Фразця
ΘHIMHIN KeIeciDe eKeHIN XapnlaaDbI
AkkymyTopbI Kergan wankbI 36 cm
40VLM2-36P.1
MD 2006/42/EC DnpeKTHBaHbI TaIaIaTapbHa JcHe YJTTbI KepexeJIepre CcKeC KeJeTIHdiTypaIbI MJIIMDei:
3MY DInpeKtNbacbI 2014/30/EU
ROHS DnpeKtNbacb (EU) 2015/863 e3reptiIrrhen DnpeKtNbBa 2011/65/EU
UyblI DnpeKtNbAcbl 2000/14/EC, VI KocbIMsa JkHe 2005/88/EC
EcenTeIReH dIbIbIcTbIK Kyat DeHrei: 92,21 D5(A)
KeninДидыбic KyaTbHbIn DeHrei: 96 dB(A)
EN 60335-1:2012+A11:2014+A13:2017
EN 60335-2-77:2010
EN 62233:2008
EN 55014-1:2017
EN 55014-2:2015
IEC 62321-1:2013
IEC 62321-2:2013
IEC 62321-3-1:2013
IEC 62321-4:2013+A1:2017
IEC 62321-5:2013
IEC 62321-6:2015
IEC 62321-7-1:2015
IEC 62321-7-2:2017 & ISO 17075-1:2017
IEC 62321-8:2017
CepnJIbIK N: ApTkbl Myka6a 6eTih KHe
acnantbIH 3aybTTbIK TaKtaWacbIH KapaHbi3
Ekileni opran: 2000/14/EC XeHe 2005/88/EC DnpeKtBacbHa cKeckti pactay eici
SGS wifapfah EK taIanTapbHa cKeCTik cepTnΦkAtbl
UybI INpeKTHBaCbHbI eKiJIeTTI TyJfAcbl: ISET S.r.l.
4 Texhniue He 6cnyroByBaHHa Ta 36epiraHHa
- TpimaiTe Bci raiKn, 6oNTu Ta rBnHTn 3aTAYTMn dJa yTpImaHn npictpoHy 6e3neuHomy po6oyomy cTaHi.
- Yacto nepeBiprIte TpaBo36ipHnK Ha npEpmTe 3NoUeHHa60 NooKoJKeHHa.
- 3Простраими 3багатума Лесами 6удte о��сяні, ockількі, о��таючсь, одно Лес може пивець в рух inші Леса.
- Bydte obepexhi niz yac hanaityBaHHia nctpyMeHTa, 0o6 3anobirn notpanHnnaIbciB mixk pyxOMMJIe3amTa HepyOMMMu cactiHaMIn HCTpyMeHTa.
- 3aBxDn DaBaIte IHCTpyMeHTy OxOIOHyTu pepei 36epirAHnM.
-Плд часобслуговаьнялз Майт ha yba3i,и0,нeЗвжалчи Ha Te,и0 джерюЖИВЛЕнгЯ ВIMКHEнO,лe3a можутб 6уТи рухомi.
3HooiHa Tn oOkoJKeHi qactHn 3aMInHouTe 3apAin 6e3neKn. BnkOpncToBy Te Iuhe opurihalbHi 3anachI DeTani Ta npuiadJa.
- Pobova 30Ha Ma€ 6byTu ChSTOu Ta Do6pe OCBiTNeHO. Henpi6paHa a6o noraHo OCBITHeHa pOBovA 30Ha MoKe CTaTn PrpUHNO HeuaChHX BmnaKIB.
He
- npaioTe 3 eKeTpoiHCTpyMeHToM y Bn6yXoHe6e3neuHOMy cepeOBUuI, HapnKlaad, npn HaBbOcTI IerKo3aMmCTnx piDIn, ra3iB a60 nIy. Pid qac po6OTn eKeTpoiHCTpyMeHTu TBOpIOuTb icKpN, kki MoKvTb pnp3BeCTn do 3aMmaHnA nIy a60 BnnapiB.
- He Донускайтse 6изько дITEе i CTOPOHHIX пID уac po6OTи 3 eNEKTpoIHCTpyMeHTOM. Ze Moxe BiДВОЛКATи BAC i npu3BecTu Do BTPaTI KОHTPOnIHO.

PONEPENHEH! Ye Bnpi6 niD yac po60Tu CTBOpoe enektpomarHIThe none! Le none MoKe 3a NeBHnx O6CTaBNH BCTynATn B KOHfliKT 3 aKTHBHNu a6o NaCUBHMn IMnlaHTatamn! Pede ekCnPyataciEIO IHcTpMeNTa DnA 3HNXeHH np3Nky cepNo3Hnx a6o CMePeTbHNx TpaBM Mn paNDMO OC6am 3 MeINuHNM imnlaHTaTM NOTPMaTN KOHCyIbTaIoo y cBOrO Iikapra i Bnpo6Hnka MeINuHoro imnlaHTaty!
- He 3aIIuIaTe eJektpoiHcTpymeNT iD doUeM a6o B yMoBax niIBuIeHOi BOIorOCTi. Boda, uo noTpaIIuA B eJektpoiHcTpymeNT, iDbuIyE pN3nK ypaXeHHa eJektpuHmCtpyMOM.
2.6 INДИВIDУАЛБHA TEXHIKA BE3ПЕКИ
-Пд ча роботи 3е点点头сгимбудые уразхи,стжп звоIMдямп та мсліпь розудлво . He пацют e 3е点点头сгимом, якшо ви BTOMленi, посявашипд дій сноготичнх рechови, anko rionu a60 likiv. HabiTb mttTeBa HeyВаджнICTь пд ча роботи 3е点点头сгимом може пиЗвectи до Ваджков ТраВМИ.
Kopntyteb 3ac6amn iHnBiyaIbHoro 3axncty. 3aBXnHaJaRaTe 3axnci OKyIapn. BnkopnstAHn y BiNObiHnx yMObx TaNX 3axncHex 3ac0ib, k npOTnIOBn peCnpiaTop, HeKOB3He 3axNChe B3yTTa, IJOM-KaCKa Ta HaByuHNKn DOIpOMOKe 3MeHUnTI pN3NK TpaBMYaBaHHra.
- YHnKaIe BnnaKOBOrO 3anucy iNcTpymEnTa. Nepu HIX NiKlNoCuTn eJektpoiHcTpymEnTdo MepeXi KnBLeHnA abo akymylTopa, 6paTu a6o nepeHoCttn Ioro, npeBipTe, uN BCTaHOBJeH NopeMnKaU y noLoXeHnA «BIMKHeHO». JaKIo nepeHoCttn eJektpoiHcTpymEnT, TpMaOnu nnapeCb Ha nepeMnKaUi XnBLeHnA, a6o NiKnIOUaTn Ioro Do DxKepeLa XnBLeHnA, KOJI nepeMnKaU xnBLeHnA nepe6yBaE B NOLOXeHHI «YBIMKHyTo», ce MoKe npIN3BeCTn Do TpaBMyBaHHa.
- He dojarytecb 3 iHctpymeHOM B pykax. 3aBXdN 36epiraTe ctiKe nOIOxHnTia Ta TpImaIte pIBHObary. Lc daE 3Mory KpaSe KepyBaTn eNeKToIHCTpymeHOM y pazi BHNKHeHHn HenepeD6aHyBaHnx CITyaCiJ.
- Iepsh hix ybimkhytn eJeKtpoiHcTpymeHT, 3HIMt b yci peyIIOBaJIbHi KInHci Ta raIKOBI kIIOU. Jkso 3aJIuShnTn taKni KIOUHa pyXOMi qactNIi eJeKtpoiHcTpymeHTa, ce MoKe npN3BecTu DO TpaBMyBaHHra.
He nepeBaHTaJyIe eJekTpoIHCTpymeH. BnKOpNCtOByIte HaneJHn eJekTpoIHCTpymeH BiINoBIDNo Do noTppe6n. IpaBnIbHo NiDi6paHn
eNEKtpoHCTpymENT dONOMOxe KpaIe Ta 6e3neuHiIe 3po6ntu po60Tu 3i IWBnDkiCtU, Ka IJIy HbOrO IpePe6aueHa.
- Kopnctyteca eIeKtpoiHCTpyMeHTOM, npuiaDjam i Hacaikamn IJnI HCTpyMeHTa 3riiHO 3 zuio IHCTpykuizIO, 3BaJauOuHa pOboUy MObu Ta po6Otu, Aky cIiD BIKoHaTn. BnKopnCTaHHeIeKtpoiHCTpyMeHTa He 3a npu3HaueHHaM MoKe CTATN npuHIOBnHKHeHHa He6e3neuHX CITyaCiI.
- Hadraite BiiNobiHn OJr. He Hadraite BilbHn OJr a6o bixyTePi. Bolocc, OJr ta pykabuCi MaOtB 6yTu Ha 6e3neuHn BIDCTaHI BID pYXOMx qactnH. BIlbHn OJr, npKpacn a6o DOBRE BOLOcc MoKyTb NOTpaNTn B pYXOMi qactHN.
2.7 BKNOPUCTAHNA TAOITIA EJEKTPOHCTPMEHTOM
- y DeякIx periohax ε ΚολοχeHHЯ,aksi obMexyIbвИКОпСТаHHЯ ВИрOБу B DeякIx onepaizyx. 3BepHITbcSДо оprAHiB MicceBoIВlaɪn 3a nopaoIOJ.
- Hikon He Do3B0JrTe BnKOpNCTOByBaTn Bpi6 DiYam, OcO6aM 3 6MeXeHIMn fi3uHMM, ceHCOPHMi i pOzymOBUM MoxJIbBOCTaMn, a6o OcO6aM, kKi He 03HaNoMnInCb 3 qm Noci6HkOM 3 ekCpIyatauii. MicceBi HopMaTnBHi aKTn MoXyTb 6MeXyBaTn Bk OepaTopa.
- Pam'yaTae, 10 onepataop abo kOpntyBaH Hece BiDnOBiDaIbHicTB 3a HeuacHi BnnaKn abo 36ntKn, 3anOdiHi iHsIM Oc6am qN iXhBOMy MaHy.
- CtopoHHi 0c06n, dITn Ta TBapuHn NOBHHi 3haxOHTncb Ha BiICTaHI 15 M BiI pO6oOi 30Hn. 3yNHHt b IHCTpymeHT, kXIO XTOCB 3aXOHTb B pO6Oy 30Hy.
-Пд ус ВИКОРИСТАНHA ИСТРУМЕТа 3aВЖДи HAДЯгАт e Mlц He B3yTTa T a DOBri StaHn. He npaцюITE r3ra3OhoKocapKOIO bocOHIX a60 y BiДКрntuX caHdAniIX. He oJraIte BIlbHm OJr a60 OJr 3 BvCraUHMn HHTkAm N U ShHypiBKn. BOH moKytb nOTpaNtU y pYxOMi YacTINH.
- He najaTe BInbHn OJAR a60 KOHTOBHOCTi, OCKIN BOHN MOxytb NOTpaNTB OTBip 3a6Opy NOBITPra.
- 3akpinitb doBRE BOIOccs, uO6 BOHO bUNo BnIe pIBHn Pneuei, dJa 3aNo6irHHn noTpanJIHHy y pyxomi qacTHnH.
-Пд ус рботи 3 Истурентом 3аьди Надягт e 3ac6и 3axnctу oprahiB clyxy. Bnpi6 duxe ryнн ta може пизвеси до Heo6opOTHOI BtpaTn clyx,Якso He doTpumyBaTuC8 iHCTpyKciu Ioo O6mexeHHBnIBy,3MeHSeHHa ShMy Ta He hadraTn 3ac6и 3axncty oprahiB clyxy.
-Пд ус роботи 3 injстурентом 3аьждн надягайтze 3axичп Okулари. Вирбник HanoplernBO pekomehdye BVKOPINCTOByBaTN Mackу Дяв BCbOTo O6JIuChy a60 3akpnti 3axичсI Okylapru. 3ВИчайсI 3axичсI Okylapru a60 coHcE3axичсI Okylapru He e HANeJxHmM 3axinCTOM. ПOTУЖHM NOBITРЯнМ CTpyMeHem ПрdmEtN MoKytb 6ByTN BiDknHyTi
3 BeiNKoIO 5BnIKcTIO y 6yNb-RAKNI MOMENT I MOxYb BiDCKOHTN BiD TBepINX NOBepXOHb DO KOpNCtUBaua.
- Парад кожим Використаняпеконaitecа, со Bci opraи Керувань Та злобіжни писчpoіnpaцють коргтно. He Використовіte inhystремп, якци посямkaч He Виккасі.
-Перед Кожим ВИКОпСТаHHМ ПЕрВіРЯ`Te KOPNYС Ha HаВиCTь NOшКоДжЕнБ. ПЕрКонайТecя,zzo 3axnChi цNTKn Ta pyuKn Ha Mici Ta HadiHNo 3aФikCoВаHi.
BukopncTobuYte rpa6JI ta mItn, 0o6 po3rpe6Tu cmITra nepei 3dyBaHnM.
- Парад кожим ВИКОПСТАнгЯМ ретельно очирпь робочу 30ни. Рпсберіт bci npedmetи, habрпклад, kamehi, bte скло, CBAXN, CTальвий дріт a60 мотузк, які можут b6ут iЗdty i Ha 3нaчHy BiДСТань пOBiTрм ВИСКОДШВИДКOSTi a60 3aПУТATИСУ BEHTUNIЯTOPI.
- He p03miuye Te Bpi6 noBepx a6o no6n3y BiD cunKOrc mItT.
- He BUKOPINCTOByTe eNEKtpoiHCTpymeHT,ЯкsoперMuKaч He BMnKa€ a60 He BmMka€ Ioro. Yci eNEKtpoiHCTpymeHTN,ЯКIMN HEMOXJIInBO KepyBaTn 3a DoIOnOMToIOперMuKaaya, cTaHOBnTb He6e3NeKy Ta Notpe6yIoTB peMOHTy.
- BnmiTb akymyIaTOp 3 eNeKTpoIHCTpymeHTa nepeD TmK 3MiHIOBaTu 6yd-b-aki HalaStyBaHHa, 3amHrTu KOMNJIeKTyBaJbHi aactuHn a6o nepeD 36epirAHnem eNeKTpoIHCTpymeHTa. Taki 3anO6ixhHi 3axOdi 6e3neKn 3MeHsuToB pU3NK BnnaIkoBOr0 3anycky eNeKTpoIHCTpymeHTa.
36epiraite hCTpymeHTn, 90 He BnKOpNCOTbOyTOBcA, nOdaJI BiD iTei He Do3BOJRAte Oc06am, rki He MaIOMb DOCBiDy PO60Tn 3 TaKIMN iHCTpymeHTAmn a6o He 3HaIOMi 3 UIMN iHCTpyKcIaMn, KOpNCtBuATncb eJeKTPOIHCTpymeHTom. EJeKTPOIHCTpymeHTn CTahOBnTb He6e3neky B pykax HeNoCBiDueHnx KopNCtYBauiB.
- Binkohynte haJexHe texHicHe 6cIyROBvBaHHe eKtpoiHCTpymeHTa. IpebipraTe Ioro Ha npEiMet 3MiUeHHa 6o 3aTnCKyBaHHpyxOMHX qACTIN, 3JaMaHIX qACTIN Ta 6yd-b-AkX INuX yMOB, kI MoKytB BVInHyTuHa pO6OTy IHCTpymeHTa. Y pa3i NOrkodKeHH eKtpoiHCTpymeHT cIid 3dATN B peMOHT, nepH hIX KOpNCtYBaTnc Hm. YaCTO HeuacHi BnPaDKn TpaJIIObCBAHAcIIDOK HeHaJIexHOro TexHicHOro 6cIyROBvBaHHe eKtpoiHCTpymeHTiB.
2.8 BUKOPUCTAHNA DOJIA 3A AKUMYJTOPHIM IHCTPymeHTOM
- 3apädkaite liuhe 3a donomoro 3apändoro npictpo, Bu3naueho Bnpo6hukom. 3apädnnpictpi, kni piXoDntb dIy akymnyTopiB oDHO BNDy, MoKe cnpuHHTn pN3NK IOxexj y Bnadky IORO BkOpNCtAHn 3 iHsIM akymyJrTOPM.
-
3 eNeKTpOiHCTpyMeHTAMN cIaB VbKOpNCTOByBaTN IaIe npu3HaueHi dIa HIX aKymJIaTOpHI 6aTaPeI. BvKOpNCtAHnH 6yDb-aykX INHux aKymJIaTOpIB MoKe npu3BeCTn Do TpaBMn a60 Noxekxi.
-
Koln akymyjatop He BUKOPUCTOBYcBc, noTo cId TpMaTn OKpeMo BiD MeTaJIeBXnpedmetiB - 3aTnCKaivB panepy, MoHET, KInOuiv, CbXivB, uypyniB Ta iHxN x Di6hNx npedmetiB, kki MOKytb 3aMKHyTN Klemu. KopOTke 3aMnKaHH Klem aKymyJrTopa MoKe CTATn pRUnHOo onIKIB a60 noKexi.
- y haTTo Baxkux yMOBax ekCnIyatauii 3 akymyIaTopa MoKe BuTIkaTu piDIna; He TopkaiTeCb ii. KaIO BUnaKoBO BV BCE KTOpKHyInci ii, ue MlcE cIe npOMTu BOIOU. KaIO pDiHa NotpaHua B Oci, cIe 3BepHyTncs 3a MeDnHO IO DOnOMOrO. PdIna, kA BnCTynae 3 akymyIaTopa, MoKe cnPunHHTn IopDa3HeHHa a60 onIKn.
2.9 PABUNJA TEXHIKU B3NEKINJIA KUMYJATOPHOI RA3OHOKCAPKIN
BukopncToBynte eien Bupi6 tIbKn IaI ne, Iyaknx BIn 6yB po3po6neHn.
-Пд ac trpaHcnpTuBaHHa Ta 36epirahnBnMaIte aKymyIaTOp.
36epiraTe ra30HOKocapky B npIMiueHHi, KOJI BOHa He BnKOpNCTOByETbCra. Ra30HOKocapky cIiD 36epirATu B npIMiueHHi B cyXOMy, 3aKpITOMy, He DoCTynHOMy dJIa diTei, npIMiueHHi.
2.10 OBCJIyTOBByBAHHJ
- 06cnyrobyBaHNe eIeKtpoiHCTpymeHTa NOBHeH IpoBOOHTu TIlbKn KBaniΦiKOBAHn cneiaJIcT, BVKOpNCTOByUOn BVKIIUChO opriHaJIbHi 3aNaChi qactHn. Lc 3a6e3neuHb NaiHy po6Ory IHCTpymeHTa.
- Пара Довим ВИКОпСТаHHЯ Машину NOВиЕн ПeрБіріті KВаJIФіКOBаHи cneцIANICT i BIDpEМоNTуВaTи II y pa3i noTpe6n.
2.11 3AJIHJKOBI PN3IKN
- 03haionMeTcB 3 BnKOpCTaHHM 1eMaunHn 3a DOnOMoTO 2bOTo Noc6HnKa 3 eknnyatau. 3anam'raTne npabnla texhikn 6e3neKn i TOnHO dOtpmuyTeCb ix. Ce DonomOxge 3anobirn pn3nKam i He6e3neci. 3abXdn 6ydbte HanoROTObi npn BnKOpCTaHHi 1eMiunHn, 106 BN 3a3daJIerIb 3MOrnn p03ni3HaTu i CnpaBHTncB 3 pN3nKamn. 5BnDke BTPUaHn MaOxge 3anobirn cepio3Hm TpaBMam i NooKOJKeHHo MaHa. Akuo e 6ydb-1kHeCnpaBHOcti, BumKHITb ra3OHOKocapKy Ta BmMitb akymyTAop.
- HabitякючITKOДOTPIMyBaTnCЯВсixIHCTpyKcii,ВCEЖЕЯкTopи,Яki MOxytb npu3BecTudo He6e3Neku,HaNPknaJd:
-BiDknDaHHn YacTHN npEpmTeB, 0o6pO6HIOJtbcra.
- TpaBm BiD Bi6pauii:BVKOpNCTOByTe CneuaIbHi pyuKn Ta HAmaraTecr 3MeHunTPO6oOy uac i BnIaN.
- TpaBm BID 7umy: HndraaTe 3ac06n 3axncty opraHIB clyxu Ta HamaarTeC 3MeHsntn p6ooun yac i BnIb.
- Bdunxahnny Ta YaCTOK.
- TpaBMn BiД npeДmEtIb, lo BiДnIaIbTb BiД le3 eIeKTpOInHCTpyMeHTa. 3abJdNn HndraIte 3axnChi OkyIapn.
3aKpiTe KpnsKy 6aTapeHnOro BicKiCy.

PONPEIXEHH: Kpnska 6aTapeHoro BiDckiy Mae 6ytu 3akpTOIO. Jkso BOHa 3akpTa He NobHicTIO, Ra3OHOKocapKa He bye npauObTu.
BIMMaHHa:
PiiHIMITb KpiuKy akymylatopHoro BiDcKiy. BnMItb akymylarTop, HaTncHyBnHa KhoNkpo36NoKyBaHHa akymylarTopi, Ta BnTgHiB akymylarTop.
BkaizBki zuoIO nobHOi 3apRAnDyIb. y noci6HnKax 3 ekCnlyatauii akymyIaTopa Ta 3apRAnHOrO npicrpoI dIyBaWoTO akymyIaTopa.
4.3 INEPUJE BUKOPUCTAHN
Ipebeipte akymyIaTOp:3o6paXeHHa 3.8

Ha MOMENT npiD6aHnA kUyMylaTOp 3apJxKeHn He NOBHicTIO.
Ipeed nepshm BnKOpucTaHnMaB Bnpo6y BcTaHOBiTb aKymyIaTOP B 3apAHDn npucpti Ta 3apAidt b Ioro IOBHicTIO.
Bybte Oc06blBO yBaxHpi npn nepwOMy BIKOPnCTaHHI ra3OHOKocAPK: 3OcepeBtce Ta pncBtNTb BCIO CBOIO yBaIg cybOMy nepwOMy BIKOPnCTaHHIO. 3p06iTB nepu npo6y Ha BInbHOMy npocToPi 6e3 JODNHx nepeXKOd i HABKOnuHix PnpdmTIB.
4.4 EKCNJYATAU

PONPEJXEHH! Kocapky MoJHa BnKOpNCTOByBaTn TIlbKn HaDbopi, iHi BЯKOMy pa3i B 6ydIbI. Kocapka Ma€3aIIuShaTncb Ha BiKpntomy NOBITpi pInHaMHI npOTarom DBox rOdn Nepei nepemiiueHHam y 6ydIbIIO.
3anyckBnpo6y:3o6paXeHHaB 3.8do3.11

PONEPENJEHN! Tocpe pyxome ne3o. Hikonn He HamaraiTeCz 3mHHTu po6Otu zboTO nepemKaua Ta CnCTeMn 3an06jXHoro KIOUca, OCKINbKn ue MoKe npn3BecTn Do OTPMaHHa cepNo3HOI TpaBMn.

PONPEДЖEHH! KOnN MOTOP BiIDKIIUOaεTbc8, Ne30 npoIobJxye 6eepTaTnC7e KInbKa cekyH. Tomy He TOPkaIteCb HIXHbOi YactINH rA30HOKocapKn, NOKu pi3aJIbHa qactInHa NOBHICTU He 3yUnHHTbc8!
BCTABTe NOBHCTIO 3apJxKeHn AkymyIaTOP. HATNCHTb I yTPmMyIe KONky nepemKaua. NotarHtB 7taHry nepemKaua y 6ik pyuKa Ta BiDnyctITb KONky nepemKaua, 0o6 3anyCTnTn KocapKy. Uo6 3ynHnTn KocapKy, BiDnyctITb 7taHry nepemKaua. 3aueKaIte, DOKN ne3O NOBHCTIO 3ynHnTbCra, nepu HIX BVKOHyBaTn 6yd-b-aki peYrIbOaHHN KocapKn.
3ano6ixhnn KIIOU:
3anobixknn KJIouc E BmNkAaBnM npiCtpoem dna 3anob6iraHn HehABMaCHOi AKTNaCuIra3OHOKocapKn. He BnMaTe KJIOU pni 3BnuAaHni po6oTi; 3anobixknn KJIou He e npCtpoem KepyBaHn, knn Kepye p6oToIO piaJbHorO npuJaJa. 3abKdN BnMaTe 3anobixknn KJIou, KOJIn 3aIIwaTe ra3OHOKocapKy 6e3 Hargny.

YBATA! 3aBXKn HaJraTe 3axuChi OkyIapn, Miue B3yTTa Ta Dobri stan. HJaRaIte pecnPipatop, kso po6ota nepe6b4aAc yTBOpENHn nnL. TaKoX peKOMeHDoBaHo HaJraTu 3axuChi pyKaBuNci.
Пи д скocinня мiцно Trpimamte руky oboma rykanm. He hamaraiTece scKocuTn doBry tpaby 3a pa3. 3amictb zuboro kocitb raoh noctynobo. 3po6iTb nepepy Ha oINH uDba dHi mixKocHHM,doKN ra3OH He ctahe pibHM. Пи дс кocinня по Краях obOB'ЯЗКOBO NOBepHITb iHCTpymeT NIBM 6OKOM Do KpaI, a NOTIM nepemiuye Te IHcTpymeHT y3doBx KpaI.
PONEPEDKEHH: kkuo Kocapka 3itKHynac3i CTOpOHim npedMetom, 3yHInHb MOTop. Bmmitb 3anobixhnn Kluou, yBaJxHO orIaNbte ra3ohOKocapky Ha npedmet NOsKOxHeHra Ta BiDpeMOHTyTe ii, nepu HIX 3anyckatn 3HOy. Iocuneni Bi6paui ni d acpobTu Kocapkn E noka3HkOM ukoOxHeHH. Kocapky Tpe6a HeraHno nepeBipuTn Ta BiDpeMOHTyBatn.

Ioctppe Ie3o 3NaHNO iINBnUHTb npaue3daTHicTb KocapKn, OcO6JIuBO pnp KocinHi Bucokoi TpaBu.
Kocitb nonepek cxiny, a He Bropy i BHN3.
- BydBe NaI3BnauHoyBaXHi, 3MiHIOUCh HAprrMOK Ha CXNIi.
- He KociTb Ha 3aHaITo KpyTnx CxuIax.
- Bydte oO6JIbBO 06eJHnI, pyXaUChc b y 3BOpOTHomy HaprMy a6o Taryu npicTpii do ce6e.
3yyninHb ihcTpyment i doyeKaTeCra 3ynnKn Ie3, JaKIO Kocapky nOtpi6HO HaxnIHT (Jn TpaHCnopTyBaHH na c npetHy iHux nobepxohb, KpIM TpaBn, a TAKoK nn d ac TpaHCnopTyBaHH iHcTpymenta Ha diJnHKy dJa KocIHn Ta 3 ciCi diJnHKn). 3abXnn nepehoCt b Kocapky 3a pyuKy.
- He haxinjte MaunHy niz ac3anycky a60 yBIMKHeHHn DBNrHa.
- He 3anyckaIte iNCTpymEnT, cT0yU npeD BnynCKHIM OTBOPOM.
- He ha6njuyTe pykn a6o HOrn do qactnH, 10 o6epTaHObC. 3aBxJn TpMaItecb Ha BiDCTahi BiD BnynckHoro OTbOpY.
- BnKOpNCToBvIe Bnpi6 TiIbKn B pO3ymHn Yac - He paHO BpaHci a60 Ni3Ho BBeuepei, KOJI MOnKHa NopUHTN CnOKi JIOJeI.
Hikon He BnKOpncToBnyTe iNctpyMeHT y Bn6yXone6e3neuHomy cepedOBuui.
- He BUKOPUCTOByTe iHCTpyMeHT npn noraHnx noroDnHex yMObax, oO6JIbBO, kKIO icHyepn3uk ydapy 6nckabKn. He BUKOPCTOByTe iHCTpyMeHT npn noraHomy OCBITNeHi. Opepatopy notpi6Hni qITkn orIyad po6OoI 30Hn dJa BnABHeHHa NOTeHciHnx He6e3neK.
Bukopustahna 3ac6ib 3axncty opraHIB clyxh 3nKye 3daTHiCtb yTu nonepeJxehna (kpiu a6o Tpmbory). OepaTOp nobunen 3Beptatn DoaTKOBy YBaRy Ha Te, 00 Bi6yBaCTbca B p6ooyi 30Hi. He BiDBoIkaItecra, a 3abKm 3OcepeDbTeecHa 3aBdaHHI.
BnKOpNCTaHHaHAnIogUHHxIncHtpymEnTIB no6n3y 36ilb7ye pn3NK OTpMaHHa TpaBMn CnyxTa MoKJIbICt bInuXn IuDei NToPanTu y BaSu pO6Ouy 3Ony.
Miuzho ctiIte Ha Horax i TpImaIte pibHObary.
- He doTaryuTeCb 3 iHCTpyMeHTOM B pykax. Lc MoJKe npU3BecTu Do BtpaTu pIBHOBarN. 3aBxDn 36epiraute CTiKe nOLOXeHHr Hir Ha cxImax.
- IpeceyBaIteCb Kpokamn, hikonn He 6ixiTb. TpMaIte Bci qactHn CBoro Ti na noaI BiD 6yDb-RAKnx qactHn, 10 pyxaiotbcra.
Hikon He BMnkaTe iHcTpMeHT 6e3 BiIDNoBIDHOO 6naHaHHa.
- He moni kiyute Bnpi6 6ydb-aym qHOM i He BnKOpNCTOByte Detani Ta npuadny, kI He pekomeHdoBaHi Bnpo6hNKoM.

JaKIo Bvpi6 BnAb, OTPMmAB CnIbHn yIap a6o noaB HeHOpMaIbHo Bi6pyBaTu, HeraIHO BmMKHITb HAcoc i nepeBipTe Ha HaNBHICTh bNoWKoJKeHb a6o 3"JcuyTe npuHy Bi6pauii. Bydb-aki NoWkoJKeHHa cIiD BiIDpeMOHTyBaTu HaJeKHm YInHom a6o BiIdaTu Ha 3aMiHy B aBTOpN3OBAHni cepBicn IeHTp.
- 3H3NTn p3Nk OTPMaHHa TpaBMN BiD KOHTaKTy 3 aCTNaHAMN, 30 o6eptaTObC4, 3JxN BmkaTe iHcTpymENT, BmMaTe aKymyIaTOp i DooekaiTeCn NobHOi 3ynHKn TaKnx YactNH:
-пегд Ушеним a60 усуненин засmicенин;
-пегд ТИМ, як 3алшити HaCoC 6e3 HaJЯДу;
-NepeI BCTaHOBHeHHa6o BnJaHeHHm npuJaDja;
- nepei nepebipkoio, 06cnyrobyBaHHa m a6o NOBOJKeHHaM 3 Hm;
-Якто Вириб поунан HeHOpMaJIbHo Bi6pyBaTn (HeraiHo NepeBipTe).
Bümmann Ta 3apjdxahn akymnyaTopa: 3o6paXeHH 6.1 Ta noci6Hnk 3 ekcnnyatauii akymnyaTopa
- Hatncihb KhoNk y po36nokyBaHn B ceHTpi BepxHbOi YactnHn akymyIaTopa, 0o6 BnHrtn Ioro 3 Bvpo6y.
- Bctanobitb akymyIaTOpB 3apAHN pniCTpi, 3cyHyB ioro y 3aikcoBaHe noloxeHHdo KlaaHnA.
- Koln 6lmae 3eeleni iHdkaTOp, akyMnyAToP 3apJxkaetbCn. Koln 3eeleni iHdkaTOp 6Ibwe He 6lmae, akyMnyAToP nobHiCTU 3apJinBcN.
5. TPAHCNOPTYBAHH
TpaHcnpTyBaHHa iHCTpyMeHTa a6o aKymyIaTopa MoKe BmMaTaN DoTPMaHnneBHNx BmOr, xapaKtePHNX dJaBaWoI KpaIHn. Byb IacKa, NobaxaJIe ix, 3BepHyBUnCb Do opraHIB BlaDi CBOei KpaIHn. IpeKoHaIteC, 10 TempePaTpa NiJ cac TpaHcnpTyBaHHa HikOJIe He 6yJe BuxOUnTn 3a Mexi TempePAtyn, 10 BkazHa y poZdII 10do 36epirAHn.
5.1 TPAHCNOPTYBAHHI IHCTPYMEHTA
3o6paXeHHaI6 6.1do 6.8
Bumkhitb Bupi6 Ta BnMItb akymyIaTOp.
3aBxdi nepehocbte Bnpi6, trmaoun 3a Ioro pykU. 3axnttBnpi6 BiD BaKnx yapib a6o CunbHex B16paui, kI MOKytB BnHKHTn iI d ac napeBe3HnB TpAHCNoptHOMy 3ac06i. 3aikcnyte Bnpi6, 06 3ano6irtn noor NaDHIO a6O zickOB3yBaHHIO. He ndabaTe Bnpi6 BnINBy coHnHns npomeHIB.
5.2 TPAHCNOPTYBAHHJ LITIEBUX AKYMILTOPIB
IbItcnoi6HnK 3 ekCnpyataaui akymyIaTopa oio noDaalbooi iHΦOpMauiii.
6. 3БЕPIГАньВЗМКУ
3o6paXeHHa 6.9
BnMItbakymyIaTOp3eneKtpoiHcTpymenta.
Ipeed trpBaJIIM 36epirAHnHm nepeKoHaTeC, 03apJd akymyIaTopa BiNobJaE IHCTpyKcIbM B nociBHKy 3 ekcnlyataii akymyIaTopa. DToPmUyTEcBCix IHCTpyKcI, 0o HabeHei B pozdi npo 36epirAHn HnXue.ДЯ 36epirAHn MIn peKOMeHnyEMO BIKOPINCTOBYBaTn OpriHaJIbHy ynaKOBky abo NaHApRbATn IHCTpMENT BiNObiHDIO TKAHNHO a60 KOpO6KO, 0o6 3axNCtTN Ioro BiD nIIy.
7. 3BEPIgAHH
36epiraTe iHcTpymEt i akymyIaTOp B uNCTOMy, cyXOMy, 1o6pe npObitpObAHOMy Micci 3 TemnepaTypoIO bID 4 do 24°C. HakpiTe Ioro, 1o6 3a6e3neuHTn DoaTkOBni 3axnCT. IЯ 36epirHaHMy peKoMeHnyEMO BInkopncTOBvBaTn opirHaHbHy ynaKOBky a60 hakPbAtn iHcTpymEt BiINOBiDHO tKaHHOIO a60 kopo6koIO, 1o6 3axnCTnI NO rO bID nIIy. HadiHNo 3akpinitb iHcTpymEt y pazi TpaHcnOpTybaHnY.
7.1 36EPIAHHBVIPO6Y
3o6paXeHHaB 6.1do 6.9
BnmiTb akymjIop3 eIeKtpoHcTpymenta. PeTeIbHO orJHbTe npncptiHa npedMe 3NoweHnx, He3akpinHeNx a6o noKoJxehNx DeTanei. Ouncitb IHcTpyment nepe 36epirAHm. He niDaBaIte Bpi6 BnInBy coHauHnx npomeHib. IpekoHaTeCsA, 0o Bpi6 3aBXd 3axuHn BID xOIoDy ta BOIorn. IpekoHaTeCsA, 0o Bpi6 3hAxOnItbcB Trop3oHTaIbHOMy nOIOKeHHi.
3aBkDn daTMe MaunHi OxONoHyTN nepei TmIK NoCTaBtN Ha 36epirAHHn.
7.2 3BEPI RAHH JITIEBUX AKUMYJATOPIB
3o6paekenne 6.9
IpekehauTecra, 10 pireb3a4y akymnyTopa BiIOBIAe pekomeHdoBaHomy pIBHO B noci6nky 3 ekcnnyatauii akymnyTopa. Nibitbcn oci6nK 3 ekcnnyatauii akymnyTopa nooNoanbwoi iHopmaui.
8. TEXHlUHE O6CJyTOBvBAHHa

HE6E3NEKA! Pn3nk TpaBMn uepe3 ypaXeHHa eNeKtpuHm CTpyMOM.
BnMaIte akymyIaTOp nepei HanaWtYBaHnM, npeBipKoIO, uNueeHHaM a60 36epiraHHm Bnpo6y.
8.1 YIJIeHHJ
3o6paXeHHa 5.1
PpIbKopnyc i pIacTKOBI eMeHtN BOJoroIO, M"raKOHO raHupKOIO. He 3actOCOByTe cInbHi pOzHHNKn a6o MnHi 3aco6n Ha pIacTKOBOMy Kopnyci Ta pIacTKOBHX eMeHtax. DeKei no6yTOBi MnHi 3aco6n MoKyb CnpuHHHTn NoIKoJxHe HnTa np3BecTn Do ypaXeHHN ENEKtpuHHM CTpyMOM.
- TpimaiTe Bci raiKn, 6oJItn Ta rBnHTn 3aTyrHtMn dIy UTPIMaHH npNCtpoHy 6e3neuHomy po6Ouyomy cTaHI.
- Yacto nepeBipIte TpaBo36ipHnK Ha npEIMeT 3NoWeHHa60 NooKoJKeHHa.
- Bydte obepexhi niz yac hanahtybaHHia HcTpymeHTa, 0o6 3anobirn notpanlHnnaIbciB mix pyxOMMm le3amn Ta HepyxOMMm qactnHaMn iHcTpymeHTa.
- 3aBxDn daBaIte iHCTpyMeHTy oxoIoHyTu nepeD 36epirAHnM.
-Пд уасocnyroBvBaHЯ le3 MaITe Ha yBa3i, lsO, He3BaXaIOUH Na Te, lsO IXxepeIo XINBJIeHHA BUMKHeHO,Je3a MoJyTb 6yTu pyxOMi.
- 3ношени та пошкожени чашини замину зарази 6eэпки. Викоростову te Лшешоригалыни зарази та пиладя.
8.2 3AMIHA JI3A
3o6paXeHHa 5.2
Поверніт b кору Na6iK, 606 OТРIMaTи DoCTyn Do HNKHbOiЧаTNHIn IHCTpyMeHTa. Po3aTuYTe DepeB'Янni 6pyc a6o 6ydb-Як e iHne pIncTocyBaHNЯДЯ 6bOKyBaHNmIx Jezom i Kpaem Dekn, 606 3aNo6irn BInhOMy ObeptahHIO le3a.3a DOnOMOrIO raKOBORO KInOua Nocla6Te raKy le3aHa HNKHII quchNI pIncTPOIO. 3HIMt braKy le3a, wai6y Ta le3o 3IHCtpyMeHTa.
UctahOBiB HOBe Ie3o Ha BaI, a NotIM 3akpinITb NOrO WaI6OIO Ta raiKOIO. 3aTARHITb raiKy Ie3a. KpyTHNI MOMENT 3aTAYBaHHraIKN Ie3a MaE 6yTu 25-30 H*M. 3akpinIBuIN Ie3o, nepeBipTe BpyHy, cn BCE o6eptAeTcbraK, kTpe6a.
8.3 306PAXEHH B PO3IBPAHOMY BUNJI
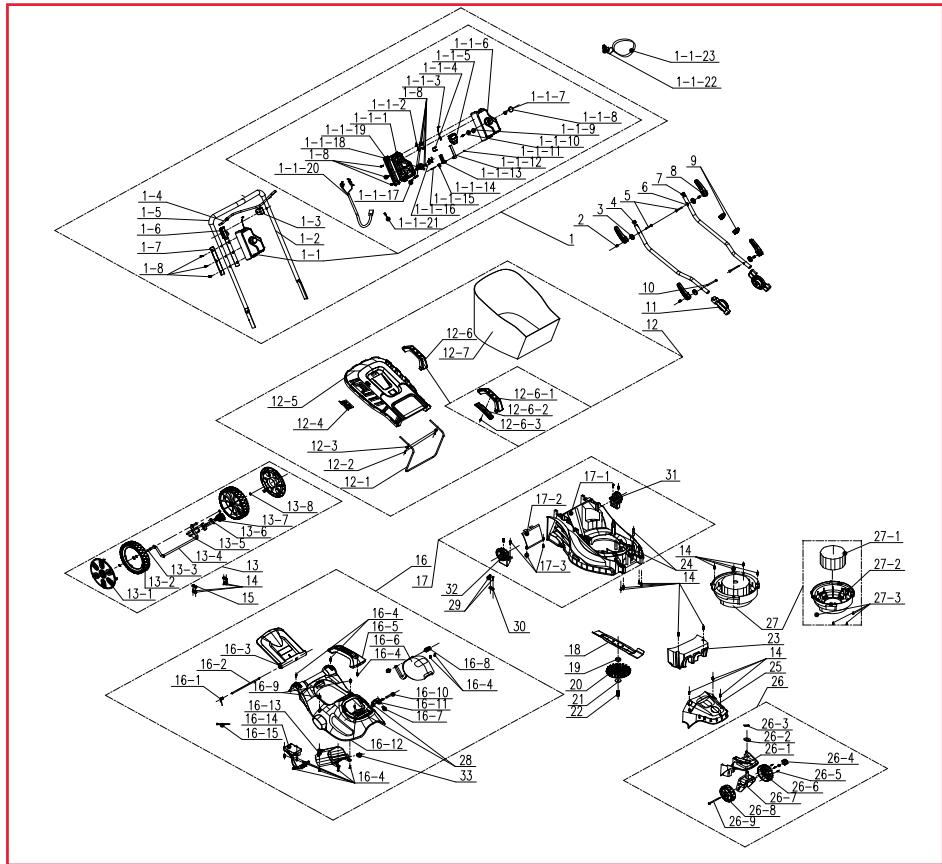
| ПОЗ. | HOMEPДETAЛI | ОПИС | КИлькICTь |
| 1 | A021039-018-00 | Руча в зборi | 1 |
| 1-1 | A022034-015-00 | Компонent SFLOKу перемикуа | 1 |
| 1-1-1 | A022034-006-00 | БлOk перемикуа | 1 |
| 1-1-2 | A021039-021-00 | Фісymbальна плacrпа | 1 |
| 1-1-3 | A021039-028-00 | Металевий дріт | 1 |
| 1-1-4 | 8343-510801-02 | Тригэрна Кногka | 1 |
| 1-1-5 | 8042-510902-01 | Переми acqu | 1 |
| 1-1-6 | A022034-005-00 | БлOk переми acqua | 1 |
| 1-1-7 | 8342-510505-00 | Прочина Кногки | 1 |
| 1-1-8 | 8312-519201-00 | Кногka | 1 |
| 1-1-9 | 8208-519201-00 | Ушільноевальke кільце | 1 |
| ПОЗ. | HOMEPДETАЛ | ОПИС | КИлькICTь |
| 1-1-10 | 8183-519201-00 | Плacrина | 1 |
| 1-1-11 | 8NH-03D01 | Гайka | 1 |
| 1-1-12 | 8183-510906-00 | Плacrпгачок | 1 |
| 1-1-13 | 8183-510902-02 | Налрмна плacrина | 1 |
| 1-1-14 | 8342-510903-00 | Звіта пружінha | 1 |
| 1-1-15 | 8SJAD03-25 | Дрибни кріпльnéngвіnt | 1 |
| 1-1-16 | 8323-510903-00 | Кontаekt клоча | 2 |
| 1-1-17 | 8184-516201-0000110 | Фіксатор shнураЖивления | 1 |
| 1-1-18 | A022034-008-00 | Травач | 1 |
| 1-1-19 | A022034-007-00 | Задніе Фікsovанegrпдzo | 1 |
| 1-1-20 | A022034-009-00 | Еlement рч neuropья | 1 |
| 1-1-21 | 8413-515001-00 | Повдійни КLEMніngья | 1 |
| 1-1-22 | 8045-513001-00 | Клоч | 1 |
| 1-1-23 | 8214-510501-00 | Клочові ремінцi | 1 |
| 1-2 | A022034-010-00 | Штокштовхача | 1 |
| 1-3 | A021039-011-00 | Опера | 1 |
| 1-4 | A021039-003-00 | Таярев | 1 |
| 1-5 | 8331-515701-00 | Губka | 1 |
| 1-6 | A021039-010-00 | Травач | 1 |
| 1-7 | A021039-009-00 | Втуліа trубки | 2 |
| 1-8 | 8206-000001-00 | Гвіnt | 11 |
| 2 | 8086-513001-00 | Штофт | 4 |
| 3 | 8202-513001-00 | Швідіковозагскна<|rotate_down|>klадka | 4 |
| 5 | 8206-513001-00 | Болт | 2 |
| 8 | 8003-513003-00 | Швідіковозагскна ручка | 4 |
| 9 | 8007-512001-00 | Скоба | 2 |
| 10 | 8206-513002-00 | Гвіnt | 2 |
| 11 | A021039-012-00 | Рergуливальny зубец | 2 |
| 4 | A021039-004-00 | Штокштовхача | 1 |
| ПОЗ. | HOMEPДETAЛI | ОПИС | КИлькICTь |
| 6 | A021039-025-00 | ШтOKштовхачa | 1 |
| 7 | 8371-513001-01 | Засувka | 2 |
| 12 | 8440-513005-00 | Еlementоно
Травозбірника | 1 |
| 12-1 | 8292-513002-00 | Опора | 1 |
| 12-2 | 8SNAB50-16Q | ГВИNT | 2 |
| 12-3 | 8WT-05B01 | Шаіба | 2 |
| 12-4 | 8181-513001-01 | Иndиатор | 1 |
| 12-5 | 8020-513005-00 | Верхая крипka | 1 |
| 12-6 | 8440-512012-00 | Ручка в зборi | 1 |
| 12-6-1 | 8001-512002-00 | Чужая Травозбірника | 1 |
| 12-6-2 | 8020-512006-00 | Ножнaya крипka | 1 |
| 12-6-3 | 8SJAB40-14Q | ГВИNT | 1 |
| 12-7 | 8104-513003-00 | ЗатICCач | 1 |
| 13 | A021039-020-00 | Вал кoleса в зборi | 1 |
| 13-1 | A021039-015-00 | Ковпak кoleса | 2 |
| 13-2 | 8121-511002-02 | Заднec кoleсо | 2 |
| 13-3 | 8202-989101-00 | Хвileясташайба | 2 |
| 13-4 | 8440-513001-00 | Еlementоно валa | 1 |
| 13-5 | 8SQDD05-12D | Болт | 2 |
| 13-6 | 8003-513002-00 | Чужая ретунованna
ВисOTи | 1 |
| 13-7 | 8NE-05D01 | Гавka | 2 |
| 13-8 | 8CC-10B | Ел actичne kільце дія
вала | 2 |
| 14 | 8SNAB50-16Q | ГВИNT | 17 |
| 15 | 8304-511002-00 | Установна пл actина
oci | 2 |
| 16 | A022034-016-00 | Верхая крипka в
зборi | 1 |
| 16-1 | 8342+513001-01 | Прочина | 1 |
| 16-2 | 8081-513002-00 | Задnia крипka валa | 1 |
| 16-3 | 8020-513004-00 | Задnia кriшka | 1 |
| 16-4 | 8206-000001-00 | ГВИNT | 11 |
| 16-5 | A022033-008-00 | Чужа | 1 |
| 16-6 | A022034-003-00 | Шитok | 1 |
| ПОЗ. | HOMEPДETAJI | ОПИС | КИлькICTь |
| 16-7 | A022033-012-00 | Штейфт | 2 |
| 16-8 | 8184-282101-00 | Фіксвальна пл actина | 2 |
| 16-9 | 8206-000001-00 | ГВИNT | 10 |
| 16-10 | A022034-011-00 | Вал | 1 |
| 16-11 | 8044-780502-00 | Кнорka | 1 |
| 16-12 | A022034-002-00 | Верхая крипka | 1 |
| 16-13 | A022034-004-00 | Коробka akumулайтора | 1 |
| 16-14 | A022034-012-00 | Еlement ронika в зборi | 1 |
| 16-15 | 236-1004 | Кабельнастяжka | 2 |
| 17 | A021039-022-00 | Еlemententи Шасi | 1 |
| 17-1 | 8006-513001-01 | Шасi | 1 |
| 17-2 | 8020-513006-00 | Ножнaya крипka | 1 |
| 17-3 | 8SNAB50-16Q | ГВИNT | 2 |
| 19 | 8334-513002-00 | Муфта валa | 1 |
| 18 | 8231-513001-03 | Лесо | 1 |
| 20 | 8403-513001-00 | Логаты Вентлиайтора | 1 |
| 21 | 8186-511003-00 | Картоний кожух лесa | 1 |
| 22 | 8206-511001-01 | БOLT Кріпеленя лесa | 1 |
| 23 | 8301-513001-00 | Блok пrotиаги | 1 |
| 24 | 8334-911603-00 | Кришka podушки | 2 |
| 25 | 8020-513003-00 | Пere'dney Кришka | 1 |
| 26 | A021039-023-00 | Унivерсанье кoleсов зборi | 1 |
| 26-1 | 8020-513007-00 | Пere'dneшaci | 1 |
| 26-2 | 8324-463101-00 | Зашільник | 1 |
| 26-3 | 8091-940202-00 | Штейфт | 1 |
| 26-4 | A021041-010-00 | Ручka-баранник | 1 |
| 26-5 | 8SJAB40-16Q | ГВИNT | 3 |
| 26-6 | 8020-513009-00 | Ковпak павoro кoleса | 1 |
| 26-8 | 8020-513008-00 | Ковпak liвого кoleса | 1 |
| 26-7 | A021039-026-00 | Підставka за Кріпеленя кoleса | 1 |
| 26-9 | A021041-018-00 | Болт | 1 |
| 27 | 8440-513027-00 | Мотор в зборi | |
| ПОЗ. | HOMEPДETАЛI | ОПИС | КИльКICTь |
| 27-1 | 8401-513002-00 | Бeзцітковий мотор | 1 |
| 27-2 | 8141-513021-00 | Сiдzo мотора | 1 |
| 27-3 | 8SJAN05-16D | ГВИNT | 4 |
| 28 | 8SJAB50-75Q | ГВИNT | 2 |
| 29 | 8206-000001-00 | ГВИNT | 2 |
| 30 | 8184-516201-0000110 | Φικсатор унuya
ЖИВLENHЯ | 1 |
| 31 | A021039-013-00 | Φικсυвалné зуб ecь | 1 |
| 32 | A021039-032-00 | Φικсυвалné зуб ecь | 1 |
8.4 YCYHEHHH HECIPPABHOCTEi

HE6E3NEKA! Pn3nk TpaBMn uepe3 ypaXeHHa eNeKtpnHIM CTpyMOM.
PonepeJxehn! Pepd BnKoHaHHm 6yDb-aykux po6it 3 ycHyHeHH HeCnpaBHocTe BUMKHItb Bnpi6.
Thank you for choosing this product. Upon designing and manufacturing our products, we place all of our efforts into ensuring an excellent quality that meets the needs of the users. Following these instructions allow to optimize the lifetime
IMPORTANT! IN ORDER TO OBTAIN THE UTMOST SATISFACTION FROM THIS PRODUCT UPON SETTING IT UP, USING IT, AND MAINTAINING IT, WE RECOMMEND THAT YOU CAREFULLY READ THIS USER MANUAL BEFORE USING THE PRODUCT. PLEASE PAY ATTENTION TO BASIC WARNINGS RELATING TO SAFETY WITHIN THIS MANUAL, AND KEEP THE MANUAL FOR LATER REFERENCE.

IMPORTANT, KEEP THE MANUAL FOR LATER REFERENCE : READ CAREFULLY
Contents
- Intended use of Battery Lawn Mower 36cm
- Storage
- Safety Instructions
- Maintenance
- Technical data
- End of life
- Assembly
- Warranty
- Transportation
- CE declaration of conformity
- Wintering
1. INTENDED USE OF BATTERY LAWN MOWER 36CM
This product is intended for outdoor use only, and must not be used inside a building under any circumstances. The cordless lawn mower is only intended for use in dry and well-illuminated conditions. This lawn mower is only intended to be used for cutting grass in domestic use. Do not use it for others purposes. The product is not intended to be used by children or persons with reduced physical, mental or sensory capabilities.
After unwrapping the packing, make sure that the product is complete with its accessories (if any). If the product is damaged or has any defect, please do not use it and bring back it to your dealer. If you give this tool to another people, please give him also this instruction manual.
Please note that our equipment has not been designed for use in commercial, trade or industrial applications. Our warranty will be voided if the machine is used in commercial, trade or industrial businesses or for equivalent purposes. This product has been designed to be used over a period of 6 years (Expected lifetime).
2. SAFETY INSTRUCTIONS

WARNING : Read all safety warnings and all instructions. Failure to follow the warnings and instructions may result in electric shock, fire and/or serious injury. Save all warnings and instructions for future reference.
2.1 GENERAL SAFETY WARNINGS
- Do not operate the product near glass enclosures, automobiles, trucks, window wells, drop-offs, etc. without properly adjusting the aim of the discharge.
- Do not force or overload the product. The product will perform better and safer when it is used at the rate that it was designed to work at.
- If the product is already assembled, please make sure that all screws are tightly fixed before using it. If the product requires that you assemble it, please make sure upon opening the package that all the elements needed for setting up the product have been provided. If the product is damaged or has defects, do not use it and take it back to the nearest store.
- The term «power tool» in the warnings refers to your mains-operated (corded) power tool or battery-operated (cordless) power tool.
2.2 SYMBOLS ON THE PRODUCT

Complies with European standards: This symbol means that this appliance is compliant with the applicable European directives, and a test of compliance with these directives has been performed.

Single mark of circulation of products on the market of the Member States of the Customs Union.

Ukrainian conformity marking
Electrical products should not be discarded with household products. Used electrical products must be collected separately and disposed of at collection points provided for this purpose. Talk with your local authorities or dealer for advice on recycling.

Read and understand all instructions before operating the product, follow all warning and safety instructions.

*Universal : compatible only with Sterwins UP40, Lexman UP40 and Dexter UP40 products.
IPX1 Degree of protection against moisture

Guaranteed sound power level (tested according to Directive 2000/14/EC as amended by 2005/88/EC).

Do not expose the product to rain or wet conditions.
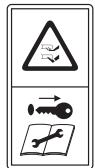
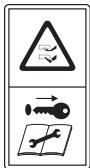
Beware of sharp blades. Blades continue to rotate after the motor is switched off-Remove disabling device before maintenance.
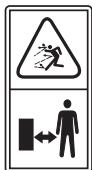
Keep by standers away.
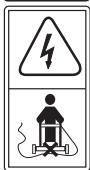
Keep the flexible supply cord away from the cutting blades.
2.3 SYMBOLS IN THIS MANUAL

Type and source of the danger : Failure to observe this warning may result in physical injury or death.

Type and source of the danger: This symbol indicates that damage to the appliance, the environment or other property may occur as a result of non-observation of this warning.

Note : This symbol indicates important information for better understanding of the product.

Read the manual: This symbol indicates that you need to read the user manual carefully.

Please refer to the corresponding illustration at the end of the booklet.

Remove battery during transportation, storage, repair work and cleaning.

Green point : Packaging recycling.

This product is recyclable. If it cannot be used anymore, please take it to waste recycling centre.

Brazilian environmental label : Recycle this product.

Brazilian environmental label : Recycle the packaging of the product.
2.4 WORK AREA SAFETY
1 Training
- Read the instructions carefully. Be familiar with the controls and the correct use of the machine.
- Never allow children or people unfamiliar with these instructions to use the machine. Local regulations can restrict the age of the operator.
- Never operate the machine while people, especially children, or pets are nearby.
- Keep in mind that the operator or user is responsible for accidents or hazards occurring to other people or their property.
2 Preparation
- While operating the machine always wear substantial footwear and long trousers. Do not operate the machine when barefoot or wearing open sandals. Avoid wearing clothing that is loose fitting or that has hanging cords or ties.
- Thoroughly inspect the area where the machine is to be used and remove all objects which can be thrown by the machine.
- Before using, always visually inspect to see that the blade, blade bolt and the blade assembly are not worn or damaged. Replace worn or damaged components in sets to preserve balance. Replace damaged or unreadable labels.
- Before use check the supply and extension cord for signs of damage or aging. If the cord becomes damaged during use, disconnect the cord from the supply immediately. DO NOT TOUCH THE CORD BEFORE DISCONNECTING THE SUPPLY. Do not use the machine if the cord is damaged or worn.
3 Operation
4 Maintenance and storage
- Keep all nuts, bolts and screws tight to be sure the machine is in safe working condition.
-
Check the grass collector frequently for wear or deterioration.
-
On machines with multi blade, take care as rotating one blade can cause other blades to rotate
- Be careful during adjustment of the machine to prevent entrapment of the fingers between moving blades and fixed parts of the machine.
- Always allow the machine to cool down before storing
- When servicing the blades be aware that, even though the power source is switched off, the blades can still be moved.
- Replace worn or damaged parts for safety. Use only genuine replacement parts and accessories.
- Keep work area clean and well lit. Cluttered or dark areas invite accidents.
- Do not op
- erate power tools in explosive atmospheres, such as in the presence of flammable liquids, gases or dust. Power tools create sparks which may ignite the dust or fumes.
- Keep children and bystanders away while operating a power tool. Distractions can cause you to lose control.
2.5 ELECTRICAL SAFETY

WARNING ! This product produces an electromagnetic field during operation! This field may under some circumstances interfere with active or passive medical implants! To reduce the risk of serious or fatal injury, we recommend persons with medical implants to consult their doctor and the medical implant manufacturer before operating this product!
- Do not expose power tools to rain or wet conditions. Water entering a power tool will increase the risk of electric shock.
2.6 PERSONAL SAFETY
- Stay alert, watch what you are doing and use common sense when operating a power tool. Do not use a power tool while you are tired or under the influence of drugs, alcohol or medication. A moment of inattention while operating power tools may result in serious personal injury.
- Use personal protective equipment. Always wear eye protection. Protective equipment such as dust mask, non-skid safety shoes, hard hat, or hearing protection used for appropriate conditions will reduce personal injury.
-
Prevent unintentional starting. Ensure the switch is in the off-position before connecting to power source and/or battery pack, picking up or carrying the tool. Carrying power tools with your finger on the switch or energising power tools that have the switch on invites accidents.
-
Do not overreach. Keep proper footing and balance at all times. This enables better control of the power tool in unexpected situations.
- Remove any adjusting key or wrench before turning the power tool on. A wrench or a key left attached to a rotating part of the power tool may result in personal injury.
- Do not force the power tool. Use the correct power tool for your application. The correct power tool will do the job better and safer at the rate for which it was designed.
- Use the power tool, accessories and tool bits etc. in accordance with these instructions, taking into account the working conditions and the work to be performed. Use of the power tool for operations different from those intended could result in a hazardous situation.
- Dress properly. Do not wear loose clothing or jewelry. Keep your hair, clothing and gloves away from moving parts. Loose clothes, jewelry or long hair can be caught in moving parts.
- Some regions have regulations that restrict the use of the product in some operations. Check with your local authority for advice.
- Do not allow children, persons with reduced physical, sensory or mental capabilities or lack of experience and knowledge, or people unfamiliar with these instructions to use the product. Local regulations may restrict the age of the operator.
- Keep in mind that the operator or user is responsible for accidents or hazards occurring to other people or their property.
- Keep bystanders, children and pets 15m away from the area of operation. Stop the product if anyone enters the area.
- While operating the product, always wear substantial footwear and long trousers. Do not operate the machine when barefoot or when wearing open sandals. Avoid wearing clothing that is loose fitting or that has hanging cords or ties; they can be caught in moving parts.
- Do not wear loose clothing or jewellery that can be drawn into the air inlet.
- Secure long hair so it is above shoulder level to prevent entanglement in moving parts.
- Wear hearing protection at all times while operating the product. The product is extremely noisy and permanent hearing injury may result if instructions to limit exposure, reduce noise and wear hearing protection are not strictly followed.
-
Wear full eye protection at all times while operating the product. The manufacturer strongly suggests a full face mask or fully enclosed goggles. Normal spectacles or sunglasses are not adequate protection. Objects can be thrown at high speed by the powerful air jet at any time and may rebound from hard surfaces toward the operator.
-
Before each use, ensure that all controls and safety devices function correctly. Do not use the tool if the off switch does not stop the product.
- Before each use, always inspect the housing for damage. Ensure that guards and handles are in place and properly secured.
- Use rakes and brooms to loosen debris before blowing.
- Clear the work area before each use. Remove all objects, such as rocks, broken glass, nails, wire, or string, which can be blown a considerable distance by high velocity air, or become entangled in the fan.
- Do not place the product on top of or near loose debris.
- Do not use the power tool if the switch does not turn it on and off. Any power tool that cannot be controlled with switch is dangerous and must be repaired.
- Disconnect the plug from the battery pack from the power tool before making any adjustments, changing accessories, or storing power tools. Such preventive safety measures reduce the risk of starting the power tool accidentally.
- Store idle power tools out of the reach of children and do not allow persons unfamiliar with the power tool or these instructions to operate the power tool. Power tools are dangerous in the hands of untrained users.
- Maintain power tools. Check for misalignment or binding of moving parts, breakage of parts and any other condition that may affect the power tool's operation. If damaged, have the power tool repaired before use. Many accidents are caused by poorly maintained power tools.
- Recharge only with the charger specified by the manufacturer. A charger that is suitable for one type of battery pack may create a risk of fire when used with another battery pack.
- Use power tools only with specifically designated battery packs. Use of any other battery packs may create a risk of injury and fire
- When battery pack is not in use, keep it away from other metal objects, like paper clips, coins, keys, nails, screws or other small metal objects that can make a connection from one terminal to another. Shorting the battery terminals together may cause burns or a fire.
- Under abusive conditions, liquid may be ejected from the battery; avoid contact. If contact accidentally occurs, flush with water. If liquid contacts eyes, additionally seek medical help. Liquid ejected from the battery may cause irritation or burns.
2.9 BATTERY LAWN MOWER SAFETY WARNINGS
2.10 SERVICE
- Have your power tool serviced by a qualified repair person using only identical replacement parts. This will ensure that the safety of the power tool is maintained.
- Have the product checked by a qualified professional and repaired, if necessary, before you operate it again.
2.11 RESIDUAL RISKS
- Familiarise yourself with the use of this product by means of this instruction manual. Memorise the safety directions and follow them to the letter. This will help to prevent risks and hazards. Always be alert when using this product, so that you can recognise and handle risks early. Fast intervention can prevent serious injury and damage to property. Switch off and disconnect from the battery if there are malfunctions.
-
Even if all instructions are strictly followed, there are still some factors that could lead to hazards, such as:
-
Thrown out pieces of the work piece.
-
Vibration injuries : use designated handles and try to reduce working time and exposure.
-
Injuries caused by noise : wear ear protection and reduce working time and exposure.
-
Inhalation of dust and particles.
-Injury from flying objects projected by the blades of the power tool. Wear eye protection at all times.
If you experience any of these factors while using the machine, stop the machine consult your doctor immediately
- Injuries may be caused or aggravated by prolonged use of a tool. When using any tool for prolonged periods, ensure you take regular breaks.
3. TECHNICAL DATA
| Model | 40 VLM2 - 36P.1 |
| Rated voltage (V) | 36V d.c. |
| Machine weigh (including battery pack) | 12.69 kg |
| Guaranteed sound power level (dB(A)) | 96 dB(A) |
| Measured sound power level (dB(A)) | 92.21 dB(A)
K=0.724 dB(A) |
| Working current | 9-12 A |
| Maximum current | 22 A |
| Recommended protection | Over current protection |
| Grass bag capacity | 35 L |
| Cutting width | 360 mm |
| Cutting height | 25 - 75 mm |
| Blade reference | 5130 DC |
| No-load speed (min-1) | 3500 |
| Vibration level (K=1.5m/s2) | Left handle = 0.759 m/s2
Right handle = 0.940 m/s2 |
The declared vibration total value has been measured in accordance with a standard test method and may be used for comparing one tool with another. The declared vibration total value may also be used in a preliminary exposure assessment. The vibration emission during actual use of the power tool can differ from the declared total value depending on the ways in which the tool is used; and it may be necessary to identify safety measures to protect the operator that are based on an estimation of exposure in the actual conditions of use (taking into account all parts of the operating cycle such as the times when the tool is switched off and when it is running idle in addition to the trigger time).
| Battery pack |
| Type of battery | Li-Ion |
| Model | 40VBA2-50.1 |
| Rated voltage [V d.c.] | 36V d.c. |
| Battery rated capacity | 5Ah Li-Ion |
| Number of battery cells | 20 |
| Weight [kg] | 1.29 kg |
| Charger pack |
| Model | 40VCH1-3A.1 | 40VCH2-6A.1 | 40VCH1-3ABR.1 |
| Rated input | 100-240V~ | 220-240V~ | 100-240V~ |
| Rated output | 42V d.c. | 42V d.c. | 42V d.c. |
| Working temperature [°C] | 4°C~24°C | 4°C~24°C | 4°C~24°C |
| Weight [kg] | 0.605 kg | 1.06 kg | 0.605 kg |
4. ASSEMBLY

WARNING! The product must be fully assembled before operation! Do not use a product that is only partly assembled or assembled with damaged parts! Follow the assembly instructions step-by-step and use the pictures provided as a visual guide to easily assemble the product!
4.1 UNBOXING
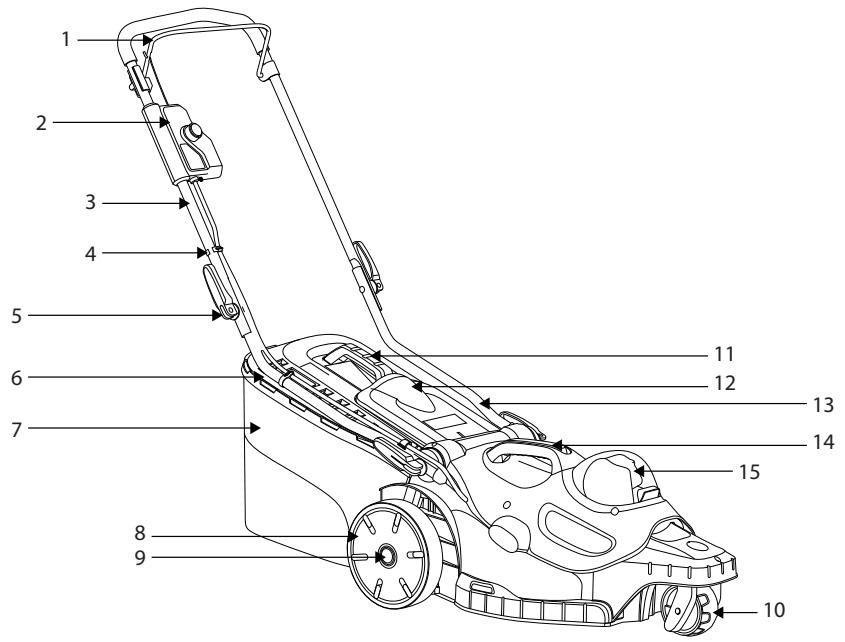
- Switch Bar
- Switch Box
- Upper Handle
- Wire Clip
- Knob
- Grass Collection Box Indi-cator Plate
- Grass Collection Box
-
Rear Wheels
-
Wheel Retaining Knob
- Front Wheels
- Grass Collection Box Handle
- Rear Discharge Door
- Lower Handle
- Motor Cover Handle
-
Battery Cover
-
Wear gloves when unboxing.
- Do not use cutter, knife, saw or any other similar tool for unboxing.
- Carry the tool only by the handles.
- Keep the box for further reuse (transport and storage).
- Keep instruction manual in a dry area for further consultation.
4.2 INSTALLATION
Set up the lawn mower : illustration ② to ②
Set up the lawn mower on flat and firm ground to ensure safe and sturdy operating.
Insert the lower handle 13 into the handle fixing hole of the mower and tighten it with the self-tapping screw. Fix the upper 3 and lower handles 13 with the knob 5.
The main module of the switch box group is pointed at the side module on the right of the upper handle 3 and push the button lightly. After locking, cross the main module down again to confirm whether the installation is complete.
Adjust the handle height : illustration (3.14)
Adjust the lower handle to the correct position for comfortable height, by aligning the line on end of the lower handle with one of the four lines on the mower body. Fit the quick clips through the lower handle, then tighten it.
Installing/Removing the grass collection box : illustration 2.3 to 2.5
Before installing, make sure the grass box has been properly attached to the metal grass collection box 7 frame via the clips around the mouth of the box.
Lift the rear discharge door 12. While holding the door open, place the grass collection box 7 with handle side up into the grooves under the hinge of the rear discharge door 12, making sure that the hooks rest properly inside their respective grooves. After stopping, lift the rear discharge door 12, take the grass collection box 7 away.

Installing/Removing the battery pack : illustration 3.8
WARNING: Make sure the latch on the bottom of the battery pack snaps in place and the battery pack is fully seated and secure in the product's battery docking port before beginning operation.
Failure to securely seat the battery pack could cause the battery pack to fall out, resulting in serious personal injury.
To install : Raise the battery cover, and insert the battery pack. Push battery pack into the bottom of the battery cover, and make sure that battery pack is secured in the product before beginning operation. Close battery cover.

WARNING: The battery cover must be closed. If it can't be closed completely, the mower won't be started.
To remove:
Raise the battery cover. Depress the battery pack unlock button and by pulling the battery pack out. For complete charging instructions, see the operator's manuals of the battery and charger for your battery pack and charger.
4.3 FIRST USE
Check the battery : illustration 3.8

WARNING! Read the « SAFETY INSTRUCTION » section at the beginning of this manual including all text under subheading therein before using this product.

The battery is not fully charged at the time of purchase. Before using the product for the first time, place the battery in the charger and charge it fully.
Pay particular attention using the machine for the first time : focus and dedicate all your attention to this first use. Make the first trial on a free space with no obstacle and no surrounding element
4.4 OPERATION

WARNING! The mower can only be used outdoors, and in no case in a building. The mower must be left outdoors for at least two hours before entering inside a building.
Start the product:illustration 3.8 to 3.11

WARNING! Sharp moving blade. Never attempt to override the operation of this switch and safety key system as a serious injury could result.

WARNING! When the motor has been switched off, the cutter continues to run for several seconds. Therefore, do not touch the underside of the mower until the cutter has come to a standstill.
Connect the battery fully charged. Press and hold the switch button. Pull the switch bar toward the handle and release the switch button to start the mower. To stop the mower, release the switch bar. Let the blade come to a complete stop before making any adjustments to the mower.
About safety key:
The safety key is a disabling device to prevent unintentional activation of the lawnmower.
Do not pull out the key in normal operation, the safety key is not control device that govern the operation of the cutting means. Always remove the safety key if the lawnmower is going to be left unattended.
Operate the product: illustration 3.12 to 3.14

CAUTION! Always wear safety glasses, substantial footwear and long trousers. Wear a filter mask if the operation is dusty. Use of proper gloves is also recommended.
Firmly hold the handle with both hands when mowing. Do not try to cut long grass all at once. Instead, mow the lawn in steps. Leave a day or two between mowings until the lawn becomes evenly short. When mowing at the edge, be sure to face the left side of the machine toward the edge, and then move the machine along the edge.
WARNING : if you strike a foreign object, stop the motor. Remove the safety key, thoroughly inspect the mower for any damage and repair the damage before restarting and operating the mower. Extensive vibration of the mower during operation is an indication of damage. The mower should be promptly inspected and repaired.

- Mow across the face of slopes, never up and down.
Exercise extreme caution when changing direction on slopes.
- Do not mow excessively steep slopes.
- Use extreme caution when reversing or pulling the machine towards you.
- Stop the machine and wait blade(s) to stop if the product has to be tilted (for transportation when crossing surfaces other than grass, when transporting the machine to and from the area to be used). Always carry the product by its handle.
- Do not tilt the machine when switching on the motor.
- Do not start the machine when standing in front of the discharge opening.
- Do not put hands or feet near or under rotating parts. Keep clear of the discharge opening at all times.
- Operate the product only at reasonable hours – not early in the morning or late at night when people might be disturbed.
- Do not operate the product in an explosive atmosphere.
- Avoid using the product in bad weather conditions, especially when there is a risk of lightning. Do not operate the product in poor lighting. The operator requires a clear view of the work area to identify potential hazards.
- Use of hearing protection reduces the ability to hear warnings (shouts or alarms). The operator must pay extra attention to what is going on in the work area. Do not get distracted, and always concentrate on the task.
- Operating similar tools nearby increases both the risk of hearing injury and the potential for other persons to enter your work area.
- Keep firm footing and balance.
- Do not overreach. Overreaching can result in loss of balance. Always be sure of the footing on slopes.
- Walk, never run. Keep all parts of your body away from any moving part.
- Never run the product without the proper equipment attached.
- Do not modify the product in any way or use parts and accessories that are not recommended by the manufacturer.

If the product is dropped, suffers heavy impact or begins to vibrate abnormally, immediately stop the product and inspect for damage or identify the cause of the vibration. Any damage should be properly repaired or replace by an authorized service centre.
-
To reduce the risk of injury associated with contacting rotating parts, always stop the machine, remove the battery pack, and make sure all moving parts have stopped:
-
before cleaning or clearing a blockage
- when leaving the product unattended
- before installing or removing attachments
- before checking, maintaining or working on the product
- if the machine starts to vibrate abnormally (inspect immediately)
Removing and charging the battery : Illustration 6.1 and battery instruction manual
- Press the lock button on the top center of the battery to slide it out of the product.
- Place the battery pack into the charger by sliding it into a locked position until it clicks
- When the green light is flashing, the battery is charging. If the green light is no longer flashing, the battery is fully charged.
5. TRANSPORTATION
Transporting the machine or battery may require that you meet certain requirements specific to your country. Please make sure to respect them by contacting the authorities of your country, in order to respect them all. Ensure temperature during transportation will never be out of temperature range given on chapter storage
5.1 TRANSPORT THE MACHINE
Illustration 6.1 to 6.8
Switch the product off and remove the battery pack.
Always carry the product by its handle. Protect the product from any heavy impact or strong vibrations which may occur during transportation in vehicles. Secure the product to prevent it from slipping or falling over. Do not expose the product to sunlight..
5.2 TRANSPORT THE LITHIUM BATTERIES
Please refer to the battery instruction manual for further details.
6. WINTERING
Illustration 6.9
Plug out the battery from the power tool.
Before long storage please ensure the battery charge fit to instructions provided on battery instruction manual. Follow all instructions given on chapter storage below. We recommend using the original package for storage or covering the product with a suitable cloth or enclosure to protect it against dust.
7. STORAGE
Only store the machine and the battery in a clean, dry, ventilated place with a temperature range of 4^ to 24^ . Cover it in order to provide added protection. We recommend using the original package for storage or covering the product with a suitable cloth or enclosure to protect it against dust. Be sure to secure the unit while transporting
7.1 STORE THE MACHINE
Illustration 6.1 to 6.9
Plug out the battery from the power tool. Examine the unit thoroughly for worn, loose or damaged parts. Clean the unit before storing. Do not expose the product to sunlight. Make sure the product is always protected from cold and humidity.
Ensure the product is left in a horizontal position.
- Always allow the machine to cool down before storing.
7.2 STORE THE LITHIUM BATTERIES
Illustration 6.9
Please make sure that the battery power level is as recommended in the battery instruction manual. Please refer to the battery instruction manual for further details.
8. MAINTENANCE

DANGER! Risk of injury due to electric shock. Remove the battery pack before adjusting, inspecting, cleaning or storing the product.
8.1 CLEANING
Illustration 5.1
Wipe off the housing and the plastic components using a moist, soft cloth. Do not use strong solvents or detergents on the plastic housing or plastic components. Certain household cleaners may cause damage, and may cause a shock hazard.
- Keep all nuts, bolts and screws tight to be sure the machine is in safe working condition.
- Check the grass collector frequently for wear or deterioration.
- Be careful during adjustment of the machine to prevent entrapment of the fingers between moving blades and fixed parts of the machine.
- Always allow the machine to cool down before cleaning.
- When servicing the blades be aware that, even though the power source is switched off, the blades can still be moved.
- Replace worn or damaged parts for safety. Use only genuine replacement parts and accessories.
8.2 CHANGING THE CUTTING BLADE
Illustration 5.2
Turn the mower onto its side to reveal the underside of the machine. Place a block of wood or a stop of some kind between the blade and the edge of the deck to prevent the blade from turning freely. Using a wrench, loosen the blade nut on the bottom of the unit. Remove the blade nut, the washer, and the blade from the machine.
Put the new blade onto the shaft and replace the blade washer and the blade nut. Tighten the blade nut. Torque the blade nut to 25-30 N·m. Once the blade is secure, check by hand that everything rotates as it should.
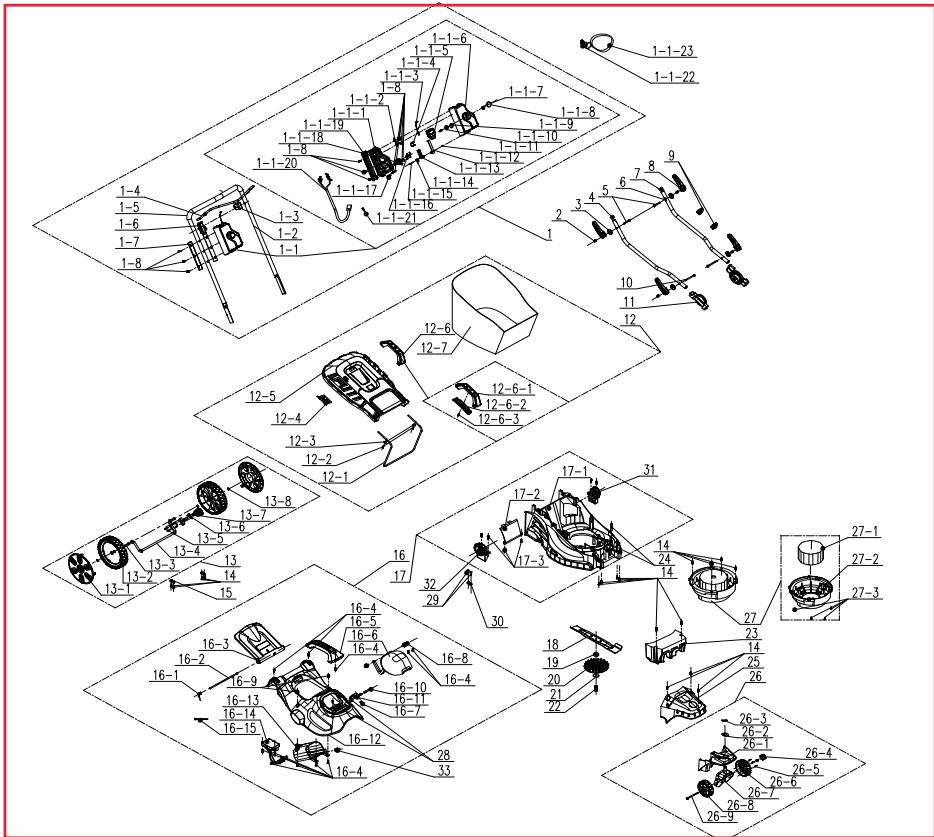
| POS | PART NUMBER | DESCRIPTION | NUM |
| 1 | A021039-018-00 | Handle Assembly | 1 |
| 1-1 | A022034-015-00 | Switch Box Component | 1 |
| 1-1-1 | A022034-006-00 | Switch Box | 1 |
| 1-1-2 | A021039-021-00 | Fixing Plate | 1 |
| 1-1-3 | A021039-028-00 | Zip Components | 1 |
| 1-1-4 | 8343-510801-02 | Trigger Button | 1 |
| 1-1-5 | 8042-510902-01 | Switch | 1 |
| 1-1-6 | A022034-005-00 | Switch Box | 1 |
| 1-1-7 | 8342-510505-00 | Button Spring | 1 |
| 1-1-8 | 8312-519201-00 | Button | 1 |
| 1-1-9 | 8208-519201-00 | Sealing Ring | 1 |
| 1-1-10 | 8183-519201-00 | Floor | 1 |
| 1-1-11 | 8NH-03D01 | Nut | 1 |
| 1-1-12 | 8183-510906-00 | Hook Plate | 1 |
| 1-1-13 | 8183-510902-02 | Guide Plate | 1 |
| 1-1-14 | 8342-510903-00 | Twisted Spring | 1 |
| 1-1-15 | 8SJAD03-25 | Machine Screw | 1 |
| 1-1-16 | 8323-510903-00 | Key Contact | 2 |
| 1-1-17 | 8184-516201-0000110 | Cable Clamp | 1 |
| 1-1-18 | A022034-008-00 | Holder | 1 |
| 1-1-19 | A022034-007-00 | Rear Fixed Seat | 1 |
| 1-1-20 | A022034-009-00 | Cable | 1 |
| 1-1-21 | 8413-515001-00 | Double Terminal Cable | 1 |
| 1-1-22 | 8045-513001-00 | Key | 1 |
| 1-1-23 | 8214-510501-00 | Key Straps | 1 |
| 1-2 | A022034-010-00 | Push Rod | 1 |
| 1-3 | A021039-011-00 | Support | 1 |
| 1-4 | A021039-003-00 | Pull Rod | 1 |
| 1-5 | 8331-515701-00 | Sponge | 1 |
| 1-6 | A021039-010-00 | Holder | 1 |
| 1-7 | A021039-009-00 | Pipe Sleeve | 2 |
| 1-8 | 8206-000001-00 | Screw | 11 |
| 2 | 8086-513001-00 | Pin | 4 |
| 3 | 8202-513001-00 | Fast Clip Gasket | 4 |
| 5 | 8206-513001-00 | Bolt | 2 |
| 8 | 8003-513003-00 | Quick Clamp Handle | 4 |
| 9 | 8007-512001-00 | Line Deduction | 2 |
| 10 | 8206-513002-00 | Screw | 2 |
| 11 | A021039-012-00 | Adjusting Tooth | 2 |
| 4 | A021039-004-00 | Push Rod | 1 |
| 6 | A021039-025-00 | Push Rod | 1 |
| 7 | 8371-513001-01 | Stopcock | 2 |
| 12 | 8440-513005-00 | Grass Basket Components | 1 |
| 12-1 | 8292-513002-00 | Support | 1 |
| 12-2 | 8SNAB50-16Q | Screw | 2 |
| 12-3 | 8WT-05B01 | Washer | 2 |
| 12-4 | 8181-513001-01 | Dashboard | 1 |
| 12-5 | 8020-513005-00 | Up Cover | 1 |
| 12-6 | 8440-512012-00 | Handle Assembly | 1 |
| 12-6-1 | 8001-512002-00 | Grass Basket Handle | 1 |
| 12-6-2 | 8020-512006-00 | Lower cover | 1 |
| 12-6-3 | 8SJAB40-14Q | Screw | 1 |
| 12-7 | 8104-513003-00 | Clippings Bag | 1 |
| 13 | A021039-020-00 | Wheel Shaft Assembly | 1 |
| 13-1 | A021039-015-00 | Wheel Cap | 2 |
| 13-2 | 8121-511002-02 | Rear Wheel | 2 |
| 13-3 | 8202-989101-00 | Wave Washer | 2 |
| 13-4 | 8440-513001-00 | Shaft Components | 1 |
| 13-5 | 8SQDD05-12D | Bolt | 2 |
| 13-6 | 8003-513002-00 | Raise The Handle | 1 |
| 13-7 | 8NE-05D01 | Nut | 2 |
| 13-8 | 8CC-10B | Elastic Ring For Shaft | 2 |
| 14 | 8SNAB50-16Q | Screw | 17 |
| 15 | 8304-511002-00 | Axle Positioning Plate | 2 |
| 16 | A022034-016-00 | Upper Cover Assembly | 1 |
| 16-1 | 8342+513001-01 | Spring | 1 |
| 16-2 | 8081-513002-00 | Rear Cover Shaft | 1 |
| 16-3 | 8020-513004-00 | Rear Cover | 1 |
| 16-4 | 8206-000001-00 | Screw | 11 |
| 16-5 | A022033-008-00 | Handle | 1 |
| 16-6 | A022034-003-00 | Shield | 1 |
| 16-7 | A022033-012-00 | Pin | 2 |
| 16-8 | 8184-282101-00 | Fixing Plate | 2 |
| 16-9 | 8206-000001-00 | Screw | 10 |
| 16-10 | A022034-011-00 | Shaft | 1 |
| 16-11 | 8044-780502-00 | Button | 1 |
| 16-12 | A022034-002-00 | Loam Cake | 1 |
| 16-13 | A022034-004-00 | Battery Pack Box | 1 |
| 16-14 | A022034-012-00 | Electronic Assembly | 1 |
| 16-15 | 236-1004 | Binding Wire With | 2 |
| 17 | A021039-022-00 | Chassis Components | 1 |
| 17-1 | 8006-513001-01 | Chassis | 1 |
| 17-2 | 8020-513006-00 | Bottom Cover | 1 |
| 17-3 | 8SNAB50-16Q | Screw | 2 |
| 19 | 8334-513002-00 | Shaft Sleeve | 1 |
| 18 | 8231-513001-03 | Blade | 1 |
| 20 | 8403-513001-00 | Fan Blade | 1 |
| 21 | 8186-511003-00 | Blade Pressboard | 1 |
| 22 | 8206-511001-01 | Blade Bolt | 1 |
| 23 | 8301-513001-00 | Counterweight Block | 1 |
| 24 | 8334-911603-00 | Cushion Cover | 2 |
| 25 | 8020-513003-00 | Front Cover | 1 |
| 26 | A021039-023-00 | Universal Wheel Assembly | 1 |
| 26-1 | 8020-513007-00 | Before The Chassis | 1 |
| 26-2 | 8324-463101-00 | Gasket | 1 |
| 26-3 | 8091-940202-00 | Pin | 1 |
| 26-4 | A021041-010-00 | Knob | 1 |
| 26-5 | 8SJAB40-16Q | Screw | 3 |
| 26-6 | 8020-513009-00 | Right Wheel Cover | 1 |
| 26-8 | 8020-513008-00 | Left Wheel Cover | 1 |
| 26-7 | A021039-026-00 | Stent Components | 1 |
| 26-9 | A021041-018-00 | Bolt | 1 |
| 27 | 8440-513027-00 | Motor Assembly | |
| 27-1 | 8401-513002-00 | Brushless Motor | 1 |
| 27-2 | 8141-513021-00 | Motor Seat | 1 |
| 27-3 | 8SJAN05-16D | Screw | 4 |
| 28 | 8SJAB50-75Q | Screw | 2 |
| 29 | 8206-000001-00 | Screw | 2 |
| 30 | 8184-516201-0000110 | Braçadeira de cabo | 1 |
| 31 | A021039-013-00 | Fixed Tooth | 1 |
| 32 | A021039-032-00 | Fixed Tooth | 1 |
8.4 TROUBLESHOOTING

DANGER! Risk of injury due to electric shock.
Warning! Before any trouble shooting, switch off the product.
| Problems | Probable causes | Solutions | Qualification required |
| Product does not start | Battery is not secure | To secure the battery pack, make sure the latches on the top of the battery pack snap into place | - |
| Battery is not charged | Charge the battery pack according to the instructions included with your model |
| Power/speed switch is in the OFF position | Press the on/off switch |
| Battery pack not properly attached | Attach properly |
| On/off switch not set on ON position | Refer to chapter "Start the product" |
| The handle is not correctly fitted | The panel bolts are not correctly inserted | Adjust the height of the handle and check that the panel bolts are correctly inserted | - |
| The quick-fastening levers are not tightened | Tighten them |
| The mower cuts unevenly | The grass is not uniform or thick, or the cutting height was not correctly adjusted | Check the height of the wheels. All the wheels must be set to the same cutting height so that the mower can cut evenly | - |
| Mulching is not done correctly | The grass cuttings are damp and sticking to the mower | Wait for the lawn to dry before mowing | - |
| The mower is difficult to push | The grass is long, the rear panel of the mower and the blade are dragging in very dense grass, or the cutting height is set too low | Raise the cutting height | - |
| The grass cuttings are not collected properly in the grass box | The cutting height is too low | Raise the cutting height | - |
| The mower vibrates at high speed | The blade is out of balance or worn | Change the blade | - |
| The motor shaft is twisted | Turn off the motor and inspect the mower. Get the mower repaired. | Approved repair centre |
| The motor stops while mowing | The cutting height is too low | Raise the cutting height | - |
| The battery is discharged | Recharge the battery |
| Mower suddenly stopped while cutting grass. | Mower maybe occur overload | Stop the mower and wait for 3 minutes to restart. | |
| Product does not reach full power | Battery pack capacity too low | Charge battery pack | - |
| Air vents are blocked | Clean the air vents |
| Vibration or noise is excessive | Bolts/nuts are loose | Tighten bolts/nuts | - |
| Product suddenly stops | Battery pack discharged | Remove and charge battery pack | - |
| Battery too hot | Remove battery pack and let it cool down |
9. END OF LIFE

Electrical products should not be discarded with household products. Used electrical products must be collected separately and disposed of at collection points provided for this purpose. Talk with your local authorities or dealer for advice on recycling.
10. WARRANTY
10.1 OUR WARRANTY
STERWINS products are designed according to the highest quality standards for products intended for the consumer market. This sale warranty covers a period of 3 years as of the date of purchase of the product. This warranty covers all defects in materials and workmanship: missing parts and elements, and damage occurring under normal use circumstances. Repair and replacement of parts do not lead to an extension of the initial warranty period. You must be able to provide proof of the purchase for this product and the date of purchase. Warranty coverage is limited to the value of this product.
10.2 WARRANTY EXCLUSIONS
This warranty does not cover problems nor incidents resulting from incorrect use of the product.
The following items are not covered by warranty :
- The tool have been used incorrectly; or
- Damage occurring upon transporting or setting up this product; or
- Repairs and/or change of parts carried out by a third party; or
- Damage caused by external factors or foreign objects such as sand or stones; or
- Damage resulting from non-compliance with the safety and usage instructions; or
- The tool have been disassembled or opened; or
- The tool have been in a wet environment (dew, rain, submerged in water...); or
- The tool has been used for professional purpose; or
- The tool has been exposed to a temperature out of the range specified in chapter "storage"
The product must be used under normal usage circumstances, and for non-professional purposes. Therefore, excluded from this warranty are products used by gardening companies, local authorities, as well as companies offering paid rentals or free loaning of equipment.
In the event of a problem or defect, you should first always consult your Sterwins dealer. In most cases, the Sterwins dealer will be able to solve the problem or correct the defect. Keep your invoice or your receipt: these documents will be requested upon processing any claims.
We:ADEO Services
135 Rue Sadi Carnot
CS 00001 59790 Ronchin, France
Declare that the product
Battery Lawn Mower 36cm
40VLM2-36P.1
Is in conformity with the requirements of the Directive MD 2006/42/EC and with national regulations:
EMC Directive 2014/30/EU
ROHS Directive(EU)2015/863 amending Directive 2011/65/EU
NOISE Directive 2000/14/EC,Annex VI and 2005/88/EC
Measured Sound power level : 92.21 dB (A)
Guarantee sound power level : 96 dB (A)
EN 60335-1:2012+A11:2014+A13:2017
EN 60335-2-77:2010
EN 62233:2008
EN 55014-1:2017
EN 55014-2:2015
IEC 62321-1:2013
IEC 62321-2:2013
IEC 62321-3-1:2013
IEC 62321-4:2013+A1:2017
IEC 62321-5:2013
IEC 62321-6:2015
IEC 62321-7-1:2015
IEC 62321-7-2:2017 & ISO 17075-1:2017
IEC 62321-8:2017
Serial No : Please refer to the back cover page
and rating label of machine
Notified Body: Conformity assessment method to Directive 2000/14/EC and 2005/88/EC
The EC type-examination certificate is issued by SGS
Notified body of Noise directive: ISET S.r.l.
Signed in Ronchin, France
Date of signature : 10/10/2019
Eric LEMOINE
International Project Quality Leader
ADEO Services
135 Rue Sadi Carnot
CS 00001 59790 Ronchin, France
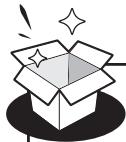
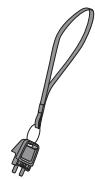
D
x2
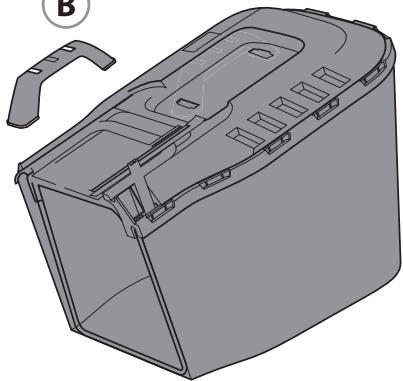
B

x2


E
x2
0 1 2 3 4 5 cm

F)
x2

45mm
G
x2
O

13#
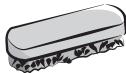
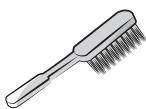
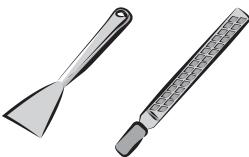


UNIVERSAL* POWER
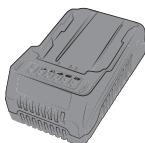
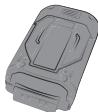
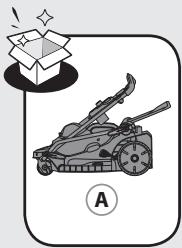

2.1
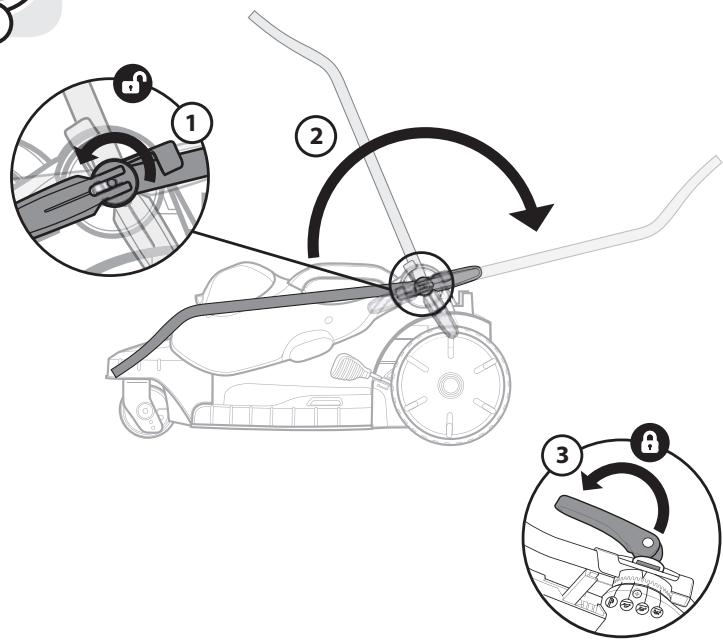
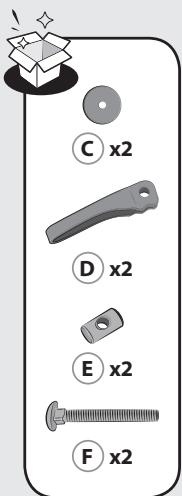
2.2
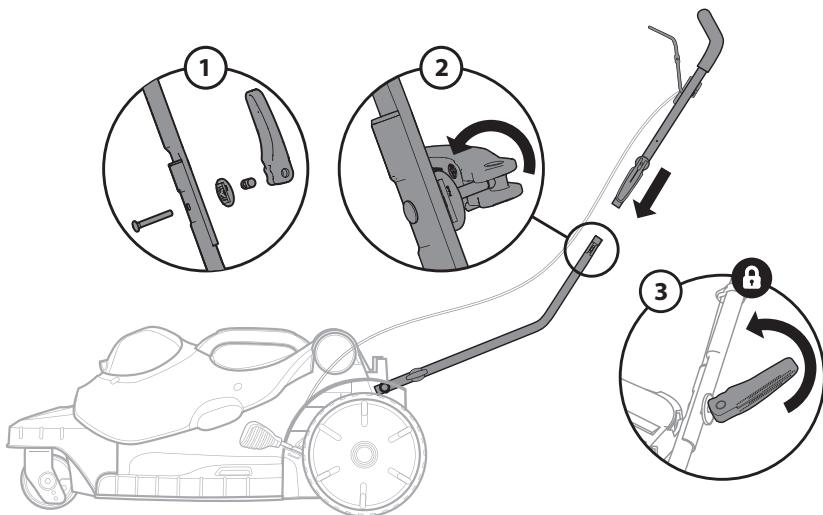
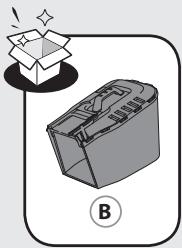
2.3
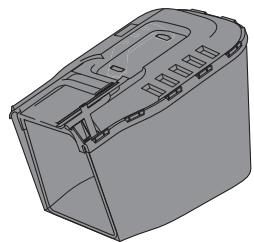
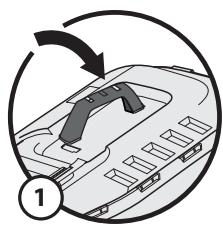

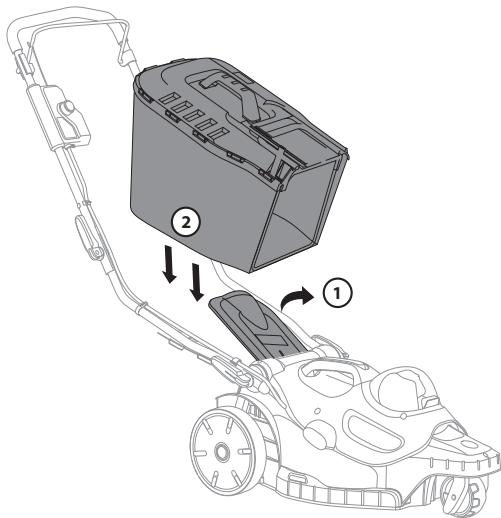
2.4
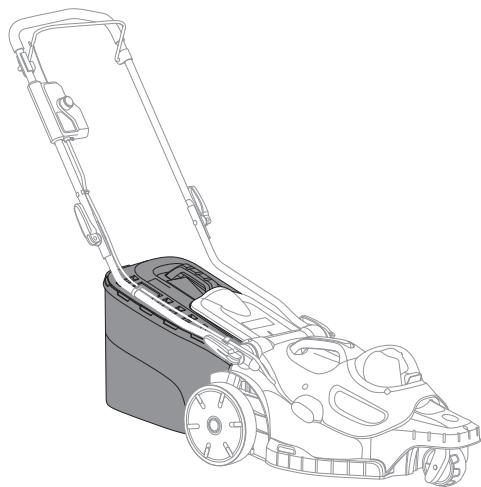
2.5

3.1
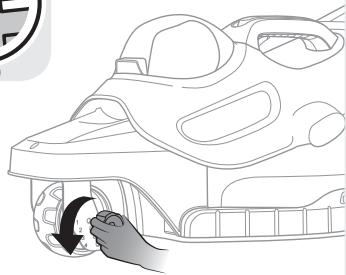
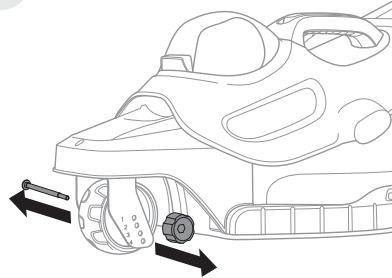
3.2
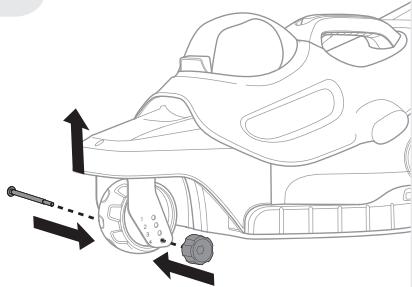
3.3
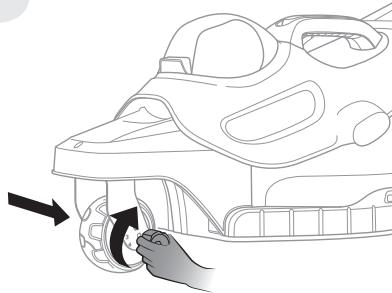
3.4
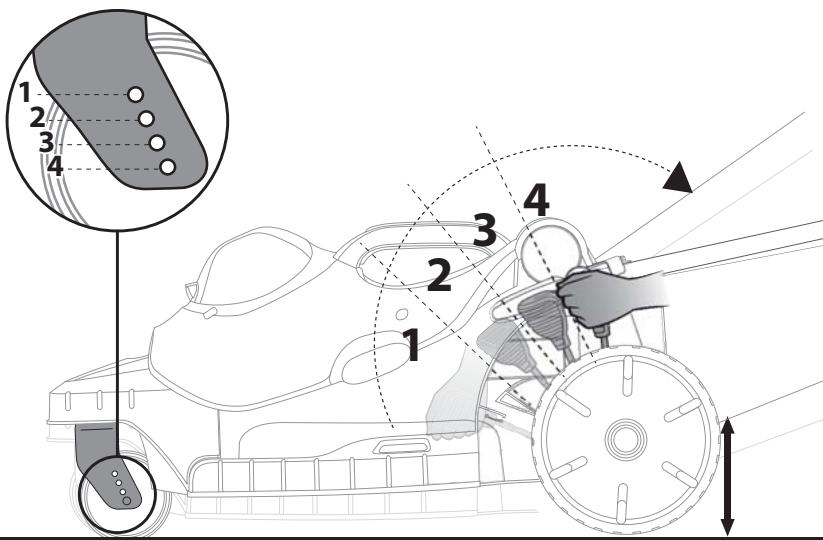
3.5
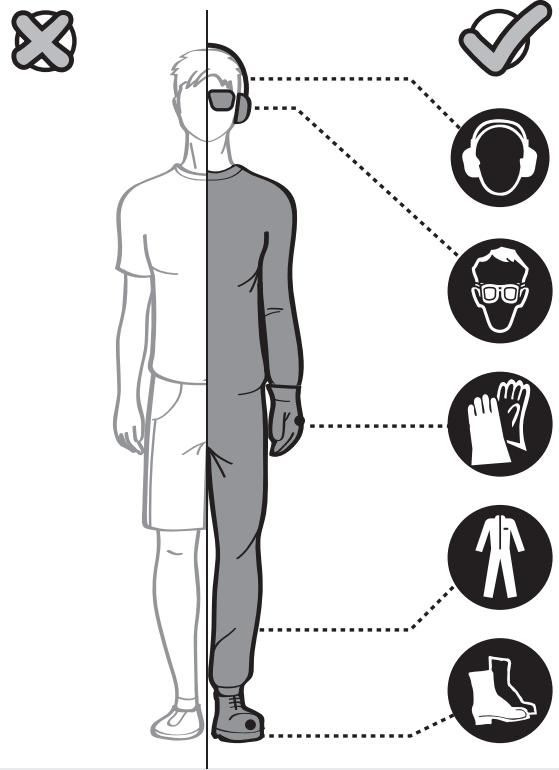
3.6
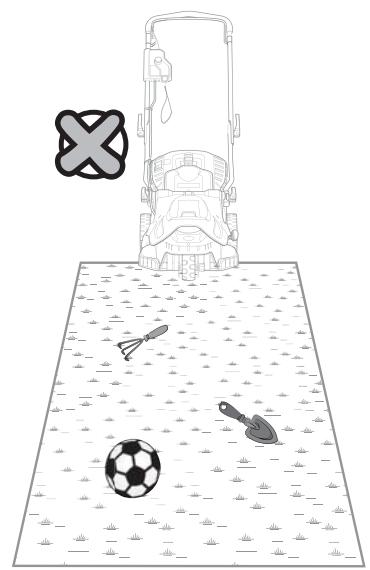
3.7

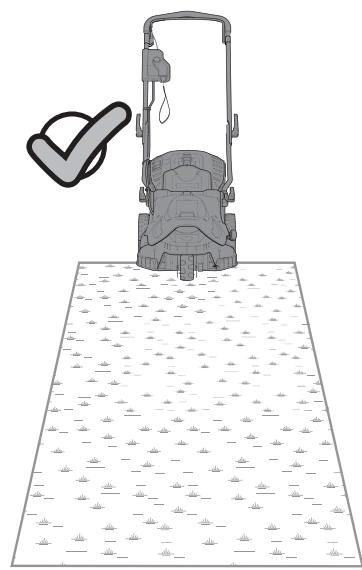
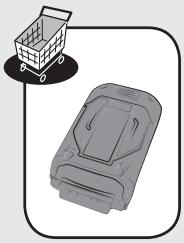
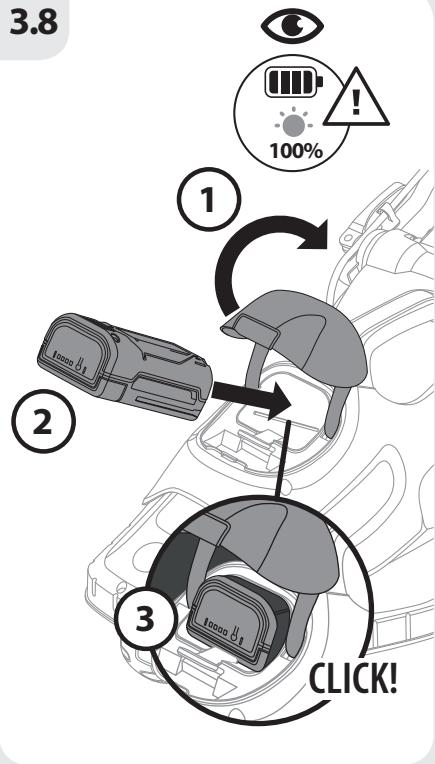
3.8
3.9
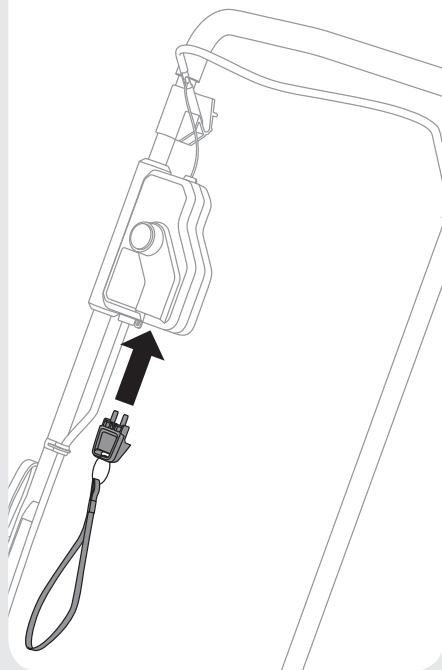

3.10
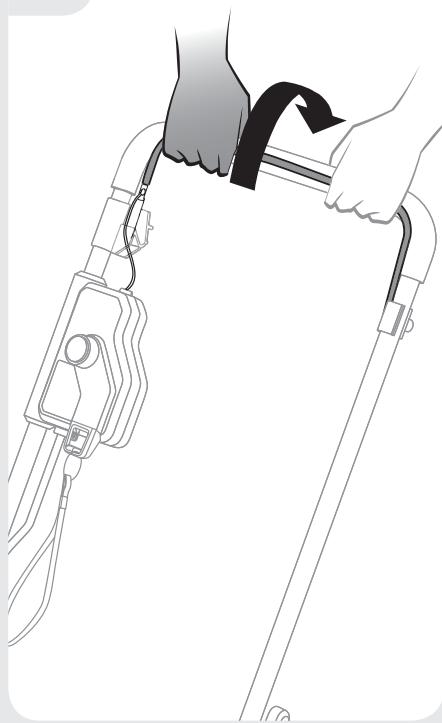
3.11
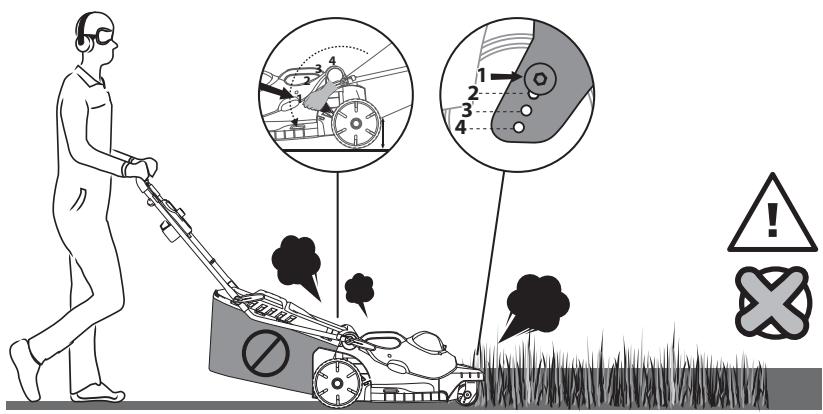
3.12
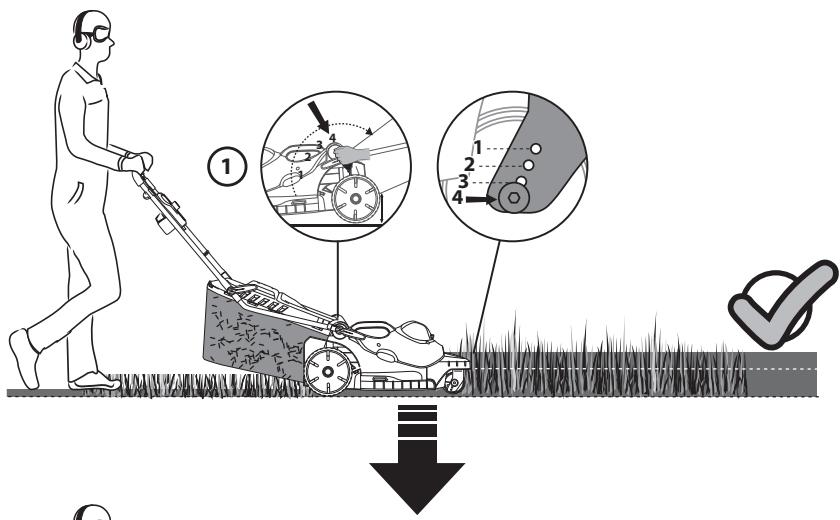
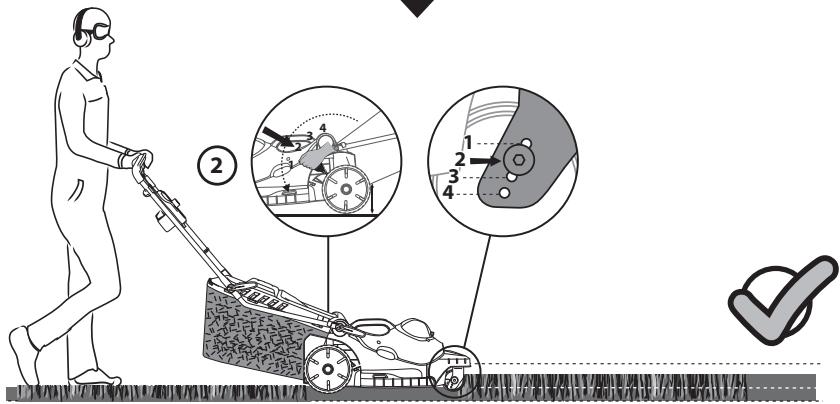
3.13
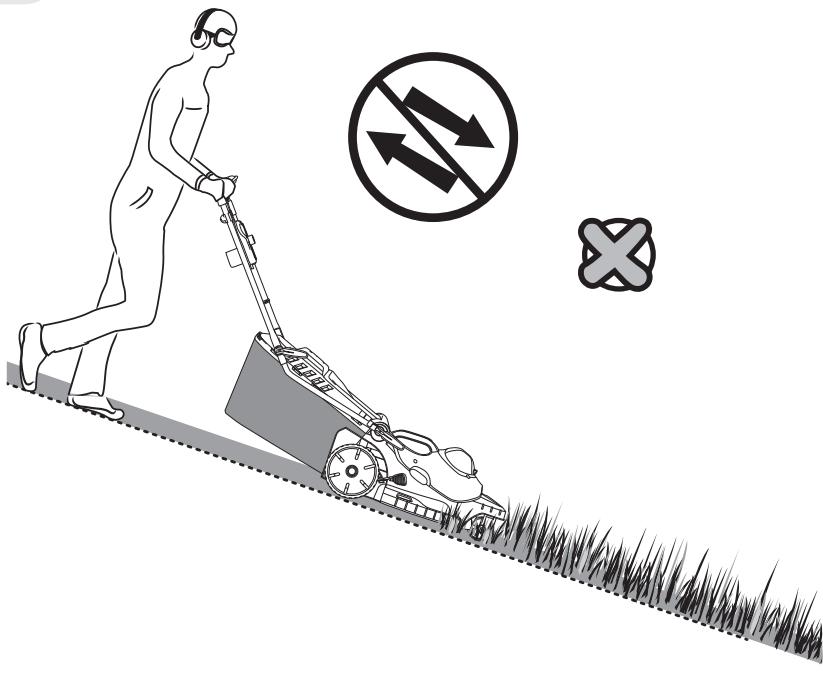
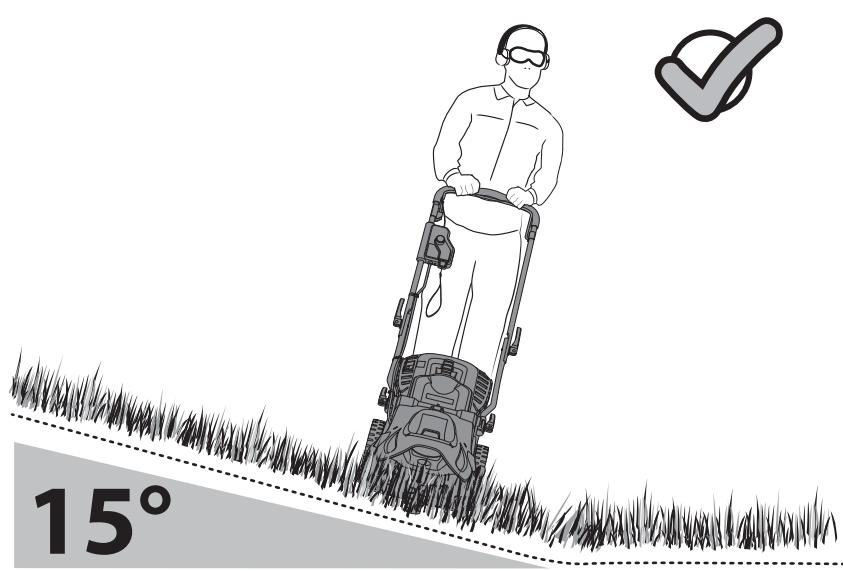
3.14
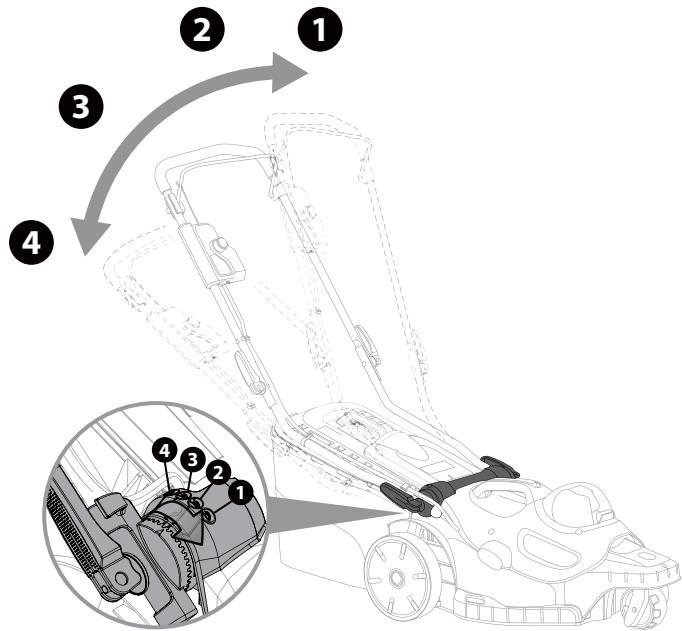

4.1
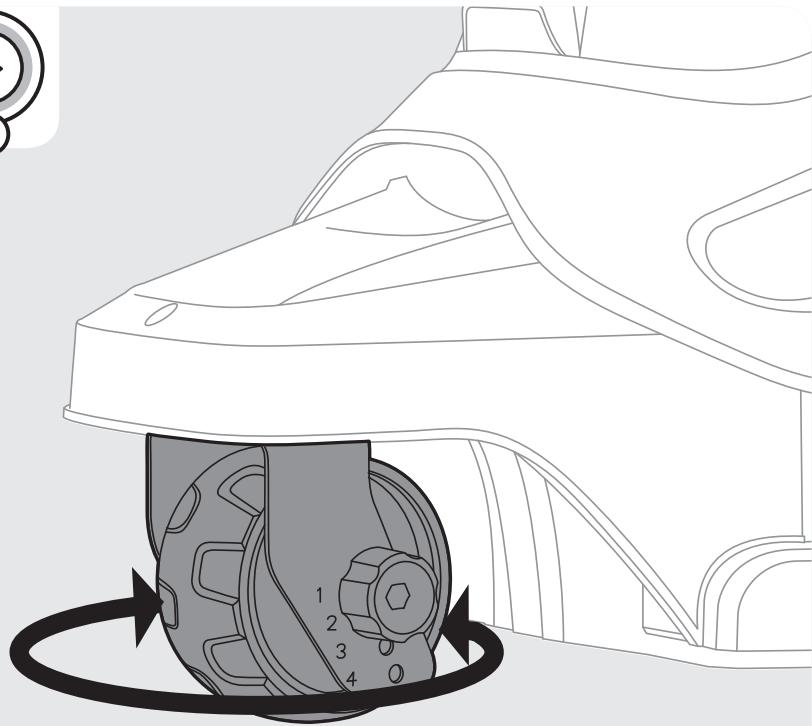
360^
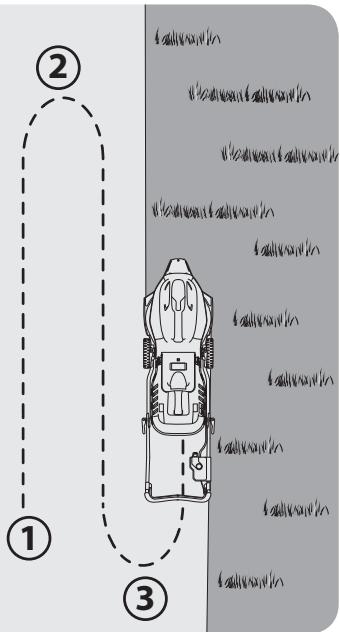
4.2
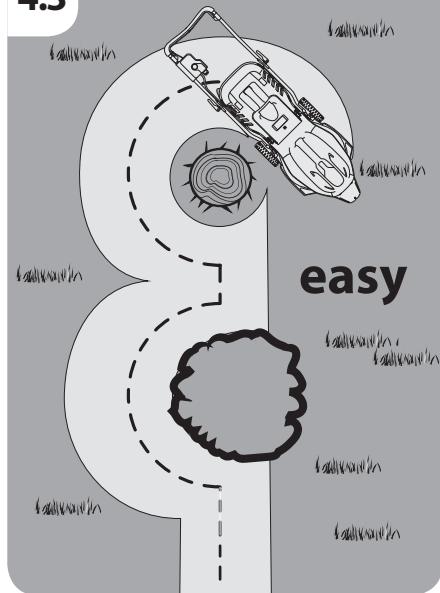
4.3
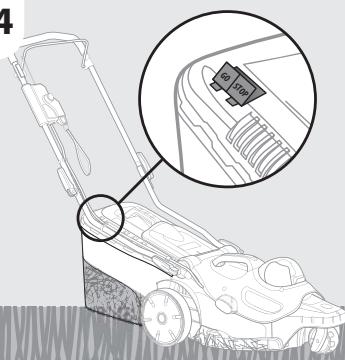
4.4
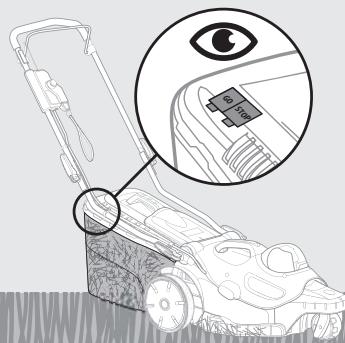
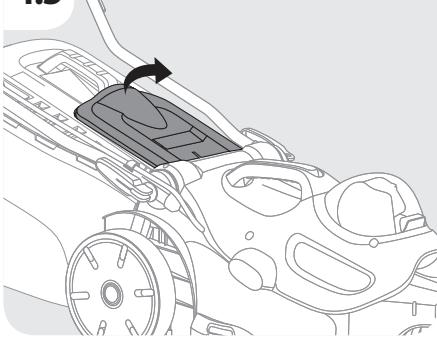
4.5
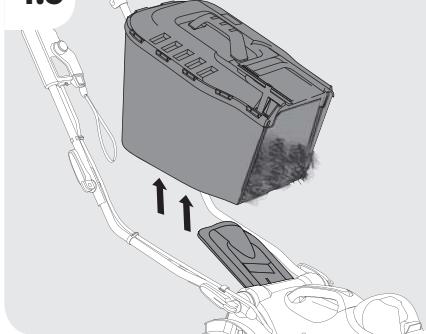
4.6
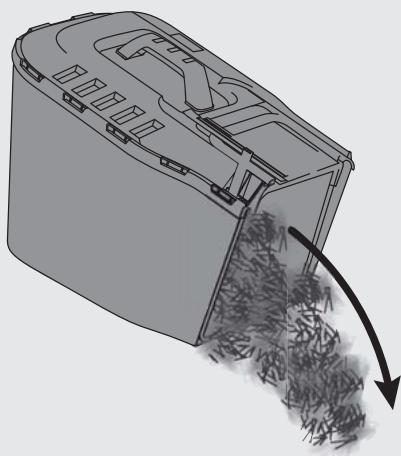
4.7

4.8
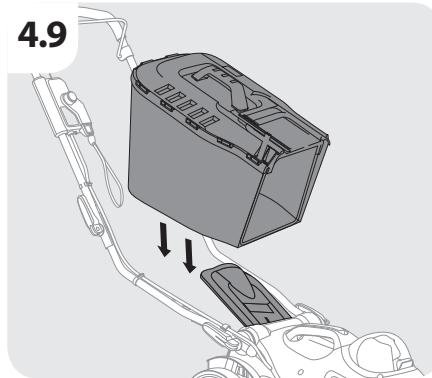
4.9

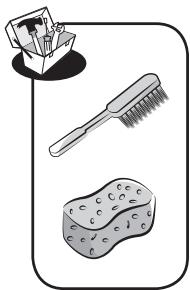

5.1
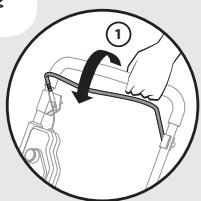

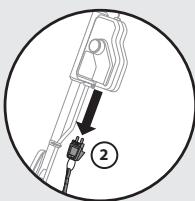
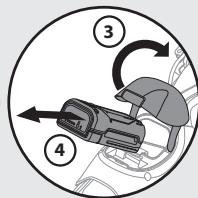
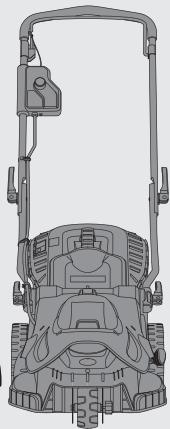
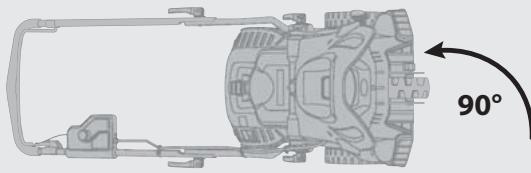
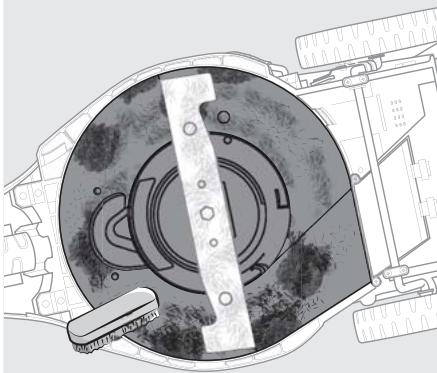
b
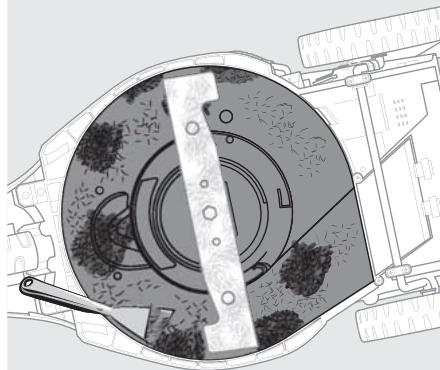
C
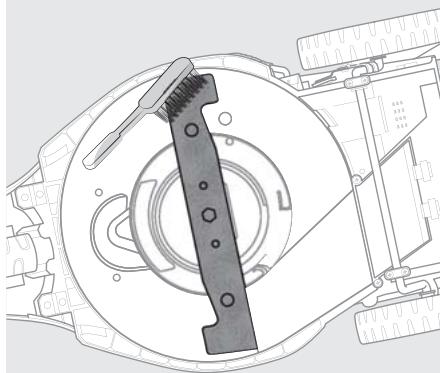
d
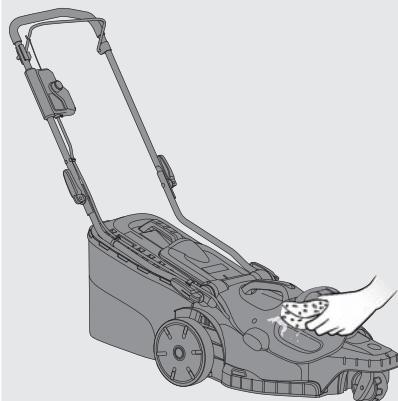
e
5.2
a
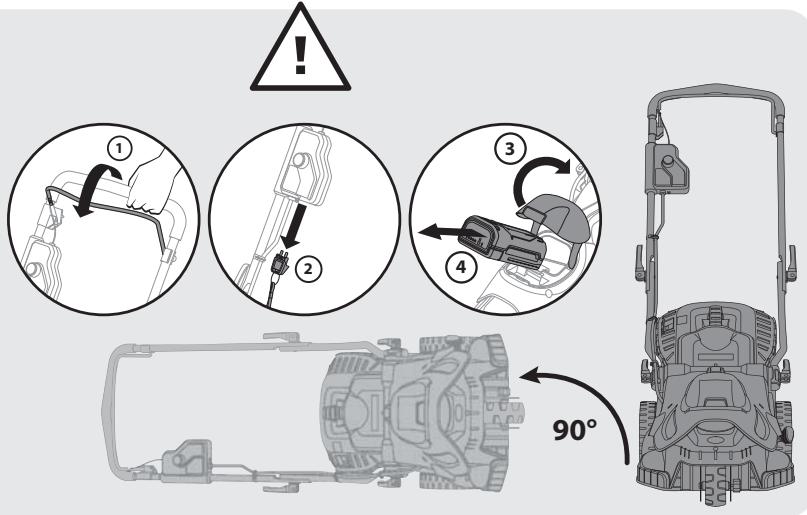
b
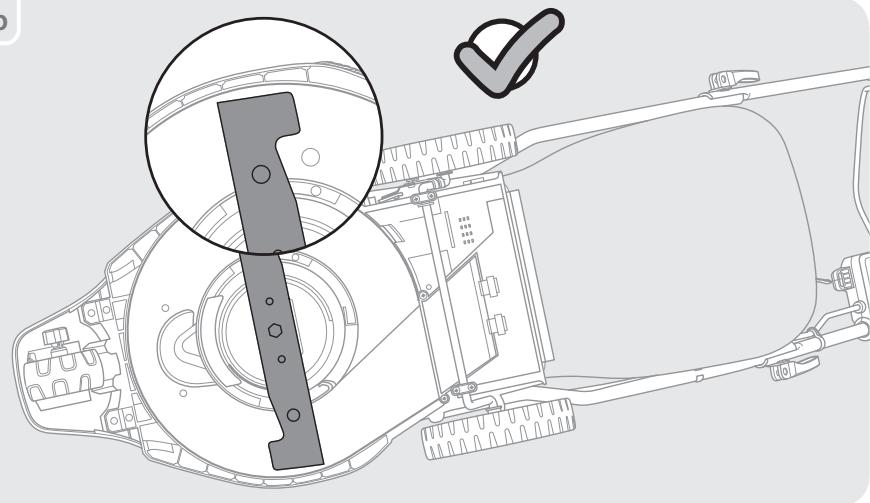
C

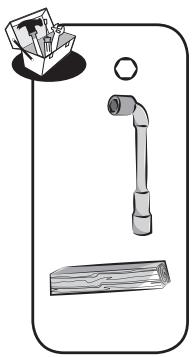
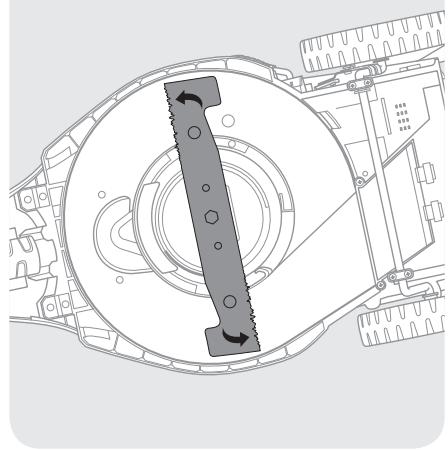
d
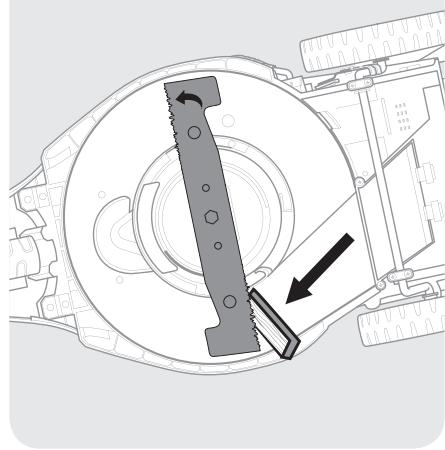
e
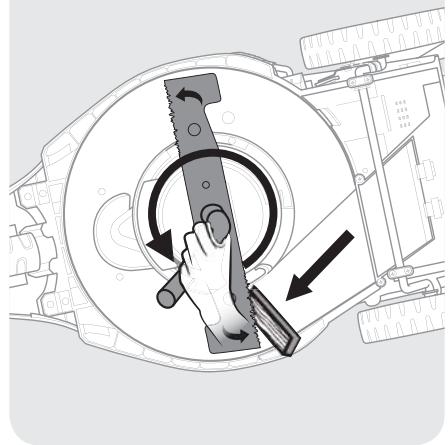
f
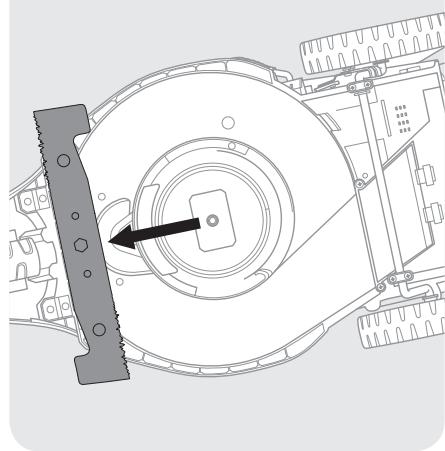
9
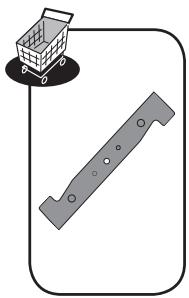
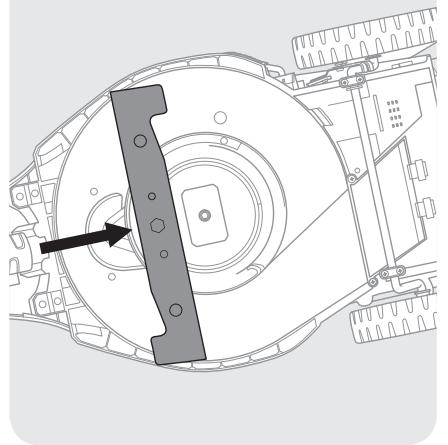
h
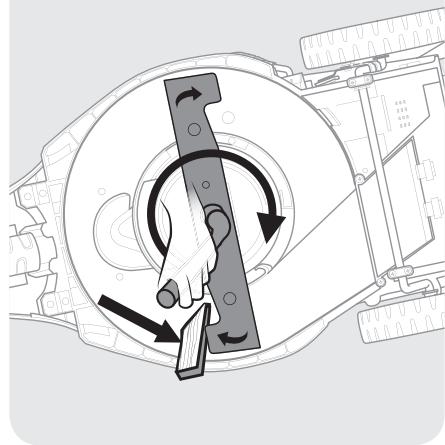
i


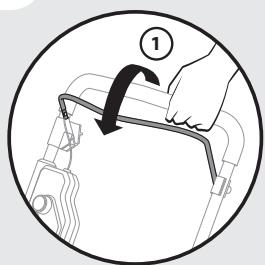
6.1
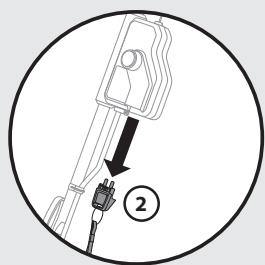
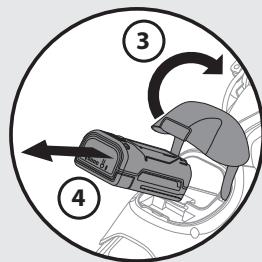
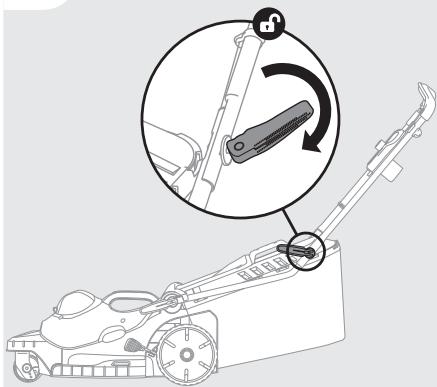
6.2
6.3
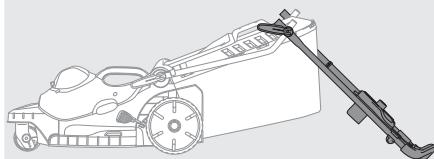

6.4
6.5
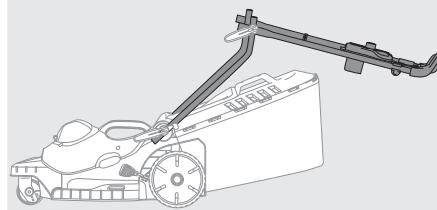
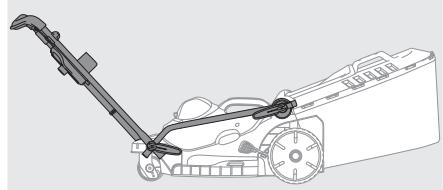
6.6
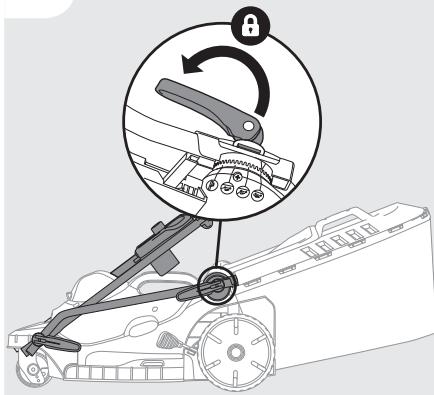
6.7
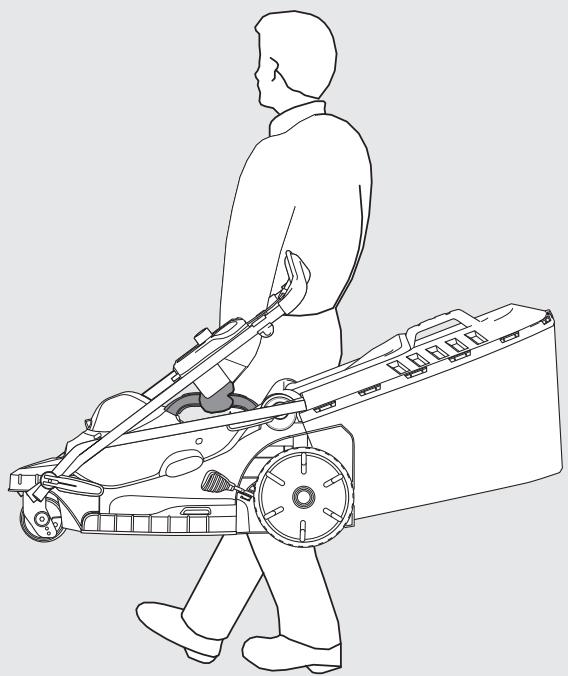
6.8
6.9
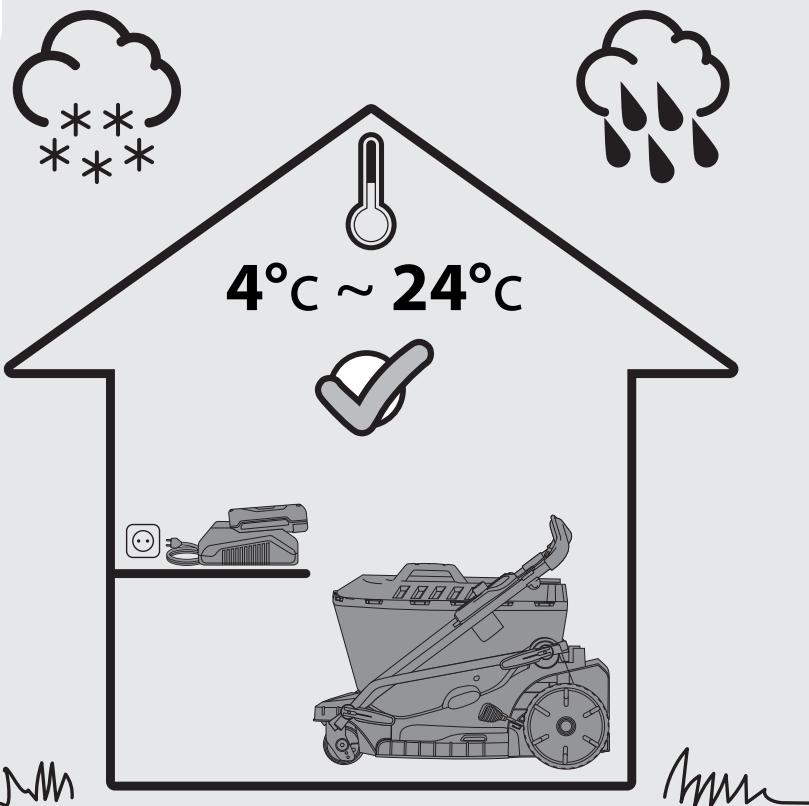
Ce produit est recyclable. S'il ne peut plus etre utiliseveuillez apporter dans un centre de recyclage de déchets.
Este producto es recicable. Si ya no se pueda usar, Ievelo a un centro de recicaje de residuos.
Este produit e reciclavel. SeDEXAR de outilizar,entregue-o num centro de reciclagem de residuos.
17 Questo prodotto più essere ricericlato. Se deve essere smaltito, portalo presso un centro de reciclaggio.
Auto to npoiov evai avakukkwio. Eav dev mnpei nleov va xpoiopoiointheta, metapepe tnv oe kantoio kevtpo avakukwonganoppmuatwv.
Ten produkt poddwany jest recycklingogi, kiedy przystaje byc uzyteczny nalezy dostarczy go do punktu zbiorny odpadow.
3TOT npodykT mojET nepepa6aTaBbAtc. Ecnn OH 60nbIe He npirodeH Ira nolb3oBaHna, cdaTe erO B yTuINi3auOnHbIy eHTp.
byn eHIM kaetaeHneye kenei. Ohbi api kondahyfa 60maaTbH KaFdaJa, OHbi kaTa eHneTIn opTaBikKa TaCblpybHb3dbI etiHem3
1A Κεη προύκτ MÔke περούσλητις. ἀκιο BOHO 6Πbʌe He c πριδaTHe dIpy BnKOpncTyBaHŋ, 3daiTe Ioro B yTuɪi3aúiHni ΚεHTp.
Aceast produs este reciclabil. Daca nu mai poate ti folosit, va rugam sa il aducei intr-un centru de reciclare a deseurilor.
Este produits e reciclavel. Se nao puder mais ser uso, descarte em um centro de reciclagem de residuos.
This product is recyclable. If it cannot be used anymore, please take it to waste recycling centre.

Made in P.R.C. 2019 随订单变
C E
EAC


DESCARTE SELETIVO
Imported by Adeo South Africa (PTY) LTD T/A Leroy Merlin Leroy Merlin Greenstone Store
Corner Blackrock Street and Stoneridge Drive, Greenstone Park East 2, Edenvale, 1610 Johannesburg, Gauteng, South Africa
IMMOTPATUbIy/TayapandBn CanaB60bHnHa
nap3ab3bKbTAPdRk Kab6bnayya Eknetti Tynra:
Jepya Mepen HKa3akCTAnH KJIUC Ka3akCTan
PecnyNtbnKac60,00000, AnMaTb K, KOnaEB KwSei, 77,
<'VkView> B0, 6K, 07-KeHcE