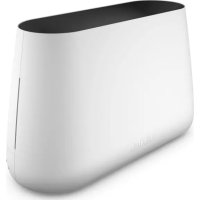
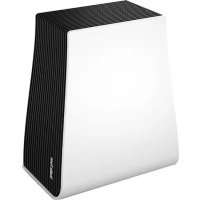
EVA LITTLE - Humidifier STADLERFORM - Free user manual and instructions
Find the device manual for free EVA LITTLE STADLERFORM in PDF.
| Product type | Ultrasonic humidifier |
| Brand | STADLERFORM |
| Model | EVA LITTLE |
| Dimensions (W × H × D) | 196 × 418 × 196 mm |
| Weight | 3.0 kg |
| Power supply | 220-240 V / 50 Hz |
| Nominal power | 10-95 W |
| Water tank capacity | 6.3 liters |
| Max. humidity output | 550 g/h |
| Noise level | 26-34 dB(A) |
| Adaptive Humidity™ technology | Yes: automatically adjusts humidification to maintain 45% RH |
| External humidity sensor (Remote Sensor™) | Yes, with remote control (range 10 m, AAA batteries) |
| Operating modes | Auto, Night (3 brightness levels), Warm (pre-heating), Continuous (CO), 5 humidity levels |
| Adjustable hygrostat | 30-75% RH and continuous mode |
| Fragrance function | Drawer for essential oils (max 1-2 drops) |
| Silver Cube™ (silver cube) | Prevents bacterial growth – effective for 1 year |
| Anti-limescale cartridge | Included, lasts 1-3 months depending on water hardness (up to 360 L) |
| Cleaning | Integrated cleaning mode (hold night button 5 s); descaling recommended 1x/month |
| Safety | Automatic shut-off in case of water shortage, protected heating plate, removable power cable |
| Warranty | 2 years (wear parts excluded) |
Frequently Asked Questions - EVA LITTLE STADLERFORM
User questions about EVA LITTLE STADLERFORM
0 question about this device. Answer the ones you know or ask your own.
Ask a new question about this device
Download the instructions for your Humidifier in PDF format for free! Find your manual EVA LITTLE - STADLERFORM and take your electronic device back in hand. On this page are published all the documents necessary for the use of your device. EVA LITTLE by STADLERFORM.
USER MANUAL EVA LITTLE STADLERFORM
Operating instructions
Mode d'emploi
EN ADAPTIVE HUMIDITY™ technology automatically adapts the humidification output in Auto Mode in order to reach and keep the desired humidity level quietly and efficiently
Congratulations! You have just acquired the exceptional Eva air humidifier. It will give you great pleasure and improve the indoor air for you.
As with all domestic electrical appliances, particular care is also needed with this model in order to avoid injury, fire damage or damage to the appliance. Please study these operating instructions carefully before using this appliance for the first time and follow the safety advice on the appliance itself.
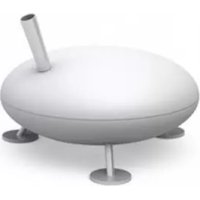
Description of the appliance
The appliance consists of the following main components:
1. Mains cable for power supply
2. Remote Sensor™ humidity sensor with remote control
3. Stand for Remote SensorTM
4. Battery compartment of Remote SensorTM (Type AAA)
5. Position of the humidity sensor
6. Water tank with carrying handle
7. Water tank lid with anticalc cartridge
8. Anticalc cartridge
9. Water tray
10. On/off button
11. Button for the selection of the desired humidity (hygrostat: 30-75% and continuous operation "C0")
12. Button for the selection of the humidification output level 1-5
13. Button for warm mode (water pre-heating)
14. Button for auto mode
15. Display with the indication for the current and desired (blinking) humidity
16. Water level indicator
17. Heating plate for water pre-heating
18. Silicone cover for the heating plate
19. Ultrasonic membrane
20. Fragrance container
21. Button for night mode (LEDs normal, dimmed or off) and cleaning mode (press for at least 5 seconds)
22. Symbol for a failed connection between Remote Sensor™ and humidifier
23. Mist chamber
24. Silver CubeTM
25. Cleaning brush
26. Air inlet (Caution: no water may enter this opening!)
27. Mist outlet
Important Safety Instructions
Please read through the operating instructions carefully before you use the appliance for the first time and keep them safely for later reference; if necessary pass them on to the next owner.
- Stadler Form refuses all liability for loss or damage which arises as a result of failure to follow these operating instructions.
- The appliance is only to be used in the home for the purposes described in these instructions. Unauthorized use and technical modifications to the appliance can lead to danger to life and health.
- This appliance can be used by children aged from 8 years and above and persons with reduced physical, sensory or mental capabilities or lack of
experience and knowledge if they have been given supervision or instruction concerning use of the appliance in a safe way and understand the hazards involved. Children shall not play with the appliance. Cleaning and user maintenance shall not be made by children without supervision.
- Only connect the cable to alternating current. Observe the voltage information given on the appliance.
- Do not use damaged extension cords.
- Do not run the power cord over sharp edges and make sure that it does not get trapped.
- Do not pull the plug from the socket with wet hands or by holding on to the power cord.
- Do not use the appliance in immediate vicinity of a bath tub, a shower or a swimming pool (observe a minimum distance of 3m ). Place the appliance such that a person in the bath tub cannot touch the appliance.
- Do not place the appliance near a heat source. Do not subject the power cord to direct heat (such as a heated hotplate, open flames, hot iron sole plates or heaters for example). Protect power cords from oil.
- See to it that the appliance is properly positioned to ensure a high stability during its operation and make sure that no one can trip over the power cord.
- The appliance is not splash-proof.
- For indoor use only.
- Do not store the appliance outdoors.
- Store the appliance in a dry place inaccessible to children (pack the appliance).
- If the power cord is damaged, it must be replaced by the manufacturer or a repair shop authorized by the manufacturer or by similarly qualified persons in order to avoid a hazard.
- Prior to any maintenance, cleaning and after each use, switch off the appliance and unplug the mains cable from the socket.
- Prior to cleaning the interior of the appliance, make sure the appliance has been off for at least 15 minutes!
- When the pre-heating is turned on, the water inside the appliance is heated: the water in the water tray (9) and the heating plate (17) become hot. Avoid touching the water and the heating plate!
- Place the appliance out of reach of children, as the water inside the appliance is heated up to 50^ and the heating plate reaches hot temperatures up to 75^ .
Before setup: Anticalc cartridge and water hardness
The anticalc cartridge reduces the limescale in the water and the undesirable emission of limescale particles into the surroundings. Effective for one to three months, depending on water hardness (see table).
Important: Soak the anticalc cartridge in a water bath for 24 hours before the first use (not in the water tank!). The resin has to absorb water to reach high performance.
The period of time that the cartridge is effective for depends on the hardness of the water. This can be tested using the testing strips provided (testing strip stuck to the Quick Setup Guide).
- Dip the testing strips into the water for a second.
- After around one minute the results can be seen on the test strip.
Some of the green fields change colour into pink. The water hardness is shown by how many boxes turn pink. Example: If three are pink, then the water hardness is >14^ .
| Number of pink boxes | Water hardness | Degree of hardness (°dH) | Cartridge will last for (with 4 liter/day) | |
| Days | Liter | |||
| 0/1 | Soft | From 4 °dH | 90 days | approx. 360L |
| 2 | Moderately hard | From 7 °dH | 45 days | approx. 180L |
| 3 | Hard | From 14 °dH | 30 days | approx. 120L |
| 4 | Very hard | From 21 °dH | 15 days | approx. 60L |
With a water hardness above 21^ , we can no longer recommend the use of an ultrasonic humidifier. We recommend that you use an evaporative humidifier to increase the humidity in your house (e.g. an Oskar humidifier made by Stadler Form: www.stadlerform.com/Oskar).
Note: Do not operate Eva with decalcified water out of a decalcification system that uses the principle of an ion exchanger (salt is added to the water). The salt contained in the water may lead to white dust accumulation around the appliance. However, Eva may be operated from a drinking water filter system (e.g. Brita). Should you be unsure about the quality or composition of the water in your area, contact the caretaker or your drinking water provider.
Setting up / operation
- Put Eva in the desired location on a flat surface. The mist reaches a height of up to 1.4m thanks to the high-performance humidification (output level 5, warm mode on). This makes it possible to place Eva directly on the floor. Connect the power cord (1) to a suitable socket.
- Take the Remote SensorTM (2), the stand (3) and the two batteries out of the packaging. Open the battery compartment (4) on the underside of the Remote SensorTM (2) by turning the lid anticlockwise. Insert the two batteries into the battery compartment (4), as shown on page 4, and close the lid again. Now place the Remote SensorTM (2) on the stand (3).
- On the one hand, the Remote Sensor™ (2) is a humidity sensor and guarantees precise humidification by its external position. On the other hand, the Remote Sensor™ (2) also serves as a remote control. Position the humidity sensor Remote Sensor™ (2) in the centre of the room on a table or a sideboard with an optimal distance from Eva between 3 - 5m . The Remote Sensor™ should be positioned centrally in the room so that the room air can flow past the sensor (5) as freely as possible. If this is not possible, we recommend positioning the Remote Sensor™ with a minimum distance of 30cm from the wall and a minimum distance of 2m from windows and ventilation openings.
- Remove the water tank (6) by holding it by the handle and pulling it up. Screw off the water tank lid (7) and fill the water tank with clean,
cold tap water up to the maximum mark. Make sure that the anticalc cartridge (8) has been soaked in water for 24 hours prior (see "Before setup"). Finally, screw the lid (7) back on the water tank (6). Then place the water tank (6) in the unit. The water tray (9) will now slowly fill from the water tank. Important: please do not move the appliance when it is filled with water. The water could run into the electronics.
- Press the on/off button (10) to switch Eva on. The current relative humidity in % is shown on the display (15). If the water level indicator light (16) is red, there is too little water in the unit. The humidification output level is pre-set to level 2 and the desired humidity at 45% .
- Activate the Remote Sensor™ (2) by pressing the "Hygrostat" button (11a). The humidity sensor automatically sends information about the measured relative humidity several times per minute to the unit, which shows it on the display (15). The measurement can also be activated by pressing any button on the Remote Sensor™ (2) (aside from the on/off button (10)).
- The desired humidity can be changed by pressing the "Hygrostat" button (11) several times (35-75% and continuous operation "CO"). The symbol on the display (15) blinks during input. After a few seconds without input, the selected value is saved. The symbol changes to the current measured humidity.
- The humidification performance can be changed by pressing the "Output" button (12) several times (levels 1-5). The level is indicated on the display (15) by horizontal bars (e.g. 1 bar = level 1).
- By pressing the "Warm" button (13), the warm mode, and with it the water pre-heating, is turned on. Now the LED on the "Warm" button on the unit is on. The heating plate (17) warms the water before it is turned to mist by the ultrasonic membrane (19). The warm mode creates a pleasantly warm mist plus increases the humidification performance.
- By pressing the "Auto" button (14), the auto mode, and with it the Adaptive Humidity™ Technology, is activated. Now the LED on the "Auto" button on the unit is on. In auto mode, the unit adapts the humidification output level automatically in order to reach and maintain the desired humidity of 45% quietly and in an energy-efficient way. The lower the current humidity is, the higher the humidification output level will automatically be set (under 33% = level 4, from 34% -37% = level 3, from 38% -41% = level 2, from 42% -45% = level 1). You can change the desired humidity in auto mode by pressing the "Hygrostat" button (11) several times while auto mode is active (the LED on the "Auto" button on the unit is on). The humidification output level (12) cannot be altered manually in auto mode. As soon as the "Output" button (12) is pressed to change the humidification output level, the auto mode is deactivated.
- You can use Eva to disperse fragrances in the room. Be extremely sparing with fragrances because an excessive dosage can result in the malfunctioning of, and damage to, the appliance. In order to use fragrances, briefly press and release the fragrance container (20) and pull it out of the appliance. Let the fragrance drip directly onto the cotton pad in the fragrance container (20). Add a maximum of 1-2 drops of fragrance into the fragrance container! Push the container back again and press and release it to lock it. Tip: in order to change the fragrance, remove the cotton pad and clean the container with soap. Now you may insert
a new cotton pad (commercially available) and add drops of the desired fragrance.
- If the water level indicator (16) changes to red, the water must be refilled. Remove the water tank (6) and fill it with clean, cold tap water up to the maximum mark. After replacing the water tank, the appliance automatically resumes operation after a few seconds. The water tank can also be refilled during operation.
- If you find the lamps too bright (in a bedroom, for example), you may reduce the light intensity by pressing the night mode key (21):
Normal mode (default mode)
- Dimmed mode (push once)
- Lights-out mode (push twice)
- By pushing the dimmer button once more, you can go back into normal mode.
If there is no water in the appliance, the red water level symbol (16) lights up in all modes. The red light cannot be dimmed.
- If two dots are shown (22) on the display (15), Eva cannot establish a radio connection to the Remote Sensor™ (2). Eva still functions thanks to a humidity sensor within the appliance. Press any button on the Remote Sensor™ (2) to activate it. Make sure that the Remote Sensor™ (2) is within a 10 m radius of Eva. Walls, doors and floors between Eva and the Remote Sensor™ (2) can disrupt the radio connection. The Remote Sensor™ (2) should be optimally positioned at a distance between 3–5 m from Eva and on an elevated surface in the middle of the room (see «Setup/operation» No. 3). The two dots on the display (22) could also indicate that the batteries in the Remote Sensor™ (2) need replacing (see «Setup/operation» No. 2).
Note: Should you see droplets (or other signs of dampness) on or around the unit, this condensed water is from the humidifier. This means that the air can no longer absorb the moisture from the humidifier. Please activate the auto mode with a desired humidity of 45% . Water droplets should then stop forming.
Cleaning
Prior to any maintenance, cleaning and after each use, switch off the appliance and unplug the mains cable (1) from the socket.
Attention: Never submerge the appliance in water (danger of short-circuit). If pre-heating is turned on (the warm mode LED is on (13)), the water inside the appliance is heated: the water in the water tray (9) and the heating plate (17) become hot. Avoid touching the water and the heating plate!
- For external cleaning, rub with a damp cloth and then dry thoroughly.
-
Run the cleaning mode at least once per month. The appliance must be off for at least 15 minutes prior to internal cleaning! Then remove the water tank (6), the mist chamber (23), the silicone cover (18), the Silver Cube (24) and the fragrance container (20). Fill a cup with 200ml of tap water mixed with descaling agent (mix according to the manufacturer's instructions). Pour the liquid carefully into the water tray (9) by holding the cup directly over the water tray (see page 5). Do not pour the liquid into the water tray from high above the tray! Be sure that no liquid enters the air inlet opening (26). This will damage the appliance and will void any claim to the warranty.
-
To start the cleaning mode, the mains cable must be connected to a socket. Press and hold the night mode button (21) on the underside of the right corner for 5 seconds to activate the cleaning mode. Now the water level symbol (16) on the appliance will blink red. The cleaning mode runs for around 5 minutes and automatically turns off afterwards (the water level symbol stops blinking).
- Check in the water tray (9) if the limescale on the ultrasonic membrane (19) and the heating plate (17) has dissolved. Attention: the water and the heating plate are hot, risk of scalding!
- If limescale residue remains, the ultrasonic membrane (19) and the heating plate (17) can be cleaned with the help of the cleaning brush (25) (front- and backside). Do not try to scrape them with a hard object.
- For stubborn limescale, we recommend descending the appliance by running the cleaning mode (21) several times in a row. Leave the descending agent in the water tray for a maximum of 20 minutes and pour it out afterwards as described below.
- Important: Pour the descending agent out over the left front corner of the appliance (see the arrow on the appliance). No water may enter the air inlet opening (26). This will damage the appliance and will void any claim to the warranty.
- To rinse, now fill the cup with 200ml of tap water and carefully pour the liquid into the water tray (9) by holding the cup directly over the water tray (see page 5). Do not pour the liquid into the water tray from high above the tray! Pour the water out over the left front corner of the appliance. Repeat the process until there is no more descaling agent in the water tray (9). Place the Silver Cube (24), silicone cover (18), mist chamber (23), water tank (6) and fragrance container (20) back into the appliance. If the water tank is not sitting right, check if the upper part of the mist chamber (23) is properly mounted.
- Clean the water tank (6) thoroughly every two weeks with a soft brush or sponge and warm water. Use diluted descaling agent (mix according to the manufacturer's instructions) for lime deposits. Rinse the water tank afterwards with clean, cold tap water thoroughly.
Replacement of the anticalc cartridge
- Please find the recommended replacement interval in the table (see "Before setup").
- Tip: the efficiency of the cartridge (8) can be inspected with a simple test. Hold a small mirror in the mist (27) for a few seconds. If white deposits (calcium carbonate) appear on the mirror, then the cartridge needs changing.
- The anticalc cartridge is located on the inner side of the tank lid (7). First, screw the tank lid (7) off the water tank (6) and then screw the cartridge off the tank lid. Dispose of the cartridge in the domestic waste (8). Prior to screwing the new anticalc cartridge into the inside of the tank lid, soak it in water (not in the water tank!) for 24 hours.
- Keep the tank lid (7) when replacing the cartridge!
Silver CubeTM
The Silver Cube™ (24) prevents the growth of germs and bacteria in the humidifier due to the continuous release of silver ions. The use of silver cubes leads to a hygienic room climate. The lifetime of the silver is around
one year. We therefore recommend that you replace the silver cube at the beginning of every humidifying season. The silver cube starts working as soon as it comes into contact with water, and also works when the unit is switched off.
Repairs
- Repairs to electrical appliances must only be carried out by a qualified electrical technician. If improper repairs are carried out, the warranty lapses and all liability is refused.
- Never operate the appliance if the adaptor or plug is damaged, after it has malfunctioned, if it has been dropped or has been damaged in any other way (cracks/breaks in the casing).
- Do not push any object into the appliance.
- If the appliance is beyond repair, make it unusable immediately by cutting through the cable and hand it in at the collection point provided for the purpose.
Disposal
The European directive 2012 / 19 / CE on Waste Electrical and Electronic Equipment (WEEE), requires that old household electrical appliances must not be disposed in the normal unsorted municipal waste stream. Old appliances must be collected separately in order to optimize the recovery and recycling of the materials they contain and reduce the impact on human health and the environment. The crossed out "wheeled bin" symbol on the
product reminds you of your obligation, that when you dispose of the appliance it must be separately collected. Consumers should contact their local authority or retailer for information concerning the correct disposal of their old appliance.
Specifications
| Rated voltage | 220–240V / 50Hz |
| Rated power | 10–95W |
| Humidity output | up to 550 g/h |
| Dimensions | 196 x 418 x 196 mm (width x height x depth) |
| Weight | 3.0kg |
| Water tank capacity | 6.3 litres |
| Sound level | 26 – 34 dB(A) |
| Complies with EU regulations | CE / WEEE / RoHS |
All rights for any technical modifications are reserved
fkeKTHBHOCTN yBlaJXHeHn (IHTeHCMBHOCTb yPoBHa 5, pexm nOIOrpeBa BkIouen).3To no3BOJnAET pa3MeaATb yCtpoiCTBO Eva Ha nOly. BkIIOHTe shyP nITAHn (1) B noDxOJaIyU PO3eTKy.
- BbHbTe DaTnK Remote SensorTM (2), NoCTaBky (3) n DBe 6atapeKn n3 ynaKOBKn. OTkpoIte OTcek dJIЯ 6atapeek (4) B HnXHe Yactu DaTn Ka Remote SensorTM (2), NOBepHyB KpbIshky npOTUB YacobOY cTpeKn. BcTaBte DBe 6atapekn B OTcek dJIЯ 6atapeek (4), KAK noka3aHO Ha cTp. 4, n 3akpoIte KpbIshky. YcTaHOblte DaTnK Remote SensorTM (2) Ha noCTaBky (3).
- C O ndo hctopohbl, Remote SensorTM (2) JBnlaetc daTnykOM BnaXHoctn n rapaHTnpyert Tochny ypoBHeYbIaXHeHnra, NockOJIbky pa-noloxhen chapxyn. C dpyroT cToPOhbl, daTnyk Remote SensorTM (2) BbICTyaet Takke B kaueCTBe pNbTa nctaHIOHOHOr o npabJeHnA. Pa3MeCTte daTnyk BnaXHoCTn Remote SensorTM (2) B ceHTpe KomHa-tb Ha cTone mIn cepBaHte. OntmAlbHoe pacCToHnE o TycPoIcTBa Eva coCTabJrert ot 3 do 5 M. DaTnyk Remote SensorTM cneDyEt pa3Me-qtB b CEHTpe KOMHAtb, YTObbl BO3dYK kAK MOHX Bo9ee npoxOINuepez daTnyk (5). Ecn 3TO HeBO3MOXHO, peKOMEHyETcpa3Meuatb daTnyk Remote SensorTM ha pacCToHnHn He MeHee 30 cm OT cTeHbN He MeHee 2 M OT OKOH N BeHTNuOIOHHbIX OTBepCTn.
- BbInbte pe3epByap dIJI BObl (6), B3aER eO 3a pyKU y NotAHyB BBepx. OTKpyTnte KpbIshky pe3epByapa dJI BObl (7) n 3anOIHNte pe3epByap uHcToi XoIOHO BOIOPOBOHNO BOIO DO OTMeKN MAcCMJaBHO rOboHn. He 3a6yIbTe nepeI 3TNM ONCTNb KapTpNdx npOTNB HAKINN (8) B BOy Ha 24 Yaca (cm. pa3dIe «Peped UCTAHOBKO»). ChObA npKpyTnte KpbIshky (7) K pe3epByap dJI BObl (6). 3aTeM NOMECTNE pe3epByap dJI BObl (6) B np6Op. IToK dJI BObl (9) 6yDet MeJenHo HAnONHtCB SO BOIO n3 pe3epByapa. BaxHo! He nepemeuaite YeCTpoIcTO, KOrDa OHO HANOJIHeO BOIO. BOda MoKet nonactb Ha 3JeKTPOHnKy.
- Haxmte KhoNkny nItaHnra (10), YTO6b bKbnOHTb yCTpoIcTb EvHa. Ha dinCnlee (15) OTo6paXaetcTa TeKUaAor OTHocTeJIbHaB BJaXHOCTb B npOeHTax. Ecln INHdkatOp yPoBH BObl (16) Tropnt KpaChbIM cBeTOM, 3TO O3Haayet, YTO B pInbOpoe HeNoctatoHOn BObl. IIO YMolnaHIO UCTaHOBHeN yPoBEh INHTeHCINBHOCTu YBlaXHeHn2 N XeJLaemar BLaXHOCTb 45%.
- Aktunbpyute daTukk Remote SensorTM (2), Haxab KhoNky «Hygrostat» (Peryntop BnaXhOCTn) (11a). DaTukk BnaXhOCTn HeckoIko pa3 B MInHyt y ABtOMaTHeCKn NocBlaJatep npbOpny HnΦopMauHO 06 NImpeHHo OTHCOTbHOB BnaXhOCTn, n 3TO 3NaYeHne OTo6paKaTaCn Ha DnCpIee (15). NImpeHne MoxHo TaKxe AKTUnbPOBaTb, Haxab IIO-6yU KhoNky Ha daTukke Remote SensorTM (2) (3a NcKIIouHeHem KhoNkn NITAHIN (10)).
- YtobbIzM3MeHntb Jxelaemyu BlaJaxHoCTb, Heo6xoJIMo HeckOJIbKO pa3 haxaTb KhoNky (HygroStat) (PeryJrTOp BlaJaxHoCTn) (11) (35-75% n HenpepbIBhbl pexm «CO»). Bo BpemBaBbopa 3haueHn CmBON Ha Dncnnee (15) Miraet. EcJn He haxmAtb KhoNky B TeueHne HeckOJIbKnx CeKynD, BbIbpaHnoe 3haueHncoXpaHreTc. CmBON Ha Dincnnee MeHReTcra Ha N3MepEHNOE TekUiee 3haueHn BLaJxHoCTn.
- WHTEHCNBHOCTb YBIAJXHEHNA M0XHO I3MeHNTb, ECNI HECOJIbKO pa3 HAXaTB KHONKY «Output» (WHTEHCNBHOCTb) (12) (ypOBHN 1-5). YpOBHN
OTo6paJaoTcHa nucnIee (15) B vIne rOpn3oHTaIbHbIX nIoCOK (Ha-npImep, 1 noL0cka = ypoBeH b).
9.Пинхати Кногки Warm (Подогрев) (13) Вкlioуаетс ржим поогрев,а вмосте сним ппеварпелов поогрев bobl.Ha npиборе загораетс CBETODIOHь ИнДИКATOP Ha Kногke Warm (Подогрев).HarpeBaTeNBaHЯ Пл actuha(17) noDorogpeBaET Bovy,nepe TEm кak OHA npeBpaaaetcВТУМан yIbtpa3ByKOВ МeMбано(19). Pexm noDorogpeBA no3BOJIaET CO3DAbaTb npnAHTbI Tymahи NOвышаETФфкгТВHOBCTb YBlaЖHeHIN.
-
Пи нахати кноги «Auto» (АВтOMATУССКИ рекIM) (14) akTNBUPуETcA BNTOMATUССКИ рекIM, ИпОьзУПОДМ.TexHONOrIHOAdaptive HumidityTM. Ha npi6pe 3aRopaetc CBETOДИОДНИнДИкATOP ha Kногke «Auto» (АВТOMATUССКИ рекIM).В abTOMATUССКOM pekime npi6op ABtOMATUССКИ peryluyepET INTECHCINBOCTb yBnaxHeHnIA, YTO6bI paBHomePno I 6e3 IINuHInx 3aTpat 3ePRnY cTahOBHTbIpoDedpKnbBaT JeknaemyIO BlaXHoCTb BO3dYxa 45% .Yem HnIXeTeKYUaB BLAnXHOCb BO3dYxa, TEM bByIe 6byET abTOMATUCSKИ cTahOBJIeHHb IypOBeHb INTECHCINBOCTN yBnaxHeHnIA (do 33% = ypOBeHb 4,34-37 % = ypOBeHb 3,38-41 % = ypOBeHb 2,42-45 % = ypOBeHb 1).MoxHO nI3MeHnT bJeknaemyIO BlaXHoCTb BO3dYxa B abTOMATUCSKOM pekime, HeckOJIbKO pa3 hXab KhONky (HygroStat) (PerynIaTOp BLAnXHocTn) (11) npi BKJIouEHHom ABtOMATUCSKOM pekime (ropIT CBeToIOnIDHn INIduKATOp HA KChONE «Auto» (ABTOMATUCSKII pekime) HA npi6ope).B abTOMATUCSKOM pekime HeNb3Я nI3MeHnB bpyHyIO yPOBEH nIteCINBOCTN yBnaxHeHnIA (12).Пи нахати кноги «Output» (ИнТeHcINBHOCTb) (12) ДЯ nI3MeHnEA yPoBHa nIteHCINBHOCTN yBlaXHeHnA BtOMATUCSKII pekim OTKILOuAeTcR.
-
Moxho nCnoB3ObaT np6Op Eva dIy pacnbJIeHn apoma macna B nomuehen. IcnoB3yIte apoma macna ouHb 3KOHOMHO, nockoBky nx ype3Mephoe KOJUYeCTBO MOXET npVBecTI K HEnCnpabHocTn IIN NOBpeKdHnO uCTpoiCTBa. DIn rncNoB3ObaHnApoma macna HaKmnte Ha KOtHeHep dIy apoma macna (20) IN BbIbTe erO i3 yctpoiCTBa. KaHnTe apoma macna HENOCPeDCTBeHHo Ha BATHbI DNCK B KOtTeHep dIy apoma macna (20). DoabJIaTe B KOtHeHep dIy apoma macna He 6Oone 1-2 Kanelb apoma macna! BCTabte KOtHeHep Ha MecTo n HaxMtne do ueLka. Cobet: YTO6bI cMeHNTb apomaT, BbIHbTe BATHbI DNCK N BbIMoTE KOtHeHep C MbIJOM. 3aTeM MoXHO BCTaBNb HObI BATHbI DNCK (NMeEeTcB B pOdaXe), KAnHyB Ha Hero HUxHbI apomat.
-
Ecln Hndnkatop yobHb BObl (16) ropnt KpaChbIM ZbETOM, Heo6xOmo Doabnt B Ody. BbHte pe3epByap dIra Bobl (6) n HanoJIHnte erO uHCTOn XoIOHOH BOONPOBOHOH BOOJ DO OTMeTKN MAKCImaJIbHorO yobHn. IocJe YCTAHOBKn pe3epByapa dIra BObl Ha MeTo npIbOp ABtOMaTHeCKn BO306HOBnT pa6Oty uepe3 HeckOJIbKO cekyHd. MoXHo TAKKe DOnNTB OBody B pe3epByap BO Bpemr pa6Obl.
-
Pexim cha npedna3nauhen IJNcnoIb3ObaHnraYbIaXHntenB HooHoe Bpem.B 3TOM peXime nHTeHCNBHOCTcb CBTOBINHnIkaunymHehwaetcdo npiaTHoro MArKOro CBeueHnry. YTo6bl BKJIooHTbpeXim cHaXmTe COOTBETCTByHOUY KHOKNy (21).BbMOxete Bbi-6paTb 1n3 peXIMOB:
This warranty covers defects of construction, production and material. All abrasion parts are excluded and also inappropriate usage or maintenance.
Garantie 2 ans
Thanks to all people involved in this project: Del Xu for his engagement and for building cultural bridges, John Ye for the engineering and Zeng Ling Shang for his CAD work, Mario Rothenbühler for the photos, Matti Walker for the elegant design and the graphic work.
Martin Stadler, CEO Stadler Form Aktiengesellschaft