Ben - Humidifier STADLERFORM - Free user manual and instructions
Find the device manual for free Ben STADLERFORM in PDF.
| Product type | 3-in-1 humidifier (humidifier, aroma diffuser, fireplace effect) |
| Brand | STADLERFORM |
| Model | Ben |
| Dimensions | 338 x 206 x 134 mm (W x H x D) |
| Weight | 1.7 kg |
| Power supply | 100-240 V / 50-60 Hz, power adapter included |
| Rated power | 24 W |
| Water tank capacity | 2.5 liters |
| Moisture emission | Up to 160 g/h |
| Recommended maximum area | 25 m² / 63 m³ |
| Noise level | 27-30 dB(A) |
| Runtime per fill | Approximately 3 days |
| Humidification technology | Ultrasonic |
| Aroma diffuser function | Yes, addition of essential oils (alcohol-free) into the water base |
| Lighted fireplace effect | Adjustable amber LED (3 levels: normal, dimmed, off) |
| Water level indicator | Red indicator light when tank is empty |
| Water Cube™ filter | Activated carbon filter, lifespan approximately 1 year |
| Anti-limescale cartridge | Optional, lasts 1-3 months depending on water hardness |
| Included accessories | Cleaning brush, water hardness test strip |
| Recommended cleaning | Daily emptying, cleaning every 2 weeks, descaling monthly |
| Warranty | 1 year limited |
| Materials | ABS plastic, polypropylene tank |
| Color | White (not specified but assumed) |
Frequently Asked Questions - Ben STADLERFORM
User questions about Ben STADLERFORM
0 question about this device. Answer the ones you know or ask your own.
Ask a new question about this device
Download the instructions for your Humidifier in PDF format for free! Find your manual Ben - STADLERFORM and take your electronic device back in hand. On this page are published all the documents necessary for the use of your device. Ben by STADLERFORM.
USER MANUAL Ben STADLERFORM
Operating instructions
Mode d'emploi
READ AND SAVE THESE INSTRUCTIONS
LISEZ ET CONSERVEZ CES INSTRUCTIONS
LEA Y GUARDE ESTAS INSTRUCCIONES
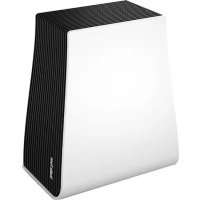
natural_image
White rectangular electronic device with black lid, no visible text or symbols on bodyBen
text_image
Exploded view diagram of a smart appliance with numbered parts for identification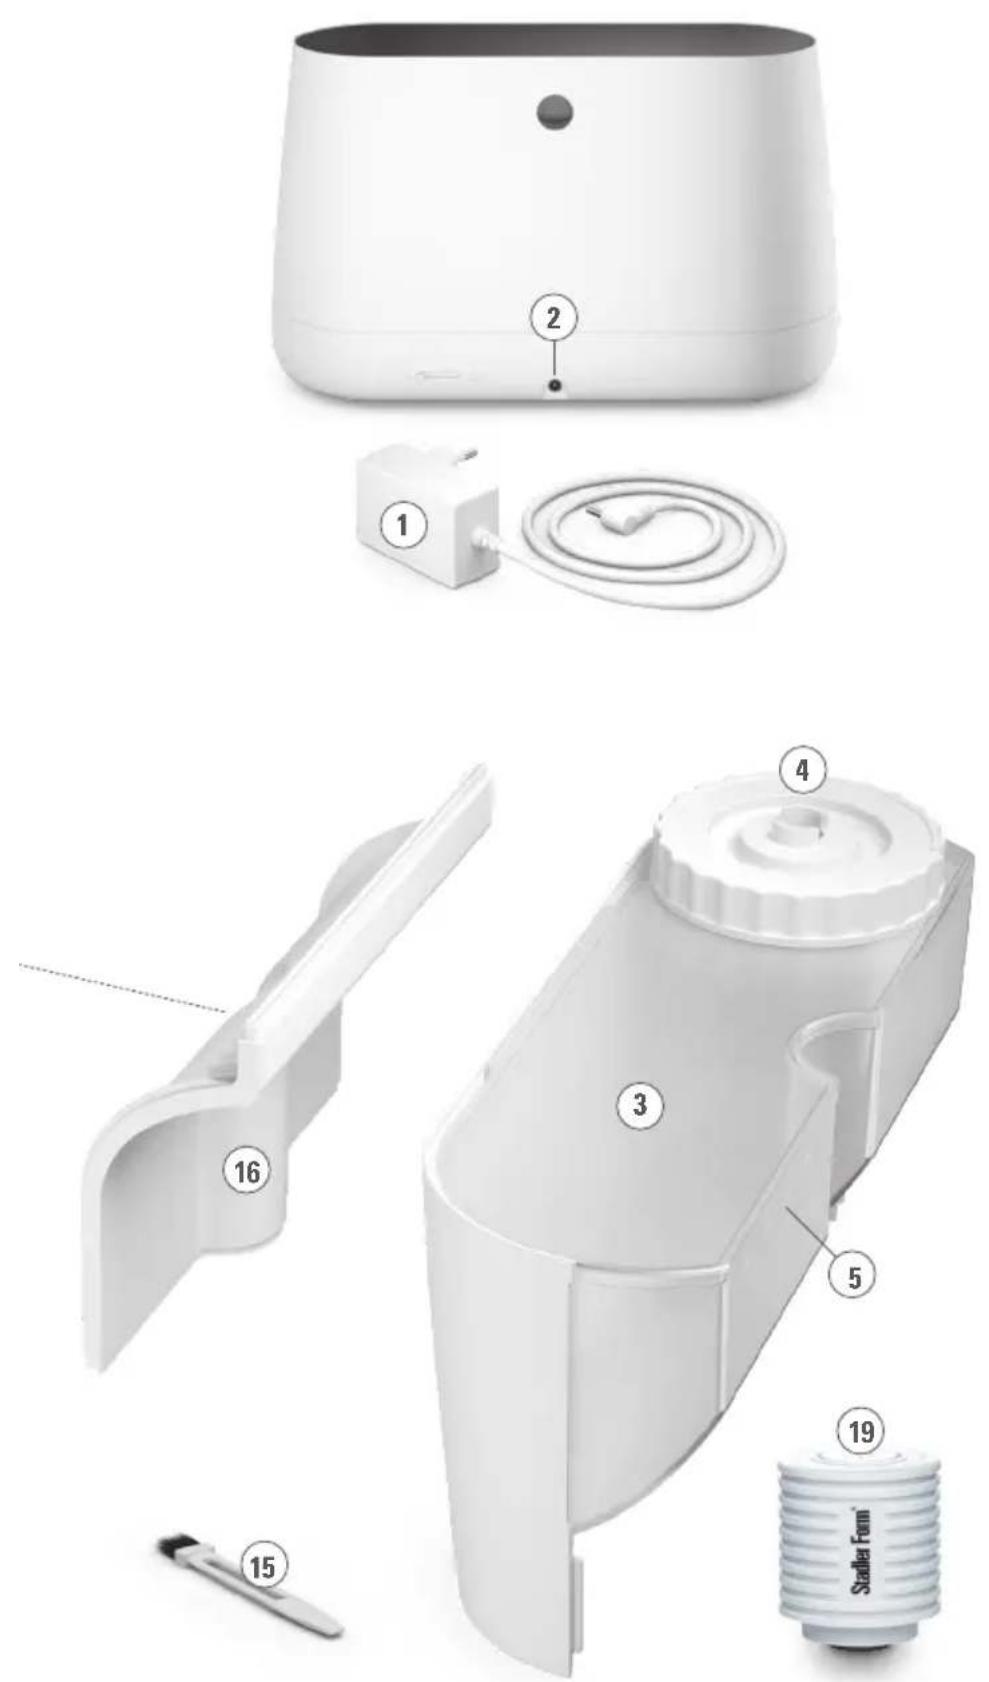
text_image
Exploded view diagram of a Steller Hum brand air purifier with numbered parts and labeled componentsEN: Optional accessory
FR : Accessoire optionnel
ES: Accesorio opcional
Water testing strip
BANDELETTE TESTEUR / PAPEL INDICATOR

natural_image
Blank white rectangle with rounded corners (no text or symbols)Fragrance
PARFUMS / FRAGANCIAS
natural_image
Hand inserting a small electronic device into a white plastic appliance casing (no text or symbols visible)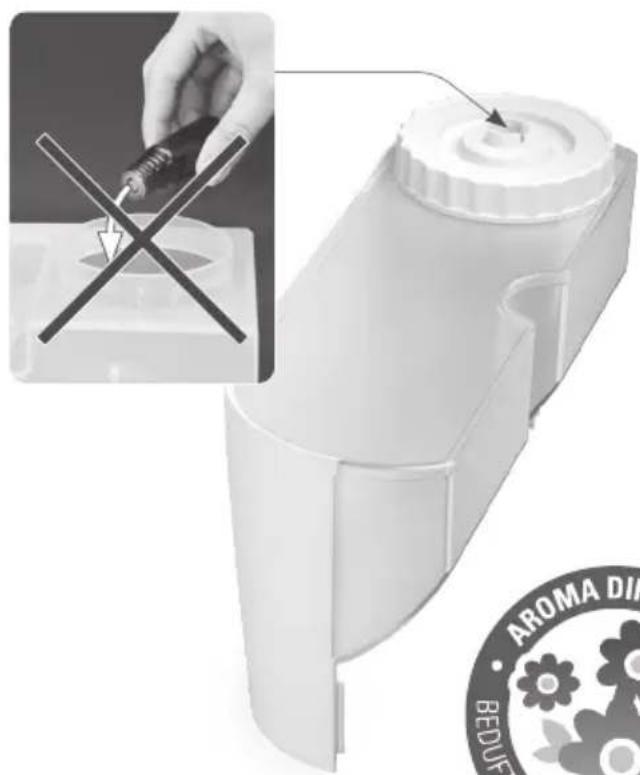
text_image
AROMA DI BEDUF
text_image
AROMA DIFFUSER BEDUFTER DIFFUSEUR D'HUILESSetting up
SOAK CARTRDIGE / TREMPER LA CARTOUCHE / EMPAPAR EL CARTUCHO
EN: Optional accessory
FR : Accessoire optionnel
ES: Accesorio opcional

Download instruction manual: Téléchargez le mode d'emploi : Descargue el manual de instrucciones: www.stadlerformusa.com/manuals

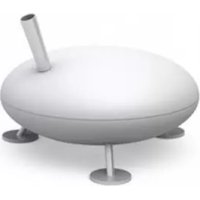
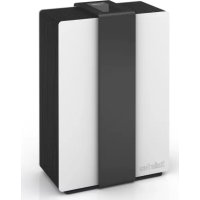
Congratulations! You have just purchased BEN, the exceptional 3 in 1 appliance (humidifier, aroma diffuser and fireplace effect). It will give you great pleasure and improve the indoor air for you.
As with all domestic electrical appliances, particular care is needed with this model also, in order to avoid injury, fire damage or damage to the appliance. Please study these operating instructions carefully before using the appliance for the first time and follow the safety advice on the appliance itself.
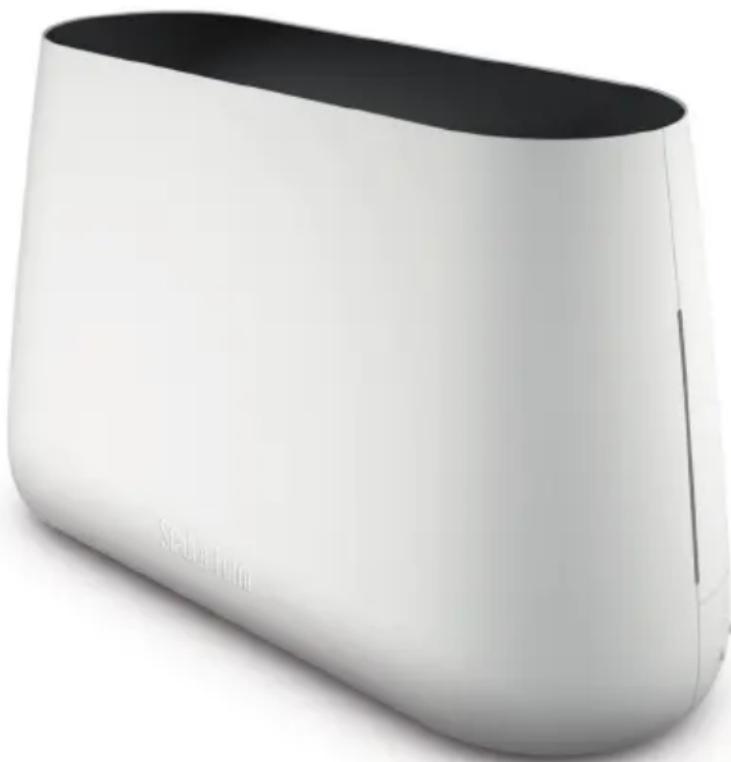
Description of the appliance
The appliance consists of the following main components:
- Power adapter
- Power adapter connection
- Water tank
- Tank cover
- Maximum mark
- On/off button
- Lid & Mist outlet
- Variable output controller (Humidification and aroma diffusion)
- Button for night mode (LEDs normal, dimmed or off)
- Water tray (fragrances can be added to this if wished)
- Water level indicator if the water tank is in place
12.WaterCube™ - Air outlet opening (Caution: no water may enter this opening!)
14.Ultrasonicmembrane
15.Cleaningbrush
16.Cover - Floating switch
- LED strip for the fireplace effect
- Anticalc cartridge (optional: see "Before setup")
How your product works
Ben is a 3 in 1 appliance – humidifier, aroma diffuser and fireplace effect. A membrane which vibrates by means of ultrasound divides water into minuscule droplets, which are then distributed by a ventilator as a mist around the room, where it evaporates. If an essential oil is added to the water, this is also nebulised and blown into the air with the mist. The dimmable Amber Light™ creates the unique fireplace effect by bathing the mist in an amber-coloured light.
Important safety instructions - SAVE THESE INSTRUCTIONS
Please read through the operating instructions carefully before you use the appliance for the first time and keep them safely for later reference; if necessary pass them on to the next owner.
- Stadler Form refuses all liability for loss or damage which arises as a result of failure to follow these operating instructions.
- The appliance is only to be used in the home for the purposes described in these instructions. Unauthorised use and technical modifications to the appliance can lead to danger to life and health.
- Use and keep the device out of reach of children.
- This appliance can be used by children aged from 8 years and above and persons with reduced physical, sensory or mental capabilities or lack of experience and knowledge if they have been given supervision or instruction concerning use of the appliance in a safe way and understand the hazards involved. Children shall not play with the appliance. Cleaning and user maintenance shall not be made by children without supervision.
- Only connect the cable to alternating current. Observe the voltage information given on the appliance.
- Do not use damaged extension cords.
- Do not run the power cord over sharp edges and make sure that it does not get trapped.
- Do not pull the plug from the socket with wet hands or by holding on to the power cord.
- Do not use the appliance in immediate vicinity of a bath tub, a shower or a swimming pool (observe a minimum distance of 10 ft / 3 m). Place the appliance such that a person in the bath tub cannot touch the appliance.
- Keep the device away from heat sources.
- Do not place the appliance near a heat source. Do not subject the power cord to direct heat (such as a heated hotplate, open flames, hot iron sole plates or heaters for example). Protect power cords from oil.
- See to it that the appliance is properly positioned to ensure a high stability during its operation and make sure that no one can trip over the power cord.
• The appliance is not splash-proof.
- For indoor use only.
- Do not store the appliance outdoors.
- Store the appliance in a dry place inaccessible to children (pack the appliance).
- If the power cord is damaged, it must be replaced by the manufacturer or a repair shop authorized by the manufacturer or by similarly qualified persons in order to avoid a hazard.
- Only use the adapter provided by the manufacturer.
- Only use fragrances, aromas or essential oils that do NOT contain alcohol. Alcohol can damage the appliance. Appliances that are damaged by such additives are not covered by the warranty.
- Make sure that the appliance is placed on a surface that is not sensitive to moisture (avoid parquet flooring or delicate carpets).
- Do not permit the area around the humidifier to become damp or wet. If dampness occurs, turn the output of the humidifier down. If the humidifier output volume cannot be turned down, use the humidifier intermittently. Do not allow absorbent materials, such as carpeting, curtains, drapes, or tablecloths, to become damp.
- Unplug the appliance during filling and cleaning.
- Never leave water in the water tank when the appliance is not in use.
- Clean the water tank every 3 days
- Empty and clean the humidifier before storage. Clean the humidifier before next use.
Before setup: Anticalc cartridge and water hardness (optional accessory)
The anticalc cartridge reduces the limescale in the water and the undesirable emission of limescale particles into the surroundings. Effective for one to three months, depending on water hardness (see table).
With a water hardness above >7^ dH, we recommend the use of the anticalc cartridge (19) to inhibit lime deposits. Test your water's hardness (= lime content) with the included testing strip (see page 4). If the strip shows 2 pink boxes, your water hardness is >7^ dH.
- Dip the testing strips into the water for a second
- After around one minute, the results can be seen on the testing strips. Some of the green boxes change colour into pink. The water hardness is shown by how many boxes turn pink. Example: If three boxes are pink, then the water hardness is >14^ dH.
Important: Soak the anticalc cartridge in a water bath for 24 hours before the first use (not in the water tank!). The resin has to absorb water to reach high performance.
The period of time that the cartridge is effective for depends on the hardness of the water.
| Number of pink boxes | Water hardness | Degree of hardness (°dH) | Cartridge will last for (with 0.8 gallons/day) (with 2.5 liter/day) | |
| Days Gallons / Liter | ||||
| 0/1 Soft | From 4°dH | 140 days approx. 115 gal / 360 L | ||
| 2 Moderately hard | From 7°dH | 70 days approx. 60 gal / 180 L | ||
| 3 Hard | From 14°dH | 50 days approx. 40 gal / 120 L | ||
| 4 Very hard | From 21°dH | 25 days | approx. 20 gal / 60 L | |
With a water hardness above 21^ dH, we can no longer recommend the use of an ultrasonic air humidifier. We recommend that you use an evaporative humidifier to increase humidity in your house (e.g. Oskar humidifier made by Stadler Form).
The unit only works properly with untreated water. Do not use where there are water softeners and water ionisers in operation. However, Ben may be operated from a drinking water filter system (e.g. Brita). Should you be unsure about the quality or composition of the water in your area, contact the caretaker or the provider of drinking water.
Setting up / operation
- Put Ben in the desired location on a flat surface. Connect the power adapter (1) to the unit (2) and plug the adapter (1) into a suitable socket.
- Lift up the water tank (3) to the side, out of the way. Unscrew the tank lid (4) and fill the water tank to the maximum mark (5) with clean, cold
tap water. Then put the tank into the appliance. To do this, position the water tank (3) sideways again, diagonal to Ben, and lift the water tank up and insert it again. Important: Please do not move Ben when it is filled with water. The water could splash out of the interior tank and into the electronics.
-
Next, start Ben by pressing the On/Off button (6). The LEDs for the fireplace effect will then light up, and the mist will be visible as it comes out of the appliance (7) at variable output controller (8) height.
-
By turning the variable output controller (8), you can adjust the humidifier output as you wish.
-
If you are disturbed by the brightness of the illuminated mist (in the bedroom, for example), you can reduce the brightness of the LEDs by pressing the dimmer button (9). You can choose between three different modes:
• Normal mode (default mode)
- Dimmed mode (push once)
- Lights-out mode (push twice)
- By pushing the dimmer button once more, you can go back into normal mode.
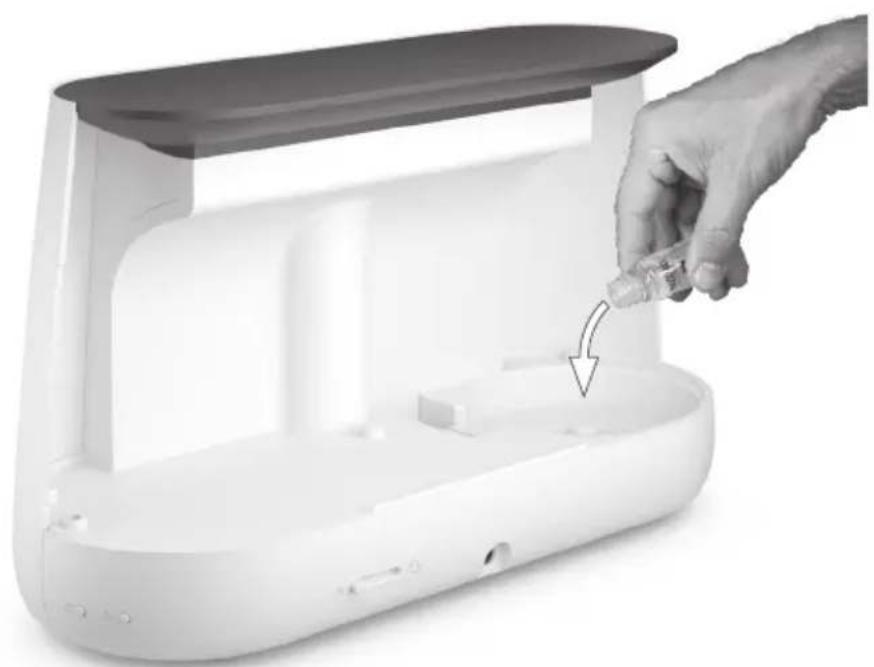
- You can also use Ben to fragrance the room. We ask that you be sparing when dealing with fragrances as too much can lead to malfunctions and damage to the unit. To use fragrances, remove the water tank (3) from the unit and trickle the fragrance directly into the water tray (10) (see page 5). Add a maximum of 2–3 drops of fragrance per full tank of water. Install the water tank back into the unit.
Tip: Would you like to change the fragrance? Remove the water tank from the unit, pour the remaining water out and clean the humidifier (see «Cleaning»). Now Ben is ready to distribute a different fragrance of your choice around the room. The intensity with which the aroma is diffused can be adjusted smoothly by sliding the variable output controller.
- The water level indicator (11) glows red when the water needs to be refilled. Remove the water tank (3) and fill it up with tap water. Replace the water tank. The appliance will resume operation after a few seconds.
- Would you like to refill the water during operation? You can simply remove the water tank (3) and fill it up. The unit will operate for around a further 5 to 10 minutes with the water that remains in the system. Put the water tank back into the unit within this time period and Ben can continue operation without stopping at all.
Note: Should you see droplets (or other signs of dampness) on or around the unit, this is condensed water from the humidifier. This means that the air can no longer absorb the moisture from the humidifier. Please reduce the humidifier output until you can no longer see any droplets.
Cleaning
Before each piece of maintenance and after every use, turn off the unit and remove the plug from the plug socket. Before you clean Ben, the power adapter (1) must be separated from the power adapter connection (2).
Attention: Never submerge the unit in water (danger of short circuiting).
- For hygienic reasons and to ensure proper operation, we recommend the following cleaning intervals.
- Daily: Fill the water tank (3) with fresh, cold tap water. If the appliance is not used for several days, empty the water from the water tray (10) be-
forehand and if necessary, clean it with a bit of dish detergent and a clean cloth. Fill fresh water into the water tank (3), before putting the appliance back into operation.
- Every 2 weeks: First remove the water tank (3), the lid (7), the cover (16) and the Water Cube™ (12). Clean the inside of the water tray (10,14,17) thoroughly with a bit of dish detergent, warm water and a soft, clean cloth, sponge or brush. Use diluted descaling agent (mix according to the manufacturer's instructions) for lime deposits. Then rinse the water tray (10) thoroughly with cold water and put the water tank (3), the lid (7), the cover (16) and the Water Cube back in.
-
Descaling at least 1x per month. Remove the water tank (3) the lid (7), the cover (16) and the Water Cube (12). Fill a cup with 6.6 fl. oz. / 200 ml of tap water mixed with descaling agent (mix according to the manufacturer's instructions). Alternatively, you can use a household decalcifier or vinegar. Pour the liquid carefully into the water tray (10). Be sure that no liquid enters the air outlet opening (13). This will damage the appliance and will void any claim to the warranty.
-
Let the descaling agent allow to take effect according to manufacturer's instructions (approx. 30 min.). Check in the water tray (10) if the limescale on the ultrasonic membrane (14) has dissolved.
- If limescale residue remains, the ultrasonic membrane (14) can be cleaned with the help of the cleaning brush (15) (front- and backside). Do not try to scrape them with a hard object.
- For stubborn limescale, we recommend descaling the appliance several times in a row.
- To rinse, now fill the cup with 6.6 fl. oz. / 200 ml of tap water and carefully pour the liquid into the water tray (10). Pour the water out of the appliance at the front right corner. Repeat the process until there is no more descaling agent in the water tray (10). Place the Water Cube (12), the lid (7), the cover (16) and the water tank (3) back into the appliance.
- Regularly as required: For external cleaning, rub with a damp cloth and then dry thoroughly. If the top of the lid (7) shows water and/or fragrance deposits, please clean it using a damp cloth and a bit of dish detergent.
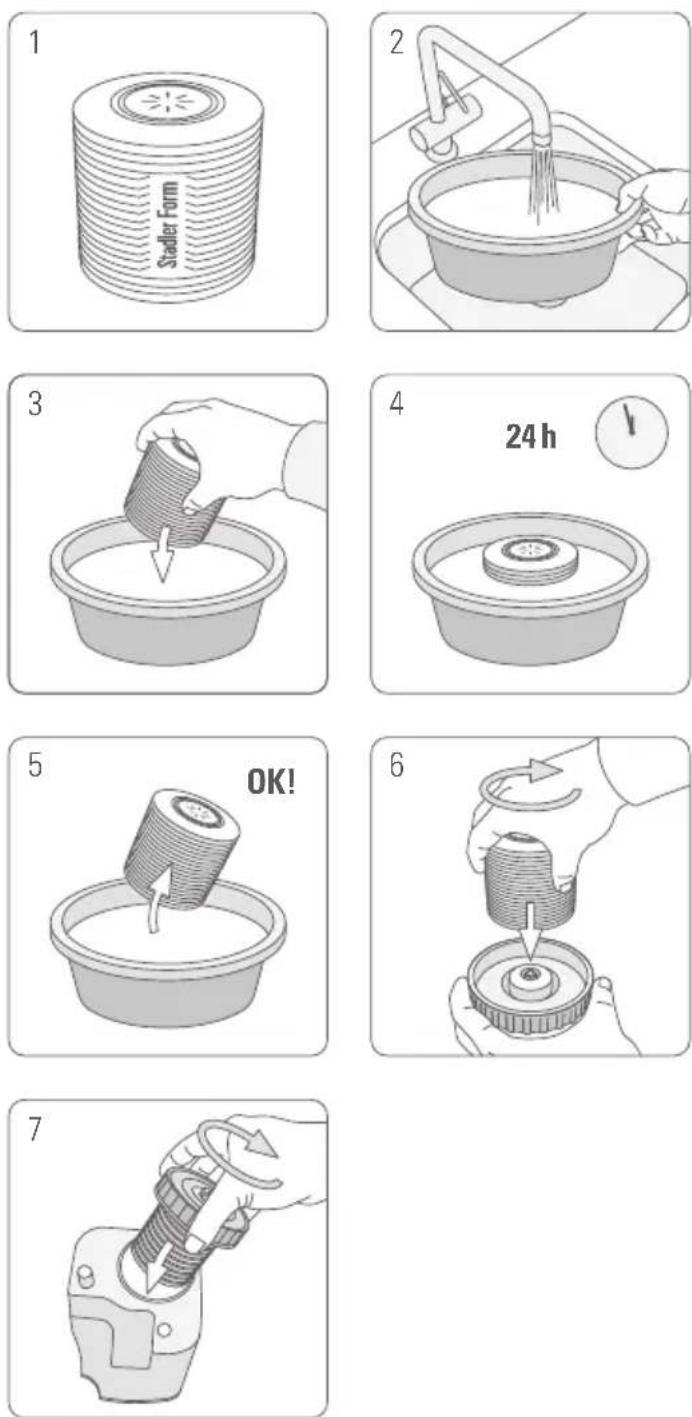
- At the end of the season: Before putting away the appliance at the end of the season, decalcify as described above. Then clean it thoroughly inside and out and let it dry completely. Insert a new Water Cube (12) and anticalc cartridge (19, optional) in order for your appliance to be ready for the start of the next season. Do not put the appliance away with a used anticalc cartridge in place, as the granules inside will remain moist for a long time.
Replacement of the anticalc cartridge (optional accessory)
- Please find the recommended replacement intervals in the table (see «Before setup»).
- Tip: The efficiency of the cartridge can be inspected with a simple test. Hold a small mirror in the mist for a few seconds. If there are then white deposits (calcium carbonate) on the mirror, then the cartridge needs changing.
- The anticalc cartridge (19) is located on the inner side of the tank cap (4).
First screw the tank cap off the water tank (3) and then screw the cartridge from the tank cap. Dispose of the cartridge in the domestic waste. Soak the anticalc cartridge in a water bath for 24 hours before the first use (not in the water tank (3)!). The resin has to absorb water to reach high performance.
- Keep the tank cap when replacing the cartridge!
Water Cube ^TM
Attention: Remove Water Cube from plastic bag before use.
The Water Cube (24) keeps the humidifier fresh using activated carbon and therefore ensures an optimal performance of the humidifier. Activated carbons's range of application for example includes the use in water purification to remove pollutants, reduce heavy metals and odor-causing chemicals. The Water Cube starts working as soon as it comes into contact with water, and also works when the unit is switched off. The lifetime of the Water Cube is around one year. We therefore recommend that you replace the Water Cube at the beginning of every humidifying season.
Repairs
- Repairs to electrical appliances must only be carried out by a qualified electrical technician. If improper repairs are carried out, the warranty lapses and all liability is refused.
- Never operate the appliance if the adaptor or plug is damaged, after it has malfunctioned, if it has been dropped or has been damaged in any other way (cracks/breaks in the casing).
- Do not push any object into the appliance.
- If the appliance is beyond repair, make it unusable immediately by cutting through the cable and hand it in at the collection point provided for the purpose.
- In the event of a repair, the following points must be observed before the appliance is shipped or taken to the dealer: completely empty the water in the appliance (water tray and any water tank), remove any filters and/or anti-limescale cartridges and allow the appliance to dry completely. Appliances containing residual water may be damaged during transport, invalidating the warranty
Disposal
- Do not dispose of electrical appliances in the domestic waste. Please use the communal collection points.
- Ask your local authority if you do not know where the communal collection points are located.
- If electrical appliances are disposed of thoughtlessly, exposure to the elements may cause hazardous substances to find their way into the groundwater and from there into the food chain, or to poison the flora and fauna for many years to come.
Specifications
Rated voltage 100–240 V / 50/60 Hz
Power output 24 W
Humidity output up to 0.35 lbs /160 g/h
Room size (up to) 250 sq ft. / 25 m ^2 / 63 m ^3
Running time approx. 3 days
Dimensions 13.3 x 8.1 x 5.2 inch / 338 x 206 x 134 mm
(width x height x depth)
Weight 3.7 lbs / 1.7 kg
Water tank capacity 0.8 gallon / 2.5 Liter
Sound level 27 - 30 dB(A)
Complies with EU
regulations CE / WEEE / RoHS / EAC
All rights for any technical modifications are reserved
1 year Limited Warranty
A. This 1 year limited warranty applies to repair or replacement of product found to be defective in material or workmanship. This warranty does not apply to damage resulting from commercial, abusive, unreasonable use or supplemental damage. Defects that are the result of normal wear and tear will not be considered manufacturing defects under this warranty. SWIZZ STYLE IS NOT LIABLE FOR INCIDENTAL OR CONSEQUENTIAL DAMAGES OF ANY NATURE. ANY IMPLIED WARRANTY OF MERCHANTABILITY OR FITNESS FOR A PARTICULAR PURPOSE ON THIS PRODUCT IS LIMITED IN DURATION TO THE DURATION OF THIS
WARRANTY. Some jurisdictions do not allow the exclusion or limitation of incidental or consequential damages or limitations on how long an implied warranty lasts, so the above limitations or exclusions may not apply to you. This warranty gives you specific legal rights, and you also may have other rights which vary from jurisdiction to jurisdiction. This warranty applies only to the original purchaser of this product from the original date of purchase.
B. At its option, Swizz Style will repair or replace this product if it is found to be defective in material or workmanship. Defective product should be returned to the place of purchase in accordance with store policy. Thereafter, while within the warranty period purchaser should contact Swizz Style at 1-877-663-7895 Monday – Friday 9 am – 4 pm EST for product return information.
C. This warranty does not cover damage resulting from any unauthorized attempts to repair or from any use not in accordance with the instruction manual.
D. If the product has replaceable filters, these are not covered under this warranty, except for material or workmanship defects.
E. The following must accompany all products returned for service: 1) Proof of purchase 2) Brief description of the problem 3) Full contact information (including return shipping address) 4) Check or money order for \10 (\15 if in Canada) for return handling, packaging and shipping charges. All funds are in US dollars.
F. Swizz Style is not responsible for items lost, stolen or damaged during return shipping.
Français
natural_image
Portrait of a man wearing glasses and a suit (no text or symbols visible)Design by Fabian Zimmerli
Thanks to all people involved in this project: Barry Huang for his engagement and organization, Jerry Lee with Shen Yongjiu for the main engineering and Shu Hebo for his CAD work, Mario Rothenbühler for the photos, Fabian Zimmerli for the unique idea and design, Matti Walker for the graphic work.
Martin Stadler, CEO Stadler Form Aktiengesellschaft
Retailer's stamp /