Robert - Humidifier STADLERFORM - Free user manual and instructions
Find the device manual for free Robert STADLERFORM in PDF.
| Product type | Humidifier / Air washer |
| Brand | Stadler Form |
| Model | Robert |
| Dimensions (L × H × D) | 321 × 471 × 235 mm |
| Weight | 8.2 kg |
| Power supply | 220-240 V ~ 50 Hz |
| Nominal power | 7 - 30 W |
| Water tank capacity | 4.7 liters |
| Max. humidification output | 550 g/h |
| Noise level | 27 - 56 dB(A) |
| Operating modes | Auto, Night, Cleaning |
| Humidity control | 35% - 65% or continuous |
| Fan speeds | 4 speeds (1, 2, 3, Turbo) |
| Motion sensor | Yes |
| Perfume drawer | Yes, with cotton |
| WaterCube™ system | Yes, for optimal hygiene |
| Anti-limescale cartridge | Optional |
| Air filter | Washable, removable |
| Evaporation discs | Yes, removable and cleanable |
| Low water level indicator | Yes |
| Maintenance and cleaning | Regular cleaning of the tray, discs, filter; integrated cleaning mode for descaling |
| Safety | Automatic shut-off when desired humidity is reached; dry run protection (low level indicator); do not immerse |
| Materials | Plastic, electronic components |
| Warranty | 2 years |
| Use | Indoor only, room up to approx. 50 m² (recommendation) |
Frequently Asked Questions - Robert STADLERFORM
User questions about Robert STADLERFORM
0 question about this device. Answer the ones you know or ask your own.
Ask a new question about this device
Download the instructions for your Humidifier in PDF format for free! Find your manual Robert - STADLERFORM and take your electronic device back in hand. On this page are published all the documents necessary for the use of your device. Robert by STADLERFORM.
USER MANUAL Robert STADLERFORM
product design award 2014

reddot award 2014 winner
Stadler Form
SWISS DESIGN SINCE 1998
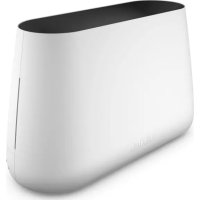
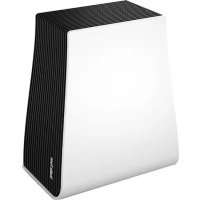
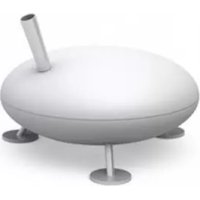
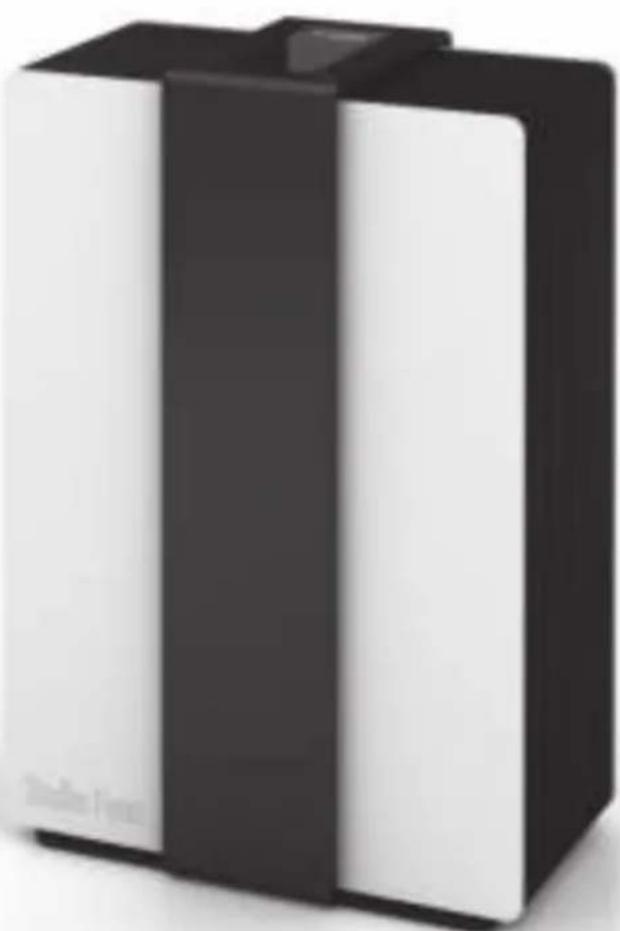
ROBERT - the powerful air improver!

Humidifies and purifies the air
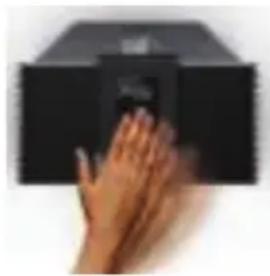
Touch display with motion sensor
Auto, night and clean mode With fragrance dispenser
As an air washer, Robert humidifies and purifies the air and ensures a clean and pleasant room climate all year round. The powerful air improver evaporates up to 13.2 liters of water per day and is also suitable for large rooms. And uses from as little as 7 watt in energy. With his discs that turn in the water, Robert efficiently filters particles from the air and is thus also the ideal roommate for those suffering from allergies. Robert can be activated with an elegant movement of the hand and operated by a gentle touch of the buttons. By adding a few drops of the desired fragrance oil, Robert scents the room air discreetly and pleasantly. Robert's elegant look is rounded off by coated surfaces and sophisticated aluminium.
Specifications
Humidification output: max. 13.2L / 24h (550g / h)
Room size: up to 80 m^2 / 200 m^3
Tank capacity: 6.3 liter / Power: 7 - 30 watt
Digital hygrostat / washable pre-filter
Touch display with motion sensor
Auto, night and clean mode
Automatic shut-off / Fragrance dispenser
4 speed levels (incl. Turbo)
Dimensions: 321 × 471 × 235 mm ( w × h × d )
Weight: 8.2kg /Sound level:27-56 dB(A)
Black
Silver
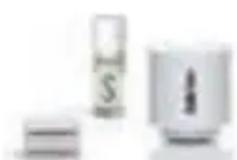
Accessories:
Water CubeTM
Anticalc Cartridge
(optional) and
Essential oils
Robert
Operating instructions
Gebrauchsanweisung
Mode d'emploi
reddot award 2014 winner
Stadler Form
Robert

Congratulations! You have just purchased the exceptional air washer (air purifier and humidifier) ROBERT. He will give you great pleasure and improve the indoor air for you.
As with all domestic electrical appliances, particular care is needed with this model also, in order to avoid injury, fire damage or damage to the appliance. Please study these operating instructions carefully before using the appliance for the first time and follow the safety advice on the appliance itself.
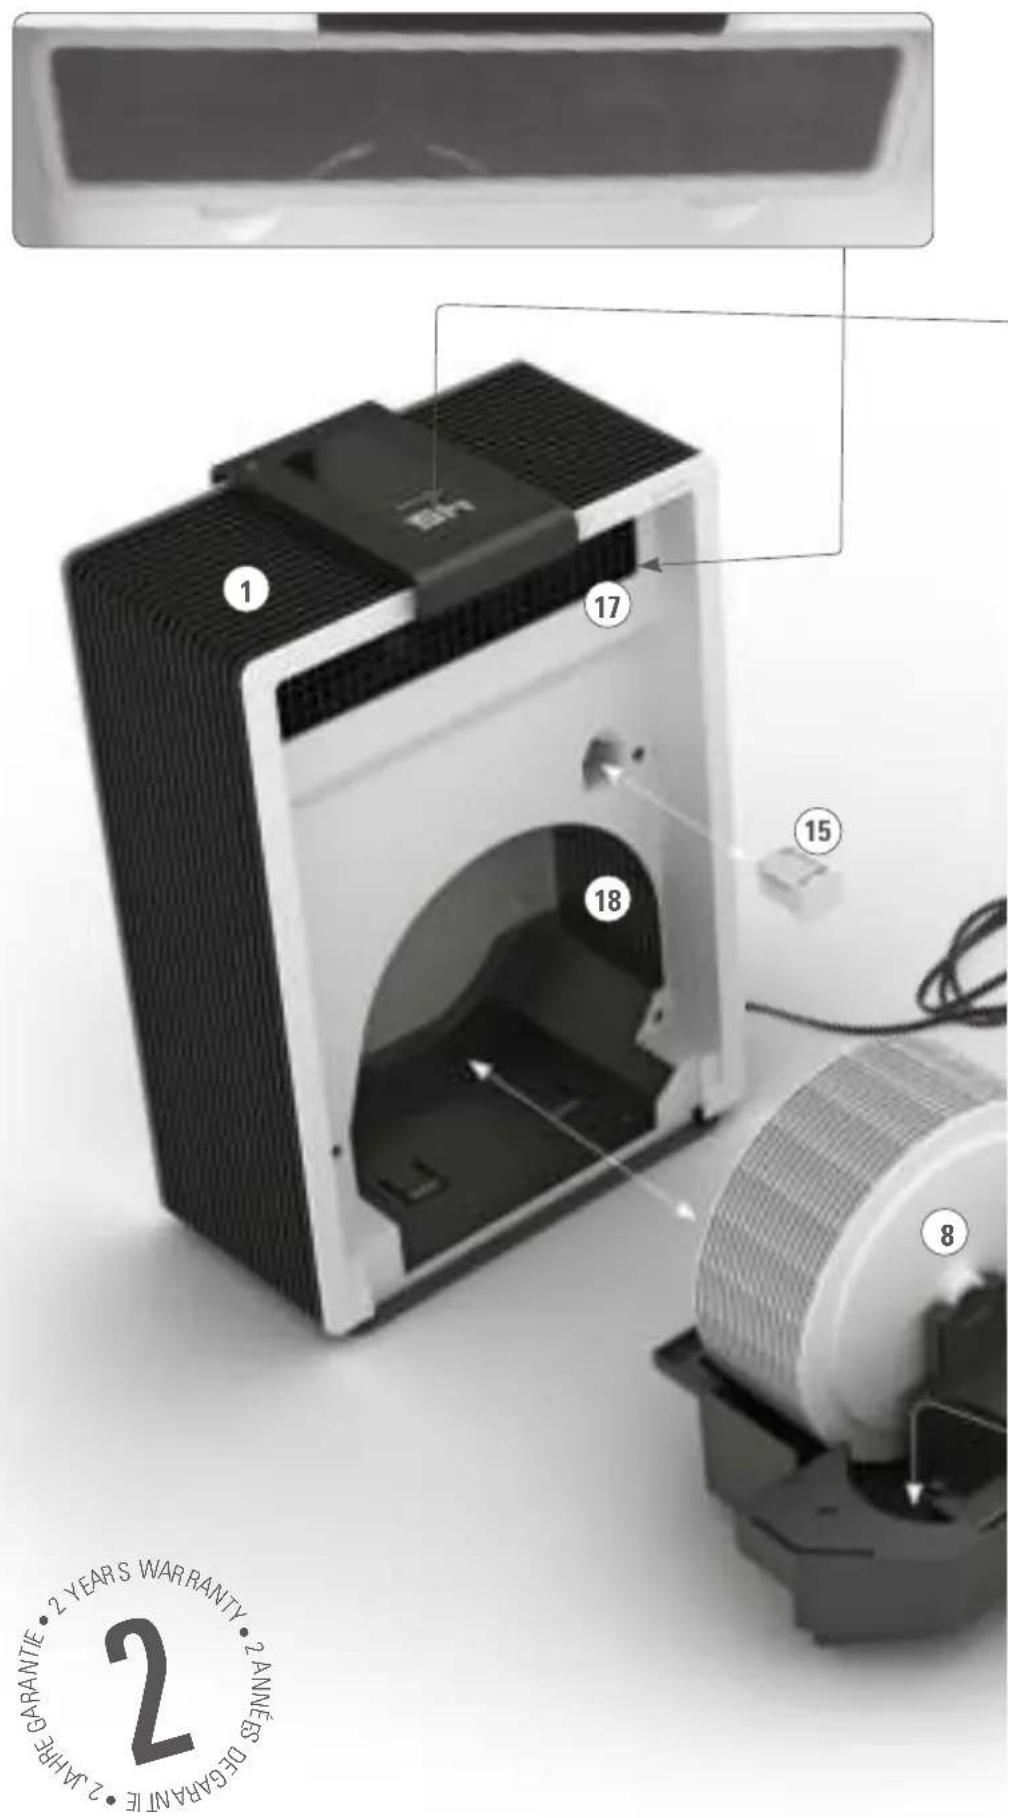
Description of the appliance
The appliance consists of the following main components:
- Air washer housing with motor
- Air washer water tray
- Mains cable for power supply
- On/Off switch
- Water tank with carrying handle
- Water tank lid
- Anticalc cartridge (optional)
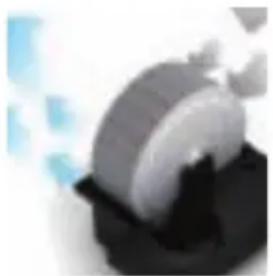
- Evaporator discs
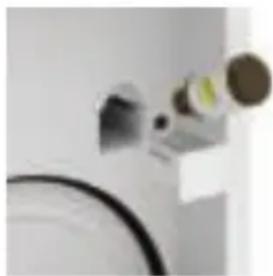
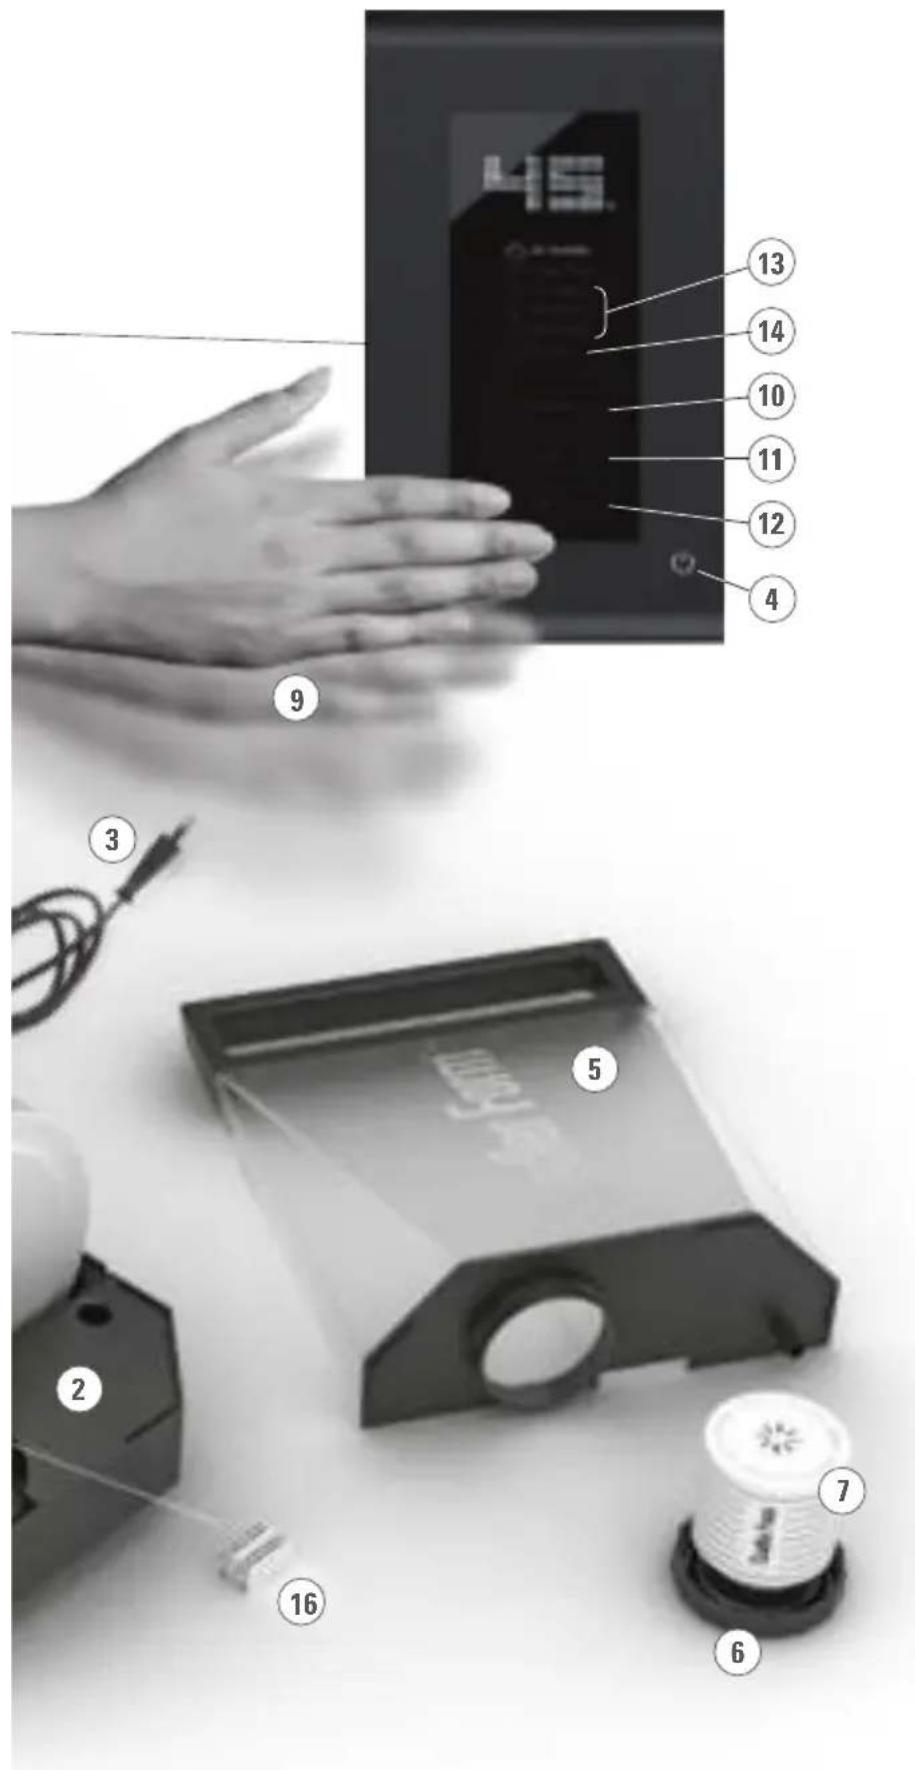
- Motion sensor (movement over the display activates buttons)
- Button for the selection of the desired humidity (hygrostat: 35 - 65 % or continuous operation «CO»), symbol «Air Humidity»
- Button for the selection of the fan speed (1,2,3,4 = Turbo) , symbol «Speed»
- Button for the selection of the mode (Auto Mode, Night Mode, Clean Mode)
- Symbol of the selected mode («Auto Mode», «Night Mode», «Clean Mode»)
- Indicator for low water level, symbol «No Water»
15.Fragrancecontainer
16.WaterCubeTM - Air inlet with washable air filter
18.Airoutlet
Important safety instructions
Please read through the operating instructions carefully before you use the appliance for the first time and keep them safely for later reference; if necessary pass them on to the next owner.
- Stadler Form refuses all liability for loss or damage which arises as a result of failure to follow these operating instructions.
- The appliance is only to be used in the home for the purposes described in these instructions. Unauthorized use and technical modifications to the appliance can lead to danger to life and health.
- This appliance can be used by children aged from 8 years and above and persons with reduced physical, sensory or mental capabilities or lack of experience and knowledge if they have been given supervision or instruction concerning use of the appliance in a safe way and understand the hazards involved. Children shall not play with the appliance. Cleaning and user maintenance shall not be made by children without supervision.
-
Only connect the cable to alternating current. Observe the voltage information given on the appliance.
-
Do not use damaged extension cords.
- Do not run the power cord over sharp edges and make sure that it does not get trapped.
- Do not pull the plug from the socket with wet hands or by holding on to the power cord.
- Do not use the appliance in immediate vicinity of a bath tub, a shower or a swimming pool (observe a minimum distance of 3m ). Place the appliance such that a person in the bath tub cannot touch the appliance.
- Do not place the appliance near a heat source. Do not subject the power cord to direct heat (such as a heated hotplate, open flames, hot iron sole plates or heaters for example). Protect power cords from oil.
- See to it that the appliance is properly positioned to ensure a high stability during its operation and make sure that no one can trip over the power cord.
- The appliance is not splash-proof.
- For indoor use only.
- Do not store the appliance outdoors.
- Store the appliance in a dry place inaccessible to children (pack the appliance).
- If the power cord is damaged, it must be replaced by the manufacturer or a repair shop authorized by the manufacturer or by similarly qualified persons in order to avoid a hazard.
- Prior to any maintenance, cleaning and after each use, switch off the appliance and unplug the mains cable from the socket.
Setting up / Operation
- Place Robert at the desired position on a flat surface. Connect the mains cable (3) to a suitable plug socket.
- Remove the water tank (5) by holding it by the handle and gently pulling it back. Screw off the water tank lid (6) and fill the water tank with clean, cold tap water. Then screw the lid back onto the water tank. Place the water tank on the water tray (2). The water tray now fills slowly with the water from the water tank. Important: please do not transport Robert as long as he is filled with water. The water could spill over.
- To switch Robert on, press the On/Off switch (4). The current relative humidity is shown in the display in % («Air Humidity»). The «No Water» indicator (14) lights up when there is not enough water in the appliance. The speed level is set to the lowest speed and the desired air humidity is set to continuous operation.
- If the motion sensor does not detect any motion for 10 seconds, the illumination of the buttons and the symbols goes out (only the current relative humidity «Air Humidity» will be displayed in %). Activate the buttons by moving your hand over the display (9). Alternatively, the display can also be activated by touching the lower part with your hand.
- If no mode has been set, the desired air humidity can be adjusted (between 35 - 65% and continuous operation CO ): Push the «Air Humidity» button. The display will blink. You may now select the desired air humidity in increments of 5% by repeatedly pressing the «Air Humidity» button (the display will blink while settings are being adjusted). The selected value is saved if no other adjustments are made after approx. 10 seconds. The display changes to the current measured air humidity.
Info: Once the desired air humidity is reached, the appliance stops and the display blinks. The current air humidity is then measured approx. every 30 minutes (the fan runs for 1-2 minutes). Should the measured current air humidity fall below the set value, the appliance begins to humidify again.
- The humidification performance depends on the speed of the fan. If no specific mode has been set, the speed level may be changed: Press the «Speed» button (if necessary, first activate the display with a hand motion). The display will blink. Now select the speed level 1, 2, 3 or 4 (Turbo) by repeatedly pressing the «Speed» button. The levels are displayed using horizontal bars (e.g. 1 bar = level 1).
-
Robert is equipped with 3 different pre-programmed modes: «Auto Mode», «Night Mode» and «Clean Mode». Press the «Mode» button (if necessary, first activate the display with a hand motion). The display will blink. Select the mode by repeatedly pressing the «Mode» button:
-
«Auto Mode»: Robert automatically maintains the air humidity level at 45% . The lower the current air humidity level is, the higher the speed level of the fan will automatically be set (e.g. under 30% = level 3, from 31% to 40% = level 2, from 41% to 45% = level 1).
-
«Night Mode»: The display illumination is reduced to minimum and the fan speed is set on level 1. The desired air humidity level and the fan speed can be adjusted manually.
-
«Clean Mode»: This mode is used in order to clean and descale the appliance. Here the evaporator discs rotate but the fan does not run. Thus no air is blown into the room. After 20 minutes in cleaning mode, the appliance stops and the «Clean Mode» display blinks (see «Cleaning» chapter).
-
You can use Robert to disperse fragrances in the room. It must be emphasised to please use fragrances extremely sparingly because an excessive dosage can result in malfunctioning of and damages to the appliance. In order to use fragrances, remove the water tank (5) and pull the fragrance container (15) out of the appliance. Let the fragrance drip directly onto the cotton pad in the fragrance container. Add a maximum of 1-2 drops of fragrance into the fragrance container.
Tip: In order to change the fragrance, pull the fragrance container out of the appliance, remove the cotton pad and clean the container with soap. Now you may insert a new cotton pad (commercially available) and add drops of the desired fragrance.
- As soon as the «No Water» symbol (14) lights up, the appliance must be refilled with water. To do this, remove the water tank (5) and fill it with clean, cold tap water. After replacing the water tank, the appliance automatically resumes operation after a few seconds.
- If you would like to refill the water during operation, you may remove the water tank and refill it. The appliance will continue to operate using the water still in the appliance for at least 30 minutes. As long as the water tank is replaced within this period of time, the appliance can continue its service without interruption.
Important information
Humidification with an air washer takes some time. An air washer works according to the evaporation principle. In this process the air only absorbs as much water as it needs at the current temperature (self-regulating
humidification). This means that it could take several hours to achieve a measurable humidification result. If you put the air washer into operation in a very dry environment, we recommend that you set the appliance to continuous operation («Air Humidity») and the speed level to 3 or Turbo («Speed») in order to effectively increase the air humidity level. Here the size of the room and the ventilation intervals also play a role. (Also see www.stadlerform.com/faq).
Cleaning
Prior to any maintenance, cleaning and after each use, switch off the appliance and unplug the mains cable (3) from the socket.
Attention: Never submerge the appliance in water (danger of short-circuit).
- For external cleaning, rub with a damp cloth and then dry thoroughly.
- For internal cleaning, remove the water tank (5) and then pull out the water tray (2) with the evaporator discs (8) (grab underneath the tray).
- Rinse the water tray (2) and the evaporator discs (8) with clean water once per week, in order to wash out the particles of dirt removed from the air.
- Clean the water tray (2), evaporator discs (8) and the water tank (5) thoroughly every 2 weeks with a soft brush or sponge and warm water. If there are lime scale deposits in the water tray or water tank, use a descaling solution diluted with water (for mixture ratio, see manufacturer's instructions). Subsequently rinse the tray and tank with tap water thoroughly.
- Descale the evaporator discs (8) approx. every 4 weeks, depending on the water hardness level. To do so, first empty out any water remaining in the water tray (2). Then fill the water tray with a descaling solution (mixture ratio of solution/water according to the manufacturer's instructions) up to 2cm below the edge of the tray (leave the evaporator discs in the tray). Now push the water tray back into the appliance (the tank does not have to be inserted). Activate the buttons with a hand motion over the display. Press the «Mode» button three times in order to start the cleaning mode. The «Clean Mode» symbol lights up. Here the evaporator discs rotate but the fan does not run. Thus no air is blown into the room. After 20 minutes in cleaning mode, the appliance stops and the «Clean Mode» display blinks. The cleaning process may be run several times depending on the thickness of the limescale deposits (also see Point 7 under «Setting up/Operation»). Once the cleaning process is finished, switch the appliance off using the On/Off switch (4). Empty the water tray and clean it thoroughly with tap water.
- Make sure that the air inlet and outlet are cleaned regularly to prevent the build-up of dust. Clean the air outlet (18) with a dry brush or vacuum cleaner. The air inlet grid (17) is fitted with an air filter which can be removed and cleaned with a damp cloth. Remove the filter by pulling out the flap at the bottom using the recessed grips.
Water CubeTM - optimal hygiene for your air humidifier
The Water CubeTM (16) by Stadler Form provides optimal hygiene in your air humidifier. It keeps your humidifier running smoothly, extending its lifespan. The Water Cube even works when your appliance is switched off, so the humidifier stays fresh all season long. We recommend replacing the Water Cube at the start of the humidifier season.
Anticalc cartridge (optional accessory)
The anticalc cartridge (7) decreases the limescale in the water and thus reduces the decalcification intervals. The cartridge has to be replaced every one to three months, depending on the water hardness (see table).
With a water hardness above 21^ , we recommend the use of the anticalc cartridge.
Important: Soak the anticalc cartridge in a water bath for 24 hours before the first use (not in the water tank!). The resin has to absorb water to reach high performance.
The period of time that the cartridge is effective for depends on the hardness of the water. This can be tested using the testing strips provided (strips are stuck to the reverse side of these instructions for use).
- Dip the testing strips into the water for a second.
- After around one minute, the results can be seen on the testing strips. Some of the green boxes change colour into pink. The water hardness is shown by how many boxes turn pink. Example: If three boxes are pink, then the water hardness is >14^ .
| Number of pink boxes | Water hardness | Degree of hardness (°dH) | Cartridge will last for (with 6 liter/day) | |
| Days Liter | ||||
| 0/1 Soft | From 4 °dH | 60 days approx. | 360 L | |
| 2 Moderately | hard | From 7 °dH | 30 days approx. | 180 L |
| 3 Hard | From 14 °dH | 20 days approx. | 120 L | |
| 4 Very hard | From 21 °dH | 10 days approx. | 60 L | |
The cartridge is screwed onto the inside of the water tank lid (6). First, screw the tank lid (6) off of the water tank (5) and then affix the cartridge to the inside of the tank lid. Dispose of used cartridges in the household waste. Do not throw away the water tank lid when changing the cartridge!
Repairs
- Repairs to electrical appliances must only be carried out by a qualified electrical technician. If improper repairs are carried out, the warranty lapses and all liability is refused.
- Never operate the appliance if the adaptor or plug is damaged, after it has malfunctioned, if it has been dropped or has been damaged in any other way (cracks/breaks in the casing).
- Do not push any object into the appliance.
- If the appliance is beyond repair, make it unusable immediately by cutting through the cable and hand it in at the collection point provided for the purpose.
- In the event of a repair, the following points must be observed before the appliance is shipped or taken to the dealer: completely empty the water
in the appliance (water tray and any water tank), remove any filter cassettes and/or anti-limescale cartridges and allow the appliance to dry completely. Appliances containing residual water may be damaged during transport, invalidating the warranty.
Disposal
The European directive 2012 / 19 / CE on Waste Electrical and Electronic Equipment (WEEE), requires that old household electrical appliances must not be disposed in the normal unsorted municipal waste stream. Old appliances must be collected separately in order to optimize the recovery and recycling of the materials they contain and reduce the impact on human health and the environment. The crossed out "wheeled bin" symbol on the
product reminds you of your obligation, that when you dispose of the appliance it must be separately collected. Consumers should contact their local authority or retailer for information concerning the correct disposal of their old appliance.
Specifications
Rated voltage 220 - 240V / 50Hz
Rated power 7-30 W
Humidity output up to 550g / h
Dimensions 321× 471× 235mm
(width x height x depth)
Weight 8.2kg
Tank capacity 4.7 Liter
Sound level 27-56 dB(A)
Complies with EU
regulations CE / WEEE / RoHS / EAC
All rights for any technical modifications are reserved
BHHMaHHe HnKOrHa He norgyKaIe np6Op B Body (Bo n36ekaHne KoPOTKOrO 3aMbIkaHnR).
-Дянарухно OUCNTKи npotpnte KOpnyc BnaJxHoi TpnoOyKo, a 3aTEM TuaTeJIbHO BbICyUInTe.
-Дя BHyTpHeHn OUnCTK n CHmnte pe3epByap nBODbI (5), BbTaunTe JOTOK nBODbl (2) c DnCKamn nCnpnten8.
CnolacknBaIte IOTOK DnB OBObl (2) nDnCKn NcnapTeJIa (8) YnCTOn BODo pa3 B HeJeIIO DnA ydaIeHn rpa3n, CkONNBWeNc H a DeTaJAX B npOecce OuNCtKn BO3dyxa.
-
TцаTeNbH npOuHuaIte loTOK dIa BODbI (2), nckn nCnapTeJIa (8) npe3epByap dIa BODbI (5) kaxdble 2 HeJeN MrgKoI uetKoI nn r6koI n TeNoB BoDIO. Pp nnoBHeHN n3BeCTKOBOr HaneTa B Notke nIpa3epByape dIa BODbI nCNOJb3yIte paCTBOP dIaJaEHHaKnII, pa36abHeHHbI BoDIO (dIra nOlyeHHn IHOpMaun O COOTHOseHHN KOMHOHTOB BCMEcN CM. INHCTpyKUnn pOn3BOUnteJIa). 3aTeM TzauTeNbHO cNoLOCHNTe loTOK n pe3epByap BOdo.
-
YdaIaIte HaKINb C DaNCKOB NcnapTeJIa (8) npImepHO KaKdBiE 4 HeJeBn B 3aBNCIMOCTo NT yPOBHa JecTKoCTN BOJb. IJa 3TOrO ChauanaBbIeNeT OCTABUIOCA BOy n3 loTka nIra BOJb (2). 3aTeM 3aONHInTE IOTOK pACTBOPOM Dnla YdaIeHnRA HAKUN (DJIa NOLYeHnRA INHOpMaunO COOTHOWeHN PAcTBOPa/BODb IB CMECN CM. INCHTPyKUnn PpOn3BOuNTeR), He DOINBAI Do Kpaar NtKa Ha 2 cm (ocTabBe TnCKN UcnapTeJIa BLOKE). 3aTeM BCTABbTe IOTOK oBaTHo B np6Op (He BCTABNaItepe3epByap). AKTNBPuyITE KHOKN DBXKeHnEM pyKn nO DnCnIeIo. HAKMITE KHOKNy (Mode) Tpu pa3a dIra BbIbopa pexmua OHCTKn. Ppi 3OM 3aROPITcA cIMBOI (Clean mode). B 3OM pEXmme DnCKN UcnapTeJIa BpaAHTc, HO BEHTNIATop He pa60aet. TaKIM O6pa3OM, Bo3-DyX He BbIDyBaETC B NOMEseHne. Yepez 20 MmHT nocLe pa60tBu PEKmme ONUCTKN Pp6Op BBKlHuOaETCn, HA DnCnIee HaunHaet MIRAtbCIMBOI (Clean mode). Ppocecc ONUCTKN MOXHO NOBtOpNTb HECKOJIbKOpa3 B 3aBNCIMoCTN OT ToIuINHb CIoR HaKUnn (TaKxe CM. PyHKT 7 (HaCTPouKa/3KcnNyatauIA)). IIO OKOHAnHn PpOcecca ONUCTKN BBkLIouHnTE Pp6Op, Haxab BBKlnOuATEJIb On/Off (4). YdaIaTIe OCTATKn XnIKKOCTN nIOTKa n TsiAteJIbHO IpomOIte ERO BOIDONPOBOHDHBoDII.
-
CJIeIte 3a TEM, YTO6bI BODxUd NOCTOARHNO ONUJACRA HA BXOJe N BblXoJe. JIy 3TOrO ONUJAE peWETky DnRA BbInycka BO3dyxa (18) cyxoI ueKo nn IyIecocOM. PeWETka DnRA BnYcKa BO3dyxa (17) cHa6xeHa BO3DyUHbIM QINbTpOM, KOToPbIM MOXHO CHATB C NOMOuio CneuaJIbHbIX BbEMOK IN pOTepeTB BlaxHoN TKAHbIO.
Baktpnndhki Kaptpnck Water CubeTM - onTmnaIbnaIra rnrueHa dJa Bawero yBnaXHnteIa Bo3dyxa
BaKTePnUHb KApTpIxq Water CubeTM (16) ot Stadler Form obecneHT onTImaJIbHyIO rIrgHeHy BaIeO yBnaJXHntEIN B03dyxa. IcNoJIb3ObaHne 6aKTePunHOrO KaTpIxJa Water Cube cnooc6CTByET 6e3ynpueHOn pa6oTe yBnaJXHntEIN B03dyxa I npOJIeBAeT cPOK ClyX6bl np6opa. BaKTePunHb KApTpIxq Water Cube npOJIxKaet pa6oTaB, daKe KOrda np6Op BbIKInOyeH, NOdepKJBBaTakIM O6pa3OM ONtImaJIbHyO 6aKTePunHbHyIO cpeyB TeueHne Bcero Ce3OHa 3KcIIyatauN. IpeD ha- YaJOM kAxDoTo Ce3OHa yBnaJXHeHH B03dyxa peKOMHdyETCAmeHrTB 6aKTePUnHb KApTpIxk.
KaptpnJx npotnb haknn (akceccyap, onmoHaBho)
KaptpnIx npotnb Haknn (7) yMehbwaet XeCTKOcTB BObl, TEM cMbIM, yMehbwaIHTepBaIbI ydaJIeHna Haknn. KaptpnIX Heo6xOJMo MeHrtb kaxDbIe TpN MecraB 3aBNCIMOCn OT XeCTKOCT BObl (CM. Tabniu).
Mby peKOMeHnyem nCNoIb3OBA Tb KapTpIx KpoTIN HaKINn npN JecTKoCTN BObl 60nee 21 公
Baxhna Hnfoopmaun. Ipeep nepbIM nCnoJb3ObaHem onyctnte KaptpnIX npotNB haknn B BaHHooy C BoOn Ha 24 yaca (He B pe3epByap dIra BObl). KayyK DoJKeH BnntaTb BOny dIra yBeInueHnra 0fΦekTNBHOCTn pa60tbl.
Cpok 3KcNpyataun KApTpua 3aBnCT OT XeCTKOCTN BObl. Ee MoXHO npOBepntb c NOMOULIO NOCTABLREMBIX TECT-NOLOCOK (UyT B KOMJIeKTE c np6opom).
- Onyctnte Tect-NOLOCKY B BOy Ha Ody CekyHny.
2.Прмерно уеет МИнут ha TECT-NIOCKax OTO6pa3ntcpe3yIbTaT. HeKOTOpbIe 3eJIeHbIe RaeyKn CTaHyT pO3OBbIMN. XecTKoCTb BOdbl 3aBnCIT OT TORO, CKOJIbKO RaYeEeK CTaII N pO3OBbIMN. Прмep: EcII n TpI Raeykn CTaII N pO3OBbIMN, XecTKoCTb BOdi>14°X.
Daty n3rTOBJIeHnI CNeJyET YHTaTb:
78901 1511 123456 - 2015 rOД, hOЯбрь.
Warranty/Garantie/Garantie/Garanzia/Garantia Garantie/Garanti/Takuu/Garanti/Garanti
2 Years warranty
This warranty covers defects of construction, manufacturing and material. Excluded are all wearing parts and improper usage, or consequential damages due to lack of cleaning and/or descaling of the appliance.
2 Jahre Garantie
Thanks to all people involved in this project: Stanley Chen for his engagement and focus, Vincent Hsu for the main engineering and open mind, Shan Li for his CAD work, Mario Rothenbuhler for the photos, Matti Walker for the cool design and graphic work.
Martin Stadler, CEO Stadler Form Aktiengesellschaft