
ROMAXI PIEZO - Thermal weed remover ROTHENBERGER - Free user manual and instructions
Find the device manual for free ROMAXI PIEZO ROTHENBERGER in PDF.
| Product type | Thermal weed burner |
| Brand | ROTHENBERGER |
| Model | ROMAXI PIEZO |
| Compatible gas | Propane, butane, propane/butane mixture |
| Maximum gas pressure | 4.0 bars |
| Flame temperature | Up to 1060 °C |
| Ignition | Piezoelectric (red push button) |
| Hose length | 5.0 meters |
| Hose connection | R3/8" on both sides |
| Recommended gas cylinders | 5 kg, 11 kg, 33 kg |
| Main uses | Weeding, flaming, sheet welding, tarring, roof insulation, concrete drying, moss removal |
| Safety system | Economizer valve (pilot light), hose rupture safety (optional accessory) |
| Pressure regulator | Constant pressure regulator required (not supplied) |
| Spare parts | Burner, tube, hose, handle with valve, support, hose rupture safety (optional) |
| Maintenance | Check seals and hoses before each use, clean with a dry cloth |
| Storage and transport | Disconnect the cylinder, store upright in a ventilated area, out of reach of children |
| Recycling | Take the device at end of life to an approved recycling center |
Frequently Asked Questions - ROMAXI PIEZO ROTHENBERGER
User questions about ROMAXI PIEZO ROTHENBERGER
0 question about this device. Answer the ones you know or ask your own.
Ask a new question about this device
Download the instructions for your Thermal weed remover in PDF format for free! Find your manual ROMAXI PIEZO - ROTHENBERGER and take your electronic device back in hand. On this page are published all the documents necessary for the use of your device. ROMAXI PIEZO by ROTHENBERGER.
USER MANUAL ROMAXI PIEZO ROTHENBERGER
ROTHENBERGER INDUSTRIAL
D Gebrauchsanweisung
GB Instructions for use
Mode d'emploi
CZ Návod na použiti
DK Brugsanvisining
E Instrucciones de uso
FIN Käyttohjojeet
GR Obnyiec xprnncs
Hasznalatiutasitas
HR Upute za uporabu
Istruzioni per l'uso
Bruksanvisning
NL Gebruiksanaanjwijing
P Instruções de uso
PL Instrukcja uzytkowania
RO Instruetioni de utiliser
S Bruksanvisning
SLO Navodila za uporabo
TR Kullanma Kilavuzu
Art.-Nr.030955E

SICHERHEITSHINWEISE
Read these instructions carefully and thoroughly before using the gas equipment. Keep the instructions in a safe, easily accessible spot for later reference.
The product warranty expires when the tool is damaged due to improper use.
Assemble and disassemble the equipment as described by the manufacturer. Do not assemble or disassemble gas tools other than described by the instructions.
Any modifications or structural changes to the equipment can be extremely hazardous. Do not remove any parts or components. Do not replace any parts with parts that do not bear the manufacturer's approval.
BEFORE CONNECTING THE VESSEL:
- Use the described vessels/torch components only.
- The use of inadequate or improper vessels/torch components can be exceptionally hazardous.
- Use manufacturer approved parts and accessories only.
- Never connect your gas tool to a vessel without having previously read the vessel instructions.
- Ensure that all valves and connections are undamaged, sit properly and are tight.
- Connect hose to the gas torch first and only then connect the hose to a vessel.
- Carefully inspect any hoses before connecting.
- Never use gas tools if any part or component shows signs of damage.
- Connect hose to the respective vessels in a well-ventilated area, away from open fire or flame, any source of possible ignition as well as any electric cooker. Do not assemble or disassemble gas equipment near other people.
- Always assemble equipment and accessories starting with the gas vessel.
- Check all connections for leaks and ensure that each connection is gas-tight before using the torch.
- Never smoke while using gas tools and equipment.
- Protect gas vessels against any rise in temperature. Protect hoses from scorching. Change accessories whenever required.
OPERATING CONDITIONS
- Set up tools and equipment in such a manner that they cannot tip or fall down.
- To avoid the risk of LPG escaping from the vessels, always stand propane and oxygen bottles upright and use gas cartridges in a slight oblique position only. Never lay flat or turn upside down open propane and oxygen bottles or a gas cartridges when in use.
- Never use the gas tool below ground level.
- Never set up gas tools and equipment near sources of heat (heaters, furnaces, open fire etc.).
- Do not use in enclosed areas and provide adequate ventilation.
- Operate away from combustible or oily materials. Always wear oil-free clothing.
- Do not inhale soldering/welding fumes.
- Shut off torch when not in use.
- Never leave gas tools unattended when not in use. Any extinguishing of the flame can allow gas to escape which poses an urgent hazard.
- Keep this and all gas tools and equipment out of reach of children.
- When using a new cartridge or propane bottle together with cold tools, a variation of the flame can occur. This phenomenon tapers off within a short period of time.
- Whenever using gas tools, even during short use, beware of the heat radiating from the flame (glass, torch etc.). Negligence can lead to serious burns or injury.
- Never modify your gas tool. Have repair and maintenance work carried out by competent and qualified personnel.
WHAT TO DO WHEN LEAKS ARE DISCOVERED:
If you smell gas or suspect a gas leak, shut down the gas tool and equipment immediately and take the tool outside to a place with good air circulation. There you can check the tool for leaks. Never try to find a leak with an open flame, always use soap sud.

OPERATING INSTRUCTIONS
SCOPE OF USE
Your propane roofing torch is suited for a variety of applications: preheating, scarfing, foil bonding, tarring, roof insulation, drying concrete as well as ecologically removing weeds and moss.
This roofing torch operates with LPG. When equipped with a respective propane regulator, it can be used with 5 kg, 11 kg and 33 kg propane bottles.
It can be dangerous to connect other than the above recommended gas bottles.
TECHNICAL DATA:
| Flame temperature: | up to 1060°C (1940°F) |
| Gas type: | propane, propane/butane, butane |
| Gas pressure: | max. 4.0 bar |
| This gas tool must be operated together with a suitable propane regulator. | |
Warning:
Professional craftsmen (roofers, gardeners, builders) must use this roofing torch together with a safety valve. We recommend that the average consumer also use such a safety device. In the event that the 5m hose ruptures, bursts or is punctured (e.g. on sharp edges) the safety valve immediately interrupts the flow of gas at the pressure regulator. This stops the flow of gas and protects the roofing torch user against hazardous situations.
BEFORE USING THE TOOL
Ensure that all valves and stop-cocks are closed before you start. The threads on the hose and hose connection to the blowpipe are left-handed. Always check for leaks before use. Never try to find a leak with an open flame, always use soap sud.

IGNITING AND ADJUSTING THE TORCH:
- Connect the propane regulator to the gas bottle. Ensure that the connection is tight.
- Then connect the recommended safety valve and only then connect the gas hose to the safety valve and the propane handle. Again ensure the connections are tight.
- Open the bottle cut-off valve first.
- Then open the control valve on the tool (large control knob with +/- symbol). When using small torches or freshly refilled gas bottles, allow the captured air to escape.
- The built-in Piezo ignition device located above the burner is used to light a flame in the burner. Press the red button to produce a spark and light a flame in the burner.
- Increase gas flow with the integrated valve for full output. Ensure that the flame aspect does not burn away from the nozzle edge as it will reduce output and temperature.
- Retention flame persists until the gas throttle is actuated. By pressing the economizer lever the torch gains full capacity as previously set.
- For short work interruptions release economizer lever and the tool reduces the flow of gas and the retention flame returns. It is essential that the torch holder is mounted in full accordance with the assembly diagram.
- Avoid torsional stress of the hose.
FEATURES
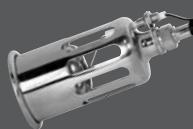
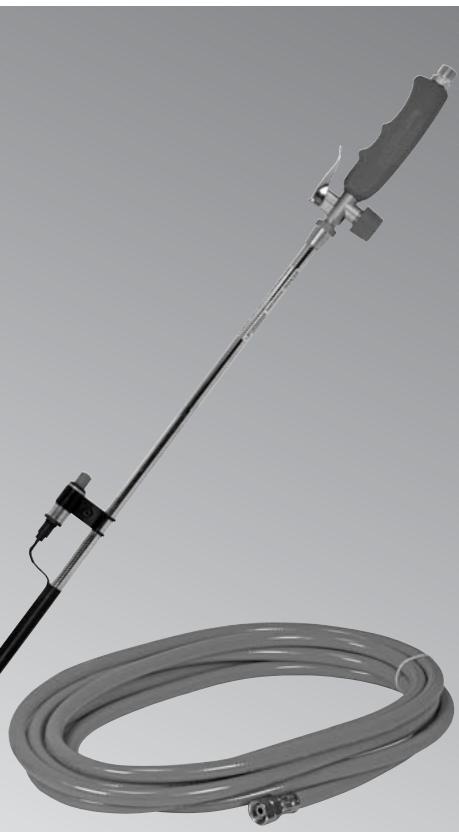
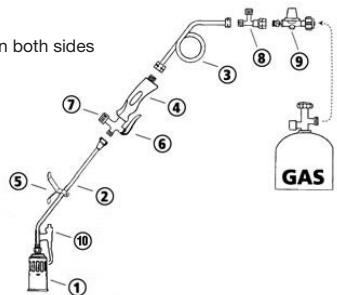
1 Torch
2 Pipe
3 5.0m hose, R3/8" threaded connection on both sides
4 Safety economizer valve - handle
5 Torch holder
6 Economizer lever
7 Control valve for regulating flame size
8 Safety valve (accessory)
9 Propane regulator (accessory) (not included)
10 Piezo ignition button
WORK COMPLETION - SHUTTING OFF THE TORCH
Always close the torch valve. Reduce hose pressure to normal atmospheric pressure. Before taking prolonged breaks or after work completion, close bottle valves and allow the torch to burn off any excess gas. Then close gas regulator and allow hot parts to cool. Wait until parts and components have fully cooled before disassembling and stowing gas equipment.
STORAGE AND TRANSPORT CONDITIONS
Before taking prolonged breaks or transporting equipment, always disconnect the hose from the vessel. Always transport gas vessels in an upright position.
Warning: Compressed gas cylinders (and single-use oxygen bottles) are non-refillable vessels. Refilling is prohibited by law and any attempt poses an urgent safety hazard.
Have refillable vessels filled by authorized, qualified stations. Improper refilling and handling can lead to serious accidents.

RECYCLING

Worn out machines must be recycled at a suitable recycling facility. Do not dispose of in the household waste. Further information is available from your local council.

CONSIGNES DE SECURITÉ

