USER MANUAL CL-AF76F COSYLIFE
Thank you for choosing this COSYLIFE product. COSYLIFE products are chosen, tested, and recommended by ELECTRO DEPOT, so you can be sure you are getting a top-quality, easy-to-use product that won't let you down.
We're confident your new device will be a pleasure to use every day!
Welcome to ELECTRO DEPOT.
Table of Contents
A Product overview
Parts Specifications
B Product usage
Before first use
Preparing for use
Using the appliance
Cleaning and maintenance
Cleaning and maintenance Troubleshooting Storage
Parts
A Housing
B Touch control panel
Metal rack
D Pot
Pot handle
Air outlet
6 Power cord
Specifications
| Rated supply: | 220-240 V~, 50-60 Hz |
| Electric protection class: | Class I |
| Maximum power: | 2000 W |
| Capacity of pot (without grid): | 7,6 L |
| Weight capacity: | 1,6 kg |
| Noise level: | 57 dB (50 cm) |
| T°C range: | 80°C - 200°C (7 menus)
30-80°C (dehydration function) |
| Timer: | 1-60 minutes (7 menus)
1-24 hours (dehydration function) |
B Product usage
Before first use
- Remove all packaging material.
- Remove any stickers or labels from the appliance except the nameplate.
- Thoroughly clean the metal rack and pot with hot water, some washing-up liquid and a non-abrasive sponge.

Note: You can also clean these parts in the dishwasher.
- Wipe the inside and outside of the appliance with a moist cloth.
This is an air fryer that works on hot air. Do not fill the pot with oil or frying fat.
Preparing for use
- Place the appliance on a stable, horizontal and level surface.
- Do not place the appliance on non-heat-resistant surfaces.
- Place the metal rack in the pot properly.
- Do not fill the pot with oil or any other liquid.
- Do not put anything on top of the appliance. This disrupts the airflow and affects the hot air frying result.
Using the appliance
The air fryer can prepare a large range of ingredients. The suggested temperature table and cooking time will help you learn how to use the appliance.
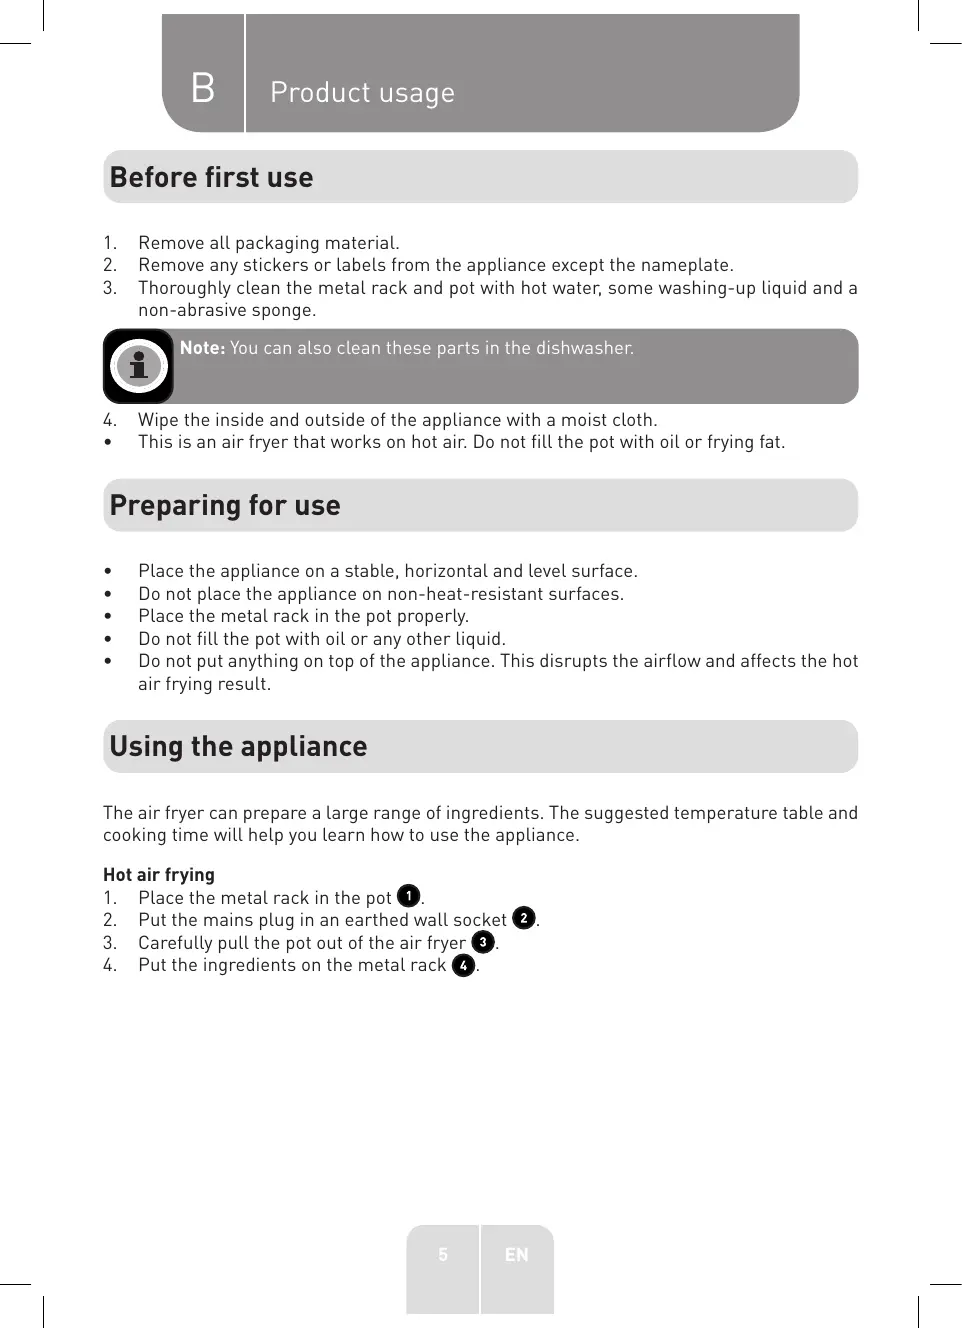
Hot air frying
- Place the metal rack in the pot ①
- Put the mains plug in an earthed wall socket 2
- Carefully pull the pot out of the air fryer 3
- Put the ingredients on the metal rack 4

Note: Never fill the pot beyond the MAX indication or exceed the amount indicated in the table see section 'Settings' in this chapter], as this could affect the quality of the end result.
Make sure you check the preparation time and the temperature required for the different ingredients before you start to prepare them simultaneously. Potato cubes and schnitzel, for example, can be prepared simultaneously because they require the same settings. Please note that the maximum amount for each of the ingredients is half the normal amount.
- Slide the pot back into the air fryer 5

CAUTION: Do not touch the pot during and sometime after use, as it gets very hot. Only hold the pot by the handle.
- Operatethecontrolpanelasfollows:
Plug in the power, the whole power indicator light is on.
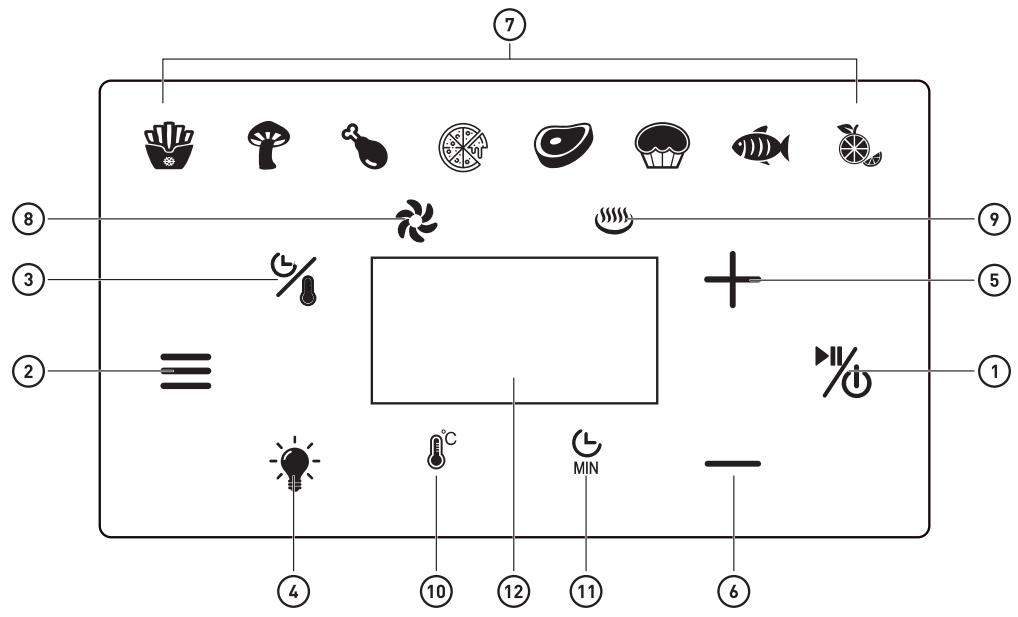
| 1 | Power button
Once the pot and the metal rack are properly placed in the main unit of housing, plug in the power, the power indicator light gradually becomes bright and then gradually dim in cycle. Press the power button for 2 seconds will make the unit's default temperature 200°C while the cooking time will be set to 20 minutes. Press the Power Button a second time will start the cooking process. Press the power button for 2-3 seconds to close the entire device during cooking. The electric heating tube stops working and the fan stops running after 15 seconds. Note: During cooking, you can touch the button to control the pause and start of cooking. |
| 2 | Preset Button
Press the Preset Button enables you to scroll through the 8 popular food choices. Once selected, the predetermined time and cooking temperature function begins. |
| 3 | Temperature time switch button
Touch this button, the screen alternately flashes the temperature and time, and the corresponding temperature and time indicator light is lit, and the time and temperature are set according to the “⑤” key and “⑥” key. |
| 4 | Lighting switch button
Press the light button and the head lamp in chamber will light up. The lamp will turn off automatically after 60 seconds. Press the button again can turn off the lamp manually. |
| 5 | “-” and “+” control buttons
When the temperature indicator light is on, press “⑤” and “⑥” keys to set the temperature. Temperature control range is 80-200°C [7 menus] and 30-80°C (dehydrate).
When the time indicator light is on, press “⑤” and “⑥” keys to set the time. Time control range is 1-60mins [7 menus] and 1-24hrs (dehydrate). |
| 7 | Menu indicator
• Fries
• Vegetables
• Chicken
• Pizza
• Meat
• Cake
• Fish
• Dehydrate |
| 8 | Fan indicator |
| 9 | Heating indicator |
B Product usage
10 Temperature indicator
Time indicator
(12) Temperature/Time Display
- Some ingredients require shaking halfway through the preparation time (see section "Settings" in this chapter). To shake the ingredients, pull the pot out of the appliance by the handle and shake it. Then slide the pot back into the air fryer.

Tip: To reduce the weight, you can use a pair of food tongs to shake the ingredients instead of shaking the pot. Please use a pair of food tongs because the ingredients in the pot are hot.
- When you hear the buzzer alarm beep~ ~ Di, the set preparation time has elapsed. Pull the pot out of the appliance and place it on the trial framework.
- Check if the ingredients are ready.
If the ingredients are not ready yet, simply slide the pot back into the appliance and set the timer to a few extra minutes.
- To remove ingredients (e.g. fries), pull the pot out of the air fryer and place it on trial framework, and please use a pair of food tongs to help remove the hot ingredients.
Please do not turn the pot upside down with the metal rack still attached to it, as any excess oil that has collected on the bottom of the pot will leak onto the ingredients.
The pot and the ingredients are hot. Depending on the type of the ingredients in the air fryer, steam may escape from the pot.
- When a batch of ingredients is ready, the air fryer is instantly ready for preparing another batch.
Settings
This table below will help you to select the basic settings for the ingredients.

Note: Keep in mind that these settings are indications. As ingredients differ in origin, size, shape as well as brand, we cannot guarantee the best setting for your ingredients.
- Because the Rapid Air technology instantly reheats the air inside the appliance instantly, pull the pot briefly out of the appliance during hot air frying barely disturbs the process.

Tip:
- Smaller ingredients usually require a slightly shorter preparation time than larger ingredients.
- A larger amount of ingredients only requires a slightly longer preparation time, a smaller amount of ingredients only requires a slightly shorter preparation time.
- Shaking smaller ingredients halfway through the preparation time optimizes the end result and can help prevent unevenly fried ingredients.
- Add some oil to fresh potatoes for a crispy result. Fry your ingredients in the air fryer within a few minutes after you added the oil.
- Do not prepare extremely greasy ingredients such as sausages in the air fryer.
Snacks that can be prepared in an oven can also be prepared in the air fryer
The optimal amount for preparing crispy fries is 500 grams.
- Use pre-made dough to prepare filled snacks quickly and easily. Pre-made dough also requires a shorter preparation time than home-made dough.
- Place a baking tin or oven dish on the metal rack if you want to bake a cake or quiche or if you want to fry fragile ingredients or filled ingredients
- You can also use the air fryer to reheat ingredients. To reheat ingredients, set the temperature to 150^ C for up to 10 minutes.
| Min-max Amount (g) | Time (min.) | Temperature (°C) | Shake | Extra information |
| Potato & fries |
| Thin frozen fries | 500-1000 | 18-26 | 200 | shake | |
| Thick frozen fries | 500-1000 | 22-30 | 200 | shake | |
| Potato gratin | 400 | 20-25 | 200 | shake | |
| Meat & Poultry |
| Steak | 100-400 | 10-15 | 180 | | |
| Pork chops | 100-400 | 10-15 | 180 | | |
| Hamburger | 100-400 | 10-15 | 180 | | |
| Sausage roll | 100-400 | 13-15 | 200 | | |
| Drumsticks | 100-400 | 25-30 | 180 | | |
| Chicken breast | 100-400 | 15-20 | 180 | | |
| Snacks |
| Spring rolls | 100-350 | 8-10 | 200 | shake | Use oven-ready |
| Frozen chicken nuggets | 100-400 | 6-10 | 200 | shake | Use oven-ready |
| Frozen fish fingers | 100-350 | 6-10 | 200 | | Use oven-ready |
| Frozen bread crumbed cheese snacks | 100-350 | 8-10 | 180 | | Use oven-ready |
| Stuffed vegetables | 100-350 | 10 | 160 | | |
Baking
| Cake | 250 | 8-15 | 180 | Use baking tin |
| Quiche | 350 | 20-22 | 180 | Use baking tin/oven dish |
| Muffins | 250 | 15-18 | 200 | Use baking tin |
| Sweet snacks | 350 | 20 | 160 | Use baking tin/oven dish |

Note: Add 3 minutes to the preparation time when you start frying while the air fryer is still cold.
Cleaning and maintenance
- Clean the appliance after every use.
- The pot and the metal rack are with the non-stick coating. Do not use metal kitchen utensils or abrasive cleaning materials to clean them, as this may damage the non-stick coating.
- Remove the mains plug from the wall socket and let the appliance cool down.

Note: Remove the pot to let the air fryer cool down more quickly.
- Wipe the outside of the appliance with a moist cloth.
- Clean the pot and the metal rack with hot water, some washing-up liquid and a non-abrasive sponge.
- You can use a degreasing liquid to remove any remaining dirt.

Note: The pot and the metal rack are dishwasher-proof.

Tip: If dirt is stuck to the pot and the metal rack, fill the pot with hot water with some washing-up liquid. Put the metal rack in the pot and let the pot and the metal rack soak for approximately 10 minutes.
- Clean the inside of the appliance with hot water and a non-abrasive sponge.
- Clean the heating element with a cleaning brush to remove any food residues.
Troubleshooting
| Problem | Possible Cause | Solution |
| The air fryer does not work | ·The appliance is not plugged in.
·You have not set the timer.
·You have not pressed the start button. | ·Put the mains plug in an earthed wall socket.
·Press "+" or "-" to set the required preparation time to switch on the appliance.
·Press the power button to start. |
| The ingredients fried with the air fryer are not done. | ·The amount of ingredients in the pot is too big.
·The set temperature is too low.
·The preparation time is too short. | ·Put smaller batches of ingredients in the pot. Smaller batches are fried more evenly.
·Press "+" or "-" to set the required temperature (see section “settings” in chapter “Using the appliance”).
·Press "+" or "-" to set the required preparation time (see section “Settings” in chapter “Using the appliance”). |
| The ingredients are fried unevenly in the air fryer. | ·Certain types of ingredients need to be shaken halfway through the preparation time. | ·Ingredients that lie on top of or across each other (e.g. fries) need to be shaken halfway through the preparation time. See section “Settings” in chapter “Using the appliance”. |
| Fried snacks are not crispy when they come out of the air fryer. | ·You used a type of snacks meant to be prepared in a traditional deep fryer. | ·Use oven snacks or lightly brush some oil onto the snacks for a crispier result. |
| I cannot slide the pot into the appliance properly. | ·There are too much ingredients in the pot. | ·Do not fill the pot beyond the MAX indication. |
| White smoke comes out of the appliance. | You are preparing greasy ingredients.
The pot still contains grease residues from previous use. | When you fry greasy ingredients in the air fryer, a large amount of oil will leak into the pot. The oil produces white smoke and the pot may heat up more than usual. This does not affect the appliance or the end result.
While smoke is caused by grease heating up in the pot, make sure you clean the pot properly after each use. |
| Fresh fries are fried unevenly in the air fryer. | You did not use the right potato type.
You did not rinse the potato sticks properly before you fried them. | Use fresh potatoes and make sure they stay firm during frying.
Rinse the potato sticks properly to remove starch from the outside of the sticks. |
| Fresh fries are not crispy when they come out of the air fryer. | The crispiness of the fries depends on the amount of oil and water in the fries. | Make sure you dry the potato sticks properly before you add the oil.
Cut the potato sticks smaller for a crispier result.
Add slightly more oil for a crispier result. |
Storage
- Unplug the appliance and let it cool down.
- Make sure all parts are clean and dry.
- Push the cord into the cord storage compartment. Fix the cord by inserting it into the cord fixing slot.
- Store the unit in a fresh, dry and dust-free place, out of the reach of children and pets.
- Please retain the packaging and use it to store your unit when it is not in use for an extended period of time.
Merci!
This product is guaranteed against faults caused by defects in manufacturing or the materials used for a period of two years, starting from the date of purchase.* This warranty does not cover defects or damage caused by failure to install the device correctly, incorrect use of the product, or excessive wear and tear.
*proof of purchase required.
FR
CONDITION DE GARANTIE