USER MANUAL CL-BL1015SM COSYLIFE
Thank you for choosing this COSYLIFE product. COSYLIFE products are chosen, tested, and recommended by ELECTRO DEPOT, so you can be sure you are getting a top-quality, easy-to-use product that won't let you down.
We're confident your new device will be a pleasure to use every day!
Welcome to ELECTRO DEPOT.
Table of Contents
| A | Product overview | Parts
Product Features
Safety Tips
Specifications |
| B | Product usage | Using the blender jar
Disassembling the blender jar
Scope of application
Usage
Indicator lights overview
Stir
Quick clean mixing jar
Food preparation
Using the portable bottle |
| C | Cleaning and maintenance | Cleaning
Troubleshooting
Storage |
Parts
Feeding cover
B Lid
c Blender/stir jar
D Blending knife
E Blending knife stand
F Main machine
Cup lid
Personal blender cup
Knife stand
Product Features
- With functions of mixing, grinding, meat chopping, equipped with one-click pulse switch, milkshakes and ice function keys, meet various needs.
Using transparent glass jar, cap feeding, products can be observed clearly.
- Infinitely variable speeds adjustment function, meet the demand of various speed.
- Safety switch on the lid, operate more secure, more at ease.
- Convenient spatula to ensure stir to mix well.
Safety Tips
- Please do not let children and have no independent behavior ability people to operate the machine.
A Product overview
- Before power supply through to the machine, please check whether the machine indicate voltage is consistent with the local voltage.
- If the power cord plug is damaged, please don't use the product, refer to the company's after-sales service.
Before the machine work, please make sure to confirm all parts installed correctly;
- Before disassembling any attachment or adjust the product position, please remove the plug.
Before clean any parts of the machine, please unplug the machine power plug;
- Do not put the main machine into water or any other liquid, do not rinse under the tap. Please use wet cloth to wipe instead.
- Please do not let the product idling. When using the blender jar, please add suitable amount of water or liquid seasoning materials to stir the raw materials.
- When blending the materials, do not exceed the mark on mixing cup processing capacity. Such as: Max/highest water level.
- Don't make products to work in the case of unattended.
- Please send the product properly kept in the place where children can't touch.
- Don't put the cutter holder without screwing the glass alone on the main machine, so as to avoid accidents.
- When the machine is working do not use your fingers or other body parts into the mixing jar.
- The machine blade so sharp, do not touch the blade, especially when the machine power -on.
- When cleaning the blade, please refer to the section "cleaning".
- If the blade congestion while the machine working, please take the jar shaking, after the raw material get loose and then continue to stir. When necessary, please inverts the jar after take it down from the main machine, after unscrew the base and cleaning blockages, operation again.
- When you stop to use this machine, please remember unplug the power plug.
This product use stainless steel blade.
This product use the glass mixing jar.
Specifications
| Model: | 983714 |
| Rated supply: | 220V-240V~, 50-60Hz |
| Electric protection class: | Class II |
| Maximum power: | 1000 W |
| Blender jar capacity: | 1.5 L |
| Personal blender cup capacity: | 600 ml |
| Cable length: | 120 cm |
| Blades RPM: | 17800 RPM |
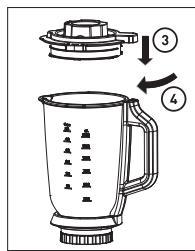
Using the blender jar
- Clean all parts which contact with food.
- As shown below put the blender components together.
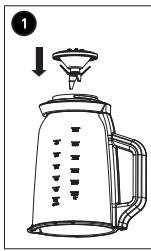
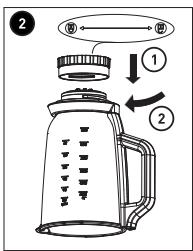
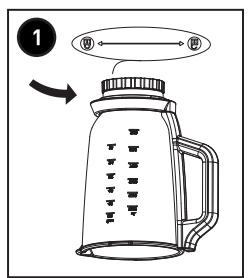
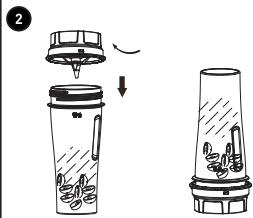
Disassembling the blender jar
- Turn the lid counterclockwise to remove it from the blender jar.
- Turn the feeding cover counterclockwise to remove it from the lid.
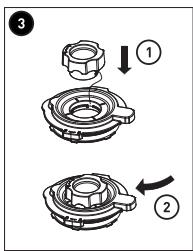
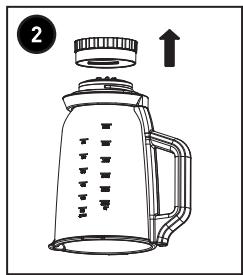
- Place the blender jar upside down and spin out the jar holder counterclockwise as directed, see below figure 1 & 2.
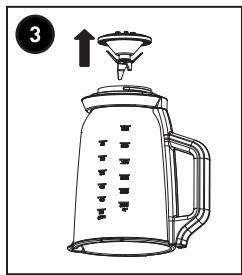
- Pick up the blender blade head upwards and see below figure 3.
Scope of application
The Mixing/blending components suitable for stirring, mixing, crushing fruit, vegetables, nuts and other kinds of food raw materials and condiments. Make all kinds of fruit juice, ice sand, milkshakes, beverage, seasoning liquor, soup, porridge, paste, juice, sauce etc.
B Product usage
Usage
- Turn the Control knob clockwise to the desired speed setting to start blending. Turn the Control knob to the OFF position to stop.
- To crush ice, press the button once to start crushing ice. Press the button once to stop.
- To quickly process ingredients, press and hold the button for a few seconds. Release the button to stop.
- To make smoothies or milkshakes, press the button once to start. Press the button once to stop.

NOTE:
Before using the buttons, the Control knob must be turned to the OFF position.
- To crush ice into snowflake shape, choose the highest speed setting on the Control knob, or press the button for a few seconds. If the ice is still very thick, press the button to crush again.
Indicator lights overview
- When the appliance is plugged in, and the blender jar/cup is not attached to the main machine, the blue indicator lights will flash on the Control knob and the 3 buttons.
- When the blender jar/cup is attached to the main machine, the blue indicator lights will turn solid blue on the 3 buttons and turn off on the Control knob.
- When the Control knob is turned to a speed setting, the blue indicator light will turn solid on the knob and turn off on the 3 buttons.
- When the button is pressed and held, the blue indicator light will turn solid blue on the button while it is held and will turn off on the knob and other buttons.
- When the or button is pressed once and the blender is running, the or button will turn solid blue respectively."
Stir
- Clean all parts which contact with food.
- Confirm your power plug is consistent with this machine.
- The machine should be placed on the smooth table, so as to avoid accidents.
- Put the preparation raw materials into the mixing jar, according to individual favor, adding suitable amount of water (not more than the highest scale line), cover the lid and cover the feeding cove to the hole of feeding.
- Plugged in, run the machine by rotating the knob to the desired speed. After 40 seconds to 60 seconds, processed foods can be crushed or dissolved.
B Product usage
Quick clean mixing jar
- Put a half full of water into the jar, add a few drops of dishwashing liquid.
- Press the _ button several times in a row.
- Remove the mixing jar and emptied it, wash down to tap.

Tips: Only the feeding cover, lid, Blending knife stand, Cup lid and Personal blender cup are available to dishwasher.

Note: please don't use the steel wool, corrosive cleaning solvents or corrosive solution to clean ( such as the gasoline).
Food preparation
You can be in a very short period of time to make all kinds of fruit juices, smoothies, milkshakes, beverage, liquor, soup, porridge, paste food, juice, sauce and so on characteristics foods. In order to let you know the possibilities, we list some below production method; Please according to the mixing jar capacity to matching the proportion and the ratio of personal taste.
Orange juice, banana mixed milk shake
1 cup of milk
1.5 cup of orange juice
12 teaspoon vanilla
- 12 bananas (large block )
1 cup vanilla ice buttermilk
1 / 2 cup orange buttermilk
3 TBSP concentrated orange juice
Mix liquid ingredients into the glass jar. Add ice raw material, use pulse button at first (brief intermittent repeatedly) operation several times, according to the need (continuous operation), after get the moderate mixture to drink.
Strawberry lemonade mixed juice
2 cups lemon water
2 cups frozen strawberries
1 cup of strawberry buttermilk
Mix liquid ingredients into the glass jar. Add ice raw material, use pulse button at first (brief intermittent repeatedly) operation several times, according to the need (continuous operation), after get the moderate mixture to drink.
B Product usage
Vitamin drink (3 cups)
1 mango only
1 kiwi
1 citrus
1 bananas
- 2 teaspoon of honey (or more, according to personal taste)
- 1 apple (apple to wash)
300 ml of buttermilk
- Remove the kiwi and citrus peel, along with has been cut into small pieces of apple into the mixing cup and blending to juice.
- Stripping off the mango and banana skin, with the first step has good fruit juice, honey, buttermilk into the blender mixing together, to make a delicious mix drink.

Tip: Use the curd or yogurt, instead of buttermilk, can be made into delicious and healthy dessert after dinner.
Hot weather to drink cold drinks (2 cups)
12 pineapple only
1 pink grapefruit
2 apple
1 large glass of ice water
Washing apple, stripping off the pineapple and grape peel, and cut into small pieces, mix all ingredients in a mixing glass can be a delicious, cold, can quench the fresh fruit juice drinks.
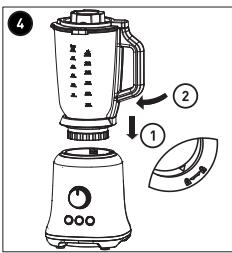
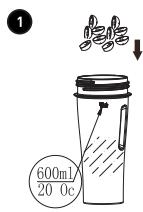
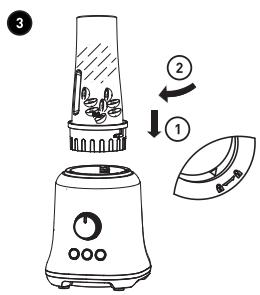
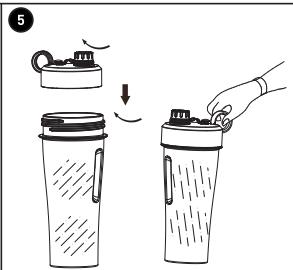
Using the portable bottle
- Put the ingredient into the cup, and pay attention not to exceed the maximum scale "600ml";
- Assemble the knife holder to the cup according to Figure 2, then put the cup holder on the cup mouth position and tighten it clockwise, paying attention to ensure that it is tightened;
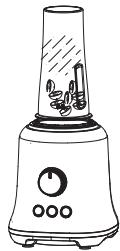
- Assemble the cup to the main machine as shown in Figure 3, first align the buckle according to the prompt, and then turn it clockwise to fasten it, and then the agitator can be powered on;
- After the food is stirred, rotate the cup body and the cup holder assembly counterclockwise to the rack slot position, and then lift the cup vertically away from the main machine;
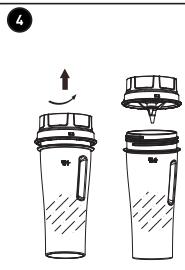
- As shown in Figure 4, separate the cup holder and the knife holder from the cup body, and then replace the lid of the personal blender cup, so that you can carry the juice with you;
Cleaning
- Close the machine and unplug the power plug.
- All removable parts must be removed before cleaning.
Troubleshooting
| Problem | Solution |
| Product does not work | ·Please check whether the product power plug plug in, at the same time, please check whether the mixing jar is installed correctly. |
| Motor device emits an odor when processing | ·The first few times when used, new product emits an odor or smoke is normal phenomenon, after use a few times will not appear. But if continuous use a long time also can make the product emits an odor or smoke, products must be closed at this time, and let it cool 60 minutes. |
| Stirring jar leakage | ·Shut down power supply, move the jar to pour out of the raw material, then counterclockwise to unscrew the blade device. Check whether the seal is correctly installed in the stirring knife base device. |
| Whether can be boiling hot raw materials into the mixing jar? | ·Can’t. Need to let the liquid or ingredients cooling to 60 degrees Celsius, in order to avoid damage in the attachment. |
| Whether all removable parts can be clean in the dishwasher? | ·Can’t. Only the feeding cover, lid, blending knife stand, cup lid and personal blender cup are available to dishwasher. |
| When motor over load operation or continuous use for a very long time, causing the product does not work | ·To prolong the working life of the machine, the motor has the over-heat temperature protection device, when the motor work for a long time or overload operation, once over the vigilant temperature it will automatically power off. After the machine stops working, you must unpin the plug, after waiting for motor cooling (60 minutes) then can use again. |
Storage
- Always unplug the unit before storing it.
- Store the unit in a fresh, dry and dust-free place, out of the reach of children and pets.
- Please retain the packaging and use it to store your unit when it is not in use for an extended period of time.

Merci!
This product is guaranteed against faults caused by defects in manufacturing or the materials used for a period of two years, starting from the date of purchase.* This warranty does not cover defects or damage caused by failure to install the device correctly, incorrect use of the product, or excessive wear and tear.
*proof of purchase required.
CONDITION DE GARANTIE
FR