USER MANUAL VB-MAC VALBERG
Merci !
natural_image
Line drawing of a sewing machine with no visible text or symbols
natural_image
Technical line drawing of a mechanical component (no text or symbols)
natural_image
Technical line drawing of a sewing machine with an arrow indicating assembly direction (no text or symbols present)

natural_image
Line drawing of a sewing machine with no visible text or symbols

ATTENTION!
natural_image
Illustration of a hand holding a tool with a circular component and directional arrows indicating motion (no text or symbols)

natural_image
Technical line drawing of a mechanical device with an arrow indicating force or movement, showing internal components and a dashed outline below (no text or symbols)
natural_image
Technical line drawing of a mechanical device with a downward arrow indicating motion or assembly (no text or symbols)
Enfilage de la machine
natural_image
Technical line drawing of a mechanical device with rotating components and directional arrows (no text or symbols)
natural_image
Pure mechanical diagram showing a gear or cam mechanism with directional arrows, no text or symbols present.
natural_image
Technical line drawing of a mechanical device with no visible text or symbols
natural_image
Diagram showing a mechanical assembly with a flange and a cylindrical component, no text or symbols present.
natural_image
Diagram showing a hand turning a mechanical component with arrows indicating motion (no text or symbols)
B
Insertion de la canette
natural_image
Technical line drawing of a mechanical device with no visible text or symbols
natural_image
Diagram of a mechanical device with a hand operating a lever and two small objects on the side (no text or symbols)
natural_image
Technical line drawing of a mechanical device with no visible text or symbols
natural_image
Technical line drawing of a mechanical assembly with no visible text or symbols
natural_image
Technical line drawing of a mechanical assembly with no visible text or symbols
natural_image
Mechanical component diagram showing rotational and linear motion arrows (no text or symbols)
B
natural_image
Technical line drawing of a mechanical component with directional arrows indicating motion (no text or symbols)
natural_image
Line drawing of a hand holding a tool interacting with a mechanical component, showing motion arrows (no text or symbols)
natural_image
Line drawing of a hand holding a rope with a black arrow indicating direction (no text or symbols)
natural_image
Diagram of a mechanical tool or screw with a curved base and directional arrow (no text or symbols)
natural_image
Mechanical sewing process diagram showing needle insertion and assembly (no text or symbols)
natural_image
Technical line drawing of a mechanical component with a rotating knob (no text or symbols)
natural_image
Close-up of a sewing machine needle stitching a small electronic component (no visible text or symbols)
natural_image
Technical line drawing of a sewing machine needle and base mount (no text or symbols)
natural_image
Technical line drawing of a sewing machine needle stitching (no text or symbols)
Tension du fil
Trop de tension
natural_image
Technical line drawing of a mechanical device with no visible text or symbols
natural_image
Pure mechanical diagram showing a rotating component with curved arrows indicating motion (no text or symbols)
natural_image
Line drawing of a sewing machine needle stitching fabric (no text or symbols)
natural_image
Simple line drawing of a hand pressing a button with an arrow indicating rotation (no text or symbols)

natural_image
Technical line drawing of a sewing machine with measurement tools and a pointer (no text or symbols)
Coupage du fil
natural_image
Line drawing of a sewing machine needle and foot (no text or symbols)
flowchart
graph TD
    A["Star-shaped Object"] --> B["CLOUD Shape"]

flowchart
graph LR
    A["Single outline"] --> B["Mechanical assembly with central component"]
    B --> C["Final assembly with two components"]
Ourlet invisible

③

Point zigzag multiple
Thank you for choosing this VALBERG product.
VALBERG products are chosen, tested, and recommended by ELECTRO DEPOT, so you can be sure you are getting a top-quality, easy-to-use product that won't let you down.
We're confident your new device will be a pleasure to use every day!
Welcome to ELECTRO DEPOT.
Table of Contents

Product overview
Parts
Product overview
Intended use
Specifications

Product usage
Machine overview
Threading the machine
Sewing

Cleaning and maintenance
Cleaning and maintenance
Replacing the sewing light
Troubleshooting
Storage
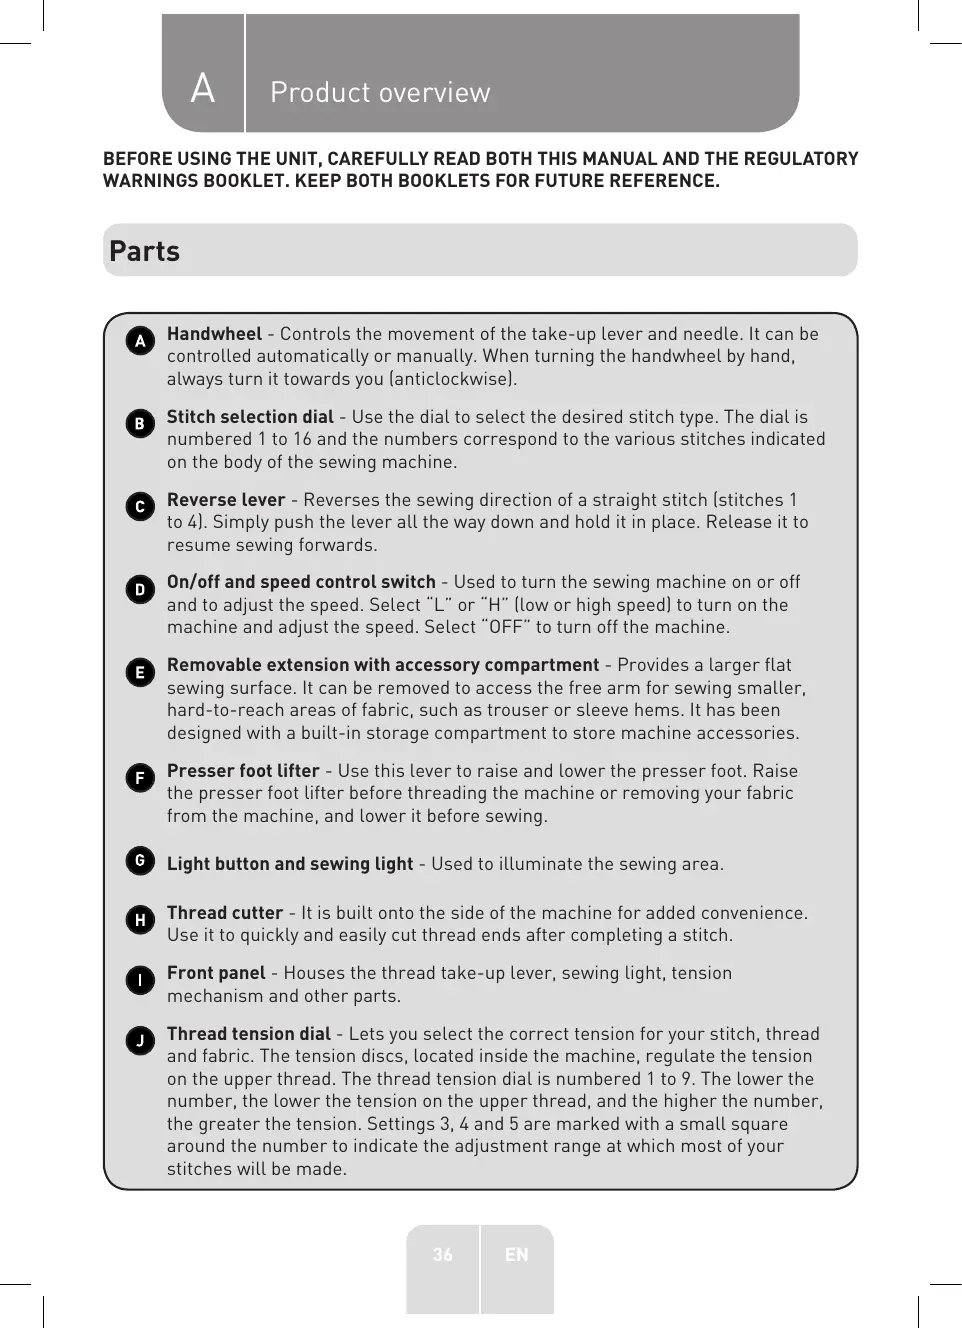
BEFORE USING THE UNIT, CAREFULLY READ BOTH THIS MANUAL AND THE REGULATORY WARNINGS BOOKLET. KEEP BOTH BOOKLETS FOR FUTURE REFERENCE.
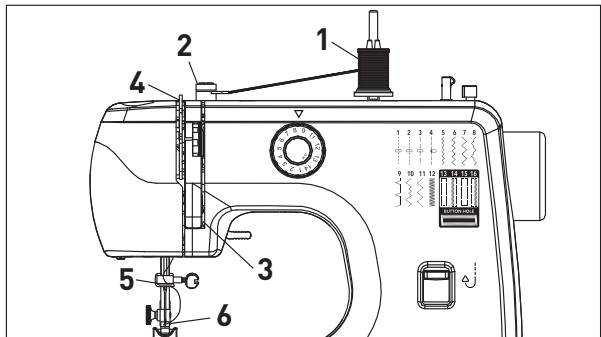
Parts
A Handwheel - Controls the movement of the take-up lever and needle. It can be controlled automatically or manually. When turning the handwheel by hand, always turn it towards you (anticlockwise).
B Stitch selection dial - Use the dial to select the desired stitch type. The dial is numbered 1 to 16 and the numbers correspond to the various stitches indicated on the body of the sewing machine.
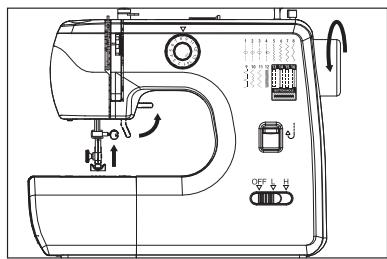
Reverse lever - Reverses the sewing direction of a straight stitch (stitches 1 to 4). Simply push the lever all the way down and hold it in place. Release it to resume sewing forwards.
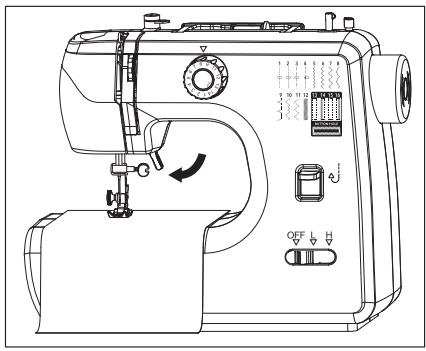
On/off and speed control switch - Used to turn the sewing machine on or off and to adjust the speed. Select "L" or "H" (low or high speed) to turn on the machine and adjust the speed. Select "OFF" to turn off the machine.
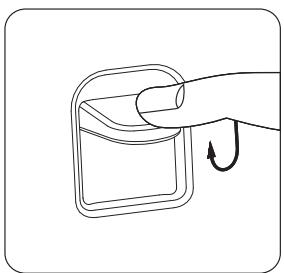
Removable extension with accessory compartment - Provides a larger flat sewing surface. It can be removed to access the free arm for sewing smaller, hard-to-reach areas of fabric, such as trouser or sleeve hems. It has been designed with a built-in storage compartment to store machine accessories.
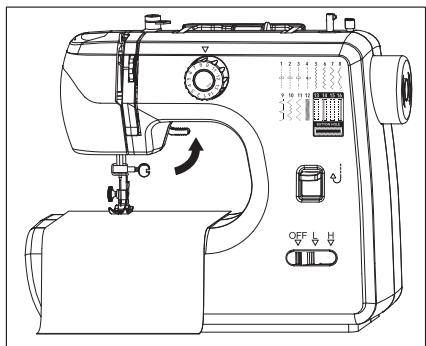
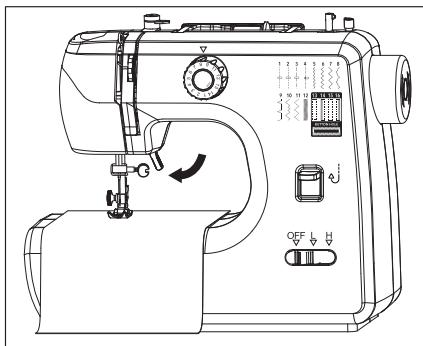
Presser foot lifter - Use this lever to raise and lower the presser foot. Raise the presser foot lifter before threading the machine or removing your fabric from the machine, and lower it before sewing.
G Light button and sewing light - Used to illuminate the sewing area.
H Thread cutter - It is built onto the side of the machine for added convenience. Use it to quickly and easily cut thread ends after completing a stitch.
Front panel - Houses the thread take-up lever, sewing light, tension mechanism and other parts.
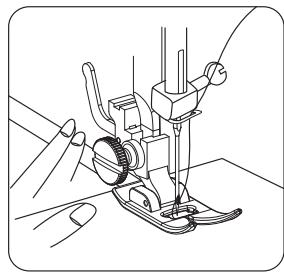
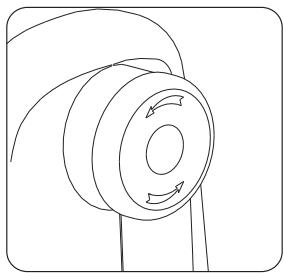
Thread tension dial - Lets you select the correct tension for your stitch, thread and fabric. The tension discs, located inside the machine, regulate the tension on the upper thread. The thread tension dial is numbered 1 to 9. The lower the number, the lower the tension on the upper thread, and the higher the number, the greater the tension. Settings 3, 4 and 5 are marked with a small square around the number to indicate the adjustment range at which most of your stitches will be made.
Thread take-up lever - Controls the amount of upper thread supplied. The self-threading slot makes it easier to thread the take-up lever.
Thread guide - Guides the thread from the spool pin to the tension discs or bobbin winder.
M Carry handle - It is built in to make the machine easy to transport.
N Bobbin winder - Winds the thread onto the bobbin for use as the lower thread.
Bobbin winder stopper - This is used during the bobbin-winding process.
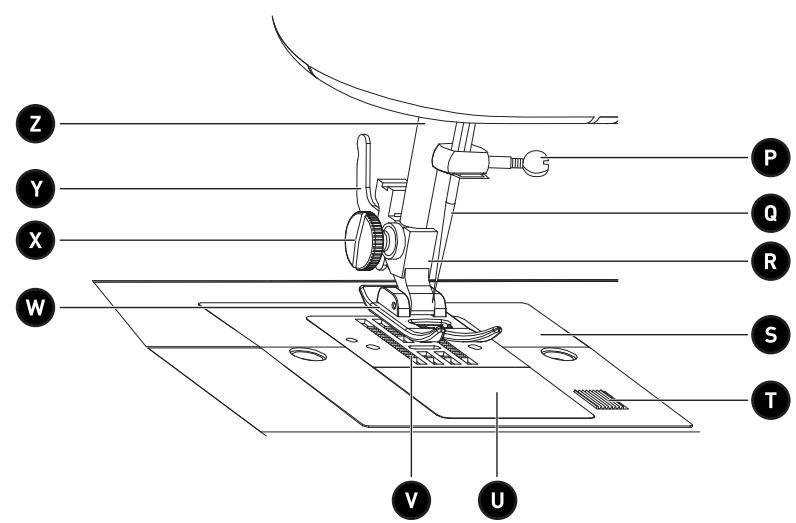
P Needle clamp screw - Secures the needle in the sewing machine for sewing purposes.
Q Needle - It is inserted into the needle bar. It contains the sewing thread.
Presser foot holder - This is attached to the presser foot bar. It keeps the presser foot in place for sewing.
S Throat plate - This is located under the presser foot area, around the feed dogs. It provides a flat sewing surface for the fabric.
T Bobbin cover release button - This is located to the right of the bobbin cover. Push the button to the right to remove the bobbin cover when replacing the bobbin.
Bobbin cover (and bobbin case inside) - It protects both the bobbin and bobbin case. It is transparent, which makes it easy to check the bobbin's (lower) thread feed.
Bobbin case - Securely holds the bobbin and keeps the bobbin thread taut whilst sewing.
Feed dogs - Move the fabric under the presser foot.
Presser foot - Keeps the fabric flat against the feed dogs. Use the presser foot lifter to lower the presser foot (for sewing) or raise it (to remove the fabric).
X Presser foot holder screw - This is located to the left of the presser foot holder. It secures the presser foot holder in place on the presser foot bar.
Y Presser foot release lever - This is located at the rear of the presser foot holder. Use this lever to remove the presser foot from the presser foot holder.
Z Presser foot bar - Secures the presser foot support and presser foot. It can be raised and lowered via the presser foot lifter.
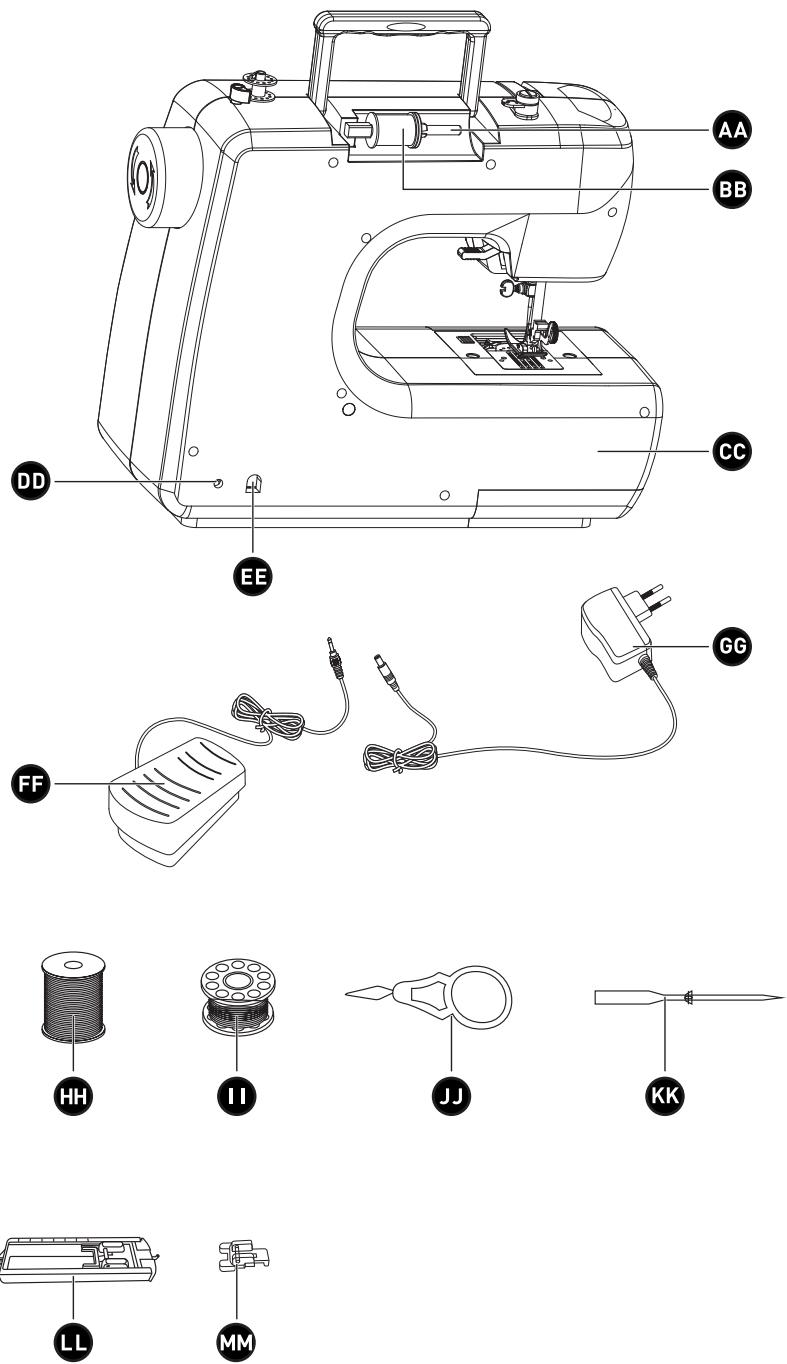
AA Spool pin with spool cap - Secures the spool of thread in place by means of the spool cap, thus allowing the upper thread to unwind without too much or little tension. The spool pin can be used horizontally or vertically, depending on the size of the spool of thread.
BB Spool of thread - Holds and feeds the upper thread to the tension discs. The diagram on the top of the machine indicates how the upper thread should pass through the thread guide.
CC Free arm - Allows you to sew sleeve or trouser hems, necklines or other small openings in clothing. Remove the extension to access the free arm.
DD Foot control input - Located at the back of the machine. Connect the foot control to this input before starting to sew.
EE AC adapter input - Located on the back of the machine. Connect the AC adapter (supplied) to this inlet.
FF Foot control - Used to start and stop the machine. Press down on the pedal with your foot to start sewing and take your foot off the pedal to stop sewing.
GG AC Adapter - One end plugs into the machine's power inlet and the other plugs into the mains socket.
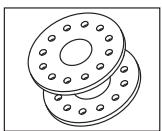
HH 2 x spools of thread
2 x bobbins
JJ 1 x needle threader
KK 1 x needle
LL 1 x automatic buttonhole foot
MM 1 x buttonhole foot
Product overview
- Unpack the product. Remove all the labels from the product. Check that it is complete and in a good condition. If the unit is damaged or faulty, do not use it and take it to your retailer or after-sales service centre.
- Keep all packaging out of the reach of children. There is a risk of accidents if children play with packaging materials.
Intended use
- This unit is intended exclusively for domestic sewing purposes, as described in this user manual. It has not been designed for industrial or commercial use. Only use this unit indoors, in a dry place.
• Any other use may damage the unit or result in fire, an electric shock or injury.
Specifications
| Model: | 972697 – VB-MAC |
| AC adapter input: | 100-240 V~ AC, 50/60 Hz |
| Sewing machine operating voltage: | 12 V DC, 2.0 A |
| Power consumption: | 24 W |
Machine overview

CAUTION!
Before adding or removing parts from the sewing machine, make sure that it has been unplugged from the mains power.
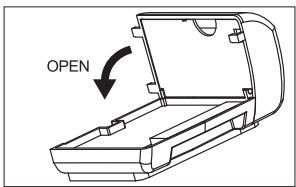
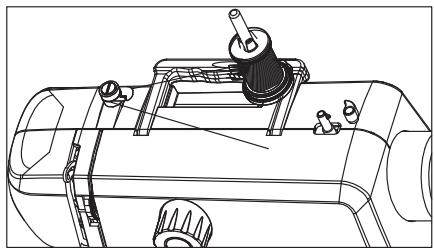
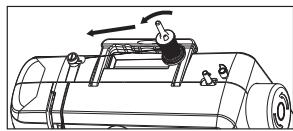
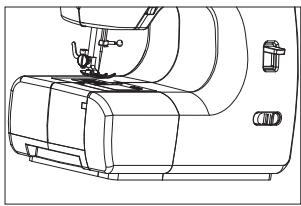
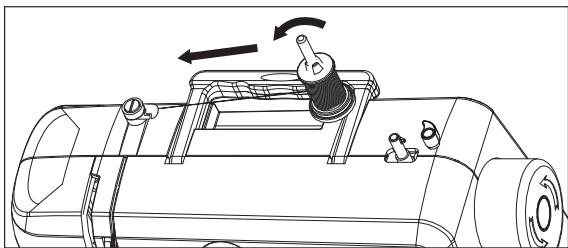
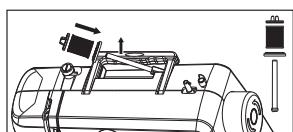
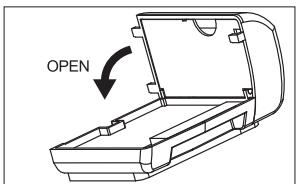
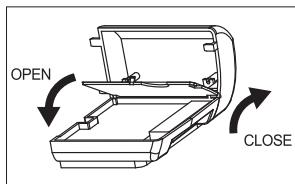
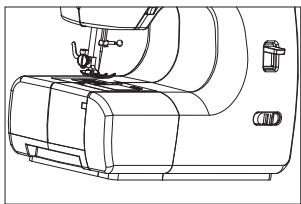
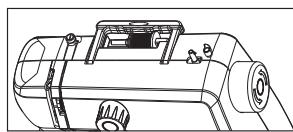
Removable extension with accessory compartment
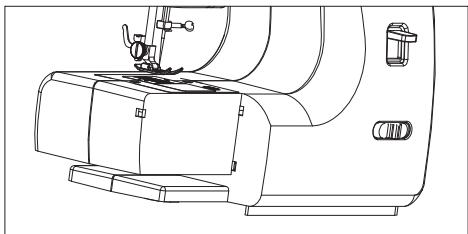
- To remove the extension from the machine, firmly grasp hold of it and pull it to the left. Once the extension has been removed, you will have access to the free arm. This setting makes it easier to sew trouser or sleeve hems, in addition to other hard-to-reach areas of fabric.
natural_image
Line drawing of a sewing machine with no visible text or symbols
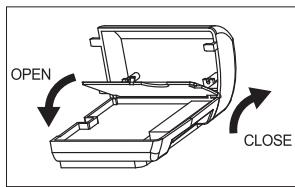
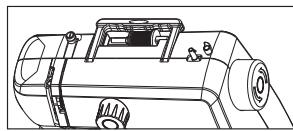
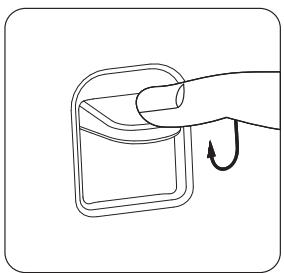
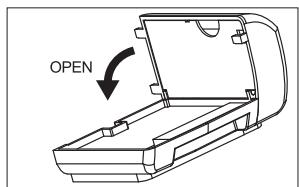
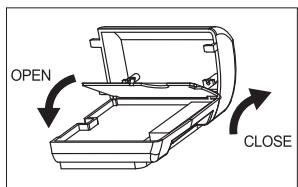
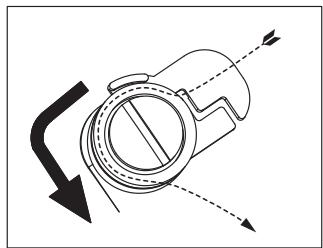
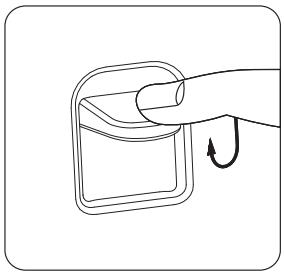
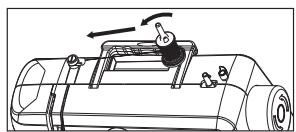
- The extension has been designed with a built-in accessory compartment for storing machine accessories. To open the accessory compartment, fold the cover down as shown.
natural_image
Technical line drawing of a mechanical component (no text or symbols)
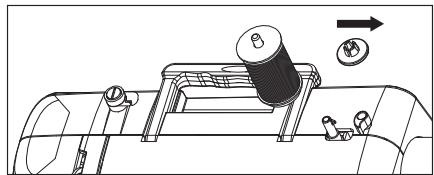
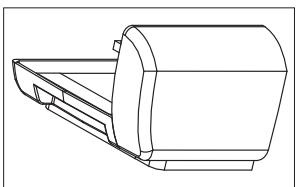
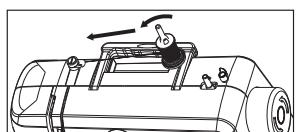
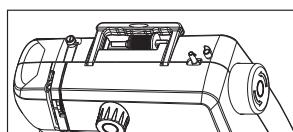
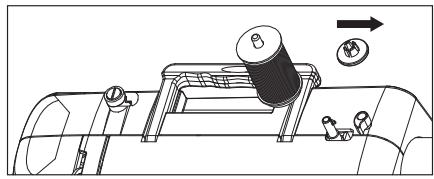
- To reposition the extension, align it with the left side of the machine and push it in until it clicks into place.
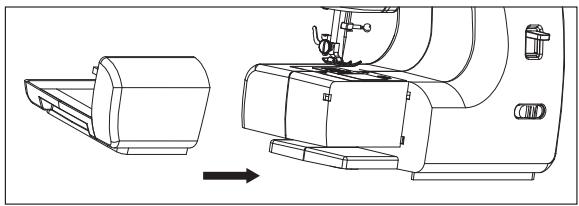
natural_image
Technical line drawing of a sewing machine with a side view showing internal components and a directional arrow (no text or symbols)
natural_image
Line drawing of a sewing machine with no visible text or symbols
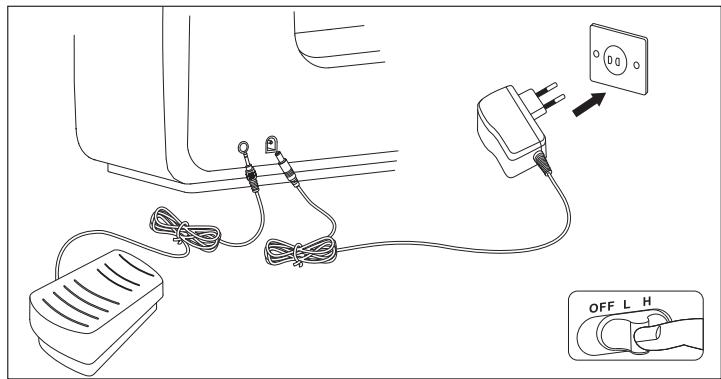
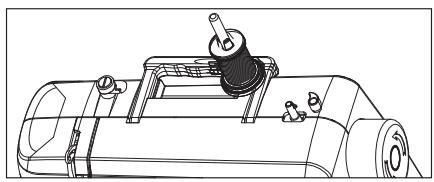
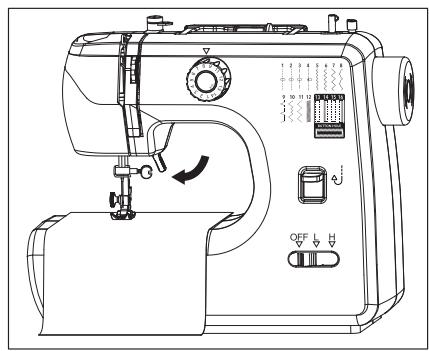
This sewing machine is supplied with an AC adapter which must be plugged into a suitable mains socket.
- Make sure that the machine's on/off switch is set to "OFF".
B Product usage
- Connect the foot control to the foot control input on the back of the machine, as shown.
- Connect the AC adapter cable to the machine's power input, then plug the adapter into a suitable mains socket. Make sure all plugs are firmly inserted.

WARNING!
- Only use the AC adapter (model: S030A1202000E) supplied with this unit to avoid any electrical risks and damaging the unit.
• This unit must only be used with the foot control (model: FPD-700) supplied.
Power on/off
• To start the machine, set the on/off switch to "L" or "H" speed (low or high).
- To turn off and unplug the machine, set the on/off switch to "OFF" and unplug the AC adapter from the mains socket. Next, disconnect the adapter cable from the machine.

CAUTION!
- Keep fingers away from all moving parts. Take care when approaching the sewing machine needle and thread cutter. Avoid contact with moving parts.
- To avoid any electrical hazards or injury, always unplug the machine from the mains socket immediately after use, before cleaning it, threading it, and before adding or removing parts.
Needle, fabric and thread guide
Different types of needles can be used with your machine, and these depend on the type of fabric you are sewing. Be sure to use the correct needle type and size to obtain the best results for your sewing projects.
- The most common needle types are regular-point and ball-point needles. The most commonly used sizes are: 11/80, 14/90 and 16/100. The smaller the number, the smaller the needle. The larger the number, the bigger the needle. Use smaller size needles for lighter weight fabrics and larger size needles for heavier fabrics. The table below provides some suggestions - with best results in mind - for matching the thread and needle type with various fabrics.
- Regular-point needles are designed for use with woven fabrics, such as cotton, linen, silk, denim or twill.
- The ball-point needles are designed for use with stretch knit fabrics, such as Spandex, mesh T-shirt fabrics or knits.
| Materials | Types of materials | Thicknesses | Needle type | Needle diameter | Thread type | Label number |
| Woven | Fine fabrics, organza, tulle, voile | Fine | 130/705H | 60-70 | Cotton sewing thread | 120-100 |
| Voile, poplin, crepe, taffeta, silks, cotton, underwear, lace | Medium-fine | 130/705H | 70 | Cotton sewing thread | 100 |
| Crepe, poplin, gingham, taffeta, satins, cottons and woollen clothing, shirts, blouses, dresses, linings, velvet | Medium | 130/705H | 80 | Cotton sewing thread | 100-60 |
| Woollen clothing, dresses, skirts, coats, tweed, sheets, linens, gabardines, overalls, jeans | Medium/thick | 130/705H-J | 80-90 | Cotton sewing thread | 80-40 |
| Heavy canvases, thick woollens, blankets, gabardines, coats, clothing and upholstery fabrics, work clothes, overalls, jeans | Thick | 130/705H-J | 90-100 | Cotton sewing thread | 40 |
| Soft leathers | | I30/705H-LR | 90-100 | Cotton sewing thread | 60 |
| Suede, calfskin, kidskin | | 130/705H-LR | 90-100 | Cotton sewing thread | 60 |
| Leathers, elastics, faux leathers | Faux leather, plastics. | | 130/705H-LL | 90-100 | Cotton sewing thread | 60-40 |
| Vinyl type | | 130/705H-LL | 80-100 | Cotton sewing thread | |
| Oilcloth | | 130/705H-LL | 80-100 | Cotton sewing thread | 60-40 |
| Knitwear, stretch | Knitwear, jerseys, underwear | Fine | I30/705H-S | 80-90 | Cotton sewing thread | 80 |
| Jersey, stretch velvet, interlock, medium knits, corsets | Medium | 130/705H-S | 60-100 | Cotton sewing thread | 80-90 |
| Jersey and stretch clothing, chunky knitwear, knits, hosiery, elastic materials | Medium/thick | 130/705H-SUK | 60-80 | Cotton sewing thread | 90-100 |
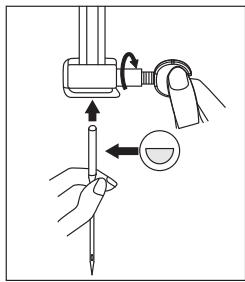
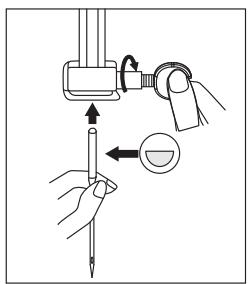
Changing or replacing the needle
Replace needles regularly, especially when they show signs of wear or start causing problems.
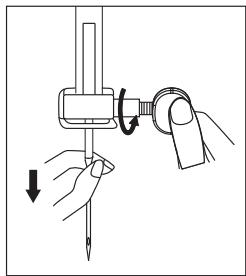
- Set the on/off switch to "OFF" and unplug the machine from the mains socket.
- Loosen the needle clamp screw by turning it anticlockwise.
- Remove the needle. Dispose of it if it is bent, worn or damaged.
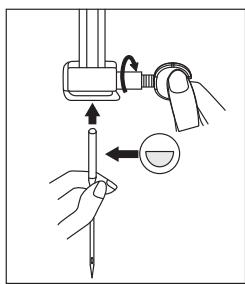
- Insert the new needle as high as possible with the flat side facing the back of the machine.
- Tighten the needle clamp screw to hold the needle in place.
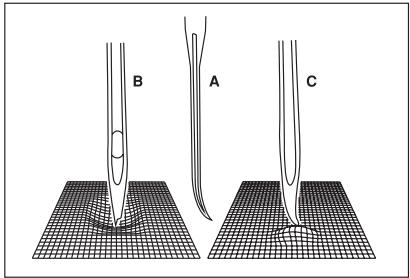
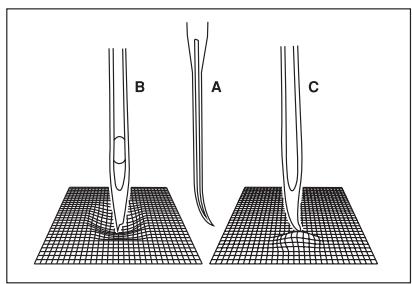
The needles must be in a perfect condition.
Problems can arise with: A. Bent needles. B. Damaged tips. C. Blunt needles.
natural_image
Illustration of a hand holding a tool with a circular component and directional arrows indicating motion (no text or symbols)
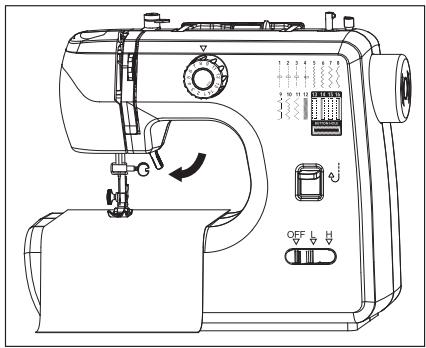
The presser foot lifter is located inside area “C” of the machine. Use this lever to raise and lower the presser foot.
- Before threading the machine, always raise the presser foot lifter to make sure that the machine can be threaded correctly.
- Raise the presser foot lifter to remove the fabric from the machine once you have finished sewing it.
- Once the fabric has been positioned underneath the presser foot, lower the presser foot once more to start sewing.
- Set the on/off switch to "OFF" and unplug the machine from the mains socket.
• Turn the handwheel toward you (anticlockwise) to raise the needle to its highest position.
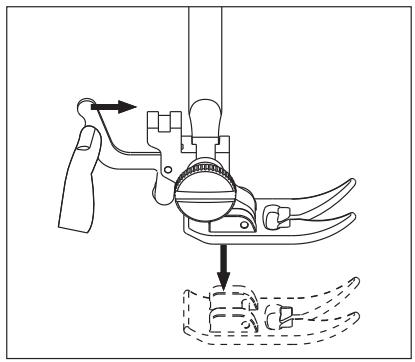
• To remove the presser foot:
Raise the presser foot lifter. Press the presser foot release lever on the back of the presser foot holder to release the presser foot.
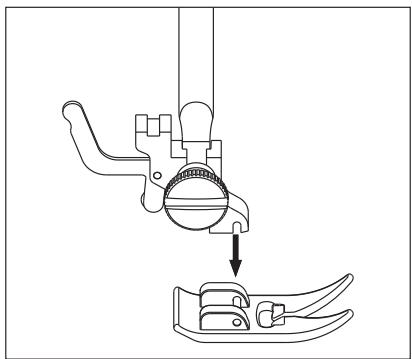
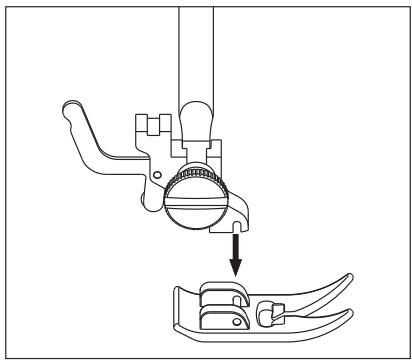
• To install the presser foot:
Raise the presser foot lifter. Position the presser foot by aligning it under the presser foot holder. Lower the presser foot lifter until the presser foot holder's cut-out is positioned directly above the pin. The presser foot will automatically engage.
natural_image
Technical line drawing of a mechanical device with a tool and base, showing motion direction (no text or symbols)
natural_image
Technical line drawing of a mechanical device with a downward arrow indicating process (no text or symbols)
Threading the machine
The bobbin is located at the bottom of your machine and provides the lower thread for your stitches.
This sewing machine uses metal bobbins. The bobbin case is magnetised. Use the metal bobbin to obtain the correct tension for the bobbin thread. Always use 15K-type metal bobbins.
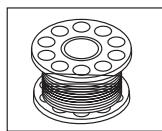

Important: Only use metal bobbins in this sewing machine. The bobbin thread is magnetically tautened. Therefore, a metal bobbin is required. Should transparent or plastic bobbins be used - even if they seem to fit into the machine - the machine will not be able to operate properly and unsatisfactory stitches will be obtained. Using metal bobbins will result in correct stitches.
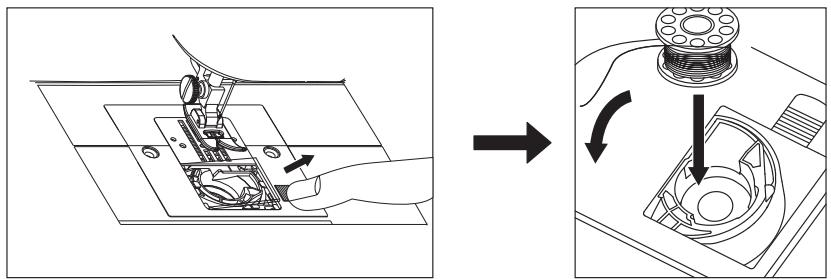
Winding the bobbin
- Make sure the on/off switch is set to "OFF".
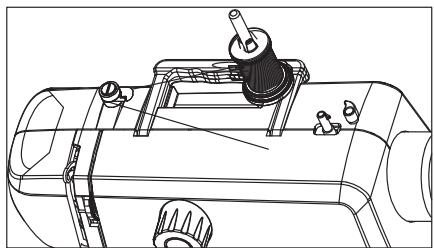
- Insert the spool base, spool of thread and spool cap onto the spool pin.
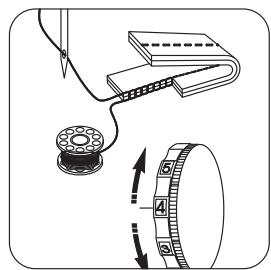
- The thread should face the back of the spool. Make sure that when the thread is pulled from the left, the spool of thread turns anticlockwise as shown.
natural_image
Technical line drawing of a mechanical device with rotating components and directional arrows (no text or symbols)
- Pass the thread under the slot to the right of the thread guide, then through it; next, wrap the thread around the tension guide and pull the thread to the right as shown.
natural_image
Pure mechanical diagram showing a rotating component with directional arrows, no text or symbols present
natural_image
Technical line drawing of a mechanical device with no visible text or symbols
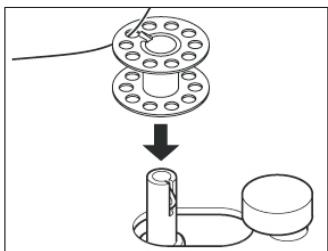
- Pass the thread through an upper hole in the bobbin from the inside to the outside. Then place the bobbin on the bobbin winder and push it in until it clicks into place.
natural_image
Diagram showing a mechanical assembly with a flange and a cylindrical component, no text or symbols present.
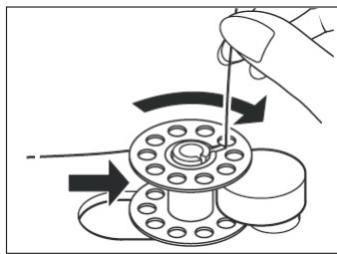
- Firmly push the bobbin winder and bobbin to the right, against the bobbin winder stopper.
natural_image
Diagram of a hand turning a flange with arrows indicating rotation direction (no text or symbols)
- Hold the end of the thread and step on the foot control to wind the bobbin a few turns. Remove your foot from the pedal to stop winding. Release the end of the thread and cut it near the top of the bobbin.
B
Product usage
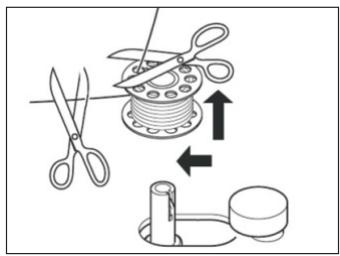
- Step on the foot control again to continue winding the bobbin. Winding stops automatically when the bobbin is full. You can also stop winding when you have wrapped enough yarn for your project.
- Take your foot off the pedal to stop the machine.
- Push the bobbin winder to the left, cut the thread and remove the threaded bobbin.
Inserting the bobbin
- Make sure the on/off switch is set to "OFF".
- Push the bobbin cover release button to the right to remove the cover.
- Hold the bobbin with the thread unwinding anticlockwise and place it in the bobbin case.
- Pull the end of the thread to make sure the bobbin turns anticlockwise. If the bobbin turns clockwise, it has been incorrectly positioned. Remove the bobbin, turn it over and reinsert it into the bobbin case. Pull on the end of the thread to check once more.
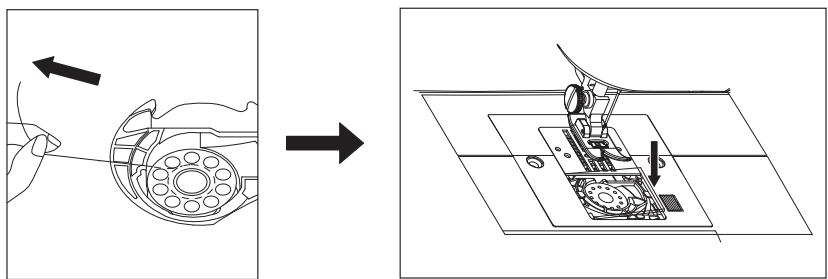
- Follow the below-indicated sections to thread the upper thread and pull the bobbin thread.
Threading the upper thread
Threading the upper thread is a straightforward process, but it must be done correctly to achieve correct sewing results. Follow the steps below and refer to the numbered upper threading-related diagrams, which are indicated on your machine.
- Set the on/off switch to "OFF" and unplug the machine from the mains socket.
- Raise the needle to the highest position by turning the handwheel towards you (anticlockwise) and keep turning it until the needle starts to descend.
- Raise the presser foot lifter to release the tension on the machine.

Important: If the presser foot lifter is not raised before being thread, it will cause the thread to jam under the fabric when you start to sew.
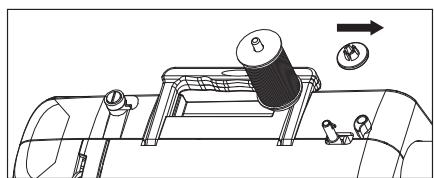
- Raise the spool pin and insert the spool base, spool of thread and spool cap. The thread should be facing backwards. Gently pull the thread from the left to make sure that the spool of thread turns anticlockwise as shown.
natural_image
Technical line drawing of a mechanical device with no visible text or symbols
natural_image
Diagram of a mechanical device with rotating components and directional arrows (no text or symbols)
natural_image
Technical line drawing of a mechanical device with no visible text or symbols
• If the spool of thread is small enough, the spool pin can be lowered to a horizontal position.

Note: If the spool of thread is frayed at one end, position that end to the right to prevent the thread from getting caught whilst sewing.
- If the spool of thread is large and cannot fit over the spool pin in the horizontal position, lift the spool pin up into the vertical position. When using the vertical position, slightly loosen the spool cover or remove it completely from the spool pin, so that it won't prevent the spool from rotating whilst sewing.
natural_image
Technical line drawing of a mechanical device with no visible text or symbols

natural_image
Technical line drawing of a mechanical assembly with no visible text or symbols
- Whilst firmly holding the spool of thread on the spool pin with your right hand, start threading the upper thread with your left hand as follows:
1) Pass the thread under the slot to the right of the thread guide, then through it; next, wrap the thread around the tension guide as shown.
natural_image
Pure mechanical diagram showing a rotating component with directional arrows, no text or symbols present
2) Pull the thread downwards and insert it into the groove on the right of the front panel to pass the thread between the tension discs.
natural_image
Technical line drawing of a mechanical component with directional arrows indicating motion (no text or symbols)
3) Make a U-turn around the bottom of the panel.
natural_image
Line drawing of a hand holding a tool interacting with a mechanical component (no text or symbols)
4) Pass the thread through the take-up lever from right to left. If you cannot see the take-up lever, turn the handwheel towards you (anticlockwise) to raise the take-up lever to the highest position.
natural_image
Line drawing of a hand holding a knuckle, with a black arrow indicating direction (no text or symbols)
5) Pass the thread through the thread guide above the needle.
6) Then thread the thread through the eye of the needle from front to back.
natural_image
Diagram of a mechanical tool or device with a pointed tip and directional arrows indicating motion (no text or symbols)
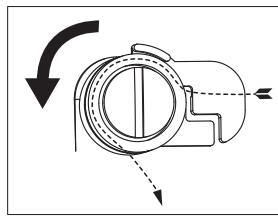
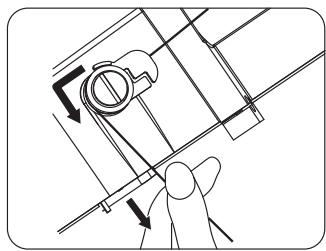
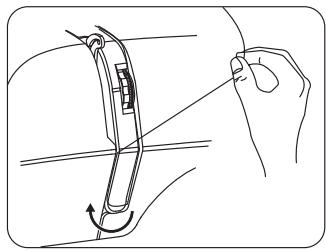
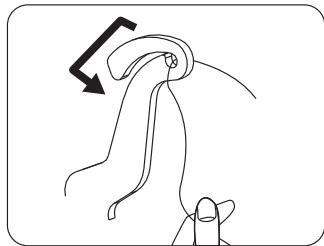
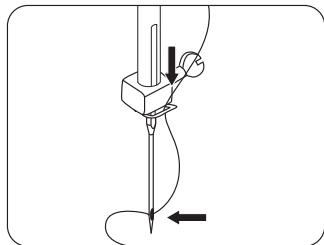
Pulling the bobbin thread (lower thread)
After threading the upper thread and inserting the bobbin, the bobbin thread must be pulled out before the sewing process can begin.
- Make sure that the on/off switch is set to "OFF" and the machine is unplugged from the mains socket.
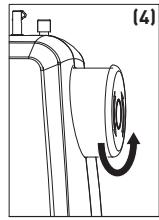
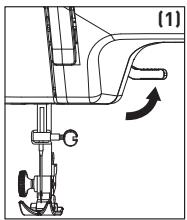
- Raise the presser foot lifter (1).
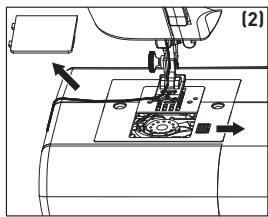
- To open the bobbin cover, push the bobbin cover release button to the right (2).
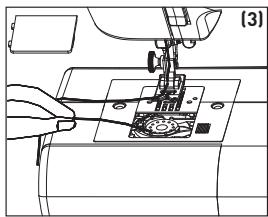
- Insert the threaded bobbin into the bobbin case, leaving the tail of the thread on the left. Make sure that the bobbin turns anticlockwise (3) when pulling the thread from the left.
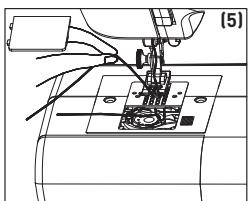
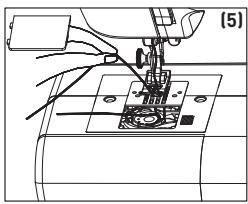
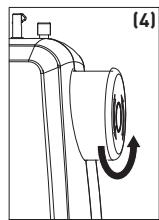
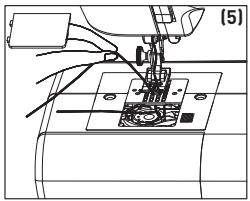
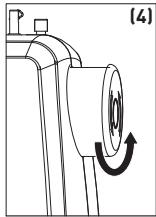
- Hold the upper thread with your left hand and turn the handwheel towards you (anticlockwise) with your right hand to lower the needle (4) (5). Keep turning it until the needle rises to the highest position.
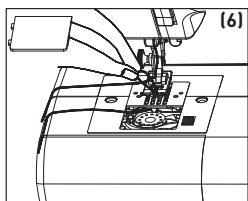
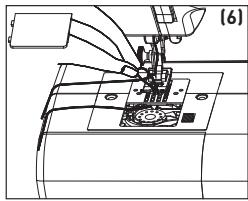
- Pull the upper thread upwards to pull the bobbin thread through the throat plate (6).
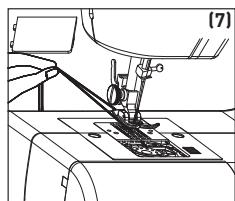
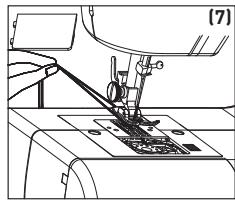
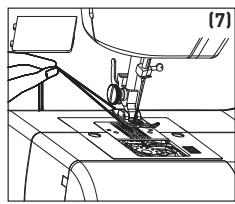
- Pull both threads through the throat plate and position them under the presser foot (towards the rear of the machine), leaving a thread tail of approx. 15 cm for both threads (7).
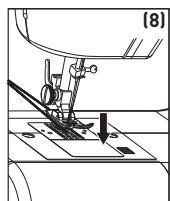
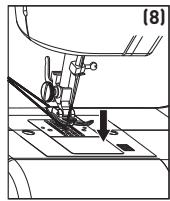
- Close the bobbin cover (8).
natural_image
Line drawing of a sewing machine needle stitching a small mechanical component (no text or symbols)

natural_image
Technical line drawing of a mechanical component with an arrow indicating rotational motion (no text or symbols)
natural_image
Mechanical assembly diagram showing a sewing machine needle inserted into a workpiece (no text or symbols visible)

natural_image
Technical line drawing of a sewing machine needle and base mount (no text or symbols)

natural_image
Technical line drawing of a sewing machine needle and base (no text or symbols)

natural_image
Mechanical sewing machine diagram showing needle insertion and base alignment (no text or symbols)
Thread tension
After having selected the correct needle and thread combination for the fabric being used, you may need to adjust the sewing machine's tension in order to ensure the correct stitch balance. A stitch is well balanced when the upper and lower threads appear the same on the fabric. Your machine is equipped with an adjustable thread tension dial. It allows tension to be exerted on the upper and lower threads as they pass through the machine to form a stitch.
Too much tension will produce a tight stitch which will cause the fabric to pucker.
Too little tension will produce a loose stitch.
When a uniform tension is exerted on the two threads, a regular stitch, i.e. a well-balanced one, is obtained.
The machine's thread tension dial is numbered 1 through 9, and settings 3, 4 and 5 are marked with a small square around the number to indicate the adjustment range at which most of your stitches will be made.
How does the tension work?
To help you understand the role tension plays on fabrics and threads, try this simple test.
Take 2 pieces of a medium-weight woven fabric - in a solid, light colour - that measure approx. 15 cm long.
Place a size 14 needle in the machine.
Thread the top of the machine with an all-purpose thread (darker colour) and put the same type of thread (lighter colour) in the bobbin.
Set the machine to stitch No. 3; one of the straight stitch options.
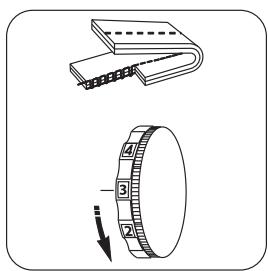
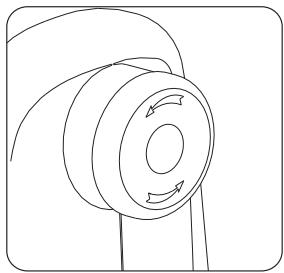
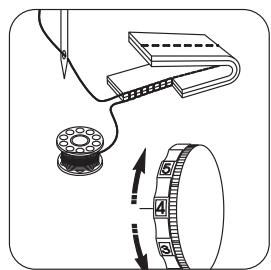
Sew the two pieces of fabric together, starting with an upper thread tension set to 1. Whilst sewing, slowly turn the tension dial from 1 to 9.
Sew another row by returning the handwheel to 1. You should see a balanced stitch on each row halfway between the start and end.
The different-coloured threads will allow you to see the effect that tension has on the upper and lower threads.
natural_image
Illustration of two mechanical components: a closed notebook and a ring with a curved arrow indicating rotation (no text or symbols)
Too much tension

Not enough tension
Well-balanced stitches
Tension test
To check that the upper thread has been properly threaded through the tension discs, perform this simple test:
- With the presser foot raised and the thread removed from the needle, pull the thread towards the back of the machine. You should only detect slight resistance and little or no needle deflection.
- Now lower the presser foot and pull the thread back towards the back of the machine. This time you should detect considerable resistance and much more needle deflection. If you do not detect any resistance, it means that you have not threaded the machine correctly and will need to rethread it.
Sewing
Types of sewing-suitable fabrics
| Fabric characteristics\Fabric | Sewing features |
| Fabric | Cotton/Linen | Silk/Wool | Polyester |
| Standard | | √ | √ | √ |
| Thick | | √ | √ | √ |
| Fine | | √ | × | × |
| Hard | | √ | √ | √ |
| Soft | | × | × | × |
Sewing features:
√ = Easy to sew
x = Difficult to sew
= Not ideal for a fluid stitch
NOTE:
- Fabric thickness definition:
Fine: Thickness of two layers of fabric = < 0.35 mm.
Thick: Thickness of two layers of fabric = > 0.8 mm.
Standard: Thickness of two layers of fabric = ≥ 0.35 mm and ≤ 0.8 mm.
- Definition of stretch fabric:
If a piece of fabric measuring "100 mm x 30 mm" can be stretched up to 106 mm or more under a tensile force of 0.5 kg, the fabric is defined as stretch; if not, it is a non-stretch fabric.
- Fabric textures:
Soft: Fabrics such as towels, feather dusters, etc.
Hard: Fabrics such as jeans, fine canvas, etc.
Choosing a stitch type
Use the stitch selection dial to choose the desired stitch type. The numbers on the dial directly correspond to the designs printed on the front of the machine. Simply rotate the dial until the desired stitch number lines up with the red dot on the dial.
| Stitch number | Stitch name | Use | Recommended foot |
| 1 | Short straight stitch | For sewing lightweight fabrics | All-purpose foot |
| 2 | Medium straight stitch | For sewing medium-weight fabrics | All-purpose foot |
| 3 | Long straight stitch | For sewing heavier fabrics | All-purpose foot |
| 4 | Straight stitch in left position | Topstitching | All-purpose foot |
| 5 | Satin zigzag stitch | For sewing appliqués and decorative stitching | Satin stitch foot* |
| 6 | Short zigzag stitch | For finishing seams and decorative stitching | Satin stitch foot* |
| 7 | Medium zigzag stitch | For finishing seams and decorative stitching | Satin stitch foot* |
| 8 | Long zigzag stitch | For finishing seams and decorative stitching | Satin stitch foot* |
| 9 | Blind hem | For hems on woven fabrics; decorative stitching | Blind hem foot* |
| 10 | Long blind hem | For hems on woven fabrics; decorative stitching | Blind hem foot* |
| 11 | Stretch blind hem | For hems on stretch knits; decorative stitching | Blind hem foot* |
| 12 | Multiple zigzag stitch | For mending, inserting elastic and decorative stitching | Satin stitch foot* |
| 13 | Sewing buttonholes | 1^st step of sewing a buttonhole | Buttonhole foot |
| 14 | Sewing buttonholes | 2^nd step of sewing a buttonhole |
| 15 | Sewing buttonholes | 3^rd step of sewing a buttonhole |
| 16 | Sewing buttonholes | 4^th step of sewing a buttonhole |

*N.B.: This stitch can be created with the all-purpose foot; however, you will get a better result with the aforementioned specific foot (not supplied).
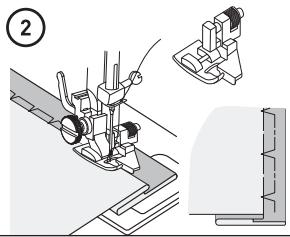
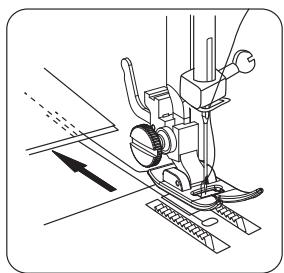
Straight stitch
The straight stitch is the stitch most frequently used for all types of sewing.
- To start sewing, first raise the presser foot lifter.
- Pull the upper thread and bobbin thread under the presser foot towards the back of the machine, leaving approx. a 15 cm tail of excess thread at the end.
- Place the fabric under the presser foot and then lower the presser foot lifter.
- Rotate the handwheel towards you (anticlockwise) until the needle penetrates the fabric.
- Start the machine by pressing the foot control. Guide the fabric with your hands. When you reach the edge of the fabric, stop the sewing machine.

WARNING!
Do not pull or push the fabric while sewing, as this may cause the needle to deflect and break.
- Turn the handwheel towards you (anticlockwise) until the needle is in the highest position, and then raise the presser foot lifter.
- Pull the fabric backwards and cut the excess thread with the thread cutter located on the side of the machine.
Reverse stitch
Reverse stitches are usually performed at the start and end of a seam. The goal is to block the threads at both ends of the seam so that it doesn't come undone.
B
Product usage
- Set the stitch selection dial to a straight stitch (stitches No. 1-4), depending on the fabric being sewn.
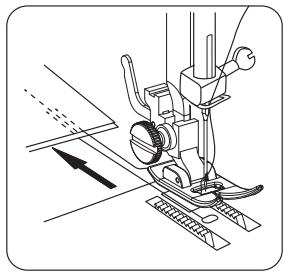
- Position the fabric under the presser foot, just level with the inside of the fabric's top raw edges.
- Lower the presser foot and sew approximately 3 stitches.
- Stop sewing, then hold down the reverse lever, located at the front of the machine. Keep it pressed while you reverse stitch 3 stitches.

Note: The reverse stitch length is pre-set, regardless of the selected stitch.
- Release the reverse lever and sew forwards again, until you reach the opposite end of the fabric.
- Hold the reverse lever down to sew approx. 3 reverse stitches again.
- Release the lever to sew forwards again until you reach the end of the fabric.
- Raise the presser foot lifter, then remove the fabric from the machine.
natural_image
Technical line drawing of a mechanical assembly with no visible text or symbols

natural_image
Pure mechanical diagram showing a rotating component with curved arrows indicating rotation direction (no text or symbols)

natural_image
Line drawing of a sewing machine needle and fabric being sewn, no text or symbols present
natural_image
Simple line drawing of a finger pressing a button with an arrow indicating rotation (no text or symbols)
natural_image
Technical line drawing of a sewing machine needle with no visible text or symbols
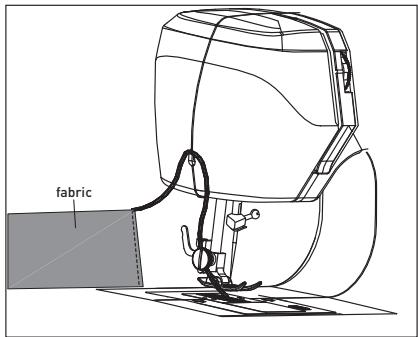
Cutting threads
To cut the ends of the thread, hold the fabric in your left hand. Bring the thread back from the back of the machine, then thread the ends of the thread through the thread cutter on the side of the machine. Pull down until the threads are cut.
Zigzag stitch
The zigzag stitch can be used for finishing seams, appliqués or decorative stitching.
Finishing seams
The edges of the seams support the garment and should have a durable finish, especially if the fabric is prone to fraying.
Seams can be finished in two different ways: Trimmed after sewing the edge of the seam or overlocked. Try these techniques on a scrap piece of fabric first to determine which method is right for your project.
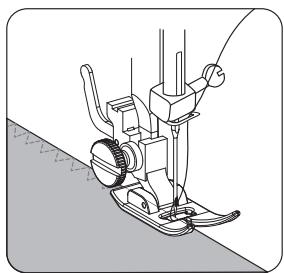
1. Overlocked seam finish
- Set the machine to stitch No. 5 or 6 and attach the satin stitch foot (not supplied).
- Then sew with the right side of the stitch at the edge of the seam. Evenly trim the seam edges.
natural_image
Line drawing of a sewing machine needle and foot (no text or symbols)
2. Decorative stitching
You can add a personal touch or spruce up your projects with decorative threads. Mix different types and colours of thread to create trim-like finishes on clothing, home décor items, crafts projects and more.
- Set the machine to stitch No. 7 or No. 8, depending on the style you are looking for.
B Product usage
- Attach the satin stitch foot (not supplied).
- If you are using thicker thread (like topstitching thread), be sure to change the needle to a larger size needle as well.
Appliqués
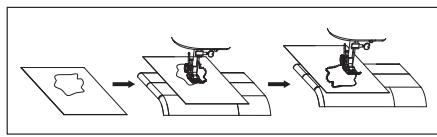
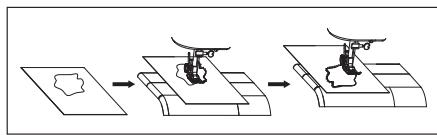
Appliqués are made by sewing pieces of certain-shaped fabric onto a base fabric to form a design or pattern. This technique offers unlimited creative possibilities.
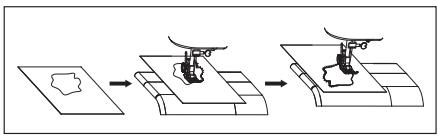
1. Preparing appliqués
- Apply iron-on tape with a paper backing to the back of the appliqué fabric, according to the manufacturer's recommendations.
- Outline the shape of the appliqué, then cut this shape out of the fabric that was fused to the iron-on tape.
- Remove the paper from the back of the tape. Position the appliqué on the base fabric, then fuse them into place.
2. Sewing appliqués
- Set the machine to stitch No. 5: the satin zigzag stitch.
- To sew the appliqué, sew it in such a way that the right side of the stitch falls from the outer edge of the appliqué, thus enclosing the fabric's raw edge. The left side of the stitch will enter the appliqué fabric.

flowchart
graph TD
    A["Star-shaped Object"] --> B["CLOUD Shape"]
flowchart
graph LR
    A["Initial Drawing"] --> B["Assembly"]
    B --> C["Final Assembly"]
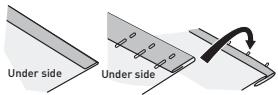
Blind hem
The blind hem stitch is mainly used to create seemingly invisible hems on various types of projects, such as curtains, trousers, skirts, etc. There are two different blind hem stitch types to choose from on the machine: standard blind hem stitch (for hems on woven fabrics) and stretch blind hem stitch (for hems on stretch fabrics).
- Set the machine to stitch No. 9 for the standard blind hem stitch or to stitch No. 11 for the stretch blind hem stitch.
- Attach the blind hem foot (not supplied).
- Insert the appropriate needle for the fabric being hemmed ( “Needle, fabric and thread guide”).
- Thread the top of the machine and the bobbin with a thread colour that closely matches or blends with the colour of the item being hemmed.
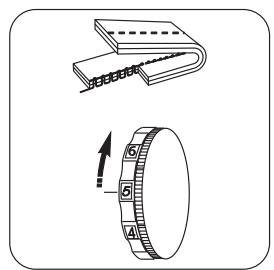
- Fold and pin the fabric, as shown (1).
- Place the fabric under the blind hem presser foot (not supplied) with the fold of the fabric positioned in such a way that the needle only pierces the fold when the needle passes to the left. Make sure to remove the pins as you sew (2).
- When you have finished, fold the hem and press (3).
①
③

Multiple zigzag stitch
The multiple zigzag stitch is an ultra-versatile stitch. Use it for mending, inserting elastic or simply as a decorative embellishment.
Repairing a tear
- Set the machine to stitch No.12 and attach the satin stitch foot (not supplied).
• Cut any loose threads from the torn area.
- To reinforce the torn area, place interfacing or a small scrap of fabric (a similar fabric and colour) underneath the tear.
• Work from the right side to bring the edges of the tear together, and then sew them.
- Use a hand sewing needle to pull the threads on the wrong side, then tie them off and cut them.
• Cut off the excess underlay.
Inserting elastic
It is easy to insert a piece of elastic using the multiple zigzag stitch. As these stitches are very elastic, they are not prone to break when the elastic is stretched.
- Set the machine to stitch No.12 and attach the satin stitch foot (not supplied).
- If you are repairing a garment with a broken elastic, first remove the old elastic from the garment, then press down.
- Divide the elastic and the area of the garment in which the elastic will be sewn into four parts. Place a pin at these four parts on the elastic and the garment.
• Gently pull the elastic to evenly cover the fabric as you sew.
- Attach the buttonhole foot.
- Place the fabric under the buttonhole foot and lower the foot onto the fabric at the point you would like to sew the buttonhole.
- Select stitch No. 13. Step on the foot control to sew 5-6 stitches at a slow speed, then release the foot control to stop (Fig. a).
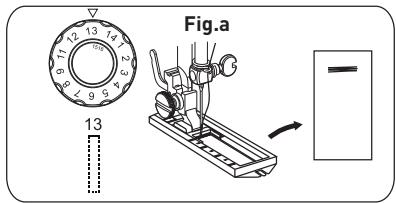
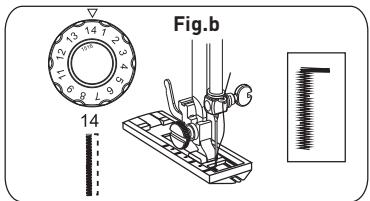
- Select stitch No. 14. Step on the foot control to sew the correct length of stitches on the fabric, then release the foot control. Make sure the stitch is straight. (Fig. b).
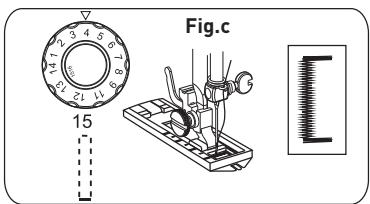
- Select stitch No. 15. Step on the foot control to sew 5-6 stitches at slow speed, then release the foot control (Fig. c).
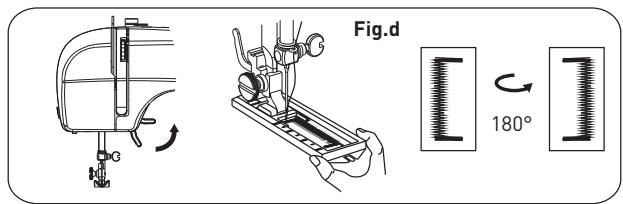
- Raise the presser foot lifter and rotate the fabric 180^ (Fig. d).
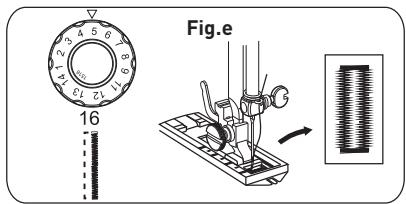
- Select stitch No. 16. Lower the presser foot lifter and step on the foot control to finish sewing the buttonhole. (Fig. e).
Cleaning and maintenance

CAUTION!
- Always turn off and unplug the unit from the mains socket before cleaning it.
- To avoid all electricity-related risks, never immerse the unit, cable, power plug or foot control in water or any other liquid. Never rinse them under a tap.

Important: Do not use solvents, chemical or abrasive cleaning products, wire brushes, sharp objects or scouring pads to clean the unit.
- Clean the machine with a soft, dry cloth.
- Open the bobbin cover, take out the bobbin and use a small brush to clean the bobbin case. Close the cover again.
- Do not expose the machine to high temperatures.
- Do not drop the machine.
- Change the accessories as described in this user manual.
- Always ensure that the accessories have been correctly installed before plugging in the machine.
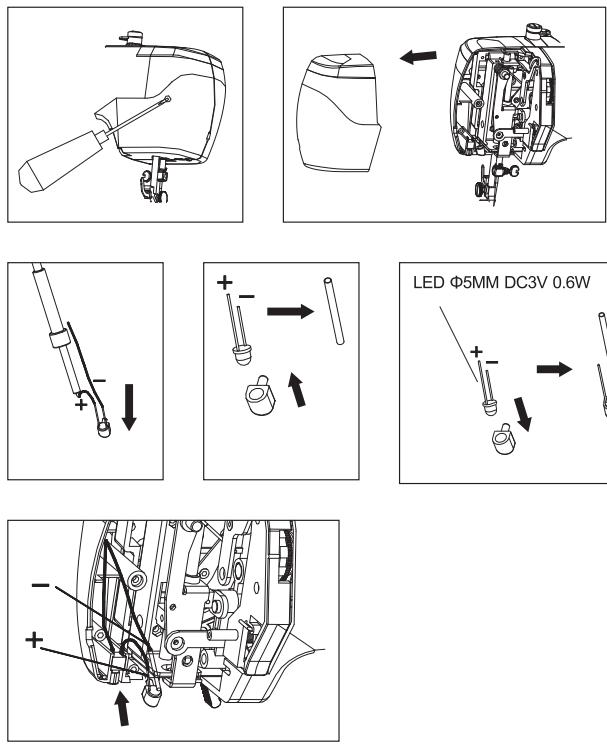
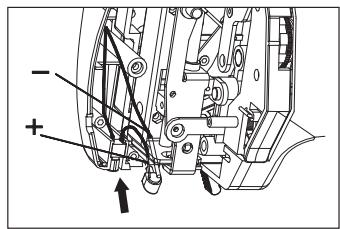
Replacing the sewing light

DANGER!
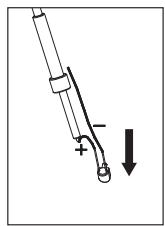
Before replacing the sewing light, unplug the machine from the mains socket to avoid an electric shock.
- Unplug the machine from the mains socket.
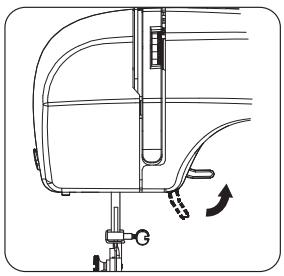
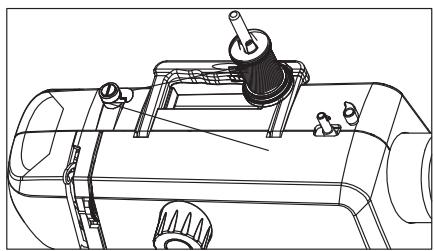
- Loosen the screw on the back of the front cover as shown.
- Close the front cover.
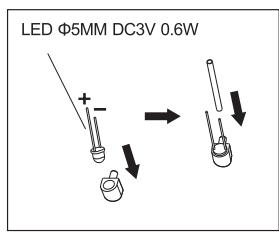
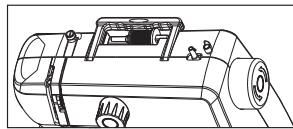
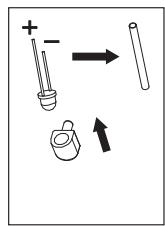
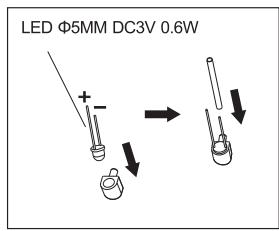
- Observe the LED bulb's + and - connections, then remove it.
- Replace the LED bulb with a bulb with the same rated power ( ≤slant 0.6 W and LED voltages ≤slant 3.2 V, LED 5 mm).
6. Close the front cover and tighten the screw.
Troubleshooting
Follow this troubleshooting guide to resolve common issues. If the problem persists, do not use the unit and contact an authorised repair centre to have it inspected or repaired.
| Problem | Possible Cause | Solution |
| No power or the machine is idling. | The AC adapter is not suitable. | Use the power adapter supplied with this unit. |
| Stitches are being skipped. | Needle incorrectly inserted.The needle is bent.The presser foot is too loose. | Remove and reinsert the needle with the flat side facing backwards.Replace it with a new needle.Retighten the presser foot. |
| The bobbin thread cannot be pulled out. | The bobbin is empty.The needle has been incorrectly threaded. | Replace it with a full bobbin.Thread the needle from front to back again. |
| The thread keeps breaking. | The needle is bent.The needle shaft is not properly seated.The thread tension dial, thread guide or thread take-up bar is too tight. | Replace it with a new needle.Replace it with a new needle.Release the thread tension by selecting a number between 3 and 5. |
| The stitches are too loose or irregular. | The stitch tension is unbalanced. | Thread the upper thread and the bobbin thread again. |
| The needle is breaking. | The needle is bent or warped. | Replace it with a new needle. |
Why is the thread making loops or folds under my fabric?
When the thread loops under your fabric, it is usually because it has not been threaded properly or there is an incorrect upper thread tension. In this case, follow these steps:
- With the presser foot lifter raised and the thread tension dial set to 4, re-thread the upper thread according to the threading diagrams indicated on your machine: Place the spool of thread on the spool pin and secure it with the thread spool cap. Whilst holding the spool of thread in place with your right hand, use your left hand to hold the thread and pass it through the thread guide, then follow the thread path, bringing the thread down through the tension channel, around the bottom of the machine and up the other side. Continue to thread the machine, but do not thread the thread through the needle.
- Before threading the thread through the needle, perform this simple test to make sure that the upper thread has been threaded correctly. While the presser foot is raised, pull the thread. It should be easy to pull. Then lower the presser foot. The thread should now resist when you pull it. There should be a significant increase in thread tension. If there is no more tension, the upper thread is threaded incorrectly. Try again ( “Threading the upper thread”).
Why is my machine skipping stitches?
Stitches may be skipped if the needles are dull or damaged, or if they have been incorrectly inserted in the machine.
- First, check whether the needle is dull or damaged, and replace it if necessary. Furthermore, make sure that you are using the correct needle size for the type of fabric being sewn ( "Needle, fabric and thread guide").
C
Cleaning and maintenance
- Then check that the needle is correctly inserted. The needle should be pushed as high as possible. It's easy to insert the needle halfway, tighten it and think that it's been properly installed. In addition, the flat side of the needle should be positioned backwards. If the needle is not inserted correctly, it will not be able to pull the bobbin thread, thus resulting in stitches being skipped.
Storage
• Always unplug the unit before storing it.
- Store the unit in a fresh, dry and dust-free place, out of the reach of children and pets.
- Please retain the packaging and use it to store your unit when it is not in use for an extended period of time.
Bedankt!
natural_image
Line drawing of a sewing machine with no visible text or symbols
natural_image
Technical line drawing of a mechanical device with no visible text or symbols
natural_image
Technical line drawing of a sewing machine with a side view showing internal components and a directional arrow (no text or symbols)

natural_image
Line drawing of a sewing machine with no visible text or symbols

OPGELET!
natural_image
Illustration of a hand holding a tool with a circular knob and arrow indicating rotation (no text or symbols)

Persvoethendel

natural_image
Technical line drawing of a mechanical device with a downward arrow indicating process (no text or symbols)
natural_image
Technical line drawing of a mechanical device with rotating components and directional arrows (no text or symbols)
natural_image
Mechanical component diagram showing rotational and linear motion directions (no text or symbols)
natural_image
Technical line drawing of a mechanical device with no visible text or symbols
B
natural_image
Diagram showing a mechanical assembly with a flange and a cylindrical component, no text or symbols present.
natural_image
Diagram of a hand turning a mechanical component with arrows indicating motion (no text or symbols)
De spoel aanbrengen
natural_image
Technical line drawing of a mechanical device with no visible text or symbols

natural_image
Diagram of a mechanical device with rotating components and directional arrows (no text or symbols)
natural_image
Technical line drawing of a cylindrical mechanical component with mounting flanges and internal components (no text or symbols)
natural_image
Technical line drawing of a mechanical device with no visible text or symbols
natural_image
Technical line drawing of a mechanical assembly with no visible text or symbols
natural_image
Pure mechanical diagram showing a rotating component with directional arrows, no text or symbols present
natural_image
Technical line drawing of a mechanical component with directional arrows indicating motion (no text or symbols)
natural_image
Line drawing of a hand holding a tool interacting with a mechanical component, showing motion arrows (no text or symbols)
natural_image
Simple line drawing of a folded ribbon or rope with a hand holding the tip (no text or symbols)
natural_image
Diagram of a mechanical tool or screw with a curved base and directional arrows indicating movement (no text or symbols)
natural_image
Line drawing of a sewing machine needle stitching a small component (no text or symbols visible)
natural_image
Technical line drawing of a mechanical component with an arrow indicating rotational motion (no text or symbols)
natural_image
Line drawing of a sewing machine needle stitching a small component (no text or symbols)
natural_image
Technical line drawing of a sewing machine needle and base mount (no text or symbols)
natural_image
Technical line drawing of a sewing machine needle and foot (no text or symbols)
Draadspanning
Te veel spanning

Te weinig spanning
natural_image
Technical line drawing of a mechanical assembly with no visible text or symbols

natural_image
Pure mechanical diagram showing a rotating component with curved arrows indicating motion (no text or symbols)

natural_image
Line drawing of a sewing machine needle stitching fabric (no text or symbols)

natural_image
Simple line drawing of a hand pressing a button with an arrow indicating rotation (no text or symbols)

natural_image
Technical line drawing of a sewing machine with measurement tools and a pointer (no text or symbols)
natural_image
Line drawing of a sewing machine needle and foot (no text or symbols)
flowchart
graph TD
    A["Star-shaped Object"] --> B["CLOUD Shape"]
flowchart
graph LR
    A["Single outline"] --> B["Mechanical assembly with central component"]
    B --> C["Final assembly with two components"]
Blinde zoom

③

Meervoudige zigzagsteek
natural_image
Line drawing of a sewing machine with no visible text or symbols
natural_image
Technical line drawing of a mechanical component (no text or symbols)


natural_image
Technical line drawing of a sewing machine with a side view showing internal components (no text or symbols)
natural_image
Line drawing of a sewing machine with no visible text or symbols

¡ATENCIÓN!
¡ADVERTENCIA!
natural_image
Illustration of a hand holding a tool with a circular knob and arrow indicating rotation (no text or symbols)

natural_image
Technical line drawing of a mechanical device with a tool and base, showing motion direction (no text or symbols)

natural_image
Technical line drawing of a mechanical device with a downward arrow indicating process (no text or symbols)
natural_image
Technical line drawing of a mechanical device with rotating components and directional arrows (no text or symbols)
natural_image
Pure mechanical diagram showing a rotating component with directional arrows, no text or symbols present

natural_image
Technical line drawing of a mechanical device with no visible text or symbols
natural_image
Diagram showing a mechanical assembly with a flange and a cylindrical component, no text or symbols present.
natural_image
Diagram of a hand turning a flange with arrows indicating rotation direction (no text or symbols)
natural_image
Technical line drawing of a mechanical device with no visible text or symbols
natural_image
Diagram of a mechanical device with a lever and adjustment mechanism (no text or symbols)
natural_image
Technical line drawing of a mechanical device with no visible text or symbols
natural_image
Technical line drawing of a mechanical device with no visible text or symbols
natural_image
Technical line drawing of a mechanical assembly with no visible text or symbols
natural_image
Pure mechanical diagram showing a rotating component with directional arrows, no text or symbols present
natural_image
Technical line drawing of a mechanical component with directional arrows indicating motion (no text or symbols)
natural_image
Line drawing of a hand holding a tool interacting with a mechanical device (no text or symbols)
natural_image
Simple line drawing of a rope being twisted with a hand, no text or symbols present
natural_image
Diagram of a mechanical tool or screw with a curved base and directional arrows indicating movement (no text or symbols)
natural_image
Line drawing of a sewing machine needle stitching a small mechanical component (no text or symbols)
natural_image
Technical line drawing of a mechanical component with an arrow indicating rotational motion (no text or symbols)

natural_image
Mechanical assembly diagram showing a sewing machine needle inserted into a workpiece (no text or symbols visible)

natural_image
Technical line drawing of a sewing machine needle and base mount (no text or symbols)
natural_image
Technical line drawing of a sewing machine needle and base (no text or symbols)

natural_image
Mechanical sewing machine diagram showing needle insertion and base alignment (no text or symbols)
Tensión del hilo
natural_image
Illustration of two mechanical components: a closed notebook and a ring with a curved arrow indicating rotation (no text or symbols)
Tensión excesiva

natural_image
Technical line drawing of a mechanical device with no visible text or symbols
natural_image
Pure mechanical diagram showing a rotating component with curved arrows indicating rotation (no text or symbols)

natural_image
Line drawing of a sewing machine needle and foot (no text or symbols)
natural_image
Simple line drawing of a hand pressing a button into a rounded rectangular frame (no text or symbols)
natural_image
Technical line drawing of a sewing machine needle and foot (no text or symbols)
Corte del hilo
natural_image
Line drawing of a sewing machine needle and foot (no text or symbols)
2. Costura decorativa
flowchart
graph TD
    A["Single Shape"] --> B["Arrow"]
    B --> C["Final Shape"]
flowchart
graph LR
    A["Initial Drawing"] --> B["Assembly"]
    B --> C["Final Assembly"]

③
natural_image
Technical line drawing of a mechanical device with handle and lever (no text or symbols)

natural_image
Technical line drawing of a mechanical assembly with no visible text or symbols
This product is guaranteed against faults caused by defects in manufacturing or the materials used for a period of two years, starting from the date of purchase.* This warranty does not cover defects or damage caused by failure to install the device correctly, incorrect use of the product, or excessive wear and tear.
*proof of purchase required.
NL
GARANTIEVOORWAARDEN