
VAL-AF76-DR - Deep fryer VALBERG - Free user manual and instructions
Find the device manual for free VAL-AF76-DR VALBERG in PDF.

| Brand | Valberg |
| Model | VAL-AF76-DR |
| Product Type | Oil-free Fryer (Air Fryer) |
| Manufacturer Model Number | 10009154 |
| Power Supply | 220-240 V ~, 50-60 Hz |
| Power Consumption | 2800 W |
| Power Consumption in Off Mode | 0.2 W |
| Temperature Range | 80 °C to 200 °C |
| Timer Duration | 1 to 60 minutes |
| Auto Standby Delay | 10 minutes |
| Protection Class | I |
| Preset Cooking Programs | Fries, Bacon, Poultry, Shrimp, Steak, Cake, Vegetables, Fish |
| Maximum Capacity (Potatoes) | 1000 g |
| Maximum Capacity (Meats) | 400 g |
| Maximum Capacity (Fish/Seafood) | 350 g |
| Included Accessories | Basket, removable grid |
| Non-stick Coating | Yes (basket and grid) |
| Interior Light | Yes (Light button) |
| Cleaning of Basket and Grid | Dishwasher or warm soapy water |
| Safety | Automatic shut-off, hot surfaces indicated, cool handles |
| Warranty | 2 years |
Frequently Asked Questions - VAL-AF76-DR VALBERG
User questions about VAL-AF76-DR VALBERG
0 question about this device. Answer the ones you know or ask your own.
Ask a new question about this device
Download the instructions for your Deep fryer in PDF format for free! Find your manual VAL-AF76-DR - VALBERG and take your electronic device back in hand. On this page are published all the documents necessary for the use of your device. VAL-AF76-DR by VALBERG.
USER MANUAL VAL-AF76-DR VALBERG
natural_image
Line drawing of a kitchen appliance with a grid-patterned lid and handle, showing a downward arrow indicating compression or lifting (no text or symbols)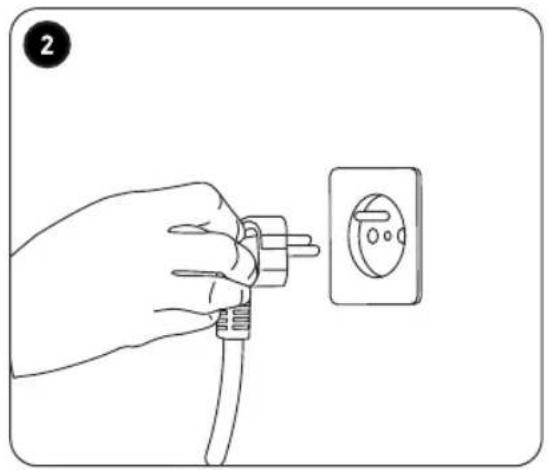
natural_image
Line drawing of a hand inserting a plug into an electrical outlet (no text or symbols)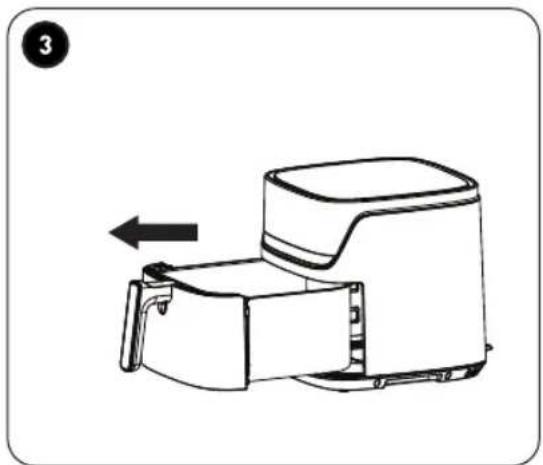
natural_image
Line drawing of a mechanical device with an arrow indicating motion or force direction (no text or symbols)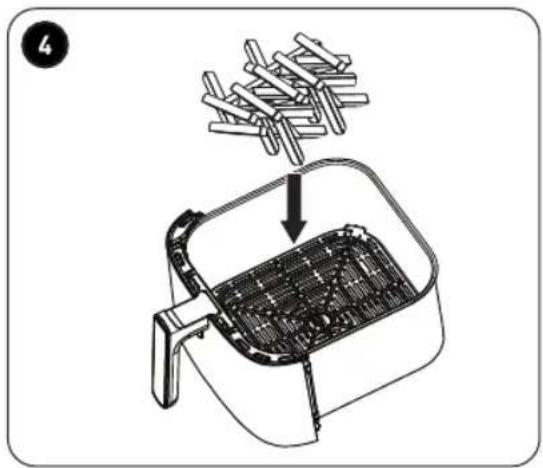
natural_image
Line drawing of a cooking pan with clothes being lifted, showing internal components and a downward arrow (no text or symbols)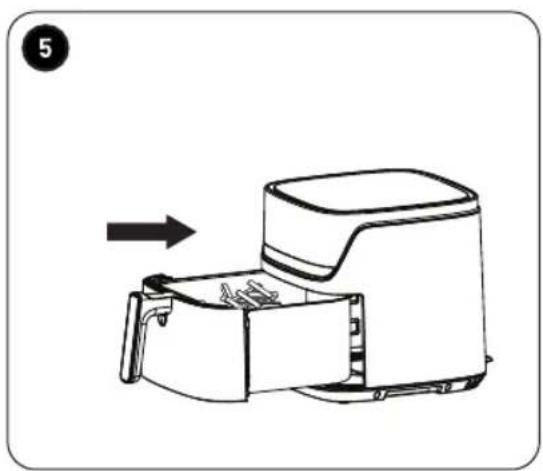
natural_image
Line drawing of a kitchen air fryer with an arrow indicating motion (no text or symbols)Thank you!
Thank you for choosing this VALBERG product. VALBERG products are chosen, tested, and recommended by ELECTRO DEPOT, so you can be sure you are getting a top-quality, easy-to-use product that won't let you down.
We're confident your new device will be a pleasure to use every day!
Welcome to ELECTRO DEPOT.
Table of Contents

Product overview
Parts
Product overview
Intended use
Specifications

Product usage
Before first use
Using the air fryer

Cleaning and maintenance
Cleaning and maintenance
Troubleshooting
Storage
Before using the unit, carefully read both the Manual and the Regulatory Warnings booklet. Keep these instructions for future reference and pass them on to possible new owners of the unit.
Parts
| Description | |
| A Control panel | |
| 1 | Decrease temperature or timer button |
| 2 | Temperature/timer button |
| 3 | Increase temperature or timer button |
| 4 | Chip programme icon |
| 5 | Bacon programme icon |
| 6 | Poultry programme icon |
| 7 | Temperature icon |
| 8 | Prawn programme icon |
| 9 | Steak programme icon |
| 10 | MIN Timer icon |
| 11 | Cake programme icon |
| 12 | Vegetable programme icon |
| 13 | Fish programme icon |
| 14 | Light button |
| 15 | On/off and start/pause button |
A
Product overview
16

Programme button
17
Screen
B
Main body
C
Basket
D
Basket handle
E
Food rack (removable)
F
Air outlet
G
Power cable and plug
H
Handle
1
Air inlet
Product overview
- Unpack the unit. Remove all the labels from the product except the nameplate. Check that it is complete and in good condition. If the unit is damaged or faulty, do not use it and take it to your retailer or after-sales service centre.
- Keep all packaging out of the reach of children and pets. There is a risk of accidents if children or pets play with packaging materials.
Intended use
Use this air fryer to cook meat, vegetables and breaded foods (like cheese or chicken). It is intended for household use only and should not be used for commercial purposes. Any other use may damage the unit or cause injury.
Specifications
Model: 10009154
Voltage: 220-240 V \~, 50-60 Hz
Power consumption: 2800 W
Off mode power consumption: 0.2 W
Thermostat range: 80 °C to 200 °C
Timer duration: 1 to 60 minutes
The period after which the equipment reaches automatically off mode: 10 minutes
Protection Class: I
Before first use
- Clean the unit before first use ( CLEANING AND MAINTENANCE).
- Do not place the unit on a hot surface (such as a hob) or near the edge of a counter where it could accidentally fall.
- Place the unit on a stable, level, non-slip and heat-resistant surface.
- The unit may give off a little smoke or a slight odour on the first use. This is normal for new units and will wear off with regular use. Alternatively, you can turn the unit on for 10 minutes prior to use to remove the smell and smoke.
Using the air fryer
Inserting the food rack into the basket and subsequently, the air fryer
-
Insert the food rack into the basket.
-
Slide the basket into the bottom of the main body until it clicks into place. Should the basket be incorrectly positioned, the screen will display OPE and the air fryer cannot be used.
Operation

WARNING - RISK OF BURNS!
- Make sure children are kept a safe distance away from the unit at all times when it is being used and/or cooling down.
- Never pour oil or grease into the basket or base. The unit has been designed to fry the food via hot air which circulates from the top to the bottom of the unit. If necessary, the food can be lightly coated food with oil to make it crispier.
- Make sure that the unit is well ventilated (leave at least 10 cm all around).
- Never move the unit when it is in use or cooling down.
- Never touch the unit anywhere (except for the handles or control panel buttons) when it is warming up, in use or cooling down. In particular the basket and food rack can become hot when the air fryer has been used.
- When cooking or when removing the basket, be cautious and bear in mind that steam may escape from the air vents/openings or the basket itself. Keep your face and hands away from the steam.
B
Product usage

NOTE:
- Do not place anything on top of the unit, as this will disturb the air flow and affect the cooking results.
- When using the unit and for 10 minutes after cooking, we recommend opening a window or turning on an extractor hood to keep the room odour-free.
- All handles are made with cool-touch materials for safe handling when the unit is in use.
- Only use silicone or wooden utensils to prevent damaging the basket's and food rack's non-stick coating.
- When the unit is cooled completely, use the handles on the underside of the unit to carry and move it.
- You can use the air fryer without the food rack, but it's recommended to use it for better heating. The hot air will fry out the fat from the food, which collects at the bottom. Using the food rack keeps the food elevated, reducing fat intake and making it healthier.
2 Fully unwind the power cable. Plug the power cable into a mains socket. A beep will sound, the screen will turn on temporarily. Then the unit enters standby mode and the button displays on the screen. Press the button to turn on the air fryer and come out of standby mode. The manual programme's default settings will display on the screen.
3 Slide the basket out of the air fryer. OPE (open) displays on the screen whenever the food basket is not fixed into the main body.
- Make sure the food rack is in the bottom of the basket.
4 Place the food into the basket. Refer to the FRYING GUIDE section for the minimum and maximum amounts of different types of food that can be cooked in the air fryer. Do not exceed the maximum recommended food volumes.

NOTE:
For fragile foods or foods that require a container, such as a cake or quiche, you can place a baking tin or oven dish directly into the basket.
5 Slide the basket into the air fryer, making sure it clicks into place and has been closed properly. Should the basket be incorrectly positioned, the screen display will not turn on and the air fryer cannot be used.
- To select a pre-set air-fryer programme or manual air-fryer programme, repeatedly press the button until the desired programme appears. The corresponding icon will flash to indicate the current programme.
B
Product usage
| Icon Programme | Default temperature (°C) | Default time (minutes) | |
 | Chips 200 18 | ||
 | Bacon 180 6 | ||
 | Poultry 180 20 | ||
 | Prawn 180 12 | ||
 | Steaks 180 12 | ||
 | Cake 180 6 | ||
 | Vegetables 175 25 | ||
 | Fish 180 18 | ||
| No pre-set programme icon is flashing | Manual 200 15 | ||
- Press the button to select the temperature or timer and then press the / buttons to change the temperature or timer settings. Press and hold the + / -buttons to cycle quickly through the values.
- The temperature can be changed in 5 °C intervals from 80 °C to 200 °C.
- The timer can be changed in 1-minute intervals from 1 to 60 minutes.
- You can redo a setting by pressing the ☑ button and selecting another program. You can also change the temperature and timer settings during a program.
- Press the button to start the air fryer. The air fryer takes about 3 minutes to reach the set temperature. You have two options:
- Place the food in before the air fryer heats up and include the preheating time in your total cooking time.
- Wait for the air fryer to preheat, then add the food to the basket before inserting it into the air fryer.
- While cooking, the display screen will alternate between showing the remaining cooking time and the set temperature.
- Press the button at any time to stop the cooking process. The button and the cooking programme flashes when the cooking process has been paused. Press the button again to resume cooking.
B
Product usage
- To prevent some foods from sticking together and ensure everything cooks evenly, you may need to shake the food during the cooking process. To do this, hold the basket handle and carefully remove the basket, whilst keeping your face/skin a safe distance away from any steam that may escape. Shake the food, then reposition the basket back into the unit's main body. The cooking programme will resume automatically when the basket is reinserted. Avoid shaking food for more than 30 seconds, as the air fryer will then start to cool down.
- When the cooking time has elapsed, END displays on the screen. Check that the food is cooked. Should the food need a little while longer, return it to the air fryer and adjust the time by adding a few minutes.

NOTE:
After cooking, the fan will run for about 30 seconds to cool the air fryer. After this time, you'll hear a few beeps, the fan will stop, and the unit will switch to standby mode.
- To abort a cooking programme, press and hold the button for 3 seconds. END displays on the screen and then the air fryer goes into standby mode.
- When the food is cooked, remove the basket via the handle. You can remove the food with silicone tongs (for fragile food) or a wooden/silicone spoon.
• Once a batch of food has finished cooking, you can immediately start to cook a new batch. - When you have finished using the air fryer, always make sure it is turned off and unplug it to completely disconnect it from the power supply.

NOTE:
When cooking food with a high fat content, oil or fat will fall into the bottom of the basket and can heat up to the point of producing white smoke. This will not affect the air fryer or the end result.
Frying guide
The frying times are a guide only and should be adjusted according to quantity.
| Food | Min./max. weight (grams) | Temperature (°C) | Cooking time (minutes) | |
| Potatoes | Skinny fries* (frozen) | 500-1000 200 18-26 | ||
| Thick-cut fries* (frozen) | 500-1000 200 22-30 | |||
| Gratin dauphinois* 400 200 20-25 | ||||
B
Product usage
| Meat | Steaks 100-400 180 10-15 | |
| Pork chops 100-400 180 10-15 | ||
| Hamburger 100-400 180 10-15 | ||
| Sausage rolls 100-400 200 13-15 | ||
| Chicken drumsticks | 100-400 180 25-30 | |
| Chicken breasts 100-400 180 15-20 | ||
| Chicken nuggets *(frozen) | 100-400 200 6-10 | |
| Fish / Seafood | Breaded fish fingers (frozen) | 100-350 200 6-10 |
| Vegetables / Cheese | Spring rolls* (frozen) | 100-350 200 8-10 |
| Breaded cheese (frozen) | 100-350 180 8-10 | |
| Stuffed vegetables 100-350 160 10 | ||
| Baking | Cake 250 180 8-15 | |
| Quiche 350 180 20-22 | ||
| Muffins 250 200 15-18 | ||
| Crème caramel 350 160 20 | ||
*Shake these foods halfway through the cooking process.
WARNING - RISK OF BURNS!
- Do not pour food directly from the basket into a container. If you do this, the food rack will fall out along with any accumulated oil, fat or cooking juices. This can cause dangerous splattering that may burn you.
- Also, pouring the food this way will result in the oil, fat, and cooking juices spilling onto the food. This will make the food greasy and soggy.
Tips
- For best results when making homemade chips or crisps, use potatoes suitable for frying. Rinse the cut potatoes in cold water to remove some of the starch. This will prevent them from sticking together when frying. Dry them, then coat them lightly with oil before cooking them.
- Do not leave fried foods in the basket for too long as the residual heat may soften them.
- Cooking food in small batches will result in crispier and more evenly cooked food. If your food is not crispy enough, try brushing it lightly with oil and/or increasing the cooking temperature.
- Oil sprays are an effective way to evenly apply small amounts of oil to all the food.
B
Product usage
- When air frying different types of food, always fry the food that requires the lowest temperature setting first.
- Some food, like steaks, will benefit from being turned during the cooking process to ensure that they cook evenly.
- Dry marinated food by dabbing it with kitchen roll before air frying to prevent it from splattering and producing excess smoke during the cooking process.
- For foods that need to be shaken you can set the timer to the halfway point so that you will know when it's time to shake the food. Then reset the timer and adjust it to the remaining cooking time.
- Store-bought dough tends to require a shorter cooking time than homemade dough. Adjust the timer accordingly.
- To reheat cold food, set the temperature to 150^ for up to 10 minutes.
Light
- Press the button to turn the light inside the air fryer on or off.
Cleaning and maintenance

WARNING!
- To prevent the risk of electrocution, turn off and unplug the unit from the mains socket before cleaning.
- Allow the unit to cool down completely (at least 30 minutes) before cleaning. Remove the basket to help the unit cool down.
- Do not immerse the unit's power cable, plug, or main body in water or any other liquids as they contain electrical components. Do not rinse them under the tap.
- Never use solvents, chemical or abrasive cleaning products, wire brushes, sharp objects or scouring pads to clean the unit.
Disassemble the unit and clean it after each use as follows:
Parts Cleaning method
| Main body exteriorMain body interior (the part that houses the basket only) | Wipe with a slightly damp cloth and dry. |
| BasketFood rack | Clean with a sponge in warm soapy water and dry. Alternatively, you can clean these parts in the dishwasher.NOTE: Clean thoroughly to prevent a build-up of dirt that could start to smoke during the cooking process. |
Heating elements Use a soft brush to remove food residues.
Troubleshooting
Problem Possible Cause Solution
| The air fryer does not work. | · The air fryer is not plugged in.· The button has not been pressed. | · Plug the power cable into an earthed mains socket.· Press the button to come out of standby mode and then select a cooking programme. Press again when you have selected your cooking programme to begin cooking. |
| Ingredients are not fully cooked. | · The amount of ingredients is too large.· The set temperature is too low.· The cooking time is too short. | · Cook smaller batches for more even frying.· Increase the temperature.· Increase the time. |
| Ingredients are fried unevenly. | · Some ingredients need to be shaken halfway through cooking. | · Shake ingredients that overlap (e.g., fries) halfway through cooking. |
| Fried ingredients are not crispy. | · Ingredients meant for traditional deep frying were used. | · Use oven-ready ingredients or lightly brush oil on ingredients for crispier results. |
| I cannot slide the basket into the air fryer. | · The basket is overfilled with ingredients. | · Do not exceed the recommended maximum ingredients levels as shown in the FRYING GUIDE section. |
| White smoke comes from the air fryer. | · Greasy ingredients are being cooked.· The basket has grease residues from previous use. | · Excess oil from greasy ingredients can create white smoke and excess heat, which is normal.· Clean the basket thoroughly after each use to prevent smoke from heating grease. |
| French fries (skinny fires) are fried unevenly. | · The wrong type of potatoes was used.· The fries were not rinsed properly. | · Use fresh, firm potatoes for frying.· Rinse fries to remove excess starch before frying. |
C
Cleaning and maintenance
Problem Possible Cause Solution
French fries (skinny fries) are not crispy.
- The amount of oil and water in the fries affected the crispiness.
-
Thinner fries yield crispier fries.
• Insufficient oil used. -
Dry potato sticks thoroughly before adding oil.
- Cut potato sticks smaller for better crispiness.
- Add a little extra oil for improved crispiness.
Storage
• Always unplug the unit before storing it.
- Store the unit in a fresh, dry and dust-free place, out of the reach of children and pets.
- Please retain the packaging and use it to store your unit when it is not in use for an extended period of time.
Merci !
This product is guaranteed against faults caused by defects in manufacturing or the materials used for a period of two years, starting from the date of purchase.* This warranty does not cover defects or damage caused by failure to install the device correctly, incorrect use of the product, or excessive wear and tear.
*proof of purchase required.
CONDITION DE GARANTIE
FR


- Thank you!
- Table of Contents
- Parts
- A
- Product overview
- 16
- 17
- B
- C
- D
- E
- F
- G
- H
- 1
- Intended use
- Specifications
- Before first use
- Using the air fryer
- Inserting the food rack into the basket and subsequently, the air fryer
- Operation
- WARNING - RISK OF BURNS!
- Product usage
- NOTE:
- Frying guide
- Tips
- Light
- Cleaning and maintenance
- WARNING!
- Disassemble the unit and clean it after each use as follows:
- Troubleshooting
- Problem Possible Cause Solution
- Storage
- Merci !
- CONDITION DE GARANTIE
- FR
Brand : VALBERG
Model : VAL-AF76-DR
Category : Deep fryer