BOOMASTER 1000 - Powered speaker BOOMTONEDJ - Free user manual and instructions
Find the device manual for free BOOMASTER 1000 BOOMTONEDJ in PDF.

User questions about BOOMASTER 1000 BOOMTONEDJ
0 question about this device. Answer the ones you know or ask your own.
Ask a new question about this device
Download the instructions for your Powered speaker in PDF format for free! Find your manual BOOMASTER 1000 - BOOMTONEDJ and take your electronic device back in hand. On this page are published all the documents necessary for the use of your device. BOOMASTER 1000 by BOOMTONEDJ.
USER MANUAL BOOMASTER 1000 BOOMTONEDJ
ACTIVE SPEAKER WITH LEDs FRONT 1000W
WITH USB, BLUETOOTH & MIC
ENCEINTE ACTIVE A FAÇADE LEDs 1000W
AVEC USB, BLUETOOTH et MICRO
ACTIEVE LUIDSPREKER MET LED FRONT 1000W
MET USB, BLUETOOTH & MICROFOON
ALTAVOZ ACTIVO CON LED FRONTAL 1000W
CON USB, BLUETOOTH Y MICRO
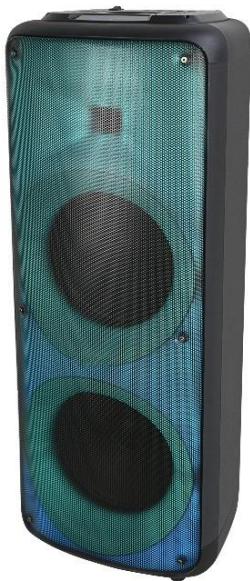
BOOMASTER1000
PANNEAU DE COMMANDE - CONTROL PANEL - CONTROLPANEL - PANEL DE CONTROL
FR - MODE D'EMPLOI
Please read the manual carefully and keep it for future reference.
The lightning flash with arrow head symbol, within an equilateral Triangle, is intended to alert the user to the presence of notinsulated dangerous voltages within the product's enclosure that maybe of sufficient
magnitude to constitute a risk of electric shock to persons.
The exclamation point within an equilateral triangle is intended to alert the user to the presence of important operating and maintenance (servicing) instructions in the literature accompanying the appliance.

CAUTION
DO NOT OPEN THE HOUSING
SHOCK HAZARD
CAUTION:
Do not place any recipients filled with liquids, such as glasses or vases, on top of the directly next to the appliance. They could fall over, causing water to enter the appliance. Never put liquids over the appliance. Do not places small objects, such as coins or paper clips, on the appliance since they could fall inside the appliance and cause fire or shock hazard! If any liquid or objects enter the appliance, pull immediately the mains plug out of the socket and contact a specialist.
- Only pull the mains plug out of the socket by the intended gripping surface. Do not pull it by the cable.
- Never plug the mains plug in or out with damp or wet hands
Electrical appliances must be kept out of thereach of children. Be particularly careful if children are present. Children are not aware of the hazards involved in handling electrical appliancesimproperly. Children could attempt to poke objects into the appliance. There is a life-threatening danger of electrocution.
- Neverplacetheapplianceonanunstableormobilesurface. Personscouldbeinjuredortheappliedamaged by it falling down.
All persons involved in operating, installing and servicing the appliance and putting it into service must be trained and qualified accordingly and observe these operating instructions.
Defective mains cables may only be replaced by specialists. Danger of shock hazard!
If you are not sure about the correct connection or if questions arise which are not answered by the operating instructions, please do not hesitate to contact support or a specialist of your choice. Consult a specialist if you are in doubt about the operating principle or the safety of the product.
- Please unplug the adaptor and switch the unit off if you don't use it for a long time, to avoid damage due to voltage surges.
No naked flame sources such as lighted candles should be placed on the apparatus.
- A warning that batteries (battery pack or batteries installed) shall not be exposed to excessive heats such as sunshine, fire or the like.
Where the MAINS plug or an appliance coupler is used as the disconnect device, the disconnect device shall remain readily operable.
The device in operation cannot be exposed to extreme temperatures (not below 5^ and not above 35^ )
The device can only be used indoors
Use of the Remote Control
Please operate the remote control within distance of 3m and 30^ between the remote and the appliance. Aim the remote at the sensor. Remove all obstacles between the remote and the sensor.
The remote control might not work properly if the sensor is exposed to strong sunshine. If the remote control doesn't work properly, please check the batteries
RECOMMENDATIONS FOR BATTERIES
This symbol indicates that used batteries should not be disposed of with household waste but
deposited in separate collection points for recycling.
ATTENTION
Danger of explosion if battery is incorrectly placed. Only replace by the same or equivalent type. Keep new and old batteries out of the reach of children.
If the battery compartment doesn't close properly, stop using the product and keep it out of the reach of children.
Batteries shall not be exposed to excessive heat such as sunshine, fire or the like.
When the internal batteries are not to be used, remove them to avoid damage caused by battery leakage or corrosion.
WARNING
The supplied remote control contains abattery. In case of ingestion, it might cause serious internal burns within only 2 hours that might lead to death.
If you are indoubt whether the batteries have been swallowed or introduced into any other part of the body, contact immediately a doctor.

Electric products must not be put into household waste. Please bring them to a recycling centre. Ask your local authorities or your dealer about the way to proceed.

Accordance with the requirements of CE standard

Recycled products can be recycled

The product is suitable for indoor use
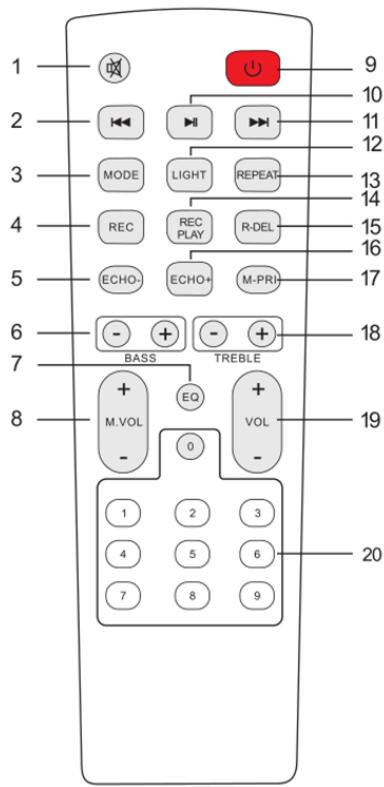
REMOTE CONTROL
- Mute button. Mute or unmutes the sound
- Rear SKIP button. To go back to the previous track
- Mode button. A short press selects the desired input source Bluetooth / Radio / Line In / USB. A long press deactivates the commentary voice.
- REC button (Record). Allows recording of microphones on the USB key. To do this, insert a USB key into the USB drive and connect your microphones. Press the REc buttons and adjust the volume. Press REC again to stop recording.
- ECHO button. To decrease the echo of microphones
- BASS + - buttons. To increase or decrease the bass
- EQ button. Allows you to select different equalizer presets depending on the type of music you are listening to. Pop / Rock / Jazz / Vocal / Flat / Classic
- Adjusting the microphone volume level
- Standby switch
- Play / Pause button. Short press for play / pause. Long press for TWS connection (see below).
- Front SKIP button. To skip forward to the next track
- Light button (adjustment of light effects). Each press of this button changes the light effect around the speaker. Pressing 3 seconds will turn off the light or change mode (Color fade, music mode)
- Repeat button. For loop playback of a track or the entire playlist
- REc PLAY button. To listen to the last recording on the USB stick
- REDEL button. To erase the last recording on the key
- ECHO + button. To increase the echo of the microphones
- M-Prio button. Puts microphone sound priority over music when speaking into microphone (only in USB/BT mode)
-
TREBLE + - buttons. To increase or decrease the treble
-
Adjusting the general volume
- Direct access buttons
CONTROL PANEL
- ON / OFF button to turn the device on or off
2.USB to connect a USB stick for music playback or recording
3.TF to connect a USB stick to it for music playing - LINE IN to connect a device with a 3.5mm jack audio output (tablet, laptop, etc.)
- MIC IN microphone input to connect a dynamic 6.35mm jack microphone
- Guitar input GUITAR IN to connect a guitar (Please note, the guitar must be equipped with a built-in microphone and a 6.35mm jack output
- KARAOKE button. Attenuate the vocals on the song to allow singing over.
- MIC Priority button. To put the microphone sound in priority over the music
- REC button to record microphones on USB stick
- Repeat button to repeat one or all songs on USB key or TF card (no function in Bluetooth or Line In mode)
- MODE button. To select the different input MODE (Bluetooth / USB / TF / LINE IN)
A long press on MODE turns the prompter voice on / off
12. LIGHT button to select the different light animation modes of the LED front panel
13. MEGA BASS button to boost low frequencies
14. EQ button to select the different preset equalizers (Pop / Rock / Jazz / Vocal / Flat / Classic)
15. Previous song button (In USB / TF mode). Long press to advance in the song
16. Next song button (In USB / TF mode ). Long press to go back in the song
17. MENU button. Each press allows the adjustment of different functions / volume:
Table 1
| MENU | ||
| tr | Treble volume | -7 to +7 |
| bA | Bass volume | -7 to +7 |
| n | Mic volume | 0 to 16 |
| nt | Mic Treble | -7 to +7 |
| nb | Mic Bass | -7 to +7 |
| EC | MIC echo | 0 to 16 |
| Gt | Guitar Volume | 0 to 16 |
| U | Main volume | 0 to 32(max) |
- Play / Pause button and TWS pairing to pair 2 BOOMASTER1000 speakers to the same bluetooth source. See procedure in the rest of the manual.
- Main Volume button to adjust the volume of the different functions (Table 1)
BLUETOOTH OPERATION
- Turn on the unit and press the MODE button (11) on the unit or the remote control to select the BLUETOOTH function "BLUE" and the unit will switch to search mode.
- Activate the Bluetooth function on the external device to be synchronized.
- Start the device search. The loudspeaker is displayed as "BOOMASTER1000".
- Select it and enter the password "0000" if necessary.
- Press the play button on the device on the remote control to start playback.
Select the titles with the NEXT and PREV keys and the Volume with the rotary button, making sure that the volume of the Bluetooth source (mobile, tablet) is active.
TWS MODE
TWS mode allows 2 BOOMASTER1000 speakers to be used in stereo. You need 2 speakers for this.
First connect via bluetooth on one of the 2 speakers with the device. (The second speaker is switched off)
Once paired with the 1st speaker, turn on the second, switch to Bluetooth mode using the MODE button (11). Long press the TWS Play / Pause button (18) on the 2nd speaker until SLAU appears on the screen flashing.
Once connected to the 1st speaker, SLAU stops flashing on the 2nd speaker and they are now connected together.
After pairing, one speaker will be the left channel and the other the right channel (Stereo)
Long pressing the TWS Play / Pause button (18) will cancel the function.
In USB / TF reading mode and after inserting a USB key (2 or 3):
Press and hold the REC button on the remote control (4) or REC on the speaker (9) to start recording microphones on the USB stick. Press REC to stop.
The REC function only records sound from microphones and never sounds from line input or Bluetooth.
To listen to the last recording, press the REC play button (14) on the remote control.
LINE IN MODE
To use this mode, press the mode button (11) until LINE is displayed on the screen.
Then connect a compatible device using a mini-jack cable to the LINE IN input (4) and adjust the volume using (19).
USB/TF OPERATION
Compatible music files: MP3, WMA
Press the MODE button (11) to switch the audio sources to USB.
-
Play / Pause: Press to play, pause and resume play.
-
Back / next: During playback, press once to go back to the beginning of the current title or the next title.
USE OF MICROPHONES
Connect the microphone to the microphone input provided (5) and / or (6). Adjust the volume with the MENU button (1) and (7)
Technical Specification
| Power supply | AC100-240V 50/60Hz |
| Speakers | 2 x 10” (25cm) + Tweeter 2” |
| Maximum musical power | 1000W |
| Power consumption | 60W max |
| Frequency response | 50Hz – 20KHz |
| Bluetooth frequency range | 2.18dBm |
| Max BT RF emission | 2402 – 2480MHz |
| Packaging dimension | 893 x 375 x 335mm |
| Product dimension | 830 x 330 x 300mm |
| Gross weight / Net weight | 12.05KG / 10.3KG |
The EU declaration of conformity is available on our website www.msc-distribution.om
NL - HANDLEIDING
| MENU | ||
| tr | Treble volume | -7 to +7 |
| bA | Bass volume | -7 to +7 |
| n | Mic volume | 0 to 16 |
| nt | Mic Treble | -7 to +7 |
| nb | Mic Bass | -7 to +7 |
| EC | MIC echo | 0 to 16 |
| Gt | Guitar Volume | 0 to 16 |
| U | Main volume | 0 to 32(max) |
| MENU | ||
| tr | Treble volume | -7 to +7 |
| bA | Bass volume | -7 to +7 |
| n | Mic volume | 0 to 16 |
| nt | Mic Treble | -7 to +7 |
| nb | Mic Bass | -7 to +7 |
| EC | MIC echo | 0 to 16 |
| Gt | Guitar Volume | 0 to 16 |
| U | Main volume | 0 to 32(max) |