
ILX-700 - Car stereo ALPINE - Free user manual and instructions
Find the device manual for free ILX-700 ALPINE in PDF.
| Product Type | Car stereo with touch screen |
| Brand | ALPINE |
| Model | ILX-700 |
| Screen Size | 7.0 inches |
| Display Type | Active matrix TFT LCD |
| Screen Resolution | 800 x 480 pixels |
| Max Output Power | 50 W x 4 |
| Power Supply | 14.4 V DC (11-16 V allowable) |
| Weight | 0.9 kg |
| FM Tuner | Sensitivity 8.1 dBμV, selectivity 80 dB |
| MW Tuner | Range 531-1602 kHz, sensitivity 25.1 μV |
| LW Tuner | Range 153-281 kHz, sensitivity 31.6 μV |
| USB Port | USB 1.1/2.0, max current consumption 1000 mA |
| Apple CarPlay Compatibility | Yes (iPhone 5 or later) |
| Auxiliary Input | Yes (AUX jack) |
| Operating Temperature | -20°C to 60°C |
| Preamp Audio Output Level | 2 V/10 kohms |
| Main Functions | Radio, Apple CarPlay, Siri, touch screen |
| Safety | Use appropriate fuses, installation by an expert |
| Maintenance | Clean with a soft, dry cloth |
Frequently Asked Questions - ILX-700 ALPINE
User questions about ILX-700 ALPINE
0 question about this device. Answer the ones you know or ask your own.
Ask a new question about this device
Download the instructions for your Car stereo in PDF format for free! Find your manual ILX-700 - ALPINE and take your electronic device back in hand. On this page are published all the documents necessary for the use of your device. ILX-700 by ALPINE.
USER MANUAL ILX-700 ALPINE
Works with Apple CarPlay

Alpine Tunelt App
QUICK REFERENCE GUIDE
Kurzanleitung
GUIDE DE RÉFERENCE RAPIDE
KPATKOE CIPABOYHOE PYKOBOCTBO
SKROCONA INSTRUKCJA DLA UZYTKOWNIKA
Contents
WARNING 2
CAUTION 2
Getting Started 3
Features 4
Radio/RDS Operation 5
Apple CarPlay Operation (Optional). 6
Auxiliary Device Operation (Optional) 6
Installation 7
Connections 9
Specifications 10
IMPORTANT
Please record the serial number of your unit in the space provided below and keep it as a permanent record.
SERIAL NUMBER:
ISO SERIAL NUMBER: AL
INSTALLATION DATE:
INSTALLATION TECHNICIAN:
PLACE OF PURCHASE:
For details on all functions, refer to the Owner's Manual published on our website at: http://www.alpine-europe.com. If required, an ALPINE dealer will readily provide you with a print out of the Owner's Manual published on the website.

WARNING
This symbol means important instructions. Failure to heed them can result in serious injury or death.
DO NOT OPERATE ANY FUNCTION THAT TAKES YOUR ATTENTION AWAY FROM SAFELY DRIVING YOUR VEHICLE.
Any function that requires your prolonged attention should only be performed after coming to a complete stop. Always stop the vehicle in a safe location before performing these functions. Failure to do so may result in an accident.
KEEP SMALL OBJECTS SUCH AS SCREWS OUT OF THE REACH OF CHILDREN.
Swallowing them may result in serious injury. If swallowed, consult a physician immediately.
KEEP THE VOLUME AT A LEVEL WHERE YOU CAN STILL HEAR OUTSIDE NOISES WHILE DRIVING.
Excessive volume levels that obscure sounds such as emergency vehicle sirens or road warning signals (train crossings, etc.) can be dangerous and may result in an accident. LISTENING AT LOUD VOLUME LEVELS IN A CAR MAY ALSO CAUSE HEARING DAMAGE.
DO NOT DISASSEMBLE OR ALTER.
Doing so may result in an accident, fire or electric shock.
USE ONLY IN CARS WITH A 12 VOLT NEGATIVE GROUND.
(Check with your dealer if you are not sure.) Failure to do so may result in fire, etc.
USE THE CORRECT AMPERE RATING WHEN REPLACING FUSES.
Failure to do so may result in fire or electric shock.
DO NOT BLOCK VENTS OR RADIATOR PANELS.
Doing so may cause heat to build up inside and may result in fire.
USE THIS PRODUCT FOR MOBILE 12V APPLICATIONS.
Use for other than its designed application may result in fire, electric shock or other injury.
DO NOT PLACE HANDS, FINGERS OR FOREIGN OBJECTS IN INSERTION SLOTS OR GAPS.
Doing so may result in personal injury or damage to the product.
MAKE THE CORRECT CONNECTIONS.
Failure to make the proper connections may result in fire or product damage.
BEFORE WIRING, DISCONNECT THE CABLE FROM THE NEGATIVE BATTERY TERMINAL.
Failure to do so may result in electric shock or injury due to electrical shorts.
DO NOT SPLICE INTO ELECTRICAL CABLES.
Never cut away cable insulation to supply power to other equipment. Doing so will exceed the current carrying capacity of the wire and result in fire or electric shock.
DO NOT DAMAGE PIPE OR WIRING WHEN DRILLING HOLES.
When drilling holes in the chassis for installation, take precautions so as not to contact, damage or obstruct pipes, fuel lines, tanks or electrical wiring. Failure to take such precautions may result in fire.
DO NOT USE BOLTS OR NUTS IN THE BRAKE OR STEERING SYSTEMS TO MAKE GROUND CONNECTIONS.
Bolts or nuts used for the brake or steering systems (or any other safety-related system), or tanks should NEVER be used for installations or ground connections. Using such parts could disable control of the vehicle and cause fire, etc.
DO NOT INSTALL IN LOCATIONS WHICH MIGHT HINDER VEHICLE OPERATION, SUCH AS THE STEERING WHEEL OR SHIFT LEVER.
Doing so may obstruct forward vision or hamper movement etc., and results in serious accident.

CAUTION
This symbol means important instructions. Failure to heed them can result in injury or material property damage.
HALT USE IMMEDIATELY IF A PROBLEM APPEARS.
Failure to do so may cause personal injury or damage to the product. Return it to your authorized Alpine dealer or the nearest Alpine Service Centre for repairing.
HAVETHEWIRINGANDINSTALLATIONDONEBYEXPERTS.
The wiring and installation of this unit requires special technical skill and experience. To ensure safety, always contact the dealer where you purchased this product to have the work done.
USE SPECIFIED ACCESSORY PARTS AND INSTALL THEM SECURELY.
Be sure to use only the specified accessory parts. Use of other than designated parts may damage this unit internally, or may not securely install the unit in place. This may cause parts to become loose resulting in hazards or product failure.
ARRANGE THE WIRING SO IT IS NOT CRIMPED OR PINCHED BY A SHARP METAL EDGE.
Route the cables and wiring away from moving parts (like the seat rails) or sharp or pointed edges. This will prevent crimping and damage to the wiring. If wiring passes through a hole in metal, use a rubber grommet to prevent the wire's insulation from being cut by the metal edge of the hole.
DO NOT INSTALL IN LOCATIONS WITH HIGH MOISTURE OR DUST.
Avoid installing the unit in locations with high incidence of moisture or dust. Moisture or dust that penetrates into this unit may result in product failure.
Getting Started
Touch operation
You can operate the system by using the touch panel on the screen.
Common onscreen buttons

Returns to the previous screen. Depending on the function, this button may cancel the operations performed on the screen.

Closes the window.

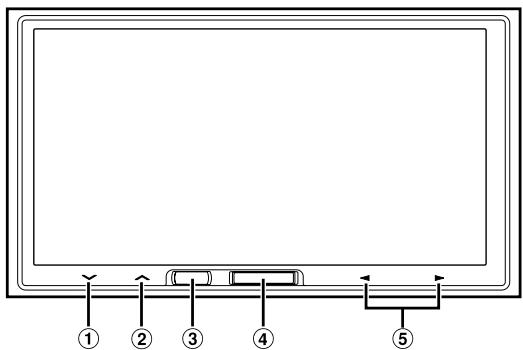
Location of Controls
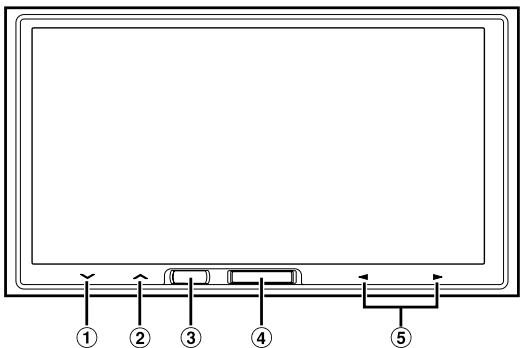
① button
Touch to turn down the volume. Touch and hold for at least 2 seconds to mute.
Touch to turn up the volume.
Siri button
Starts the Siri function of the iPhone.
④ Home button
Press to call up the Home Screen.
Press and hold for at least 5 seconds to turn the power off.
⑤
This action varies according to the Audio/Visual application.
(Track Up/Down, Fast reverse/Fast forward, etc.)
- You can reset the unit by pressing and holding Home and Siri buttons at the same time for 10 seconds.
Turning Power On or Off
1 Turn the ignition key to the ACC or ON position.
The system is turned on.
2 Press and hold the Home button for at least 5 seconds to turn the power off.
Features
About Apple CarPlay
Apple CarPlay allows your iPhone 5 or later to operate smoothly from this head unit.
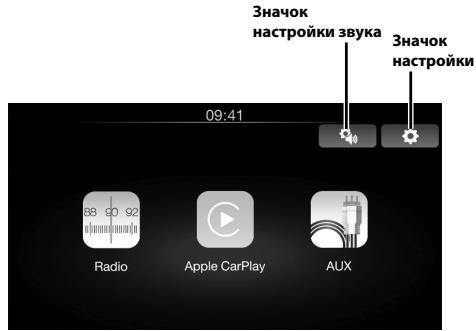
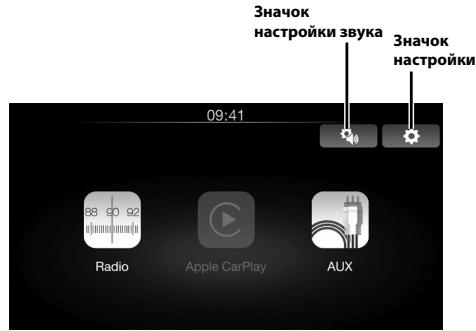
About Home Screen
The Home Screen for this unit gives direct access to those applications designed to work with Apple CarPlay. The Apple CarPlay icon will indicate whether the appropriate iPhone is connected.
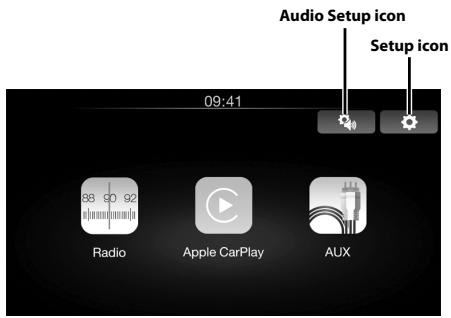
When iPhone is connected
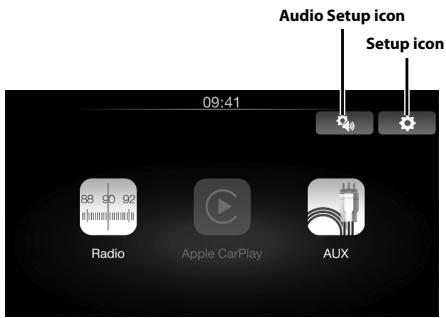
When iPhone is not connected
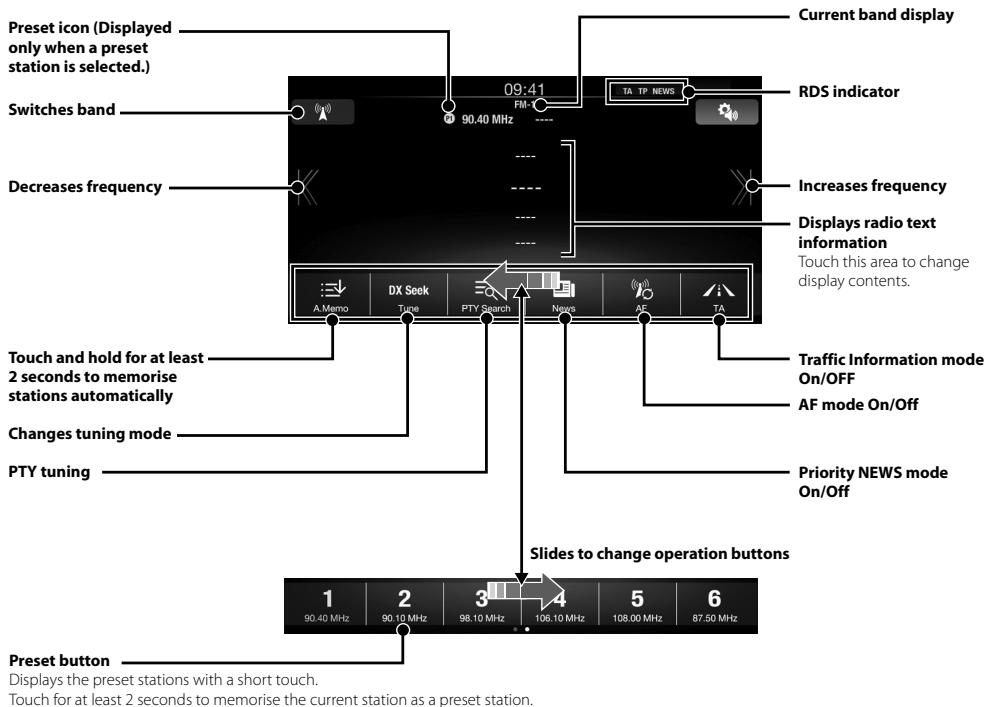
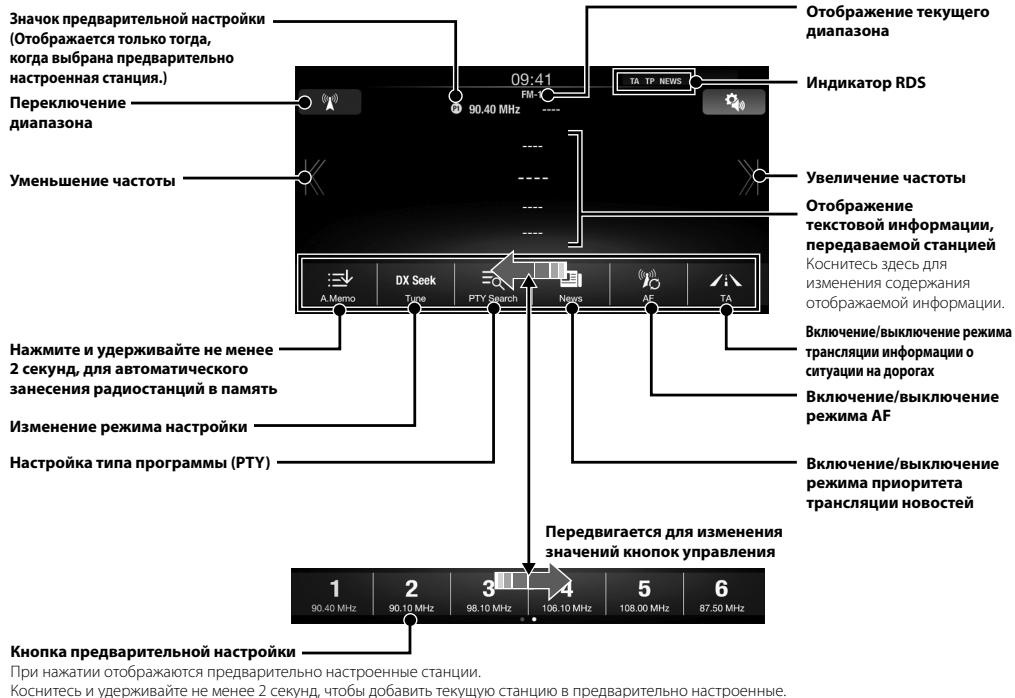
Radio/RDS Operation
Apple CarPlay Operation (Optional)
Apple CarPlay is a smarter, safer way to use your iPhone in the car. Apple CarPlay takes the things you want to do with your iPhone while driving and puts them right on iLX-700. You can get directions, make calls, send and receive messages, and listen to music, all in a way that allows you to stay focused on the road. Just plug in your iPhone to iLX-700 and go.
For details, refer to Owner's Manual published on our website.
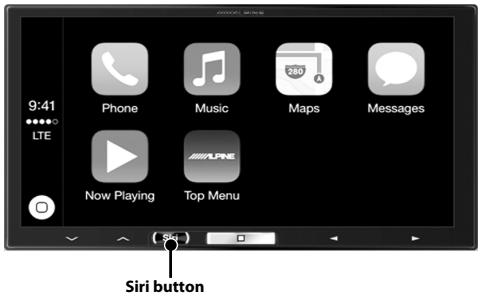
Press to activate Siri function of the iPhone.
You can make a call, play music, etc., by using Siri function of the iPhone.
You can also control Apple CarPlay on touchscreen.
Owner's manual
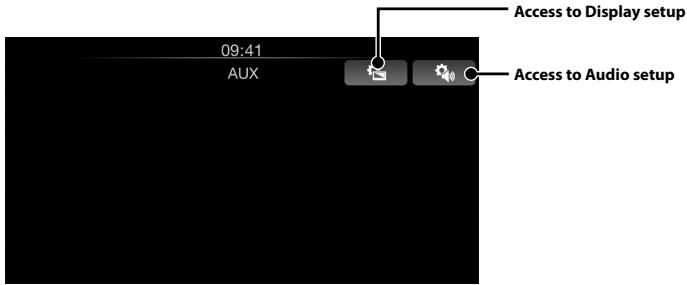
Auxiliary Device (Optional)
Auxiliary Device Operation (Optional)
Use the AUX INPUT terminal to input your favourite Audio/Video source. Use of appropriate adapters may be required.
For details, refer to Owner's Manual published on our website.
Installation
Note on installation
- Install at an angle between horizontal and 30^ . Note that installing at an angle outside of this range will result in a loss of performance and possible damage.
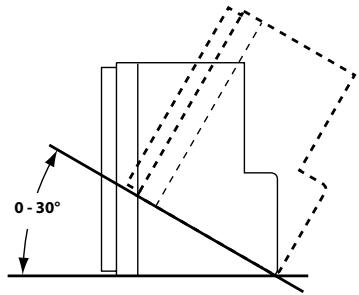
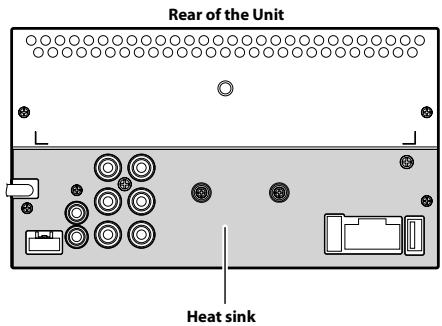
- Do not block the unit's heat sink, which would prevent air circulation. If blocked, heat will accumulate inside the unit and may cause a fire.
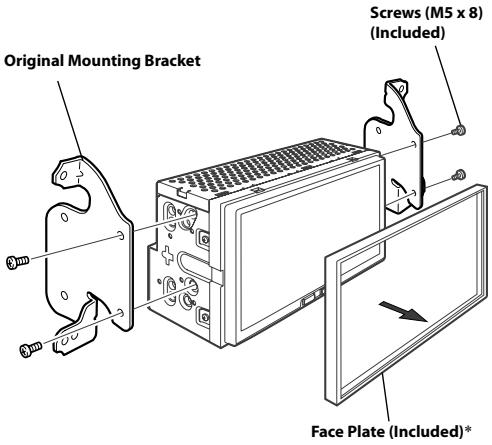
Uninstalling the original car stereo
1 Uninstall the car stereo with its mounting bracket.
2 Remove the cables and the mounting bracket attached to the car stereo.
(The mounting bracket will be used in "Installing the unit.")
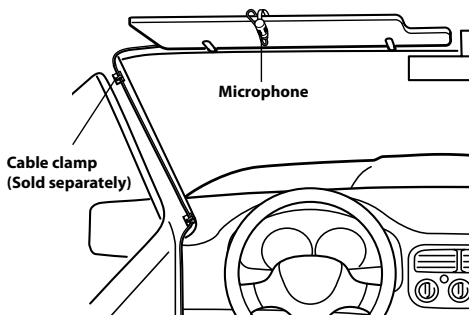
Mounting the Microphone
For safe use, make sure of the following:
- Location is stable and firm.
- Driver's view and operations are not obstructed.
- Microphone is located where the driver's voice can be easily picked up (for example, on the sun visor).
When you speak into the microphone, you should not have to change your driving posture. This may cause a distraction, taking your attention away from safely driving your vehicle. Carefully consider direction and distance while mounting the microphone. Confirm that the driver's voice can be easily picked up at the selected location.
Installing the Unit
1 Remove the Face Plate from the unit.
2 Mount the original mounting bracket to the unit using the supplied screws.
3 Connect all other leads of the unit according to details described in the "Connections" section (page 9).
4 Mounting the unit in a car.
- Use the removed Face Plate if needed.
Fix the Cables etc.
Fix the cables carefully. Do not damage them by tucking them into movable parts, such as a seat rail, or by locating them against sharp or pointed edges.
Connection Diagram of SPST Switch (sold separately)
(If the ACC power supply is not available)
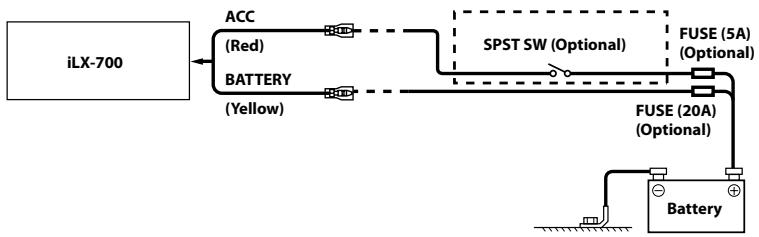
- If your vehicle has no ACC power supply, add an SPST (Single-Pole, Single-Throw) switch (sold separately) and fuse (sold separately).
- The diagram and the fuse amperage shown above are in the case when iLX-700 is used individually.
- If the switched power (ignition) lead of the iLX-700 is connected directly to the positive (+) post of the vehicle's battery, the iLX-700 draws some current (several hundred milliamperes) even when its switch is placed in the OFF position, and the battery may be discharged.
Connections
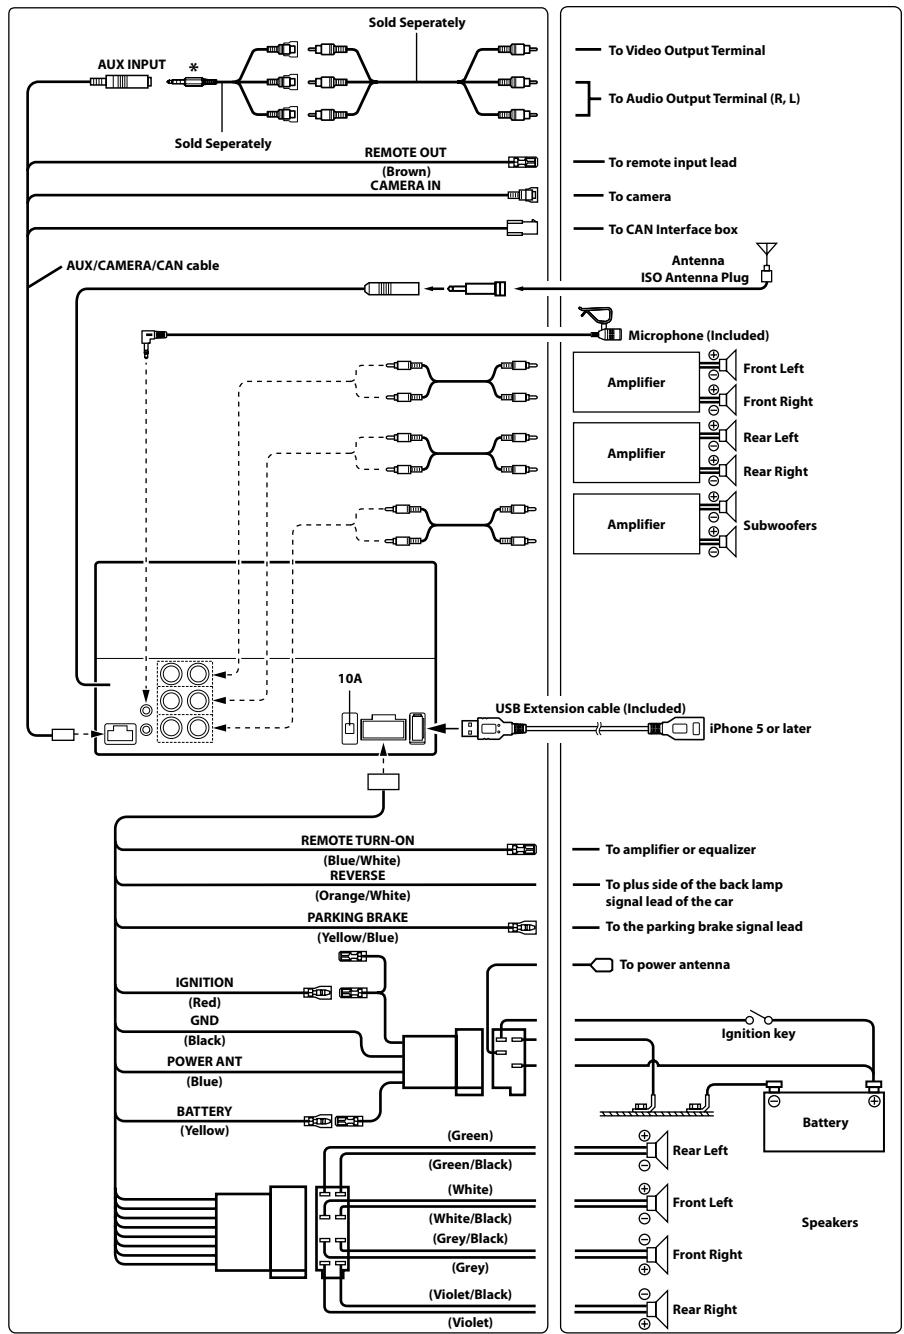
* Notice that the configuration of commercially available 4-pole mini AV plugs is not standardized. For details, refer to Owner's Manual published on our website.
Specifications
MONITOR SECTION
Screen Size 7.0"
LCD Type Transparent type TN LCD
Operation System TFT active matrix
Number of Picture Elements 1,152,000 pcs. (800× 480× 3 RGB))
Effective Number of Picture Elements
99% or more Illumination System LED
FM TUNER SECTION
Tuning Range 87.5-108.0 MHz
Mono Usable Sensitivity 8.1 dBf (0.7 V/75 ohms)
Alternate Channel Selectivity 80 dB
Signal-to-Noise Ratio 60 dB
Stereo Separation 35 dB
Capture Ratio 2.0 dB
MW TUNER SECTION
Tuning Range 531-1,602 kHz
25.1 V/28 dBf
LWTUNERSECTION
Tuning Range 153-281 kHz
Sensitivity (IEC Standard) 31.6 V/30 dBf
USB SECTION
USB requirements USB 1.1/2.0
Max. Power Consumption 1,000 mA
USB Class USB (Play From Device)/
USB (Mass Storage Class)
File System FAT16/32
GENERAL
Power Requirement 14.4V DC
(11-16 V allowable)
Operating temperature -4°F to +140°F
(-20^ to +60^)
Maximum Power Output 50W× 4
Weight 0.9 kg (1 lbs 15 oz)
Audio output level
Preout (Front, Rear): 2V/10k ohms (max.)
Preout (Subwoofer): 2V/10k ohms (max.)
CHASSIS SIZE
Width 178 mm (7")
Height 100 mm (3-15/16")
Depth 75.5 mm (3")
- Due to continuous product improvement, specifications and design are subject to change without notice.
- The LCD panel is manufactured using an extremely high precision manufacturing technology. Its effective pixel ratio is over 99.99% . This means that there is a possibility that 0.01% of the pixels could be either always ON or OFF.
- iPhone, iTunes and CarPlay are trademarks of Apple Inc., registered in the U.S. and other countries.
- "Made for iPhone," means that an electronic accessory has been designed to connect specifically to iPhone, respectively, and has been certified by the developer to meet Apple performance standards. Apple is not responsible for the operation of this device or its compliance with safety and regulatory standards. Please note that the use of this accessory with iPhone may affect wireless performance.
Inhalt
DATE D'INSTALLATION:
INSTALLATEUR:
LIEU D'ACHAT:
Plage d'accord 87,5-108,0 MHz
DIMENSIONS DU CHASSIS
Largeur 178mm
Hauteur 100 mm
Profondeur 75,5 mm
Alternatively, you can use the App Store to install a new app.
Manual de operación
Dispositivo auxiliar (Optional)
Control del dispositivo auxiliar (Optional)
Dimensioni schermo 7,0
Pre-out (subwoofer): 2 V/10K ohm (max.)
DIMENSIONI DEL TELAIO
Ampiezza 178 mm
Altezza 100 mm
Profondità 75,5 mm
INSTALLATIONSTEKNIKER:
INKOPSSTALLE:
USB (Mass Storage Class)
Bestandssysteme FAT16/32
ALGEMEEN
Stroomvereiste 14,4V DC
OCHOBHbIe ceHCOPHbIe KhoNKn

IcnoJb3yetcTdIg Bo3Bpata KnpdeIduyueemy EkpaHy. B 3aBNCmOCTn O fYHKuN DaHHoN KHOJMOxH0 OTMeHNb BblONJIHeHHbIe Ha 3KpaHe Oepaun.

VcnoIb3yETcTЯla 3aKpbITnOkHa.

PacnoloxKeHne 3JeMeHTOB ynpaBHeHnA
① Khonka
HaxmMaiTe ee, yTo6bi yMeHbIuNTB rPOMKoCTb. YTo6bi OTKIOUHTb 3Byk, HaxmTe ee n UyepKmbaTe He MeHee 2cekynd.
② KhoNka
HakimaiTe ee, yTo6bIyBEnuHTb rPOMKoCTb.
③ Khonka Siri
3aŋyckaet ΦyHKιnIO Siri ha iPhone. BkJIoueHa roJIoCoBaA KOMaHJa.
④ Khonka Home
Hajmite KhoiKy Home, Yto6bI nepeTn Ha rnaBhny ekpaH.
HaJMMITE ee yUdpKJBMaIe He MeHee 5cEynH, qTO6bI BbIKJIIOUYTH NITaHHe.
⑤ Khonkn
ДeICTBNE OTINHuaTcB 3aBVCIMOCTN OT ayDnO- INI INBIDEONPUNOXENH.(PepexoB VBepx/BnI3 NO cINCKy DOpOKeK,6bICTpa NpeMOTKa VBpeNd/Ha3ad N.T.I.)
Umobblcbopocumh hacmpouku ycmpoicmba, odnopeMenho haJcMume u ydepJCuaime Khonku Home u Siri meueheue 10 cekyhd.
BkIIOueHne n BbIKIOueHne nITaHn
1 Nobephnte KIOUc 3aXnurHaMBA NOIOXeHne ACC mnn ON.
CnCTema BkJIIOUHTTCa.
2 Haxmnte u yedejkvaBte Khonky Home B teeHne He Mehee 5 cekynd, YTO6bblBkIouHyt yctpoIcTBO.
С蜱еня о6 Apple CarPlay
Blaorapr cnteme Apple CarPlay moxno Ierko ocuyceTBtbynpabIeHne rnaBbIM 6IOKOM c nOoIbIo iPhone 5nII 60nee no3dneBvpcnn.
CbeHnO rnaBHom 3KpaHe
Tlambn 3KpaH 3TOrO yCTpoiCTBa oBecneuHbAe TnpaMOI DocTyP K npInIOXeHnM, npedHa3NaueHbIM dIra pa6OTbI c Apple CarPlay.
3NaUOK Apple CarPlay yka3bIaBaeT, noKJIIOUeHOn IIN COBMEcTIMOe yCTpOiCtBO iPhone.
UcTpoIcTBo iPhone noIqKJIuOeHo
UcTpoIcTBo iPhone He noIeKIIuyeHo
Mcnonlb30BaHme paIIO/RDS
IcnoJb3ObaHne Apple CarPlay (npNo6peTaetcJaDOnoJIHTeJIbHo)
TexhONorIy Apple CarPlay n03BOnJeT NcNoJIb3OBAt b iPhone B MaJInHe 6oJee 3ΦΦeKTHBn H 6e3oNacHO. KorJa bbl 3a pyJEM, Apple CarPlay nepenocit BCE Heo6xOAnMbte yHKUIN iPhone Ha iLX-700. 5narOapr 3ToI TexHONorI MOnJHO IOnb3OBAtBCa KapTAMN, OCUSeCTBnAIB T 3BOHNK, O6MeHNBaTbC COo6eHnAIM, CnyuATb My3bKy, pRi 3TOM He OTBNeKaAcB oT DOpOrN. PpOcTo nOcOeDInHte iPhone K iLX-700 u Bnepe.
1 DeMoHTnpyuTe MaRHTOny u MoHTaXHbIe KPOHsTeHbI.
2 OToCoeAnHInTe OT MaHHTOnJI npOBoJa mOHTaXHbIe KPOHHTeHbI.
(MOHTaXHbIe KPOHHTeYHbI 6yDyt NcPONb3OBaTbCn DJIa"YCTaHOBKn YCTPOINCTBa")
YcTaHOBKa MMKpOfoHa
IoporobayyBCTBnTeBHOCTb25,1MKB/28D6
LW-TIOHEP
Klacc USB USB (Bocnpn3BedeHne c
yctpoicTba)/
USB(KJacc MaccOBN nAMrTn)
MaKcImaJIbHaB BbIXOHaJ MoUHOCtB
50BTx4
Bec 0,9K
YpOBeHb BbIXoJHO aUdIOcRHaHa
PpeBapuTeNbHbBbXoD (pOHT, TbI):
2 B/10 KOM (MaKc.)
PpeBapntelhBn BbIXoD (ca6Byep, cHTp):
2 B/10 KOM (MaKc.)
PA3MEP KOPITYCA
UHINa 178MM
BbICota 100 MM
Ipy6nHa 75,5MM
- H3-aH enpebbohozo coepuuehemboaun npodykma e0e mexhueceue xapakmepcmuu u duain mozym uzmehmcb63 e9pdeabumelbhozo yebodomnju.
Ipanel LCD uzomoblena no cbepxmouho mexhnozua. Kounemcbo 3f6kmeuibx nuKceoB npebtuiaem 99,99%. 3mo o3naeam, 3mo cyuecemtyem bepoemmmcb 0,01% nauiu nukceoB, komopbte bce2da Bkliouehb uU Bce2da Bkliouehb.
iPhone, iTunes and CarPlay are a tool to take the top 3000 apps from your home computer.
"Made for iPhone"03hauaet,уTO JIeKToPOnHbI akCEccyap 43pa6OtaH CTpeMaIbHO DnIPOJKnIooHnry K cytpoCTBy iPhone n cepTnIuropoBaH pa3paOboTHNKOM kak yUOBnBETOPBOHoum EKcTIpyataIOHHbIM CTaNaptAm Apple.KopnpaIaNr Apple He HeceT OTBeTCTBeHHOCtN 3a paOto DaHORO yctpoCTBa NIN erO COOTBE TCTBME CTaNaptAm Be3OpNaCHOIn n peYJIaTbNBbIM HopMaM. ImeTe B BVdy, UTO mCNoIb3OBAHne 3TOrA KeCCsCyapa c iPhone MoXeT NOBNIATb Ha paOto 6ecnpBoDHO CBZrN.
OOO «KoMaHnBaBoHaH3a»
HhopmaunOcebpncbIX cehtpax
dOCTynHa Ha caIe www.alpine.ru
DO PRAC MONTAZOWHY STOSOWAC WYSZCZEGOLNIONE AKESORIA I MOCOWAC JEW SPOSWO BPEWNY.
WYLACZNY DYSTRYBUTOR
HORN DISTRIBUTION S.A.
UL.KURANTOW34
02-873 WARSZAWA
TEL.: 0-22 331-55-55
FAX.: 0-22 331-55-00
WWW.ALPINE.COM.PL
Centralny Serwis:
161-165 Princes Highway,
Hallam Victoria 3803, Australia
Phone 03-8787-1200
ALPINE ELECTRONICS GmbH
Fletchamstead Highway, Coventry CV4 9TW, U.K.
www.alpine.co.uk
ALPINE ELECTRONICS FRANCE S.A.R.L.
(RCS PONTOISE B 338 101 280)
98, Rue de la Belle Etoile, Z.I. Paris Nord II
B.P. 50016, 95945 Roissy Charles de Gaulle Cedex,
France
Phone +33-(0)1-48638989

- Contents
- IMPORTANT
- WARNING
- DO NOT OPERATE ANY FUNCTION THAT TAKES YOUR ATTENTION AWAY FROM SAFELY DRIVING YOUR VEHICLE.
- KEEP SMALL OBJECTS SUCH AS SCREWS OUT OF THE REACH OF CHILDREN.
- KEEP THE VOLUME AT A LEVEL WHERE YOU CAN STILL HEAR OUTSIDE NOISES WHILE DRIVING.
- DO NOT DISASSEMBLE OR ALTER.
- USE ONLY IN CARS WITH A 12 VOLT NEGATIVE GROUND.
- USE THE CORRECT AMPERE RATING WHEN REPLACING FUSES.
- DO NOT BLOCK VENTS OR RADIATOR PANELS.
- USE THIS PRODUCT FOR MOBILE 12V APPLICATIONS.
- DO NOT PLACE HANDS, FINGERS OR FOREIGN OBJECTS IN INSERTION SLOTS OR GAPS.
- MAKE THE CORRECT CONNECTIONS.
- BEFORE WIRING, DISCONNECT THE CABLE FROM THE NEGATIVE BATTERY TERMINAL.
- DO NOT SPLICE INTO ELECTRICAL CABLES.
- DO NOT DAMAGE PIPE OR WIRING WHEN DRILLING HOLES.
- DO NOT USE BOLTS OR NUTS IN THE BRAKE OR STEERING SYSTEMS TO MAKE GROUND CONNECTIONS.
- DO NOT INSTALL IN LOCATIONS WHICH MIGHT HINDER VEHICLE OPERATION, SUCH AS THE STEERING WHEEL OR SHIFT LEVER.
- CAUTION
- This symbol means important instructions. Failure to heed them can result in injury or material property damage.
- HALT USE IMMEDIATELY IF A PROBLEM APPEARS.
- HAVETHEWIRINGANDINSTALLATIONDONEBYEXPERTS.
- USE SPECIFIED ACCESSORY PARTS AND INSTALL THEM SECURELY.
- ARRANGE THE WIRING SO IT IS NOT CRIMPED OR PINCHED BY A SHARP METAL EDGE.
- DO NOT INSTALL IN LOCATIONS WITH HIGH MOISTURE OR DUST.
- Getting Started
- Touch operation
- Common onscreen buttons
- Location of Controls
- ① button
- Siri button
- ④ Home button
- ⑤
- Turning Power On or Off
- Turn the ignition key to the ACC or ON position.
- Press and hold the Home button for at least 5 seconds to turn the power off.
- Features
- About Apple CarPlay
- About Home Screen
- Radio/RDS Operation
- Apple CarPlay Operation (Optional)
- Auxiliary Device Operation (Optional)
- Installation
- Note on installation
- Uninstalling the original car stereo
- Mounting the Microphone
- Installing the Unit
- Fix the Cables etc.
- Connection Diagram of SPST Switch (sold separately)
- Connections
- Specifications
- MONITOR SECTION
- FM TUNER SECTION
- MW TUNER SECTION
- LWTUNERSECTION
- USB SECTION
- GENERAL
- CHASSIS SIZE
- Inhalt
- DIMENSIONS DU CHASSIS
- Control del dispositivo auxiliar (Optional)
- DIMENSIONI DEL TELAIO
- ALGEMEEN
- OCHOBHbIe ceHCOPHbIe KhoNKn
- PacnoloxKeHne 3JeMeHTOB ynpaBHeHnA
- ① Khonka
- ② KhoNka
- ③ Khonka Siri
- ④ Khonka Home
- ⑤ Khonkn
- BkIIOueHne n BbIKIOueHne nITaHn
- Nobephnte KIOUc 3aXnurHaMBA NOIOXeHne ACC mnn ON.
- Haxmnte u yedejkvaBte Khonky Home B teeHne He Mehee 5 cekynd, YTO6bblBkIouHyt yctpoIcTBO.
- С蜱еня о6 Apple CarPlay
- CbeHnO rnaBHom 3KpaHe
- Mcnonlb30BaHme paIIO/RDS
- IcnoJb3ObaHne Apple CarPlay (npNo6peTaetcJaDOnoJIHTeJIbHo)
- YcTaHOBKa MMKpOfoHa
- LW-TIOHEP
- PA3MEP KOPITYCA
- OOO «KoMaHnBaBoHaH3a»
- DO PRAC MONTAZOWHY STOSOWAC WYSZCZEGOLNIONE AKESORIA I MOCOWAC JEW SPOSWO BPEWNY.
- WYLACZNY DYSTRYBUTOR
Brand : ALPINE
Model : ILX-700
Category : Car stereo