
GR47BE - Meat grinder plate CUISINART - Free user manual and instructions
Find the device manual for free GR47BE CUISINART in PDF.
| Product Type | Electric Griddle & Grill |
| Brand | Cuisinart |
| Model | GR47BE |
| Dimensions (L x W x H) | Approximately 42 x 30 x 17 cm |
| Weight | Approximately 4 kg |
| Power Supply | 220-240 V ~ 50/60 Hz |
| Power | 1500 W |
| Material | Non-stick plates, heat-resistant plastic base |
| Maximum Temperature | 230 °C |
| Thermostat | Adjustable with heating indicator lights (red/green) |
| Timer | Integrated with audible signal (non-automatic shutdown) |
| Main Functions | Grilling, cooking in closed, open or semi-open mode, panini press |
| Included Plates | 2 ridged grill plates + 2 plancha plates (interchangeable plates) |
| Drip Tray | Integrated, removable, dishwasher safe |
| Cooking Positions | Fully open, semi-open, closed (adjustable to food thickness) |
| Safety | Minimum clearance 100 mm around, 700 mm above; hot surfaces indicated |
| Maintenance | Plates dishwasher safe (top rack), base cleaned with damp cloth |
| Spare Parts | Not repairable; accessories available via customer service for at least 5 years |
| Warranty | 5 years against manufacturing defects (upon presentation of proof of purchase) |
| Use | Household only |
| Power Cord | Approximately 1 m long |
Frequently Asked Questions - GR47BE CUISINART
User questions about GR47BE CUISINART
0 question about this device. Answer the ones you know or ask your own.
Ask a new question about this device
Download the instructions for your Meat grinder plate in PDF format for free! Find your manual GR47BE - CUISINART and take your electronic device back in hand. On this page are published all the documents necessary for the use of your device. GR47BE by CUISINART.
USER MANUAL GR47BE CUISINART
A.To fit the plates. 20
B. Selecting the cooking position . . . . . . .21
C. Using the integrated drip tray 22
D.Cooking with the Griddle & Grill . 2
- Cleaning and storage 24
- Recipes 25
International Guarantee. 135
CONTENUTO
Carefully read all the instructions before using the appliance and keep in a safe place for future reference.
Always follow these safety cautions when using this appliance to avoid personal injury or damage to the appliance. This appliance should be used only as described within this instruction book. There is a risk of injury if the product is misused.

IMPORTANT SAFEGUARDS
CAUTION: BURN HAZARD
-WARNING: very hot surfaces.
-DO NOT TOUCH hot surfaces as possible injury could occur. Always use the handle.
- THIS IS AN ATTENDED APPLIANCE. Do not leave unattended during use, unplug after each use. Never leave the appliance unattended when switched on or plugged in.
- IMPORTANT: Use extra care when working with hot liquids to avoid injury from overflowing, steaming and splattering.
- Any adjacent furniture must be able to withstand a minimum temperature rise of 85^ C above the ambient temperature of the room it is located in, whilst in use. This appliance requires 100mm clearance around the front, back and sides of the appliance and a minimum of 700mm between the cooking plate and the underside of any horizontal surface above it. Certain types of vinyl or laminate kitchen furniture are particularly prone to heat damage or discolouration at temperatures even below the guidelines given above. Any damage caused by the appliance being installed in contravention of these instructions will be at the liability of the owner. You should not use this appliance to store items on or as work surface.
- Do not use the grill near or under combustible materials like
curtains or furniture.
- This appliance is not intended for use by persons with reduced physical, sensory or mental capabilities, or lack of experience and knowledge, unless they have been given supervision or instruction concerning use of the appliance by a person responsible for their safety.
- Children should always be supervised to ensure that they do not play with this appliance.
- Not for use by children. Keep the appliance and its supply cord out of reach of children during and after use.
- This appliance is for indoor, domestic use only and is not intended to be used in applications such as: staff kitchen areas in shops, offices and other working environments; farm houses; by customers in hotels, motels and other residential type environments; bed and breakfast type establishments.
- Do not use the appliance if the supply cord is damaged. In the event of supply cord damage, discontinue use immediately. If the supply cord is damaged it must be replaced by the manufacturer. Return the appliance to the Customer Care Centre. No repair must be attempted by the consumer.
- Do not wrap the supply cord around the main body of the appliance during or after use.
- Do not leave the supply cord hanging over the edge of a kitchen table or worktop.
- Do not allow the supply cord to come into contact with sources of heat.
- As the outer surfaces may get hot when the appliance is in use, take care not to allow the appliance surfaces to come into contact with other heat sensitive surfaces.
- Do not use metal utensils as this will damage the cooking plates.
- Always unplug the appliance from the mains outlet and allow to cool before cleaning.
ELECTRICAL SAFETY
- Always ensure the voltage to be used corresponds with the voltage on the appliance, this is indicated on the bottom of the housing.
- The appliance is not intended to be operated by means of external timer or separate remote control system.
- Always disconnect the appliance from the electric supply if it is left unattended and before assembling, disassembling or cleaning.
- Never pull the plug out of the mains socket by the supply cord.
- Always ensure that your hands are dry before touching the supply cord or removing the plug from the mains socket.
GENERAL SAFETY
- Ensure all packaging materials and any promotional labels or stickers are removed from the appliance before first use.
- Always inspect the appliance before use for noticeable signs of damage. Do not use if damaged, or if the appliance has been dropped. In the event of damage, or if the appliance develops a fault, contact the Cuisinart Customer Care Line.
- Before switching on the appliance ensure that the plates are correctly fitted and locked into position.
- Do not use the appliance for anything other than its intended use.
- Do not touch hot surfaces; use the handle whilst the appliance is switched on and during cooling time.
- Position the Grill on a stable, level, heat resistant surface near a power socket.
- Do not attempt to move or lift the Griddle & Grill by the handle, when lifting the appliance ensure you fully support from underneath.
- Do not place anything on top of the appliance while it is operating or while it is hot.
- Do not wrap food in plastic film, polythene bags or metal foil during cooking. This may cause damage to the cooking plates and
create a fire hazard.
- Do not use accessories or attachments with this appliance other than those recommended by Cuisinart.
- Do not place the appliance on or near a hot gas or electric burner or place in a heated oven.
- Never leave the appliance unattended when switched on or plugged in.
- Periodically check all parts before use. If any part is damaged DO NOT USE.
- To avoid injury or possible fire, do not cover the appliance when in use.
- To protect against fire, electric shock or personal injury, do not immerse the housing base, cord or plug in water or other liquids or place in a dishwasher.
- To disconnect, turn the control to the zero setting (0) and then remove the plug from the mains.
- Switch off and unplug the appliance after use.
- Unplug from the mains when not in use and before cleaning. Allow to cool completely before fitting or removing parts and before cleaning the appliance.
- We recommend washing the plates by hand. If you wash the plates in a dishwasher place them on the top rack only. If you wash the cooking plates by hand do it carefully.

WARNING: Polythene bags over the product or packaging may be dangerous. To avoid danger of suffocation, keep away from babies and children. These bags are not toys.

DISPOSING OF ELECTRICAL AND ELECTRONIC APPLIANCES AT THE END OF LIFE
This symbol on the product or on the packaging indicates that this product may not be treated as household waste.
Instead it should be handed over to the appliance collection point for the recycling of electrical and electronic equipment. By
ensuring this product is disposed of correctly you will help prevent potential negative consequences for
the environment and human health which could otherwise be caused by inappropriate waste handling of the product. For more detailed information about the recycling of this product, please contact your local council office or your household waste disposal service.
2. INTRODUCTION
Congratulations on your purchase of the Cuisinart® Griddle & Grill.
For over 30 years Cuisinart's aim has been to produce the very finest kitchen equipment. All Cuisinart products are engineered for exceptionally long life and designed to be easy to use as well as to give excellent performance day after day.
To learn more about our products and for recipe ideas visit our website www.cuisinart.eu
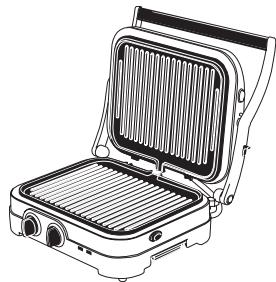
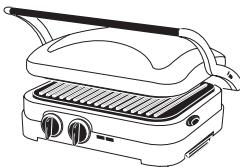
3. FEATURES (refer to cover)
- Handle
- Hinge Release Lever
- Plate Release Buttons (both upper and lower)
- Temperature Control Dial
- Timer Dial
- Housing Base
- Drip tray
- Scraping tool
- Grill plates
- Griddle Plates
4. USE
The Griddle & Grill is a really versatile piece of kitchen equipment. It can be used in different ways depending on the food you are cooking.
It is supplied with two sets of plates, the ribbed grill plates are ideal for steaks, kebabs and Paninis, the flat griddle plates are great for pancakes, eggs and French toast.
You can use both grill plates together, both griddle plates together or a combination of one grill plate and one griddle plate.
A. TO FIT THE PLATES
To fit the plates:
- Ensure the product is switched off and disconnected from the electric supply.
- Select the plates you intend to use for cooking.
- Position the Griddle & Grill so that the controls are facing towards you. Lift the handle to open the grill.
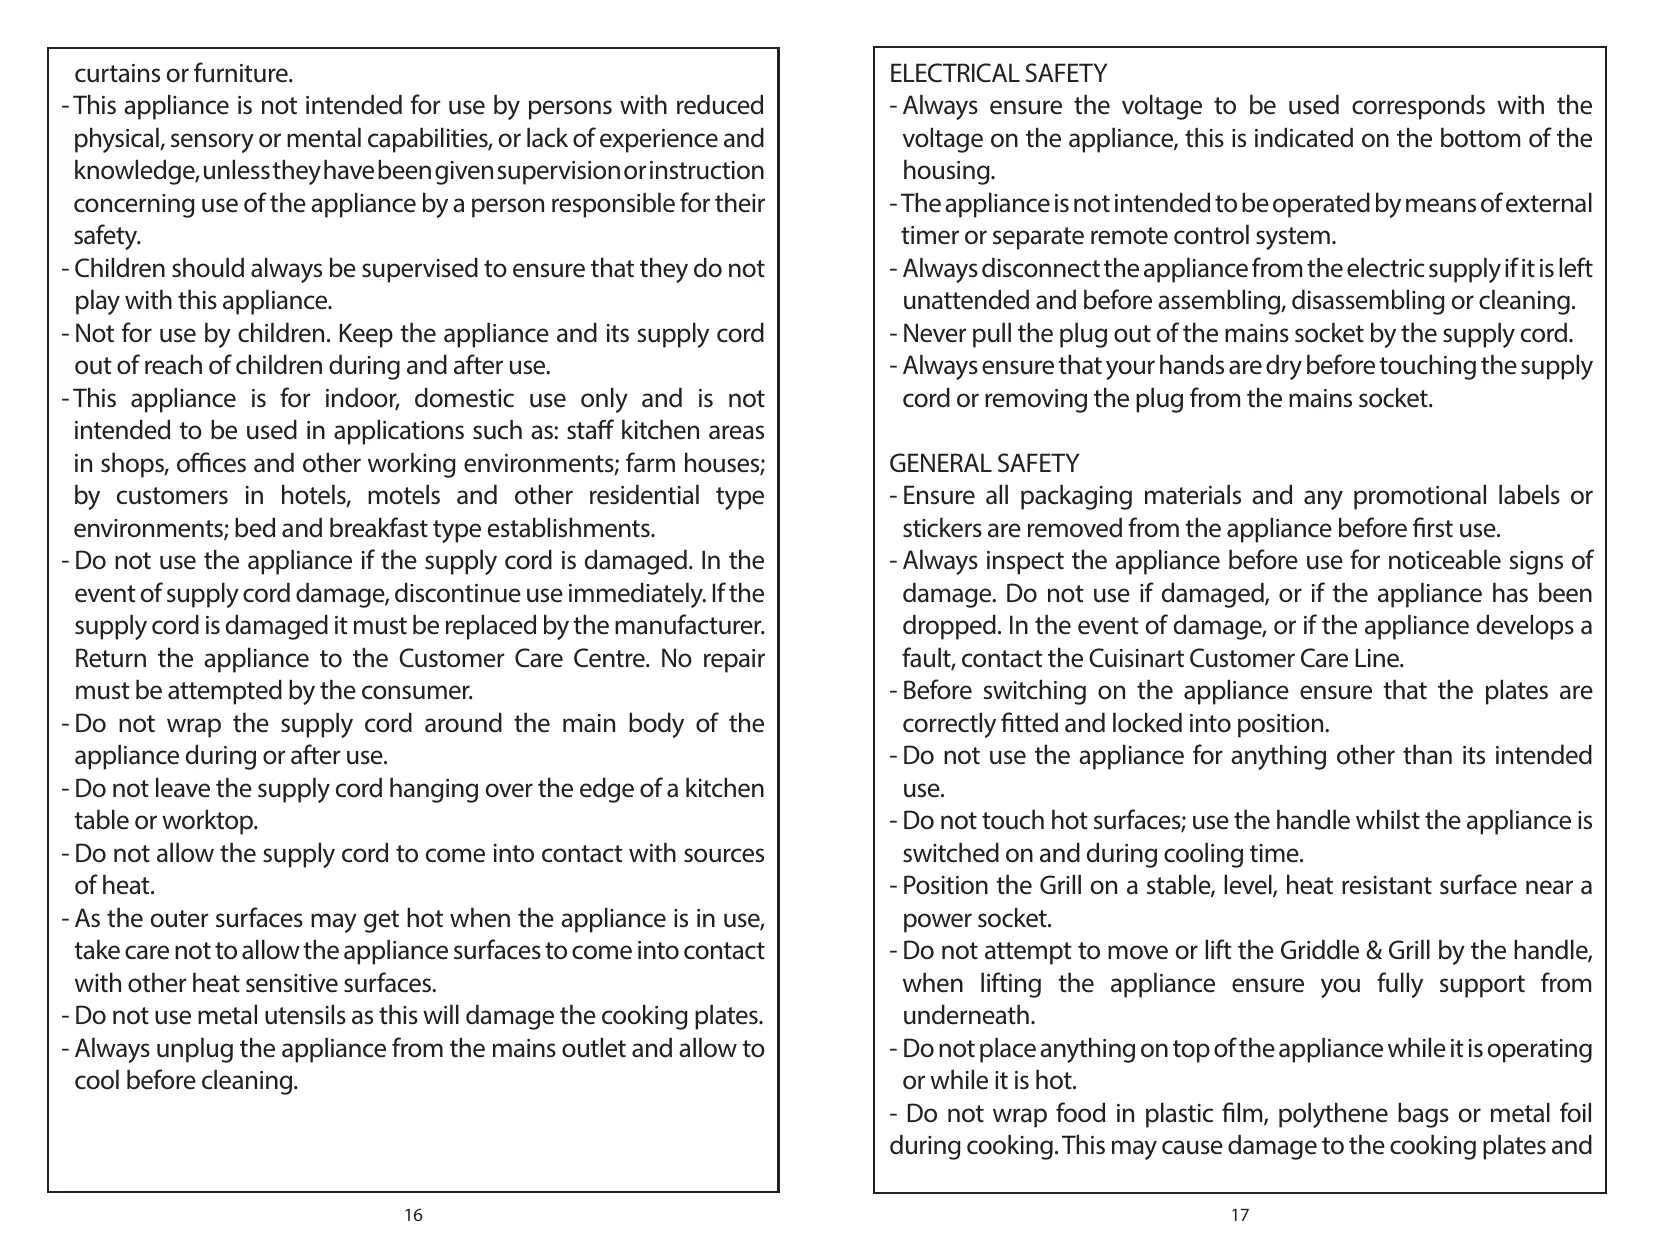
- Align the two plate locating legs at the back of the plate (See Fig. 1) with the brackets on the bottom of the housing case (See Fig. 2) Tilt the plate and slide it underneath the bracket.
- Push the plate into the grill housing until it clicks and locks into place.
- Repeat with the second plate.
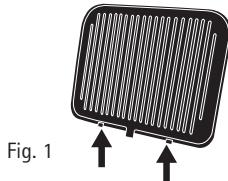
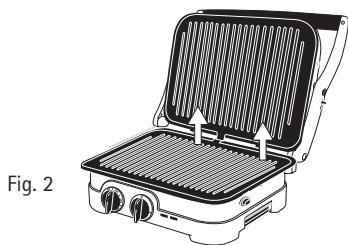
Fig. 2
To remove the plates:
- Ensure the product is switched off, disconnected from the electric supply and is fully cooled down before removing the plates.
- Locate the plate release buttons which can be found on the right side of the unit, there is one on the upper and lower casing.
- Press the upper release button firmly and the upper plate will pop up slightly from the base.
- Lift the plate up and slide out from under the brackets.
- Repeat by pressing the lower release button and releasing the lower plate.
- The plates can be hand washed carefully or placed on the top shelf of a dishwasher.
B. SELECTING THE COOKING POSITION
Once you have fitted the cooking plates you intend to use, you need to select the cooking position.
Fully open position
The Griddle & Grill can be used in the fully open position to create a double cooking surface.
To adjust the Griddle & Grill to the fully open position, lift the handle using one hand, then use the other hand to push the hinge release lever located on the right side of the product upwards. As you do this, push the handle back, until it is resting on the work surface and the upper and lower plates are level.
Half Open Position
The Griddle & Grill can be used in the half open position. To adjust the appliance to this position, simply lift the handle until it comes into the fully upright position and clicks into place. The unit will stay in this position until you close the cover or continue to open it to the fully open position, using the hinge release lever.
Closed Position
The Griddle & Grill can be used in the closed position as a contact grill/panini press and is ideal for quick cooking as the heat comes from both sides of the plates. The floating hinge design means that the space between the top and bottom plate adjusts to the thickness of your food. When cooking more than one item at a time, try to ensure the thickness of the food is consistent to ensure even cooking for each piece of food.
To achieve this position simply place food on the bottom plate, place your left hand on the handle, use your right hand to tap the top of the grill using light pressure until the lid is level with the base unit and is resting on your food. You can apply light pressure using the handle to press whilst cooking to lock in flavour.
C. USING THE INTEGRATED DRIP TRAY
The Griddle & Grill has a clever fat drainage system. Fat is drained via a small recess at the rear of the plates, allowing fat and grease to drip down into the integrated tray.
To insert the drip tray, insert it into the slot on the right side of the lower housing, the edge of the drip tray with the curved shape should be inserted first.
To remove the drip tray, simply slide the tray out of the slot. Grease should be disposed of safely after cooking. The drip tray can be washed in the dishwasher.
D. COOKING WITH THE GRIDDLE & GRILL
Once the plates and drip tray are fitted and the cooking position has been selected, you are ready to start cooking with the Griddle & Grill.
- Ensure the unit is plugged into the mains power supply.
- Select the required temperature using the temperature dial. The red light will illuminate to indicate the grill is on and is heating up. When the Griddle & Grill reaches the required temperature the green light will illuminate.
- Set the timer dial once you have placed the ingredients to be cooked on the grill.
NOTE: The timer does not switch the Griddle and Grill off when the timer countdown is complete. It will make an audible sound when the timer reaches the end.
- The green light will continue to turn on and off as the thermostat monitors the temperature during cooking. This is normal.
N.B: The first time you use the appliance, it may have a slight odour and may smoke a little. This is normal and common to appliances with a non-stick surface.
Use wooden or heatproof plastic utensils only. Never leave plastic utensils in contact with the hot grill plate.
In between recipes, scrape excess food build-up through the grease channel and into the drip tray, then wipe off any residue with a paper towel before proceeding with the next recipe.
When you have finished cooking, turn the temperature dial to zero and unplug the power cord from the mains. Allow the appliance to cool completely before handling. The following table is provided as a guide only to help you with cooking. The cooking guide provides suggested cooking times for contact grilling fresh food. Cooking times may vary depending on overall thickness and density of food. Cook poultry and meat until juices run clear, cook fish until flesh is opaque throughout. Ensure food is thoroughly cooked before serving. Please also see the recipes in the booklet included..
| Meat | Preparation | Grill Posi-tion | Temp | Time |
| Chicken breast bone-less, skin removed | Pound to an even thickness of 15-20mm (1/2 to 34"). | Closed | 210°C | 7-9 minutes |
| Fully or half open | 210°C | 8-10 minutes per side | ||
| Chicken thighs, bone-less, skin removed | Spread to an even thickness, remove all visible fat | Closed | 210°C | 8-10 minutes. |
| Fully or half open | 210°C | 8-10 minutes per side | ||
| Beef steak, boneless, 20-25mm (3/4" to 1") thick | Season to taste. If marinated drain well before cooking | Closed | 230°C | 3-10 minutes depending on your preparation. |
| Fully or half open | 230°C | 3-10 minutes depending on your preparation. | ||
| Beef, fillets, 25mm (1") thick | Season to taste. If marinated drain well before cooking | Closed | 230°C | 4-5 minutes. |
| Beef, hamburgers | Beef, hamburgers | Closed | 230°C | 5-8 minutes. |
| Pork tenderloin | Cut into 3/4" (20mm) thick medallions, may be pounded. Season to taste | Closed | 230°C | 4 minutes. Pork should be slightly pink in appearance, overcooking will result in dry meat. |
| Boneless pork loin chops, 15-25mm (1/2 to 1"). | All chops should be same thickness | Closed | 210°C | 4-9 minutes. Pork should be slightly pink in appearance, overcooking will result in dry meat. |
| Sausages, uncooked | Prick links with tines of fork or tip of knife. | Closed | 210°C | 14-18 minutes depending on thickness. |
| Fish Steaks (sword, tuna, salmon, boned) 20-25mm (3/4" to 1") thick | Closed | 210°C | 6-7 1/2 minutes. | |
| Fully or half open | 210°C | 7-8 minutes per side. | ||
| Prawns | Dry well. Season to taste and or rub with extra virgin olive oil | Closed | 230°C | 2-2 1/2 minutes. |
| Fully or half open | 230°C | 1-2 minutes per side. | ||
| Scallops | Dry well. Season to taste and or rub with extra virgin olive oil | Closed | 230°C | 2-2 1/2 minutes. |
| Fully or half open | 230°C | 1-2 minutes per side. Do not overcook. | ||
| Portobello mush-rooms, 15mm (1/2") thick slices | Closed | 210°C | 6-8 minutes until nicely brown and tender. |
5. CLEANING & MAINTENANCE
Before first use and after every use, clean each part thoroughly.
Once you have finished cooking, turn the temperature control to the zero (0) position and unplug the power cord from the mains.
Allow the appliance to cool completely before handling.
When cold use the scraper to remove any leftover food from the cooking plates. The scraper can be washed by hand or in the dishwasher.
Dispose of grease from the drip tray. The drip tray can be cleaned by hand or in the dishwasher.
The cooking plates can be washed by hand or in the top rack of the dishwasher. Do not use metallic objects such as knives when cleaning. This will damage the non-stick coating.
If you have been cooking seafood, wipe the cooking plate with lemon juice to prevent seafood flavour transferring to the next recipe.
The housing base cover and control knobs can be wiped clean with a soft, dry cloth. For tough stains dampen cloth. Never use an abrasive cleaner or harsh pad.
Never immerse the plug, lead or housing base in water or any other liquid.
Make sure all the parts are clean and dry before storing.
Never wrap the cord around the outside of the grill.
6. RECIPIES
Here are a few recipe ideas to help you get started with your Griddle & Grill. For more recipe ideas and inspiration, visit www.cuisinart.eu
CHICKEN SATAYS WITH PEANUT SAUCE
Makes 8 skewers
FOR THE CHICKEN SATAY MARINADE
- 350g chicken, mini breast fillets
- 2 stalks of lemongrass, peeled & finely chopped
- 1 red chilli, chopped
- 5cm piece of ginger, finely chopped
- 2 garlic cloves, finely chopped
- 1/2 tsp turmeric
- 1/4 tsp cumin seeds
- 1/4 tsp coriander seeds
- Juice of a lime
- 1 tsp palm sugar (can be substituted with granulated brown sugar)
- 2 tbsp olive oil
FOR THE PEANUT SAUCE
- 1 tbsp nut oil (you can substitute with vegetable oil).
- 1 clove of garlic, peeled and crushed
- 1 small onion, peeled and finely chopped
- 1/2 ground red chilli pepper
- 1/2 tsp curry powder
- 1 stalk of lemongrass, finely chopped
- 300ml coconut milk
-1 tbsp tamarind - 1/2 tsp ground cinnamon
- 1 tbsp of nampla (fish sauce)
- 1 tbsp of palm sugar (can be substituted with granulated brown sugar)
- Juice of a lemon
- 100g crunchy peanut butter
YOU WILL ALSO NEED:
A spice grinder or pestle & mortar + 8 wooden skewers
- For the chicken satay marinade place the lemongrass, chilli, ginger, garlic, turmeric, cumin & co-riander seeds into a spice grinder or pestle and mortar and grind together. Mix in the lime juice, palm sugar and olive oil. Stir well.
- Cut the chicken into long strips, then add to the satay marinade and cover. Allow the chicken to marinate overnight in the refrigerator.
- For the peanut sauce place the nut oil, garlic, onion, chilli, curry powder and lemongrass in a small pan and bring to a gentle simmer. After a couple of minutes add the coconut milk, cinnamon, tamarind, fish sauce, palm sugar, lemon and peanut butter. Stir to combine all the ingredients and bring back to a gentle simmer for 20 minutes.
- Attach the grill plates. Set the temperature dial to 230^ .
- Add each strip of chicken lengthways onto wooden skewers.
- Place the chicken skewers onto the grill plates and bring the lid down so that it gently rests on the food. Cook for approximately
8 minutes ensuring the chicken is cooked through. - Serve hot with the peanut sauce.
BEEF TAGLIATA WITH CHARGRILLED VEGETABLES
Serves 2
- 300g rib eye steak
- 8 asparagus spears, woody ends removed
- 1 small yellow pepper, cut into 3cm strips
- 1 small red pepper, cut into 3cm strips
- 1 small courgette, sliced into thin ribbons
- 50g parmesan, shaved
- 20g rocket
- 50g pesto
- 30ml balsamic vinegar
- 30ml olive oil
-
Salt and ground black pepper
-
Attach the grill plates. Set the temperature dial to 230^ .
- Blanch the asparagus for 30 seconds in hot salted water then refresh in ice cold water.
- Rub the vegetables with half the olive oil and grill for 4 minutes with the lid lowered. The vegetables may need to be cooked in a couple of batches. Once ready set aside.
- Rub the meat with the remaining olive oil and season. Place on the grill and lower the lid. Cook for 8 minutes (or less depending on your preference).
- Arrange the vegetables on plates and top with the rocket leaves and shaved parmesan.
- Slice the beef very thinly and arrange next to the vegetables.
- Serve each plate with a drizzle of pesto, balsamic vinegar and olive oil.
SALMON, COURGETTE & ROCKET SALAD
Serves 2
- 2 salmon fillets
- 1 courgette, sliced into rounds
- 1/2 yellow pepper, sliced
- 1/2 red pepper, sliced
- 12 cherry tomatoes
- Sprig of rosemary, stalks removed
- Salt & pepper
- 2 tbsp olive oil
DRESSING
- 125ml extra virgin olive oil
- 2 tbsp sherry vinegar
- Juice of 1 lemon
- 1 clove of crushed garlic
- 2 tsp honey
TO SERVE
-
2 large handfuls of rocket
-
Attach the grill plates. Set the temperature dial to 230^ . Release the hinge lock and lower the top plate so the unit is in the fully open position.
- Place the sliced courgette, peppers, cherry tomatoes and rosemary in a bowl. Drizzle over one tablespoon of the olive oil and season with a little salt and pepper. Gently combine all the ingredients together ensuring that they are coated in the oil. Place the vegetables on one of the grill plates and cook until they start to soften.
- Place the salmon in the bowl with the remaining olive oil and coat well. Place the salmon on the other grill plate and cook for 5 to 7 minutes on each side, until cooked through and slightly charred.
- Whilst the salmon is cooking prepare the dressing. Place all the dressing ingredients into a small food processor and blend until combined or mix by hand.
- Gently mix all the vegetables together along with the rocket and share between two plates. Finally, place a fillet of cooked salmon on each plate and drizzle over the dressing.
VEGETARIAN BUCKWHEAT PANCAKES
Serves 4
220°C/180°C
100 g of buckwheat flour
50g of white flour
5 eggs
50 ml of milk
100 ml of water
6 red peppers
1 garlic clove
50 ml of olive oil
100 g of grated Parmesan cheese
Salt and freshly ground pepper
- Mix the white flour and the buckwheat flour.
- Add an egg, the milk, water and a little salt then mix.
- Allow the batter to rest for at least 1 hour.
- Wash the peppers before cutting them.
- Cut the peppers into quarters and remove the seeds.
- Mix the garlic and olive oil.
- Preheat the appliance with the grill plates fitted.
- Brush the pepper pieces and cook on the grill. Put in a dish and set aside.
- When the plates have cooled, replace the grill plate with a griddle plate and fully open the grill to the flat position.
- Lightly grease the griddle plate once warm.
- Sprinkle Parmesan cheese on the plate to form strips.
- Brown the strips and carefully remove them from the plate.
- Set aside on paper towels. Repeat the process.
- Pour pancake batter onto the plate to form four discs 10cm in diameter.
- Cook for about 3 minutes, turning them over halfway through cooking.
- Set the pancakes aside.
- Reduce the temperature to 180^ to cook the eggs.
- Cook 4 fried eggs on the greased griddle plate.
- At the same time, reheat the peppers.
- Place a warm pancake with an egg on top on each plate.
- Slice the peppers thinly and place them around the pancake.
Suggestion:
Sprinkle the peppers with a few drops of balsamic vinegar.
FRUIT SKEWERS
Serves 6
210^
3 bananas
2 mangoes
2 Victoria pineapples
200 g of flour
4 beaten eggs
200 g of grated
coconut
80 g of caster sugar
2 tbsp of honey
1 lime
6 stainless steel skewers
- Peel the bananas and cut each into 4 sections.
- Set aside.
- Peel the mangoes and pineapples.
- Cut each into 12 large cubes. Set aside the remaining flesh.
- Thread 6 pieces of fruit on the skewers, alternating the different varieties.
- Roll the skewers in the flour and dip them in the beaten eggs.
- Roll again in a mixture of coconut and sugar. Set aside.
- Mix the rest of the fruit with honey, lime zest and juice. Store in the refrigerator.
- Preheat the appliance with the grill plates fitted.
- Roast the skewers on the appliance in the fully open position.
- Brown each side for about 3 minutes.
- Serve the skewers with fresh fruit coulis.
Suggestion:
Also make orchard fruit skewers with almond powder.
Para remover as placas:
TAGLIATA WOLOWA Z GRILLOWANYMI WARZYWAMI
2 osoby
BHIMAHHE! IOni3TnIeHOBbIe NaKeTbI Ha npOdyKtax IyN yNaKOBke MOrTy
npeiCTaBnTb ONaCHocTb.Bo n36exaHne ONaCHocTu dyuWeHn, XpaHnte INX B MeCTe, HeIOCTyINHom IJRA MJaDeHnceB IN DeTeN. 3TN paKeTbI - He ngpyuKa.

YTNJIN3AUJN 3JEKTPNUECKNX N 3JEKTPOHHbIX PUNBOPOB IIO OKOHUAHNI CPOKA CJYXbbl

3TOT CnMBOJ Ha n3delen nn ynaKOBKe yka3bIBaET
Ha To, YTO DaHHoe I3dJIne He MoJcET 6bITb yTnIIN3NpOBaHO B KaueCTBe 6bITOBbIX OTXODOB. 3TO O3Naayet, YTO yCTPOIcTBO CJIeDyET CdaTb DnIy TnIIN3aCNI B PnyKt c6Opa 3JIeKTPnueCKOTO IN 3JIeKTPoHNO O6OpyIDOBAHNA. 06ecneuVBa HADJIeXaUYIO YTNIN3aCNI IO DAHHORIO N3DeJIIN, Bbl CnOCO6CTByeTe IpeDOrBpaUeHNIO IOTeHcuaJIbHbIX HerATNBbIX NocJeIcTBNI DnI OKpykaUOSeI cpeDbI IN 3DOpOBbI JIoDeI,
KOTOPbIe MOryT BO3HnKHyTb B pe3yIbTaTe erO HeNpaBnIbHOJ yTuIN3aUIn.ДЯ NOlyuYeHna 60Jee NpOBoHOn HΦOpMaUIn O6 yTuIN3aUIn DaHHoro n3DeJIIna O6paTITecb B MeCThBi MYNuIpaJIntET UIn B CnyX6by yTuIN3aUIn 6blTOBbIX OTXODOB.
2. BCTUJIENHE
Ipeud Tem KaK y6paTb yCTpoiCTBO Ha xpaHHeHne, y6eDInTEcB TOM, YTO BCE erO KOMNHOHTbl YnCTbIe n cyxHe.
Hikorda He o6opauuBaIe 7hyp nItaHnB Okpyr BHeuNe yactn rpnna.
6. PEÇEΠΤbl
Obou, Bo3MOxHNO, Heo6xoIMo 6ydet npuroTOBnTB, pa3dennb nx Ha nBe qactn. 3aKOHnuB npiroTOBHeHne, OCTaBbTe OBOU B CTOpOHy.
4.CmaJbTe mco OCTaBImMcO lNIBKOBbIM MaCOnI NIOcbIbTe pnpIpaBaMn. IonoXte Mco Ha rPnIb I ONyCTHte KpbIshKy. FToOBbTe mco 8 MNHyT (nn MeHbWe B 3aBNCmOCTn OT BaIINx npednoptyhen).
5. Pazloukinte Obozhi Ha TapeIkax u yKpaIte CBepx IINCTbIMy pYKKoJIbI n CTpyKkoCBipa napMe3aH.
6.Порожьтеговдуну на очев тонки Ломтуки и разложиTe ee ряdom с овоцам.
7.Плдаваite эTo 6люо, пиправи NB мсо кадои поцу coycom nectо и сбpb3HyB er0 6aJIb3amUneCKIM yKCyCOM И OЛNBKOBblM MaCLOM.
JIOOCb, LyKKHH N PYKKOJa
COnb mOJToB yepHbI nepe
- CmeaIte nIeHnHyIO MyKu I rpeHneBHyO MyKy.
- 1o6aBbTe OndHO RyUO,MOLOKU,BOUY HEMHORO CoUN,3aTEM NepemeuAHTe.
- OctaBbTe TECTO MNHIMYM Ha 1 yac.
- Помоше перац, пера tem как erо pa3pe3aTb.
- Pa3peXbTe nepeu Ha yeTbIpe yactn u yaJInte cemeHa.
- CmeuTe YeCHOK N OINBKOBOE MacNo.
- PpeBapnteNo pa3orpeTe rpiNb.
- CmaXbTe KycOuKn nepa Macn oN rTOBbTe Ha rPIne. IToOBbI nepeC npeNoXHTe Ha TapeKky.
- 3aMeHInTe npOTnBeHb-rgnIb Ha pIIOckn npOTnBeHb I n3MeHInTe cNoCo6 npuToTobHeHnHa 6ap6ekIo.
- Cnerka cmaXbTe MacJOn IpOToNBeHb, KOrDa OH Harpeetca.
- IpebcIbTe napMe3aH Ha npOTnBeHb, cOpMnpOBaB nIoockn.
- NopdpyMaHbTe NOLOCKn n aKKypaTHO CHMInTe nx C npOTNBHa.
- IpeJIOXKeIte Ha cAnfoKy, UTo6bI BnITaINCb N3NlWKn MaCna. IOBTOpTe onepaunio.
- Haje Te TecTo Ha npoTBeHb, cOpMnpOBaB 4 6nHnuKa dnaMeTpom 10 cm.
- TOTOBbTe npImepHO NO 3 MmHyTbI CKaJdoN CTOpOhbl.
- NepenoxnTe 6nnHnKn.
17.Длгприготовлияи пони Te Tempepatуdo 180^ - PoxapbTe 4 Rua Ha NIOCKOM npOTUBHe, CMA3aHHOM MacJOM.
- B 3TO JxBpempa3oRpeIte nepeu Ha npotNBHe-tpnJIe B pexIme 6ap6ekIO.
- Ha KaJdyu TapeKyu nIoXnTe OIN TEnNbI 6InHnK, Cbepx yIIO.
- HapeKbTe nepeu nnoJoxKe Te BOKpy 6nHcNka.
PekomeHa:
Iobabte Ha nepeu HeckoJbKO Kaenb 6aJb3amUeckoro yKcyca.
210^ C
INHrpEeHntbHa6 nepcoH
36aHaHa
2MaHro
2aHaHaca BukTopn
200 r Myk
4 B36ntbIXa
200 r Kokocoboi
CTpyKKn
80 r caxapno nypbbl
2 cT.I.MeDa
1 naM
6 wamnpob IV3 Hepxaboeuopei CTaII
- Ouinchnte 6aHaHbI pa3peXbTe Hx Ha 4 qactn.
- OToJoxKeTe.
- OuInCTIte MaHro n aHaHaCbl.
- BbipexkTe n3 mKOTn KaJDOgo fpykTa no 12 60JIbIuX Ky6HkoB. OTIOxKITE ocTJIbHyO mKOTb.
- Heo6xOaHMo HAnH3aTb Ha KaJdbI WAMnyp 6 KycouKOB pyKTOB,YepeyraNx DpyrC dpyrom.
- 06BaJIaIe ΦpyKtbl Ha 7aAMnpax ChauJaB MyKe, 3aTeM — B JIue.
- 3aTeM o6BaJnTe B Cmecn KOKOCOBn CTpyKKn n caxapa. OTloKnTe.
- CmeuaiTe ocTaubnecc fpykTbI c MeiOM, ceepo n cokom laima. Oxnaute.
- PpeBapnteJbHO pa3orpeTe rPnIb.
- O6xapbTe 9pykTbHa 7aamnpax B pexnme 6ap6ekIO.
- 06xapnbaiTe cKaJdoi CTOPOhbl npImepHNO 3MHyTbI.
- PódaBaIte ΦpyKtbl Ha rplne co CBexkIMn ΦpyKtamn.
PekomeHa:
Takxe MoXHO npriTOBtB Ha 7aAMnpax caIOBbIe pyKTBc MmHdaJIbHO KnPOsKoJ.
Cuisinart

CUISNART
99 avenue Aristide Briand
92120 MONTROUGE - FRANCE
www.cuisinart.eu
Garantie Internationale / International Guarantee/ Internationale Garantie / International garantiebewijs / Garanzia Internazionale / Garantia Internacional / Garantia Internacional / Gwarancja międzynarodowa / Męczynyhapodna rapańtnia
ENGLISH: CUISINART guarantees easier contact with its customer services in every country. For details of the customer services in your area, call:
cuisinart_international@conair.com
Cuisinart offers you a 5-year warranty. We offer a standard exchange of the appliance (identical or equivalent) during this period. To benefit from the warranty, the original proof of purchase (sales ticket or receipt) must be attached to this warranty slip along with your full contact details. The warranty does not cover damage resulting from misuse, falls, dismantling, or repair by unauthorized persons. This guarantee in no way affects your rights under statutory law.
DEUTsCH: GARANTIE
- CONTENUTO
- IMPORTANT SAFEGUARDS
- CAUTION: BURN HAZARD
- ELECTRICAL SAFETY
- GENERAL SAFETY
- DISPOSING OF ELECTRICAL AND ELECTRONIC APPLIANCES AT THE END OF LIFE
- INTRODUCTION
- Congratulations on your purchase of the Cuisinart® Griddle & Grill.
- FEATURES (refer to cover)
- USE
- TO FIT THE PLATES
- To fit the plates:
- To remove the plates:
- SELECTING THE COOKING POSITION
- Fully open position
- Half Open Position
- Closed Position
- USING THE INTEGRATED DRIP TRAY
- COOKING WITH THE GRIDDLE & GRILL
- CLEANING & MAINTENANCE
- RECIPIES
- CHICKEN SATAYS WITH PEANUT SAUCE
- FOR THE PEANUT SAUCE
- YOU WILL ALSO NEED:
- BEEF TAGLIATA WITH CHARGRILLED VEGETABLES
- SALMON, COURGETTE & ROCKET SALAD
- DRESSING
- TO SERVE
- VEGETARIAN BUCKWHEAT PANCAKES
- FRUIT SKEWERS
- Para remover as placas:
- TAGLIATA WOLOWA Z GRILLOWANYMI WARZYWAMI
- YTNJIN3AUJN 3JEKTPNUECKNX N 3JEKTPOHHbIX PUNBOPOB IIO OKOHUAHNI CPOKA CJYXbbl
- BCTUJIENHE
- PEÇEΠΤbl
- JIOOCb, LyKKHH N PYKKOJa
- Cuisinart
- Garantie Internationale / International Guarantee/ Internationale Garantie / International garantiebewijs / Garanzia Internazionale / Garantia Internacional / Garantia Internacional / Gwarancja międzynarodowa / Męczynyhapodna rapańtnia
- DEUTsCH: GARANTIE
Brand : CUISINART
Model : GR47BE
Category : Meat grinder plate