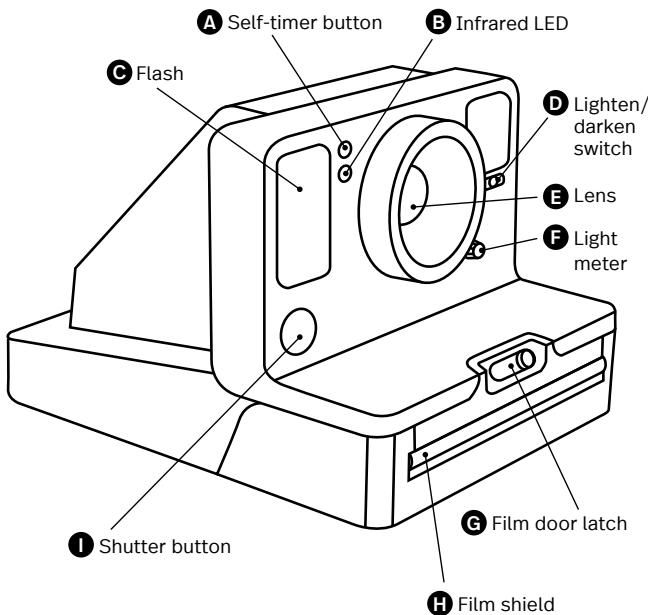
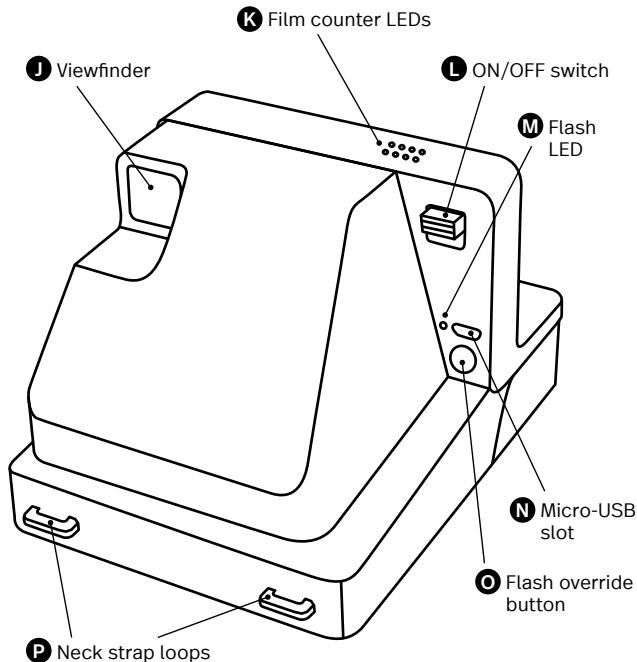
ORIGINALSTaNONE STEP 2 ITYPE CAMERA BLEU CIEL - Instant Camera POLAROID - Free user manual and instructions
Find the device manual for free ORIGINALSTaNONE STEP 2 ITYPE CAMERA BLEU CIEL POLAROID in PDF.

| Product type | Analog instant camera |
| Brand | Polaroid |
| Model | OneStep 2 i-Type |
| Color | Sky blue |
| Dimensions (L × W × H) | 150 mm × 111 mm × 97 mm |
| Weight | 460 g |
| Battery type | Integrated rechargeable lithium-ion, 1100 mAh, 3.7 V |
| Battery life | Approximately 15 to 20 film packs (with flash) |
| Charging time | Approximately 2 hours (wall adapter), 3-4 hours (USB port) |
| Compatible film | Polaroid Originals i-Type and 600 type (color and B&W) |
| Number of photos per pack | 8 photos |
| Lens | Fixed polycarbonate lens with coating, 106 mm focal length |
| Field of view | 41° vertical, 40° horizontal |
| Flash | Built-in discharge tube flash, enabled by default |
| Exposure compensation | Lighten/darken button: +1/2 EV or -1/2 EV |
| Self-timer | 8 seconds, with LED indicator |
| Viewfinder | Traditional optical viewfinder |
| Minimum shooting distance | 60 cm |
| Tripod mount | Yes, standard |
| Operating temperature | Not specified (recommended: avoid temperatures > 42°C) |
| Housing material | Polycarbonate + ABS plastic |
| Compliance | CE, FCC, IC |
| Box contents | OneStep 2 camera, USB cable, manual, strap |
Frequently Asked Questions - ORIGINALSTaNONE STEP 2 ITYPE CAMERA BLEU CIEL POLAROID
User questions about ORIGINALSTaNONE STEP 2 ITYPE CAMERA BLEU CIEL POLAROID
0 question about this device. Answer the ones you know or ask your own.
Ask a new question about this device
Download the instructions for your Instant Camera in PDF format for free! Find your manual ORIGINALSTaNONE STEP 2 ITYPE CAMERA BLEU CIEL - POLAROID and take your electronic device back in hand. On this page are published all the documents necessary for the use of your device. ORIGINALSTaNONE STEP 2 ITYPE CAMERA BLEU CIEL by POLAROID.
USER MANUAL ORIGINALSTaNONE STEP 2 ITYPE CAMERA BLEU CIEL POLAROID
OneStep2 i-Type camera
User Manual
For updated information, video tutorials and more, please visit polaroidoriginals.com/help
Inspired by the original OneStep camera from 1977, the Polaroid OneStep 2 is an analog instant camera for the modern era. It takes a moment and turns it into something you can hold, something you can share, something real.
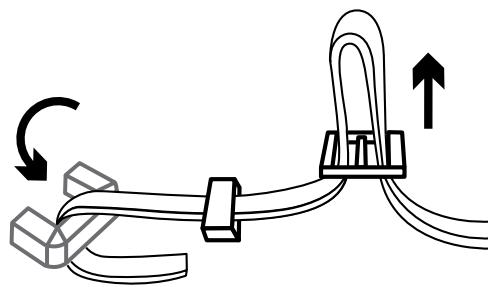
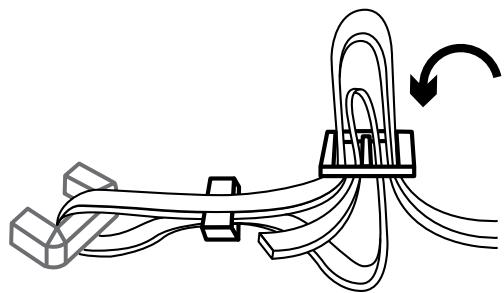
Attach the camera neck strap
Fixez la sangle à l'appareil
Colocación de la correa de cuello
Applicación della tracola
Kamera-Tracegurt anbringen力メラstsラフを取り付ける連接相机挂绳 / 連接相機掛環
KanraLoknSTeRnBukh
PncoeinHneNe WHeHORo
pemhafoaannapa
1
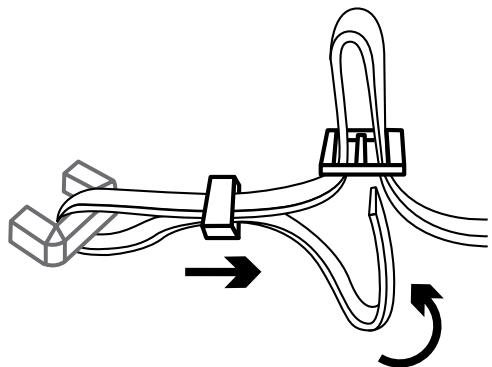
2
3
User Manual
14 Box Contents
14 How to Use the OneStep 2
17 Further Guidance
19 Troubleshooting & FAQ
21 Tips for Making Great Photos
22 Customer Support
22 Technical Specifications
23 Safety Information
24 Compliance
Manuale utente
PykoBODCTBO nonb3OBaTeJRA
126 KomnneKT noCTaBKn
126 IInctpyuynno no ekcnnyataunn OneStep 2
129 DOnONHHTeNbHbIe INHCTpyKUIN
132 POMC K & UCTPAHENHE HENCPABHOCTE N QUACTO
3aDaBaemble BOpocbl
134Kan nonyun'tb notperraiouhe CHAMKK
135 Texnuecka noidepka
135 Texnueckne xapaKtepcntKN
136 Izhopomamaia noTexhike 6e0napachOtn
137 CoOTBeTCTBHeN HOpMATINHbIM Tpe6OBAHIN
Please be sure to read through this manual before using the OneStep 2.
Keep for future reference.
User Manual
Box contents
01 OneStep 2 Camera
02 USB Charging Cable
03 User Manual
04 Camera Neck Strap

How to use the OneStep2
Charge the camera
Important The OneStep 2
will not be fully charged upon purchase - it should be fully charged before first use. To charge the camera, plug the USB charging cable into the Micro-USB slot on the camera's back panel, and the other end of the cable into a charger, such as a smartphone adapter or your computer's USB slot. The red flash charge LED will turn off when the battery is fully charged.
A full charge usually takes about 2 hours through a wall socket with a smartphone adapter, or up to 4 hours through a computer's USB slot. A fully-charged OneStep 2 camera will have enough power to shoot 15-20 packs of film, depending on usage. Remember to turn your camera off after every use to conserve battery life.
1. Turn the
camera on/off
To turn the camera on, slide the power switch into the ON position (down). The flash charging LED on the back panel will start blinking to charge the flash, and the remaining film counter on the top of the camera will light up to indicate that the camera is switched on. To turn the camera off again, return the power switch to the OFF position.
2. Load the film
Slide the film door latch to open the film door. Push the film cassette all the way in, with the film's darkslide facing up.
Note Please check individual film packaging for development time, handling and storage details.
3. Close film door
When you close the film door, the darkslide will eject from the camera automatically, underneath the film shield. The plastic film shield is
designed to protect images from light as they develop - it should not be removed. Take the darkslide out from under the film shield and let the film shield roll back up. If the darkslide has not ejected, remove the film pack and re-insert it, making sure it is pushed all the way to the back of the camera.
4. Set the Flash
& Lighten/Darken
Flash The camera flash will trigger by default when you shoot with the OneStep 2. To shoot without the flash, press and hold the flash override button on the back panel as you press the shutter button.
Warning Shooting without flash will reduce camera performance and picture quality in most lighting situations except brightly-lit, sunny environments. We recommend always shooting with flash.
Lighten/Darken Use the lighten/darken switch on the right side of the lens barrel to adjust
the exposure of your shot. To get a brighter photo, move the lighten/darken switch right to the plus/lighten position. For a darker photo, move the lighten/darken switch left to the minus/darken position. These two settings correspond to different Exposure Values (EV). The camera's Exposure Values are +1/2 EV (when you move the switch to plus/lighten) and -1/2 EV (when you move the switch to minus/darken).
5. Using the viewfinder
The OneStep 2 uses a traditional viewfinder located on the right side of the lens barrel. The viewfinder is most accurate when you align your right eye with the space behind the viewfinder, resting your cheek on the slope of the camera body.
Note Remember that theviewfinder sits slightlyabove and to the right ofthe camera's lens – aboveand to the left from yourperspective when shooting– so you will need to adjust
your aim to compose your shot correctly when shooting at distances of 1.2 meters or less.
6. Compose your photo
To avoid a blurry photo, make sure you are at least 60cm (2 feet) away from your subject when you take the picture. For the best results, always try to shoot with your light source behind you.
7. Take the photo
Press the shutter button all the way in to take the photo. The photo will be ejected from the slot at the front of the camera as soon as you let go of the shutter button. It will be shielded from the light by the film shield, and will be held in place until you are ready to remove it.
8. Remove and shield the photo
Remove the photo from beneath the film shield and let the film shield roll back into the camera. Place the photo face
down to continue shielding it from light as it develops.
flash will trigger automatically. To make self-timed photos without flash, activate the self-timer, then press and hold the flash override button as you press the shutter button.
Further Guidance
Using the self-timer
The OneStep 2 has a self-timer function allowing you to place yourself in your photos or create perfectly-timed photographs. To use the self-timer, press the self-timer button on the left of the lens barrel. The self-timer button will light up to solid orange, indicating that the self-timer is activated. Once you have framed your photo, press the shutter button. The self-timer uses an 8-second interval between pressing the shutter button and taking the photograph. Once triggered, the self-timer's orange LED will blink to indicate the self-timer countdown. In bright or sunny environments, the camera flash will also countdown with short, low-power flashes.
Note When using the self-timer to shoot, the
How much film is left
in the pack
There are 8 orange LED lights on top of the camera. When the OneStep 2 is switched on and not in sleep mode, the LEDs will constantly display the film count. The number of LEDs which light up corresponds to the number of shots left in the film pack. For example: If 6 LEDs light up, that means there are 6 shots left in the film pack. If you have used up all 8 shots in the film pack, or if there is no film pack inserted in the camera, then the LEDs will blink rapidly when you turn the camera on.
How much battery
you have left
The camera has 3 battery states, indicated by
the camera's flash charge LED light:
- Battery charged: Enough charge for at least 2 packs of film.
The flash LED will blink green whilst charging between shots, and will be solid green when ready to shoot.
- Battery low:
Enough charge for about 1 pack of film.
The flash LED will blink orange whilst charging between shots, and will be solid orange when ready to shoot.
3. Battery empty:
No charge remaining. The flash LED will blink red, and the camera will cease to operate until it is recharged.
A fully-charged OneStep 2 camera will have enough power to shoot 15-20 packs of film, depending on usage. To check the camera's charge at any time, switch the camera off, then switch it back on whilst holding down the self-timer button. The 8 film counter LEDs on top of the camera will light up, indicating
how much battery remains.
For example: If 6 LEDs light up, that means the camera has 6/8 (75%) charge remaining. Once you release the self-timer button, the LEDs will return to displaying the number of shots remaining in your film pack.
Compatible Film
The OneStep 2 works with all Polaroid Originals i-Type and 600 type film packs. We recommend using i-Type film as it is optimized for use with the OneStep 2.
Power supply
Charge the OneStep 2 before use to ensure it has enough power for the duration of your shoot (see Charge the Camera). The flash charge LED will be solid red whilst the camera is plugged in and charging, and will turn off once the camera is fully charged.
Attach the camera neck strap
See page 8 for guide to attaching your neck strap.
Using a Tripod
The OneStep 2 has a tripod socket in its base, which works with most standard tripods. Simply screw your tripod mount into the socket on the base of the OneStep 2.
Note With most tripods, the tripod mount will need to be unscrewed before you can load or exchange film into the OneStep 2.
Cleaning the rollers
Sometimes excess developer paste from photos may build up on the camera's rollers, affecting the camera's performance and causing photos to show unwanted imperfections. The OneStep 2 has a built-in roller cleaning mode to help with this issue. Just follow these steps:
- Turn the camera off.
- Open the film door.
- Hold the flash override button and press the shutter button.
- The camera is now in roller cleaning mode.
-
Using a damp cloth or cotton swab, gently clean the rollers.
-
Press shutter button to incrementally advance roller positions.
- Once both rollers are clean on all sides, close the film door.
- Rollers will automatically return to their correct position.
Troubleshooting & FAQ
My OneStep 2 won't eject my photo/darkslide
Make sure that your OneStep 2 camera is charged: The camera's flash charge LED will blink red if it doesn't have enough charge to operate. If this is the case, you should recharge your camera before using the camera again.
Make sure you still have film in your camera: to check, slide the power switch off and on. The remaining film counter LEDs will indicate how many shots you have left in the film pack. If the LEDs flash rapidly when the the camera turns on again, this means that there are
no shots left in the film pack, or that no film pack is inserted.
The flash doesn't fire when I take a photo
When taking photos make sure you aren't accidentally pressing the flash override button, located on the camera's back panel.
My photo turned out slightly too dark
We strongly recommend that you always shoot with flash when shooting indoors, as well as outside at night-time, at dusk and on cloudy days with low light conditions.
Make sure you are not shooting towards the sun; the OneStep 2 meters the average light level it sees. When shooting toward sunlight, the excessive light may cause the camera to over-compensate when exposing the image, creating an image that is too dark to expose your subject properly.
Move the lighten/darken switch on the right side of the lens barrel to the plus/lighten
position for a brighter image.
My photo turned out blurry or fuzzy
When shooting, make sure to hold the camera steady, especially in low light conditions, and make sure you have a strong light source to illuminate your shot.
We strongly recommend that you always shoot with flash when shooting indoors, as well as outside at night-time, at dusk and on cloudy days with low light conditions. You can also use a tripod to give your camera a stable base.
Make sure you are not too close to your subject when taking photos. In order to avoid blurry or out-of-focus photos, you should shoot from at least 60cm (2 ft) away from your subject.
Tips for Making Great Photos
Make photos indoors
Always use the flash when shooting indoors, even if you don't think you need it.
Indoor light appears yellow on analog film - the OneStep 2's flash is designed to compensate for this.
Make photos at night
When shooting at a party (or any indoor night-time environment), you should always use the flash.
You can also try moving the lighten/darken switch to the plus/lighten position to get a brighter shot.
Make photos outdoors
Natural light is your best friend when it comes to instant photography. On a sunny day outdoors, you don't need to use your flash at all. Make sure not to shoot towards the sun; shoot with the sun behind you, facing your subject directly
or side-on. If your environment is very bright, you can try moving the lighten/darken switch to the minus/darken position to let less light into the shot and prevent it from being "blown out".
In any situation where you are not shooting in bright, direct sunlight, we recommend still using the flash to achieve the best shots.
Make landscape photos
When trying to capture a landscape shot, make sure that the sun or main light source is behind you to prevent the image from being "blown out" by excess light.
On a cloudy or overcast day with low light, you may wish to place the camera on a tripod or steady surface which will make it easier for the entire scene to remain in focus.
Customer Support
The Polaroid Originals Customer Support Team is always more than happy to hear from you. Get in touch using the contact details provided. For more detailed and up-to-date information, visit polaroidoriginals.com/help
USA/Canada
usa@polaroidoriginals.com
+212 219 3254
Europe/Rest of World
service@polaroidorphinals.com
0080057701500
Impossible B.V.
P.O.Box 242
7500 AE Enschede
The Netherlands
Technical Specifications
General
Dimensions
150mm (L) × 111mm W × 97mm H Weight
460 grams (without film pack)
Operating Temperature
40-108°F / 4-42°C, 5-90%
relative humidity
Compatible Film
Polaroid Originals i-Type and 600 type film in both Color and Black & White, including Special Editions. Battery
High performance lithium-ion battery, 1100mAh, 3.7V nominal voltage, 4.07Wh
Materials
Outer shells
Polycarbonate + ABS plastics Lens
Optical grade polycarbonate lens, coated
Shutter system
Custom design using precision step motor
Optical System
Lens
Fixed focus lens
Focal length
106mm
Field of view
41 degrees vertical,
40 degrees horizontal
Flash System
Vacuum discharge tube strobe
Safety Information
Caution RISK OF ELECTRIC SHOCK -DO NOT OPEN/ DISASSEMBLE THE MOTORIZEDROLLER SYSTEM
- Do not disassemble the device. Incorrect reassembly can cause electrical shock if the device is used again.
- Do not immerse the device in water or other fluids.
- Do not operate the device in a high humidity environment or very dusty environments.
- Do not attempt to tamper with, adjust or remove the battery and/or the electronics located below the rollers behind the device's film door.
- Do not attempt to remove the door itself as it is connected electronically to the body of the device. Doing so is unsafe, will likely damage your device, and will void your warranty.
- Do not insert metal objects into the device.
- Do not insert any objects into the rollers or gears.
- Keep small children and infants away from device to avoid them being injured by the device's moving parts.
- Do not use or store the device near any heat source or any type of equipment that generates heat, including stereo amplifiers.
- Do not use the device near flammable or explosive gases.
- Do not charge the device if you notice any unusual odors, noise or smoke.
- Do not attempt to disassemble the film's battery or modify it in any way (if using 600-type film). If battery fluid gets in your eyes, immediately rinse your eyes with fresh, cold running water and seek medical attention immediately.
Battery and Charger
-
This device uses a custom lithium-ion battery that is non-removable and mounted inside the camera body. No other type of battery can be used. Battery replacement can only be done by authorized service centers. The battery will provide many years of service if properly used.
-
Power consumption varies depending on the environment the device is used in and how the device has been stored. Used immediately after full charge, the battery will power the processing of up to 20 film packs with flash exposures. Due to the high energy requirements of the flash, we recommend charging the camera fully before every session for best results.
Once the battery energy level falls below a certain level, the device will no longer process film. The LED will blink and signal when it needs to be recharged. This is to avoid a photo getting stuck as it is being processed through the roller system. - The rechargeable battery is not fully charged at the time of purchase. Charge the battery fully with the USB charging cable (provided). This usually takes 1-2 hours (can vary depending on usage).
- The supplied battery charging cable has been tested to work with the Apple iPhone power adaptors. While it can be used in other USB ports e.g. computer, USB power adaptors, TVs, cars etc., correct operation cannot be guaranteed.
- When the device is no longer in use, please recycle it properly.
Usage Environment
To protect the high-precision technology contained in this device, never leave the camera in the following environments for extended periods of time: high temperature (+42^ / 108^) , high humidity, places with extreme changes in temperature (hot and cold), direct sunlight, sandy or dusty environments such as beaches, damp places, or places with strong vibrations.
- Do not drop the device or subject it to severe shocks or vibrations.
- Do not push, pull or press on the lens.
Compliance
Important directions for using Lithium-Ion Batteries
- Do not throw into fire.
- Do not short circuit.
- Do not disassemble.
- Do not continue to use when damaged.
- Dispose correctly after use.
- Keep away from water.
EU Declaration of Conformity
Hereby, Impossible B.V. declares that the OneStep 2 analog instant camera is in compliance with the essential requirements of the Electromagnetic Compatibility Directive (2014/30/EU), Low Voltage Directive (2014/35/EU) and RoHS Directive (2011/65/EU) and other relevant provisions, when used for its intended purpose.
FCC Compliance Statement
This device complies with Part 15 of the FCC Rules. Operation is subject to the following two conditions: (1) this device may not cause harmful interference, and (2) this device must accept any interference received, including interference that may cause undesired operation.
Caution The user is cautioned that changes or modifications not expressly approved by the party responsible for compliance could void the user's authority to operate the equipment. This equipment must not be co-located or operated in conjunction with any other antenna or transmitter.
Note This equipment has been tested and found to comply with the limits for a Class B digital device, pursuant to part 15 of the FCC rules. These limits are designed to provide reasonable protection against harmful interference in a residential installation. This equipment generates, uses and can radiate radio frequency energy and, if not installed and used in accordance with the instructions, may cause harmful interference to radio communications. However, there is no guarantee that interference will not occur in a particular installation. If this equipment does cause harmful interference to radio or television reception, which can be determined by turning the equipment
off and on, the user is encouraged to try to correct the interference by one or more of the following measures:
Reorient or relocate the receiving antenna.
- Increase the separation between the equipment and receiver.
- Connect the equipment into an outlet on a circuit different from that to which the receiver is connected.
- Consult the dealer or an experienced radio/TV technician for help.
This equipment complies with FCC radiation exposure limits set forth for an uncontrolled environment. End user must follow the specific operating instructions for satisfying RF exposure compliance.
Industry Canada (IC)
The symbol means that according to local laws and regulations your ct should be disposed of separately household waste. When this product es its end of life, take it to a collection designated by local authorities. Some tion points accept products for free.
The separate collection and recycling of your product at the time of disposal will help conserve natural resources and ensure that it is recycled in a manner that protects human health and the environment.
(sans cartouche de film)
4-42°C/40-108°F,5-90%
d'humidité relative
Films compatibles
Directives importantes relatives
150mm (Largo) × 111mm (Ancho) ×
97mm (Alto)
Peso
460 gramos (sin el carrete depellicula)
Temperatura operativa
4-42°C/4-108°F,5-90% de
humedad relativa
Pellicula compatible
4-42°C/40-108°F,5-90%
umidità relativa
Pellicole compatibili
41 gradi in verticale,
4-42°C/40-108°F, 5-90%
囂卡賊列部起2月(60cm)1534153415341534153415341534153415341534153415341534153415341534153415341534153415341534153415341534153
音云。
7. 案例
OneStep 2 He BbIaet foToTropaHn / He OTKpbBaet CBeTO3aunTHyO 3acJIOHky
Y6eHntecb, YTO FOToaannapat OneStep 2 3apJKe: ecnI 3apaA aKKyMnIaTOpHe NOCTATOHO dIpaB0tbl yCTPOICTBA, INDIKAkTop 3apJa BcNbIuK Mmraet KpaChbIM UBeTOM. B 3Tom cIyae HeoXoDImo 3apIITb FOToaannapat Ipeed CneJeUoUmm NcOnb3OBAHNEM.
YbEInTeCb, YTO BΦOaannapateEcTb\PIeHka:YTObI pObePrtb 3TO,BbIKIOHnTE n CHOBABKNIOHTNE mTaHne.CBtEOHnDhIbe INdIKaTOpblcHTcHnKa IJIeHNoKajyT, CKOBko KaPBOBOctaIOCBΦINbMnake.EcNIINdIKaTOplb6ICTo MraHOTnBPBKNIOHnΦOToaannpata,3TOROBOPNT O TOM,YTO BΦINbMnakeHe OCTaIOCb KaPBo, NIObΦINbMnak He BCTaBNeH.
Bcblska He cpaabaBaet npn Cbemke FOtorpaФи Y6eHntecb, cyTO pnCbemke cnayHNo He NaKan KHOJky 6bOKnpOBkN BCblskn Ha3aHne naHEn foToaannapata.
ΦotorpaФи nIonyuAOTcCnIshKOM TEMhblIMN
HaCToTaeNbHO peKOMeHdyetyTCNIOJIbOaBb BCNIbIuKy pINCbEMKe B NOMEUeHInn, A TaKkeBHE NOMEUeHInn B TEMHOE BEmy CYtOK IN B OblaNuHyo NOrOHy CHeNOCTaTOuHbIM OCBEUeHNeM.
He ChmMaIte npOTNB cOlnHca; OneStep 2 n3MepaET cpeHn ypoBHeN OcBEuEHNHOCTN B NOle CBOero 3peHn. Pnp CSbEmke npOTNB cOInHca CnUHKOM rpkn CBET MOKeT bI3BaTb Ype3MEpHyO KOMNeHCaMuOp npi 3KcNoHINpOBaH N KaDpa, B pe3yJbTaTe Yero N3o6paXeHne NpOyuAeTc CnUHKOM TEmhblM N ObEkt Ha fOToTropaFm pNOx BVdEn.
YTObI CdeNaTb N3O6paXeHHe RApHe, CDBINbTE pepeKlUOATEbN OCBETNEHn/3aTeMHeHn CnpBaO OT npAbB obEkeTNBa B NIOJKeHne IJIIOC/OCBETNEHHe.
Фотографи поуаOTс pa3MbIbIMN IIN HeYETKIMN Bo Вретм CBemK YupeRЖИВaTe poToaHnPaT HeNoOBeHXHO, OCO- bEHO B YCNOBIX HeOCTaTOU- Horo OCBeSEHry, pny ATOM ob- eKT CBemKДОЛЖЕH 6bITb XoPoIOO OCBeUeH.
HactoTaeIbHo peKOMeHdyET
CnOIpb3OBaTb BCblUkny pni
CbEMeB B NOMEuEHm, a TaKKe
BHe NOMEuEHn B TEMHO BpE
McyToK n B oIaHuYIOrOy C
HeNOCTaOHTbIM OCEueHEm.
MoXHO taKKe BocNoB3OBaTbC
StaTINbOM, YTObI OBeCneHtB
yctOnHBoe IIOxKeHne FOto
annapara.
YbI HxOINCTcB Ha DOCTATOHOM ydaneHHOTob6u I36exaTb pa3MbItbIX n foTOrpa#n, pacCToHne do obekTa cBEMK DoJXHO 6bITb He MeHee 60 cm.
KaK noJyUHTb nOTpRAcaUoUne CHIMKIN
CbeMkaBnomelueHm
PnI cBemKe B NOMEuEHM NOB-3aTeNbHO NcONb3yIte BCbluHk, DaJIe ECNI BAM KAXETC, YTO OHa He HxKHa. OCbESeHne B NOMEuEHM BblrJNT Ha aHAnorOBOI PIIeHe JeNtBlM — BCbluKHa OneStep 2 KOMnEHCpyET 3OT 3ΦΦeKT.
HouhajcbeMka
PnI cBemKe Ha BeeepHKe (INB N IIObO Bpuro O6ctAHOBKe B NOMeueHnB H OHOHe BPEM) O683aTeNbHO NIOb3yUInTcB BCbUllKo. MoKHO TaKcE NonpOboBaT nepEmuTaB NepeKlOuCteNbOCBETHeH3aTEMHeHnB NPOJOKeHne ITOIOc/OCBETHeHNe),YTObI NOJyUHTb BOJIee AApKCHIMOK.
Cbemka BHe NOMeueHnA
Korda pehy ndet O MOMeHTaB-NHOM FOOTORpaHPOBAHN, ONTHMaJIbHbN BAPnAHT - 3TO eCTBeHNHO CCBUEHNE. BCOJIHeuHbI DeHb Na pnpOde
Ncno30BaTb BCbIbKU BOoBue He Tpe6yetcHa. He ChmMaTe npOTb BcOnHua; PnI CbEMKe cOnHue DOJNKHO bItb Y Bac 3a CnHNO, OcBeuA oBekt npRmo HIn cboKy. EcnI cpea CnHsKOM JpKa, MOxHO nepeDBeHHTb peKeJIIOuAteb OCBETHeHNA/3aTeMHeHnB NIOLOXHeMe «MHNyc/3aTeMHeHne》,YTObbl yMeHbUnTB KOnHcETBO CBeta, NpadaioUeHa KaAp, INpeOToBPATITb erO «3aCBtky》. B IIObO BcTuAunu, KpOMe CbEmKn B ycNoBnx RpKOro PnprMO CoINHeHORo CBeta pekOMeHdyETcNcNo30BaTb BCbIbKU dIaONyEHHn CHIMKOB MaKCMMAhBOHKAeCTBA.
JaHuaqThaΦOTorpaqna
PnCbEMKe ne3aKeJ coINHcE
HIN OCHOBHO INCTOHNK CBETA
DOJIKNHbI 6bITb 3a CINHO, YTOb6I
HE NOyCTNt 3acBETK IN3o6pa-
XeHnA IN3-3a CmUkOM JRPKOrO OCB
BESeHnI. B NaCMpyHbI INxMypbl DeHc B HeOCTaTOHbIM
YPOBHEM OCBeUeHNOCTM MOxHO
YCTaONHTb FOToaNNapat Ha
WITATB INI HA yTOHNVyIO NOBepxHOCTb -3TO ObIeNHT COxpan pe3KOCT BCEiCLHebl.
TexHnuecka npDepkka
Cnykba Texnueckoi noedepkkn Polaroid Originals cberda pada npniuHa nomouch.Дя CBzriC n HAMN cnoIb3yute npBedeHnble NHEK oKTaKTHbIe daHbIe.DЯ noIPOyehna 6oJIe noPpOboHoi n AKTuAhnHOHmOpMaun Ha be6cait polaroidorigiins.com/help
CUSA/KaHaJa
usa@polaroidorphinals.com
+212 219 3254
Ebpona/octaJIbHbIe CtpaHbI
service@polaroidoriginals.com
0080057701500
Impossible B.V.
P.O.Box 242
7500 AE Enschede
HndepnaHdbi
TexHnueckne xapaKTepeNCTnKn
06uhe xapaKTepeNtukn
Pa3Mepbl
150 (Д) ×111 (Л) ×97 (В) ММ
Macca
460r(6e3ΦnIbMnaKa)
Paboya temepaforma
4 - 42^ ,OTHOCTENbHnBnBnAaXHcOt b5-90%
CobmecTmam nnEHa
Пленику Polaroid Originals i-Type nTm 600,委书记н урегно-беля, BKNoHач сецальнысерп.
AkkymyIaTOp
BbICOKO3ΦpeKTHBbHbI nHTnHnHOHH bAkyMnyTOp, 1100 Mau, HOMHaHbHoe HaprrxHeNe 3,7 B, 4.07 B-TH
Maternabli
Kopnyc
COOTBCTBHE HOPMATNBHbIM Tpe6obabnM
Bakhye kya3aennnpo hcnlbo3a0bAHHNHOHNNbHbAKyMHTTROPO
- He 6pocatb B orOHb.
- He noDBepratb KOpOTKOMy 3aMbIKAHNIQ.
- He pa36npaTb.
- He npdojnkabh hcnlntb3oaba H cn7yae nopboekdieny
- NapibnblbHo TYNIH3NPOBbTa NO OKOHANHm 3KcNPTaUaTc.
- XpaHnTb BdaJIN OT BoDbl.
Deknapaue EC o COOTBETCTBHN
KOMANHIM IMOPTB V. 3AABHTT, YTO anharoBbI pOtoaannapat MTHOBeHNbI cBmEOM OneStep.2 OTBWAEHT OCHOBHbIM TpeBOBaHIN MMIXKETMbV bS hNtPKoMAHNTNH COBMECTHMOCTH (2014/30/EU), DIIeKETMbV o HIXKOBOBTHN BOMcOpDyBaHIN (2014/35/EU), DIIeKETMbV b6 oparHnEHNIc oBdKePAHn BpeDhXbBEvCEST (2011/65/EU) nDpyHxu COOTERTBTOUYIOx pPnDCNAHnPi pY cNOBmN icNoJIb3OBAHN PfoaONAPATA no CEIEEOMY HAHAeHHeN.

CIMBUN OH3aHaHT, YO C0BETCTBMM C MECHTBM 3AOKHOATEJTBOMI H
HOPMAMMA YUINIIMIROBAPT 3TO IQUENINE HEOX6MODIO MTOJIbHO TO Bt08bUTsOXTOX
IOI HcTeHEni cPcO cIyKbI dAaHOrO hIeNtE Iero cIeyTe cTaNbT bNHy TnPiMe, MeCthbIy OropAHmN bAACTN. HeKOpTe pNyHKbTI pNMe IpnHIMOT hKeNcBc6SnTnAO. YTNMa3aJIH IeNtE C cObeIoJeHem mPabHl paDeBtHOro cObpa I nepeAp0bTK mPOKTe nproDIOHe ly pecBycI aRapHTaYPeT NepeAp0Be K BY COOTBETCTBN cTpeBOAaHHMn 3aauITdOOBpy I oKpyKaouei cPdeB.
OneStep2 i-Type camera
OneStep 2 Analog Instant Camera Polaroid Originals
Impossible B.V.
P.O. Box 242
7500 AE Enschede
The Netherlands


End of life disposal warning: When the product has come to the end of life, dispose of it in accordance with local regulations. This product is subject to the EU directive 202/96/EC on Waste Electrical and Electronic Equipment (WEEE) and should not be disposed as unsorted municipal waste.
Revision 3.0 - 10/2017
Manufactured in China. This product is distributed and sold by Impossible B.V., P.O. Box 242, 7500 AES Enschede, The Netherlands and its wholly owned subsidiaries. Polaroid, Polaroid Classic Border logo, Polaroid Originals Design and Polaroid OneStep are trademarks of PLR IP Holdings, LLC, used under license. PLR IP Holdings, LLC does not manufacture this product or provide any Manufacturer's Warranty or support.
Join our community by signing up at polaroidoriginals.com