MV-SAM20TBK - Microwave Oven TOSHIBA - Free user manual and instructions
Find the device manual for free MV-SAM20TBK TOSHIBA in PDF.
Questions des utilisateurs sur MV-SAM20TBK TOSHIBA
0 question sur cet appareil. Repondez a celles que vous connaissez ou posez la votre.
Poser une nouvelle question sur cet appareil
Download the instructions for your Microwave Oven in PDF format for free! Find your manual MV-SAM20TBK - TOSHIBA and take your electronic device back in hand. On this page are published all the documents necessary for the use of your device. MV-SAM20TBK by TOSHIBA.
USER MANUAL MV-SAM20TBK TOSHIBA
DE BLESSURE CORPORELLE,
CONNECTER L'INSTALLATION A LA TERRE

AVERTISSEMENT DE SECURITE
DANGER
https://qcode.smartiolife.com/THA/down.htm?instruction manual=Oven2XM
1 Telecharger I'application Tsmartlife
Hotline Darcy France
PROBLEMOPLOSING.. NL-45
WAARSCHUWING
VEILIGHEIDSWAARSCHUWING
VEILIGHEIDSWAARSCHUWING
VEILIGHEIDSWAARSCHUWING
GEVAAR
https://qcode.smartiolife.com/THA/down.htm?instruction manual=Oven2XM
Selecteer "Connect to WiFi network".
Opmerking: 5G is nog nicht beschikkaar.
https://qcode.smartiolife.com/THA/down.htm?instruction manual=Oven2XM
- Vuelva a Tsmartlife.
https://qcode.smartiolife.com/THA/down.htm?instruction manual=Oven2XM
- Voltar a Tsmartlife.
PRODUCT INTRODUCTION
PRECAUTIONS TO AVOID POSSIBLE EXPOSURE TO EXCESSIVE
MICROWAVE ENERGY EN-6
TO REDUCE THE RISK OF INJURY TO PERSONS GROUNDING
GROUNDING INSTALLATION EN-7
MATERIALS YOU CAN USE IN MICROWAVE OVEN EN- 10
MATERIALS CAN NOT BE USED IN MICROWAVE OVEN EN-11
INSTRUCTION FOR USE
SETTING UP YOUR OVEN. EN- 12
CONTROL PANEL EN-16
OPERATION EN-17
MAINTENANCE
TROUBLESHOOTING. EN-41
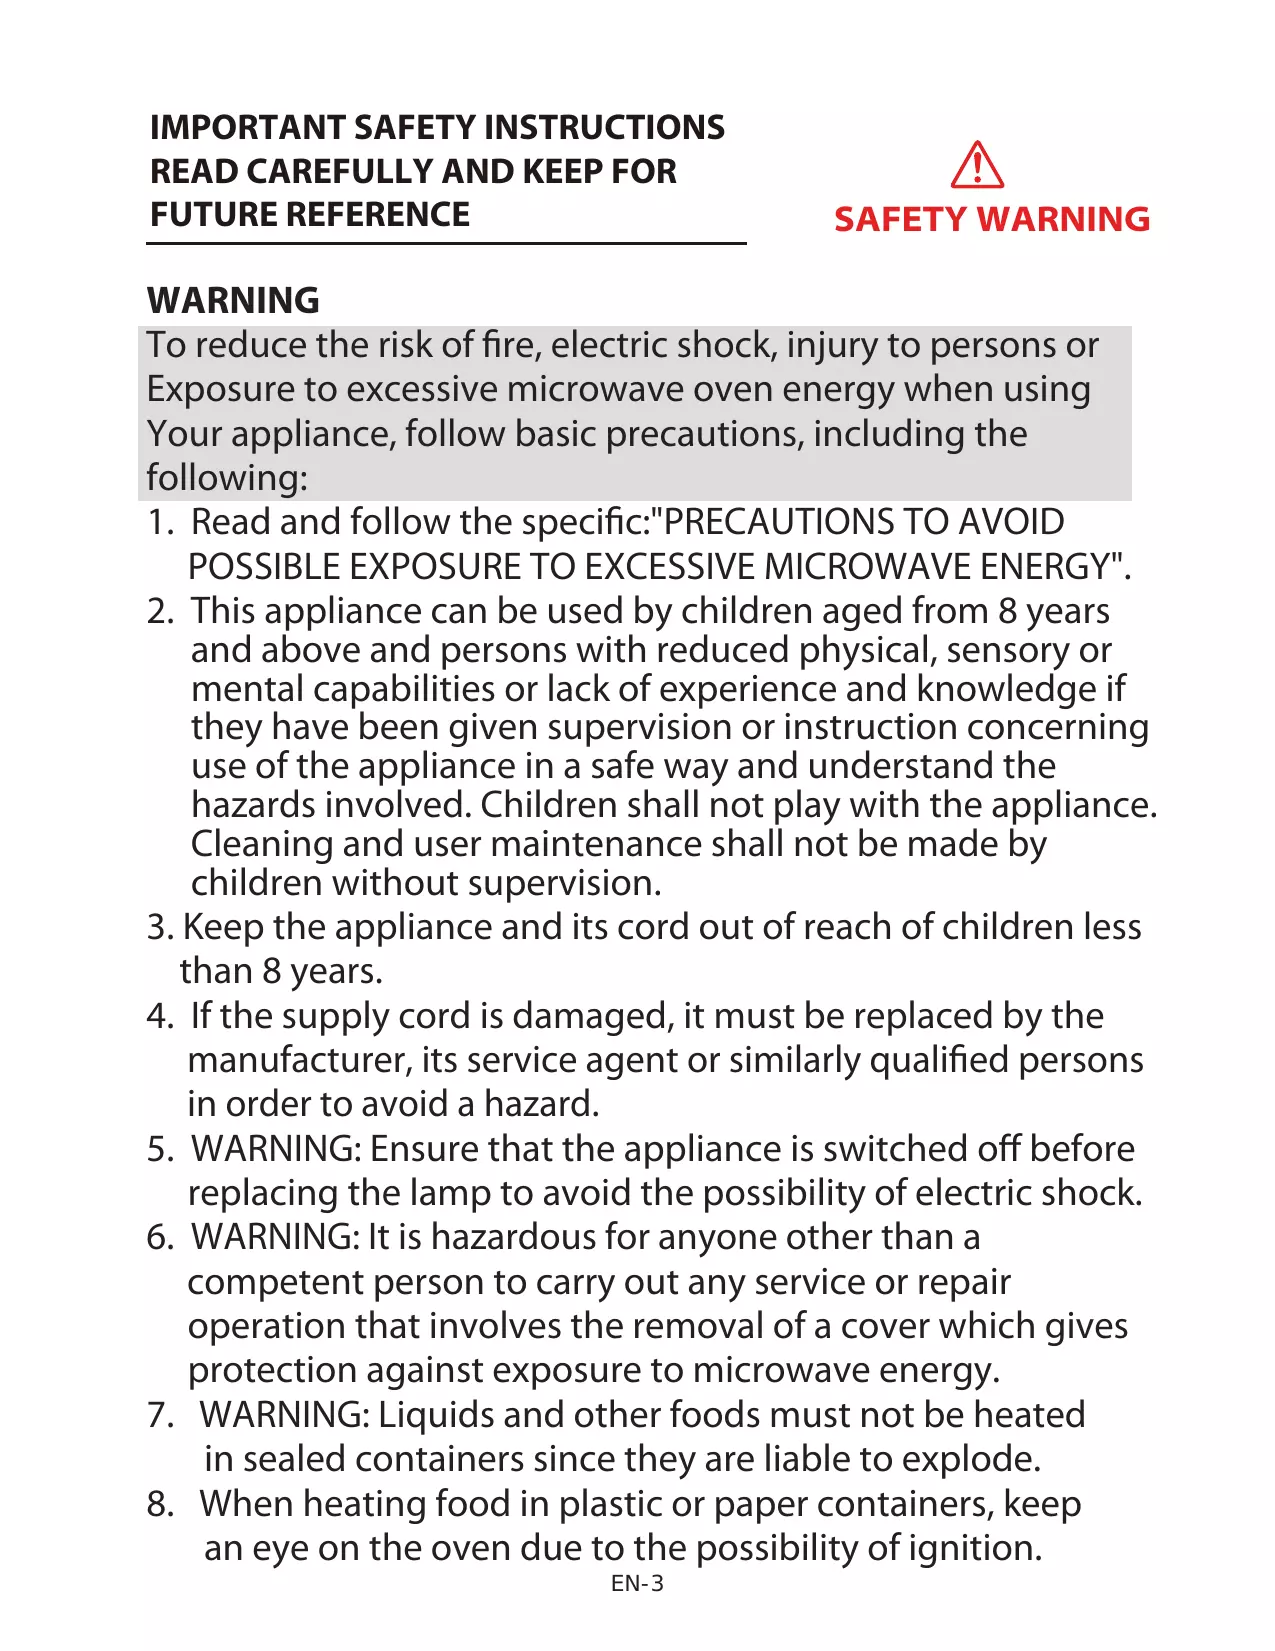
WARNING
To reduce the risk of fire, electric shock, injury to persons or Exposure to excessive microwave oven energy when using Your appliance, follow basic precautions, including the following:
- Read and follow the specific:"PRECAUTIONS TO AVOID POSSIBLE EXPOSURE TO EXCESSIVE MICROWAVE ENERGY".
- This appliance can be used by children aged from 8 years and above and persons with reduced physical, sensory or mental capabilities or lack of experience and knowledge if they have been given supervision or instruction concerning use of the appliance in a safe way and understand the hazards involved. Children shall not play with the appliance. Cleaning and user maintenance shall not be made by children without supervision.
- Keep the appliance and its cord out of reach of children less than 8 years.
- If the supply cord is damaged, it must be replaced by the manufacturer, its service agent or similarly qualified persons in order to avoid a hazard.
- WARNING: Ensure that the appliance is switched off before replacing the lamp to avoid the possibility of electric shock.
- WARNING: It is hazardous for anyone other than a competent person to carry out any service or repair operation that involves the removal of a cover which gives protection against exposure to microwave energy.
- WARNING: Liquids and other foods must not be heated in sealed containers since they are liable to explode.
- When heating food in plastic or paper containers, keep an eye on the oven due to the possibility of ignition.
IMPORTANT SAFETY INSTRUCTIONS

SAFETY WARNING
- Only use utensils that are suitable for use in microwave ovens.
- If smoke is emitted, switch off or unplug the appliance and keep the door closed in order to stifle any flames.
- Microwave heating of beverages can result in delayed eruptive boiling, therefore care must be taken when handling the container.
- The contents of feeding bottles and baby food jars shall be stirred or shaken and the temperature checked before consumption, in order to avoid burns.
- Eggs in their shell and whole hard-boiled eggs should not be heated in microwave ovens since they may explode, even after microwave heating has ended.
- The oven should be cleaned regularly and any food deposits removed.
- Failure to maintain the oven in a clean condition could lead to deterioration of the surface that could adversely affect the life of the appliance and possibly result in a hazardous situation.
- The appliance must not be installed behind a decorative door in order to avoid overheating. (This is not applicable for appliances with decorative door.)
- Only use the temperature probe recommended for this oven. (for ovens provided with a facility to use a temperature-sensing probe.)
- The microwave oven shall not be placed in a cabinet.
- This appliance is intended to be used in household and similar applications such as: - staff kitchen areas in shops, offices and other working
environments;
- by clients in hotels, motels and other residential type environments;
-farm houses; -
bed and breakfast type environments.
-
The microwave oven is intended for heating food and beverages. Drying of food or clothing and heating of warming pads, slippers, sponges, damp cloth and similar may lead to risk of injury, ignition or fire.
-
Metallic containers for food and beverages are not allowed during microwave cooking.
- The appliance shall not be cleaned with a steam cleaner.
- The appliance is intended to be used freestanding.
- The rear surface of appliances shall be placed against a wall.
- Keep a minimum free space 30 ~cm above the top surface of the oven.
- Regarding the instructions of the details for cleaning the door seals, cavities, adjacent parts and the surfaces in contact with food, refer to the section "CLEANING" on page EN-8 of the manual.
- Group 2, Class B equipment This equipment is Group 2 equipment as it intentionally generates radio frequency energy for treating material and is designed to be used in domestic premises or an establishment directly connected to the low voltage electricity distribution network supplying buildings used for domestic purposes (Class B).
PRECAUTIONS TO AVOID POSSIBLE EXPOSURE TO EXCESSIVE MICROWAVE ENERGY
(a) Do not attempt to operate this oven with the door open since this can result in harmful exposure to microwave energy. It is important not to break or tamper with the safety interlocks.
(b) Do not place any object between the oven front face and the door or allow soil or cleaner residue to accumulate on sealing surfaces.
(c) WARNING: If the door or door seals are damaged, the oven must not be operated until it has been repaired by a competent person.
ADDENDUM
If the apparatus is not maintained in a good state of cleanliness, its surface could be degraded and affect the lifespan of the apparatus and lead to a dangerous situation.
SPECIFICATIONS
| Model: | MV-SAM20T(BK) |
| Rated Voltage: | 230-240V~50Hz |
| Rated Input Power (Microwave): | 1250-1320W |
| Rated Output Power (Microwave): | 800-850W |
| Transmit frequency(WIFI): | 2412-2472MHz |
| Transmit frequency(Bluetooth): | 2402-2480MHz |
| Maximum transmit power: | WiFi: 17,9 dBm Bluetooth: 7,1dBm |
| Microwave frequency : | 2450MHz |
DANGER
Electric Shock Hazard
Touching some of the internal components can cause serious personal injury or death. Do not disassemble this appliance.
WARNING
Electric Shock Hazard
Improper use of the grounding can result in electric shock.
Do not plug into an outlet until appliance is properly installed and grounded.
This appliance must be grounded. In the event of an electrical short circuit, grounding reduces the risk of electric shock by providing an escape wire for the electric current.
This appliance is equipped with a cord having a grounding wire with a grounding plug. The plug must be plugged into an outlet that is properly installed and grounded.
Consult a qualified electrician or serviceman if the grounding instructions are not completely understood or if doubt exists as to whether the appliance is properly grounded.
If it is necessary to use an extension cord, use only a 3-wire extension cord.
-
A short power-supply cord is provided to reduce the risks resulting from becoming entangled in or tripping over a longer cord.
-
If a long cord set or extension cord is used:
a. The marked electrical rating of the cord set or extension cord should be at least as great as the electrical rating of the appliance.
b. The extension cord must be a grounding-type 3-wire cord.
c. The long cord should be arranged so that it will not drape over the counter top or tabletop where it can be pulled on by children or tripped over unintentionally.
CLEANING
Be sure to unplug the appliance from the power supply.
- Clean the cavity of the oven after using with a slightly damp cloth.
- Clean the accessories in the usual way in soapy water.
- The door frame and seal and neighbouring parts must be cleaned carefully with a damp cloth when they are dirty.
- Do not use harsh abrasive cleaners or sharp metal scrapers to clean the oven door glass since they can scratch the surface, which may result in shattering of the glass.
- Cleaning Tip---For easier cleaning of the cavity walls that the food cooked can touch: Place half a lemon in a bowl, add 300 ml (1/2 pint) water and heat on 100 % microwave power for 10 minutes. Wipe the oven clean using a soft, dry cloth.
CAUTION
Personal Injury Hazard
It is hazardous for anyone other than a competent person to carry out any service or repair operation that involves the removal of a cover which gives protection against exposure to microwave energy.
See the instructions on "Materials you can use in microwave oven or to be avoided in microwave oven." There may be certain non-metallic utensils that are not safe to use for microwaving. If in doubt, you can test the utensil in question following the procedure below.
Utensil Test:
- Fill a microwave-safe container with 1 cup of cold water (250ml) along with the utensil in question.
- Cook on maximum power for 1 minute.
- Carefully feel the utensil. If the empty utensil is warm, do not use it for microwave cooking.
- Do not exceed 1 minute cooking time.
MATERIALS YOU CAN USE IN MICROWAVE OVEN
| UTENSILS | REMARKS |
| Browning dish | Follow manufacturer's instructions. The bottom of browning dish must be at least 3/16 inch (5mm) above the turntable. Incorrect usage may cause the turntable to break. |
| Dinnerware | Microwave-safe only. Follow manufacturer's instructions. Do not use cracked or chipped dishes. |
| Glass jars | Always remove lid. Use only to heat food until just warm. Most glass jars are not heat resistant and may break. |
| Glassware | Heat-resistant oven glassware only. Make sure there is no metallic trim. Do not use cracked or chipped dishes. |
| Oven cooking bags | Follow manufacturer's instructions. Do not close with metal tie. Make slits to allow steam to escape. |
| Paper plates and cups | Use for short-term cooking/warming only. Do not leave oven unattended while cooking. |
| Paper towels | Use to cover food for reheating and absorbing fat. Use with supervision for a short-term cooking only. |
| Parchment paper | Use as a cover to prevent splattering or a wrap for steaming. |
| Plastic | Microwave-safe only. Follow the manufacturer's instructions. Should be labeled "Microwave Safe". Some plastic containers soften, as the food inside gets hot. "Boiling bags" and tightly closed plastic bags should be slit, pierced or vented as directed by package. |
| Plastic wrap | Microwave-safe only. Use to cover food during cooking to retain moisture. Do not allow plastic wrap to touch food. |
| Thermometers | Microwave-safe only ( meat and candy thermometers). |
| Wax paper | Use as a cover to prevent splattering and retain moisture. |
MATERIALS TO BE AVOIDED IN MICROWAVE OVEN
| UTENSILS | REMARKS |
| Aluminum tray | May cause arcing. Transfer food into microwave-safe dish. × |
| Food carton with metal handle | May cause arcing. Transfer food into microwave-safe dish. × |
| Metal or metal-trimmed utensils | Metal shields the food from microwave energy. Metal trim may cause arcing. × |
| Metal twist ties | May cause arcing and could cause a fire in the oven. × |
| Paper bags | May cause a fire in the oven. × |
| Plastic foam | Plastic foam may melt or contaminate the liquid inside when exposed to high temperature. × |
| Wood | Wood will dry out when used in the microwave oven and may split or crack. × |
SETTING UP YOUR OVEN
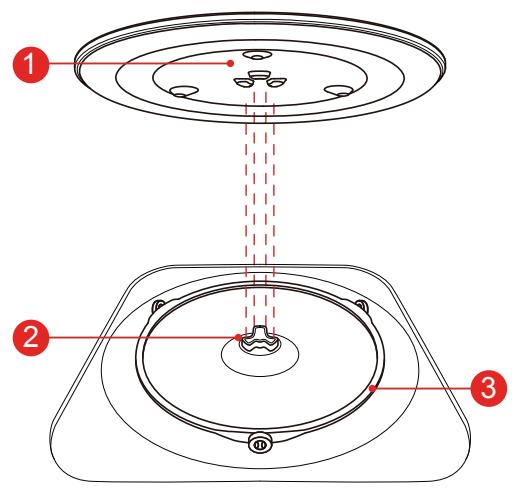
Names of Oven Parts and Accessories
Remove the oven and all materials from the carton and oven cavity.
Your oven comes with the following accessories:
- This illustration is for reference only. Some accessories are available only with certain models, depending on the appliance model, individual details may differ.
Glass Tray
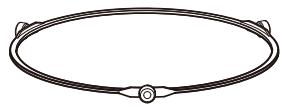
Turntable Ring Assembly

Turntable Shaft
Instruction Manual

A) Control panel
B) Turntable shaft
C) Observation window
Turntable Installation
Cleaning the cooking compartment and putting the turntable in place.
For new installations, make sure all packaging and shipping tape has been removed from the turntable shaft. Before using the appliance to prepare food for the first time, you will need to put the turntable in place correctly. You must clean the cooking compartment and accessories.
How to put the turntable in place:
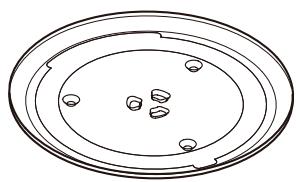
- Place the turntable ring assembly ③ into the recess in the cooking compartment.
- Place the glass tray ① on the turntable ring assembly ③ . Fit the raised, curved lines in the center of the glass tray bottom between the three spokes of the shaft. Make sure that the glass tray ① engages in the turntable shaft ② in the center of the cooking compartment floor.
The rollers on the ③ should fit inside the turntable bottom ridge.
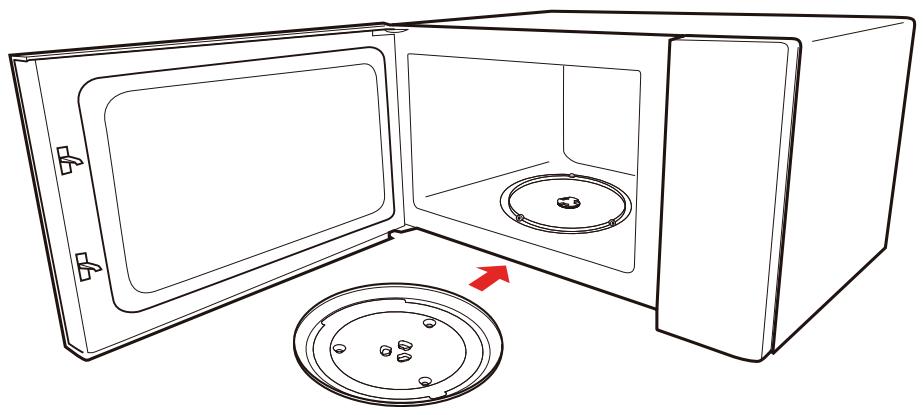
Note:
- Never use the appliance without the turntable. Make sure that it is properly engaged. The turntable can turn clockwise or anti-clockwise.
- Never place the glass tray upside down. The glass tray should never be restricted.
- Both glass tray and turntable ring assembly must always be used during cooking.
- All food and containers of food are always placed on the glass tray for cooking.
- Never restrict the movement of the turntable.
- If glass tray or turntable ring assembly cracks or breaks, contact your nearest authorized service center.
SETTING UP YOUR OVEN
Counter-top Installation
Remove all packing material and accessories. Examine the oven for any damage such as dents or broken door. Do not install if oven is damaged.
Cabinet: Remove any protective film found on the microwave oven cabinet surface. Do not remove the light brown Mica cover that is attached to the oven cavity to protect the magnetron.
Installation
- Select a level surface that provide enough open space for the intake and/or outlet vents.
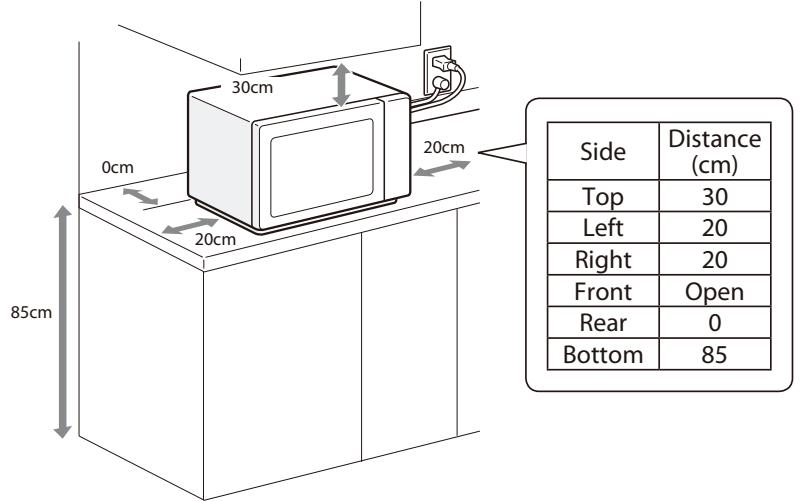
(1) The minimum installation height is 85cm.
(2) The rear surface of appliance shall be placed against a wall. Leave a minimum clearance of 30 ~cm above the oven, a minimum clearance of 20 ~cm is required between the oven and any adjacent walls.
(3) Do not remove the legs from the bottom of the oven.
(4) Blocking the intake and/or outlet openings can damage the oven.
(5) Place the oven as far away from radios and TV as possible. Operation of microwave oven may cause interference to your radio or TV reception.
SETTING UP YOUR OVEN
- Place the oven as far away from radios and television sets as possible. Operation of microwave oven may cause interference to your radio or TV reception.
- Plug your oven into a standard household outlet. Be sure the voltage and the frequency is the same as the voltage and the frequency on the rating label.

Do not install oven over a range cook-top or other heat-producing appliance. If the oven is installed near or over a heat source, it could be damaged and the warranty would be void. The oven is designed for bench-top use only and must not be placed in a cabinet.
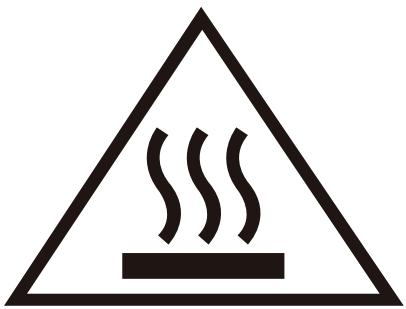
The accessible surface may be hot during operation.
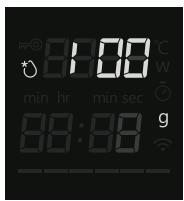
CONTROL PANEL
Control Panel And Features
In this chapter, we will explain the displays and controls. You will also find out about the various functions of your appliance.
In the control panel, you can use the various buttons to set the required function of the appliance. The current settings are shown on the display window.
NOTE
- Depending on the appliance model, your control panel may have differences in appearance. Individual details and colors may differ, but the words on the buttons and functionality will be the same.
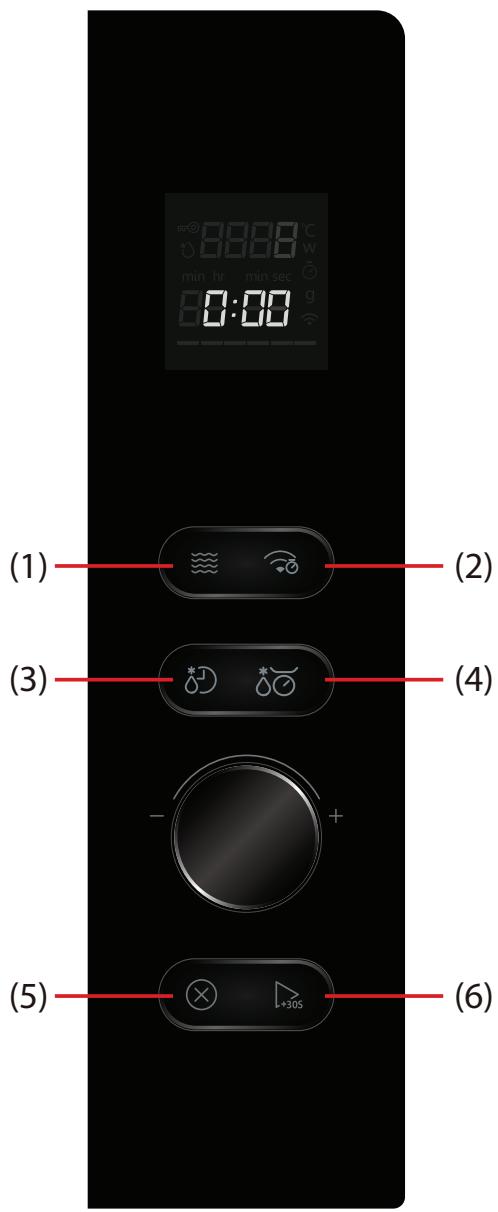
(1) MICROWAVE
(2) CLOCK / KITCHEN TIMER / WIFI
(3) TIME DEFROST
(4) * WEIGHT DEFROST
(5) STOP/CANCEL
(6) _+30S START/+30SEC.
OPERATION
This oven uses modern electronic control to adjust cooking parameters to meet your needs better for cooking.
- Before operating your new microwave oven make sure you read and understand this use and care guide completely. The microwave oven is for food preparation only. ALWAYS have food in the microwave oven when it is on to absorb the microwave energy. Stay near the oven while it's in use and check cooking progress frequently so that there is no chance of overcooking food.
Follow these procedures:
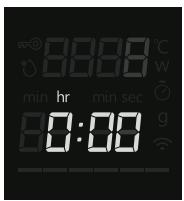
Plug in the oven. Close the door. The oven display will show 0:00. Oven go into standby mode.
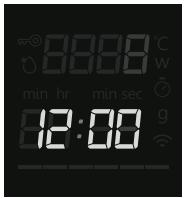
1. Clock Setting
Suppose you want to enter the correct time of day 12min 30sec.
PROCEDURE
Step
Press / Display
- Press CLOCK / KITCHEN TIMER / WIFI twice. Leftmost "0" will flash to show it can be adjusted.
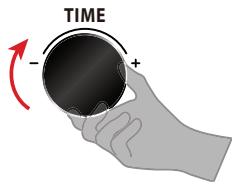
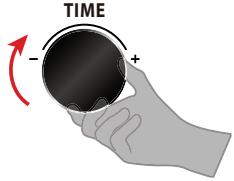
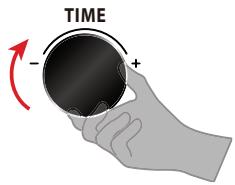
- Enter the correct time of day of hour figures by turning
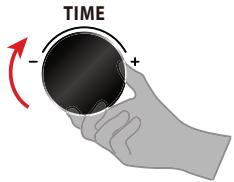
input "12"min at this step. (Input range: 00:00~23:59)
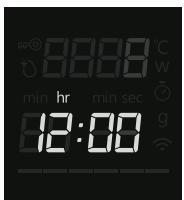
- Press START/+30SEC. to confirm hour figures.

OPERATION
PROCEDURE
Step
Press / Display
- Enter the correct time of day of minute figures by turning

input "30" at this step.
(Input range: 00:00~23:59)
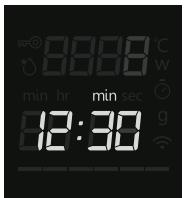
- Confirm with START/+30SEC.
A colon starts to blink.
NOTE
- If you enter an incorrect clock time, simply press STOP/CANCEL and re-enter the correct time of day.
- To reset the clock, please repeat steps 1 to 5, as above. In the process of setting the figures, if you do not press START/+30SEC. to confirm within one minute, it will restore the clock and the clock setting will be invalid.
- Electrical power supply to your Microwave Oven should not be interrupted. If this occurs during cooking, the program will be erased. The time of day will also be erased.
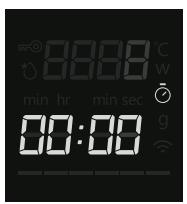
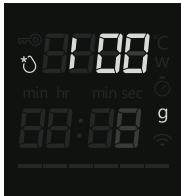
2. Kitchen Timer
To set the length of time for an operation. To set a countdown. It will monitors how long the function operates automatically.
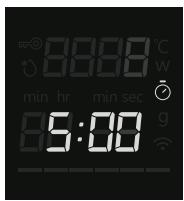
- Suppose you want to set timer for 5 minutes.
PROCEDURE
Step
Press / Display
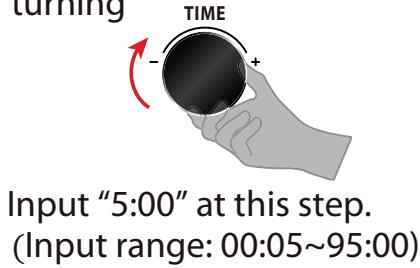
- Press CLOCK / KITCHEN TIMER / WIFI . 00:00 starts to blink.
- Enter the correct time by turning TIME
Input "5:00" at this step.
(Input range: 00:05~95:00)
- Confirm with START/+30SEC..

- The countdown is over .
NOTE
- Kitchen timer is countdown timer only and does not control or start any cooking modes. Opening or closing the door has no effect on the timer.
- When the set time has elapsed, the unit will sound 5 times and the screen will return to standby. If the clock has been previously set, the current time will display.
OPERATION
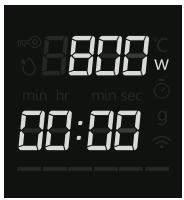
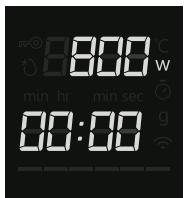
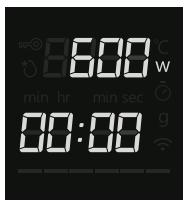
3. Microwave
The microwave function is useful for steaming, as well as the quick and convenient defrosting and reheating of foods. Using lower power levels increases the cooking time which is recommended for foods such as cheese, milk and long slow cooking of meats. Five preset power levels are available for Microwave cooking.
| Press MICROWAVE once then press MICROWAVE | Approx. Percentage of power | Display |
| / | 29/29 | 800W |
| Once | 22/29 | 600W |
| Twice | 14/29 | 400W |
| 3 times | 8/29 | 200W |
| 4 times | 3/29 | 100W |
Press MICROWAVE
once then select desired power level by turning

oven output power
Less heating power required

800 600 400 200 100 Watts

More heating power required
OPERATION
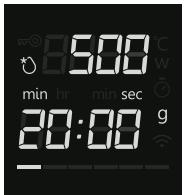
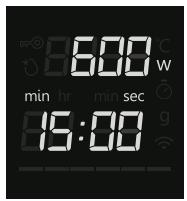
- Suppose you want to cook with 600W microwave power for 15 minutes.
PROCEDURE
Step
Press / Display
- Press MICROWAVE.
- Select desired power level by turning

or press MICROWAVE repeatedly. Input "600W" at this step.
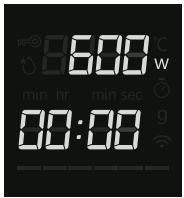
- Confirm with START/+30SEC..

- Enter the correct time by turning the
Input "15:00" at this step.
(Input range: 00:05~95:00)
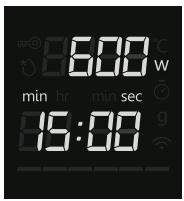
- Press START/+30SEC. to start cooking.

NOTE
- It is completely normal in these programs to see the Program progress bar change during the cooking cycle.
OPERATION
NOTE
- For many heating type, the appliance specifies a default temperature or level. You can accept this value or you can use the rotate selector to change it manually.
- After starting the operation, the timer countdown is highlighted. Cooking time may also be increased in 30 second increments by pressing START/+30SEC. repeatedly. When you press the START/+30SEC., the time is changed and adopted immediately.
- To check the power level during cooking, press the MICROWAVE button. As long as your finger is pressing the MICROWAVE, the power level will be displayed.
STOP/CANCEL
Press the STOP/CANCEL to:
- Erase if you make a mistake during programming.
- Cancel timer.
- Stop the oven temporarily during cooking.
- Return the time of day to the display.
- Cancel a program during cooking, press twice.
NOTE
- In the process of setting, if the STOP/CANCEL is pressed or after a period of inactivity for 1 minute, the oven will revert to the former setting automatically.
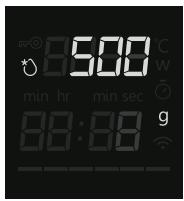
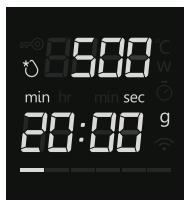
4. Defrost By Weight
With this feature you can defrost food according to the weight. The weight is programmed in grams for weight defrost and auto menu. Do not include the weight of any added water or the weight of container.
- Suppose you want to defrost food for 500g.
PROCEDURE
Step
Press / Display
- Press WEIGHT DEFROST.
"100"starts to blink.
OPERATION
- Set the weight of the frozen food by turning _AMOUNT
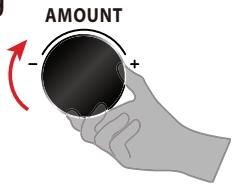
Input range: 100 1500g
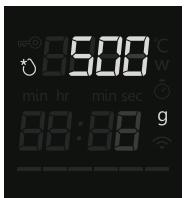
- Press START/+30SEC..The time counts down in the display.
5. Defrost By Time
- Suppose you want to defrost food for 5 minutes at P30 (default 240W).
| PROCEDURE | |
| Step | Press / Display |
- Press TIME DEFROST.
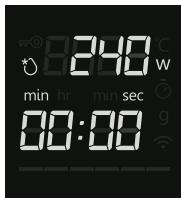
- Enter the correct time by turning TIME
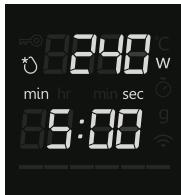
- Press START/+30SEC..

OPERATION
6. Auto menu
| PROCEDURE | |
| Step | Press / Display |
| 1. Select the required menu by turning FOD TYPE to the right. A-1 A-2 A-3 ...... A-10 A-11 A-12 A-1 (Refer to the "Auto menu Chart" below.) | |
| 2. Confirm with START/+30SEC.. | |
| 3. Select the required Weight or component by turning AMOUNT | |
| 4. Press START/+30SEC..The time counts down in the display. | |
| NOTE | ·When using the auto menu, it is not necessary to program the time or cooking power. Indicating the food type and weight is sufficient. Some foods require stirring during cooking. Stir halfway through at oven beeps. |
| MENU | WEIGHT | DISPLAY | POWER |
| A-1 Reheat cup | 1 cup (200g) | 1 | P100 (800W) |
| 2 cups (400g) | 2 | ||
| 3 cups (600g) | 3 | ||
| A-2 Dinner plate | 250g | 250g | P100 (800W) |
| 350g | 350g | ||
| 500g | 500g | ||
| A-3 Reheat Beans | 200g | 200g | P50 (400W) |
| 400g | 400g | ||
| A-4 Scrambled eggs | 1 | 1 | P100 (800W) (40% and 80% time passes, the buzzer sound twice to remind user to Stir the food) |
| 2 | 2 | ||
| 3 | 3 | ||
| A-5 Bacon | 1 slice | 1 | P100 (800W) |
| 2 slices | 2 | ||
| 3 slices | 3 | ||
| 4 slices | 4 | ||
| 5 slices | 5 | ||
| 6 slices | 6 | ||
| A-6 Pizza | 200g | 200g | P100 (800W) |
| 400g | 400g | ||
| 600g | 600g | ||
| A-7 Lasagna | 250g | 250g | P100 (800W) |
| 500g | 500g | ||
| A-8 Potato | 1 (230g) | 1 | P100 (800W) |
| 2 (460g) | 2 | ||
| 3 (690g) | 3 | ||
| A-9 Vegetable | 150g | 150g | P100 (800W) |
| 350g | 350g | ||
| 500g | 500g | ||
| A-10 Popcorn | 50g | 50g | P100 (800W) |
| 100g | 100g | ||
| A-11 Mug cake | 1 (100g) | 1 | P100 (800W) |
| 2 (200g) | 2 | ||
| 3 (300g) | 3 | ||
| A-12 Soften ice-cream | 250g | 250g | P50 (400W) |
| 500g | 500g |
OPERATION
7. Quick Start / Add 30 seconds
a. In standby mode, START/+30SEC. control instant switches on the microwave oven with maximum microwave power 800W, and a duration of 30 second (up to 95min). Simply pressing the START/+30SEC. repeatedly increases the duration in cooking.
b. In standby mode, first turn the rotary coding switch to the left, then right-rotate to increase cooking time. Press START/+30SEC. to switch on the microwave oven with maximum microwave power 800W.
NOTE
- During Auto Menu, Weight Defrost, Timer functions and Multi-stage cooking, it's not available to lengthen the cooking time.
8. Home Appliance
This appliance is WiFi-capable and can be remotely controlled using a mobile device. If the appliance is not connected to the home network, the appliance functions in the same way as an oven with no network connection and can still be operated via the display.
Setting up
To implement settings via Home Appliance, you must have downloaded and set up the Home Appliance app on your mobile device.
Read the Home Appliance documents supplied for this.
Follow the steps specified by the app to make the settings.
The app must be open in order to perform the setup process.
Connect to the network and app
Visit the following URL for latest version of Tsmartlife :
Android / iOS:
https://qcode.smartiolife.com/THA/down.htm?instruction manual=Oven2XM
Then trust developer.
If the Tsmartlife app is installed on your mobile device. Always update software to the latest version and follow these steps to connect the app to your microwave oven.
Download the latest version of the "Tsmartlife" App from the app store or Google Play.
Instructions to Connection with Tsmartlife App
Before you start, make sure that:
- Your smartphone is connected to home WiFi network, and you know the network password.
- You are next to the appliances.
- The frequency of your wireless router is 2.4GHz (preferable) or 5GHz.
- Initiate your mobile phone's Bluetooth and allows the APP to find your phone.

Download Tsmartlife App
Scan the QR code below or search for "Tsmartlife "in Google palyAndroid devices) or App Store(ios devices) to download the app.


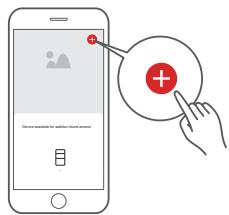
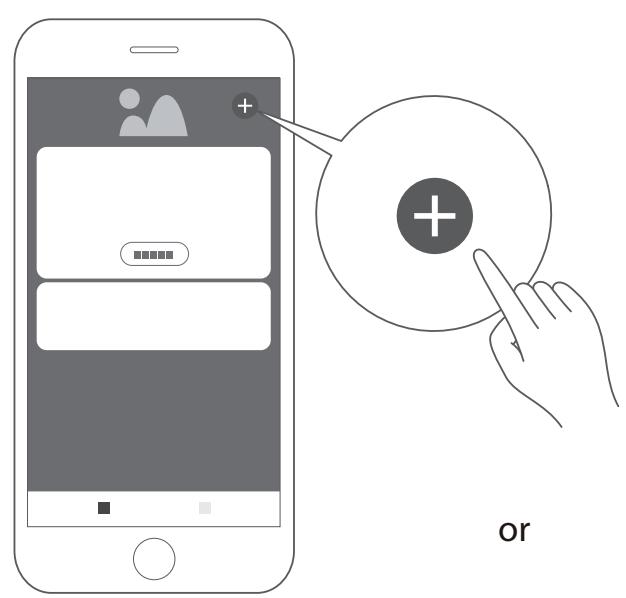
Add your appliance
Click the "+" button, add your device according to the device model or choose the device found out by Bluetooth and add it.

Register or Login account
Open the App and create a user account. If you already have one, just log in


Connected to the network
Follow the instructions in the App to set up the WiFi connection. If the network connection fails, please refer to the App tips for operation.

Notes on Connection
- When networking the product, please make sure that the mobile phone is as close as possible to the product.
- According to the App tips, if the appliance could only connect to the 2.4GHz WiFi network, please note that the 2.4GHz network is now available.
- Toshiba recommends that you would better name your WiFi router SSID with letters and numbers only; otherwise, the SSID might become invalid if it is named with special characters, punctuation marks or spaces. After the SSID is available, please try to connect with WiFi, otherwise, please login the router and change the SSID name.
If there is a large number of devices connecting with the WiFi router, the network stability might be affected. Toshiba is not obliged to advise you that how many devices you shall connect you're your WiFi router, for it depends on router quality and many other factors.
If the router is replaced or WiFi name or password is revised, please carry out the steps above mentioned again for WiFi connection. - When the product technology is updated, Tsmartlife may be changed, but what the content shown in the Tsmartlife shall prevail.
Tsmartlife Troubleshooting
Background:
Offering dual-band support provides choices and maximum flexibility of the product to have successful experience on home network. Home networks can be expected to have multiple WiFi service possibilities, depending on how their router is configured. There are four WiFi router configuration modes: A, B, C and D.
A. 2.4GHz only ... e.g. older model WiFi router
In this case dual band radio will automatically operate at 2.4GHz
B. 5GHz only ... some people may choose to turn off older 2.4GHz band due to conflicting interference
In this case dual band radio will automatically operate at 5GHz
C. 2.4GHz and 5GHz sharing same SSID name ... e.g. Johns WiFi
In this case the WiFi router and dual-band radio will negotiate the best frequency to use
D. 2.4GHz and 5GHz with different SSID names ... e.g. JohnsWiFi_2G and JohnsWiFi_5G
In only this case is there a choice which WiFi band to use.
Having a dual band radio in the appliance means it is not necessary to change routers or router configuration unless problems are experienced, in which case knowing what WiFi router configuration you have (see above A, B, C or D) is important to know and understand.
If unable to join network at the first time
- Cannot see home SSID network :
- Weak signal ... Since appliance radio is dual-band this means neither 2.4GHz nor 5GHz signal is being received by the appliance. Just because the WiFi signal can be seen by the phone doesn't necessarily mean that the appliance radio can see it if the signal is marginal. Long distance between router and appliance or encountering too many barriers can reduce the signal level too much. Reorienting the router may improve the situation slightly. A better solution would be a WiFi repeater or a higher quality router. Recognize that all WiFi routers transmit power is limited by federal regulations, but a higher quality router can do a better job of transmitting the signal equally in all directions, have more sensitive receivers to better handle weak signals, and have higher quality software to minimize the dropping of connections.
SSID network seen but cannot join:
o Networks requiring authentication ...often used with public networks at restaurants or hotels. Products cannot accept the legal agreement required to join the network. Please switch to a network that does not require authentication.
Insufficient encryption ... for cybersecurity reasons Toshiba does not recommend products to join non-encrypted or insufficiently encrypted networks (e.g. WEP encryption).
Password length ... for cybersecurity reasons Toshiba recommends networks to have strong passwords, but the maximum password length supported is 32 characters
Incorrect password ... If trying to join a different network than the one the phone is currently using, then it is always possible that the network password in the phone is no longer correct. In this case, new credentials will need to be provided.
o non-alphanumeric or foreign language characters. - WLAN+ (Android) or WLAN Assistant (iOS) functions are turned on, please turn off and reconnect to the Internet.
If can join network but the connection is unstable
For WiFi configuration modes A, B and C, follow the instructions provided by your router manufacturer to make the indicated router configuration changes :
- In case of router configuration A (see above), Toshiba recommends enabling 5GHz band if it is disabled in your router and choosing a distinct SSID name for the 5GHz band (e.g. SSIDname_5G). Then follow the normal joining instructions to join the 5GHz network. If your router is an older 2.4GHz only router, Toshiba recommends upgrading to a newer dual-band router.
- In case of router configuration B (see above), Toshiba recommends enabling 2.4GHz band (all routers that offer 5GHz also support 2.4GHz), and choose a distinct SSID name for the 2.4GHz band (e.g. SSIDname_2G). Then follow the normal joining instructions to join the 2.4GHz network.
- In case of router configuration C (see above), Toshiba recommends assigning distinct SSID names for the 2.4GHz and 5GHz bands. Then follow the normal joining instructions to one of the networks, and subsequently follow the troubleshooting instructions for WiFi mode D.
For these steps router configuration changes are not required:
- In case of router configuration D (see above), then it is worthwhile to try operation on the other band before making changes to the router configuration or upgrading the router. In other words, if unstable connection using 2.4GHz then try 5GHz instead. Or if unstable connection using 5GHz then try 2.4GHz instead. Follow the instructions below "How to set the network to 2.4GHz or 5GHz."
- WLAN+ (Android) or WLAN Assistant (IOS) functions are turned on, please turn off and reconnect to the Internet.
If your Device off line, check your connection status Please confirm that
- Whether the device is properly powered
- Whether the network signal is stable
- Whether the WiFi name or password has been changed, if so, please add the device again
OPERATION
Plug the microwave oven into a power outlet that is grounded. Add devices in "Tsmartlife" App. Please follow the steps below.
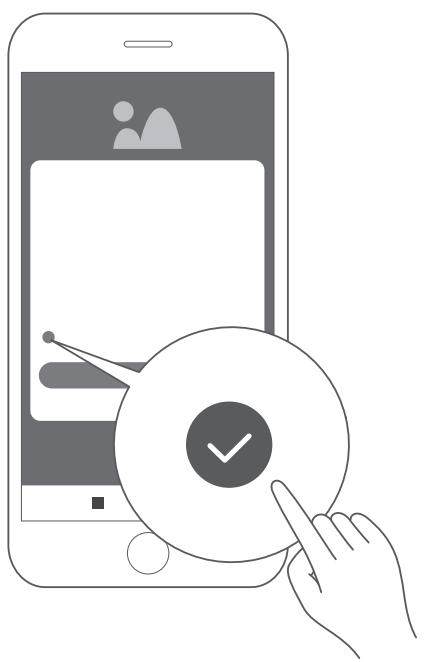
1. Check checkmark and click "Agree"

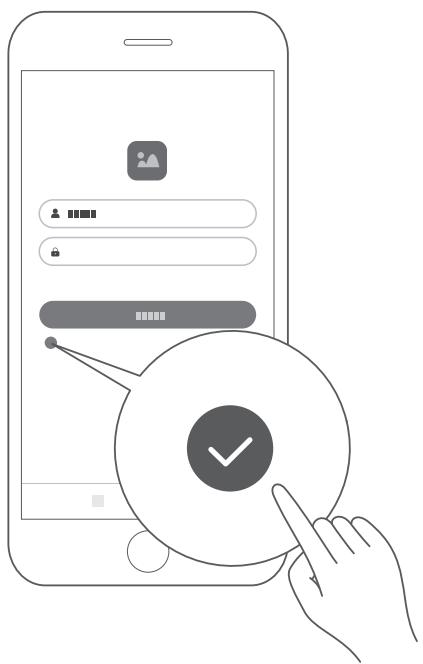
- Click Sign up and enter email address to sign up.
- Enter user-name & password, check check-mark and click Login.
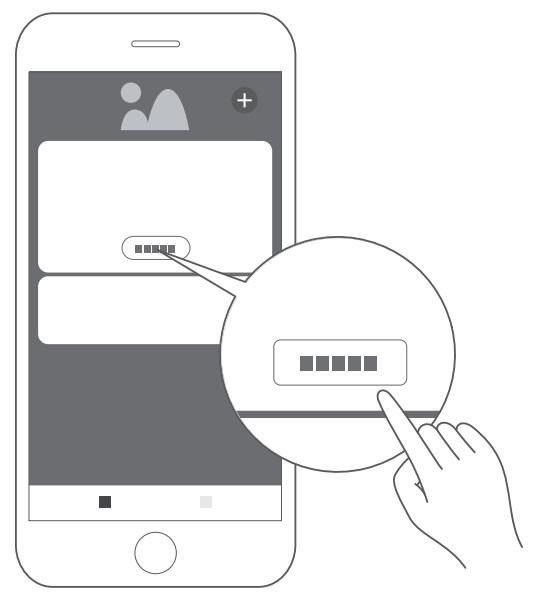
- Click "add device" or "+" to add device
Note: Before adding a new device, make sure the microwave is powered.
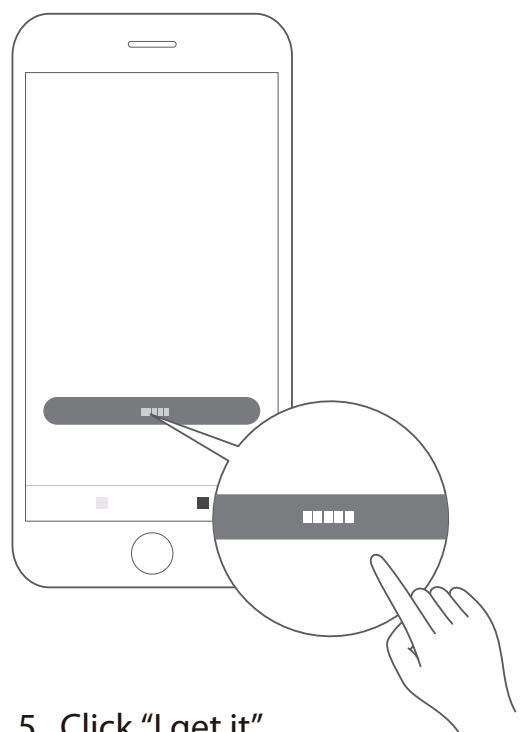
- Click "I get it"
- Scroll down and select "Microwave Oven"
OPERATION
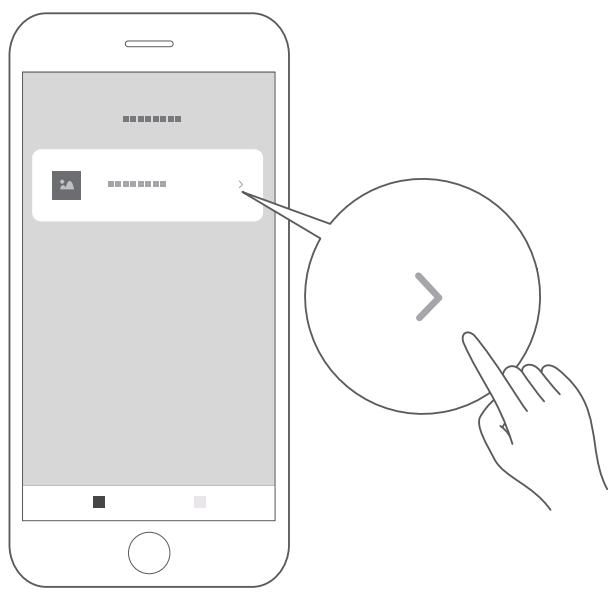
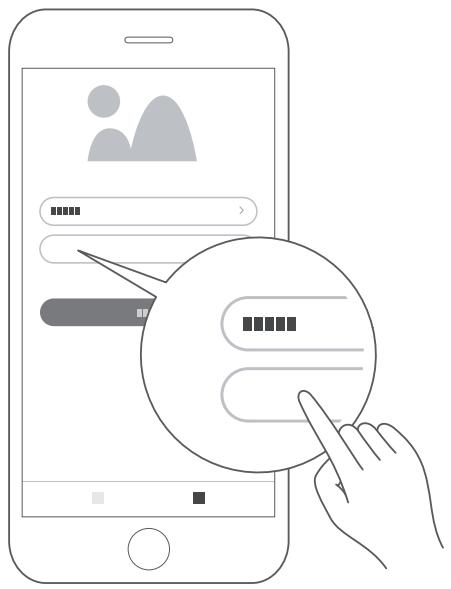
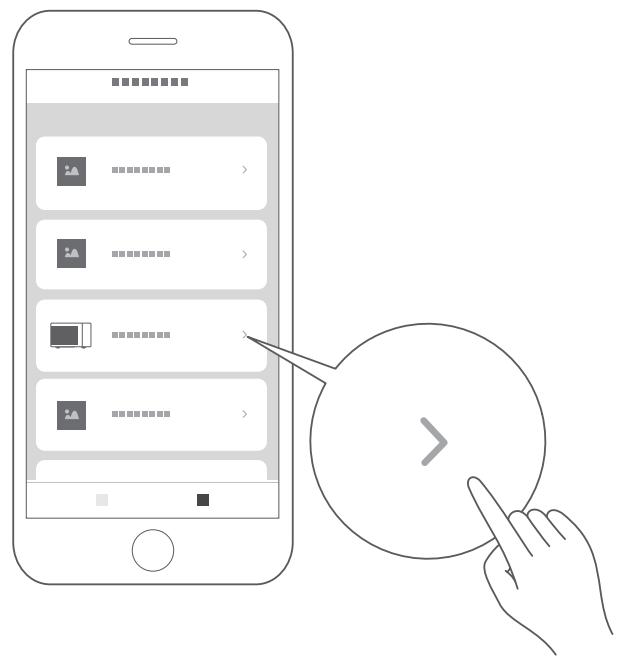
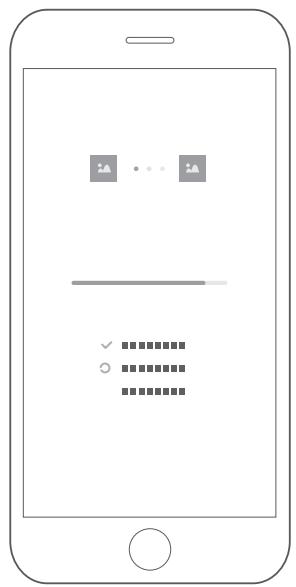
7. Select "1EMLAAQQ"
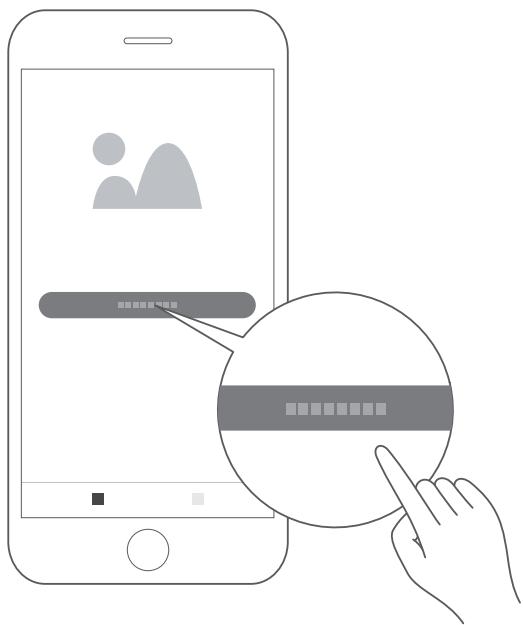
8. Switch to Wi-Fi first if not already. Select "Connect to WiFi network" Note: 5G is not yet available.
9. Enter password for desired network. Note: please use 2.4GHz Wi-Fi network as guided.
10. Click Next
OPERATION

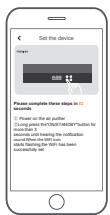
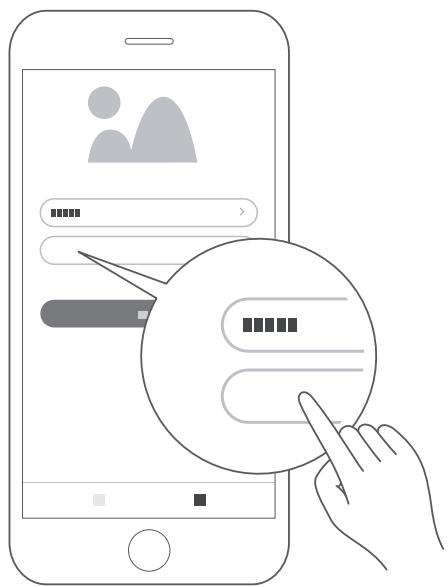
- Press and hold the
CLOCK / KITCHEN TIMER button on control Panel (the upper right one) for approx. 3 seconds, till a beep sounds, "AP "and flashing " show on display.
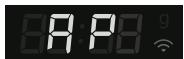
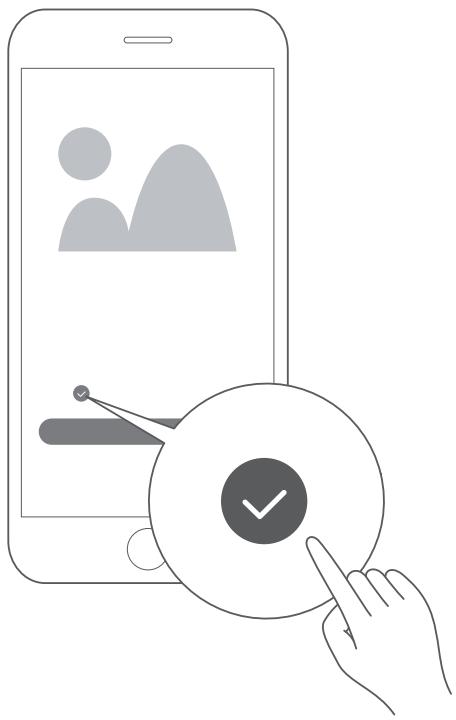
- Check check-mark.
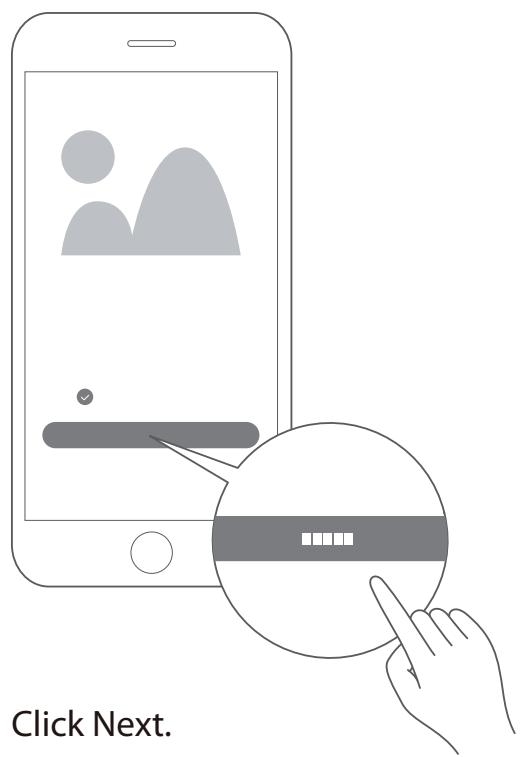
- Click Next.
OPERATION
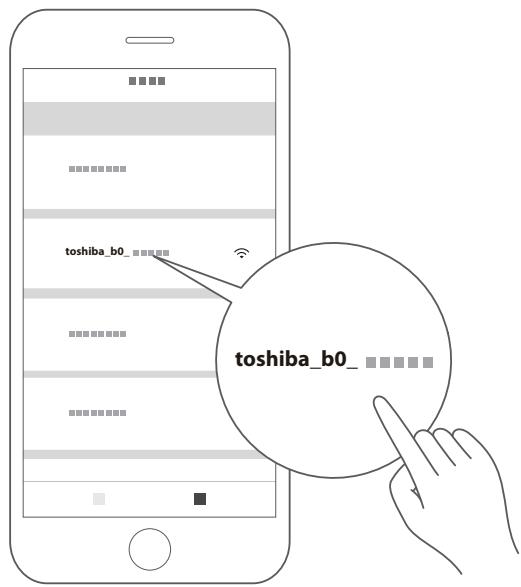
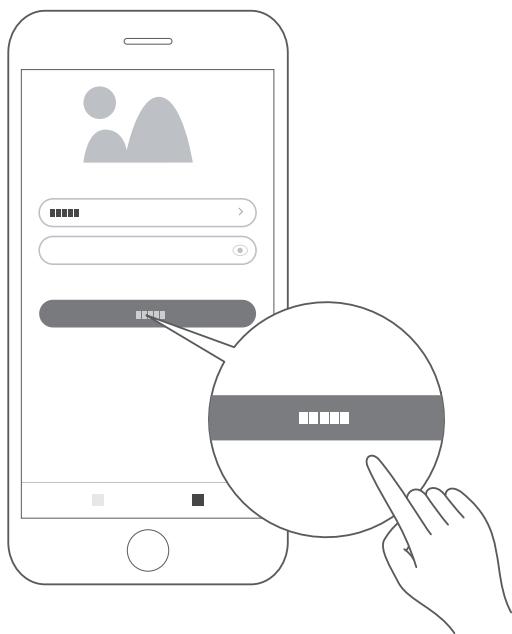
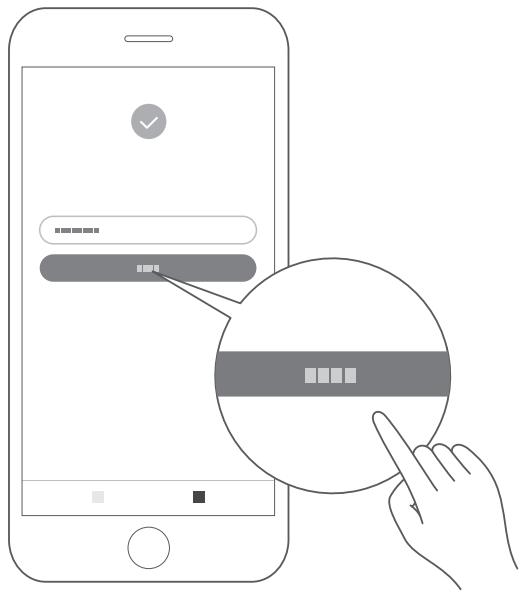
- Turn to WLAN setting page and connect to
$$ \mathsf {t o s h i b a _ b 0 _ x x x x} $$
Using 12345678 as pass-code.
- Go back to Tsmartlife.
Wait until " " sign is normally on display.

If the connection fails, the error code "N0~N5" is displayed for 3 seconds. Other errors show "FFFF" for 30 seconds. Please try the link again.
When an error message "N*" appears on the display, please check the following table.
| Error | Possible Cause |
| N0 | The module cannot be found. |
| N1 | The connection to the router failed and the router signal was poor. |
| N2 | Router Wi-Fi could not be found. |
| N3 | The connection to the router failed. The Wi-Fi password is incorrect. |
| N4 | Connection to router failed, good signal and no password error reported. |
| N5 | Connection to router successfully but the server could not be connected overtime. (including domain name resolution error) |
16. Click "Finish"
The device will be connected to server and will be shown on homepage of app. The appliance is ready to connect to the app. You can use the "Tsmartlife" to access the functions of your oven easily.
Disconnect from the network
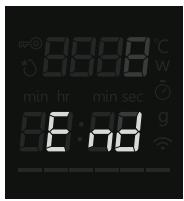
You can disconnect your oven from the network at any time. If your oven is disconnected from the network, it is not possible to operate the oven using Home Appliance. If the remote control has been deactivated, the time on your phone are displayed on the oven screen.
Press and hold the CLOCK / KITCHEN TIMER
button on device (the upper right one) for approx. 8 seconds. " -- " flashes for 5 seconds.
√ The link has been removed successfully. The screen will display "8888"and then return to standby after 3 seconds.
× Unlink failed, screen will display "FFFF" and then return to standby after 3 seconds.
You can use your microwave oven without setting it up for Google Home control. However, we recommend using your microwave oven with Google Home control to unlock its full potential. To control your microwave oven using Google Home, you'll need to set up your microwave and connect to Google Home. To do so:
- Download the latest version of the Google Home App from the app store on Google Play.
- Plug the microwave oven into a power outlet that is grounded.
- Add devices in "Tsmartlife" App (Refer to Instructions to Connection with Tsmartlife App)
- Connect to Google Home
- Control your smart devices through Google Assistant Discover devices
Google Assistant needs to discover your smart devices before it controls them, you can Say, "Hey Google" or "Ok Google", Google Assistant will discover devices which have already been added in the "Tsmartlife" App.
Control devices by voice commands.
Our device works with Google Assistant
Before you can add the voice features with Toshiba smart appliance devices, please kindly follow below steps:
- Download "Tsmartlife" app from Google Play or App Store;
- Sign up or sign in with your Tsmartlife account;
- Setup the device with your "Tsmartlife" app, and make sure you can control it by the app;
- Open Google Home app, search "Tsmartlife" skill/action and enable it by signing in with the same ID you used in "Tsmartlife" app.
- When setup is ready, try ask ( Hey / Ok ) Google to control your home appliance.
NOTE
As a safety measure, the microwave can only be commanded using voice / App within 10 minute of the door being closed.
| Microwave | Hey Google, | Run/Start Microwave for 30 seconds |
| Hey Google, | Add 10 minutes to the microwave | |
| Hey Google, | Subtracts 10 minutes to the microwave timer | |
| Hey Google, | Run microwave for 20 seconds | |
| Stop | Hey Google, | Stop the microwave |
| Pause | Hey Google, | Pause the microwave |
| Resume | Hey Google, | Resume/Restart the microwave |
| Defrost by weight | Hey Google, | Start defrosting in microwave |
| Cup | Hey Google, | Microwave 3 Cups |
| Beans | Hey Google, | Microwave 200 g of Beans |
| Scrambled eggs | Hey Google, | Microwave 1 Scrambled egg |
| Bacon | Hey Google, | Microwave 3 Bacon |
| Pizza | Hey Google, | Microwave 400 g of Pizza |
| Lasagna | Hey Google, | Microwave 250 g of Lasagna |
| Potato | Hey Google, | Microwave 2 Potatoes |
| Hey Google, | Microwave 230 g of Potato | |
| Vegetables | Hey Google, | Microwave 150 g of Vegetables |
| Popcorn | Hey Google, | Microwave 50 g of Popcorn |
| Mug cake | Hey Google, | Microwave 1 Mug cake |
| Hey Google, | Microwave 100 g of Mug cake | |
| Soften ice cream | Hey Google, | Microwave 250 g of ice cream |
| Dinner plate | Hey Google, | Microwave 350 g of Dinner plate |
OPERATION
9. Multi-stage cooking
Up to two stages of cooking can be set. In multi-stage cooking, the first stage may be microwave and defrosting. If the defrosting program is set in the first stage, only microwave can be set in the second stage. If one of the multiple stages of cooking is defrosting, it is automatically performed in the first stage when cooking starts. The buzzer sounds after each stage of cooking, and the next stage starts automatically.
- Suppose you want to cook with defrost food for 500g + 60% microwave power for 15 minutes. Steps are as following:
PROCEDURE
Step
Press / Display
- Press WEIGHT DEFROST. "100"starts to blink.
- Set the weight of the frozen food. by turning AMOUNT
Input range: 100 1500g
- Press MICROWAVE.
- Select desired power level by turning

or press MICROWAVE repeatedly. Input "600W" at this step. Confirm with START/+30SEC..
PROCEDURE
Step
Press / Display
- Enter the correct time of day of minute figures by turning
input "15:00" at this step.
(Input range: 00:00~23:59)
- Press START/+30SEC. to confirm and start cooking.
NOTE · Kitchen Timer and Auto menu cannot work in Multi-stage cooking.
10. Inquiring Function
(1) When oven is cooking, press CLOCK / KITCHEN TIMER , and the time of day to appear for three seconds in the display.
(2) When oven is cooking, press MICROWAVE, and cooking power will appear for three seconds in the display.
NOTE
- During Auto Menu, Defrost, and the first section of Multi-stage cooking functions, check the power it's not available.
OPERATION
11. Lock Function
To lock the microwave so that it cannot be operated by children or other unintended users, press STOP/CANCEL without releasing for 3 seconds. You will hear a long beep.
If the clock has been set, the time of day will appear in the display. Otherwise, "0:00" and " = 0 " will appear.
To unlock, press for three seconds, you will hear a long beep and " " will disappear.
12. Turntable Reset Function
- When cooking finished, if the turntable is not at the initial position, it will enter the turntable reset function. At this time, the lamp, fan and turntable are working. The oven stops working when the reset is complete.
NOTE
- This function only works for one completed cooking. If pause or open the door during cooking, it cannot use the reset function.
- Under the reset status, opening the door or pressing any button will back to standby mode.
Beep sound
When a button is pressed correctly, a beep will be heard. If a button is pressed and no beep is heard, the unit has not or cannot accept the instruction. At the end of any complete program, the oven will beep 5 times.
The cooking time has elapsed
The cooking compartment stops heating. 0 min 00 s appears on the display ( Current time will display if the clock was previously set ). To remind you that the food is ready, the buzzer will beeps 5 times until you either open the oven door or press the STOP/Cancel button. When the oven operates, the cooling fan turns on automatically to keep the surfaces of the oven cool. After the cooking time has elapsed, the cooling fan can continue to operate until the oven cools down.
| Normal | |
| Microwave oven interfering TV reception | Radio and TV reception may be interfered when microwave oven operating. It is similar to the interference of small electrical appliances, like mixer, vacuum cleaner, and electric fan. It is normal. |
| Dim oven light | In low power microwave cooking, oven light may become dim. It is normal. |
| Steam accumulating on door, hot air out of vents | In cooking, steam may come out of food. Most will get out from vents. But some may accumulate on cool place like oven door. It is normal. |
| Oven started accidentally with no food in. | It is forbidden to operate the appliance without any food inside. Failure to do so can cause damage to the interior of the oven. |
| Trouble | Possible Cause | Remedy |
| Oven cannot be started. | (1) Power cord is not plugged in tightly. | Unplug. Then plug again after 10 seconds. |
| (2) Fuse blowing or circuit breaker works. | Replace fuse or reset circuit breaker (repaired by professional personnel of our company) | |
| (3) Trouble with outlet. | Test outlet with other electrical appliances. | |
| Oven does not heat. | (4) Door is not closed well. | Close door well. |

According to Waste of Electrical and Electronic Equipment (WEEE) directive, WEEE should be separately collected and treated. If at any time in future you need to dispose of this product please do NOT dispose of this product with household waste. Please send this product to WEEE collecting points where available.
Android, Google Play and other related marks and logos are trademarks of Google LLC.
EU Declaration of Conformity
The object of the declaration described above is in conformity with the relevant Union harmonisation legislation:
This declaration of conformity is drawn up under the sole responsibility of the manufacturer.
The person responsible for this declaration is:
Place, Date / Lieu :