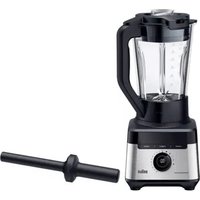
MULTIQUICK 5 MR 570 - Blender BRAUN - Free user manual and instructions
Find the device manual for free MULTIQUICK 5 MR 570 BRAUN in PDF.
| Product type | Multifunction blender (blender, chopper, whisk, food processor) |
| Brand | Braun |
| Model | MULTIQUICK 5 MR 570 |
| Main functions | Blending, chopping, whisking, slicing, grating, kneading |
| Included accessories | Blending shaft, metal whisk, measuring beaker, chopper, preparation accessory kit (knives, slicing/grating disc, kneading tool), pusher |
| Bowl material | Plastic (measuring beaker, chopper bowl, food processor bowl) |
| Maximum capacity | 250 g of flour for kneading/mixing |
| Safety | Very sharp blades; do not immerse the motor block in water; turn off before disassembly; use under supervision |
| Cleaning | Motor block and whisk drive: damp cloth; lid: rinse with clear water; other parts: dishwasher |
| Warranty | 2 years from date of purchase |
| Power supply | Mains (voltage to be checked on the appliance) |
| General information | Domestic use; compliance with safety standards; repairs by Braun authorized service centers |
Frequently Asked Questions - MULTIQUICK 5 MR 570 BRAUN
User questions about MULTIQUICK 5 MR 570 BRAUN
0 question about this device. Answer the ones you know or ask your own.
Ask a new question about this device
Download the instructions for your Blender in PDF format for free! Find your manual MULTIQUICK 5 MR 570 - BRAUN and take your electronic device back in hand. On this page are published all the documents necessary for the use of your device. MULTIQUICK 5 MR 570 by BRAUN.
USER MANUAL MULTIQUICK 5 MR 570 BRAUN
(Audio Supplies Company Ltd.)
Internet:
www.braun.com
www.service.braun.com
Braun GmbH
Frankfurter StraBe 145
61476 Kronberg/Germany

10

A


| j | Parmesan 1cm | Parmesan 1cm | |||||||
| max. | 100 g | 100 g | 50 g | 10 g | 7 g | 80 g | 80 g | 100 g | 90 g |
| ● sec. | 10 | 20 | 5 | 5 | 5 | 10 | 5 | 10 | 45 |
| 7-15 | 15 | 1-15 | 1-15 | 1-15 | 1 | 1 | |||
| Turbo | +5 sec turbo | turbo | +5 sec turbo | +5 sec turbo | turbo |
| j | Parmesan 1cm | Parmesan 1cm | |||||||||
| max. | 700 g | 500 g | 500 g | 30 g | 30 | 500 g | 500 g | 500 g | 500 g | 400 g | 200 g |
| sec. | 15-30 | 30 | 10 | 20 | 20 | 15 | 25 | 30 | 20 | 45-60 | 60 |
| 1-4 | 1-15 | 1-15 | 8-15 | 8-15 | 6-9 | ||||||
| turbo | turbo | turbo | +5 sec turbo | +5 sec turbo | turbo | turbo |
E
| j | Parmesan | ||||||||
| 22a | 1-7 | 1-7 | 9-11 | 6-9 | 9-15 | 7-9 | 6-9 | 9-15 | turbo Turbo |
| 22b | 1-7 | 1-7 | 9-15 | 7-9 | 6-9 | 9-15 | |||
| 22c | 7-9 | 7-9 | 3-5 | 7-9 | 7-9 | 7-9 |
F
Deutsch
Our products are engineered to meet the highest standards of quality, functionality and design. We hope you thoroughly enjoy your new Braun appliance.
Caution
Please read the use instructions carefully and completely before using the appliance.
The blades and the tools (22a-c) are very sharp! To avoid injuries, please handle blades with utmost care.
- This appliance is not intended for use by children or persons with reduced physical, sensory or mental capabilities, unless they are given supervision by a person responsible for their safety. In general, we recommend that you keep the appliance out of reach of children. Children should be supervised to ensure that they do not play with the appliance.
- The appliance is constructed to process normal household quantities.
- Always unplug the appliance when it is left unattended and before assembling, disassembling, cleaning or storing.
- Before operating, check whether your voltage corresponds to the voltage printed on the bottom of the appliance.
- Especially when operating the handblender attachment in hot liquids, do not immerse the blender shaft into - or remove it from the liquid while the appliance is switched on.
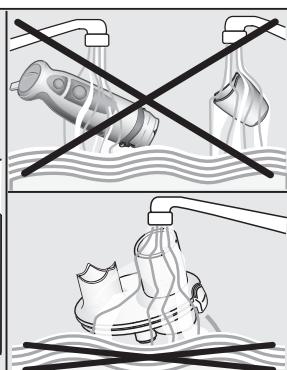
- Do not hold the motor part (1) or the whisk gearbox (7) under running water, nor immerse them in water.
- The beaker (9) is not microwave-proof.
- Before operating the food preparation attachment (15), make sure that the lid interlock (17c) is properly clicked in and that the pusher (16) is in place.
- Do not insert other tools than the pusher (16) into the filling tube during processing.
Always switch off the appliance before removing the lid (17).
- The lid (17) can be cleaned under running water, but do not immerse it in water, nor clean it in a dishwasher.
- The bowl (18) is not microwave-proof.
- Braun electric appliances meet applicable safety standards. Repairs or the replacement of the mains cord must only be done by authorised service personnel. Faulty, unqualified repair work may cause considerable hazards to the user.
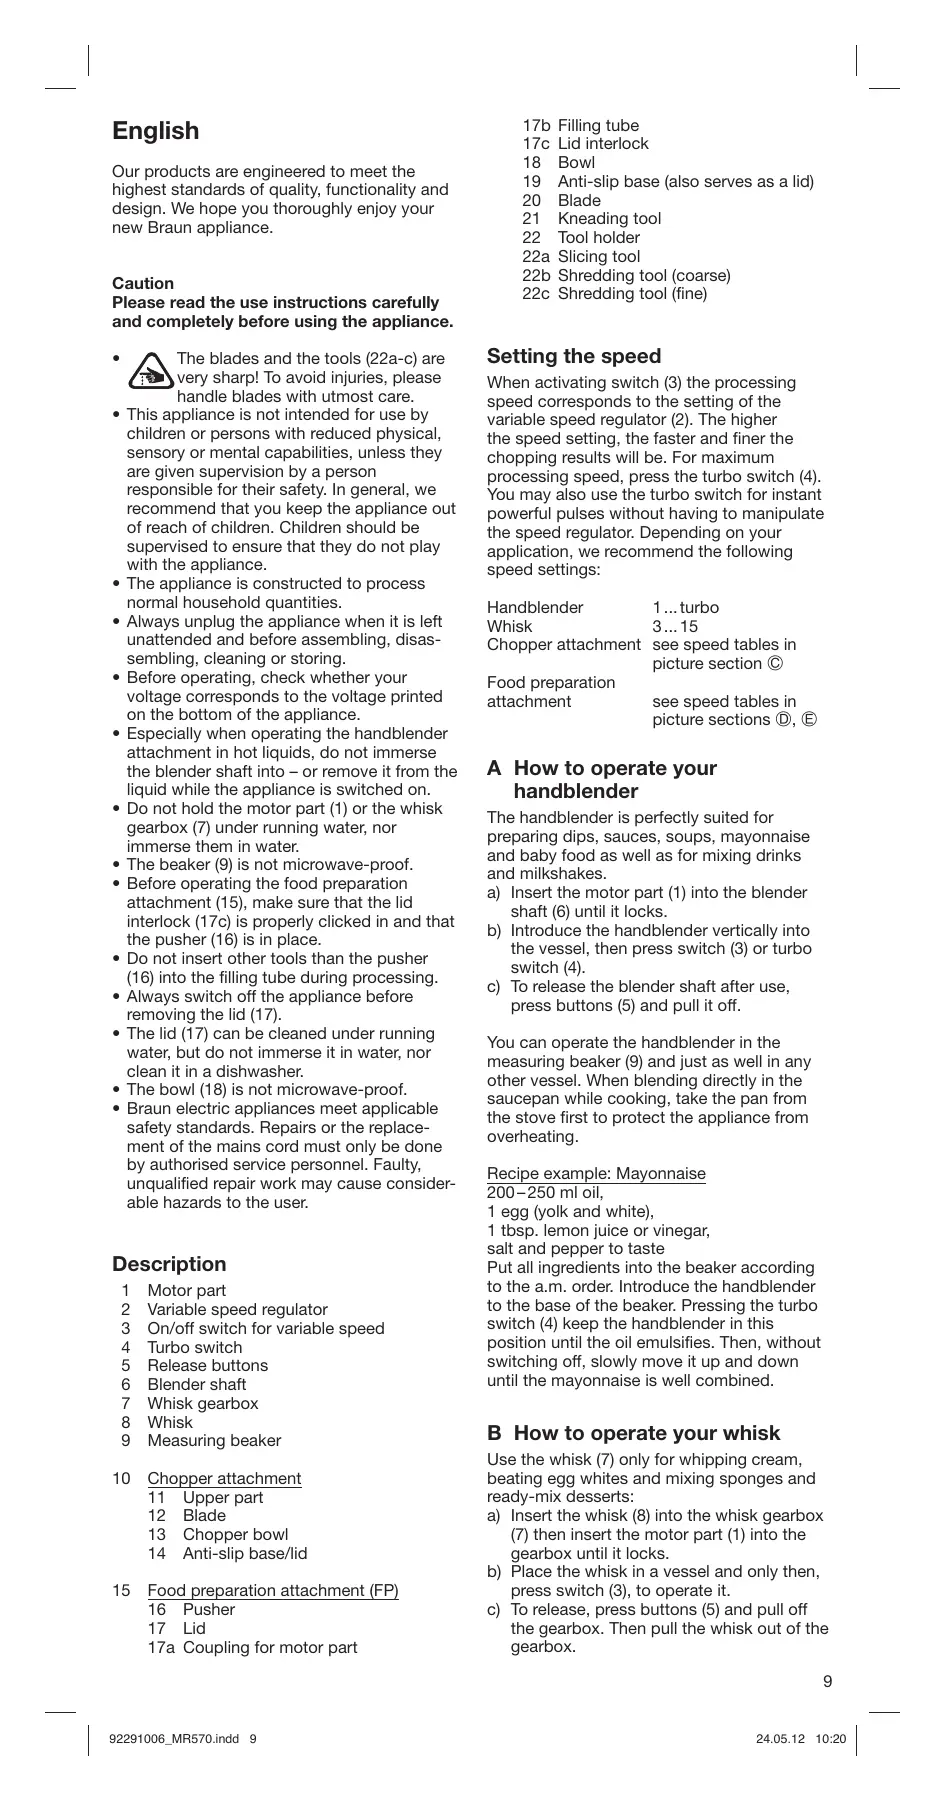
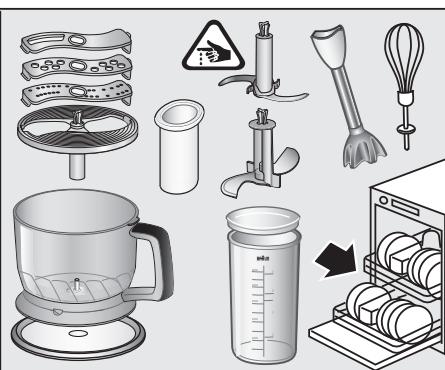
Description
1 Motor part
2 Variable speed regulator
3 On/off switch for variable speed
4 Turbo switch
5 Release buttons
6 Blender shaft
7 Whisk gearbox
8 Whisk
9 Measuring beaker
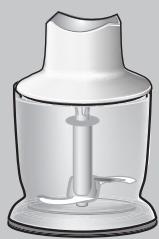
10 Chopper attachment
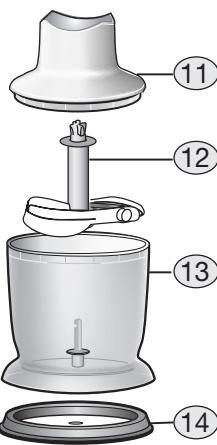
11 Upper part
12 Blade
13 Chopper bowl
14 Anti-slip base/lid
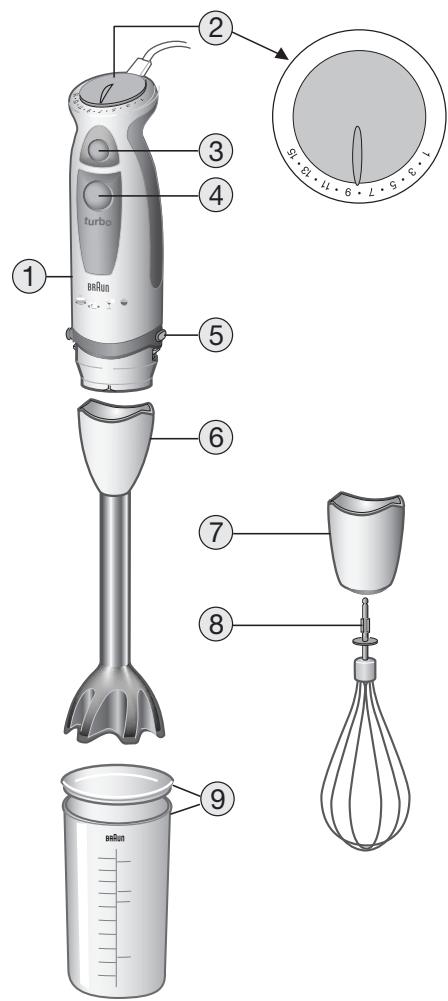
15 Food preparation attachment (FP)
16 Pusher
17 Lid
17a Coupling for motor part
17b Filling tube
17c Lid interlock
18 Bowl
19 Anti-slip base (also serves as a lid)
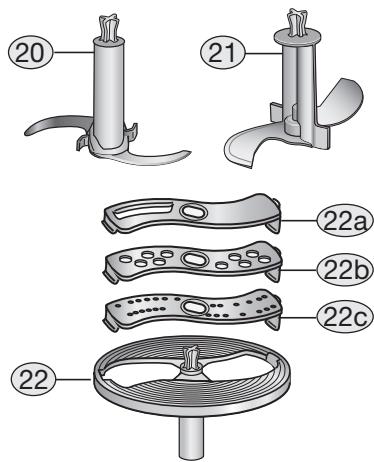
20 Blade
21 Kneading tool
22 Tool holder
22a Slicing tool
22b Shredding tool (coarse)
22c Shredding tool (fine)
Setting the speed
When activating switch (3) the processing speed corresponds to the setting of the variable speed regulator (2). The higher the speed setting, the faster and finer the chopping results will be. For maximum processing speed, press the turbo switch (4). You may also use the turbo switch for instant powerful pulses without having to manipulate the speed regulator. Depending on your application, we recommend the following speed settings:
Handblender 1...turbo
Whisk 3...15
Chopper attachment see speed tables in picture section ©
Food preparation
attachment
see speed tables in picture sections D, E
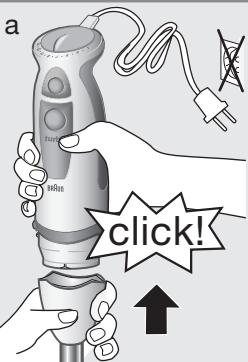
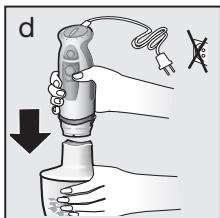
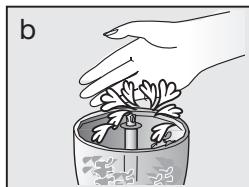
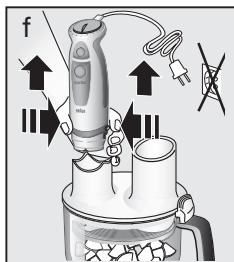
A How to operate your handblender
The handblender is perfectly suited for preparing dips, sauces, soups, mayonnaise and baby food as well as for mixing drinks and milkshakes.
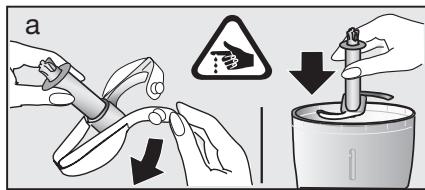
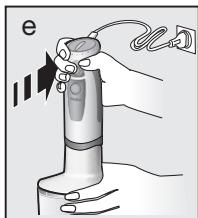
a) Insert the motor part (1) into the blender shaft (6) until it locks.
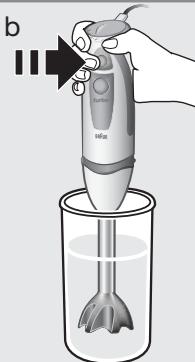
b) Introduce the handblender vertically into the vessel, then press switch (3) or turbo switch (4).
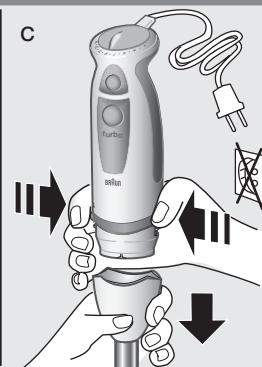
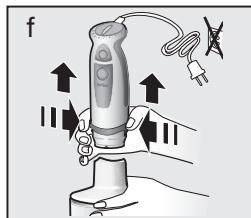
c) To release the blender shaft after use, press buttons (5) and pull it off.
You can operate the handblender in the measuring beaker (9) and just as well in any other vessel. When blending directly in the saucepan while cooking, take the pan from the stove first to protect the appliance from overheating.
Recipe example: Mayonnaise 200-250 ml oil,
1 egg (yolk and white),
1 tbsp. lemon juice or vinegar, salt and pepper to taste
Put all ingredients into the beaker according to the a.m. order. Introduce the handblender to the base of the beaker. Pressing the turbo switch (4) keep the handblender in this position until the oil emulsifies. Then, without switching off, slowly move it up and down until the mayonnaise is well combined.
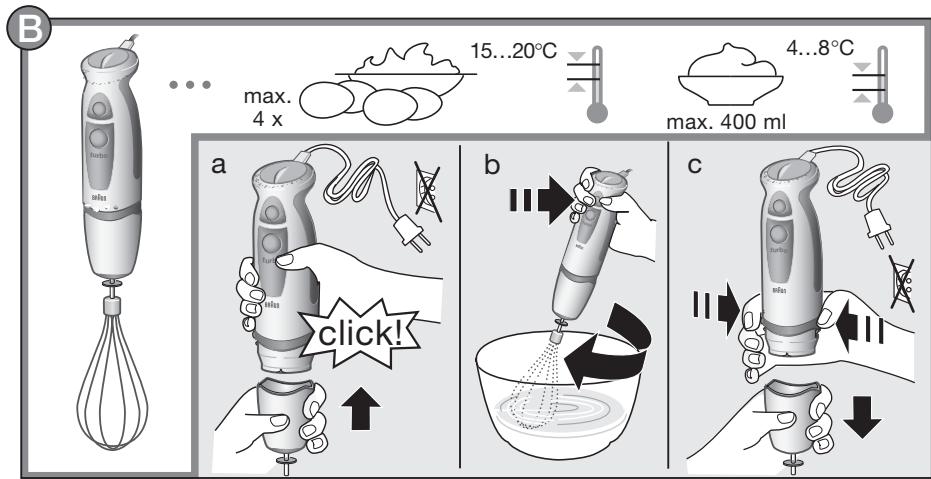
B How to operate your whisk
Use the whisk (7) only for whipping cream, beating egg whites and mixing sponges and ready-mix desserts:
a) Insert the whisk (8) into the whisk gearbox (7) then insert the motor part (1) into the gearbox until it locks.
b) Place the whisk in a vessel and only then, press switch (3), to operate it.
c) To release, press buttons (5) and pull off the gearbox. Then pull the whisk out of the gearbox.
For best results ...
- use a wide bowl rather than the beaker,
- move the whisk clockwise, holding it slightly inclined.
Whipped cream:
Only whip up to 400 ml chilled cream (min. 30% fat content, 4 - 8^ ). Start with a low speed setting «1» and while whipping, increase the speed to setting «15».
Egg snow:
Only whip up to 4 egg whites. Start with a medium speed setting «7» and while beating, increase the speed to setting «15».
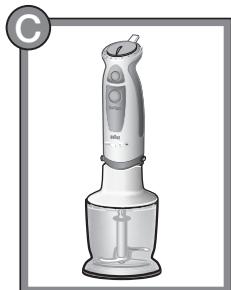
C How to operate your chopper attachment
The chopper (10) is perfectly suited for chopping meat, cheese, onions, herbs, garlic, chillies (with water) carrots, walnuts, hazelnuts, almonds, prunes etc. When chopping hard goods (e.g. hard cheese), use the turbo switch (4).
N.B. Do not chop extremely hard food, such as ice cubes, nutmeg, coffee beans or grains.
Before chopping ...
- pre-cut meat, cheese, onions, garlic, carrots, chillies,
- remove stalks from herbs, un-shell nuts,
- remove bones, tendons and gristle from meat.
For best results, please refer to the speed settings recommended in the processing table.
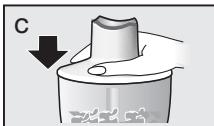
Chopping (see picture section ©)
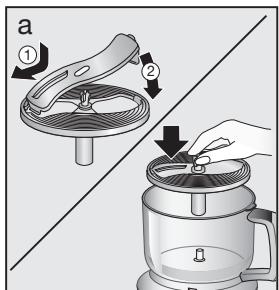
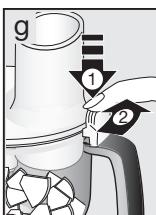
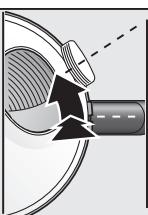
a) Carefully remove the plastic cover from the blade (12). Caution: the blade is very sharp! Always hold it by the upper plastic part. Place the blade on the centre pin of the chopper bowl (13) and give it a turn to lock into place. Always place the bowl on the anti-slip base (14).
b) Place the food in the chopper bowl.
c) Put the upper part (11) on the chopper bowl.
d) Insert the motor part (1) into the upper part (11) until it locks into place.
e) Press switch (3) or (4) to operate the chopper. During processing, hold the motor part with one hand and the chopper bowl with the other. Do not use the chopper for longer than 2 minutes.
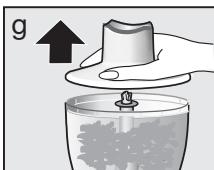
f) After use, press the release buttons (5) to remove the motor part.
g) Then remove the upper part.
h) Carefully take out the blade
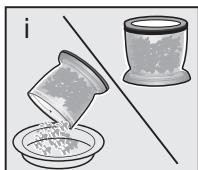
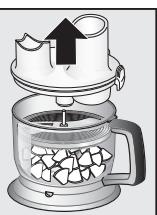
i) Remove the processed food from the chopper bowl. The anti-slip base (14) also serves as a lid for the chopper bowl.
Recipe example: Vanilla-Honey-Prunes (as a pancake stuffing or spread) (use the chopper attachment (10), speed «turbo»)
Fill 60 g creamy honey and 50 g prunes into the chopper bowl and chop 10 seconds, then add 30 ml water (vanilla-flavoured) and resume chopping for 3 seconds.
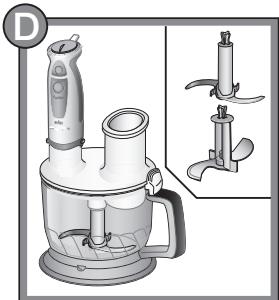
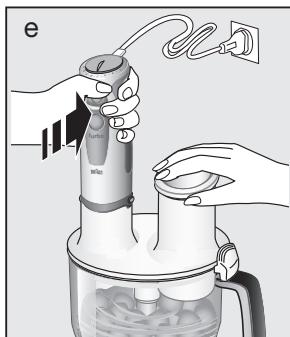
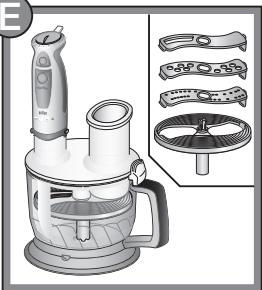
D/E How to operate your food preparation attachment
You can use the food preparation attachment (15) for:
-
chopping and blending (see picture section )
-
kneading dough (based on 250 g flour maximum)
- slicing and shredding (see picture section )
Chopping (see picture section D)
The blade (20) is perfectly suited for chopping meat, cheese, onions, herbs, garlic, carrots, walnuts, hazelnuts, almonds etc.
For chopping hard goods, use the turbo switch (4).
Do not chop extremely hard food, such as nutmeg, coffee beans and grains.
Before chopping ...
- pre-cut meat, cheese, onions, garlic, carrots, chilies,
- remove stalks from herbs, un-shell nuts,
- remove bones, tendons and gristle from meat.
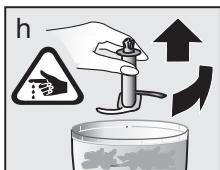
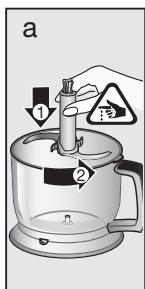
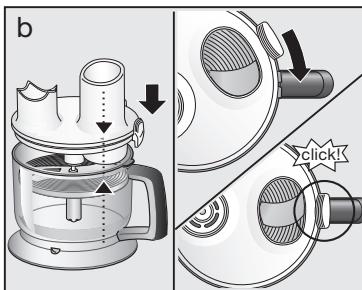
a) Carefully remove the plastic cover from the blade (20). Caution: the blade is very sharp! Always hold it by the upper plastic part. Place the blade on the centre pin of the bowl (18) and give it a turn to lock into place. Always place the bowl on the antislip base (19).
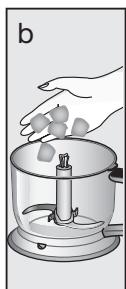
b) Place the food in the chopper bowl.
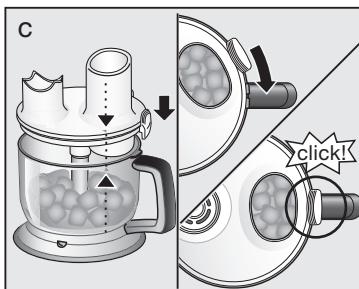
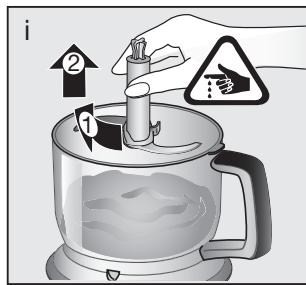
c) Attach the lid (17) onto the bowl with the interlock (17c) positioned next to the bowl handle. To lock the lid, turn it clockwise so that the interlock engages with a “click” above the handle.
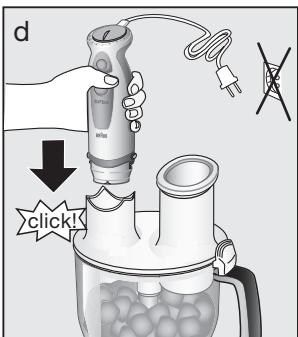
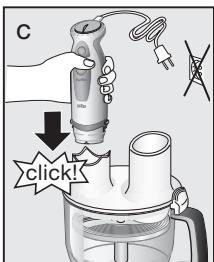
d) Insert the motor part (1) into the coupling (17a) until it locks. Make sure the pusher is in place.
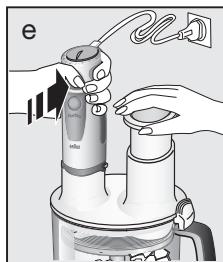
e) To operate, press switch (3) or (4) on the motor part and take hold of the bowl with your other hand.
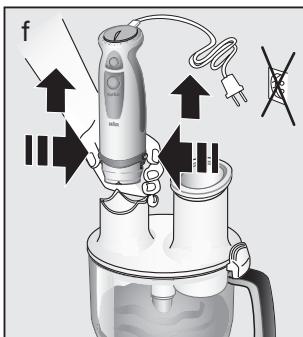
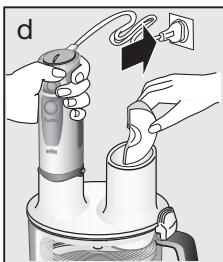
f) After use, press the release buttons (5) to remove the motor part. Remove the pusher.
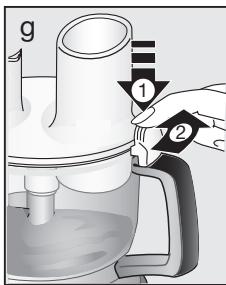
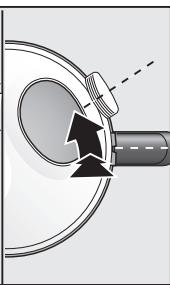
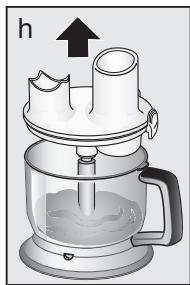
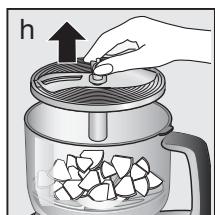
g) Pressing the lid interlock (17c), turn the lid (17) counter-clockwise to unlatch it and lift it up.
h) Carefully take out the blade by turning and pulling it, before removing the processed food.
Mixing light dough
Using the blade (20), you may also mix light dough like a pancake batter or a cake mixture based on up to 250 g fl our. For a pancake batter, for instance, first pour liquids into the bowl, then add flour and finally eggs. Pressing the turbo switch (4) and mix the batter until smooth.
Kneading dough
(Picture section ⑤ a-i also applies for the use of the kneading tool.)
The kneading tool (21) is ideally suited for kneading different dough types like yeast dough or pastry (based on 250 g flour).
- Place the kneading tool into the food processor bowl (18).
- First fill the flour into the food processor bowl, then add the other ingredients except liquids.
- Then add liquids through the filling tube while the motor is running.
- After 1-minute kneading time, please allow the motor part to cool down for 10 minutes.
Yeast dough (for pizza, bread, cake)
Max. 250 g flour plus ingredients. Speed «15», maximum kneading time: 1 minute.
First fill the flour into the food processor bowl,
then add the other ingredients except liquids. Add liquids through the filling tube while the motor is running.
Pastry (for quiche, cake)
Max. 250 g flour plus ingredients. Speed «15», maximum kneading time: 1 minute.
First fill the flour into the food processor bowl, then add the other ingredients.
For good results, do not use warm, soft butter. Stop kneading shortly after dough has formed a ball. Dough will become too soft from excessive kneading.
Slicing / shredding (see picture section E)
Using the slicing tool (22a), you can slice e.g. cucumbers, onions, mushrooms, apples, carrots, radishes, raw potatoes, courgettes, cabbage. Using the shredding tools (22b-c), you can shred e.g. apples, carrots, raw potatoes, beetroot, cabbage, cheese (soft to medium).
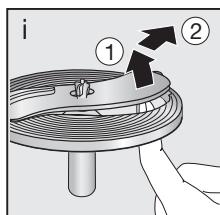
a) Place a tool (22a-c) into the tool holder (22) and snap into position. Place the tool holder on the centre pin of the bowl and give it a turn to lock into place.
b) Attach the lid (17) onto the bowl with the interlock (17c) positioned next to the bowl handle. To lock the lid, turn it clockwise so that the interlock engages with a “click” above the handle.
c) Insert the motor part into the coupling until it locks. Select speed settings according to recommendations in picture (j).
d) Fill the food to be processed into the filling tube. Never reach into the filling tube when the appliance is switched on. Always use the pusher (16) to feed in food.
e) Press switch (3) or (4) on the motor part to operate.
f) After use, press buttons (5) to remove the motor part.
g) Pressing the lid interlock (17c), turn the lid counter-clockwise to unlatch it and lift it up.
h) Take out the tool holder before removing the processed food. To remove the tool, push it up at the end that protrudes at the bottom of the tool holder.
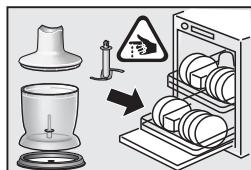
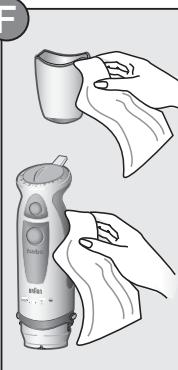
Cleaning the appliance
Clean the motor part (1) and the whisk gearbox (7) with a damp cloth only. The lid (17) can be cleaned under running water, but do not immerse it in water, nor clean it in a dishwasher. All other parts can be cleaned in a dishwasher.
When processing foods with colour (e.g. carrots), the plastic parts of the appliance may become discoloured. Wipe these parts with vegetable oil before cleaning them.
Accessories
(available at Braun Service Centres; however not in every country)
- BC: Chopper attachment, perfectly suited for chopping large quantities as well as for preparing shakes, making light doughs and crushing ice cubes.
- Wall mount
Subject to change without notice.
Please do not dispose of the product in the household waste at the end of its useful life. Disposal can take place at a Braun Service Centre or at appropriate collection points provided in your count

Guarantee
We grant a 2 year guarantee on the product commencing on the date of purchase. Within the guarantee period we will eliminate any defects in the appliance resulting from faults in materials or workmanship, free of charge either by repairing or replacing the complete appliance at our discretion.
This guarantee extends to every country where this appliance is supplied by Braun or its appointed distributor.
This guarantee does not cover: damage due to improper use, normal wear or use as well as defects that have a negligible effect on the value or operation of the appliance.
The guarantee becomes void if repairs are undertaken by unauthorised persons and if original Braun parts are not used.
To obtain service within the guarantee period, hand in or send the complete appliance with your sales receipt to an authorised Braun Customer Service Centre (address information available online at www.service.braun.com).
For UK only:
This guarantee in no way affects your rights under statutory law.
Français
Pied mixeur 1...turbo
Fouet métal 3...15
trconsumers@custhelp.com
HacaIky IJIpynIroTOBHeNnI nIuI (15) MoXHO HcIOJIb3OBAt b IJI:
I3MeJIbYeHnI nCMeUINBaHnI (CM.PNCyHOKCEKcUNI
- 3ameca Tecta
11 PeDyKTop noPi6HOBaHa
12 Hix
13 CtakaH
14 PpOtnKOB3Ha OCHOBa / KpnUka
15 Hacaika dIpyroTyaBHaNn npOdykTy (FP)
16 Bnntobxbya
17 Kpnska
17a 3'eɪnHyBaʊ dʒ eɪeKtpOMToTy
17b 3anpaBHa Tpy6ka
17c Kpnska-6noknapatop
18 CMHicTb
19 Поверхня 3 NOKPITTAM NOPTN KOB3aHHN (Takox Cnyxntb JK KPNIka)
20 JIe3o
21 HacaikaДлгпригуваньтicta
22Футлар 3iHCTpyMeHTaMn
22aДлнагиногукамn
22bДлЯшнКуВаHH(KpyHoro)
22cДлшнкувань(dpi6horo)
YctaHObKa WbNdkOcTi
PnAaBaui nepemkaa (3), wBnKictb npiroTuBaHH BIDNOBIAe yCTaHOBkam peryIaTopa wBnKoCTi (2). YIM BnIe wBnKicTB yCTaHOBKn, Tm WbNduTe Ta dpi6Hlwe 6yJe Hapizhni pOdyKT.
ДлmaKmMaJIbHoi WbNdkOcTI npnroTyBaHHaHTChITb nepeMnKaU turbo pexmMy (4).BmMOxTe TaKox KOpNCtBuTaTcHpeMnKaUemTyp6o peXmMy dIra MNTeBOrO, eEeKTHBHOToTcCKy 6e3 MaHInyIbOHaHH perYJrTOpOM WbNdkOcTi.
Mn pekomehnyeMo taki ycTaHOBKn WbNkoCTi, B 3aJIeXHOCTi BiD BaWoI nOTope6n:
Puyhnn 6IeHep 1... turbo
36nba 3...15
Iopip6HOBaU DnB. Ta6nuii WbNIOKoCTi
Ha MaJ.
Hacaikka nla
npnroTyBaHHi DnB. Ta6JnCi WbNdkOkti
Ha Man. (,)
A KopncTyBaHHpyHm 6JeHepom
PyHn6IeHep iIdeaIbHO nIXoDHTb Iy npiroTOyBaHH CoycB,CynB,MaioHe3y Ta IITaYoi iXi, Ta MeTOMD 3aHypeHH B pIDINHY, Ta cAMO JK IJN 3MiUyBaHH HaIOIB Ta MONOHNKOKTeiNIB:
a) BCTaBTe eJekTpomToP (1)ВBaJI 6JenHepa (6) Ta 3aΦiKcyIe.
b) BCTaBTe pyuHn 6JIeHdep BePTNaJbHo B nocyD, TOni HATncHiTb nepemnKaU (3) a6o nepemnKaU turbo peKmUy (4).
c)HaTnCHiB KhONKy (5)ДЯЗHRTBAny 6JIeHdepa NiCnKOpNCyBaHH.
Bm MoKeTe KOpNCTyBaTnca pyuHm 6JeHdepom B MipHomy Ctakahi (9), Tak cAmo Jk i B 6ydb-8Komy IhuOMy Nocdy. Pnp 3MiUyBaHnI nprMo B Kactpyi niz cac pNirOryBaHHa 3HIMtB cnOatky NocSy 3 nnIn, 0o5 3axnCTHTn npCtpi Bid nepePiBaHHa.
Peuert:MaHOe3
200-250 m. onii,
1 Ane (KOBTOK Ta 6iIOK),
1 cTOnoBa IIOKKa IIMMOHOrO COKy a60 ouTy, ciIb Ta Ipeue3a CMAkOM
Iotim, He BmMkaIOUH, nobInbHO pyxaTe
IHO BBePx i BHN3 DOKN MaHOHe 3MiHaCTbCra.
B KopncTyBaHHa 36nBaUem
36nBaay Mae 3actOCOByBaTNC TINbKN DnN 36nTTB BepuKIB, 36nTTa ReHOro 6iNka Ta 3MiUyBaHHb 6ickBiTy Ta rOTOBnx CmIeN dNn DecepTiB:
a) BcTaBte 36nBauch (8) BpeDyKTop 36nBaHn (7),notim BcTaBte eJekTpomToP (1) B peDyKTop DOKN BIn He 6bye 3aΦikCoBaHn.
b) BCTaBTe 36nBauch NocuNtiNbKn TOniHaTnCiHb nepemnKauch (3)ДЯpoBoTn.
c)ДиBAIMaHHHaTnCHiTB KHONky(5) Ta BnIMiTppeykTop.ToDi BnUTOBxHiTb 36Bau3peykTopa.
Динайкраших pesyntытib ...
Kpaune KOpNCyBaTnCg UINPOKOIO EMHICTHOIX MIPHIM CTaKaHOM,
pyxaTe 36nBaucha roDHHNKOBOc TprIKOIO, TpImaTe Ioro 3neRka HaxNJINBWH.
36nTiBepuKn:
巾Bniko rotye 400 Mm oxoJIoJxHeHoro Kpemy (MIMYM 30% BMCTy Xnpy, 4-8°C). Iouatn C nHbKnox yCTaHOBok WbnkOciT i>1> Ta NiD vac npriTOvBAHHN, niDnBcYBaTn yCTaHOBKn WbnkOciT iDo 15
36ntnAeHn6iJok:
WBndko rotye Tijbkn 4 aeynix 6iinka.
Pouatn 3 cepenhix yctahOBok Wbndkocti 7 Ta nic 36nbAHn, nBnuyBaTN yCTaHOBKn Wbndkocti do 15
CЯк npaцювати 3 Habichm nodpioHOBaYeM
Hacaiky IJI npiroToYBaHHI JxIMoKHa BnKOpncTOByBaTINJIA:
- noDpi6HeHH Ta 3MiUyBaHHa (INB. MaJIHO-HOK Cekuii D)
- 3amiuyuBaHHnTicTa (do 250 r 6opouHa Ha OndHy nopciio)
Hapi3aHH Ta 1aTkyBaHH (INB. MaJIIOHOK cekui (E)
3dpi6HOBAHN (INB. MaIHOK cekii) ①)
JIe3o (20) iIdeaIbHO nIiXoNDtB IJn HapI3aHHM'ra, Cnpy, u6yI, KxOHNHx TpaB, YacNHky, MOPKBn, rpeuBkNx ropiix, nicHnx ropiixB, MngdAIO To IH. JIa 3dpi6HOBAHN TBepDnX npOyKtIB KOpNCtYteCn nepemHKaemTurbo pexkmy (4).
Ybara: He noopri6HIOte 3aHaTTo TBepi npOyKTH, Taki JK: MyckaTHi rOpixn, KopeHi 3ePha Ta 3ePHoBI KjNbTypn.
Ipeep nooppi6HeHHaM ...
- popi3aTm'M'HcO, cnp, cn6yIIO, yachNK, MOPKBy, nepeCb,
BnIaJIITN CTe6Na 3 KxOHHX TpaB, p03KoJIoTN roipin,
BVIDaJIInT KICTKIN, JININ Ta XPaIci 3 M'Jca.
a) 06epeXHO 3nHTn pIacTMacOBn FyTnIp 3Je3a (20). YBara: ne3o duXe roCTpe! 3abXdn TpImaIte NOrO PnAcTMacBOIO qACTHNO BEPx. BCTaHObITb Je3o Ha Ban EMHocTI (18) Ta IpoBepHITb, Uo6 BOHO 6yIo 3aFikCOBAHO. 3abXdn BCTaHO- BIIouTe EMHicTB Na NOBepXHIO 3 NOKPNTTRM IpOTN KOB3aHHN (19).
b)ПoklaДiTb npOуКТВ EmHicTb ДЯпоordiбHeHH.
c) HakpinyTe KpnuKoIO (17) eMHicTb 3 6nokpaTopom (17c), 0o BCTaHOBnHa 6iIe EMHOCTI, 0o yTpmyEcbr By pykax. Iyra 3aKpTTa KpnuKn, NOBepHiB tI 3a RoINHHKOBOI CTPIKIO TaK, 0o6 6nokpaTop 6yNo BBeDeHO B KOHTAKT «KnauaHnM» NaDpyKoHO.
d) BCTaBTe eJekTpomotop (1)В 3'6nHybau (17a)doKn BOHO He 6yJe 3aΦikCoBaHe. IpekoHaIteCra,IO BmTobxByBaq 3aΦikCoBaHO.
e)Дяpo6OTnHaTNCHTbpepEMnKaU(3)a60 (4)eNEKtpOMOTOp,TaYTPmMyTe EMHICTb iHsOIO pyKOIO.
f)ПicЯЗ actocyBaHHHaTHCHiTb KHONKy (5), 106 BnHrTNe eJekTpOMOTOp.BnMiTb BnHTOBxBya.
g) HaTnCHiTB KpUkky 6Ioknupatopa (17c), NOBepHITb KpUkky (17) npOTn rOJHHNKoBOI CTpiKN IJIa BiKpUbaHH Ta niDiHIMtB BBePx.
h) O6epeXHo BnIMtB Je3o nobepTaIOUCh, Ioro Ta BnTByOuN, pepe BnMaHHaM nepepo6JeHOro npOdyKty.
3miuyyaHHHaJerkoroTicTa
KopncTyOuHcBJe3om(20),BnMoKeTe TaKoX 3amicHTn JERKe TICTO,AK MacNo dIa MInHcIB a6o Cymiui dIy TopTu B OCHOBI do 250 r MyKn.
Длma Macla Длma MlinuicIb, HapnKnaId, CnoaTky HanHnte piDInHy B EMHICtB, NOTIMdoaHTe Mykn Ta HapeWti Rua. HatncHtB nepeMnKauch Tpy6pexmMy (4), 3miuaIte MacNo do 3Ma-3yBaHaHH.
PnroTyBaHHTicTa
(ДиЗнся, Кп пацюс Насада Длг пиротувань TICTа, можна 3 Малюнka секцii) Hасада Длг пиротувань TICTа (21) ideaIbno NiIXxOДNTь Длг 3aMlUIyBaHnB pizhiB vIiJ B TICTa, HanpknAД, dpiXdXOBorO a60 3do6Horo (250 rборшна Ha nopciio).
- Po3aUyIe HacaIky IJn npIrOryBaHnI rictaB yaui (18).
Cnoataky hanoBHitb yaWy cyxMn iHrpeiHTam.
Pidki ihrpeiichn doaBaIte Ine uee3 haINBHH natpy6ok, KOJI npauoe DbIrHy.
Писяодiei XBИЛИН 3amiiuYBaHЯ TICTa Heo6xIDHO OXOJIOnITn DBNrHy npOdoBX 10xbiINH.
DipkdoBteTcO (npiu, xia, topta) Do 250 r bopouna, niooc inrpejeHTN.
Ubukictb-<15>,aac3amuiybaHH-He 6JIbue 1 XBnHnH.
CnoaTky noknaidiB 60oWoH B uawy,notim
doaIte iHwix inrpeiEHTIB (OKpIM pIKx).
DoabaIte piikci inrpeiEHTn uee3
HaINBHN naTpbyok, KOJIN npauOe DBNrHyN.
3d06He ticto (JnI npora, Topta)
D0 250 r 60poosHa, nIIOc iHrpEiEHTN.
WBnKicTB-«15》,aac3amiWbAHHa-He 6JIbwe1XBnHnH.
CnoaTky HanaOBHITb bopoWHom Yaay, NotIMdoaIte iHuxiHrpeJeHtIB.
Bukopncobyte MacNo KIMHaTHoI Temnepa-typI. PnpHHTe 3amiUyBaHH, NK TiJIbKN TICTO Na6yde QOpMn KyIi. Ype3 HaJMpHc 3amiUyBaHH TICTO CTAe 3aHaJTO M'KIM.
Hapi3ka /WataKIBHnca (INB. MaJIIOHOK CEkuii E)
Kopnctyouncb iHcTpymeHTn dIJI Hapi3aHHa (22a), Bn moXeTe hapi3aTn HapnKnaD oripKn, u6bIu, rpn6n, 6bNyKa, MOpKBv, peIbky, TBepydN KapToPJIIO, Ka6aUKN, KanyCTy. Kopnctyouncb iHcTpymeHTn dIJI noPdi6-HeHHa (22b, 22c), Bn moXeTe hauataKyaBaTN hApnKnaD 6bNyKa, MOpKBv, TBepy KapToPJIIO, 6byRk, KanycTy, Cnp (BID M'8KOro DO cepeDhboro).
a) BCTaBTe iHcTpymeHT (22a-22c) BФyTnIap 3 iHcTpymeHTamn (22) Ta 3aΦiKCyIte. BCTaBTe ΦyTnIap 3 iHcTpymeHTamn B ζeHTpaBnH bAan EMHOCTI Ta npOBepHiTb, Μo6 3aΦiKcyBaTn.
b)ПикpiniTbКPsUkUy(17)HaEMHicTb3 6IknKpATOpOM(17c)6IIaPyuKcEMHocTi. IIN3akPnTTKaKpnKu, NOBepHITb II 3a roDInHHKOBOO cTpJIKoTO tak 0o6 IKnpaTOP «KlaCHyB» NaI pyuKoHO.
c) BCTaBTe eNEKtpOMOTOB 3'eHnYBaU DOKN BOHO He 3aΦiKcyTbCn. Bn6epiB yCTaHOBKn UWBnKOci 3rIINO 3 peKoMeH- daiziamn Ha MaI. (j).
d)ПoklaДiTb npOyKТ ДЯпriPoTуВaHньЗлравНу Trp6ky.ИКоЛи НIi3bTeу 3anPabHy Tpy6ky.KoJInpIcTpiY bYIMKHeNo.3aBxJDi KOpNCTyTeCeWtOBxAueM (16)ДЯпОДачп npOyKТY.
e) Hatachitb nepemkauch (3) afo (4) eek-tpomotop dans poobotn.
f)ПисЯКорпстувань,HaTиСHTь KHONKIN (5),шOB BИнгТиЕнКТPOMOTOP.
g) HaTnCHiTB KpUkky 6NoKupaTopa (17c), nobepHITb KpUkky (17) npoTN roDnHHNKoBOI CTpiKN IJNA BiDkpBuaHH Ta niDiHIMtB BBepx.
h) BnIMtB cyTJrarp 3 iHCTpyMeHTAmn nepeT Nm Rk BnHrTn O6pO6JIeHN npOdyKT. Uo6 BnHrATn iHCTpyMeHTn, HATNCiTb Ha BnCTyIN BnH3y cyTJrarp 3 iHCTpyMeHTAmn.
OuHHeHH npHcTpoH
OuichieneHH enektpomotopy (1) Ta peyktopa 3bbanki (7) Mae 6ytntiBkn BOIoroIO raHcipkoHO. Kpnuka (17) MoKe 6ytN OOnupeHa nID npToOuHO BDOIO, aNe He Mae 6ytN 3aHypeHa B YoD, a TaKoX B NocCydomnHy MaSHNY.
PnO6pO6ci K0JIbOpOBnx npOdyKtIb (HApnPKlaM MOpKBu), PnAcTMacObi YacTnHi npNCTPOIO MOxTy CTaTI 3He6apBNeHmMi. IpOtpiTB ci YacTnHi pocInHHo OoiEo nepedix OunueHHM.
DogaTkoBipnHaJIeXHocTi
(MOxHa KynTn B CepBicHnx ΚeHTpax KompaniBraun; ane He ycix kpaIHax)
BC:doataKOBa HacaIka-noip6HOBa, iEaeIbHO nIXoOniB Inna Hapi3aHnBeIiKnx 06cIIB npOyKTiB,aTakox npiroTOyBaHH MoIOuHNX KOKTeiNIB, JERKOrO TicTa Ta KOJIHH Ky6NKiB JbOyD
Cko6aHaCTiHnO KrpInnHeHn6JeHepa
Пи Всесени 3мин 6e3 nonepeДжень. Komпанязалшаe 3a co6oю npавв BHOCINТЗ mИн B KOHCTpyKUIO npIC-tpoIb 6e3 cneicJIaNbHorO orOLOWeHH.
3araIbHI yMOBn 36epiraHHa
Bipobn fipm Braun pekomenobaoHo 36epiratyn y kntnobomy npimiueneHHi 3a yMOB KIMhaTHOI TEMpepaTpyn Ta HOpMaJIbHOI BOJorocTi.
Bnpo6HnK 3aJIiUaE 3a cOboI npaBOHa BHeceHHa 3mIH 6e3 nOpepEnHbOro NOBIOMJIeHHJ.
O6naJHaHHaB iDnOBiJae BmMOrAM TexHicHoRo perIaMeHTy o6MeXeHnB BVKOpNCTaHHa DeKnx He6e3neuHx peoBnB eEkeTpnuHOMy Ta eKeTpoHOMy 6blaHaHHi.

001
EJektpnHm pyHm 6JeHep Braun MR 570, Tn4191, 500-600 BATT.
BurotoBJIeHO B PJIbUci dJIb Epayn Tm6X, HiMeuHa/Braun GmbH, Frankfurter Strasse 145, 61476, Kronberg, Germany.
1 cytneHa JbXnua JIMMOHOB COK nIOCT, COI nPiNep Ha BKyc
Пиговп: ПостаBetECNчн рожукгВ кунanta 3a pa36иBaHe, no peDA,В коTo ca nocouhenno-rope.Вkapaite nacatopa DoДьhoe Na kynata.HaHnchete «turbo»БуTOH (4).Задржтес naCatopaaВТЗИpoNsIpyKNTteссмeСТ,сLEД Koeto 6e3д goI3KnIOuBATEбabHOЗANOCHETeДдвЖКITE HaRope ИHaDOLY,ДOKATO MoOHe-3aTa HeNoLnyJXeJaHaTaTgCTOTa.
B N3PON3BaHe Ha TeI Ta 3a pa36HbAHe
TeNTa 3a pa36bHaBe Tp86Ba Da ce n3noJ3Ba cAmO 3a pa36bHaBe Ha CmTaHa, 6eTbUu Na CHr, KpeMOBe, NOJyROTOBn DecepTu N 3a npriGTOBHe Ha Jekn TeCTa (HapnMpE 3a naJaunHKn).
a) NocTaBeTe TeIHa 3a pa36nBaHe (8) B 3aDbNKBaIuM MExAHN3bM (7) nCJIeT TOBA MOHTnpaTe KbM MOTOpHn6 JIoK (1), HATNCHETe DOKaTO UpaKaHNe.
b) IocTaBeTe TeNTa 3a pa36nBaHe B Cbda, KOITo Ue N3NOJ3BaTe N eEBA CneI TOBa HATNCHeTe 6yToHa 3a BkNIOUbaHe (3).
c) 3a da cBAInTe npInctabkata, haTnCHete 6byOnHte 3a ocBO6OxJdaBaHe (5) n3dbpnaIte npInctabkata. CneI TOba cBAInTe TENTa 3a pa3bUbaHe ot 3aDbNKBaunMexaHn3bm Upe3 n3DbPnBaHe.
3a NaH-do6pn pe3yIpaTn ...
(BNXNJIIOCTpaCnBaPa3JeI (E)
C NOMOHTa Ha peHDeTo 3a Hapra3BaHe Ha
sha6n (22a) moKe da pexKeTe KpactaBnCi, lyK, Tb6n, RaBKnM, MopKOBn, peNnUKN, CypOBn KaT0POn, TkBnUKN, 3eNe n Dp. C nomOuTa Ha peHDoTe 3a Hac7bprBaHe (22b, 22c), moKe Da Hac7bpxTe RaBkn, MopKOBn, cyOBn KaT0POn, UBeKNo, 3epe, CnpHe (OT MeKo Do CpeDHO TBbPdo).
a) NocTaBete n36paHnT OT BAC HOK (22a-c) B DbPkaa (22) I TO 3aKpeNTe Ha MCTO. NocTaBete dPkaaBa Bbpxocta BaenTbpaHa Kynata Na 3aBbpteTe, 3a da ce 3axBaHe cta6nHNo.
b) CnojKeTe Kanaka (17) Bbpxy Kynata, KaTo 3aTBaprUHrT MexaHn3bM (17c) e o6bP-HaT KbM DpBxKATA Ha Kynata. 3a Da 3aTBOPHT HeNoDvNkHO Kanaka, 3aBbPTe TIO NOCoka HA YacOBHKnOBaTa CTpeNka, DOkATO 3aTBaprUHrT MexaHn3bM He Ce 3axBaHe C uPaKaBaHe Ha d DpbXkKaTa.
c) 3aKpeTe HeNoDBNxHo MoToPnHrT 6nok (1) B CbBp3Baunr OTBop (17a). HAcToPoIte ckOpocTtA CbO6pa3Ho npenOpbKnTe B nIIOCTpaunr (j).
d) NocTaBete npOdyKTHe B Tp'b6aTa 3a nOdaBaHe Ha npOdyKTn. HNKora He 6bPKaIe T B Tp'b6aTa 3a noDaBaHe Ha npOdyKTn, KOrATo ypeJbT e BKnIOuCh. BInHarN i3non3BaIte 6yTuNoTO (16), 3a da npiDvBxKBaTe npOdyKTHe KbM peHJeTO.
e) 3aДа BKЛIOUHTe HaTINCHTe 6yToH (3) ИИN «turo» 6yToH (4) Bbpxy MoTOpHnIg 6nOK.
f) Cnei ynoptpe6a,HaTnCHte 6yToHnte 3a ocbo6oxJaBaHe (5),3a da ocbo6oJnte MOTOPHn8 6nok.
g) Kato HaTnCKaTe 3aTbapRzMmexAH3bM (17c), 3abbpTeKe Kanaka (17) B nocoka 6oPatha Ha yacOBHKnOBaTa CtpeKka, 3a da Ro OTKaunTe N OOBdInrHeTe.
h) N3BaIeTe IbPkaa, ppei Da N3BaIte Hapra3aHITPe npOyKTIn. HoKbT MoKe Ja CBaIte, Kato ro N36yTaTe HaOpe ot Kpaar, KoIOTo Ce nOJaBAoT OdoHaTa CTpaHa Ha IbPkaa.
Почистваны урEDA
Почистваite MOTOPнЯ 6лOK (1) И задвиж-Ваши менизм на TeЛТа 3a pa3биBaHe (7) само CBлжн KaBpna.
KanaKaTHa npnctaKaTa 3a xpaHa (17) nTO3n Ha pe3aKaTa MOrat Da ce NocHCTBaT NOI TeuAuta BOda, HO He Tn NOTanrTe BbB BOda,KaKTo H He Ce MmR T CbDomnJIHa MAuHHa.
PnOcb6a0bKaTaHa CNJHo OcBETBaUH npOyKTn (HanpIMep MOpKOBn),PiactMacobNTe YacTn Ha ypeDa MoRat Da Ce OcBETr. N36bpSeTe rC pactnteJIHa Ma3HHa, npedn da rN nouCTnTe.
PpncTaBKn
(MoKeJa 3aKynIteOTcepBn3HInTe ceHTPOBe Ha Braun, HO B HrkOn CTpaHn TOBa He e Bb3MOxHO)
BC:Ппсстава 3а рязache,идeална 3а Нарязване нао-големи КОЛЧЕСТВа npOДуктИ,КаКTo И 3a пи��ТВЯне нашейковe,лкNs TecTa и HATpoшаванe Ha Kkyбчета Лед.
- CToiKa 3a CTeHa
PpomEnB ypeJa H/nn Ta3n HNcTpyKuIy MoRat Da ce N3BbPbBat 6e3 npEiN3BecTne.
CneiH3TnUaHe Ha cpoKa Ha ynoTppe6a Ha ypeda
Korato npiklouyn ynotpe6bata ha npodykta, OTnabkbT, KOITc ce oba3yBa ce cb6bnpa pa3deIHO.
3a6pHbBa ce n3XbPnHTo My B KOHTeHepn 3a CmecEH 6ntOBn OTpaDbu.
U3XBpNAte cAmo B onpeJeHnTe 3a TOBa KOHTeHepn!
IOTbpcTe INHOpMaun 3a Bb3MOxHa NOBtOPha yNtpe6a.
PpOn3BODHTeI:
BnK Ha onaKOBkata
CtpaHa Ha npOn3xOd:
BnK Ha onaKOBkata
BHOCHTeI:
KaBEn Op6nko OOД,БуntcaT:131012382, CoФиЯ 1592,yI.ИЗТочнa TaHReHtaN°161, TEL.:02/4024900
TapaHn
HaunTe npOdykTn ca c rapaHnue 2 roDnHn, CHTaHO OT dataTa Ha noKynkata. B pamKnTe HA rapaHnOHHn cspok 6e3PnATHo ce OTcpanHBat DepeKTnTe B MaTePnAInTe n pOn3BOJCTBOTO ue3 NopPaBka, CMHa Ha qactn nnIeJIypei, NO npeceHka Ha cepBn3HNz CEHTbp. Ta3n rapaHnCe npn3Haba BbB BCNUKn CTpaHn, KbJeTo Braun n HeoBnTn3KNIOUChTIeH DnCTpN6TyOp npOdaBat To3n ypei n Hma OpaRanHe H3BaHOC INN OOFNIuaHna Pa3npope6a He 3a6paHnBA da Ce n3BbPSh npeDbNdeHOTOrapaHUnHO o6cLyKBaHe.
Fapauhuieta He noKpnuBa: nobpeDi OT HnnpaBnHa ynoTpe6a (pa6oTa npi HnOdoJIo HAppeKeHMe, BKNIOUbaHe B HnOdoXoJaIu N3TOChNk Ha eJeKTpuCheKn TOK, CUYBaHe); N3HOcBAe N He3NaHTeJIHn DeFeKtN, KOnTo He npeuat Ha HopMaJHaTa pa6oTa Ha ypeDa. Fapauhuieta He ce npi3Haba pni NoppaBka Ha ypeDa ot HeOTOpMnIpaHn INuIa NIIa AKO He ca N3No3BaHn OpunHaJIHn pe3epBn qactn Ha Braun.
IrapaHnIaTeBaJIInDaIpiIpaBnIHO nonbJIneHi:JaTaHaNOKyPkata,peaT I noDnC B rapaHcIOHHaTa KapTa.
3a BCnKn peKnaMauN, Bb3HnKHaN IN
raPapauHOHHn CpOK, n3npaTeTe ypeDa KaKTO
n rapaHcIOHOHaTa My KapTa B NaIb-6n3Kn
cepBn3 Ha Braun. 3a cnpaBKn 0800 11 003 - naCIOHale TepoH na Bf cepBn3 6e3
yBeJIueHe Na TepoOHHaTa ycnyra nIN
www.bgs.bg.
L
jIjIiJUoJUoJUoJIu
L
L
3 1
L. L. L.
.
1
log(y)
(j1sS.
Lulal
1
Country of origin: Poland
8
Year of manufacture
To determine the year of manufacture, refer to the 3-digit production code located near the type plate. The first digit of the production code refers to the last digit of the year of manufacture. The next two digits refer to the calendar week in the year of the manufacture.
Example: "642" - The product was manufactured in week 42 of 2006.
#
Ciyjy jdy
gill aiaa 1
y
g
27 11
·s + 1 即
11 11
100 100
Jusu. 1eLull Jlueo Lulj y o jy
aaii gai iie 1uia a b uai
a 1
a 1
.(j)
aaii i jia dai jao jai pabi
J 1
(16)Lj(j)
pIabll
J 4) (3)
lg// = ( x - 1)
jJ (5) jj1 Jai
.
Laii jai iai 15 15ai
Jacol JSc 11011 11 (17C)
L
aalb jddjg 1g 1g 1
juele buiol, 2ouuul o1y Juae.
Jauu Jaa
.
j_4 = 1 iL
(7) 1 (1)
(17) Lbll Jue jkaog, kao laa bai
g aai g iu y oai 2 jslg y uai all ao
ailllglllllllllllllllllllll
.()
(22c) (22a) 1000 a
[\therefore \frac{1}{2}b = \frac{1}{2}]
jio ayolal yolaiyolaiyolaiyolaiyolaiyolaiyolaiyolaiyolaiyolaiyolaiyolaiyolaiyolaiyolaiyolaiyolaiyolaiyolaiyolaiyolaiyolaiyolaiyolaiyolaiyolaiyolaiyolaiyolaiyolaiyolaiyolaiyolaiyolaiy
aill g, a. gall y, yll y
1
jall jglll jall jall jall jgal
Jai
cilll lai jie Jusall
勾结了 与 S = S_1 = 且不存在
aLwLgacLwLWJyLjzLjy
JLJ JLo JK
aessss
400 4
8-4 30%
p<1> aiaia 1d.
<15>J L 2000
ieyall bi
laIaIaIaIaIaIaIaIaIaIaIaIaIaIaIaIaIaIaIaIaIaIaIaIaIaIaIaIaIaIaIaIaIaIaIaIaIaIaIaIaIaIaIaIaIaIaIaIaIaIaI aII aII aII aII aII aII aII aII aII aII aII aII aII aII aII aII aII aII aII aII aII aII aII aII aII aII aII aII aII aII aII aII aII aII aII aII aII aII aII aII aII aII aII aII aII aII aII aII aII aII a
1 1
15...3
a a
C
1e 1
aacnll Jg jbjil aall plabll
E. D.