QA510 - Food Processor MOULINEX - Free user manual and instructions
Find the device manual for free QA510 MOULINEX in PDF.
| Product type | Food processor |
| Brand | Moulinex |
| Model | QA510 |
| Main bowl capacity | 1.8 kg light dough |
| Blender bowl capacity | 1.5 L dry / 1.25 L liquid |
| Meat grinder capacity | up to 3 kg |
| Centrifugal juicer capacity | up to 5 x 300 g |
| Mini chopper capacity | up to 100 g (meat) / 10 g (herbs) |
| Speeds | 1 to 8/max + pulse |
| Functions | Knead, mix, beat, emulsify, whisk, blend, chop, grate, slice, juice, grind |
| Safety | Lid and head locking, automatic shut-off |
| Cleaning | Wipe motor unit; dishwasher-safe accessories (except meat grinder head, kneading hook, mixer) |
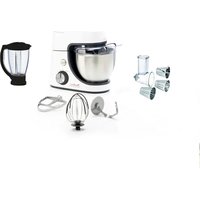
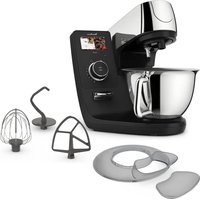
| Included accessories | Stainless steel bowl, lid, kneading hook, mixer, multi-wire whisk, blender bowl, meat grinder, vegetable slicer, centrifugal juicer, mini chopper, grain mill (depending on model) |
| Maximum usage time | Varies by function (see manual) |
Frequently Asked Questions - QA510 MOULINEX
User questions about QA510 MOULINEX
0 question about this device. Answer the ones you know or ask your own.
Ask a new question about this device
Download the instructions for your Food Processor in PDF format for free! Find your manual QA510 - MOULINEX and take your electronic device back in hand. On this page are published all the documents necessary for the use of your device. QA510 by MOULINEX.
USER MANUAL QA510 MOULINEX
ACCESSIONS AVAILABLE
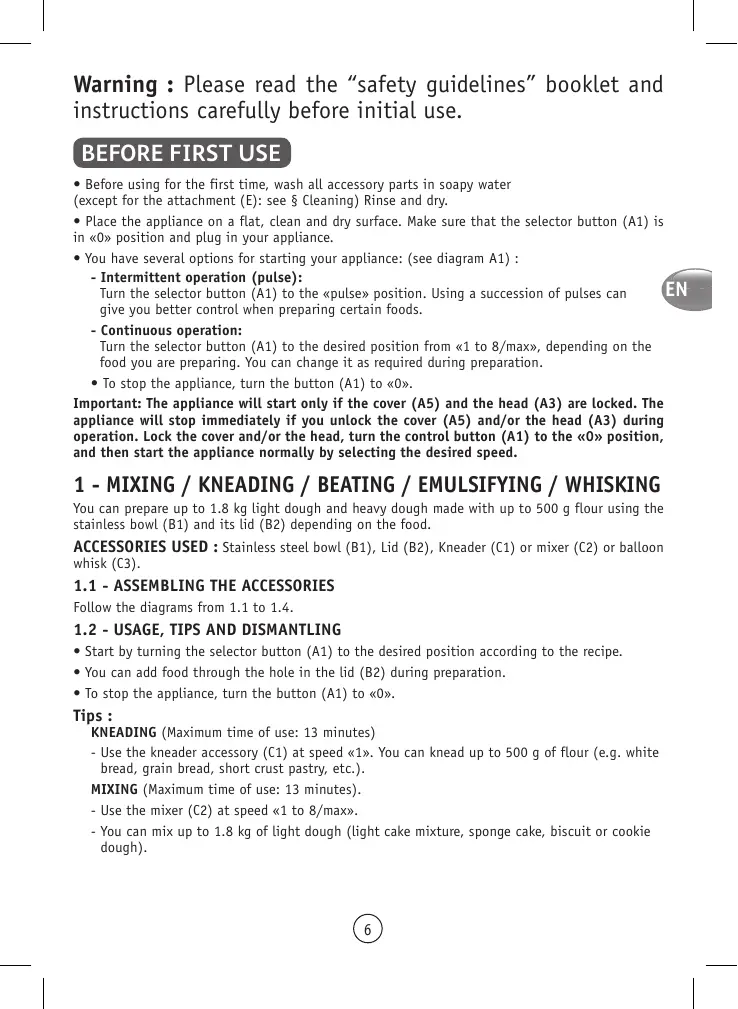
Warning : Please read the “safety guidelines” booklet and instructions carefully before initial use.
BEFORE FIRST USE
- Before using for the first time, wash all accessory parts in soapy water (except for the attachment (E): see § Cleaning) Rinse and dry.
- Place the appliance on a flat, clean and dry surface. Make sure that the selector button (A1) is in «0» position and plug in your appliance.
-
You have several options for starting your appliance: (see diagram A1):
-
Intermittent operation (pulse):
Turn the selector button (A1) to the «pulse» position. Using a succession of pulses can give you better control when preparing certain foods.
- Continuous operation:
Turn the selector button (A1) to the desired position from «1 to 8/max», depending on the food you are preparing. You can change it as required during preparation.
- To stop the appliance, turn the button (A1) to «0».
Important: The appliance will start only if the cover (A5) and the head (A3) are locked. The appliance will stop immediately if you unlock the cover (A5) and/or the head (A3) during operation. Lock the cover and/or the head, turn the control button (A1) to the «0» position, and then start the appliance normally by selecting the desired speed.
1 - MIXING / KNEADING / BEATING / EMULSIFYING / WHISKING
You can prepare up to 1.8kg light dough and heavy dough made with up to 500g flour using the stainless bowl (B1) and its lid (B2) depending on the food.
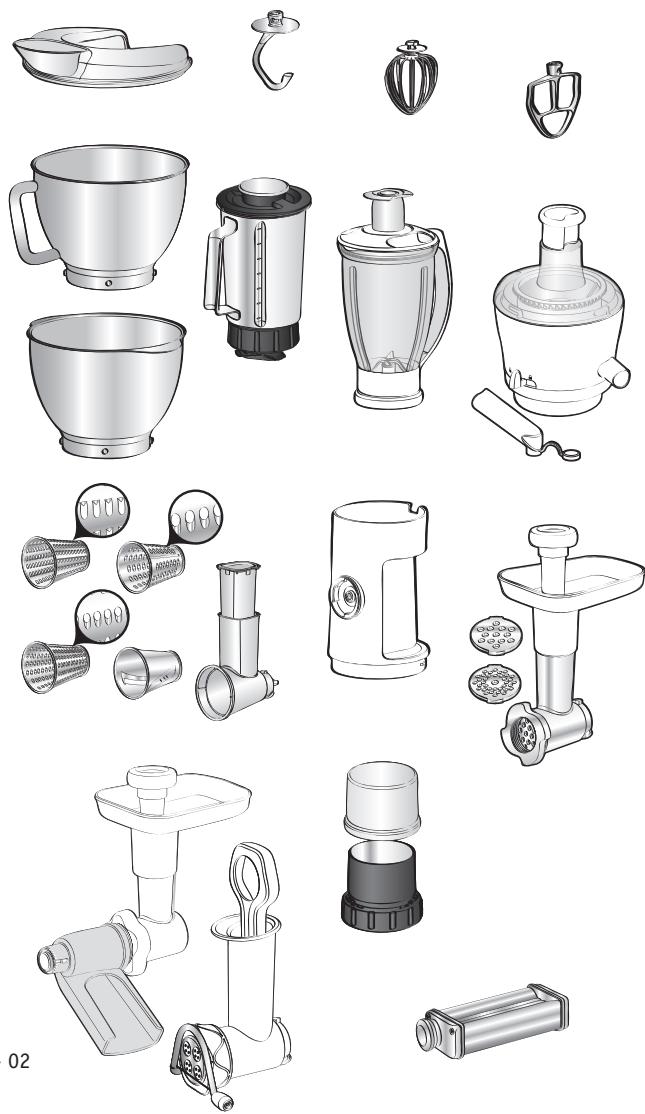
ACCESSORIES USED : Stainless steel bowl (B1), Lid (B2), Kneader (C1) or mixer (C2) or balloon whisk (C3).
1.1 - ASSEMBLING THE ACCESSORIES
Follow the diagrams from 1.1 to 1.4.
1.2 - USAGE, TIPS AND DISMANTLING
- Start by turning the selector button (A1) to the desired position according to the recipe.
- You can add food through the hole in the lid (B2) during preparation.
- To stop the appliance, turn the button (A1) to «0».
Tips :
KNEADING (Maximum time of use: 13 minutes)
- Use the kneader accessory (C1) at speed «1». You can knead up to 500 g of flour (e.g. white bread, grain bread, short crust pastry, etc.).
MIXING (Maximum time of use: 13 minutes).
- Use the mixer (C2) at speed 1 to 8 /
- You can mix up to 1.8kg of light dough (light cake mixture, sponge cake, biscuit or cookie dough).

- Never use the mixer (c2) to knead heavy dough and fresh pasta dough (lasagne, rigatoni, bigoli, etc.).
- BEATING / EMULSIFYING / WHISKING (Maximum time of use: 10 minutes).
- Use the balloon whisk (c3) at speed 1 to 8 /
- You can prepare: mayonnaise, aioli, sauces, whisked egg whites (up to 10 egg whites), whipped cream (up to 500ml ), meringues etc.
- Never use the balloon whisk (C3) to knead heavy dough or mix light dough.
Dismantling the accessory: Wait for the appliance to come to a complete stop and proceed in the reverse order of the assembly. diagrams from 1.4 to 1.1.
2-BLENDING/MIXING (DEPENDING ON MODEL)
Depending on the nature of the food, you can use the blender (D) to prepare up to 1.5 L of thick mixtures and 1.25 L of liquid mixtures.
ACCESSIONS USED : Blender jug ( D or L).
2.1 - ASSEMBLING THE ACCESSORIES
Follow the diagrams from 2.1 to 2.3 and 10.
2.2 - USAGE, TIPS AND DISMANTLING (Maximum time of use: 3 minutes).
- Start by turning the selector button (A1) to the desired position (from speed 7 to 8 or pulse) according to the recipe. Use the Pulse position for better mixing control and for a better blending of your preparation.
- You can add food through the hole in the measuring cap (D2, L5) during preparation.
Tips :
-
You can prepare :
-
finely blended soups, cream soups, stewed fruit, milkshakes and cocktails.
-
liquid batter (pancake, fritters, Yorkshire pudding, waffles, clafoutis and custard flans).
-
You cannot make crushed ice.
- If ingredients stick to the sides of the bowl when mixing, stop the appliance and wait until the blades have stopped completely. Remove the blender and push the food down onto the blades using a spatula, and put your blender back on the appliance to continue processing..
Dismantling the accessory : Wait for the appliance to come to a complete stop before removing the blender jug and proceed in the reverse order of the assembly, diagrams from 2.3 to 2.1 and 10.
3-MINCING (DEPENDING ON MODEL)
ACCESSORIES USED: Attachment holder (E), Assembled mincer head (F)
3.1 - FITTING THE MINCER ATTACHMENT
Follow the diagrams 9, 10, and then from 3.1 to 3.3.
3.2 - USAGE, TIPS AND DISMANTLING
- Run the appliance by turning the selector (A1) to speeds 5 to 7
-
Push the meat, piece by piece, down the feed tube, using the pusher (F7). Never push the ingredients down the feed tube with your fingers or any other utensil.
-
You can chop up to 3kg of meat, Maximum time of use: 10 minutes.
Tips :
- Prepare all of the foodstuffs to be minced (for meat, remove the bones, gristle and tendons and cut it into pieces of approximately 2 × 2 cm).
- Make sure that frozen meat is thoroughly thawed.
Dismantling the accessory : Wait for the appliance to come to a complete stop and proceed in the reverse order of the assembly diagrams 10, from 3.3 to 3.1 and then 9.
4 - GRATING / SLICING (DEPENDING ON MODEL)
ACCESSORIES USED : Attachment holder (E), Assembled vegetable slicer (G), Drums (depending on model)
4.1 - ASSEMBLING THE ACCESSORIES
Follow the diagrams 10, 9 and then from 4.1 to 4.2.
4.2 - USAGE, TIPS AND DISMANTLING
- Run the appliance by turning the selector (A1) to speed 5 to slice and to speed 7 to grate.
- Place the food in the feed tube on the body and press down with the pusher (G2).
Never push the ingredients with your fingers or any other utensil.
- You can prepare up to 2kg of food, maximum time of use: 10min .
-
Use the drums to:
-
Grate coarsely (G4) / grate finely (G5): carrots, celery, potatoes, cheese, etc.
- Slice thickly (G3) : potatoes, carrots, cucumbers, apples, beetroot, etc.
- Potato shredder (G6): potatoes, parmesan, etc.
Dismantling the accessory : Wait for the appliance to come to a complete stop and proceed in the reverse order of the assembly, diagrams 10, 4.2, 4.1 and 9.
5 - EXTRACTING JUICE FROM FRUIT AND VEGETABLES (DEPENDING ON MODEL)
ACCESSIONS USED : Assembled juice extractor (H)
5.1 - ASSEMBLING THE JUICE EXTRACTOR
Follow the diagrams from 5.1 to 5.6.
5.2 - USAGE, TIPS AND DISMANTLING (maximum time of use: 10 minutes.)
- Cut the fruits and/or vegetables into pieces.
- Run the appliance by turning the selector (A1) to speed «5».
- Insert the ingredients down the feed tube in the lid (H2) push them slowly using the pusher (H1).
- Do not process 500g of food more than 5 times continuously, without allowing your appliance to cool down completely
- Important : clean the filter (H3) and the juice collector (H4) after every 300g of ingredients.
Tips :
- You can make juice from: carrots, tomatoes, apples, grapes, raspberries, etc. but it is not possible to extract juice from certain fruits and vegetables: bananas, avocado pears, blackberries, some varieties of apples, etc...
- Peel fruits with thick skins; remove stones and the core of pineapples.
- Drink the juices immediately after preparation.
Dismantling the accessory : Wait for the appliance and rotary filter to come to a complete stop before removing the accessory from the appliance. Proceed in the reverse order of the assembly, diagrams from 5.6 to 5.1.
6-FINELY CHOPPING SMALL QUANTITIES (DEPENDING ON MODEL)
ACCESSORIES USED : Mini chopper lid (N1), Mini chopper bowl (N2)
6.1 - ASSEMBLING THE ACCESSORIES
Follow the diagrams 10, 6.1 and 6.2.
6.2 - USAGE, TIPS AND DISMANTLING
- You can finely chop with the mini chopper :
- fresh herbs : 10g max. / 10secs max. / speed «7»
- dried fruits / Beef (boneless and trimmed meat) : 100g max. / 10secs max. / speed «1»
-
vegetable puree : 150g max. / 20secs max. / «pulse» or speed «1»
-
This grinder is not designed for hard products like coffee beans, hard spices nor liquids.
Dismantling the accessory : Wait for the appliance to come to a complete stop and proceed in the reverse order of the assembly, diagrams 10, 6.2 and 6.1.
7 - ADJUSTING THE CORD LENGTH (see A7)
8 - ROUGH CHOPPING SMALL QUANTITIES (DEPENDING ON MODEL)
ACCESSIONS USED : Assembled grinder.
- Chop in a few seconds by pulsing: dried figs, dried apricots, etc. Quantity / max time : 100g / 5s
CLEANING
- Unplug the appliance.
- Do not immerse the motor unit (A) or the attachment (E) in water or under running water. Wipe them with a dry or slightly damp cloth.
- Disassemble completely and rinse the accessories quickly after use.
Handle the blades with care to prevent injury. (diagram 10).
- Wash, rinse and dry the accessories: they are dishwasher-safe, except for all the metal components in the mincer head: body (F), the kneader (C1) and the mixer (C2).
WHAT TO DO IF YOUR APPLIANCE DOES NOT WORK
please refer to the chapter «before first use».
Your appliance still does not work? Contact an authorised service centre (see the list in the service booklet).
AVAILABLE ACCESSORIES
See page 59 and visit the brand website.
Caution: this booklet contains instructions for additional accessories. Please keep safe for future reference. Please contact the Customer Service for further information on how to purchase accessories.
Cake Batter
Ingredients: 200 g sugar, 200 g butter + 200 g eggs + 200 g flour + 2 tsp baking powder (3 g)
Pour all ingredients into the bowl and set up the mixer and the lid. Operate the appliance for 30 seconds at speed 1 and then for 2 minutes at maximum speed. Pour the batter into a greased and floured cake tin, then place in a preheated oven at 180^ for 1 hour.
Pancake Batter
If you have the blender accessory, we recommend that you use this accessory to prepare your pancake batter.
Using the blender:
Ingredients: 750~ml milk, 375g flour, 4 eggs, 40g sugar, 100ml oil, 1 tbsp orange blossom water or flavoured alcohol
In the blender bowl, place the eggs, oil, sugar, milk and your chosen flavour. Select speed 3 and operate for 1 minute. Next, pour the flour from the measuring cap's opening and operate for 1 minute and 30 seconds. Let the batter rest for at least 1 hour at room temperature before cooking your pancakes.
Without a blender:
Ingredients: 250g flour, 500ml milk, 200g eggs, 6 g salt
In the food processor bowl equipped with a balloon whisk, place the flour, eggs and 100ml of milk. Place the lid and mix at speed 1 for 30 seconds and then at maximum speed for 45 seconds. Reduce the speed to position 6 and then pour the rest of the milk and mix for 45 seconds. Let the batter rest at least 1 hour at room temperature before cooking your pancakes.
Mayonnaise
Ingredients: 1 egg yolk, 20g mustard, a pinch of salt, 200ml oil
Into the bowl, place the egg yolk, mustard and salt. Set up the balloon whisk on your food processor, place the lid and start the appliance at maximum speed. Gradually add the oil through the lid opening for 2 minutes.
Bread Dough
Ingredients: 300 ml of cold water (out of the refrigerator), 500 g flour, 1 tbsp sugar, 1.5 tsp salt, 1.5 tbsp sunflower oil, 1.5 tbsp dry yeast
Into the food processor bowl, place the water, salt, sugar and oil. Next, add 350g of flour and then the yeast. Set up the dough hook and knead for 5 minutes at speed 1. Add the remaining 150g of flour and knead at speed 1 for 3 minutes. Let the dough rise (covered) at 35^ for 1 hour. The dough must double in volume. Shape your loaf and let it rise again for 1 hour at 35^ . Your loaf must double in volume. Cook in a preheated oven at 210^ for 10 minutes in a damp environment (place a bowl of water on the bottom of the oven) and finish cooking at 180^ for 15 minutes.
2 - MIXEN / MENGEN (AFHANKELIKK VAN HET MODEL) Depending on the nature of the food, you can use the blender (D) to prepare up to 1.5L of thick mixtures and 1.25L of liquid mixtures.
GEBRUIKTE ACCESSORIES: Blender jug (D ou L).
2.1 - MONTEREN VAN DE ACCESSOIRES
Ingredients: 250g meel, 500g melk, 200g eieren, 6g zout
5-ENTSAFTEN VON OBST UND GEMÜSE (JE NACH MODELL)
1.1 -ΣYNAPMOAoHεHTΩN EAPTHMATΩN
AkoouhntoTn oipa twv diaypaumatw 1.1.ewc 1.4.
1.2 - ENAPEH AEITOYPIIA
WHAT TO DO IF YOUR APPLIANCE DOES NOT WORK
ACESSORIOS UTILIZADOS : Attachment holder (E), Assembled mincer head (F)
NCTIOJIb3yEMbIe HACADKn: Ua7a 6JeHepa (D, L).
2.1-IOPOJOKCBOPKIPIHADJIEXKHOCTE:
Cnedyntc xemam c 2.1 no 2.3 n 10.
2.2-NCIOJIb3OBAHHe (BpemMaKcImaIbHOro IcNoJIb3OBAHnA:3MnHyT).
Bhauane NOBEPHNTHE KHOKNY NEPEKNIUATAEI (A) B HNYKHOE NOXONENHE B COOTBETCTBIM C PEENTOM (OT CKOPCTN7do8" INN PULSE (VMynbChnblpeKM).DIny UnyeHNHOKTOPTNPOJCECCApeMeUNBAHIN N IyUnyeHNH KAYECTB A CMSEUNBAHIN ICNPOB3YITE NOXONENHE "Pulse"(VMynbCHBNpeKM).
B xoje pa60tby moxHO do6abTb npOyKtby uepe3 OTBepCTne B MePHOM KOIIaueKe (D2, L5)
Cobetbl:
-MoXHO npnroTOBNTb:
- ODHOPoHbIe Cynbl, COyCbI BeJIOTe, KOMNtB1, MONOHTbI, MONOHTbI epyTne KOKTeIN.
- JxNkne Cmecn Ha MaCJHno OCHObe (6JIHbI, OaJbN, 3aNeKaHKn, fNaHbI C 3aBaPbIM KpemOM).
- Пи Налларим Инг佩пentов на CTeнки EMKOCNTO octanobite pa6oty prin6opba. Okidaite polnyoctabokny annapata, ChmHnte 6bneJedn, cuCTHNe HANILNJIpe pnoDkytbo co tEHOK HOHXI npn npoMOnu shnataTe I yctahonbe 6bneJedpHa MeCtdo nprdoJKeHHa pa6otb.
Ppokpa360pkn npnaHneXhoTei:doJnteBcIIOHNO octaHOBKn pnp6opa nepeD n3BneHem Maun 6bepaN BblOINHnTteJeCTBnB O6paTHOM pnp4Ke c60pkn,OT cxEmb2.3 do 2.1 n 10.
3- INCIOJIb3OBAHHe MRCOPY6Kn (B 3AUBICMOCTN OT MOJEIN)
NcNoJIb3yEMbIe HACAdKn: KpeIJIeHne IJra Hacadok (E), TOnobKa Mrcopy6Kn B c6ope (F)
3.1 -YCTAHOBKAPINCOEIMHREMOTO
Cnedynte cxemam 9,10,a3atem 3.1do 3.3.
3.2-MCIOJIb3OBAHNE
- 3aynctte npin60p, biv6paB c nmoosbupekekluoateTae (A1) ckopoctb "4" uill "7".
-Проталкьавпг.TуСВСВСВСВСВСВСВСВСВСВСВСВСВСВСВСВСВСВСВСВСВСВСВСВСВСВСВСВСВСВСВСВСВСВСВСВСВСВСВСВСВСВСВСВСВСВСВСВСВСВСVB 3aRpy3OCHyTOpy6b NO KcysCm CnOMoSSb TOJkAteTnF (F7).HKOrTa He npotaTakNBAHTe mHRpeDmeNTbB 3aRpy3OCHyTOpy6b NaIbCuAMn NII KAcKIMn-Ni6OdpYrMn PpeDmetAm. - Bbl MoXeTe HapeaTb Do 3 Kr Mca. BpeM MaKcImaJIbHoro NcIOnJIb3ObaHnIa: 10 MNHT.
Cobetbl:
6.1 - IOPRAJOK CSBOPK INPIHADJEXHOCTEIN
CneyuTe cxemam 10,6.1 n 6.2.
6.2 - INCIOJIb3OBAHNE
IMMeIbYHTeJIa:
- CBexKne TpaBb: MaKc. 10 r/ MaKc. 10 c/ ckopoctb «4»
-cyxoΦpyKtbl/roBAnHy(xHIOBAHHoeMRCo6e3KoCTe):MaKc.100r/MaKc.10c/ckopoctb《7》 - OBOUHoe IIOpe: MAcK. 150 r / MAcK. 20 c / «IIMnYbC» IIN CKOPoCTb «1
-3Ta MeIbHnua He npEHa3NaueHa dIa TBepdbix npOyKTOB HanoOboe Kofoe.
Iopraokpa36bOpkn npnHaadneKHOCTe: Doxntceb nonHoi octaHOBKn np6bopa n BblnoHnTe DeiCTBnO b6pAthom nopAke c6bOpkn:cXembl 10,6.2 n 6.1.
3-NOPI6HEHHA (3AJEXHO BID MODEJI)
BVKOPNUCTOBYAHI AKCECYAPN: TpImaH nacadok (E), UctaHOBnHa roLObKa m'ocopy6kn (F)
3.1-ПРИЕДHAHЯ M'ACYCOPYKIN
Dotpmytec xem 9,10,a notim bi3.1do3.3.
3.2-BVKOPNUCTAHH
3anycitb npicptpi, noberhnybni nepemikau (A1) y noonojehnha wbnkocti 5 do 7
-3aBaHTaKyIte M'ro 50MaTOK 3a 50MaTKom y trpy6ky 3aBaHTaXeHHe 3a 10nOIMOIO 5tOBxau (F7). Hikon He npoHTbXyIte ihrpeiEHTn y trpy6ky 3aBaHTaXeHHe nalbIaMn a6o iHIMnpuIadm.
-BMMOKTe NepemOnOTn Do 3K M'raCa.MaKcImaIbHn uac BkOpNCtAHn:10xbuINH.
Поради:
BVKOPNUCTOBYBAHI AKCECYAPN: 3i6paHa COKOBXIMaIIka (H)
5.1- YCTAHOBLEHHK COKOBXIMAJIKI
DToPmUyTeca xem 3.5.1 no 5.6.
5.2-BVKOPNUCTAHH(MaKcImaJIbHnYac BVKOpNUCTAHH:10XbIINH).
BVKOPNUCTOBYBAHI AKCECYAPNI: Kpnioka mHi-noDiPi6HIOBaHa (N1), qaHa mHi-noDiPi6HIOBaHa (N2)
6.1 - YCTAHOBJIENHRAKCECYAPIB:
DToTpMuyTeca cxem 10,6.1 i6.2
6.2 - BKNOPUCTAHHA
Bn MoXeTe Dpi6H O hapi3aTN 3a DonOMORO MIHI-NDpi6HIOBaHa:
-cbIXi TpaBn: mac. 10 r / mac. 10 c / wBnKicTb «7»
-cyxoΦpyKTHI /JIAOBuHHy (eTnIOBaHe M'ACO 63 KICTOK):Mac.100r/Mac.10c/UBNkICTb《1》
- OBOUeBE IIOpe: Mac. 150 r/ Mac. 10 c/ UWBUNKICTB «1»
- LcE mlnnok He npin3nauehen nIe o6po6Kn TbepdNx npoodykTb Ha KUaTt KaBn.
I'€dHaHnA akceCyapiB:3aueKaIte,doKn npuIad noBHiCTIO 3yINHITbcra,i BmKOHyIe II B 3BOPOTOMy nopAkycklaadHn:cxem10,6.2i6.1.
7-PERYUIOBAHHI OBOXHNI SHHYPA (dub.A7)
8-IOJDPISHEHHBENIKMIMIIMATOUCHAMNBHEBJNKIKKJIbKOCTI (3AJEIXHO BIDMODEJI)
BVKOPNUCTOBYBAHI AKCECYAPN: 3i6paHNI MNIHOK
- noptip6heHnra BnpoDobX kInbKoX cekyHd y imTyIbChomy pexmI: cyuHeHOr iHKpIy, cyuHenx abpIKocB toio. KInbKiCTb / MaKcMmaJIbHa TpmbaIcTb 60p6Kn: 100 r/5 c
UH
Bid'eHaHne pnpctpi Bid eJeKtpomepexi.
3aHaynpoitie 6nok Dnryna (E) a0o hAcadky (E) y Body ta He po3taowoyite ix nid npotoCHNO BDOIO. Ptoptapite ix cyxooAo 3nozErka 3boLoXeHO TKAHNHO.
-Повнию розерить i сплочут bakceсуари BiДрау nicя використаня.
Ioo6 He otpnmatn TpaBMy, 06epexHNO nobOdbTeC3 HOXAMN. (cxema 10).
BmHnTe, cnoJocHyb t BucyItb akceCyapn: ix MoKHa MNTN B NocyDomnH MaunHi 3a BNHTKOM MetaIeBnx KOMIOHeHTB rOJOBKn NOpiOIBHOBaHa: Kopnyc (F), ticTo mIwaIaKN (C1) i mikcepa (C2).
LIOPOBHTN,AKIIO PIPNCPIH HE IIPAIOE
Eckenpy: Kondahyfa DeiH "Kayinci3ik HycKaynapbl" KITanwacbH MyKnT OKbI N sbIfbIHbI3.
ANFAW KOJDAHAP AJIbIHDA
Anfauo KondaHap anbHnda 6apbIK cantaTamaNapdb (KanfaiyBn 6nOKtaH (E) 6aca: Ta3anay"6enimH kapaHb3) caBbIdb cyMeH JyBn I bIbHb3. Onapbl Myknt WaaBbHb3 XKe HcTePiH3
Kypanlby teric, t3a opi Kpyrak betke opHaTbHbI3. KblnamdbkTb aybcItbplN-Kocy 6aTbIpmacBbIH (A1) "0" xafdaia opHaTbIFaHbHa Ke3 xetki3iH3, cocBH Kypanlby XeNiRE KocBbH3.
KypaIbIb6ipHeIe aicnE icke Kocyfa bonaIb: (A1dnarpaMaBcH KapaHb3)
- Kiipmeni xmbic ictey (cepniicti pexim):
XJIINAMDbIKTb aybcITbIPn-Kocy 6atbpMaBbH (A1) "Pulse" XaJdaMbHa ("CepniNICTe peXim") XaJdaMbHa 6ypaHBz. KIipmEni JxMbic iTeY TaFamdapbH bIpKaTaPbH daNbHday yuHIN KOaNbIy.
- Y3diKci3 JxMbc ictey:
JbIaDAMbIKbTI ayIcIbIpbn-Kocy 6aTbIPmacBn (A1)daJIbHdAnbIIN JatKah TafMaFb 6aJIaHbICTb!-1-9e/Max-KaJeHHrKaXeTTI JAtdAra 6ypaHb3. Kymbc iCTey 6BaIbCbIbHa pexIMDi ayIcIbIpya Bonadj.
KyaanbTOKTaTy yuHIn 6aTbIpMaHbI (A1) “0”XaFdaNbHa 6paHbI3.
MaHbI3db! KypanDb! TeK kKaNk (A5) nen 6actneK (A3) opHbIKtbpInfHaHH KeHH rha Icke Kocyfa 6oanaDb! XMybcic tceY bpabCbInda KaNk (A5) xHe/Hemece 6actneK 6yraTah 6bIfapBlnFa HkaFainda Kpaan XbIndAM ToKtaNb. KaNkTaB (A5) XHe/Hemece 6actneKti opHbIKtbpInh3, 6ackay 6btaipmacBn (A1) "XaFdaBih3 bpaHb3, CocBn KaKeT XbIndAmDbIKt TaHday apKbInl KyaPAnDb Icke KocBbH3.
1-APAJACTbIPY / INJEY / KÖNTCY / 3MYJbΓAUJIAY / B¥JFAY
KaKNaFbI (B2) 6ap TaTtAn6aTbH 6oTaTah JcAcaFaH cbbIMdbkbTbH (B1) KEmerImeHaKTbI TaFAMr 6aIaNbHbICbI 1,8 Kr-fa DeiH JeHJ KAmblpDb daBHydaryf 6oNabl.
KOLДАнБЛАПТВИ KEPEK-XAPAKTAP: TaTTaHбаITbIb 6OJIaTTaH JxacalFaH ToCTaHaB (B1), KaKnak (B2), KaMbp nneri (C1) apanaTbPfBi (C2) hemec DeHreNek KencitTeH canTaMa (C3)
1.1-KEPEK-JKAPAKTAPdbI JXNHAY TOPTIBI
1.1 xəHe 1.4.ДиarpaMaMJaIapbIH opbHdaHbI3.
1.2-KoJIaHbIJIybl
AaBbIme aybIcTbIpBn-KockbluTbIH 6aTbIpMaCbIH (A1) peentire 6aNaHbICTb KaKetTi KaJaHaRa 6ypaHb3.
KyMbic icTey 6abcbHda KaKaNaTafbl (B2) caHbIay apKbIbI bHmIepdi Kocya 6oana.
KyaapanbltOKTaTyuHin6aTbIpMaHb(A1)"kaFaDaBbHa6yaPahbI3.
Kehectep:
HNEY (BapbIHwa y3ak KOnJaHy yaKbItb:13 MNHyT.)
- CanTama petiHne KaMbip nIeIiSti (C1 "1"XbIaDmblkTa KOnlaHbHb3.500 r-fa deiH yNbI (6nDaJyHbH, ipine TarpBtIfAH yNbI, yInme KaMbip yuHxHe T.6.) nIeYre 6oNaIbI.
-APAJACTbIPY(BapbHsua y3aK KOJdAnHy yaKbITbI:13MnHyT.)
-ДэнгreleКксiteTeH canTaMaHbI (C3)“1-дeн 8/Max" (eH KOFapbI)ЖылдмБИКka Deин KОлдНыHbIbI3.
-Ci3re:MaHone3di,aiOniDi,ty3dbIkpTapDbI,KeNciTirRehkybl3apDbI(8xymbIptKa akybl3bHa deIH),shaHTnblkPemH (500Mn-Te DeIH)XeHe T.6.daBlnDayra 6oNaBl.
- Mɪŋkcepi (c2) aybɪp kʌmblp JæHe Jæblɪdam kʌmblp (jæmHaH, mənti, Túʌnapa, t.6.) nɪeYrE Kɒŋdaɪhəbɪz.
- KENTCY / 3MYlbIaUNJAY / BYNFAY (BapbHsa y3ak konJaHy yaKbItb: 10 MNHyT.)
-Дeнгелк кенитейсantamahbl(C3)“1-дeн 8/Max"улгireбайньсты (ehxofapbl)Жылдамыкka deiH KОДанblIbI3.
-Ci3re:MaioHezdi,aiOniDi,ty3bIkapTapbl,KenciTInReh aKybl3dapbl(10XyMbIptKa aKybl3bHa deiH),waHTnblk KpeMih (500 MN-Te deiH) xHe T.6.d.aBnHdayfa 6oNabl.
-Дэнгеленкөncitetин canTamahbl (C3) eшkaшан Тыflьз камырды Иney ушин кеил Камырды apalaactbyушin колданbahtl3.
KEPEK-KAPAKTAPDbI BOJIWEKTEY TOPTIbI: KypaI an6dEN TOKTaFaHwa KytIH3, OdaH KeiH 1.4 xHe 1.1 xHnay dnaIpaMmamapbH kepi opbHaHbI3.
2 - APAJACTbIPY (YJITTE BAIJIABHbICTbl)
KoIaHbIaNbIH eHIMepre 6aIaNbHcTb 6neHepDIN (D) KemerimEn 1,5 n-ree dein H KOIO KocNaHbI HeMece 1,25 n-ree dein cyBik KocNaHbI daBHdayfa 60nabI.
KÖNJDAHbIJIATbIH KEPEK-XAPAKTAP:Биндер tocTaFaHbI (D,L).
2.1 - KEPEK-XAPAKTAPdbI XINHAY TOPTIBI
2.1, 2.3 XaHe 10 dnaPamMaIapbIn KOJaHbIbI3.
2.2-KOJIaAHbIJIybl (BapbIHwa y3ak KOJIaHy yaKbITbI: 3 MNHyT.)
·AnlbimEn aybictbipin-KocbiuTbH 6baTbpMacbH (A1) pecentire 6aIIaNbIcTbI ("7-deh 8" HeMece "pulse" (CepniciTi pexIM)) kaxetTI xafdaira 6paHb3. ApanacIbpy ydepiciH 6baJIaydbxakCapTy yuih xhe apanaactbpy canacbH xakcapTy uiiH "Pulse" (CepniciTi pexIM) xarJaibn KONJaDbHb3.
JXMybcite 1e6y abcibhdma MeIeepneriui KaKnauaacbHdaBf (D2, L5) caHbIay apKbIbI bEHIMepdi kocfybaIbnai.
Kehectep:
-
Keneci taFamdapdbI daBbINdayyfa 60naDbI:
-
6ipkeKic copnnap, BnIte Tz3dbkTapbl, Hpcynap, cyt XaHe backa KokTeJlep.
- Ман HerizhiNderi cybIK KocpIaIap (kaIMa KIMaKTap, KIMaKTap, NICIPMeIep, NICIPInreH KpemIbapФanIaIap).
Kypam 6enikTep cbIbIMblbIKtBn Ka6bpFacbHa Ka6bICbn Kanfah Ke3e KpyaIbIH XyMbICbl TOkTaTbH3. KypaIbIH ToBbIFMeH ToTkAbaHH KyTiH3. BneHepDi anbHb3, Ka6bpFapra Xa6cbIn Ka7an FhMepdi Kanakwahn KEMerIme NbiwakTapra TycipH3 Xhae XyMbCTbl XaJFaTcbTy yuH 6neHepDi opBbHa opHaTbHb3.
KEPEK-KAPAKTAPBbI B0JIWEKTEY TOPTIbI: KypaIaNbIbI 6eJeN ToK TaYbIh KytIi3, 6JIeHdep bIbIcBn aJIbI, 2.3, 2.1 JeHe 10 dIaRpaMmApabIbI KepeOpbIHaIbI3.
3 - ET TAPTKbIUtBtI KOJIaHr (YJIITRE BAJIaHbICTbI)
KOLДАнылдын KEPEК-ЖAPAKTAP: CanTamalapfa aphanfah 6ekitkiw (E), KИнakтafby et TapTkbltsbH bactneri (F)
3.1 -KAJIFAHATbIH BJOKTbI OPHATY
9, 10 dɪnərpaɪmmaɪapbɪh, ðaɪn Kæɪn 3.1 XəHe 3.3 dɪnərpaɪmmaɪapbɪh Oɒbɪnʌdɪbɪz.
3.2 - ET TAPTKbIiB BACTNEIH OPHATY
AbyIcTbIbII-KocblITbH (A1) KEMeRImEh "5-DeH" KblIaMdbfBtH TaHday apKblb KpaIaBl icke Kocblb3.
JyKteTInH K6bIpa eTTI nTePriUtiH (F7) KEMERiMeH 6eJIuEKeTIEN TePiJ3. Kypam 6eJIuEKeTJIy KxKteTInH K6bIpa eUkaaH cayCaTapBbHb36e Hemece KaHaJ da 6bp 6aca 3aTAPMeH nTePmeH3.
-Ci3 3Kr-fa dienih eTTi kkyTea anacbI3, BapbIHwa y3ak KOJIdaHy yaKbITb:10 MNHT.
Kehectep:
- Et tapTkblka apanfahan eHimdeprdi daibihdaht3 (erep 6yI et 6oIca, cykeptin, wemipwektepih xhe cihnpine anbTn Tactaht3, etTI waamamEn 2x 2 cm enwmeDe 6eKeTt Tpaht3).
-ETTIH TOJIbIFbIMeH Xi6ITINrReHHe K3 XeTl3IH3.
KEPEK-XAPAKTAPdbI BOJIWEKTEY TOPTIbI: KypaIbIbI Ε6dEη ToKtaybIh Kytin, 10 XnHay dIaRpaMmaIbI h Kei opbHaIbI3, 3.3 XaHe 3.1, oan KeiH 9 dIaRpaMaIapbIh opbHaIbI3.
4 - EγY / TYPAY (YJITIFE BAIJIAHbICTbl)
KONDAHbJIATbIH KEPEK-XAPAKTAP: CanTamapa rapanfah 6ekitkiu (E), KInhaIraH KeKehic TpaBt (G), LInnHdprpe (ynrire 6aJlHaHbIcTbl)
4.1 - KEPEK-JKAPAKTAPdbI XINHAY TOPTIBI
10, 9 dɪnərpaɪmmaɪpʌbɪn, Óɒʌn Keɪn 4.1 xəHe 4.2 dɪnərpaɪmmaɪpʌbɪn opbɪnDaɪbɪz.
4.2-KoJIaHbIJyI JxHE KEHECTEP
AybIcTbIpbIN-KCKbIbITbIH (A1) KEmerImeH "5" Hemece "7" XbIJaMdbIFbIH TaHday apKbIbI bKypaIbnI cKe KocbHbI3.
K KyteiTIN Ky6bipra eHIMdepdi caIbHb3 JHe K6bipdi iIiHe NTepriuTH (G2) Kemerimn NTepiH3.
Kypam 6eIiueKeTpdi JyKTeiTIn Ky6bIpfa eIkaaah CaycaKTapbIbI3beH Hemece KaHdaJ da 6ip baca 3aTTapMeH nTepeMeH3.
Ciz 2 kr-fa deinH eHIMdi daibHdai anacb3, BapbHsa y3ak kondahy yaBtby:10 MNHT.
LInnHnpneepiH apHaJybl:
- Ipilen yry (G4) / ycaKTan yry (G5): cə6ɪz, 6aɪdɪbɪpkeK, KapTOn, ipɪmʌɪk JxHe T.6.
- KanbHdAn typay (G3): Kapton, cəbi3, KIAp, aIma, KbIbIiHa JxHe T.6.
- Kapton Дранковери (G6): Kapton, napMe3aHЖаHe T.6.
KEPEK-JXAPAKTAPDbI BOJIWEKTEY TOPTIbI: KypaJI 6bIeH TOKTaFaHwa KytIi3, OdaH KeiIH 10,4.2,4.1 JxHe 9 dIarpaMmaIapbI H kepi opbIHdAnbI3.
5- XEMICTEP MEH KOKOHICTEPHEH bIPbIHDbI CbIFY (YJIITRE BAIJIAHbICTbl)
KOLJAHbIJIATbIH CANTAMAJAP: XInHaIFaH 乌bIpbIH cbIKkbII (H)
5.1 -UbIPbIH CbiKKblTbI OPHATY
5.1 kHe 5.6 nIaIpaMMAJIapbIh OpbIHdaHbI3.
5.2-IlbIPbIH CbIKKblITbI KYPALFA OPHATY (BapbHwa y3aK KOJdAny yaKbITbI: 10 MmHT)
XeMicTeepi XaHe / Hemece KekHicTeepi TijImDepre TypaHbI3.
-AyibcTbipIn-KockbltBn (A1) Kemerimeh "5"KbIaamdbfBTHaHday apkblbkypandbickeKocblb3.
- Onapdbi nTepriuH (H1) Kemerimeh Kypan iWine 6aay uTepy apkblb KaKnaKaTaB (H2) KKTeiTHIN Kybip apkblb caIbHb3.
Caehntap aapabHnda kpaanbl TOnbIfbIme cytTnai y3diKc3 5 petteh aptbIK hEnyde6 Bonmaid.
MaHbIaIbI: ep 300 rp nIHrpeJeHNT KOLJaHbIJFaH caIbIH, cy3ri (H3) XeHe WbIPbIH XnHaftbI (H4) Ta3anan OTbIPbIH3.
Kehectep:
- Keneci jeemictephen nbipbH anyfa 6onaIbI: ce6i3, kI3aHaK, anMA, Jx3iM, TaHkpay, T.6., bIpaK keB6ip jemicmtep MeH keKeHcIeTep H bIpbH any MyMKiHdiR iXoK: baHaH, abOkaD, amMypt, kapaKAT, anMaHbH keN6ip TynpeRi, t.6...
- Kei6ip JekicTepe MeH KeKHeICTepe 7bIpyh CbyFy yuiH XapamaiDbI: 6yn 6aHaH, ABOkaIO, Kapa 6ynIipreH, anMaHbH Kei6ip cypbntapbI xHe T.6.
-KaHa cblfblfAn llbIpblnapblbipdeiH iuiHj3.
KEPEK-JXAPAKTAPdb BΘΠΙΕKTEY TΘPTIb: Kypaπdih, kαδβιkTapbH anyfα έeɪH, κραληm eH anaiMaJIb cy3rɪH ΕδθeH ΚθTaybH kyTlɪH. XɪnHa y ἀπaŋpammaapbH Kepi opbH daHb3, 5.6-dan 5.1-reeɪH.
6-ΘHIMDEPДIH A3 FAHA MÖJIWEPIH YCAKTAY (YIJIPE BAIJIANbICTbI)
KOLДАнылдатын KEPEК-ЖAPAKTAP: МИн Тураftыш КаIGNаftы (N1), МИн Тураftыш bIДысbl (N2)
6.1- KEPEK-KAPAKTAPdbI XINHAY TOPTIBI
10,6.1KHe6,2ДиarpaMmaIapbIn KoJdaHbIbI3.
6.2 - ET TAPTKbIbB BACTNEIH OPHATY
-
MInH TypaFbIUnneH TypayFa 6oJaTbH TaFamap:
-
wentep: 10r makc. / 10cek makiC. / kbldAmdbfbl "7"
-KentipijTren JEMICTeP/ cIbI eti (cYIeKc3JxHe CIHJIpaIaBInFAn ET) : 100r MaKc. / 10ceK MaKc. / KbJIaMdbIbFlbI «1» - KeKHeIcTepeHoc: 150r MaKc. / 20ceK MaKc. / «nYbC» HeMeCe XbIaMdbIfb «1
OcbI ycaKaTbI W KoPe CnKtBi KaTbI eHIMdep yuIH apHaJMaFaH.
KEPEK-JAKAPKTAPdbI BOLIJEKTEY TOPTIbI: KypaI a6dHe TOKTaFaHaMa KyTiH3, oanH KeiH 10, 6.2 Xe He 6,1 XnHay dnaRpaMaMaPbH KeiOpbHdaHbI.
7-BAYCBIMHbIH¥3bIHDbIFbIH PETTEY (A7 cypetih KapaHbI3)
8- JUAFbIH KECEKTEPDI TYPAY (YJIITGE BAJIIAHbICTbl)
KONDAHbINATbIH KEPEK-KAPAKTAP: XnHaIfah yCaKaTaftbII.
-Biphewe cekynd iuihnde cepinnicite pexkime: kentipinre Hxkip, kentipinreepiktepe 6e. 5. ycaKTayfa 6oana. BapbHwa y3ak kondahy yakblt: 100 r / 5 c
TA3AJIAY
KypblfblHb3JeKeTpXeNiciHeh aXbipaTbHb3.
Ko3raTNTbIb6nOriH (A) Hemece XaNFAthB 6nokTi (E) cyfa 6aTbIpMaHb3 xHe aFbIn TypFaCy acTbHa caImaHb3. KypanDbkyprak Hemece XapTbIaN bJfAn fWybepeKnen cyptiH3.
KoJnDaHbICTaH KeiIH ToIbIFbIMeH 6eJIWeKeTTe, Xa6DbIKTapbIH XbIJDan WaBbHbI3.
Kapakat any mymkiHirih andbin any ywiH, xy3epih a6aIaan yctahb3. (Dnarpamma 10).
JXa6bIbKapbH xybl, yaibln, Kpyfátblb3: Xa6bIbKapbH bIbIc Jxuybl H MaunHaF aIyfa 60ana,bMkcep bacIndaB metanll 6eIwkeTepiHeb BacacbH:kopnyc(b) ,nIerii (C1) xheMmKeepi (C2).
EREP K¥PAJI X¥MbIC ICTEMECE, HE ICTEV KEPEK
"KoJaHyaIeH" TapaybIh KapaHbI3
KypbIbIbI eJI de XyMbIc ictemei Me? YekIneTTi Kbl3MeT KepeTy opTaIbIbHa xa6apnacblHbI3 (tiImdi Kbl3MeT KepeTy 6yKTeMeCHeH kapaHbI3).
KEPEK-XAPAKTAP
59-6eTTi XkHe Be6caaTTbI KapaHbI3.
Eckenpy: 6yn KITanwada KocbIMua Xa6dbkTAPRa KAtbCTb Hcckaynap 6epinre. Keewekte Konndahy uih caTan KOnbHbI3. Ka6dbkTAPbH catbIn any Typanbl aknapat kaxet Bonca, TytbHybBa Kb3MeT Kepcsey optanbHaHa xa6bpNaCbHb3.
()
(N2)^ aioa oeg (N1)"gaoa oia h: aaiuui b
aJbU bSj-6.1
6.2g 6.1.10 a
JusxwJ-6.2
1"1 a/0/0 10/0/0 100: (gjglg jglg jglg jglg jglg jglg jglg jglg jglg jglg jglg jglg jglg jglg jglg jglg jglg jglg jglg jglg jglg jglg jglg jglg jglg jglg jglg jglg jglg jglg jglg jglg jglg jglg j
1"14aJyglghia/gyd02/gay 150:laJy4
jll jia aaiall cuiuai aiabai oiaafo
aagg glll llll 111111111111111111111111111
6.1,6.2.10
(A7 1e2bby)
(yogbi)a#allu#wjgai-8
aiaiab:aaiaauiuull
aaii aaiii aaiii aaiii gaaai iiaai aiaiy
.5/10 100:g//a
#
.
a,b,g i a b g a b b a b g a b g a b g a b g a b g a b g a b g a b g a b g a b g a b g a b g a b g a b g a b g a b g a b g a b g a b g a b g a b g a b g a b g a b g a b g a b g a b g a b g a b g a b g a b g a b g a b g a b g
.
Juaaunl 2e Jauu j Coo Lds Jauu cua ldu
aaiial aaiial bia gai aaiial jao (C3) jglal aiia Jaoi y
4.1 jaoaogol oawll .gill gbo 8o 80 80 80 80 80 80 80 80
.1.1
()2
aagjog,1.5 aalw gao jao (D) blll Jaaai ciie plabla aeb clse
1.25
(D/L) bIaI Ic: alaxiauiu IaIaIbI
aJb2.1
.10g2.3J!2.1 2a aagaaagaaagaaagaaagaaagaaagaaagaaagaaagaaagaaagaaagaaagaaagaaagaaagaaagaaagaaagaaagaaagaaagaaagaaagaaagaaagaaagaaagaaagaaagaaagaaagaaagaa
.3:JuswUgSjUgU)JuswUy-2.2
(“pulse" gabd) 8 (A1)
.
LdD2/L5) (D2/L5) 0aill ceg 3o8ggtia aaiil Jn no palaal adl aie
:
:diS
.115s8g3eLsLo.ggab2a4S1g3LgS aJgawdAajgwhb
.10g2.1g2.3g aagglal
(J)-3
(F) _S_I_J_J (E) 山 _ 山 ^ 山 1 aolo: aaoaunl caiu
afo 3.1
3.3 13.10.01.9 a
Lgill (Jax) - 3.2
.(a) (a) (a) (a) (a) (a) (a) (a) (a) (a) (a) (a) (a) (a)
L
JbI bI J0"0"gA1) aaiy j j J 5i jj j j j j j j j j j j j j j j
1.4 11.1 aaaaaglll aalwllg
Jusy-1.2
.0g5 g2 . 10000000000000000000000000000000000000000000000000
0.8g9jies (wwu)
0g jjgljyj (G6)
10 glsIgogwSoo 2JtIgog gOg Cgio 05 oos 15 50: pIgj Oo500
4.2.4.1
.40151 1.5 6.5 jlaog
Max/8 11" 1 " (C3)
(1) a,b ) a > b > c
.02x.(jw 500)00004010
aololol Sglgbsbglg (C3)Soljol
:0j0000
1.1 14.15gge gse 20 20 jttgogg aegio 15s 15
()j02/05bglz-2
glbglj1.25gblcglzj5.1gssolslg(D)Sglgblojlglgla
(L.D) S bglao Su: oolaiwol aygo
Uwba 2.1
LJU210g2.32g2.1g2.9
.(.3:05aJlajjS1)2.2
"max"48"817) 1000000000000000000000000000000000000000000
oolaw sgl oolj jg yj g jy bglj jj sgl gglj gl."pulse"
ool
s0jla Sds jcbg j1 jil golgol (L5.D2) sdlslsjl
:
L 1
1.4( 15 ÷ 3) = 15
()
jS bIgO gJyolb0s Jds 8gi jbiio aagai o1o5iwi iuiuuiu a1sbl4jysbIglo 1go 1
gj g j 10g j s bglao gj w ool aol glg g g g l aq g g g
.
jIggaogaaol5oLsJbIoojSjIaIoo:jjgl00
10g2.1g2.3g6g 60
(Joo b)jS d-3
(F) jS_3j2S1(E) 0a00001jLgS:00laWJ0g0
3.1
5 L3.3 3.1 10.9 10
3.2
sJ 155"7 J5" cRg (A1) dss
jLsI y 1 ygo oKgauu .Jy JyJyJyJyJyJyJyJyJyJyJyJyJyJyJyJyJyJyJyJyJy
100 100
a 10:olalul jaoj s1o .s2r J Cg53 5d jgi
4:(E) Cgws jgl jy) ugyu glo g y1 l cbe o5olzj 0laizj glj J
S S 150
()
J5 JgB 2401. wU oU Jia (A3) gW g (A5) wU wU d 4 s U wU g W g W g W g W g W g W
J 1 g w yg d g g g g 1 g 1 (A3) g w yg d J (A5)
(C3) 120 (C2) 12 b120 (C1) 12 (B2) (B1)
aabcbjg -1.1
L 1.4 1.1
-1.2
Aolgolgog (A1) olll 11
25 14 20 23 26 29 30 31 32 33 34 35 36 37 38 39 40 41 42 43 44 45 46 47 48 49 50 51 52
dslo slol1sgo (B2)o0g
Aa 0"0" Caa aag Gg y A1 (A1) a5s. 05d Ds
:
(4a3013:ooaiw jloj j51o) aoy j
500 500 500 500 500 500 500 500 500 500 500 500 500 500 500 500 500 500 500 500 500 500 500 500 500 500
(0.25, 1.25, 2.5, 3.75)
ssolalai ojglslw jg ssiu jos loglo (C2) jS loglo j1s
(,)²y.
Ref. 8020002155 - 02