QA200110 MASTERCHEF COMPACT - Food Processor MOULINEX - Free user manual and instructions
Find the device manual for free QA200110 MASTERCHEF COMPACT MOULINEX in PDF.
| Brand | Moulinex |
| Model | QA200110 MASTERCHEF COMPACT |
| Type | Food processor |
| Main functions | Knead, mix, beat/whisk, blend (depending on model), slice/grate (depending on model), chop (depending on model) |
| Kneading capacity (white bread) | 500 g flour |
| Kneading capacity (special breads) | 400 g flour (type >55) |
| Kneading capacity (yeast doughs) | 250 g flour |
| Kneading capacity (milk bread) | 750 g flour |
| Mixing capacity (beater) | Up to 1 kg (pound cake dough) or 2.7 kg (cake batter) |
| Whisking capacity | Up to 8 egg whites or 500 ml whipping cream |
| Blender bowl capacity | 1 L (thick mixtures) / 0.75 L (liquid mixtures) |
| Included accessories | Kneading hook, beater, multi-whisk, blender bowl (depending on model), vegetable cutter adapter, drums (A slicing, C coarse grating, D fine grating, E parmesan depending on model), mini chopper (depending on model) |
| Safety | Multifunction head lock, bowl lock, release button, child safety (supervision recommended) |
| Care and cleaning | Accessories dishwasher safe; wipe motor unit with a damp cloth; do not immerse |
| Maximum operating time (kneading/beating) | 13 minutes |
| Maximum operating time (whisk) | 10 minutes |
| Maximum operating time (blender bowl) | 3 minutes |
| Maximum operating time (vegetable cutter) | 10 minutes |
| Maximum operating time (mini chopper) | 8 seconds |
| Speed | Variable speed 1 to 4 + Pulse position |
Frequently Asked Questions - QA200110 MASTERCHEF COMPACT MOULINEX
User questions about QA200110 MASTERCHEF COMPACT MOULINEX
0 question about this device. Answer the ones you know or ask your own.
Ask a new question about this device
Download the instructions for your Food Processor in PDF format for free! Find your manual QA200110 MASTERCHEF COMPACT - MOULINEX and take your electronic device back in hand. On this page are published all the documents necessary for the use of your device. QA200110 MASTERCHEF COMPACT by MOULINEX.
USER MANUAL QA200110 MASTERCHEF COMPACT MOULINEX
Thank you for choosing an appliance from the MOULINEX range, which is intended exclusively for the preparation of food and is only for indoor, domestic use.
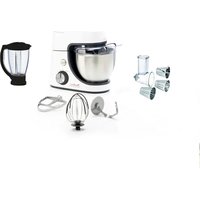
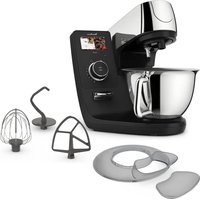
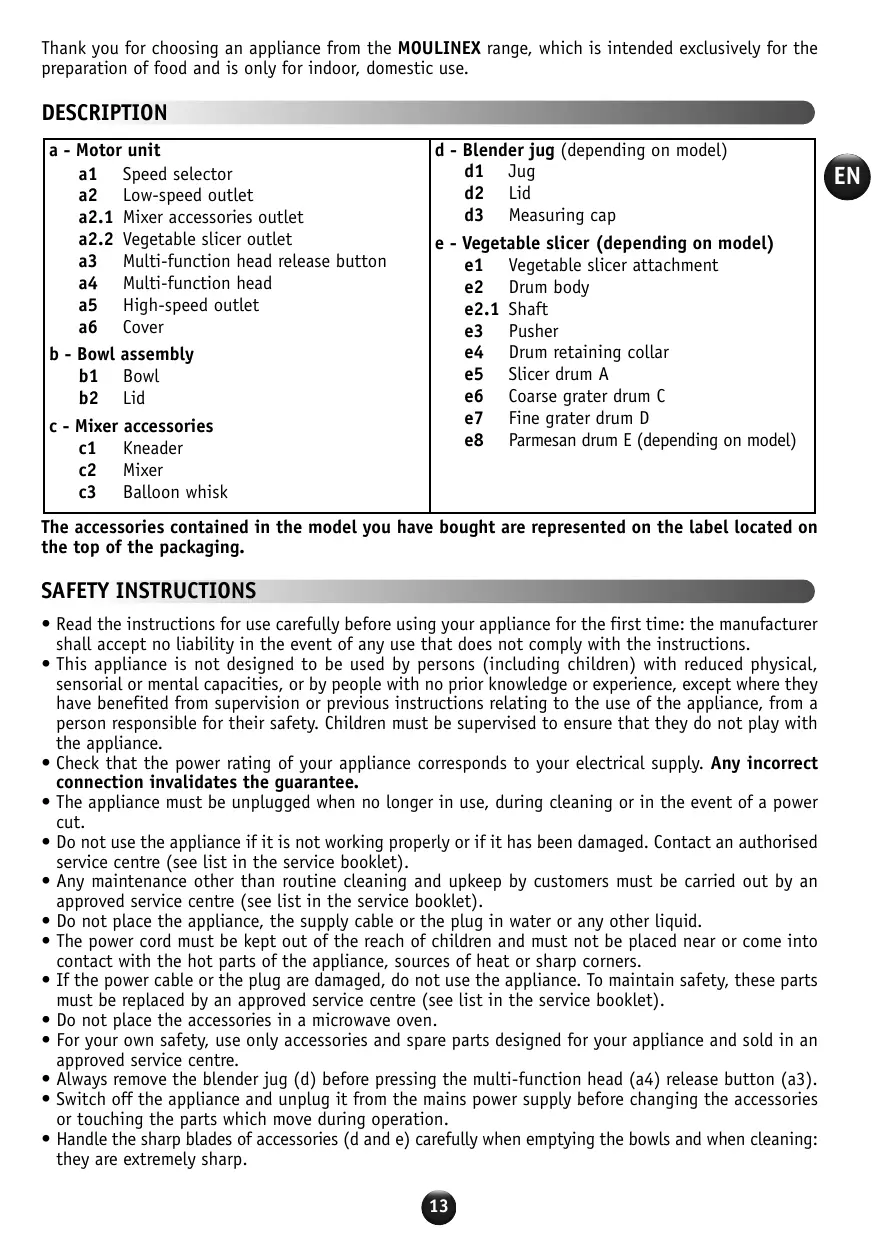
DESCRIPTION
a - Motor unit
a1 Speed selector
a2 Low-speed outlet
a2.1 Mixer accessories outlet
a2.2 Vegetable slicer outlet
a3 Multi-function head release button
a4 Multi-function head
a5 High-speed outlet
a6 Cover
b-Bowl assembly
b1 Bowl
b2 Lid
c-Mixer accessories
c1 Kneader
c2 Mixer
c3 Balloon whisk
d - Blender jug (depending on model)
d1 Jug
d2 Lid
d3 Measuring cap
e - Vegetable slicer (depending on model)
The accessories contained in the model you have bought are represented on the label located on the top of the packaging.
SAFETY INSTRUCTIONS
- Read the instructions for use carefully before using your appliance for the first time: the manufacturer shall accept no liability in the event of any use that does not comply with the instructions.
- This appliance is not designed to be used by persons (including children) with reduced physical, sensorial or mental capacities, or by people with no prior knowledge or experience, except where they have benefited from supervision or previous instructions relating to the use of the appliance, from a person responsible for their safety. Children must be supervised to ensure that they do not play with the appliance.
- Check that the power rating of your appliance corresponds to your electrical supply. Any incorrect connection invalidates the guarantee.
- The appliance must be unplugged when no longer in use, during cleaning or in the event of a power cut.
- Do not use the appliance if it is not working properly or if it has been damaged. Contact an authorised service centre (see list in the service booklet).
- Any maintenance other than routine cleaning and upkeep by customers must be carried out by an approved service centre (see list in the service booklet).
- Do not place the appliance, the supply cable or the plug in water or any other liquid.
- The power cord must be kept out of the reach of children and must not be placed near or come into contact with the hot parts of the appliance, sources of heat or sharp corners.
- If the power cable or the plug are damaged, do not use the appliance. To maintain safety, these parts must be replaced by an approved service centre (see list in the service booklet).
- Do not place the accessories in a microwave oven.
- For your own safety, use only accessories and spare parts designed for your appliance and sold in an approved service centre.
- Always remove the blender jug (d) before pressing the multi-function head (a4) release button (a3).
- Switch off the appliance and unplug it from the mains power supply before changing the accessories or touching the parts which move during operation.
- Handle the sharp blades of accessories (d and e) carefully when emptying the bowls and when cleaning: they are extremely sharp.

- Do not touch the mixer accessories when the appliance is running.
- Do not allow long hair, scarves, ties etc. to dangle over the appliance during operation.
- Never insert utensils (spoon, spatula, etc.) through the opening in the lid (d2), into the bowl (b1) or into the feed tube of the drum body (e2).
- Always use the pusher (e3) with the vegetable slicer accessory (e) to guide food into the feed tube. Never use your fingers, a fork, a spoon, a knife or any other object.
- Do not operate the blender jug (d) without the lid (d2), without ingredients or with dry products only.
- Use only one accessory at a time.
- Do not use the bowls (b1, d1) as containers for freezing, cooking or sterilisation.
FIRSTUSE
- Before using for the first time, wash all accessory parts in soapy water. Rinse and dry.
- Place the appliance on a flat, clean and dry surface. Make sure that the speed selector (a1) is in "0" position and plug in your appliance.
-
You have several options for starting your appliance:
-
Intermittent operation (pulse): Turn the speed selector (a1) to the "pulse" position. Using a succession of pulses can give you better control when preparing certain foods.
-
Continuous operation: Turn the speed selector (a1) to the desired position from "1" to "4" depending on the food you are preparing.
-
You can change it as required during preparation.
- To stop the appliance, turn the selector (a1) to "0" and then unplug your appliance.
The paragraph numbering corresponds to the numbers in the diagrams.
1 - MIXING / KNEADING / BEATING / EMULSIFYING / WHISKING
ACCESSORIES USED:
- Bowl (b1)
-Lid (b2) - Kneader (c1) or mixer (c2) or balloon whisk (c3)
1.1 ASSEMBLING THE ACCESSORIES (DIagrams 1):
- Press the button (a3) to release the multi-function head (a4) and raise it until it locks in place.
- Lock the bowl (b1) (anti-clockwise) on the appliance and put in the ingredients.
- Insert the desired accessory (c) into the outlet (a2.1), until it is clipped in place.
- Place the multi-function head (a4) to the horizontal position: press the button (a3) and manually lower the multi-function head (a4) until it locks (the button (a3) returns to its initial position).
- Slide the lid (b2) over the bowl (b1).
Please note: It is not necessary to use the lid. It limits the risk of splashing.
- Make sure that the cover (a6) is correctly in place on the high-speed outlet (a5).
1.2 USAGE:
- Start by turning the selector (a1) to the desired speed according to the recipe.
- You can add food through the hole in the lid (b2) during preparation.
- To stop the appliance, turn the selector (a1) to "0".
Tips:
- Kneading
- Use the kneader (c1) at speed "1" only.
You can knead up to:
- 500 g flour for bread dough (e.g. white bread, whole-grain bread, etc.)
- 400g of flour for special types of bread (flour above type 55 (T55): rye bread, wholemeal bread, ...)
- 250 g floor for yeast dough (brioche, kouglof, pizza dough, shortcrust pastry, etc.)
-
750 g flour for milk bread (see basic recipe)
-
Maximum operating time: 13 min.
- Mixing
- Use the mixer (c2) at speed "1" to "4".
You can mix up to:
- 1 kg of sponge cake dough, choux pastry, etc.
-
2.7 kg of sweet loaf dough (see basic recipe)
-
Never use the mixer (c2) to knead heavy dough.
-
Maximum operating time: 13 min.
- Beating / emulsifying / whisking
- Use the balloon whisk (c3) at speed "1" to "4".
You can prepare: mayonnaise, aioli, sauces, beaten egg whites (up to 8 egg whites), chantilly cream (up to 500ml ), etc.
- Never use the balloon whisk (c3) to knead heavy dough or mix light dough.
- Maximum operating time: 10 min.
1.3 - DISMANTLING THE ACCESSORIES:
- Wait for the appliance to come to a complete stop and unplug it.
- Remove the lid (b2).
- Using the button (a3), release the multi-function head (a4) and raise it to the upper position.
- Pull the accessory (c1), (c2) or (c3) to remove it from the multi-function head.
- Remove the bowl.
2-BLENDING/MIXING (DEPENDING ON MODEL)
Depending on the nature of the food, you can use the blender (d) to prepare up to 1 L of thick mixtures and 0.75 L of liquid mixtures.
ACCESSIONS USED:
- Blender jug (d)
2.1 - ASSEMBLING THE ACCESSORIES (DIagrams 2):
- Place the multi-function head (a4) in the horizontal position: press the button (a3) and manually lower the multi-function head (a4) until it locks (the button (a3) returns to its initial position).
- Pull the cover (a6) upwards to remove it from the high-speed outlet (a5).
- Make sure that the appliance is switched off before fitting the blender jug (d).
- Fit the blender jug (d) on the high-speed outlet (a5). Four positions are possible.
- Place the food in the blender jug, and lock the lid (d2) fitted with the measuring cap (d3), by rotating it clockwise.
2.2 - USAGE
- Start by turning the selector (a1) to the desired speed according to the recipe.
Use the "Pulse" position for better mixing control and for a better blending of your preparation.
You can add food after removing the measuring cap (d3) from the lid (d2) during preparation. - To stop the appliance, turn the selector (a1) to "0".
Tips:
- Use the blender jug (d) at speed "3" to "4".
Maximum operating time: 3 min.
You can prepare:
- finely blended soups, veloutés, stewed fruit, milkshakes and cocktails.
- liquid batter (pancake, fritters, clafoutis and custard flans).
-
If ingredients stick to the sides of the jug when mixing, stop the appliance. Remove the blender jug, and push the food down onto the blades and put your blender jug back to continue your preparation.
-
Never fill the blender jug with boiling liquid.
- Never run the blender empty.
- Always use the blender jug with its lid.

- Never remove the lid before the blades have stopped completely.
- Always pour liquid ingredients into the blender jug first before adding solid ingredients.
2.3 - DISMANTLING THE ACCESSORY
- Wait for the appliance to come to a complete stop and unplug it. Remove the blender jug. Put back the cover (a6) on the outlet (a5).

3 - GRATING / SLICING (DEPENDING ON MODEL)
ACCESSIONS USED:
- Vegetable slicer attachment (e1)
- Drum body (e2) + pusher (e3)
- Drums (depending on model)
- Drum retaining collar (e4)
3.1 - ASSEMBLING THE ACCESSORIES (DIagrams 3)
- Press the button (a3) to release the multi-function head (a4) and raise it until it locks in place.
- Fit the attachment (e1) under the multi-function head (a4): align the left-hand mark on the attachment (e1) with the mark on the multi-function head (a4), and turn until the right-hand mark on the attachment (e1) is aligned with that of the multi-function head (a4).
- Insert the chosen drum into the body, and make sure that it is fully engaged in the body. Fit the drum retaining collar (e4).
- Facing the attachment (e) outlet, insert the drum body (e2) inclined to the right, aligning the two bayonets in the drum body with the two notches in the attachment. Push it home. If you find it difficult to fit it, slightly turn the shaft (e2.1) of the drum body and push it again. Turn the drum body anti-clockwise until it latches with the feed tube in the vertical position.
- Lock the bowl (b1) (anti-clockwise) on the appliance.
- Make sure that the cover (a6) is correctly in place on the high-speed outlet (a5).
3.2 - USAGE AND TIPS:
- Run the appliance by turning the selector (a1) to speed "3".
Maximum operating time: 10 min. - Place the food in the feed tube on the body and press down with the pusher (e3). Never push the ingredients with your fingers or any other utensil.
- To stop the appliance, turn the selector (a1) to "0". Wait for the appliance to come to a complete stop and unplug it.
- Unlock the drum body in the reverse order of the assembly.
-
Use the drums to:
-
Grate coarsely C (e6) / grate finely D (e7): carrots, celery, potatoes, cheeses, etc.
- Slice thickly A (e5): potatoes, carrots, cucumbers, apples, beetroot, etc.
- Parmesan E (e8): potatoes, parmesan, etc.
4 - CHOPPING SMALL QUANTITIES (DEPENDING MODEL)
ACCESSORY USED:
- Assembled mini-mincer.
With the mini-mincer, you can chop in few seconds by pulsing: dried figs, dried apricots, etc.
Quantity / max time: type QA100: 50g / 8s, type QA200: 90g / 8s.
This mini-mincer is not designed for hard products like coffee.
CLEANING
- Unplug the appliance.
- Never immerse the motor unit (a) in water or put it under running water. Wipe it with a dry or slightly damp cloth.
- For easier cleaning, rinse the accessories quickly after use. Handle the blades with care to prevent injury.
- Wash, rinse and dry the accessories: they are all dishwasher-safe.
Tip:
- In the event any of your accessories are coloured by food (carrots, oranges, etc.), rub with a cloth soaked in cooking oil and then clean them as usual.
- Blender jug (d): pour some hot water containing a few drops of washing up liquid into the blender jug. Close the lid. Place it on the appliance and pulse a few times. After removing it, rinse the bowl in running water and allow to dry (bowl upside down).
EN
STORAGE
Do not store your appliance in a humid environment
WHAT TO DO IF YOUR APPLIANCE DOES NOT WORK
If your appliance does not work, check:
- that it is plugged in correctly.
- that the accessories are correctly locked.
- The position of the speed selector (a1): turn it to position "0" and then select the desired speed again.
Your appliance still does not work? Contact an approved service centre (see list in service booklet).
DISPOSAL OF PACKAGING AND THE APPLIANCE

The packaging is comprised exclusively of materials that present no danger for the environment and which may therefore be disposed of in accordance with the recycling measures in force in your area.
For disposing of the appliance itself, please contact the appropriate service of your local authority.
END-OF-LIFE ELECTRICAL OR ELECTRONIC PRODUCTS

Think of the environment!
① Your appliance contains valuable materials which can be recovered or recycled.
Leave it at a local civic waste collection point.
ACCESSORIES
You can customise your appliance and obtain the following accessories from your usual retailer or an authorised service centre:
| Bowl | Vegetable slicer attachment |
| Bowl lid | Vegetable slicer: - A: slicing |
| Kneader | |
| Mixer blade | - C: coarse grating |
| Balloon whisk | - D: fine grating |
| Blender jug | - E: parmesan |
| Mini-mincer | |
| Mincer head |
Note: you can purchase an accessory only when you present your instruction leaflet or your appliance.
White bread
Ingredients: 350 g flour (type 55), 210 ml warm water, 5 g dried baker's yeast, 5 g salt.
Put the salt, flour and baker's yeast in the bowl. Fit the kneader and the lid. Run for a few seconds at speed 1, and add water with the appliance running. Knead for about 8 minutes. Allow the dough to rest at room temperature for around half an hour. Then work the dough by hand into a ball. Place the ball of dough on a buttered, floured baking sheet. Allow to rise for about an hour. Preheat the oven to 240^ . Make cuts on the top of the loaf with a sharp blade, and brush with lukewarm water. Put a small container full of water into the oven as this helps the bread to form a golden crust. Bake for 30 minutes.
Shortcrust pastry
Ingredients: 200 g flour, 100 g softened butter cut into pieces, 50 ml water, 1 pinch of salt.
Put the flour, butter and salt in the bowl. Fit the kneader and the lid. Run for a few seconds at speed 1, and add water with the appliance running. Continue to knead until the pastry forms a ball. Cover it in cling film and allow the pastry to rest in a cool place for about half an hour before rolling out and cooking.
Milk bread
Ingredients: 500 g flour, 1 egg, 80 g softened butter cut into pieces, 80 g sugar, 250 ml warm milk, 5 g dried baker's yeast, 1 pinch of salt.
Put all the ingredients in the bowl. Fit the kneader and the lid. Run the appliance at speed 1 for about 8 minutes. Allow the dough to rest at room temperature for about 1 hour and then work the dough by hand. Cut the dough into small pieces and form them into buns. Place them on a baking sheet lined with parchment paper and allow to rise for about 30 to 40 minutes. Preheat the oven to 200^ . Brush the buns with egg yolk mixed with a little milk and sugar. Bake for about 20 minutes.
Sweet loaf
Ingredients: 2 eggs, 125 g sugar, 125 g softened butter in pieces, 250 g flour, 70 ml milk, 1 sachet (11 g) baking powder, 1 sachet (6.5 g) vanilla sugar.
Put all the ingredients in the bowl except for the flour. Fit the kneader and the lid. Run for a few seconds at speed 1, and add the flour little by little with the appliance running. Knead for 3 minutes. Preheat the oven to 180^ . Place the dough in a buttered and floured loaf tin. Bake for about 40 minutes.
Savoury loaf
Ingredients: 200 g flour, 4 eggs, 1 sachet (11 g) baking powder, 100 ml cold milk, 50 ml olive oil, 12 dried tomatoes, 200 g feta cheese, 15 destoned green olives cut into pieces, salt, pepper.
Preheat the oven to 180^ . Butter and flour a loaf tin. Put the flour, eggs and baking powder in the bowl. Fit the kneader and the lid. Start at speed 1 and then increase to speed 3. Add the olive oil and milk with the appliance running for one and a half minutes. Decrease to speed 1 and add the dried tomatoes, feta cheese and olives. Add salt and pepper. Pour the mixture into the tin and bake for 30 to 40 minutes.
Mayonnaise
Ingredients: 1 egg yolk - 1 tablespoon mustard - 1 teaspoon vinegar - 250 ml oil, salt, pepper
Attention: all the ingredients must be at room temperature.
Put all the ingredients except for the oil in the bowl. Fit the balloon whisk and lid. Start at speed 1 and begin to pour the oil in a thin trickle. After 10 seconds, increase to speed 4, and continue to add the oil little by little. Once you have added all the oil, run the appliance for another 30 seconds.
NB: Keep refrigerated and consume within 24 hours.
Chantilly cream
Ingredients: 250 ml very cold liquid crème fraîche, 50g icing sugar.
Put the cream and icing sugar in the bowl. Fit the balloon whisk and lid. Run the appliance at speed 3 for 2 minutes and then at speed 4 for one and a half minutes.
-Taça (b1)
Tampa (b2)
- Gancho para massa pesada (c1) ou batedor para massa ligeira (c2) ou batedor de claras (c3)
1.1 MONTAGEM DOS ACESSORIOS (ESQUEMA 1):
0 1 0 0 0 0 0 0 0 0 0 0 0 0 0 0 0 0 0 0 0 0 0 0 0 0 0 0 0 0 0 0 0 0 0 0 0 0 0 0 0 0 0 0 0 0 0 0 0 0 0 0 2
gll
1 10 10 10 10 10 10 10 10 10 10 10 10 10 10 10 10 10 10 10 10 10 10 10 10 10 10 10 10 10 10 10 10 10
(Savoury)
- jujj jjj 0... jujj jjj jjj jjj jjj jjj jjj jjj jjj jjj jjj jjj jjj jjj jjj jjj jjj jjj jjj jjj jjj jjj jjj jjj jjj jjj jjj jjj jjj jjj jjj jjj jjj jjj jjj jjj jjj jjj jjj jjj jjj jjj jjj jjj jjj jjj jjj jjj jjj jjj jjj jJJ
J
Jal - 10- 1000000000000000000000000000000000000000000000000000000000000
aLwYjGzEgdlgWgJxJy
4
1 3 a 4
#
aal Jauuoo
: j 1
i
S_ AOB = 12 · OB · AB = 12 × 10 × 5
a1iLi aai jil 0" gai (a1) aai i
(102)
aaii iiaai iiaai
aiee eae aee eae ee eae eae eae eae eae eae eae eae eae eae eae eae eae eae eae eae eae eae eae eae eae eae eae eae eae eae eae eae eae eae eae eae eae eae eae eae eae eae eae eae eae eae
a aal aal aal aal aal aal aal aal aal aal aal aal aal aal

aalalal
1gai
iueaie 1
aaii all yalall jyj sly
i

C

J
a a a a a a a a a a a a a a a a a a a a a a
cilll lcl (cllllllacolil (b1) clll Jai
(a5) aALLIe g 1000 (a6).blll bll
$$ \text {c i l a n g} J L a a i w - 3. 2 $$
3" a (a1)
.:山
48g jolj g1 jdl Jauu. (63) 2aall aalpse p
$$ \cdot p a l e b a l l $$
Jc 10. aal (a1) aal
$$ \therefore \vert l _ {1} \vert = \vert l _ {2} \vert $$
.
$$ \therefore \frac {1}{2} \text {L a} \text {L a l} \text {L a b} \text {L a b} \text {L a b} $$
...g. (e7) D /(e6) C -
$$ \dots \dot {e} ^ {\prime \prime} \text {, d i s t r a c t e d ,} \text {c l} \text {d i s t r a c t e d ,} \text j z j z j z j z j z j z j z j z j z j z j z j z j z j z j z j z j z j z j z j z j z j z j z j z j z j z j z j z j z j z j z j z j z j z j z j z j z j z j z j z j z j z j z j z j z j z j z j z j z j z j z $$
$$ \dots \dot {e} \quad \text {(e 8)} E \quad \text {l a m b d a} ^ {-} $$
$$ \left(\mathrm {山} _ {\mathrm {i}} \mathrm {g} _ {\mathrm {o l l}} \mathrm {s} _ {\mathrm {s o s}}\right) \mathrm {a l l} \mathrm {c} \mathrm {l} _ {\mathrm {s o s}} \mathrm {e} _ {\mathrm {s o s}} - 4 $$
$$ : \therefore a l o w $$
$$ \therefore \text {a d} = \text {a l l} \text {i o j a l l} \text {j a l o -} $$
..
AA/1JgA:QA200 1JgA/AJgO.:QA100
j 1
a.kiiill
Jy
a aaa aaa aaa aaa aaa aaa aaa aaa aaa aaa aaa aaa aaa aaa aaa aaa aaa aaa aaa aaa aaa aaa aaa aaa aaa aaa aaa aaa aaa aaa aaa aaa aaa aaa aaa aaa aaa
Jus Jus Jus Jus Jus Jus Jus Jus Jus Jus Jus Jus Jus Jus Jus Jus Jus Jus Jus Jus Jus Jus Jus Jus Jus Jus Jus Jus Jus Jus Jus Jus Jus Jus Jus Jus Jus Jus Jus Jus Jus Jus Jus Jus
$$ \therefore \angle 2 = \angle 1 $$
a a a a a a a a a a a a a a a a a a a

biul
4"1"00000000000000000000000000000000
:
11111111111111111111111 1
()
aill iayall jai (C2) bll Jaaiy
1r:J 1
/12
4"1" 1" 1" 1" (C3) jJk
gagaa (a4) aalaaal (a3) jlllai
Laxuilll lal (C3) (C2). (C1)
.
(jgall) 2
dcllll l (d3) wlll (d2) 1lll l l
:Joojuiy1 2.2
a1) aai
gle lallll lallll lallll lallll
a aae
J 1
1jla jla bla all
aIbce bbll lal Jaeel
.1oai jzjll jzjzjj 100
.0dAaIgallallglbIgblklllglgall
J 1
.
.
.
.
.
.
.
.
.
.
.
.
.
.
.
.
.
.
.
.
.
.
.
.
.
.
.
.
.
.
.
.
.
.
.
. 2 1 1 1 1 1 1 1 1 1 1 1 1 1 1 1 1 1 1 1 1 1 1 1 1 1 1 1 1 1 1 1 1 1 1 1 1 1 1 1 1 1 1 1 1 1 1 1 1 1 1 0
.
.
.
.
.
.
.
.
.
.
.
.
.
.
.
.
Jlal Jlaeayy
.
.
.
.
.
.
.
.
.
.
.
.
.
.
.
.
.
.
.
.
.
.
.
.
.
.
.
.
.
.
.
.
.
.
.
. 1
. 1
. 1
. 1
. 1
. 1
. 1
. 1
. 1
. 1
. 1
. 1
. 1
. 1
. 1
. 1
. 1
. 1
. 1
. 1
. 1
. 1
.
.
.
.
.
.
.
.
.
.
.
.
.
.
.
.
.
.
.
.
.
.
.
.
.
.
.
.
.
.
.
.
.
.
.
.
.
.
.
.
.
.
.
.
.
.
.
.
.
.
.
.
.
.
.
.
.
.
.
.
.
.
.
.
.
.
.
.
.
.
.
.
.
.
.
.
.
.
.
.
.
.
.
-
-
- -
-
-
-
- -
-
-
-
- -
-
-
-
- -
-
-
-
- -
-
-
-
- -
-
-
-
- -
-
-
-
- -
-
-
-
- -
-
-
-
- -
-
-
-
- -
-
-
-
- -
-
-
-
- -
-
-
-
- -
-
-
-
- -
-
-
-
- -
-
-
-
- -
-
-
-
- -
-
-
-
- -
-
-
-
- -
-
-
-
- \/
-
-
-
- -
-
-
-
- -
-
-
-
- -
-
-
-
- -
-
-
-
- -
-
-
-
- -
-
-
-
- -
-
-
-
- -
-
-
-
- -
-
jai jilw yLally lllll 1
j 1 j 1 j 1 j 1 j 1 j 1 j 1 j 1 j 1 j 1 j 1 j 1 j 1 j 1 j 1 j 1 j 1 j 1 j 1 j 1 j 1 j 1
a
aalabawyllw yj. aolll ooll 1e lall. jll Jaaai 2, lall algll g
(1oJzll (siaill jil) daa oia sso abolg y
gE glll. 121 no ta aas gill, ydl gll lall wll tll gll alal baaal Jaoa
.
A = 180^.
C-
D =
E-
m = 311
j5b0
gill
S_ BCD = 12 · BG · CD = 12 × 2t × 5
jduw
$$ (j \ddot {s} \dot {s} \dot {s} \dot {s} \dot {s} \dot {s} \dot {s} \dot {s} \dot {s} \dot {s} \dot {s} \dot {s} \dot {s} - 3 $$
$$ : o s o o l i e i l g $$
$$ (e 1) \quad \text {a l p h a} \quad \text {a l p h a} \quad \text {a l p h a} \quad \text {a l p h a} - $$
$$ (e 3) _ {\Delta \Delta \Delta \Delta \Delta \Delta \Delta \Delta \Delta} (e 2) _ {\Delta \Delta \Delta \Delta \Delta \Delta \Delta \Delta} - $$
$$ (j _ {1} \sigma_ {0} \sigma_ {1} \sigma_ {2}) \rho_ {1} \rho_ {2} - $$
$$ (e 4) _ {a b c d} \dots $$
$$ : (3 \text {j} \text {j} \text {j} \text {j}) \text {j} \text {j} \text {j} \text {j} \text {j} \text {j} \text {j} \text {j} \text {j} \text {j} \text {j} \text {j} \text {j} \text {j} \text {j} \text {j} \text {j} \text {j} \text {j} - 3. 1 $$
a4) 1 (a3)
ybiio jz yj yj yj yj (e1) aaii i (a4) gbiio jz yj yj yj (e1)
$$ \therefore 1 0: \therefore j k l s j k l s j k l s $$
$$ \therefore \square S $$
$$ \cdot \rho \omega \cdot j \omega \cdot d i s c o n v \bullet $$
(e7)Dj(/e6)C-
$$ \left. \right.\left. \right.\left. \right.\left. \right.\left. \right.\left. \right.\left. \right.\left.\left.\left.\left.\left.\left.\left.\left.\left.\left.\left.\left.\left.\left.\left.\left.\left.\left.\left.\left.\left.\left.\left.\left.\left.\left.\left.\right.\right.\right.\right.\right.\right.\right.\right.\right.\right.\right.\right.\right.\right.\right.\right.\right.\right.\right.\right.\right.\right.\right.\right.\right.\right.\right\rangle_ {i} = 0, j = 1, 2, 3, 4, 5, 6, 7, 8, 9, 1 0, 1 1, 1 2, 1 3, 1 4, 1 5, 1 6, 1 7, 1 8, 1 9, 2 0, 2 1, 2 2, 2 3, 2 4, 2 5, 2 6, 2 7, 2 8, 2 9, 3 0, 3 1, 3 2, 3 3, 3 4, 3 5, 3 6, 3 7, 3 8, 3 9, 4 0, 4 1, 4 2, 4 3, 4 4, 4 5, 4 6, 4 7, 4 8, 4 9, 5 0, 5 1, 5 2, 5 3, 5 4, 5 5, 5 6, 5 7, 5 8, 5 9, 6 0, 6 1, 6 2, 6 3, 6 4, 6 5, 6 6, 6 7, 6 8, 6 9, 7 (e) (f) A _ {j} = j k - j l - j m - j n - j o - j p - j q - j r - j s - j t - j u - j v - j w - j x - j y - j z - j w - j x - j y - j z - j w - j x - j y - j z - j w - j x - j y - j z - j w - j x - j y - j z - j w - j x - j y - j z - j w - j x - j y - j z - j w - j x - j y - j z - j w - j x - j y - j z - j w + i k + j l + k + l + m + n + o + p + q + r + s + t + u + v + w + x + y + z + o + p + q + r + s + t + u + v + w + x + y + z + o + p + q + r + s + t + u + v + w + x + y + z + o + p + q + r + s + t + u + v + w + x + y + z + o + p + q + r + s + t + u + v + w + x + y + z + o +p + q + r + s + t + u + v + w + x + y + z + o + p + q + r + s + t + u + v + w + x + y + z + o + p + q + r + s + t + u + v + w + x + y + z + o + p + q + r + s + t + u + v + w + x + y + z + o + p + q + s + t + u + v + w + x + y + z + o + p + q + r + s + t + u + v + w + x + y + z + o + p + q + r + s + t + u + v + w + x + y + z + o $$
$$ \left. \right. \circ \circ \circ \circ \circ \circ \circ \circ \circ \circ \circ \circ \circ \circ \circ \circ \circ \circ \circ \circ \circ \circ \circ \circ \circ \circ \circ \circ \circ \circ \circ \circ \circ \circ \circ \circ \circ \circ \circ \circ \circ \circ \circ \circ \circ \circ \circ \circ \circ \circ \cdot (e 8) E _ {\text {i j k l} ^ {2}} ^ {1} r ^ {2} $$
$$ (j \infty) (j \leq j \leq j \leq j \leq j \leq j \leq j \leq j \leq j \leq j \leq j \leq j \leq j \leq j \leq j \leq j \leq j \leq j \leq j \leq j \leq j \leq j \leq j \leq j \leq j \leq j \leq - 4 $$
$$ : o s o o l i e i l $$
$$ \Delta \Delta \Delta \Delta \Delta \Delta \Delta \Delta \Delta \Delta \Delta \Delta \Delta \Delta \Delta \Delta \Delta \Delta \Delta \Delta \Delta \Delta \Delta \Delta \Delta \Delta \Delta \Delta \Delta \Delta \Delta \Delta \Delta \Delta \Delta \Delta \Delta \Delta \Delta \Delta \Delta \Delta \Delta \Delta \Delta \Delta \Delta \Delta \Delta \Delta \Delta $$
sLgssj.5s: 1uysnssy
a1tA/ps90:QA200g,aa1tA/ps30:QA100gj:JlaJolaj/
aalolalolololololololololololololololololololololololololololololololololololololololololol
J
a
$$ \therefore \mathrm {i} $$

jds bgs
100 4"5"1"000000000000000-
Lgoloo
1
(20 2.7-
-1
13:jssJocJoojSs
J 1 J 1 J 1 J 1 J 1 J 1 J 1
1 1
111111111111111111111111
- 12 k oJdsI w Jg bgsOoo j 4 aoo
1 1 1 1 1 1 1 1 1 1 1 1 1 1 1 1 1 1 1
a
$$ \therefore \text {i s} (s) \text {j i d} \text {i s} \text {k i n} \text {i n} \text {j i n} \text {j i n} \text {j i n} \text {j i n} \text {j i n} \text {j i n} \text {j i n} \text {j i n} \text {j i n} \text {j i n} \text {j i n} \text {j i n} \text {j i n} \text {j i n} \text {j i n}. $$
$$ \therefore \text {i s} \left| \left| \right| \right| \text {i s} \left| \left| \right| \right| \text {i s} \left| \left| \right| \right| \text {i s} \left| \left| \right| \right| \text {i s} \left| \left| \right| \right| \text {i s} \left| \left| \right| \right| \text {i s} \left| | \right| \text {i s} \left| | \right| \text {i s} \left| | \right| \text {i s} $$
$$ \leq \left(b 1\right) \leq \left(d 2\right) \leq \left(\frac {1}{2} \cdot \frac {1}{2}\right) \leq \left(\frac {1}{2} \cdot \frac {1}{2}\right) \leq \left(\frac {1}{2} \cdot \frac {1}{2}\right) \leq \left(\frac {1}{2} \cdot \frac {1}{2}\right) \leq \left(\frac {1}{2} \cdot \frac {1}{2}\right) \leq \left(a, b\right) $$
$$ \therefore \quad \text {d} \leqslant \left| \right| \text {d} \leqslant (e 2) $$
$$ \cdot \lim _ {n \rightarrow \infty} \left| \frac {\partial f}{\partial n} \right| = \lim _ {n \rightarrow \infty} \left| \frac {\partial f}{\partial n} \right| = \lim _ {n \rightarrow \infty} \left| \frac {\partial f}{\partial n} \right| = \lim _ {n \rightarrow \infty} \left| \frac {\partial f}{\partial n} \right| = \lim _ {n \rightarrow \infty} f (n) $$
$$ \therefore \quad \text {d} _ {1} \leqslant \left| \frac {1}{2} \right| \leqslant 1, \quad \text {d} _ {2} \leqslant \left| \frac {1}{2} \right| \leqslant 2, \quad \text {d} _ {3} \leqslant \left| \frac {1}{2} \right| \leqslant 3, \quad \text {d} _ {4} \leqslant \left| \frac {1}{2} \right| \leqslant 4, $$
$$ \therefore \lim _ {d \rightarrow 0} \left| \frac {\partial f}{\partial x} \right| = \lim _ {d \rightarrow 0} \left| \frac {\partial f}{\partial y} \right| = \lim _ {d \rightarrow 0} \left| \frac {\partial f}{\partial z} \right| = \lim _ {d \rightarrow 0} \left| \frac {\partial f}{\partial w} \right| = $$
$$ \therefore \text {i s} \quad \text {i s} \quad \text {i s} \quad \text {i s} \quad \text {i s} \quad \text {i s} \quad \text {i s} \quad \text {i s} \quad \text {i s} \quad \text {i s} \quad \text {i s} \quad \text {i s} \quad \text {i s} \quad \text {j l b a s} $$
$$ \therefore \text {d} \leqslant \text {d} \text {d} \text {d} \text {d} \text {d} \text {d} \text {d} \text {d} \text {d} \text {d} \text {d} \text {d} \text {d} \text {d} \text {d} \text {d} \text {d} \text {d} \text {d} \text {d} \text {d d} \text {d} \text {d} \text {d} \text {d} \text {d} \text {d} \text {d} \text {d} \text {d} \text {d} \text {d} \text {d} \text {d} \text {d} \text {d} \text {d} \text {d} \text {d} \text {d} \text {a l p h a 4 (b 1 , d 1)} < s < s < s < s $$
a
1
$$ \therefore \quad \left. \right.\left. \right.\left. \right.\left. \right.\left. \right.\left. \right.\left. \right.\left. \right.\left. \right.\left. \right.\left. \right.\left. \right.\left. \right.\left. \right.\left. \right.\left. \right.\left. \right.\left. \right.\left. \right.\left. \right.\left.\left.\left.\left.\left.\left.\left.\left.\left.\left.\left.\left.\left.\left. 1 0 0 0 0 0 0 0 0 0 0 0 0 0 0 0 0 0 0 0 0 0 0 0 0 0 0 0 0 0 0 0 0 0 0 0 0 0 0 0 0 0 0 0 0 0 0 0 0 0 0 1 1 1 1 1 1 1 1 1 1 1 1 1 1 1 1 1 1 1 1 1 1 1 1 1 1 1 1 1 1 1 1 1 1 1 1 1 1 1 1 1 1 1 1 1 1 1 1 1 1 2 \right]\right]\right]\right]\right]\right]\right]\right]\right]\right]\right]\right]\right]\right] $$
$$ \therefore \text {d i s t r i b u t i o n} ^ {\prime \prime} \text {s w i l l} ^ {\prime \prime} \text {c a s e} \text {a d} \text {s w i l l} \text {a l} (a 1) \text {c a s e} \text {s w i l l} ^ {\prime \prime} \text {c a s e} (\text {s w i l l}) \text {c a s e} \text {s w i l l} ^ {\prime \prime} \text {c a s e} (\text {s w i l l}) $$
$$ \begin{array}{l} \text {a l l a l l a l l a l l a l l a l l a l l a l l a l l a l l a l l a l l a l l a l l a l l a l l a l l a l l a l l a l l a l l a l l a l l a l l a l l a l l a l l a l l a l l a l l a l l a l l a l l a l l a} \ \text {a d k a g e 4 4 4 4 4 4 4 4 4 4 4 4 4 4 4 4 4 4 4 4 4 4 4 4 4 4 4 4 4 4 4 4 4 4 4 4 4 4 4 4 4 4 4 4 4 4 4 4 4 4 1 (a 1) c o r e s i n g : y i i i i i i i i i i i i i i i i i i i i i i i i i i i i i i i i i i i i i i i i i i i i i i i i i i i i i i i i i i i i i i i i i} - \end{array} $$
$$ \therefore \angle B C E = 1 8 0 ^ {\circ} $$
$$ \therefore \text {a d} \text {a d} \text {a d} \text {a d} \text {a d} \text {a d} \text {a d} \text {a d} \text {a d} \text {a d} \text {a d} \text {a d} \text {a d} \text {a d} \text {a d} \text {a d} \text {a d} \text {b a d} \bullet $$
$$ \therefore \text {d} \leq \text {d} \leq \text {d} \leq \text {d} \leq \text {d} \leq \text {d} \leq \text {d} \leq \text {d} \leq \text {d} \leq \text {d} \leq \text {d} \leq \text {d} \leq \text {d} \leq \text {a} (1) \quad \text {d} \leq \text {d} \leq \text {d} \leq \text {d} \leq \text {d} \leq \text {d} \leq \text {d} \leq \text {d} \leq \text {d} \leq \text {d} $$
a a
a aaa a a a a a a a a a a a a a a a a a a a a a a a