Wizzo - QA319810 - Food Processor MOULINEX - Free user manual and instructions
Find the device manual for free Wizzo - QA319810 MOULINEX in PDF.
| Product type | Food processor |
| Brand | Moulinex |
| Model | Wizzo QA319810 |
| Number of speeds | 7 speeds + pulse position |
| Main functions | Mixing, kneading, beating, whisking, emulsifying, blending, grating, slicing, chopping (depending on model) |
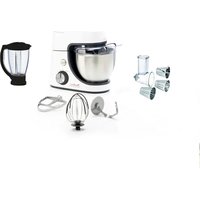
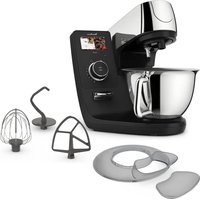
| Included accessories | Main bowl, lid, dough hook, kneader, multi-wire whisk, blender bowl (depending on model), vegetable cutter with adapter, magazine, pusher and drums (A, C, D, R depending on model) |
| Kneading capacity | Up to 750 g of flour for milk bread |
| Blender bowl capacity | Up to 1 L of thick mixtures, 0.75 L of liquid mixtures |
| Vegetable cutter capacity | Up to 2 kg of food |
| Maximum operating time (kneading) | 13 minutes |
| Maximum operating time (beating/whisking) | 10 minutes |
| Maximum operating time (blending) | 3 minutes |
| Maximum operating time (vegetable cutter) | 10 minutes |
| Safety | Microprocessor with automatic shutdown in case of overload, multifunction head locking |
| Maintenance and cleaning | Dishwasher-safe accessories; wipe motor block with a dry or slightly damp cloth |
| Available spare parts | Bowl, blender bowl, vegetable cutter, dough hook, kneader, whisk, adapter, drums |
| Power supply | Mains |
Frequently Asked Questions - Wizzo - QA319810 MOULINEX
User questions about Wizzo - QA319810 MOULINEX
0 question about this device. Answer the ones you know or ask your own.
Ask a new question about this device
Download the instructions for your Food Processor in PDF format for free! Find your manual Wizzo - QA319810 - MOULINEX and take your electronic device back in hand. On this page are published all the documents necessary for the use of your device. Wizzo - QA319810 by MOULINEX.
USER MANUAL Wizzo - QA319810 MOULINEX
natural_image
Line drawing of a kitchen mixer with control panel and side button labels (NL, DE, EN, AR, FA, UK, RU, KK) on the right side.
Protection surcharge :
PRODUITS ELECTRONIQUES OU ELECTRIQUES

PRODUITS ELECTRONIQUES OU ELECTRIQUES
3.2 - ACCENSIONE E CONSIGLI:
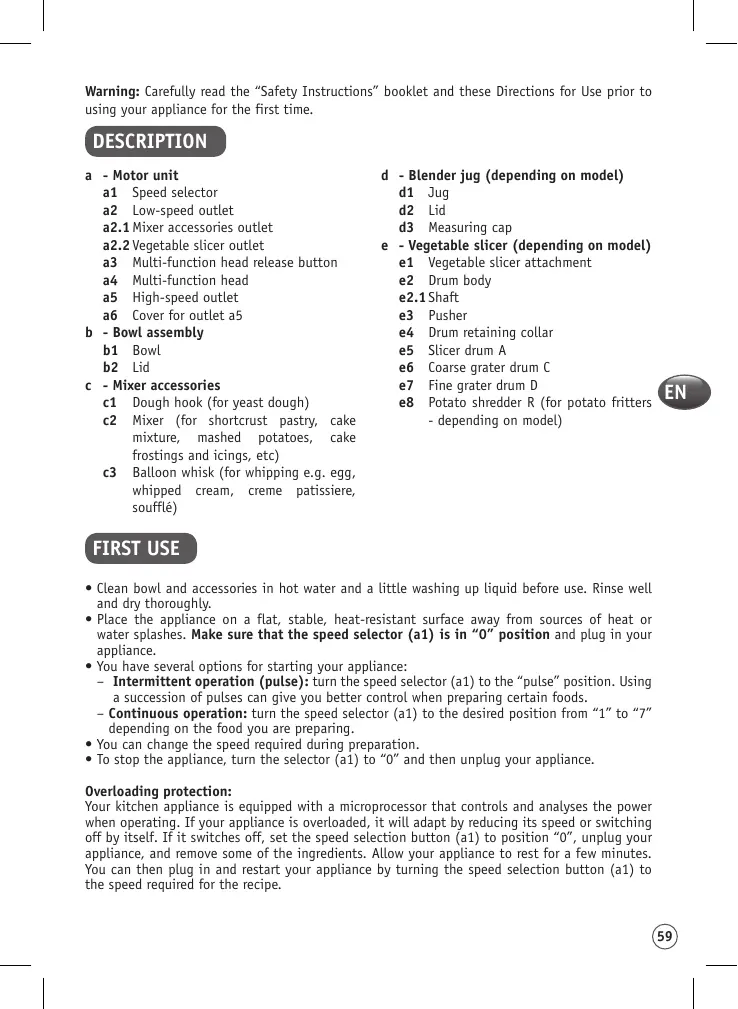
Warning: Carefully read the "Safety Instructions" booklet and these Directions for Use prior to using your appliance for the first time.
DESCRIPTION
a - Motor unit
a1 Speed selector
a2 Low-speed outlet
a2.1 Mixer accessories outlet
a2.2 Vegetable slicer outlet
a3 Multi-function head release button
a4 Multi-function head
a5 High-speed outlet
a6 Cover for outlet a5
b - Bowl assembly
b1 Bowl
b2 Lid
c - Mixer accessories
c1 Dough hook (for yeast dough)
c2 Mixer (for shortcrust pastry, cake mixture, mashed potatoes, cake frostings and icings, etc)
c3 Balloon whisk (for whipping e.g. egg, whipped cream, creme patissiere, soufflé)
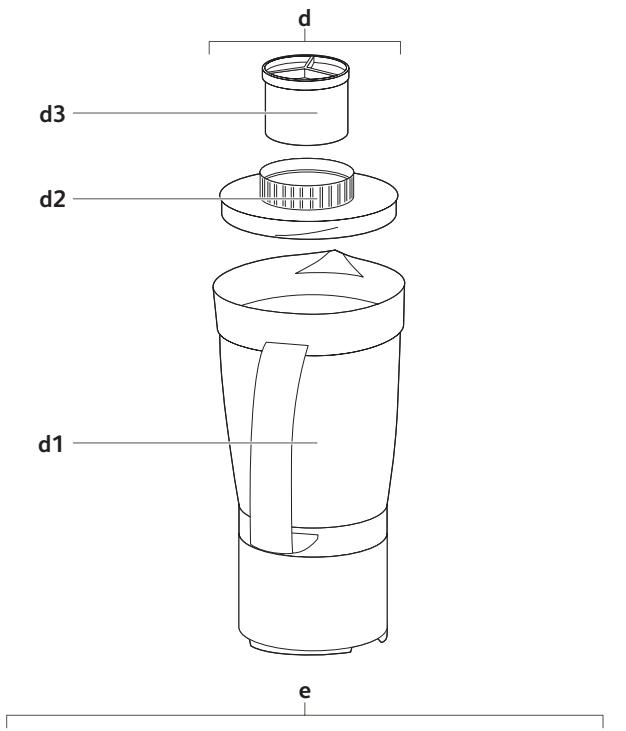
d - Blender jug (depending on model)
d1 Jug
d2 Lid
d3 Measuring cap
e - Vegetable slicer (depending on model)
e1 Vegetable slicer attachment
e2 Drum body
e2.1 Shaft
e3 Pusher
e4 Drum retaining collar
e5 Slicer drum A
e6 Coarse grater drum C
e7 Fine grater drum D
e8 Potato shredder R (for potato fritters - depending on model)
FIRST USE
- Clean bowl and accessories in hot water and a little washing up liquid before use. Rinse well and dry thoroughly.
- Place the appliance on a flat, stable, heat-resistant surface away from sources of heat or water splashes. Make sure that the speed selector (a1) is in "0" position and plug in your appliance.
- You have several options for starting your appliance:
- Intermittent operation (pulse): turn the speed selector (a1) to the "pulse" position. Using a succession of pulses can give you better control when preparing certain foods.
- Continuous operation: turn the speed selector (a1) to the desired position from "1" to "7" depending on the food you are preparing.
- You can change the speed required during preparation.
- To stop the appliance, turn the selector (a1) to "0" and then unplug your appliance.
Overloading protection:
Your kitchen appliance is equipped with a microprocessor that controls and analyses the power when operating. If your appliance is overloaded, it will adapt by reducing its speed or switching off by itself. If it switches off, set the speed selection button (a1) to position "0", unplug your appliance, and remove some of the ingredients. Allow your appliance to rest for a few minutes. You can then plug in and restart your appliance by turning the speed selection button (a1) to the speed required for the recipe.
1 - MIXING/KNEADING/BEATING/EMULSIFYING/WHISKING
ACCESSORIES USED:
- Bowl (b1)
- Lid (b2)
- Dough hook (c1) or mixer (c2) or balloon whisk (c3)
1.1 ASSEMBLING THE BOWL ACCESSORIES (DIAGRAMS 1):
- Turn the button (a3) to unlock the multifunctional head (a4) and lift it until it stops.
- Lock the bowl (b1) (anti-clockwise) on the appliance and put in the ingredients.
- Insert the desired accessory (c) into the outlet (a2.1), until it is clipped in place.
- To lower the multi-function head (a4) to the horizontal position: turn the button (a3) and manually lower the multi-function head (a4) until it locks (the button (a3) returns to its initial position).
- Slide the lid (b2) over the bowl (b1).
- Please note: it is not necessary to use the lid. It limits the risk of splashing.
- Make sure that the cover (a6) is correctly in place on the high-speed outlet (a5).
1.2 USAGE:
- Start by turning the selector (a1) to the desired speed according to the recipe.
- You can add food through the hole in the lid (b2) during preparation.
- To stop the appliance, turn the selector (a1) to "0".
Tips:
- Kneading
- Use the dough hook (c1) at speed "1" only.
- You can knead up to:
- 500 g of flour and 300 g of warm water (25-30°C) for bread dough (e.g. white bread, whole-grain bread, pizza dough, etc.)
- 400 g of flour and 240 g of warm water (25-30°C) for special breads (French flour above type T55, rye bread, wholemeal bread, ...)
- 250 g flour for enriched yeast dough and pastry dough (brioche, kugelhopf, shortcrust pastry, etc.)
- 750 g flour for milk bread (see basic recipe in recipe section)
– Maximum operating time: 13 min.
For the best results when kneading, follow the instructions in figure 4a, 4b and 4c.
- Mixing
- Use the mixer (c2) at speed "1" to "7".
- You can mix up to:
- 1 kg of sponge cake mixture, choux pastry, etc.
- 2.7 kg of mixture vanilla sponge slab cake (see basic recipe in recipe section).
- Never use the mixer (c2) to knead heavy dough.
– Maximum operating time: 13 min.
- Beating / emulsifying / whisking
- Use the balloon whisk (c3) at speed "1" to "7".
- You can prepare: mayonnaise, aioli, sauces, beaten egg whites (up to 8 egg whites), chantilly cream or whipped cream (up to 500 ml), etc.
- Never use the balloon whisk (c3) to knead heavy dough or mix light cake mixture.
– Maximum operating time: 10 min.
1.3 - DISMANTLING THE ACCESSORIES:
- Wait for the appliance to come to a complete stop and unplug it.
- Remove the lid (b2).
- Using the button (a3), release the multi-function head (a4) and raise it to the upper position.
- Pull the accessory (c1), (c2) or (c3) to remove it from the multi-function head.
- Remove the bowl.
2 - BLENDING/MIXING (DEPENDING ON MODEL)
Depending on the nature of the food, you can use the blender (d) to prepare up to 1 L of thick mixtures (400g carrots, 600g water) and 0.75 L of liquid mixtures.
ACCESSORIES USED:
- Blender jug (d)
2.1 - ASSEMBLING THE BLENDER JUG ACCESSORIES (DIAGRAMS 2):
- Bring the multifunctional head (a4) to the horizontal position: turn the button (a3) and manually lower the multifunctional head (a4) until it locks (the button (a3) returns to its initial position).
- Remove the cover (a6) from the high-speed outlet (a5) by unlocking it.
- Make sure that the appliance is switched off before fitting the blender jug (d).
- Position the blender jug (d) on the high speed outlet (a5), with three possible positions.
- Place the food in the blender jug, and lock the lid (d2) fitted with the measuring cap (d3), by rotating it clockwise.
2.2 - USAGE
- Start by turning the selector (a1) to the desired speed according to the recipe.
- Use the "Pulse" position for better mixing control and for better blending of your preparation.
- You can add food after removing the measuring cap (d3) from the lid (d2) during preparation.
- To stop the appliance, turn the selector (a1) to "0".
Tips:
- Use the blender jug (d) at speed "5" to "7".
Maximum operating time: 3 min.
You can prepare:
– finely blended soups, sauces, stewed fruit, milkshakes and cocktails.
– liquid batter (pancake, fritters, Yorkshire pudding and custard flans).
- If ingredients stick to the sides of the jug when mixing, stop the appliance. Remove the blender jug, and push the food down onto the blades using a spatula and put your blender jug back to continue processing.
- Never fill the blender jug with boiling liquid(over 80 C/176 F). Leave very hot liquids to cool slightly before blending.
- Never run the blender empty.
- Always use the blender jug with its lid.
- Never remove the lid before the blades have stopped completely.
- Always pour liquid ingredients into the blender jug first before adding solid ingredients.
2.3 - DISMANTLING THE ACCESSORY
- Wait until the device has completely stopped and unplug it. Remove the blender jug by unlocking it. Put the cover (a6) back in place on the outlet (a5).
3 - GRATING/SLICING (DEPENDING ON MODEL)
ACCESSORIES USED:
- Vegetable slicer attachment (e1)
- Drum body (e2) + pusher (e3)
- Drums (depending on mo del)
- Drum retaining collar (e4)
3.1 - ASSEMBLING THE ACCESSORIES (DIAGRAMS 3)
- Turn the button (a3) to unlock the multifunctional head (a4) and lift until it stops.
- Fit the attachment (e1) under the multi-function head (a4): align the left-hand mark on the attachment (e1) with the mark on the multi-function head (a4), and turn until the right-hand mark on the attachment (e1) is aligned with that of the multi-function head (a4).
- Insert the chosen drum into the body, and make sure that it is fully engaged in the body. Fit the drum retaining collar (e4).
- Facing the attachment (e) outlet, insert the drum body (e2) inclined to the right, aligning the two bayonets in the drum body with the two notches in the attachment. Push it home. If you find it difficult to fit it, slightly turn the shaft (e2.1) of the drum body and push it again. Turn the drum body anti-clockwise until it latches with the feed tube in the vertical position.
- Lock the bowl (b1) (anti-clockwise) on the appliance.
- Make sure that the cover (a6) is correctly in place on the high-speed outlet (a5).
3.2 - USAGE AND TIPS:
- Run the appliance by turning the selector (a1) to speed "4".
• Maximum operating time: 10 min. - Place the food in the feed tube on the body and press down with the pusher (e3). Never push the ingredients with your fingers or any other utensil.
- To stop the appliance, turn the selector (a1) to "0". Wait for the appliance to come to a complete stop and unplug it.
- Unlock the drum body in the reverse order of the assembly. When removing the drum (e5), handle it carefully, as it is sharp and could injure you.
-
With the cones, you can prepare up to 2 kg of:
-
Grate coarsely C (e6) / grate finely D (e7): carrots, celery, potatoes, cheese (firm texture), etc.
- Slice thickly A (e5): potatoes, carrots, cucumbers, apples, beetroot, etc.
- Potato shredder R (e8): potatoes.
Maximum quantity: 2 kg.
4 - CHOPPING SMALL QUANTITIES (DEPENDING ON MODEL)
ACCESSORY USED:
- Assembled mini-chopper.
With the mini-chopper, you can chop in few seconds by pulsing: dried figs, dried apricots, etc.
Quantity / max time: 80g / 4 sec.
The mini-chopper is not designed for hard products like coffee.
CLEANING
- Unplug the appliance.
- Never immerse the motor unit (a) in water or put it under running water. Wipe it with a dry or slightly damp cloth.
- For easier cleaning, rinse the accessories immediately after use. Handle the blades with care to prevent injury as they are sharp (Diagrams 5.a).
- Wash, rinse and dry the accessories: they are all dishwasher-safe.
Tip:
- In the event any of your accessories are coloured by food (carrots, oranges, etc.), rub with a cloth dipped in cooking oil and then clean them as usual.
- Blender jug (d): pour some hot water containing a few drops of washing up liquid into the blender jug. Close the lid. Place it on the appliance and pulse a few times. After removing it, rinse the bowl in running water and allow to dry (jug upside down).
STORAGE
Do not store your appliance in a humid environment.
WHAT TO DO IF YOUR APPLIANCE DOES NOT WORK
If your appliance does not work, check:
– that it is plugged in correctly.
– that the accessories are correctly locked.
- The position of the speed selector (a1): turn it to position "0" and then select the desired speed again.
Your appliance still does not work? Contact an approved service centre (see list in service booklet).
DISPOSAL OF PACKAGING AND THE APPLIANCE

The packaging is comprised exclusively of materials that present no danger for the environment and which may therefore be disposed of in accordance with the recycling measures in force in your area.
For disposing of the appliance itself, please contact the appropriate service of your local authority.
END-OF-LIFE ELECTRICAL OR ELECTRONIC PRODUCTS

Think of the environment first!
i Your appliance contains valuable materials which can be recovered or recycled. → Leave it at a local civic waste collection point.
ACCESSORIES
You can customise your appliance and obtain the following accessories from your usual retailer or an authorised service centre:
| Bowl | Blender jug | Vegetable slicer: |
| Bowl lid | Mini-mincer | - A: slicing |
| Dough hook | Mincer head | - C: coarse grating |
| Mixer | Mincing bowl | - D: fine grating |
| Balloon whisk | Vegetable slicer attachment | - R: Potato shredder |
Note: you can purchase an accessory only when you present your instruction leaflet or your appliance.
BASIC RECIPES
White bread
Ingredients: 350 g flour (type 55), 210 ml warm water, 5 g dried baker's yeast, 5 g salt. Put the salt, flour and baker's yeast in the bowl. Fit the dough hook and the lid. Run for a few seconds at speed 1, and add water with the appliance running. Knead for about 8 minutes on speed 1. Allow the dough to rest at room temperature for around half an hour. Then work the dough by hand into a ball. Place the ball of dough on a buttered, floured baking sheet. Allow to rise for about an hour. Preheat the oven to 240°C. Make cuts on the top of the loaf with a sharp blade, and brush with lukewarm water. Put a small container full of water into the oven as this helps the bread to form a golden crust. Bake for 30 minutes.
For the UK only: Use 350 g strong white bread flour - 1½ tsp Easy Bake or Fast Action dried yeast - 3/4 tsp salt - ½ tsp sugar - 2 tsp vegetable oil - 210 ml lukewarm water.
Make the dough as the recipe directs but there is no need to rest the dough for half an hour with UK dried yeast. Shape the dough as directed and leave to prove until doubled in size (for about 45 min to 1 hour). Bake in a preheated oven at 230°C for 15 minutes and then reduce to 190°C and bake for a further 15 minutes.
Butter shortcrust pastry
Ingredients: 200 g flour (plain), 100 g softened butter cut into pieces, 50 ml cold water, 1 pinch of salt.
Put the flour, butter and salt in the bowl. Fit the dough hook and the lid. Run for a few seconds at speed 1, and add water with the appliance running. Continue to knead until the pastry forms a ball. Remove from the bowl, cover it in cling film and allow the pastry to rest in a cool place or refrigerator for about half an hour before rolling out and cooking.
Note: Do not substitute butter with margarine or lard.
Milk Bread Rolls
Ingredients: 500 g of flour, 2 eggs, 120 g of soft butter cut into pieces, 70 g of sugar, 200 ml of warm milk, 10 g of dry baker's yeast, 5 g of salt.
Put all ingredients in the bowl. Fit the dough hook and cover. Run at Speed 1 for approximately 13 min. Let the dough rest overnight in the refrigerator. The next day, cut small pieces of dough of approximately 60 g and shape them into rolls.
Place them on a sheet covered with greaseproof paper and let rise for approximately 30 to 40 minutes. Preheat the over to 180°C. Brush the rolls with some egg yolk to which some milk and sugar has been added. Cook them for approximately 15 min.
For UK only: Use 500 strong white bread flour, 80 g softened butter, 80 caster sugar, 250 ml lukewarm milk, 2 tsp Easybake or Fast Action dried yeast, 1 pinch of salt, 1 egg beaten with 1 tsp water, for glaze.
Make the dough as the recipe directs but there is no need to rest the dough for 1 hour. Shape the dough as directed and leave to prove until doubled in size (for about 45 min to 1 hour). Bake as directed above.
Vanilla sponge cake
Ingredients: 3 eggs, 150 g of caster sugar, 150 g of soft butter cut into pieces, 220 g of plain flour, 1 sachet (11 g) or 4 level tsp baking powder.
Place all ingredients except the flour in the bowl. In the mixer and cover.
Run for a few minutes at Speed 1, then gradually add the flour while continuing to run the device. Mix for a total of 3 min. Preheat the oven to 180^ C.
Place the dough in buttered and floured deep sided cake tin. Cook for approximately 40 min.
Feta, Olive and Sun-dried Tomato Loaf
Ingredients: 200 g flour (plain), 4 eggs, 1 sachet (11 g) baking powder or 4 level tsp baking powder, 100 ml cold milk, 50 ml olive oil, 12 sun-dried tomatoes, 200 g diced feta cheese, 15 destoned green olives cut into pieces, salt, pepper.
Preheat the oven to 180^ C. Butter and flour a loaf tin. Put the flour, eggs and baking powder in the bowl. Fit the dough hook and the lid. Start at speed 1 and then increase to speed 4. Add the olive oil and milk with the appliance running for one and a half minutes. Decrease to speed 1 and add the sun-dried tomatoes, feta cheese and olives. Add salt and pepper. Pour the mixture into the tin and bake for 30 to 40 minutes.
Mayonnaise
Ingredients: 1 egg yolk, 1 tablespoon mustard, 1 teaspoon white wine vinegar, 250 ml oil (sunflower, olive or half and half of each), salt, pepper.
Attention: all the ingredients must be at room temperature.
Put all the ingredients except for the oil in the bowl. Fit the balloon whisk and lid. Start at speed 1 and begin to pour the oil in a thin trickle. After 10 seconds, increase to speed 7, and continue to add the oil little by little. Once you have added all the oil, run the appliance for another 30 seconds.
NB: Keep refrigerated and consume within 24 hours.
Chantilly cream
Ingredients: 250 ml very cold liquid crème fraiche*, 50g icing sugar.
Put the cream and icing sugar in the bowl. Fit the balloon whisk and lid. Run the appliance at speed 3 for 2 minutes and then at speed 7 for one and a half minutes.
* liquid creme fraiche is not available in all countries.
For the UK only: Use 300 ml well chilled double cream and 35 g icing sugar. Place the cream and icing sugar in the bowl. Fit the balloon whisk and lid. Whip on speed 4 until it forms firm peaks (takes about 2 to 3 minutes).