
ZFP419X - Refrigerator-freezer ZANUSSI - Free user manual and instructions
Find the device manual for free ZFP419X ZANUSSI in PDF.
 FR
FR
 AR
AR
 BG
BG
 CS
CS
 DA
DA
 DE
DE
 EL
EL
 EN
EN
 ES
ES
 ET
ET
 FI
FI
 HU
HU
 IT
IT
 KK
KK
 LT
LT
 LV
LV
 MK
MK
 NL
NL
 NO
NO
 PL
PL
 PT
PT
 RO
RO
 RU
RU
 SK
SK
 SL
SL
 SQ
SQ
 SR
SR
 SV
SV
 TR
TR
 UK
UK
| Product type | Built-in extractor hood |
| Brand | ZANUSSI |
| Model | ZFP419X |
| Width | 60 cm |
| Depth | Approximately 50 cm |
| Height | Approximately 15 cm (built-in body) |
| Net weight | Approximately 12 kg |
| Power supply | 220-240 V, 50 Hz |
| Motor power | 250 W |
| Lighting | Built-in LED (2 x 3 W) |
| Ventilation speeds | 3 speeds (1, 2, 3) |
| Noise level | 45-58 dB (depending on speed) |
| Filter type | Dishwasher-safe metal grease filter |
| Charcoal filter | Optional, replace every 4 months |
| Main functions | Odour and steam extraction, lighting, 3 speeds |
| Maintenance | Monthly cleaning of grease filters, replacement of charcoal filter if equipped |
| Safety | Automatic shutdown when drawer closes |
| Installation | Built-in in a cabinet above the cooking surface |
| Spare parts | Grease filter, charcoal filter, LED bulb (technical service) |
| Repairability | Replacement of lighting by an approved technician |
| Energy consumption | Energy efficiency class not specified |
Frequently Asked Questions - ZFP419X ZANUSSI
User questions about ZFP419X ZANUSSI
0 question about this device. Answer the ones you know or ask your own.
Ask a new question about this device
Download the instructions for your Refrigerator-freezer in PDF format for free! Find your manual ZFP419X - ZANUSSI and take your electronic device back in hand. On this page are published all the documents necessary for the use of your device. ZFP419X by ZANUSSI.
USER MANUAL ZFP419X ZANUSSI
SAFETY INFORMATION AND INSTALLATION

WARNING! Refer to the separate
Installation Instructions booklet for
Safety Information and Installation.
Read carefully the Safety chapters
before any use or maintenance of the
appliance.
PRODUCT DESCRIPTION
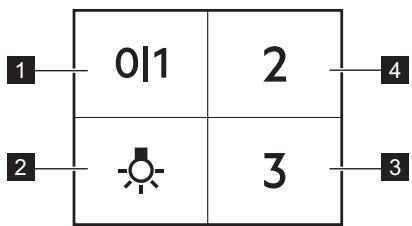
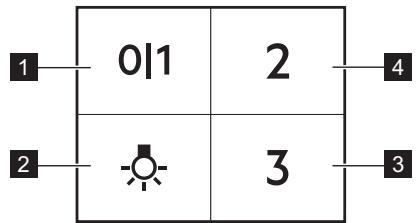
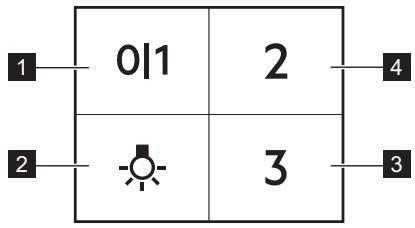
CONTROL PANEL OVERVIEW
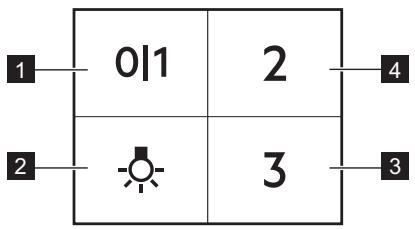
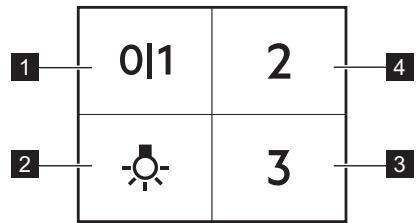
| Function | Description | |
| 1 | First Speed | The fan switches to first speed level. |
| 2 | Lamp | Turns the lights on and off. |
| 3 | Third Speed | The fan switches to third speed level. |
| 4 | Second Speed | The fan switches to second speed level. |
DAILY USE
USING THE HOOD
Check the recommended speed according to the table below.
01
While heating up food, cooking with covered pots.
2
While cooking with covered pots on multiple cooking zones or burners, gentle frying.
3
While boiling and frying big quantities of food without a lid, cooking on multiple cooking zones or burners.

It is recommended to leave the hood operating for approximately 15 minutes after cooking.
To operate the hood:
- Pull out the drawer of the hood more than 5 cm.
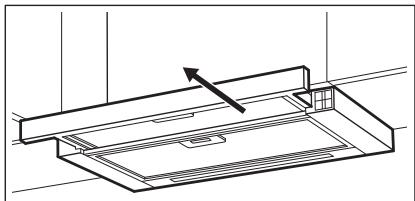
The control panel is exposed.
- To activate the function, press the 01 button.
- If needed, change the speed by pressing the desired button.

The hood's light works independently of other hood functions. To illuminate the cooking surface, press the light button. Closing the drawer has no effect on the hood light.
To turn off the fan, press 01 or close the hood drawer.

The hood remembers the last fan speed setting when the drawer is closed. The hood will operate at this fan speed level when the drawer is pulled out again.
CARE AND CLEANING
NOTES ON CLEANING
| Cleaning Agents | Do not use abrasive detergents and brushes. Clean the surface of the appliance with a soft cloth with warm water and a mild detergent. |
| After cooking some parts of appliance can get hot. To avoid stains appliance must be cooled down and dried with clean cloth or paper towels. | |
| Clean stains with a mild detergent. | |
| Keep the hood clean | Clean the appliance and grease filters each month. Clean the interior and grease filters carefully from fat. Fat accumulation or other residue may cause fire. |
| Grease filters can be washed in a dishwasher. The dishwasher must be set to a low temperature and a short cycle. The grease filter may discolour, it has no influence on the performance of the appliance. | |
| Charcoal filter | The time of saturation of the charcoal filter varies depending on the type of cooking and the regularity of cleaning the grease filter. |
CLEANING THE GREASE FILTER
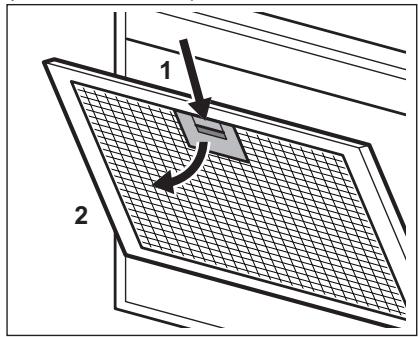
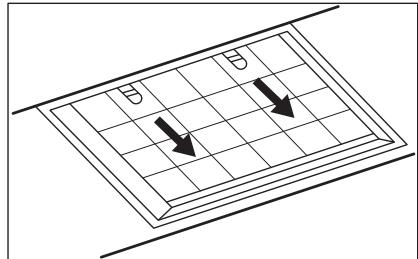
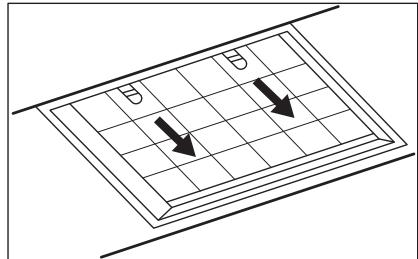
Filters are mounted with the use of clips and pins on the opposite side.
To clean the filter:
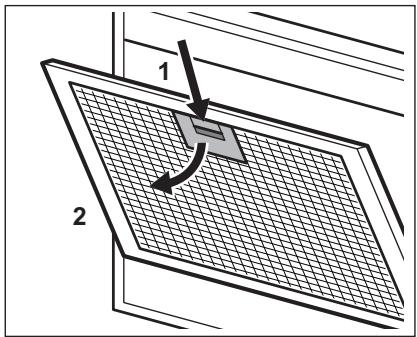
- Press the handle of the mounting clip on the filter panel underneath the hood.
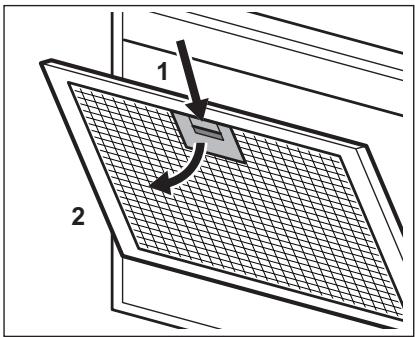
- Slightly tilt the front of the filter downwards, then pull. Repeat the first two steps for all filters.
- Clean the filters using a sponge with non-abrasive detergents or in a dishwasher.

The dishwasher must be set to a low temperature and a short cycle. The grease filter may discolour, it has no influence on the performance of the appliance.
- To mount the filters back, follow the first two steps in reverse order.
Repeat the steps for all filters if applicable.
REPLACING THE CHARCOAL FILTER -
OPTIONAL

WARNING! Depending on type, filter can be or cannot be regenerated.
Refer to the leaflet provided with the filter.
ENVIRONMENTAL CONCERNS
Recycle materials with the symbol . Put the packaging in relevant containers to recycle it. Help protect the environment and human health by recycling waste of electrical and electronic appliances. Do not dispose of appliances marked
To replace the filter:
- Remove the grease filters from the appliance. Refer to "Cleaning the grease filter" in this chapter.
- Pull the tabs towards the bottom part of the filter.
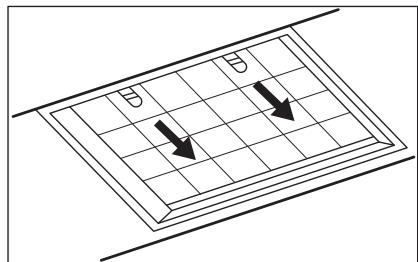
- Slightly tilt the front of the filter downwards, then pull.
- To install a new filter, perform the same steps in reverse order.
In any case, it is necessary to replace the filters at least every four months.
REPLACING THE LAMP
This appliance is supplied with a LED lamp. This part can be replaced by a technician only. In case of any malfunction refer to "Service" in the "Safety Instructions" chapter.
with the symbol \(\mathbb{R}\) with the household waste. Return the product to your local recycling facility or contact your municipal office.
www.zanussi.com/support
SAFETY INSTRUCTIONS AND INSTALLATION

OPERATING INSTRUCTIONS
SAFETY INSTRUCTIONS FOR USE
OPERATING MANUAL
IMPORTANT. READ CAREFULLY
BEFORE USE, KEEP FOR FUTURE REFERENCE
SAFETY INSTRUCTIONS
PARTS AND ACCESSORIES
READ CAREFULLY.
USER MANUAL
CONTROL PANEL
| Функция | Синатумасы | |
| 1 | Бірінші ксылдамнык | Желдетkiш Бірінші ксылдамнык DeнгreiHe ayысады. |
| 2 | Шam | Шамарды КосадыЖэHe ошірedi. |
| 3 | Ушінші ксылдамнык | Желдетkiш Ушінші ксылдамнык DeнгreiHe ayысады. |
| 4 | Екінші ксылдамнык | Желдетkiш ekінші ксылдамнык DeнгreiHe ayысады. |
Second use
FOOD PREPARATION DEVICE USE
Follow the steps below to use the device.
| 011 | Тамаксы жылтыkanда, кakпak жаблганыдыICTы колданыniciprene!. |
| 2 | Бірнese nicipy.aimaктарыnda hemece OTыктарда кaknaftы жаблkыдыICTа tamakniciprene,. bannen keriphanda. |
| 3 | Көн мөлшердerte taramdarьл кaknaксыз кайнатkaнда көн keriphanda, bірнese nicipy aimafында hemece OTыктарда niciprene!. |

After cooking the food, let the device cool for 15 minutes before cleaning.
To use the food preparation device:
IMPORTANT NOTES FOR CLEANING
| Жуftsш 3aTTAP | Жemіріш жуftsш 3aTTAPды жоне чітkepeppіді пайданhan6аньі.Курьлфынг anДынгыжafын кумсak Куftsш 3aT Kocьлfah Кьлы cyfaБаырьлфанжубepken ta3anaHь3. |
| Таfram Nicіpreshen KeiH Kурьлфынг Kei6ip 6eJIkTeperi bICbIg KeTyI MymKiH.ДakТы 6oJdIPmAc yuH IN Kурьлфынг cybITbIg,ТаЗа 6u6bepeKпeHeme KaFaz 3cynrimeH KypFaTu KepeK. | |
| ДakТарды JyMcaK Jyftsш 3aTПЕн Ta3anaHь3. | |
| Aya tarTkblsh Куралды ta3a Устаны3 | Курьлфынг Jоэн Май сузгinerin ai сayын тazalaHь3.Курьлфынг iwiH Жэне Май сузгinerin Майдан TazapMbHь3.Май xиналfaHda Hemece baska КалдыЖиналca,opt KaynPIn Tydbypyb MyMKiH. |
| Майысузгinerin bIDbic Jyftsш Maшинада JyUyfa 6Olaы.ɪdɪcis Jyftsш Maшинafа Төмөн TemnepaТура Jоэн KBICKa Ünkln Oрнау Kepek.Май сузricini Tyci e3repyi MymKiH,6vI KурьлфынгЖуMbic icTeeyiHe эсер etne'di. |
CLEANING THE WATER TANK
To install the water tank, align the short and long tabs in the opposite direction.
To clean the water tank:
- Press the release button at the bottom of the water tank with your thumb.
- Lift the tank upward and away from the base, then pull it out.
For all tanks, repeat the same two steps.
- Do not use abrasive cleaners or scouring pads on the tank; use a soft cloth or mild detergent instead.

The water tank should be placed at a low temperature and in a dry place. The water tank can be replaced; this does not affect the device's warranty.
- To put the tank back, insert it into the opening and press down until it clicks.
The valve, the pressure switch and the sensors are connected.
ADJUSTING THE PRESSURE SWITCH — IMPORTANT
NO

WARNING! Incorrect adjustment of the pressure switch may cause damage. Follow the instructions given with the pressure switch.
To adjust the pressure switch:
- Remove the cover of the pressure switch.
Refer to the section "Removing the pressure switch cover" in this manual.
- Check the setpoint of the pressure switch.
- Turn the adjustment screw counterclockwise to decrease the setpoint, then clockwise to increase it.
- To replace the pressure switch, follow the steps in the reverse order.
In some cases, the pressure switch may need to be adjusted by a qualified technician.
ADJUSTING THE LAMP
The lamp is equipped with an LED. This is a technical feature. For any maintenance, refer to the "Service" section in the "Safety Instructions" chapter.
REPLACING THE FILTER
The filter must be replaced regularly. To replace the filter, refer to the instructions. For electrical and electronic equipment, the filter must be replaced by a qualified technician.
VISIT OUR WEBSITE FOR:

www.zanussi.com/support
SAFETY INFORMATION AND INSTALLATION

WARNING! Safety information and installation are in a separate installation instruction booklet. Before using the appliance or performing maintenance work, carefully read the safety sections.
PRODUCT DESCRIPTION
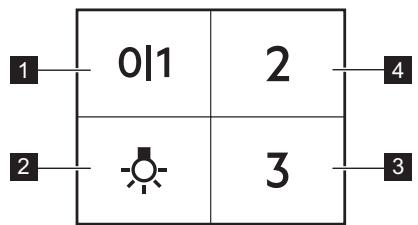
CONTROL PANEL OVERVIEW
PRODUCT DESCRIPTION
CONTROL PANEL OVERVIEW
www.zanussi.com/support
SAFETY AND INSTALLATION INFORMATION

CAREFULLY READ THE
RULES RELATING TO THE EQUIPMENT
Control panel
It is recommended to let the extractor run for about 15 minutes after cooking.
Turning on the extractor:
- Pull the extractor out more than 5 cm.
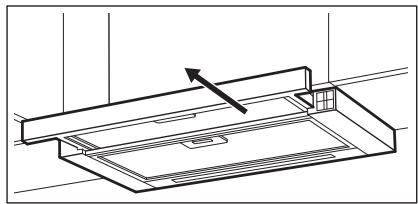
The control panel is open.
Indicator: pressing the close button does not affect the lighting.
To turn off the fan, press 011 or close the drawer.

The extractor remembers the last fan speed setting when the drawer is closed. The extractor will operate at this fan speed level when the drawer is pulled out again.
Maintenance and cleaning
Note regarding cleaning
Cleaning agents
Do not use abrasive cleaning agents or solvents.
Wipe the surface of the device with a soft cloth moistened with warm water and a mild cleaning agent.
Some parts of the appliance become very hot during operation. To avoid burns, let the appliance cool down and wipe it dry with a soft cloth.
Clean with a mild detergent.
www.zanussi.com/support
SAFETY INSTRUCTIONS AND INSTALLATION

PRODUCT DESCRIPTION
CONTROL PANEL OVERVIEW
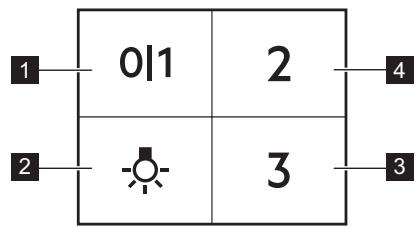
CONTROL PANEL OVERVIEW
CLEANING AND CARE
INSTRUCTIONS FOR USE
USER INSTRUCTIONS
Check the recommended viscosity
According to the table below.
01
Heating and cooking in a closed container.
WARNING! Depending on the type, the filter may or may not be replaceable. See the instructions provided with the filter.
- 3. Replacing the oil filter. This section describes how to replace the oil filter.
- Turn the filter counterclockwise to remove it.
- Slightly tilt the front part of the filter down, then remove it.
- To install a new filter, repeat the same steps in reverse order.
If the filter is damaged, it must be replaced with a new one. Use only original spare parts.
REPLACING THE LAMP
The lamp is supplied with a light bulb. This part can only be replaced by a qualified technician. In case of any malfunction, refer to the "Service" section of the "Safety Instructions" chapter.
To ensure the health and safety of others, properly dispose of electrical and electronic devices. Do not dispose of the device with
the corresponding symbol together with household waste. Return the product to
the manufacturer for recycling or contact local municipal waste authorities.


a
01 1 1 1 1 1 1
.
a aai jilwagaiallolalpaxwlyaaclijwalgaaegallbawab
aagg gall y gll jgl. gall glj jn nn n nn n
aogawio glaaabjulaoa
aabjjjwlgallabj

a 1
a a a a a a a a a a a a a a a a a a a
.>g> 15 paleall lgl gnsllpss
JdIyllalwoc plawc uogdlljLwoc
jolg 2009.000900000000000000000000000000000000000000000
JJI 1
aIbI Jc bId
a>2a11


- SAFETY INFORMATION AND INSTALLATION
- PRODUCT DESCRIPTION
- CONTROL PANEL OVERVIEW
- DAILY USE
- USING THE HOOD
- TO OPERATE THE HOOD
- CARE AND CLEANING
- CLEANING THE GREASE FILTER
- TO CLEAN THE FILTER
- REPLACING THE CHARCOAL FILTER
- OPTIONAL
- ENVIRONMENTAL CONCERNS
- REPLACING THE LAMP
- SAFETY INSTRUCTIONS AND INSTALLATION
- USER MANUAL
- SECOND USE
- TO USE THE FOOD PREPARATION DEVICE
- CLEANING THE WATER TANK
- TO CLEAN THE WATER TANK
- ADJUSTING THE PRESSURE SWITCH — IMPORTANT
- NO
- ADJUSTING THE LAMP
- REPLACING THE FILTER
- VISIT OUR WEBSITE FOR
- SAFETY AND INSTALLATION INFORMATION
- TURNING ON THE EXTRACTOR
- MAINTENANCE AND CLEANING
- NOTE REGARDING CLEANING
- INSTRUCTIONS FOR USE
- USER INSTRUCTIONS
Brand : ZANUSSI
Model : ZFP419X
Category : Refrigerator-freezer