
EA8738 - Automatic coffee machine KRUPS - Free user manual and instructions
Find the device manual for free EA8738 KRUPS in PDF.




| Product type | Automatic coffee machine with built-in grinder |
| Brand | KRUPS |
| Model | EA8738 |
| Dimensions (H x W x D) | 365 x 240 x 400 mm |
| Weight | 8.2 kg |
| Power supply | 220-240 V~ / 50 Hz, 1550 W |
| Pump pressure | 15 bar |
| Water tank capacity | 3 L |
| Bean container capacity | 250 g |
| Available drinks | Ristretto, Espresso, Lungo, Doppio, Long Coffee, Americano, Cappuccino, Frothed Milk, Caffe Latte, Latte Macchiato, Hot Water |
| Display | Intuitive touch screen |
| Light indicator | Intuitive Light Indicator with alerts and color customization |
| Grinder | Conical metal burr grinder, grind adjustment |
| Milk system | Removable One Touch Cappuccino block, milk duct and milk tube |
| Filtration | Claris Aqua Filter System cartridge |
| Smart functions | Automatic standby, programmable auto-off, automatic on, auto rinse |
| Maintenance | Milk rinse, coffee rinse, machine cleaning, descaling (on-screen guided) |
| Included accessories | Cleaning tablets (x2), descaler, milk duct, additional milk tube, steam cleaning needle, filter cartridge, hardness test strip, brush, dishwasher-safe milk jug |
| Settings | Language, date/time, brightness, water hardness, coffee and water temperature, coffee strength (1-3), volume, coffee type |
| Spare parts and repairability | Parts available on KRUPS website; built-in maintenance tutorials |
| Warranty and safety | Made in France; automatic shut-off; detailed safety instructions |
Frequently Asked Questions - EA8738 KRUPS
User questions about EA8738 KRUPS
0 question about this device. Answer the ones you know or ask your own.
Ask a new question about this device
Download the instructions for your Automatic coffee machine in PDF format for free! Find your manual EA8738 - KRUPS and take your electronic device back in hand. On this page are published all the documents necessary for the use of your device. EA8738 by KRUPS.
USER MANUAL EA8738 KRUPS
1 1st USE

FR - 1ST USE
NL - 1ST USE
NO - FIRST USE
FI - FIRST USE
IT - FIRST USE
EL - FIRST USE
SK - FIRST USE
PL - FIRST USE
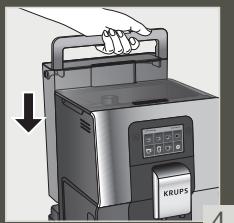
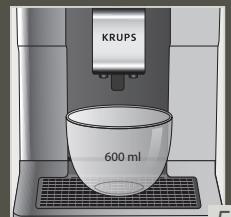
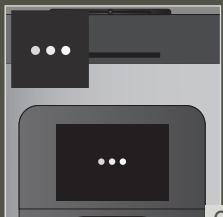

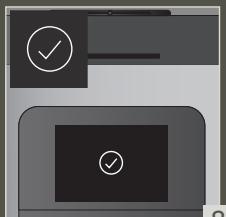
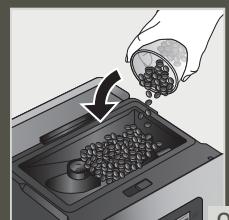
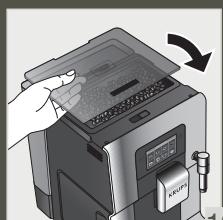
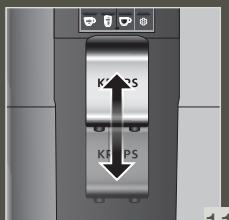
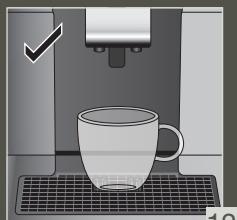
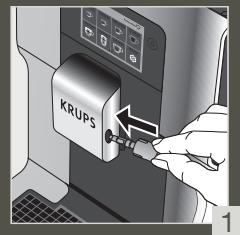
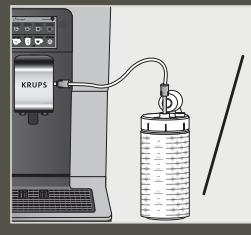
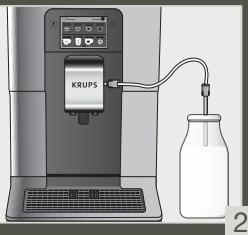
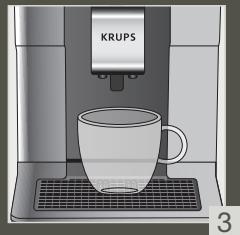
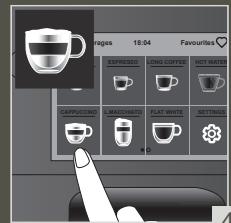
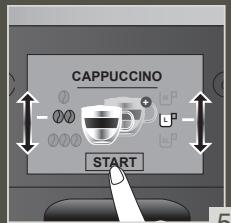
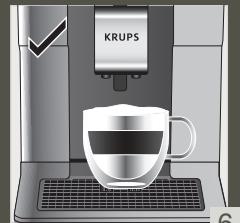
3 MAKE 2 CUPS OF A MILK RECIPE AT ONCE

FR - FOR 2 INSTANT CUPS OF A RECIPE WITH MILK
NL - IMMEDIATELY MAKE 2 CUPS OF A MILK RECIPE
NO - MAKE 2 CUPS OF A MILK RECIPE AT ONCE
FI - MAKE 2 CUPS OF MILK COFFEE AT ONCE
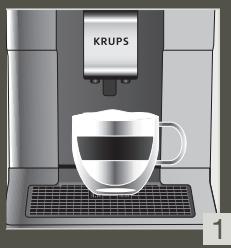
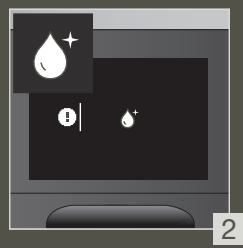
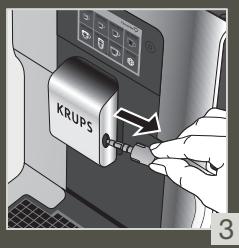
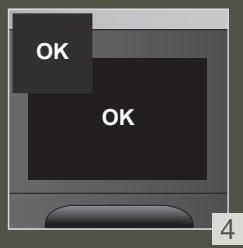
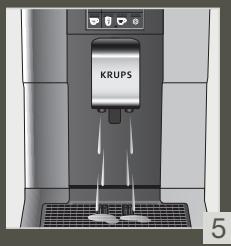
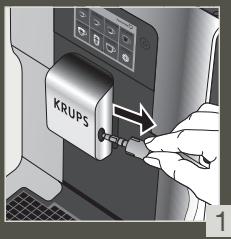
4 QUICK MILK RINSING AFTER A CAPPUCCINO
FR - RAPID RINSING OF MILK AFTER A CAPPUCCINO NL - QUICK MILK RINSE AFTER A CAPPUCCINO NO - QUICK MILK RINSE AFTER A CAPPUCCINO FI - QUICK MILK RINSE AFTER A CAPPUCCINO IT - QUICK RINSE OF THE MILK CIRCUIT AFTER A CAPPUCCINO EL - QUICK MILK RINSE AFTER A CAPPUCCINO SK - QUICK MILK RINSE AFTER A CAPPUCCINO PL - QUICK RINSE OF THE MILK SYSTEM AFTER A CAPPUCCINO UK - QUICK MILK RINSE AFTER PREPARING A CAPPUCCINO BG - QUICK MILK RINSE AFTER A CAPPUCCINO
DE - QUICK MILK RINSE AFTER A CAPPUCCINO DA - QUICK MILK RINSE AFTER A CAPPUCCINO SV - QUICK MILK RINSE AFTER A CAPPUCCINO ES - QUICK RINSE OF THE MILK AFTER MAKING A CAPPUCCINO PT - QUICK MILK RINSE AFTER PREPARING A CAPPUCCINO CS - QUICK MILK RINSE AFTER A CAPPUCCINO HU - QUICK MILK RINSE AFTER PREPARING A CAPPUCCINO RU - QUICK FLUSH OF THE MILK SYSTEM AFTER PREPARING A CAPPUCCINO RO - QUICK MILK RINSE AFTER A CAPPUCCINO HR - QUICK MILK RINSE AFTER A CAPPUCCINO
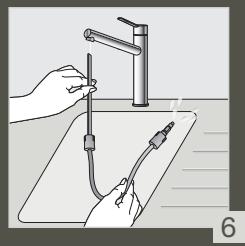
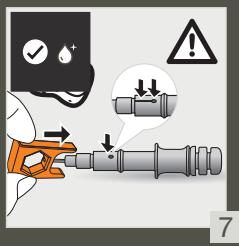
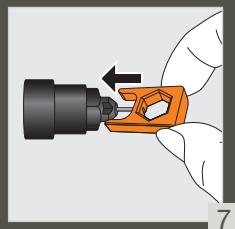
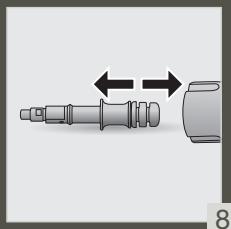
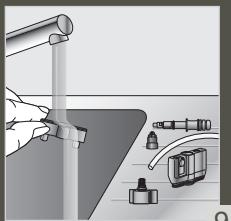
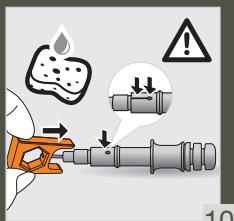
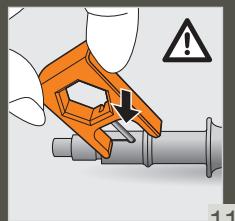
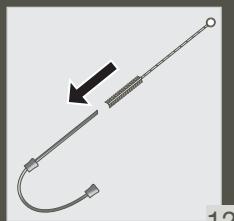
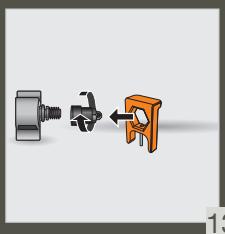
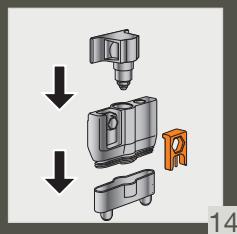
5 MANUAL DEEP CLEANING OF MILK SYSTEM – 5 MIN
FR - MANUAL DEEP CLEANING OF THE MILK - 5 MIN NL - MANUAL DEEP CLEANING OF THE MILK SYSTEM - 5 MIN NO - MANUAL THOROUGH CLEANING OF THE MILK SYSTEM - 5 MIN FI - MANUAL DEEP CLEANING OF THE MILK SYSTEM – 5 MIN IT - MANUAL DEEP CLEANING OF THE MILK CIRCUIT - 5 MIN EL - MANUAL DEEP CLEANING OF THE MILK SYSTEM – 5 MIN SK - MANUAL DEEP CLEANING OF THE MILK SYSTEM - 5 MIN PL - MANUAL DETAILED CLEANING OF THE MILK SYSTEM - 5 MIN UK - DEEP MANUAL CLEANING OF THE MILK SYSTEM – 5 MIN BG - MANUAL DEEP CLEANING OF THE MILK SYSTEM
DE - MANUAL DEEP CLEANING OF THE MILK SYSTEM – 5 MIN DA - MANUAL MAIN CLEANING OF THE MILK SYSTEM – 5 MIN SV - MANUAL DEEP CLEANING OF THE MILK SYSTEM - 5 MINUTES ES - MANUAL DEEP CLEANING OF THE MILK SYSTEM - 5 MINUTES PT - MANUAL DEEP CLEANING OF THE MILK SYSTEM – 5 MIN CS - MANUAL DEEP CLEANING OF THE MILK SYSTEM - 5 MIN HU - MANUAL DEEP CLEANING OF THE MILK SYSTEM - 5 MIN RU - MANUAL DEEP CLEANING OF THE MILK SYSTEM – 5 MIN RO - MANUAL DEEP CLEANING OF THE MILK SYSTEM – 5 MIN HR - MANUAL DEEP CLEANING OF THE MILK SYSTEM - 5 MIN.
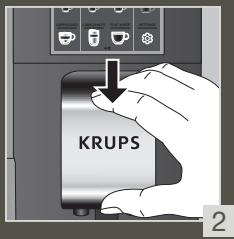
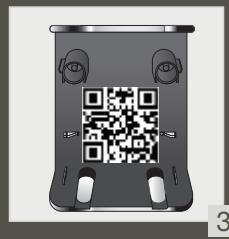
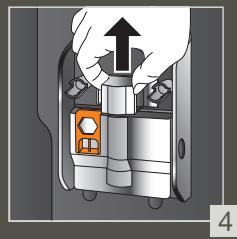

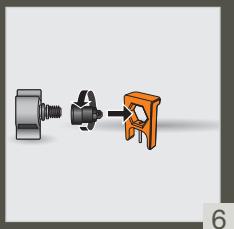
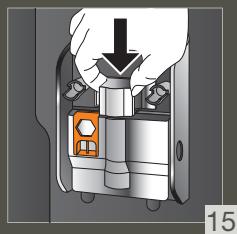
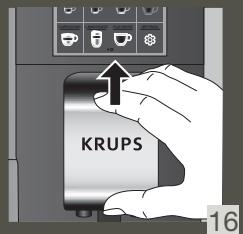
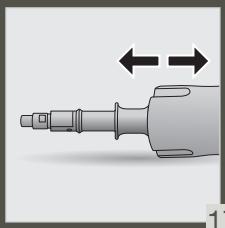
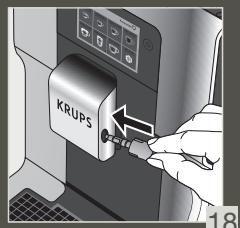





6.A
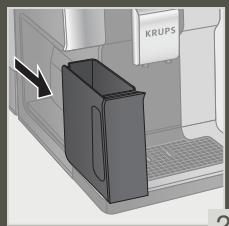
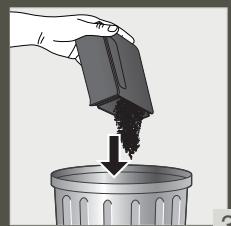
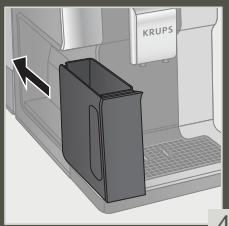
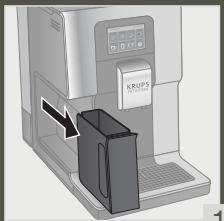
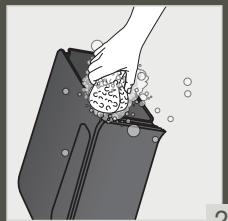
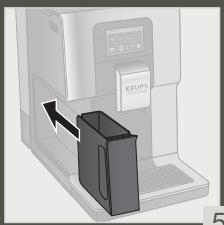
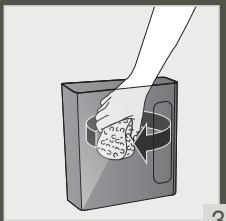
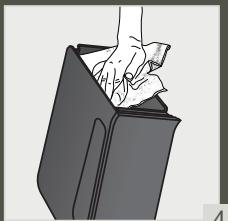
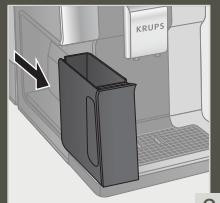
CLEAN THE COFFEE GROUND COLLECTOR REGULARLY

FR - CLEAN THE COFFEE GROUND COLLECTOR REGULARLY NL - CLEAN THE COLLECTOR FOR GROUND COFFEE REGULARLY NO - CLEAN THE COFFEE GROUND COLLECTOR REGULARLY FI - CLEAN THE GROUND COFFEE COLLECTOR REGULARLY IT - CLEAN THE COFFEE COLLECTOR REGULARLY EL - CLEAN THE GROUND COFFEE COLLECTOR REGULARLY SK - CLEAN THE COLLECTOR FOR COFFEE RESIDUES REGULARLY PL - REMEMBER TO CLEAN THE GROUND COFFEE COLLECTOR REGULARLY UK - REGULARLY CLEAN THE COMPARTMENT FOR GROUND COFFEE BG - CLEAN THE COFFEE GROUND COLLECTOR REGULARLY
1
2
DE - CLEAN THE COFFEE GROUNDS CONTAINER REGULARLY DA - CLEAN THE COFFEE GROUNDS CONTAINER REGULARLY SV - CLEAN THE COFFEE GROUNDS CONTAINER REGULARLY ES - CLEAN THE COFFEE GROUNDS CONTAINER REGULARLY PT - CLEAN THE COFFEE GROUNDS CONTAINER REGULARLY CS - CLEAN THE COFFEE GROUNDS CONTAINER REGULARLY HU - CLEAN THE COFFEE GROUNDS CONTAINER REGULARLY RU - CLEAN THE COFFEE GROUNDS CONTAINER REGULARLY RO - CLEAN THE COFFEE GROUNDS CONTAINER REGULARLY HR - CLEAN THE COFFEE GROUNDS CONTAINER REGULARLY
5
3
4
7
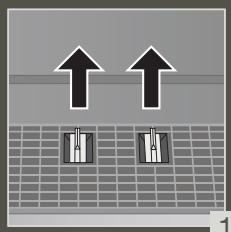
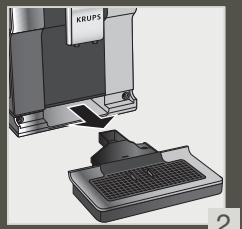
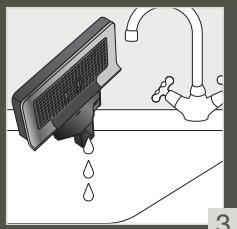
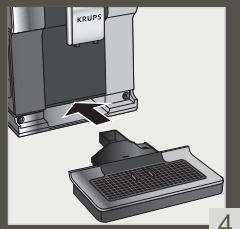
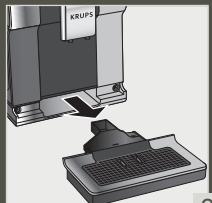
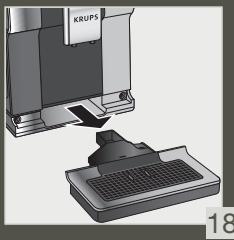
EMPTY THE DRIP TRAY

FR - EMPTY THE DRIP TRAY NL - EMPTY THE DRIP TRAY NO - EMPTY THE DRIP TRAY FI - EMPTY THE DRIP TRAY IT - EMPTY THE DRIP TRAY EL - EMPTY THE DRIP TRAY SK - EMPTY THE DRIP TRAY PL - EMPTY THE DRIP TRAY UK - EMPTY THE DRIP TRAY BG - EMPTY THE DRIP TRAY
DE - EMPTY THE DRIP TRAY DA - EMPTY THE DRIP TRAY SV - EMPTY THE DRIP TRAY ES - EMPTY THE DRIP TRAY PT - EMPTY THE DRIP TRAY CS - EMPTY THE DRIP TRAY HU - EMPTY THE DRIP TRAY RU - EMPTY THE DRIP TRAY RO - EMPTY THE DRIP TRAY HR - EMPTY THE DRIP TRAY
1
3
4
7.A
CLEAN THE DRIP TRAY REGULARLY

FR - CLEAN THE DRIP TRAY REGULARLY NL - CLEAN THE DRIP TRAY REGULARLY NO - CLEAN THE DRIP TRAY REGULARLY FI - CLEAN THE DRIP TRAY REGULARLY IT - CLEAN THE DRIP TRAY REGULARLY EL - CLEAN THE DRIP TRAY REGULARLY SK - CLEAN THE DRIP TRAY REGULARLY PL - CLEAN THE DRIP TRAY REGULARLY UK - CLEAN THE DRIP TRAY REGULARLY BG - CLEAN THE DRIP TRAY REGULARLY
DE - CLEAN THE DRIP TRAY REGULARLY DA - CLEAN THE DRIP TRAY REGULARLY SV - CLEAN THE DRIP TRAY REGULARLY ES - CLEAN THE DRIP TRAY REGULARLY PT - CLEAN THE DRIP TRAY REGULARLY CS - CLEAN THE DRIP TRAY REGULARLY HU - CLEAN THE DRIP TRAY REGULARLY RU - CLEAN THE DRIP TRAY REGULARLY RO - CLEAN THE DRIP TRAY REGULARLY HR - CLEAN THE DRIP TRAY REGULARLY

1
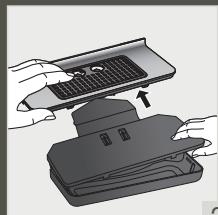
2
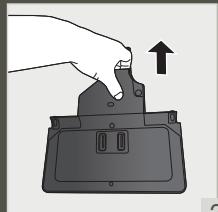
5
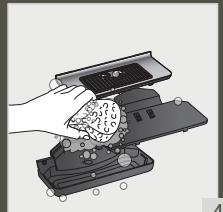
4
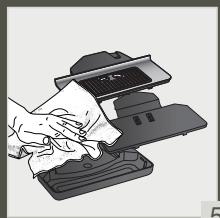
5
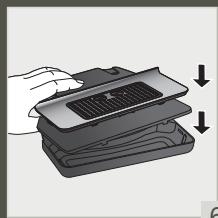
6
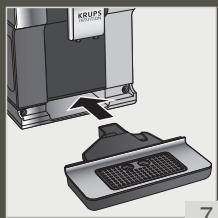
7
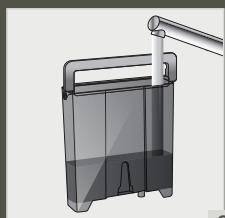
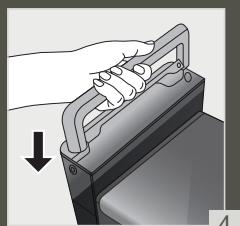
FR - NETTOYER LE RÉSERVOIR D'EAU RÉGULIÈREMENT NL - MAAK HET WATERRESERVOIR REGELMATIG SCHOON NO - RENGJØR VANNTANKEN REGELMESSIG FI - PUHDISTA VESISÄILIÖ SÄÄNNÖLLISESTI IT - PULIRE REGOLARMENTE IL SERBATOIO DELL'ACQUA EL - ΚΑΘΑΡΙΖΕΤΕ ΤΑΚΤΙΚΑ ΤΟ ΔΟΧΕΙΟ ΝΕΡΟΥ SK - NÁDRŽ NA VODU PRAVIDELNE ČISTITE PL - PAMIĘTAJ O REGULARNYM CZYSZCZENIU POJEMNIKA NA WODĘ UK - РЕГУЛЯРНО ОЧИЩАЙТЕ РЕЗЕРВУАР ДЛЯ ВОДИ BG - ПОЧИСТВАЙТЕ РЕДОВНО РЕЗЕРВУАРА ЗА ВОДА
DE - REINIGEN SIE DEN WASSERTANK REGELMÄSSIG DA - RENGØR VANDBEHOLDEREN REGELMASSIGT SV - RENGÖR VATTENBEHÅLLAREN REGELBUNDET ES - LIMPIA CON FRECUENCIA EL DEPÓSITO DE AGUA PT - LIMPE O RESERVATÓRIO DE ÁGUA REGULARMENTE CS - PRAVIDELNĚ ČISTĚTE NÁDRŽKU NA VODU HU - RENDSZERESEN TISZTÍTSA MEG A VÍZTARTÁLYT RU - РЕГУЛЯРНО ОЧИЩАЙТЕ РЕЗЕРВУАР ДЛЯ ВОДЫ RO - CURĂȚAȚI REZERVORUL DE APĂ ÎN MOD REGULAT HR - REDOVITO ČISTITE SPREMNIK ZA VODU
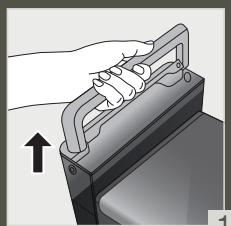
1
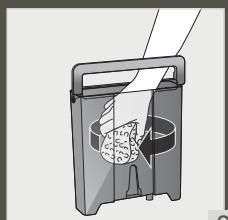
2
3
4
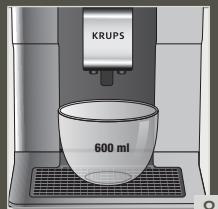
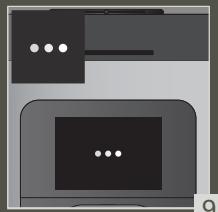
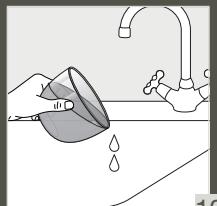
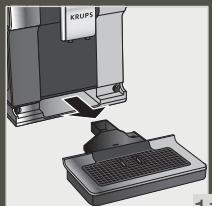
FR - NETTOYAGE AUTOMATIQUE COMPLET DE LA MACHINE 3 x / ANNÉE - 13 MIN NL - VOLLEDIGE AUTOMATISCHE REINIGING VAN DE MACHINE 3 x - JAAR - 13 MIN NO - FULLFOR MASKINENS AUTOMATISKE RENS 3 x / ARET – 13 MIN FI - KEITTIMEN PERUSTEELLINEN AUTOMAATTINEN PUHDISTUS 3 KRT VUODESSA – 13 MIN IT - PULIZIA AUTOMATICA COMPLETA DELLA MACCHINA (3x ANNO) – 13 MIN EL - ΟΛΟΚΛΗΡΩΜΕΝΟΣ ΑΥΤΟΜΑΤΟΣ ΚΑΘΑΡΙΣΜΟΣ ΤΗΣ ΣΥΣΚΕΥΗΣ 3 ΦΟΡΕΣ ΤΟΝ ΧΡΟΝΟ - 13 ΛΕΠΤΑ SK - REALIZÁCIA AUTOMATICKÉHO ČISTENIA ZARIADENIA 3 x / ROK - 13 MIN PL - PRZEPROWADZANIE AUTOMATYCZNEGO CZYSZCZENIA EKSPRESU 3x / ROK – 13 MIN UK - ПОВНЕ АВТОМАТИЧНЕ ОЧИЩЕННЯ КАВОМАШИНИ З РАЗИ НА РІК – 13 ХВ BG - ПЪЛНО АВТОМАТИЧНО ПОЧИСТВАНЕ НА КАФЕМАШИНАТА 3 x / ГОДИШНО – 13 МИН

1
2
3
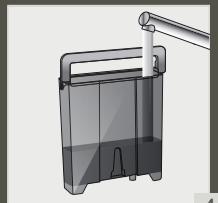
4
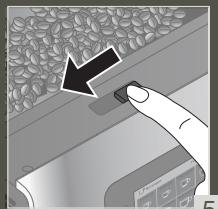
5
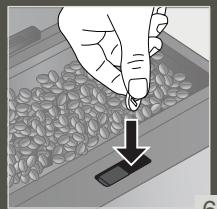
6
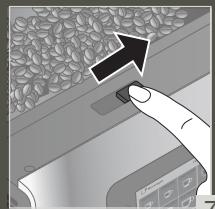
7
8
9
10
11
12
DE - COMPLETE AUTOMATIC CLEANING OF THE MACHINE 3 x / YEAR - 13 MIN DA - AUTOMATIC CLEANING OF THE MACHINE 3 x PER YEAR - 13 MIN SV - AUTOMATIC CLEANING OF THE ENTIRE MACHINE 3 TIMES / YEAR - 13 MIN ES - COMPLETE THE AUTOMATIC CLEANING OF THE MACHINE 3 x / YEAR - 13 MIN PT - COMPLETE AUTOMATIC CLEANING OF THE MACHINE 3 x / YEAR - 13 MIN CS - COMPLETE AUTOMATIC CLEANING OF THE MACHINE 3 X / YEAR - 13 MIN HU - COMPLETE AUTOMATIC CLEANING OF THE MACHINE THREE TIMES A YEAR - 13 MIN RU - AUTOMATIC CLEANING PROGRAM OF THE DEVICE 3 TIMES A YEAR - 13 MIN RO - COMPLETE AUTOMATIC CLEANING OF THE MACHINE 3 x / YEAR - 13 MIN HR - PERFORM AUTOMATIC CLEANING OF THE DEVICE 3 x / YEAR - 13 MIN
10 DESCALING PROGRAM – 20 MIN

FR - DESCALING PROGRAM - 20 MIN
NL - DESCALING PROGRAM - 20 MIN
NO - DESCALING PROGRAM - 20 MIN
FI - DESCALING PROGRAM - 20 MIN
IT - DESCALING PROGRAM - 20 MIN

Dear customer,
IMPORTANT PRODUCT INFORMATION
ACCESSORIES SUPPLIED WITH YOUR MACHINE
POWERING ON THE MACHINE

Thank you for purchasing a KRUPS Espresso machine with bean grinder.
KRUPS designs, develops and manufactures its Espresso machines in France, ensuring you the highest standards of origin and manufacturing quality.
Designed for ease of use, your machine is the effortless way to create café-quality drinks at home. With just one touch, you can enjoy coffees such as Espresso, Ristretto and Lungo, as well as Cappuccino, Latte Macchiato, Caffe Latte and other milky drinks!
To help you get the most out of your machine every day, KRUPS has developed an Intuitive Light Indicator. It will guide you in the use of your machine and brighten up your coffee breaks.
Your KRUPS Espresso machine also has a large, intuitive touchscreen, like a smartphone UX interface for an intuitive experience. In addition, your machine's advanced technology helps you get the best possible results, revealing maximum aroma and full-bodied flavour from the freshly ground coffee beans.
We hope you have a great coffee experience and that you are completely satisfied with your KRUPS machine.
The KRUPS team

NEED HELP GETTING STARTED WITH YOUR MACHINE?



HELP AND TUTORIALS
Find a list of tutorials saved on your machine to guide you in using it.
They will walk you through preparing a drink, managing your favourites, and maintaining your machine.
List of available tutorials:
1. How do I make my drinks?
a. Starting a coffee drink b. Starting a milky drink c. Starting two drinks simultaneously
2. How to create and manage my favourites?
d. Accessing favourite drinks e. Adding a favourite drink f. Organising favourite drinks g. Deleting a favourite drink
3. How to maintain your machine?
h. Performing a rinsing i. Performing a cleaning j. Performing descaling k. Cleaning the milk system

IMPORTANT PRODUCT INFORMATION
Read the instruction manual carefully before using your appliance for the first time and keep it for future reference. Improper use will release KRUPS from any liability. It is important to follow the safety information.
GUIDE TO THE SYMBOLS USED IN THE INSTRUCTIONS

Danger: Warning about the risk of serious bodily injury or death.
The lightning symbol alerts you to electricity-related dangers.

Caution: Warning against any possible malfunction, damage or destruction of the appliance.

Important: General or important comment for operating the appliance.

PRODUCTS SUPPLIED WITH YOUR MACHINE
Check the products supplied with your machine. If one of the parts is missing, contact your KRUPS Consumer Service immediately.
Products supplied
| 1. | 2 cleaning tablets |  | |
| 2. | 1 descaling sachet |  | |
| 3. | Milk tube for the “One Touch Cappuccino” block |  | |
| 4. | Additional Milk tube for the “One Touch Cappuccino” block |  | |
| 5. | Cleaning needle of the steam circuit |  | |
| 6. | 1 Claris – Aqua Filter System cartridge with tightening accessory |  | |
| 7. | 1 water-hardness testing stick |  | |
| 8. | Instructions - Safety precautionsList of approved Krups service centresInternational guarantee |  | |
| 9. | Pipe cleaner |  | |
| According to model | |||
| 10. | Milk pot:You can put the milk pot in the dishwasher |  | |
According to model

TECHNICAL DATA
| Appliance | Automatic Espresso EA87 |
| Power supply | 220-240V~ / 50 Hz |
| Pump pressure | 15 bar |
| Coffee bean container | 250 g |
| Energy consumption | When operating: 1550 W |
| Water container | 3 L |
| Getting started and storage | Inside, in a dry place (away from ice) |
| Dimensions (mm) H x l x P | 365 x 240 x 400 |
| Weight EA87 (kg) | 8.2 |
Subject to technical modifications.
Place the appliance on a horizontal, stable, heat-resistant, clean and dry work surface.

APPLIANCE DESCRIPTION
A. Handle for water container cover B. Water container C. Coffee grounds collector D. Height-adjustable coffee nozzles E. Grid and removable drip tray F. Coffee bean container lid G. "One Touch Cappuccino" block
G1. Accessory for cleaning the milk system, 2 in 1: disassembly tool + cleaning needle G2. Removable one touch cappuccino block H. Milk tube and connector
I. Water-level floats J. Intuitive Light Indicator
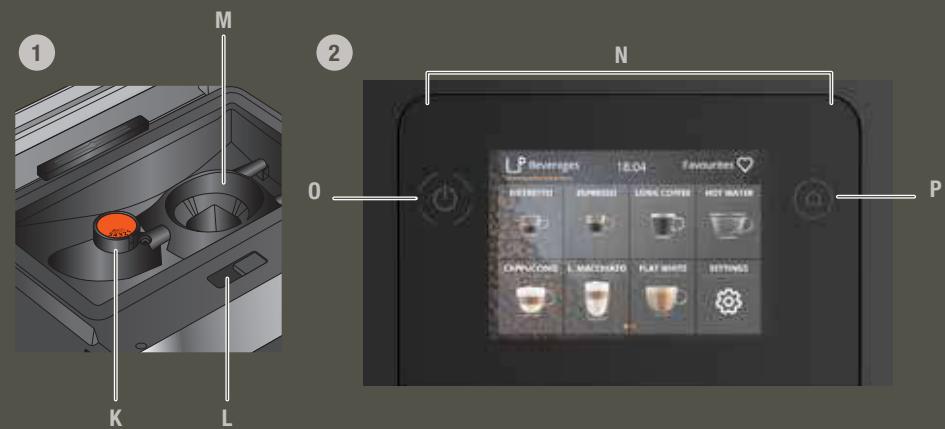
1. Coffee bean container
K. Grinding fineness adjustment button L. Cleaning tablet funnel M. Metal conical grinding mill
2. Display panel
N. Navigation touchscreen 0. ON/OFF P. Home screen shortcut

GETTING STARTED & APPLIANCE SETUP
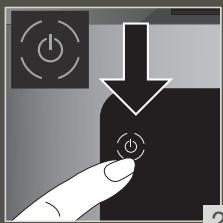
TURNING THE MACHINE ON

Danger: Connect the appliance to a grounded 230V socket. Not following this instruction puts you at risk of fatal injuries due to the presence of electricity!
Respect the safety information in the "Safety precautions" booklet.
GETTING STARTED (see 1.1 st use)
When using the machine for the first time, you will be asked to select various settings.
Follow the directions that appear on the screen.
Priming the machine allows the water circuits to be filled, so that the machine can operate. Preheating and automatic rinsing will take place.
PUTTING THE MACHINE ON STANDBY
Depending on the preparation, the machine performs automatic rinsing while on standby. The cycle only lasts a few seconds and stops automatically.

TIPS AND TRICKS
Water quality has a strong influence on the quality of the aromas. Limescale and chlorine can alter the taste of coffee. To preserve the aromas of your coffee, we recommend you to use the Claris – Aqua Filter System cartridge, or bottled water with dry residues below 800 mg/L (look on the bottle's label). See the "FILTER AND WATER HARDNESS" section.
When preparing drinks, we recommend using preheated cups (by running them under hot water) of an appropriate size for your desired quantity.
The roasted coffee beans can lose their aroma if they are not protected. We advise that you use an amount of beans equivalent to your consumption over the next 2-3 days and that you choose 250 g bags.
The quality of the coffee beans is variable and tastes are subjective. Arabica will give you fine, floral aromas, while Robusta, which has a higher caffeine content, is more bitter and full-bodied. It is common to mix the two types of coffee to get a more balanced coffee. Contact your roaster for further advice.
We do not recommend using oily and caramelised beans as these can damage the machine.
The fineness of the ground beans influences the strength of the aromas and the quality of the crema. The more finely ground the beans, the smoother the crema. Grinding can also be adapted for the desired drink.

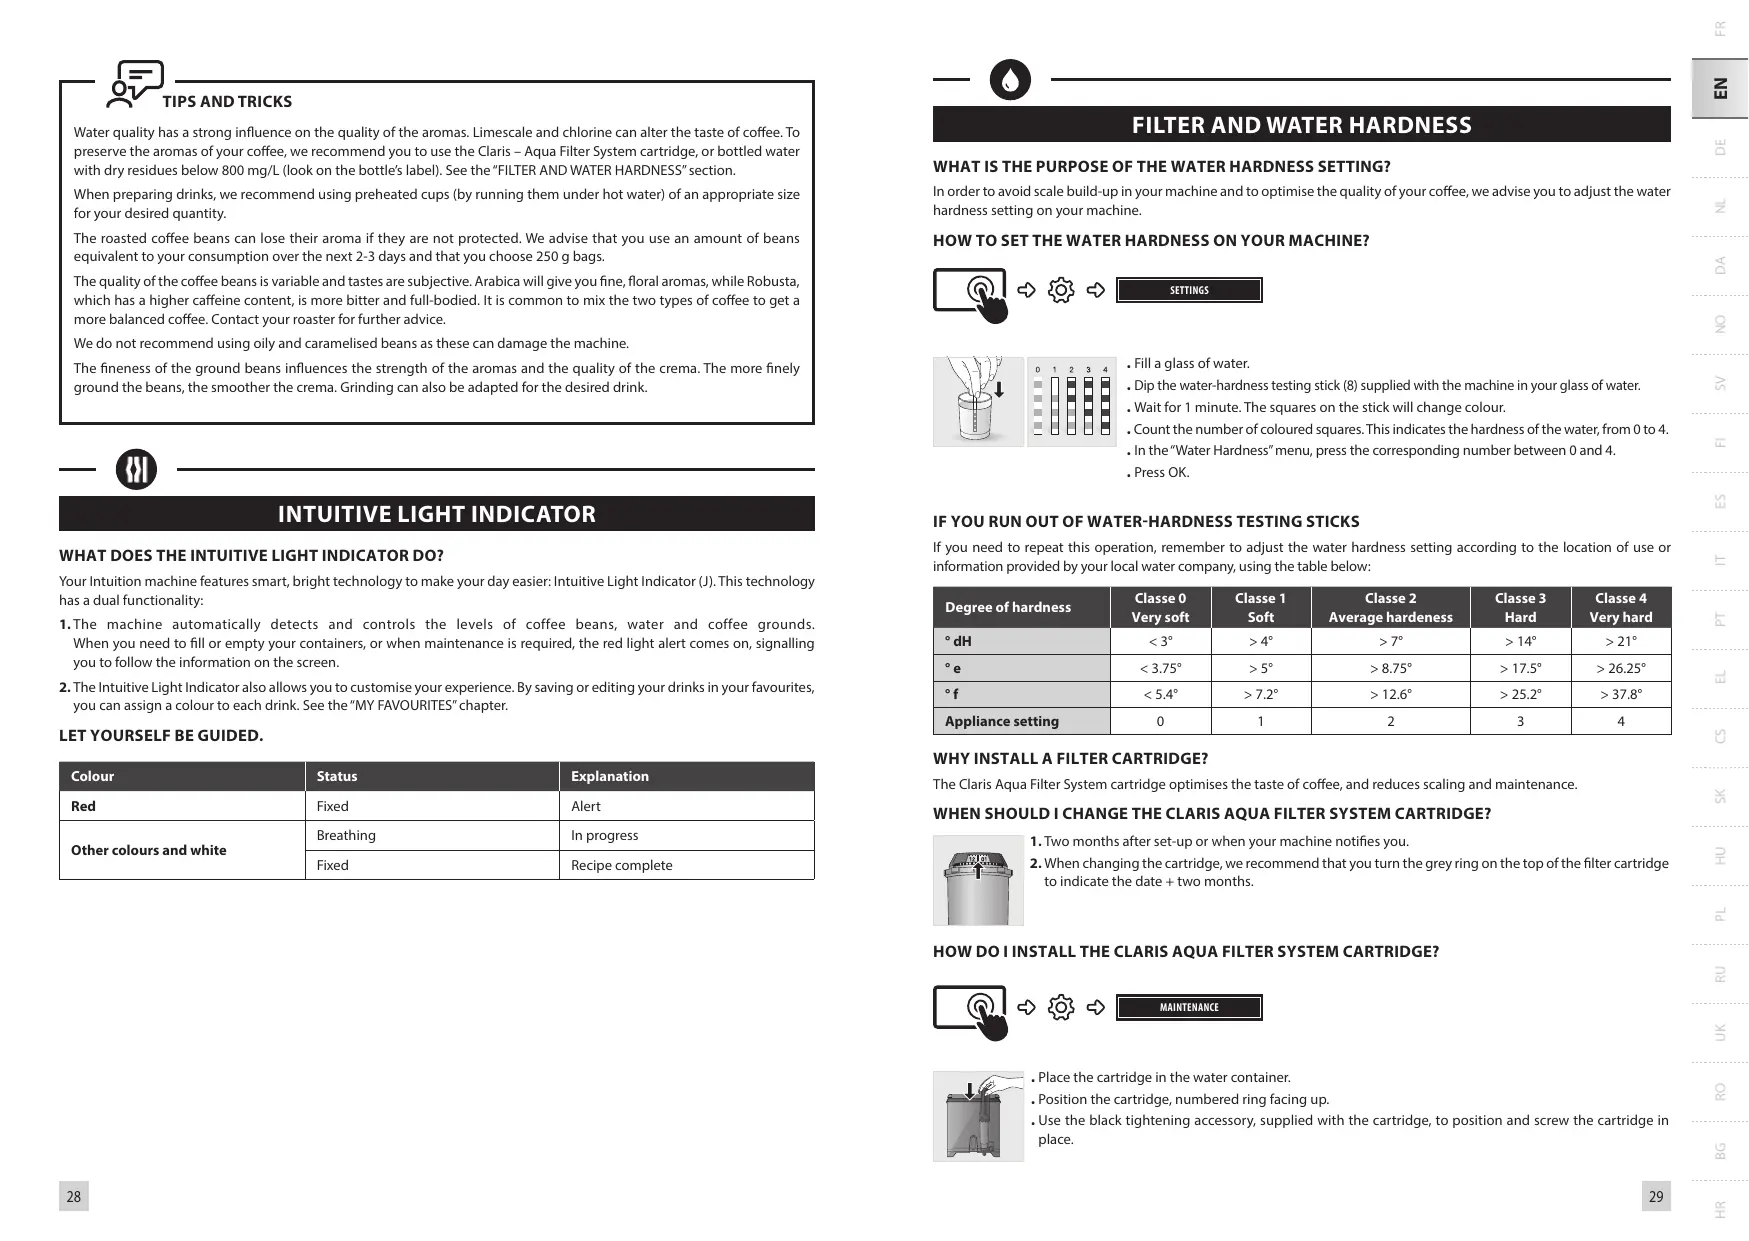
INTUITIVE LIGHT INDICATOR
WHAT DOES THE INTUITIVE LIGHT INDICATOR DO?
Your Intuition machine features smart, bright technology to make your day easier: Intuitive Light Indicator (J). This technology has a dual functionality:
- The machine automatically detects and controls the levels of coffee beans, water and coffee grounds. When you need to fill or empty your containers, or when maintenance is required, the red light alert comes on, signalling you to follow the information on the screen.
- The Intuitive Light Indicator also allows you to customise your experience. By saving or editing your drinks in your favourites, you can assign a colour to each drink. See the "MY FAVOURITES" chapter.
LET YOURSELF BE GUIDED.
| Colour | Status | Explanation |
| Red | Fixed | Alert |
| Other colours and white | Breathing | In progress |
| Fixed | Recipe complete |

FILTER AND WATER HARDNESS
WHAT IS THE PURPOSE OF THE WATER HARDNESS SETTING?
In order to avoid scale build-up in your machine and to optimise the quality of your coffee, we advise you to adjust the water hardness setting on your machine.
HOW TO SET THE WATER HARDNESS ON YOUR MACHINE?

SETTINGS
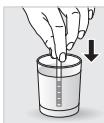
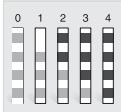
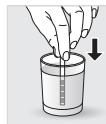
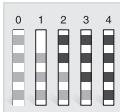
• Fill a glass of water. • Dip the water-hardness testing stick (8) supplied with the machine in your glass of water. - Wait for 1 minute. The squares on the stick will change colour. • Count the number of coloured squares. This indicates the hardness of the water, from 0 to 4. • In the "Water Hardness" menu, press the corresponding number between 0 and 4. - Press OK.
IF YOU RUN OUT OF WATER-HARDNESS TESTING STICKS
If you need to repeat this operation, remember to adjust the water hardness setting according to the location of use or information provided by your local water company, using the table below:
| Degree of hardness | Classe 0 Very soft | Classe 1 Soft | Classe 2 Average hardness | Classe 3 Hard | Classe 4 Very hard |
| ° dH | < 3° | >4° | >7° | >14° | >21° |
| ° e | < 3.75° | >5° | >8.75° | >17.5° | >26.25° |
| ° f | < 5.4° | >7.2° | >12.6° | >25.2° | >37.8° |
| Appliance setting | 0 | 1 | 2 | 3 | 4 |
WHY INSTALL A FILTER CARTRIDGE?
The Claris Aqua Filter System cartridge optimises the taste of coffee, and reduces scaling and maintenance.
WHEN SHOULD I CHANGE THE CLARIS AQUA FILTER SYSTEM CARTRIDGE?
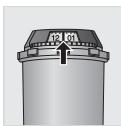
- Two months after set-up or when your machine notifies you.
- When changing the cartridge, we recommend that you turn the grey ring on the top of the filter cartridge to indicate the date + two months.
HOW DO I INSTALL THE CLARIS AQUA FILTER SYSTEM CARTRIDGE?

MAINTENANCE
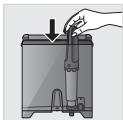
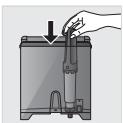
- Place the cartridge in the water container. • Position the cartridge, numbered ring facing up.
- Use the black tightening accessory, supplied with the cartridge, to position and screw the cartridge in place.
GRINDER: ADJUSTING THE FINENESS OF THE GROUND COFFEE
WHY SHOULD I ADJUST THE FINENESS OF THE GROUND COFFEE?
You can choose the strength of your coffee by adjusting how finely the coffee beans are ground.
Varying the fineness of the grinding enables you to adapt to the different types of bean:
Darkly roasted and oily beans require coarse grinding.
A more lightly roasted bean will be drier and will require finer grinding.
Note: the more finely the beans are ground, the more powerful the aroma.
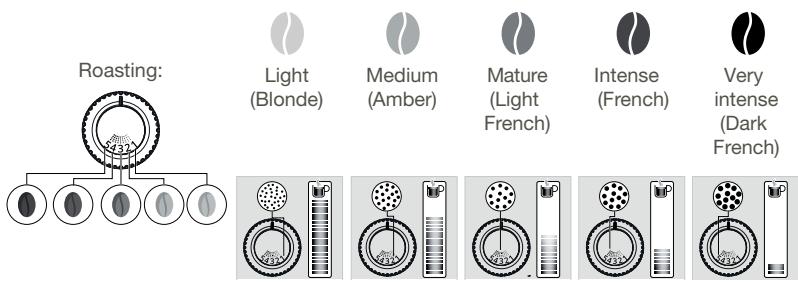
HOW DO I ADJUST THE FINENESS OF THE GROUND COFFEE?
Turn the grinding fineness adjustment button (K) located in the bean container, depending on the type of bean and the desired strength of aroma. This adjustment must be performed when the mill is in operation, notch by notch. After three preparations, you will notice a distinct difference in taste.
HOW DO I KNOW WHEN THERE ARE NO MORE BEANS IN THE CONTAINER?
Your Intuition machine has a sensor to warn you when the level of coffee beans in the container is running low. A message will appear on the screen and the Intuitive Light Indicator (J) will display red light.
WHAT IF THE ALERT APPEARS WHILE I'M MAKING A DRINK?
Fill the coffee bean container, press OK and the recipe will resume. So no coffee is wasted!
WHAT DO I DO IF I WANT TO CHANGE MY COFFEE OR IF I HAVE RUN OUT OF COFFEE?
If you press OK without adding coffee beans, the machine will try to restart and alert you again. If you press OK again, the machine will make the recipe using all of the remaining coffee. The grinder will then be empty.

Caution: We do not recommend using oily and caramelised beans that are difficult for the grinder to process. These can damage the machine and prevent the intuitive system from functioning correctly.
If an alert message appears on your screen and the red light comes on when there are enough beans:
- Press the OK button to continue the recipe.
- Or, turn off the "no bean" alert to prevent detection while there is still coffee in the coffee bean container.


SETTINGS
PREPARING OTHER DRINKS
DRINKS THAT CAN BE PREPARED WITH THIS MACHINE:
| Drinks | Approximate size | Possible volumes | Coffee strength | X2 | |
 | RistrettoShort Espresso with body | 25 ml | 20 - 40 ml | √ | √ |
 | EspressoThe full-bodied Espresso with pronounced aromas is covered with a slightly bitter caramel coloured crema | 40 ml | 40 - 70 ml | √ | √ |
 | LungoLong Espresso with caramel crema | 70 ml | 70 - 100 ml | √ | √ |
 | DoppioDouble Espresso with amber crema | 100 ml | 40 - 140 ml | √ | |
 | Long CoffeeHigher in caffeine but lighter on the palate.Very popular in the morning | 120 ml | 80 - 180 ml | √ | √ |
 | AmericanoDouble long Espresso combined with hot water | 120 ml | 90 - 150 ml | √ | |
 | CappuccinoA balance between milk, foam and coffee | M = 120 mlL = 180 mlXL = 240 ml | 120 - 240 ml | √ | √ |
 | Frothed MilkA large dose of milk with its milk froth | M = 120 mlL = 160 mlXL = 200 ml | 120 - 200 ml | √ | |
 | Caffe LatteFoam with a subtle coffee flavour | M = 200 mlL = 280 mlXL = 350 ml | 200 - 350 ml | √ | √ |
 | Latte MacchiatoA gourmet Espresso with milk foam | M = 190 mlL = 250 mlXL = 340 ml | 190 - 240 ml | √ | √ |
 | Hot Water | 200ml | 20 - 300 ml | ||
FOR INFORMATION, TO PREPARE YOUR DRINK, YOUR MACHINE AUTOMATICALLY PERFORMS THE FOLLOWING STEPS:
| For coffee recipes | For milky recipes other than Caffe Latte | For Caffe Latte |
1.  2. 2.  3. 3.  4. 4.  | 1. Pre-heating phase2. Frothing milk3. Grinding coffee beans4. Tamping the ground coffee5. Pre-infusion (a few drops may fall into your cup at this point)6. Percolation | 1. Grinding coffee beans2. Tamping the ground coffee3. Pre-infusion (a few drops may fall into your cup at this point)4. Percolation5. Pre-heating phase6. Frothing milk |
HOW DO I ADJUST THE HEIGHT OF THE COFFEE NOZZLES?
For all drinks, you can adjust the coffee nozzles according to the size of your cup(s).
HOW DO I PREPARE MY DRINK?
Refer to the "How to make drinks?" tutorial saved in your machine



HELP AND TUTORIALS
DIFFERENT SETTINGS ARE AVAILABLE, DEPENDING ON THE DRINK:
• One or two cups: to start the double recipe, select the drink and press - Coffee strength: to increase or decrease the strength of the coffee by changing the amount of ground coffee, select your drink and choose between 1 and 3 beans, with 1 being the softest and 3 being the most full-bodied. • Cup volume: to increase or decrease the cup volume, scroll up or down the list of volumes and select the one you want.

For more information, see the drinks table in the instructions.

TIP
To select the coffee strength and cup volume, you can navigate up/down or press directly on your choice.
HOW DO I STOP A DRINK MID-PREPARATION?
STOP
Warning: You can stop the preparation of a drink at any time by pressing the button. When a cycle is interrupted, it does not stop immediately. The machine will be unavailable for a time, as indicated by a message on the screen.
MILK-BASED DRINKS

TIPS
For frothed milk, use pasteurised UHT milk straight from the fridge (3–5°C). It is possible to use special milks (micro filtered, raw, fermented, enriched) or plant-based milks (rice, oat or almond milk), but this can give less satisfactory results in terms of quality and quantity of the froth.
HOW DO I START THE PREPARATION OF A MILK-BASED DRINK?
Refer to "2 PREPARING A MILK-BASED RECIPE" earlier in the instructions, or see the "Starting a milky drink" tutorial stored in your machine.



HELP AND TUTORIALS
HOT WATER
For teas and infusions, your machine has a "Hot Water" option.
HOW DO I ADJUST THE WATER TEMPERATURE?



SETTINGS
Go to Settings, Adjust, Water temperature. You can set the temperature between T1 and T3, where T1 is the coolest and T3 is the hottest temperature.

MY FAVOURITES
WHAT IS THE PURPOSE OF THE FAVOURITES FEATURE?
The Favourites feature lets you access a menu where all of your custom settings are saved. Fast and ideal for everyday use, your drink is started at the touch of a button without having to adjust your favourite recipes every time.
You can store up to eight custom recipes, adjusting the volume, strength and colour of the Intuitive Light Indicator (J). For a more in-depth explanation of the Intuitive Light Indicator, see the INTUITIVE LIGHT INDICATOR chapter.
If I stop my favourite drink in progress, this length will be saved.
HOW DO I START A DRINK THAT IS SAVED IN MY FAVOURITES?
Tap Favourites at the top right of your home screen. Your saved recipes are displayed. Select the recipe you want and it will start automatically. Start your favourite drink with just one touch – it's so quick and easy!
Learn how to access Favourites, add a Favourite, organise Favourites and delete a drink saved in My Favourites by looking at the tutorials stored in your machine, "How do I create and manage my favourites?"



HELP AND TUTORIALS

GENERAL MAINTENANCE
Carrying out proper maintenance will optimise the life of your machine and preserve the authentic taste of your coffee.
The drip tray collects the used water and the coffee grounds collector collects the used ground coffee.
Important: For hygienic reasons, as this container is in contact with milk and coffee, we recommend that you fully dismantle and clean daily each element under hot water. It is recommended that you let it air dry before you put it back in the appliance. It is important to always leave it in place and to empty it regularly. You can put the drip tray in the dishwasher. You can put the drip tray in the dishwasher but without its cover.
WHEN SHOULD I EMPTY THE DRIP TRAY?
When the floats are in the raised position, indicating that it is too full.
When the machine notifies you or more regularly but when the machine is turned on so that it can register that the bin has been emptied.

Important: Not emptying the coffee grounds collector and drip tray regularly as shown above may damage your machine. Do not put it in the dishwasher. For hygienic reasons, we recommend that you clean the coffee ground container daily under hot water with soap and sponge. It is recommended that you let it air dry before you put it back in the appliance.
MAINTENANCE OF WATER TANK AND COFFEE BEAN CONTAINER
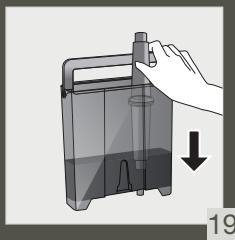
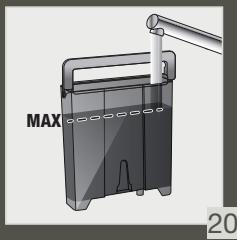
For the preservation of best coffee flavor impacted by the quality of the water and hygienic reasons, we advise you to use only fresh water and to daily clean the water tank with hot water and a bottle brush.
Coffee beans can leave greasy residue on the tank that can affect the quality of the coffee. For the preservation of best coffee flavor and hygienic reasons we recommend you to wipe it with a dry, soft cloth each time it needs to be refilled.

Important: Do not clean with water, the presence of water in the bean hopper could damage the machine

It is recommended that you let it air dry before you put it back in the appliance
WHY AND HOW DO I MAINTAIN THE MILK SYSTEM AFTER MAKING MILKY DRINKS?

Important: In order to obtain a consistent foam quality, we recommend that you:



HELP AND TUTORIALS
| Maintenance | When? | Explanation | Accessories required |
| Milk rinsing30 s / 20 ml | After each milky drink, when the machine notifies you | Allows you to rinse the machine's milk system. You can start a milk system rinsing at any time. | |
| Milk tube, nozzle rinsing and milk pot cleaning | After each milky drink | We recommend you to clean with hot water and soap the milk pot after each use. we recommend you to replace the milk tube approximately every three months. You will find these accessories available on the KRUPS.com website. | Hot water + soap + pipe cleaner |
| Milk accessory cleaning5 min | When the machine notifies you or at any time | This involves removing and cleaning the removable “One Touch Cappuccino” block. For optimum milk frothing, clean this regularly. See above in the instructions: 5. MANUAL DEEP CLEANING OF THE MILK DISTRIBUTION SYSTEM – 5 MIN. | Cleaning needle (n°5) |
OTHER MAINTENANCE
| Maintenance | When? | Explanation | Accessories required |
| Coffee rinsing 45 s / 30 ml | At any time | For hygienic reasons, it is recommended to rinse the coffee system daily or when not used for a longer period (more than 2 days). | |
| Tea rinsing 30 s - 20 ml | Before the drink starts flowing | Allows you to rinse with hot water to ensure an authentic taste of your tea or infusion. | |
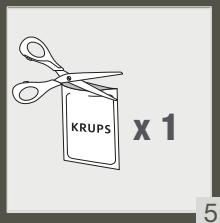
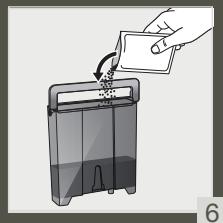
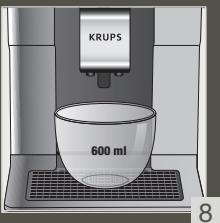
| Coffee system cleaning 13 min / 600 ml | When the machine notifies you or at any time | For the preservation of best coffee flavor and hygienic reasons we recommend you to clean the coffee system 3 times a year. | 1 KRUPS cleaning tablet (n°1) |
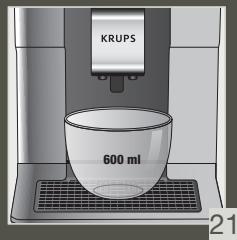
| Descaling 20 min / 600 ml | When the machine notifies you or at any time | The appliance notifies you when it is necessary to run a descaling program.This step is very important to ensure the proper functioning and longevity of your appliance. | 1 sachet of KRUPS descaler (n°2) |

Important: You do not have to run the cleaning program as soon as the appliance notifies you, but you should do it reasonably soon after. If the cleaning is postponed, the alert message will remain displayed until the operation has been performed.

Important: If you unplug your machine during cleaning or in the event of electrical failure, the cleaning program will restart. It is not possible to postpone this operation: it is mandatory in order to rinse the water system. In this case, a new cleaning tablet may be necessary.
For further explanations, please see the tutorials available in your machine's settings.



HELP AND TUTORIALS

Want to know when you should perform the maintenance operations above?
An alert message will appear on the screen as soon as there is an action you need to take.

OTHER FUNCTIONS
Your KRUPS Intuition machine has a range of settings – check them out! They let you create a more personalised experience.
HOW DO I ACCESS MY MACHINE'S SETTINGS?



SETTINGS
LIST OF SETTINGS:
| Language | Select from 21 languages. |
| Date and time | You must set the date, particularly if using an anti-limescale cartridge. Time setting and 12 or 24 hour clock display. |
| Screen brightness | Adjusts the screen backlight. |
| Light | Turns the Intuitive Light Indicator on and off. |
| Display | Choose whether drink options are displayed as slides or tiles. |
| Auto-stop | Sets the period of time after which your appliance will stop automatically. This function lets you reduce your energy consumption. |
| Auto-start | Turns on the machine and automatically starts preheating the appliance at a chosen time. Do you have your coffee at the same time every day? This function is for you! By setting the auto-start, you can save time and no longer have to manually start your drink. |
| Volume unit | Selects the unit of measurement: ml or oz. |
| Auto-rinsing | You can choose whether or not to activate automatic rinsing of the coffee nozzle when starting the machine. |
| Water hardness | Set the hardness of the water between 0 and 4. For more information, see the “Water hardness measurement” chapter. |
| Coffee temperature | Is your coffee too hot? You can use this function to reduce the temperature. The machine has three temperature settings for your coffee drinks. |
| Water temperature | Do you always drink the same tea and want to set the water temperature? This function is for you! The machine has three temperature settings for your hot water. |
| Type of coffee | Turns off the ‘No beans’ function. This function indicates a lack of coffee beans in the container and resumes a recipe which is in progress. See the GRINDER paragraph. |
| Factory reset | Resetting clears your preferences and settings and restores the default settings. Your favourites will also be deleted. |

TROUBLESHOOTING
OPERATION
- The machine has a fault, the software is frozen OR the machine has a malfunction.
√ Turn off and unplug the machine, remove the filter cartridge, wait one minute and then restart the machine. Press and hold the ON/OFF button for at least three seconds to start the machine.
- The appliance does not turn on after pressing the ON/OFF button (for at least three seconds).
√ Check the fuses and the electrical power socket. Check that the plug is correctly inserted into the socket.
- A power failure has occurred during a cycle.
√ The device will reset automatically when it turns back on.
- The grinder is running empty.
This is normal if it is occasional and there are no or few coffee beans left. It can run empty for up to ten seconds to determine its consumption and ensure that it is working properly. If there are still coffee beans in the container:
The coffee may be too oily and is not drawn into the machine properly. You can try encouraging the beans to fall and see if it works again. However, we recommend changing the coffee (see the bean type function).
If it is my usual coffee that has worked well up until now: please contact your KRUPS Consumer Service.
USE
- The grinder makes an abnormal noise.
There are most probably foreign bodies in the grinder. Try to clear it with a vacuum cleaner, otherwise contact your KRUPS Consumer Service.
- There is water under the appliance.
Before removing the drip tray, wait for 15 seconds after the coffee has flowed so that the machine finishes its cycle correctly. Check that the drip tray is positioned properly on the machine. It must always be in place even when the machine is not in use. Check that the drip tray is not full.
- The adjustment button for the grinding fineness is difficult to turn.
Only turn the grinding fineness adjustment button when the grinder is running.
- The appliance has not produced any coffee.
An incident has been detected during preparation.
The appliance resets automatically and is ready for a new cycle.
- You have used ground coffee instead of coffee beans. Use your vacuum cleaner to clear the ground coffee from the bean container.
- Water flows from the coffee nozzles when the machine is stopped. This is normal. This is an automatic rinse to clean the coffee nozzles and prevent them from getting clogged.
STEAM AND MILK
- The milk flow from your machine appears to be partially or completely blocked.
An alert message will appear on the screen if the nozzle is blocked. Clean the "One Touch Cappuccino" block. Refer to point 5 earlier in the instructions. MANUAL DEEP CLEANING OF THE MILK DISTRIBUTION SYSTEM – 5 MIN, or see the tutorial stored in your machine "Cleaning the milk nozzle".
- No steam comes out.
a. During the first use of a steam cycle, if no steam comes out correctly:
Check that the hole in the tip is not clogged. See section above: "The steam nozzle of your machine appears to be partially or completely clogged". Carry out the following protocol once and only once:
Empty the water tank and temporarily remove the Claris Aqua Filter System cartridge. Fill the tank with mineral water high in calcium (>100 mg/L) and make successive steam cycles (5 to 10 cycles) in a container until a continuous jet of steam is obtained. Put the cartridge back in the tank.
b. The steam nozzle had already worked:
Check that the hole in the tip is not clogged. See section above: "The steam nozzle of your machine appears to be partially or completely clogged".
If after performing the above steps, the steam nozzle still doesn't work, please contact KRUPS Consumer Service.
- Steam escapes from the grid of the drip tray.
Depending on the type of preparation, steam may escape from the grid of the drip tray. 4. Steam appears under the bean container lid. Check that the cleaning tablet funnel under the cover (L) is closed.
MAINTENANCE
- The machine does not request descaling. The descaling cycle is requested following preparation of a large number of milky or hot water-based drinks. If you only make coffee, descaling will not be required frequently.
- Some grounds are in the drip tray. A small amount of ground coffee can get into the drip tray. The machine is designed to clear any excess ground coffee so that the percolation area remains clean.
- The Intuitive Light Indicator remains lit after you have emptied the coffee grounds collector. √ Refit the coffee grounds collector.
- After filling the water container, the Intuitive Light Indicator stays on. √ Check that the container is positioned correctly in the appliance.
The floats at the bottom of the tank must move freely. Check and dislodge the floats if necessary.
DRINKS
- The coffee flows too slowly.
√ Turn the grinding fineness button to the right for a coarser grind (depending on the type of coffee used). √ Perform one or several rinse cycles. √ Change the Claris Aqua Filter System cartridge.
- The coffee is too light or not full-bodied enough.
√ Check that the bean container contains coffee and that it is moving down correctly. √ Avoid using oily, caramelised or flavoured coffees that may not be drawn into the machine correctly. √ Decrease the preparation volume and increase the strength using the coffee strength function. Turn the grinding fineness button to the left for a finer grind. Make your drink in two cycles using the two-cup function.
- The Espresso or coffee is not hot enough.
√ Increase the coffee temperature in the machine settings. Heat the cup by rinsing it in hot water before preparing the drink. √ Perform a coffee system rinse before starting your coffee. A coffee rinse on start function can be activated in settings/auto-rinse.
- Clean water flows through the coffee nozzles before each coffee.
√ At the start of the recipe, there is a pre-infusion of coffee which can cause a small amount of water to flow from the coffee nozzles.
If one of the problems outlined in the table persists, contact KRUPS Consumer Service.

Important: Manufacturer:
SAS GSM
DESCRIPTION OF THE DEVICE
HOW DO I ADJUST THE FINENESS OF THE GROUND COFFEE?
HOW DO I PREPARE MY DRINK?
PRODUCTS INCLUDED WITH THE MACHINE
GETTING STARTED AND SETTING UP THE DEVICE
HOW TO TURN ON THE MACHINE

L. Drawer for cleaning tablet
M. Conical metal coffee grinder
- Display panel
N. TOUCHSCREEN WITH NAVIGATION
- ON/OFF
GENERAL MAINTENANCE
MAINTENANCE OF THE MILK SYSTEM
WHY AND HOW DO I MAINTAIN THE MILK SYSTEM AFTER MAKING MILK-BASED DRINKS?

PUT THE MACHINE IN STANDBY
IMPORTANT PRODUCT INFORMATION
SETTINGS
PREPARING OTHER DRINKS
DRINKS THAT CAN BE PREPARED WITH THIS DEVICE:
IMPORTANT PRODUCT INFORMATION
IMPORTANT PRODUCT INFORMATION
WHAT IS THE PURPOSE OF SETTING WATER HARDNESS?
SETTINGS
MAINTENANCE


- ST USE
- MAKE 2 CUPS OF A MILK RECIPE AT ONCE
- QUICK MILK RINSING AFTER A CAPPUCCINO
- MANUAL DEEP CLEANING OF MILK SYSTEM – 5 MIN
- A
- CLEAN THE COFFEE GROUND COLLECTOR REGULARLY
- EMPTY THE DRIP TRAY
- CLEAN THE DRIP TRAY REGULARLY
- DESCALING PROGRAM – 20 MIN
- DEAR CUSTOMER
- IMPORTANT PRODUCT INFORMATION
- ACCESSORIES SUPPLIED WITH YOUR MACHINE
- POWERING ON THE MACHINE
- NEED HELP GETTING STARTED WITH YOUR MACHINE
- HELP AND TUTORIALS
- HOW DO I MAKE MY DRINKS
- HOW TO CREATE AND MANAGE MY FAVOURITES
- HOW TO MAINTAIN YOUR MACHINE
- GUIDE TO THE SYMBOLS USED IN THE INSTRUCTIONS
- PRODUCTS SUPPLIED WITH YOUR MACHINE
- TECHNICAL DATA
- APPLIANCE DESCRIPTION
- COFFEE BEAN CONTAINER
- DISPLAY PANEL
- GETTING STARTED & APPLIANCE SETUP
- TURNING THE MACHINE ON
- GETTING STARTED (SEE 1.1 ST USE)
- PUTTING THE MACHINE ON STANDBY
- TIPS AND TRICKS
- INTUITIVE LIGHT INDICATOR
- WHAT DOES THE INTUITIVE LIGHT INDICATOR DO
- FILTER AND WATER HARDNESS
- WHAT IS THE PURPOSE OF THE WATER HARDNESS SETTING
- HOW TO SET THE WATER HARDNESS ON YOUR MACHINE
- IF YOU RUN OUT OF WATER-HARDNESS TESTING STICKS
- WHY INSTALL A FILTER CARTRIDGE
- WHEN SHOULD I CHANGE THE CLARIS AQUA FILTER SYSTEM CARTRIDGE
- HOW DO I INSTALL THE CLARIS AQUA FILTER SYSTEM CARTRIDGE
- GRINDER: ADJUSTING THE FINENESS OF THE GROUND COFFEE
- WHY SHOULD I ADJUST THE FINENESS OF THE GROUND COFFEE
- HOW DO I ADJUST THE FINENESS OF THE GROUND COFFEE
- HOW DO I KNOW WHEN THERE ARE NO MORE BEANS IN THE CONTAINER
- WHAT IF THE ALERT APPEARS WHILE I'M MAKING A DRINK
- WHAT DO I DO IF I WANT TO CHANGE MY COFFEE OR IF I HAVE RUN OUT OF COFFEE
- PREPARING OTHER DRINKS
- HOW DO I ADJUST THE HEIGHT OF THE COFFEE NOZZLES
- HOW DO I PREPARE MY DRINK
- DIFFERENT SETTINGS ARE AVAILABLE, DEPENDING ON THE DRINK
- HOW DO I STOP A DRINK MID-PREPARATION
- MILK-BASED DRINKS
- HOW DO I START THE PREPARATION OF A MILK-BASED DRINK
- HOT WATER
- HOW DO I ADJUST THE WATER TEMPERATURE
- MY FAVOURITES
- WHAT IS THE PURPOSE OF THE FAVOURITES FEATURE
- HOW DO I START A DRINK THAT IS SAVED IN MY FAVOURITES
- GENERAL MAINTENANCE
- WHEN SHOULD I EMPTY THE DRIP TRAY
- MAINTENANCE OF WATER TANK AND COFFEE BEAN CONTAINER
- WHY AND HOW DO I MAINTAIN THE MILK SYSTEM AFTER MAKING MILKY DRINKS
- OTHER FUNCTIONS
- HOW DO I ACCESS MY MACHINE'S SETTINGS
- TROUBLESHOOTING
- OPERATION
- USE
- STEAM AND MILK
- MAINTENANCE
- DRINKS
- IMPORTANT: MANUFACTURER
- DESCRIPTION OF THE DEVICE
- PRODUCTS INCLUDED WITH THE MACHINE
- GETTING STARTED AND SETTING UP THE DEVICE
- HOW TO TURN ON THE MACHINE
- MAINTENANCE OF THE MILK SYSTEM
- WHY AND HOW DO I MAINTAIN THE MILK SYSTEM AFTER MAKING MILK-BASED DRINKS
- PUT THE MACHINE IN STANDBY
- WHAT IS THE PURPOSE OF SETTING WATER HARDNESS
Brand : KRUPS
Model : EA8738
Category : Automatic coffee machine