
IHP 7.5 C M IX - Kitchen hood INDESIT - Free user manual and instructions
Find the device manual for free IHP 7.5 C M IX INDESIT in PDF.




| Product type | Kitchen hood |
| Brand | INDESIT |
| Model | IHP 7.5 C M IX |
| Dimensions (H x W x D) | 61-82 x 69.8 x 50 cm |
| Air outlet diameter | 150 mm (adaptable to 120 mm) |
| Total absorbed power | 160 W |
| Supply voltage | 230 V |
| Bulb type | Halogen 25 W (2 bulbs) |
| Base | G9 |
| Number of speeds | 3 speeds + stop |
| Filtration type | Washable metal grease filter + optional activated carbon filter |
| Minimum distance above a gas hob | 65 cm |
| Minimum distance above an electric hob | 55 cm |
| Material | Stainless steel |
| Installation type | Wall or ceiling |
| Grease filter maintenance | Monthly cleaning (dishwasher safe) |
| Carbon filter replacement | Every 20 months |
| Repairability | Spare parts available via after-sales service |
Frequently Asked Questions - IHP 7.5 C M IX INDESIT
User questions about IHP 7.5 C M IX INDESIT
0 question about this device. Answer the ones you know or ask your own.
Ask a new question about this device
Download the instructions for your Kitchen hood in PDF format for free! Find your manual IHP 7.5 C M IX - INDESIT and take your electronic device back in hand. On this page are published all the documents necessary for the use of your device. IHP 7.5 C M IX by INDESIT.
USER MANUAL IHP 7.5 C M IX INDESIT
Operating Instructions
COOKER HOOD
Contents
Operating Instructions,1
Warnings,10
Assistance,28
Installation,35
PYRAMID controls,36
Maintenance and care,37
Troubleshooting,38
PT
Portuges
! Keep this manual for reference. If you sell, transfer or move the unit to another location, make sure to keep the manual with the product.
! Read the instructions carefully - they contain important installation, user and safety information. ! Do not tamper with the electrical or mechanical equipment of the product or its exhaust ducts.
General safety information
- The distance between the cookware support surface on top of the cooking appliance and the lowest part of the cooker hood must be at least:
65 cm if the hood is installed over a gas cooktop, 55 cm if the hood is installed over an electric cooktop.
If the installation instruction manual for the gas cooking appliance specifies a greater distance, this measurement should be taken into account.
- The cooker hood comes with anchor plugs which are suitable for use with most walls/ceilings. However, you must contact a qualified technician to check the suitability of the materials in relation to the type of wall/ceiling, which must be strong enough to support the weight of the unit.
- Caution! Do not hook the unit up to its electrical power supply until the installation has been completed.
- Before cleaning or servicing the unit, disconnect it from the mains by pulling the power plug or disconnecting the main circuit breaker.
- Always wear work gloves when installing and servicing the unit.
- It is not intended for use by children or persons with sensory or mental disability and lack of experience or familiarity, except under the supervision or instruction of a person responsible for their safety.
- Make sure children do not play with the unit.
- Never operate the unit without its grease filter installed!
- NEVER use the hood as a support, unless expressly instructed to do so.
- The room must be adequately ventilated if the hood is used at the same time with other equipment burning gas or other fuels.
- Extracted air must not be conveyed into a duct used for exhausting combustion fumes from gas or other fuel-fired equipment.
- Observe all regulations in relation to air extraction.
- NEVER cook food with an open flame under the hood; open flames will damage the filters and may cause fires. Never do this.
- Always supervise frying to make sure the heated oil does not catch fire.
- Strictly observe all local regulations in relation to the technical and safety measures to be employed in fumes extraction.
- Clean the product frequently, inside and out (AT LEAST ONCE A MONTH, and in observance of the maintenance instruction given in this manual).
- Failure to observe the hood cleaning and filter cleaning/replacement instructions can result in fires.
- Never use the hood without its bulbs properly installed - electrocution hazard.
- The manufacturer is not liable for any inconvenience, damage or fire caused by the unit as a result of failure to observe the instructions given in this manual.
- Caution! The unit's accessible parts can get very hot when used with cooking equipment.
65 cm - the filter must be installed on the boiler. 55 cm - the electric filter must be installed on the boiler.
Before installing the filter, you must take the necessary measures.
- The filter can be installed with the cables/wires disconnected. However, if the cable/wire material is sensitive, you must take the necessary precautions to protect it from damage.
- DANGER! Do not connect the filter to the power supply. Before disconnecting the filter from the power supply or performing maintenance, you must disconnect it from the power supply using the main switch. When installing the filter and during maintenance, use insulated tools. If you are not a qualified person or do not have permission, or if you are not sure about the safety and operation, do not use this filter.
- Do not allow children to play with the filter. If the device is not installed, do not use the filter!
- If the instructions are not clear, do not use the filter as a support.
- If gas or other flammable substances are detected, the room must be ventilated immediately.
- The filter must not be used to ignite gas or other flammable substances, nor to emit toxic gases through the chimney.
- Install all regulations related to air supply.
- Do not cook with fire or gas under the filter; it may cause fire or gas leaks. Do not leave it unattended. To avoid burns, be careful when touching the filter.
- Comply with all applicable regulations regarding the use of toxic substances and safety measures.
- Keep the inside and outside of the device clean (especially the air inlet; follow the technical maintenance instructions provided).
- If the filter cleaning and water cleaning/adjustment instructions are not followed, damage may occur.
- If you use the device incorrectly, there is a risk of electric shock. The manufacturer is not responsible for any damage, injury, or death resulting from failure to follow the instructions given in this manual. - Be careful! When used together with the welding machine, some parts of the equipment may become hot.

1
J 1
i
i 1
J
1
IT
Assistance
! Never use the services of an unauthorised technician.
Please have the following information to hand:
The type of problem encountered. The appliance model (Mod.). The serial number (S/N).
The latter two pieces of information can be found on the data plate located on the appliance.
FR
Assistance
Do not contact unauthorized technicians.
.
(Mod.) ja = a!jb
(S/N)
jk is independent of j
Installation
IHP 9.5 C M IX - IHP 7.5 C M IX
T1
T2
T3
T4
T5
T1 Reset motor
The installation procedure is illustrated in the first pages of this manual.
The installation must be done by a qualified technician.
Electrical hook up
The mains voltage must match that given on the ratings label inside the hood itself. If the hood has a power plug, connect the hood to an easily accessible regulatory power socket. If it does not (direct connection to the mains), or the socket is not easily accessible, install a two-pole regulatory switch to enable total disconnection from the mains in case of category III overvoltage, as required by the installation regulations.
Caution! Always check that the mains cable is hooked up properly and check that it operates correctly before reconnecting the hood to the mains.
Air exhaust (for ducted units)
Connect the hood to a duct and wall exhaust hole of a diameter equal to that of the air outlet flange. Using a smaller diameter tube and exhaust hole reduces the extraction capacity of the hood and also increases its running noise. The manufacturer is not liable for any consequences of doing so.
! Use the shortest duct required to achieve the purpose. ! Use a duct with as few bends as possible ! Avoid suddenly changing the diameter of the duct. ! The duct must have as smooth an inner surface as possible. ! The duct must be made of regulatory material. ! Do not connect the hood to flues carrying combustion fumes from other equipment (boilers, chimneys, stoves, etc.). ! Observe the instructions of the competent authorities in relation to the air exhaust. The air being exhausted may not be exhausted into a wall cavity unless the cavity in question is specifically intended for this purpose. ! Equip the room with air intakes to prevent the hood creating suction pressure in the interior (this must not exceed 0.04 mbar). ! The manufacturer is not liable for any consequences of failure to observe these instructions.
Filter or ducted?
! Your hood is supplied as a ducted unit.
If you wish to use it as a filter unit, you must install the proper ACCESSORY KIT.
Note: If supplied with the hood, the accessory active charcoal filter unit may already be installed.
Instructions for transforming the hood from the ducted to the filter version are given in this manual (see "Filter version").

Ducted version
GB
The hood purifies the air and expels it outdoors via an exhaust duct (dia. 150mm) connected to its outlet flange. The diameter of the exhaust tube must be equal to that of the outlet flange.
Caution! The exhaust duct is not supplied and must be purchased separately.
When routed horizontally, the tube must be angled slightly upwards (around 10 degrees) to enable the air to be conveyed outdoors more easily. If the hood is fitted with charcoal filters, they must first be removed.

Filter version
The hood purifies the air and returns it to the room. This version of the hood requires installation of an accessory active charcoal filter unit.
This version requires an air deflector, a reduction adapter and the charcoal filter/s. The top tube must have its air outlet slots uppermost.
Technical data
| Model | Height (cm) | Width (cm) | Depth (cm) | dia. of exhaust tube (cm) |
| PYRAMID 60cm | 61-82 | 59.8 | 50 | 15/12 |
| PYRAMID 70cm | 61-82 | 69.8 | 50 | 15/12 |
| PYRAMID 90cm | 61-82 | 89.9 | 50 | 15/12 |
| Model code | Bulb (V) | Bulb draw (W) | Total draw (W) |
| IHP 6.5 CM IX | |||
| IHP 6.5F CM IX | |||
| IHP 6.5F CM K | Halogen | 2 x 25 | 160 |
| IHP 9.5F CM IX | |||
| IHP 9.5 CM IX | |||
| IHP 7.5 CM IX |
| Power | Voltage | Cap | Dimensions | |
| Halogen 25 W | 2 x 25 W | 230 V | G9 | L40xØ14 |
| Halogen 20 W | 2 x 20 W | 12 V | G4 | L30xØ10 |
LED
Risk Group 1 according to Standard EN 62471

The hoods are conforming to the following EC Directives:
"Low voltage" Directive 2006/95/EC (12-12-2006) EMC"Directive 2004/108/EC (15-12-2004)

Only available in certain models
PYRAMID controls
Models with mechanical keypad
IHP 6.5 CM IX - IHP 6.5FCMIX
IHP 6.5FC M K - IHP 9.5FC M IX
IHP 9.5 CMIX-IHP7.5CMIX
T1
T2
T3
T4
T5
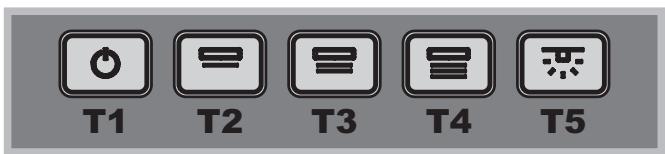
T1 Motor reset
Pressing the button while the hood is in operation turns it OFF.
T2 Speed 1
Pressing the button sets the hood to speed 1.
T3 Speed 2
Pressing the button sets the hood to speed 2.
T4 Speed 3
Pressing the button sets the hood to speed 3.
T5 Lights ON/OFF
Maintenance and care
Caution! Before cleaning or servicing the unit, disconnect it from the mains by pulling the power plug or disconnecting the main circuit breaker.
First cleaning
- Remove the protective film
- Clean with a damp sponge and a little neutral soap
- Rinse off with a damp cloth
- Dry with a soft cloth; if the hood is stainless steel, dry along the metal's grain
Periodic cleaning
The hood must be cleaned frequently (at least as often as you service the grease filter), inside and out. Use a damp cloth and a neutral liquid detergent with lukewarm water.
Do not use abrasive or corrosive products.
Warning: Failure to observe the hood cleaning and filter cleaning/replacement instructions can result in fires. Follow the instructions carefully. The manufacturer is not liable for any damage to the motor or fires caused by incorrect care or failure to follow the above instructions.
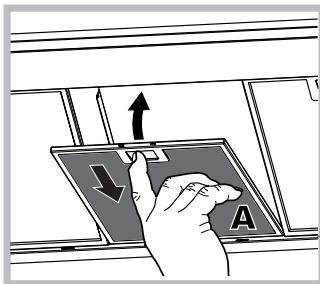
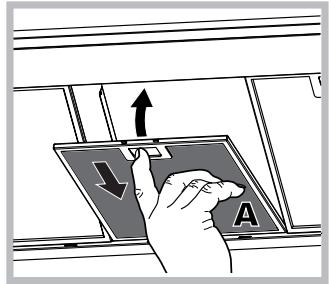
Servicing the grease filter (A)
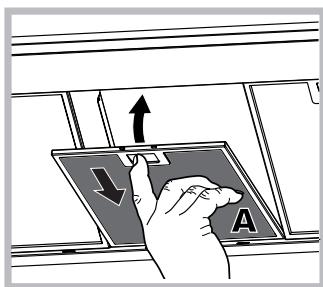
The grease filter retains the particles of grease produced during cooking; it must be cleaned at least once a month with a non-aggressive detergent, either by hand or with a low temperature, short dishwasher cycle.
To extract the grease filter, pull the spring loaded handle.
If washed in a dishwasher, the metal filter may change colour, but this does not affect its performance.
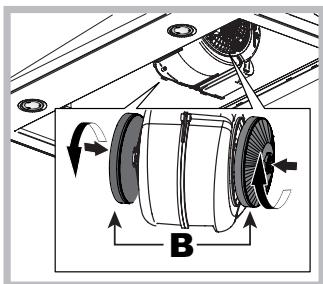
Servicing the charcoal filter (B)
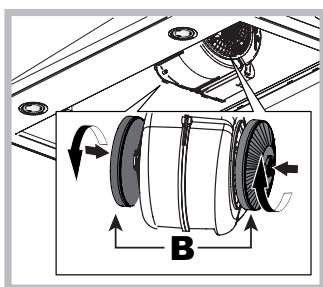
The charcoal filter retains unpleasant cooking odours. The filter saturates after a variable time, depending on the type of cooking and how often the grease filter is cleaned. The cartridge must be replaced at least once every twenty months.
This filter can NOT be washed
or regenerated
Disassembly: Rotate the filter 90° to remove it from the suction assembly.
Assembly: Fit the active-carbon filter into the suction assembly and rotate it 90° to secure it in place.
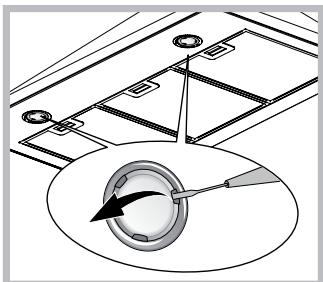
Replacing the bulbs
Disconnect the unit from the mains and remove the grease filter.
Caution! Make sure the bulbs are cool before touching them.
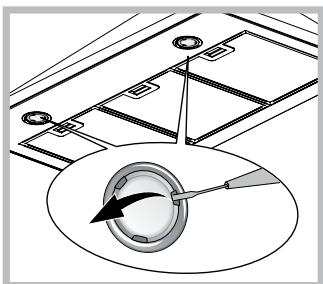
- Extract the guard by prising it out with a small flat head screwdriver or something similar.
- Replace the faulty bulb. Use only bulbs of the same type (for details, see the technical data in the following manual).
- Refit the guard (push it in).
Replacing the lights LED *
The hood is fitted with a lighting system based on LED technology. The LEDs ensure optimal lighting, longer life and lower consumption compared with traditional lights. To replace them please contact the assistance service.
Electrical cable
If the power cable is damaged, it can be replaced by the manufacturer or their technical service to prevent any attendant risks.
- Only available in certain models
SCRAPPING
The unit is marked for conformity with European Directive 2012/19/EC, Waste Electrical and Electronic Equipment (WEEE). By ensuring that the unit is scrapped properly, the user contributes to safeguarding the environment and public health.

The symbol on the product or on its accompanying documents indicates that the product may not be treated as domestic waste but must be handed over to a sorting centre for electrical and electronic waste. Dispose of it in accordance with local waste disposal regulations. For further information on the handling, recovery and recycling of this product, contact the local authority, domestic waste disposal service or the reseller from whom you purchased it.
Troubleshooting
If something does not work, make the following simple checks before contacting Technical Service:
If the hood does not operate:
Check that:
the unit is powered up. - a speed has been set.
If the hood is not working effectively:
Check that:
- the selected motor speed is sufficient to handle the amount of smoke and steam being produced.
- the kitchen is adequately ventilated for the unit to take air in.
- the charcoal filter is not exhausted (filter version).
If the hood turns off during normal operation:
Check that:
the unit is powered up. - the circuit breaker has not tripped.
In case of faulty operation, before contacting Technical service, first disconnect the machine from the mains for at least 5 seconds by pulling its plug, then reconnect it. If the fault persists, contact Technical Service.
Installation
IHP 9.5 C M IX - IHP 7.5 C M IX
T1
T2
T3
T4
T5
"Low voltage" Directive 2006/95/EC (12-12-2006) EMC" Directive 2004/108/EC (15-12-2004)
IHP 9.5 C M IX - IHP 7.5 C M IX
T1
T2
T3
T4
T5
T1 Reset motor
IHP 9.5 C M IX - IHP 7.5 C M IX
T1
T2
T3
T4
T5
T1 Motor reset
When the hood is operating, pressing the button turns the unit off (OFF).
T2 Speed 1
When the button is pressed, the hood speed is set to 1.
T3 Speed 2
When the button is pressed, the hood speed is set to 2.
T4 Speed 3
When the button is pressed, the hood speed is set to 3.
T5 Lights ON/OFF
Maintenance and Cleaning
When the button is pressed, the hood switches to speed 2.
T2 Speed 3
When the button is pressed, the hood switches to speed 3.
T5 Lights ON/OFF
Technical
Maintenance and care
Warning! Before starting any cleaning or maintenance work, disconnect the hood from the electrical supply by removing the plug from the socket or switching off the main switch in the house.
First cleaning
- Remove the protective film. Wipe the surfaces with a damp sponge and a neutral detergent. Rinse thoroughly with a damp cloth.
- Dry with a soft cloth. If the hood is made of stainless steel, wipe along the metal grain.
Clean the grease filter (or the grease filters) both inside and outside. Use a neutral detergent and warm water for cleaning. Do not use abrasive cleaning agents.
Warning: Failure to follow the rules for caring for the hood and replacing filters may lead to a fire.
It is recommended to follow the instructions provided. The manufacturer disclaims all liability for possible engine damage or fire due to improper care or failure to observe the above warnings.
Maintenance of grease filters (A)
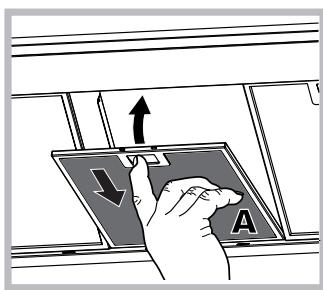
The grease filter retains grease particles that are released during cooking. Clean this filter at least once a month with neutral detergents inside the dishwasher or by hand.
At low temperature and short program. To remove the grease filter, pull the handle of the front release. When the grease filter is in the dishwasher, its color may fade, but this does not affect its functional characteristics.
Maintenance of charcoal filter (B)
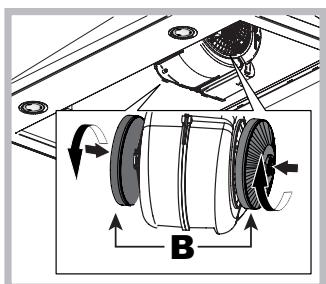
The charcoal filter absorbs odors from cooking. The saturation of the charcoal filter occurs after a fairly long period of operation, depending on the type of kitchen and the frequency of use.
Of the grease filter. In any case, even without saturation, the filter cartridge should be replaced at least once every 20 months. This filter cannot be washed or regenerated.
Removal: Turn the filter 90° to detach it from the suction block.
Installation: Insert the charcoal filter into the suction block and turn it 90° to secure it.
Procedure for replacing lamps
Disconnect the hood from the electrical supply and remove the grease filter.
Warning! Before touching the lamps, make sure they are cold.
1. Remove the grille using a small flat-head screwdriver or similar tool. 2. Replace the lamp. Use only lamps with identical characteristics (for more detailed data, see the technical manual). 3. Close the grille (fastening with a click).
data, given in ∴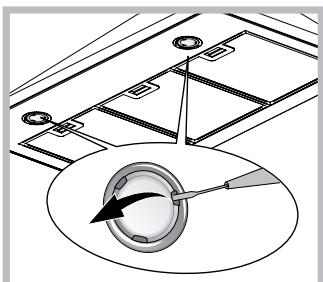
Procedure for replacing LED lamps*
The hood is equipped with a lighting system with LED lamps. LED lamps provide optimal lighting, longer service life, and lower energy consumption compared to traditional lamps. Their replacement should be carried out by a service center.
Mains cable
If the mains cable is damaged, to avoid any risk, its replacement must be carried out by the manufacturer or an authorized service center.
Disposal
This product is marked in accordance with the European Directive 2012/19/EC on waste electrical and electronic equipment (WEEE). Make sure that at the end of its service life, this product is disposed of properly. This will help protect the environment.

The symbol on the product or in the accompanying documentation indicates that this product should not be treated as household waste, but must be handed over to a specialized recycling center for electrical and electronic equipment. The product must be disposed of in accordance with local waste disposal regulations. For more detailed information on recycling and disposal of this product, contact your local waste collection service or the store where you purchased the product.
Faults and remedies
If a fault is detected, before contacting the service center, perform the following simple checks:
If the hood does not work:
Check:
The presence of power supply - whether the speed has been set.
If the hood's efficiency is low:
Check:
- That the set speed of the engine is sufficient for the volume of steam and smoke. -To ensure that the kitchen hood has sufficient vertical air extraction. Do not replace the charcoal filter (filter version with recirculation).
- Available only in some models
If the hood turns off during operation:
Check:
- The main fuse has not tripped or the multi-pole switch has not been activated.
In case of possible malfunctions, before contacting the service, disconnect the hood for about 5 seconds from the mains, pulling the plug out of the socket, then reconnect. If the malfunction is not resolved, contact the service.
Correct installation is shown on the pages at the beginning of this manual. Installation must be carried out by qualified personnel.
Maintenance of the grease filter (A)
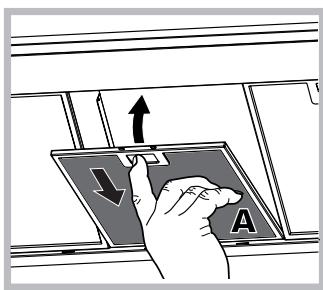
The grease filter absorbs grease particles formed during cooking; it must be cleaned once a month with non-aggressive detergents, by hand or in the dishwasher at low temperature and
short cycle.
To remove the grease filter, pull it by the handle with the release mechanism. During washing in the dishwasher, the metal grease filter may lose color, but its filtering characteristics remain absolutely unchanged.
Maintenance of the charcoal filter (B)
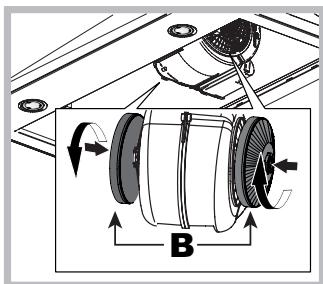
Coal dust filters are designed to be used in the preparation of them. The filling of the coal filter is checked by the manufacturer or by the user depending on the type of filter and the regularity of the price.
The filter is approved.
In any case, it is necessary to replace the filter cartridge every month, or as needed.
This filter is not intended for washing.
Removal: turn the filter 90 degrees to open the access group.
Installation: insert the coal filter into the access group and turn it 90 degrees to lock it.
Replacing the lamps
Disconnect the device from the electrical supply and remove the filter cartridges.
Attention! The first time you touch the lamps, make sure they are cool.
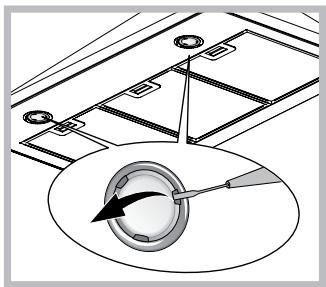
- Remove the protective cover using a suitable tool, such as a small screwdriver or similar instrument. 2. Replace the defective lamp. Use only lamps with the same characteristics as specified (for detailed information, refer to the technical data provided in this manual).
- Close the protective cover (fix it with the screw).
Replacing the LED lamps*
The device is equipped with an LED lighting system. LEDs guarantee optimal lighting, long service life, and energy savings compared to traditional lamps. For replacing LEDs, contact the service department.
Electrical connection
In case of a defective connection, which can be replaced, contact the manufacturer or its service department. This does not pose any danger.
This appliance is marked according to the European Directive 2012/19/EC on Waste Electrical and Electronic Equipment (WEEE). By ensuring this product is disposed of correctly, you will help prevent potential negative consequences for the environment and human health, which could otherwise be caused by inappropriate waste handling of this product.

The symbol on the product or in its accompanying documentation indicates that this appliance must not be treated as household waste. Instead, it should be handed over to the appropriate collection point for the recycling of electrical and electronic equipment. Dispose of the appliance in accordance with local regulations for waste disposal. For more detailed information about recycling of this product, please contact your local city office, your household waste disposal service, or the shop where you purchased the product.
Troubleshooting and remedies
If problems arise with the appliance, before contacting the service department for assistance, perform the following simple checks.
The appliance does not work:
Check:
- The power plug is not inserted into the electrical outlet.
- The wrong speed was selected.
The appliance works poorly:
Check:
- The selected speed is not sufficient for the amount of food and steam. The kitchen is not sufficiently ventilated to ensure the extraction of food odors. The charcoal filter is not installed (see the section on filters).
The appliance switches off during normal operation:
Check:
- The power plug is not inserted into the electrical outlet. The circuit breaker has tripped.
In case of malfunction, before contacting the service department for assistance, disconnect the device from the power supply for 5 seconds. Unplug the plug from the socket, and then insert it again. If the malfunction cannot be eliminated, contact the service department for assistance.
Installation
IHP 9.5 C M IX - IHP 7.5 C M IX
Air exhaust (for exhaust air devices)
The exhaust air duct must be connected to the exhaust air flange. The diameter of the exhaust air duct must correspond to the diameter of the exhaust air flange. If the diameter of the duct does not match the exhaust air connection, use a transition piece to connect the duct to the exhaust air outlet.
The exhaust air duct must be installed with a slight downward slope.
! Do not connect the exhaust air duct to a chimney or flue that is used for other purposes. ! The duct must be as short as possible. ! Do not change the diameter of the duct. ! The duct must be made of a material that complies with the standards. ! Do not connect the duct to other appliances (boiler, fireplace, stove, etc.) or to the flues of such appliances. ! Do not discharge exhaust air into the ventilation system of the building. If the exhaust air is not discharged, the exhaust air must not be discharged into the flue. ! To prevent backflow of flue gases (if the room has a negative pressure of more than 0.04 mbar), the exhaust air must be vented through a separate opening. ! Do not connect the exhaust air duct to the flue of a fireplace or other combustion appliance.
Is the duct connected to the exhaust air outlet?
! The duct must be connected to the exhaust air outlet.
If the duct is not connected to the exhaust air outlet, the duct must be connected to the exhaust air outlet.
Note: If the duct is connected to the exhaust air outlet, the exhaust air must be discharged to the outside.
The exhaust air duct must be connected to the exhaust air outlet. The exhaust air must be discharged to the outside (see the exhaust air connection).

Connecting the duct to the exhaust air outlet
KZ
The exhaust air duct must be connected to the exhaust air flange (diameter 150 mm) using a suitable adapter. The diameter of the exhaust air duct must be the same as the diameter of the exhaust air flange.
Attention! Before turning on the device, make sure it is properly grounded.
After connecting, check the device for visible damage and correct operation (at least 10°). If the device is damaged, contact the supplier immediately.

Device description
The device is designed for outdoor use and must be protected from moisture. The device has a built-in power supply. This unit contains LEDs, a control unit, and a power supply. The device must be installed in accordance with the instructions.
Technical specifications
| Мо德尔 | Биiktiri (см) | Ени (см) | Тереньдiri (сm) | ауашилару Тутirин дам. (сm) |
| PYRAMID 60 cm | 61-82 | 59.8 | 50 | 15/12 |
| PYRAMID 70 cm | 61-82 | 69.8 | 50 | 15/12 |
| PYRAMID 90 cm | 61-82 | 89.9 | 50 | 15/12 |
| Мо dyeльko dyeь | Шam (В) | Шam куаты (Вт) | Жалны куат (Вт) |
| IHP 6.5 CM IX IHP 6.5F CM IX IHP 6.5F CM K IHP 9.5F CM IX IHP 9.5 CM IX IHP 7.5 CM IX | Галoreнд i | 2 x 25 | 160 |
| Куаты | кереньi | цокои | Өлшемерi | |
| Галoreнд i 25 W | 2 x 25 W | 230 V | G9 | L40xØ14 |
| Галoreнд i 20 W | 2 x 20 W | 12 V | G4 | L30xØ10 |
LED*
Complies with EN 62471 standard, risk group 1

The device complies with the following EU directives:
2006/95/EC "Low Voltage" Directive (12-12-2006) 2004/108/EC "EMC" Directive (15-12-2004)
- Only for a specific model
PYRAMID control units
Models with mechanical panel
IHP 6.5 CM IX - IHP 6.5FC MIX IHP 6.5FCMK - IHP 9.5FCMIX IHP 9.5CMIX - IHP 7.5CMIX
T1
T2
T3
T4
T5
T1 Moisture content
The soil moisture content is determined by drying the sample.
T2 Determination 1
The soil moisture content is placed in the first determination.
T3 Determination 2
The soil moisture content is placed in the second determination.
T4 Determination 3
The soil moisture content is placed in the third determination.
T5 Calculation of results
Technical specifications
Display and control display
Attention! If the device is damaged or does not show correct readings, it is necessary to stop using it and contact the manufacturer.
Remove the cover.
To clean the filter, remove the dust bag, wash it with warm water and mild detergent, then dry it thoroughly; if the filter is damaged, replace it with a new one.
Cleaning the cover
The cover and the filter should be cleaned regularly (for example, when the dust bag is full). Use a damp cloth to wipe the cover.
Do not use abrasive cleaners.
Note: If the cover or filter is damaged, replace it immediately.
Do not operate the appliance without the filter. If the motor is damaged due to operation without the filter, the warranty will be void.
Replacing the dust bag (A)
When the dust bag is full, replace it with a new one; do not reuse it. Dispose of the used bag properly.
To remove the dust bag, pull the handle.
Caution: When using the dust bag, do not wash it; it is disposable.
Replacing the filter (B)
The filter should be replaced when it is dirty. To replace it, remove the old filter and insert a new one. Do not wash the filter.
Do not operate the appliance without the filter.
Note: To remove the filter, turn it 90 degrees.
Kypactby: Beencenki Kemip cy3rihi copy XnHaFbHa opHaIaCTbIPbIn,OpbHa 6eKiTy ysiH 90°-Ka 6ypbHb3.
UamapNbaybictbipy
KypbIfBihTOKTaH afttbn, MaCy3ricH Weuin aJIbHbI3.
A6aB6onbHb3!YCTamac6ypbIH,7aMdap caJIbIHdaFaHbHa Ke3 XeTki3iHi3.
- Ca KaTahDblpfbIbTbI 乌bIfapblaBbHb3:KiUKeHe teric bactblbpaftwnen Hemece ofan YKcac Kypalmeh UbIfapblbI3. 2.A Ka y Nbl Ma M bI aybICTbIPbl3. Typi 6ipdei wamdapbl fana KaJdaHbIHb3 (mAmimet any ywiH, TEmeHderi
HcyaynbKaTa bepiIreh TexHNkaIbIK DepeKti KaapHa3). 3. SaKaThaBbIpBbIbTbI opHbHa opHaTbIHbI3 (ntepin, opHaTbIHbI3).
UamdapdbiaaybictbipyLED*
Copfblta dnoT texHONORncaHa heri3JeIreH JapbIKTaHdbpy Knyeci bap. NIOtap aedTteri wamnapra KaparaHda OHtaJIbI JapbIKTaHdbipy, y3aftbpak Kymblc icteydi XHe a3bipak Kyat naJaHaHydbI KaMTaMaCbI3 etedi. Onapbl aybictbpy yuiH KeMeK KepceTy KbImTeHxabapnacbl3.
3neKtp ka6eJI
KyaT KaBeni 3aKbIMdAnca, TsyEKeIepeDIn aNdbH aNy yUHH OHbl eHdipyWIRE HeMeCe OHbIH TexHnKaJIbIK KbI3MeTIHe aybICTbIPtyFa 60NaDbI.
*TeK 6eIrrini 6ip moIeIbIepIe 6ap
KOKbICKA TACTAY
BykpybIbfKokbc3JneKtpXaHe3JeKtpOndbIKXabikKa (WEEE) KaTbICTb EC/2012/19 EyponaIbIK DnpeKTINBaCbHa caikec Keiendi den 6enriineHre. KpybIbf KOKbICKa dYpbic TactanyBH KamTaMaCb3 ety apKbln i naDaIaNHyuBk KopwaFah OpTa MeH KOFAMHbIH DeHCaylbIFbIH Koprayf a t CaNbCaDbI.

Himderi Hemece OHbI KxKaTtAmcBHaDafbl TaHbAcbi eHIMdi TyMpblCTbIK KOKbIC TactaJlmaybl, OHbIH OPhbHa 3JIeKTP XHe 3JIeKTPoHdbIK KOKbICTbCypbINTay OptaJIbIFbHa ta6blctanybTnic eKeHIN biDipei. JKeprinikTI KOkbIC tACTay 3aHapbHa caikec apeket etiH3. Himdi KOnDaHy, KaJIbHa KeNTipy XHe KaTaNDey TypaBl KocbIMuA MmImet any yUHH JKeprinikTI Ky3bIpbl opraHdApFa, KOKbIC XnHay KbI3MeTIHe Hemece eHIMdi catbl anfah opbyHfa xa6aplaCbIbI3.
AkaayIbIKTapdbI JxOIO
Technical service notification must be made before starting the engine.
Engine oil level:
Next maintenance interval:
Replace the oil filter. Dispose of used oil properly.
Engine oil type:
Next maintenance interval:
If the engine emits abnormal noise, stop the engine immediately and consult a specialist. Do not operate the engine if it is damaged. Replace the oil filter (if equipped).
If the engine is running and the oil pressure is low:
Next maintenance interval:
Replace the oil filter. - Do not reuse the oil filter.
Before starting the engine, notify the technical service department, and if the engine is to be stopped, stop it after running at idle for 5 seconds. If the engine is to be started, notify the technical service department.

(A) ∪saill jilla
1y 1y
(B)
0 150
1 1
10) a 1111111111111111111111111111

- OPERATING INSTRUCTIONS
- COOKER HOOD
- IT
- ASSISTANCE
- FR
- INSTALLATION
- T1 RESET MOTOR
- ELECTRICAL HOOK UP
- AIR EXHAUST (FOR DUCTED UNITS)
- FILTER OR DUCTED
- DUCTED VERSION
- FILTER VERSION
- PYRAMID CONTROLS
- MODELS WITH MECHANICAL KEYPAD
- T1 MOTOR RESET
- T2 SPEED
- T3 SPEED
- T4 SPEED
- T5 LIGHTS ON/OFF
- MAINTENANCE AND CARE
- FIRST CLEANING
- PERIODIC CLEANING
- SERVICING THE GREASE FILTER (A)
- SERVICING THE CHARCOAL FILTER (B)
- REPLACING THE BULBS
- REPLACING THE LIGHTS LED
- ELECTRICAL CABLE
- SCRAPPING
- TROUBLESHOOTING
- IF THE HOOD DOES NOT OPERATE
- IF THE HOOD IS NOT WORKING EFFECTIVELY
- IF THE HOOD TURNS OFF DURING NORMAL OPERATION
- MAINTENANCE AND CLEANING
- TECHNICAL
- MAINTENANCE OF GREASE FILTERS (A)
- MAINTENANCE OF CHARCOAL FILTER (B)
- PROCEDURE FOR REPLACING LAMPS
- PROCEDURE FOR REPLACING LED LAMPS
- MAINS CABLE
- DISPOSAL
- FAULTS AND REMEDIES
- IF THE HOOD DOES NOT WORK
- IF THE HOOD'S EFFICIENCY IS LOW
- IF THE HOOD TURNS OFF DURING OPERATION
- MAINTENANCE OF THE GREASE FILTER (A)
- MAINTENANCE OF THE CHARCOAL FILTER (B)
- REPLACING THE LAMPS
- REPLACING THE LED LAMPS
- ELECTRICAL CONNECTION
- TROUBLESHOOTING AND REMEDIES
- THE APPLIANCE DOES NOT WORK
- THE APPLIANCE WORKS POORLY
- THE APPLIANCE SWITCHES OFF DURING NORMAL OPERATION
- AIR EXHAUST (FOR EXHAUST AIR DEVICES)
- IS THE DUCT CONNECTED TO THE EXHAUST AIR OUTLET
- CONNECTING THE DUCT TO THE EXHAUST AIR OUTLET
- DEVICE DESCRIPTION
- PYRAMID CONTROL UNITS
- MODELS WITH MECHANICAL PANEL
- T1 MOISTURE CONTENT
- T2 DETERMINATION
- T3 DETERMINATION
- T4 DETERMINATION
- T5 CALCULATION OF RESULTS
- TECHNICAL SPECIFICATIONS
- DISPLAY AND CONTROL DISPLAY
- REMOVE THE COVER
- CLEANING THE COVER
- REPLACING THE DUST BAG (A)
- REPLACING THE FILTER (B)
- UAMAPNBAYBICTBIPY
- UAMDAPDBIAAYBICTBIPYLED
- NEKTP KA6EJI
- KOKBICKA TACTAY
- AKAAYIBIKTAPDBI JXOIO
- ENGINE OIL LEVEL
- ENGINE OIL TYPE
- IF THE ENGINE IS RUNNING AND THE OIL PRESSURE IS LOW
Brand : INDESIT
Model : IHP 7.5 C M IX
Category : Kitchen hood