
GINEVRA TILE 600 - Kitchen hood FALMEC - Free user manual and instructions
Find the device manual for free GINEVRA TILE 600 FALMEC in PDF.

| Product type | Cooker hood |
| Brand | FALMEC |
| Model | GINEVRA TILE 600 |
| Width | 600 mm (deduced from model) |
| Minimum distance above cooking surface | 65 cm |
| Control type | 2 keys or 5 keys depending on version |
| Number of speeds | 3 |
| Lighting | Halogen (max 20 W, 12 V, G4 base) or fluorescent (8-28 W) |
| Metal filters | Washable, clean every month |
| Activated charcoal filters | Replace every 3 to 4 months |
| Evacuation type | Extractor (external) or recirculation (filtering) |
| Power supply | 220-240 V, 50 Hz |
| Maximum lighting power | 20 W (halogen) or 28 W (fluorescent) |
| Warranty | Yes, refer to the manual |
| Exterior maintenance | Clean surfaces every 15 days with a damp cloth and neutral detergent |
| Installation | Wall-mounted, with support bar or direct fixing |
| Safety | Disconnect before any intervention; do not use with open flames |
| Spare parts available | Metal filters, activated charcoal filters, bulbs, power cable |
Frequently Asked Questions - GINEVRA TILE 600 FALMEC
User questions about GINEVRA TILE 600 FALMEC
0 question about this device. Answer the ones you know or ask your own.
Ask a new question about this device
Download the instructions for your Kitchen hood in PDF format for free! Find your manual GINEVRA TILE 600 - FALMEC and take your electronic device back in hand. On this page are published all the documents necessary for the use of your device. GINEVRA TILE 600 by FALMEC.
USER MANUAL GINEVRA TILE 600 FALMEC
Dear Sir/Madam, congratulations!
You have purchased a prestigious range hood of guaranteed quality. For best results, we suggest that you carefully follow the operating and maintenance instructions provided in this booklet; in addition, to order spare charcoal filters, use the special coupon on the cover.
Square halogen light
3. LAMPADA FLUORESCENTE
This instruction booklet must be kept together with the appliance for future reference. If the appliance is sold or consigned to other parties, check that the booklet is supplied with it, to ensure that the new user has the correct information on the operation of the range hood and is aware of the warnings. These warnings have been provided for the your safety and the safety of others. As a result, please read them carefully before installing and operating the appliance.
This appliance is not intended for use by young children or infirm persons unless they have been adequately supervised by a responsible person to ensure that they can use the appliance safely. Young children should be supervised to ensure they do not play with the appliance.
The appliance must be installed by qualified personnel, in accordance with the standards in force. If the supply cord is damaged, it must be replaced by the manufacturer, its service agent or similarly qualified persons in order to avoid a hazard. Any modifications that may be required to the electrical system for the installation of the range hood must only be made by qualified electricians.
It is dangerous to modify or attempt to modify the characteristics of this system. In the event of malfunctions or if repairs are required to the appliance, do not attempt to solve the problems directly.
Repairs performed by unqualified persons may cause damage. For all repair and other work on the appliance, contact an authorised service/spare parts centre.
Always check that all the electrical parts (lights, exhaust device), are off when the appliance is not being used. Read the entire instruction booklet before performing any operations on the range hood.
The range hood must only be used for the exhaust of cooking fumes in home kitchens. The manufacturer disclaims all liability for any other use of the appliance.
The maximum weight of any object placed above the hood, or hung to it (if possible) must not exceed 1,5 kilos. After installing the stainless steel hood, clean it in order to remove any residue of the protective glue, and stains of grease or oil. The manufacturer recommends its cleaning cloth available for purchase. The manufacturer accepts no liability in case of damage caused by the use of different detergent types.
SAFETYWARNINGS


The electrical system features an earth connection in compliance with international safety standards; furthermore, it is compliant with the European standard for electromagnetic compatibility.
Do not connect the appliance to flues (from boilers, fireplaces, etc.). Make sure the mains voltage corresponds to the values on the rating plate located inside the range hood.
Never cook on "open" flames under the range hood.
Check deep-fryers during use: superheated oil may be flammable.
- Ensure there is adequate ventilation of the room when the rangehood is used at the same time as appliances burning gas or other fuels.
- Do not flambe under the rangehood
- The exhaust air must not be discharged into a flue which is used for exhausting fumes from appliances burning gas or other fuels.
- Ensure that all regulations concerning the discharge of exhaust air have been fulfilled before you use the appliance.

Before performing any cleaning or maintenance operations, disconnect the appliance by unplugging it or using the main switch. The manufacturer disclaims all liability for any damage that may be directly or indirectly caused to people, things and animals due to the failure to follow all the instructions provided in this booklet and above all the warnings relating to the installation, operation and maintenance of the appliance.
- there is a fire risk if cleaning is not carried out in accordance with the instructions.
CAUTION: Accessible parts may become hot when used with cooking appliances.
- Max. length screw for fixing the chimney is 10mm (provided by the manufacturer).
WARNING: Failure to install the screws or fixing device in accordance with these instructions may result in electrical hazards.
Warning only for Australia: hood width less than 90 cm: use max. 4 hobs

TECHNICAL SPECIFICATIONS
The technical data pertaining to the electric appliance The technical specifications of the appliance are shown on the rating plates located inside the range hood.

INSTALLATION
(Section reserved for qualified installers of the range hood)
The distance between the hob and the lowest part of the rangehood is normally at least 65~cm (see figure C1). This distance is measured in the lowest part of the rangehood not operating at safety voltage. Based on this detail provided by European Standards, the distance may be reduced in some models as specified in the general catalogue. If the instructions for installation for the gas hob specify a greater distance, this has to be taken into account.
In the outside exhaust version, the diameter of the fume discharge duct must be no smaller than the range hood connection.
In the horizontal sections, the duct must slope slightly (around 10% ) upwards, so as to better convey the air outside of the room.
Avoid using angled pipes, make sure that the pipes are at least of the minimum length.
Comply with the current regulations on air discharge into the atmosphere.
If a boiler, stove, fireplace, etc. that uses gas or other fuels is being used at the same time, make sure the room where the fumes are extracted is well ventilated, in compliance with the current regulations.
Mounting instruction: see section "0" of the booklet.

ELECTRICAL CONNECTIONS
(Section reserved for qualified installers)
WARNING!
Before doing any work inside the range hood, disconnect the appliance from the mains power supply.
Check that the wires inside the range hood are not disconnected or cut; if this is the case, contact your nearest service centre. The electrical connections must be performed by qualified personnel.
The connections must be performed in compliance with the legal standards in force. Check that the relief valve and the electrical system are able to support the load of the appliance (see the technical specifications in point B).
Some types of appliance are supplied with a cable without plug; in this case, "standardised"
plugs must be used, keeping in mind that:
- the yellow-green wire must be used for the earth,
- the blue wire must be used for the neutral,
- the brown wire must be used for the phase; the cable must not come into contact with hot parts (over 70^ ).
- fit a plug that is suitable for the load to the power cable, and connect it to a suitable power outlet.
For appliances that come supplied with cable and plug please ensure they are plugged into a circuit suitable for this appliance.
Please refer to a qualified person. (See technical specifications in point B).
The manufacturer declines all liability if the safety standards are not observed.

RANGE HOOD WITH OUTSIDE DISCHARGE (exhaust)
In this version, the fumes and steam from the kitchen are conveyed outside through an exhaust duct.
The exhaust conveyor that protrudes from the upper part of the range hood must be connected to a duct that carries the fumes and steam outside. In this version, the charcoal filters, if fitted, should be removed; to do this, see the instructions in point F. There must be adequate ventilation of the room when the range hood is used at the same time as appliances burning gas or other fuels, according to the standard.
Deviation for Germany:
When the range hood and appliances supplied with energy other than electricity are simultaneously in operation, the negative pressure in the room must not exceed 4 Pa (4x10 E-5 bar).

RECIRCULATING RANGE HOOD (with filter)
In this version, the air passes through charcoal filters for purification, and is then recirculated back into the kitchen.
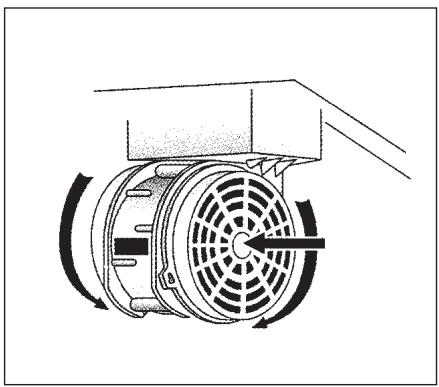
Check that the charcoal filters are fitted to the motor, and if not, install them as described in the instructions in point H.
If the hood is of filtering type, remove the non-return valve fitted at the motor's outlet.

For maximum efficiency, the third speed should be used when there are strong odours or a lot of steam, the second speed in normal conditions, and the first speed for keeping the air clean with minimum energy consumption. The range hood should be switched on when starting to cook, and left on until the odours disappear.

OPERATION
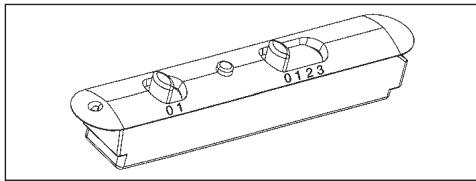
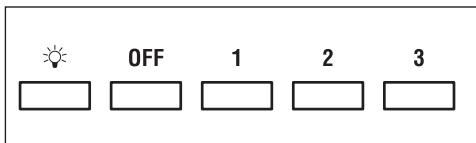
1. TWO BUTTON CONTROL PANEL
LIGHT - Switch A
Position 0: the light is off.
Position 1: the light is on.
SPEED - Switch B
This is used to start and set the speed of the motor, from 1 to 3, or with continuous speed variator, depending on the version.
LIGHT-C
Motor operation indicator light.
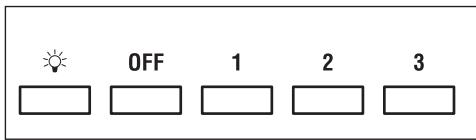
2. FIVE BUTTON CONTROL PANEL
LIGHT- button

Pressed: the light is on
Released: the light is off
MOTOR button - 1, 2, 3, OFF
1: starts the motor at minimum speed
2: starts the motor at medium speed
3: starts the motor at maximum speed
OFF: stops the motor

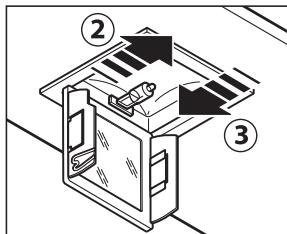
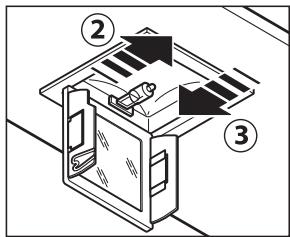
FILTERS REMOIVING AND REPLACING'S INSTRUCTIONS
1. METAL FILTERS
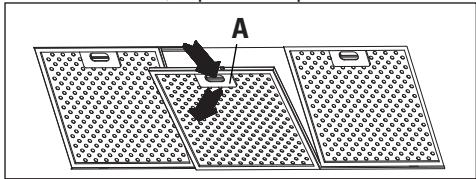
To remove the metal grease-trapping filter, simply pull the handle A until releasing it from the front guide; then tilt it slightly downwards, and slide it out of the rear guide. To reposition the filter, repeat the operation in the reverse order.
2. CHARCOAL FILTERS
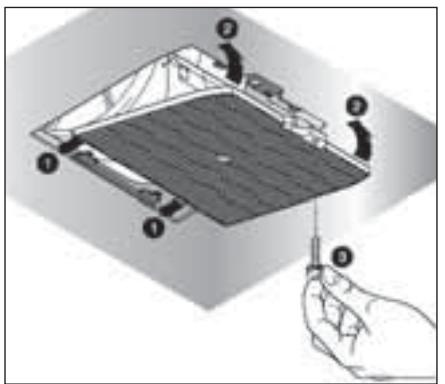
To replace the charcoal filters, proceed as follows: remove the metal filters as described above. The two filters located at the ends of the motor can now be easily accessed.
To install the new filters see picture.
In case of hood with the motor box the filter is located on the bottom part of the motor box.
To install the new filters see picture.
To order new charcoal filters contact the distributor/retailer.
VALID ONLY FOR ITALY: download the appropriate order form from: www.falmec.com (access the assistance drop-down menu).

LIGHTING ASSEMBLY AND REPLACEMENT
1. LIGHT BULB
To replace the light bulb:
a) Make sure the appliance is disconnected from the mains power supply.
b) Unscrew the support screw A and remove the light cover.
c) Replace the light bulb with the same model as the original (max 25 W, see the markings near the light).

WARNING! Light bulbs with different shapes and power ratings from the original may seriously damage the light compartment.
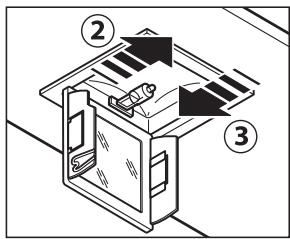
2. SPOTLIGHT
To replace the lamp for "Round halogen light":
a) Make sure the appliance is disconnected from the mains power supply.
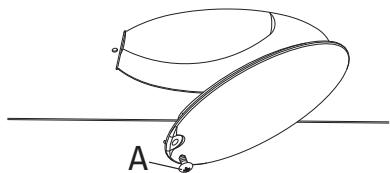
b) Remove, by levering with a screwdriver, the support ring A for the cover glass.
c) Remove the cover glass B to access the light compartment.
d) Replace the lamp with the same type (halogen, max 20 W, 12 Volt, G4 fitting).
e) Replace the glass cover B and fasten it using the special ring A.
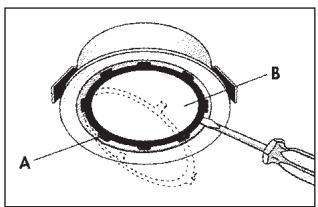
Round halogen light
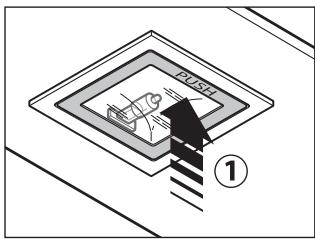
How to replace a square halogen light:
a) Check that the equipment is disconnected from the power supply.
b) Open the panel completely till 90^ (see figure) pressing the PUSH button
c) Replace the lamp with a similar one (halogen, max 20 W, 12 Volt, G4 connection).
d) Close the panel. If the panel does not close correctly repeat the operation at point b.
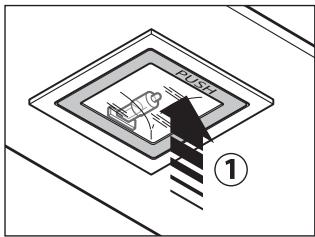
Square halogen light
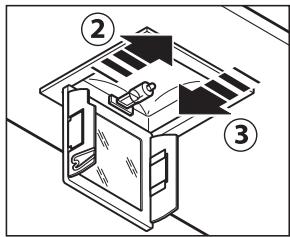
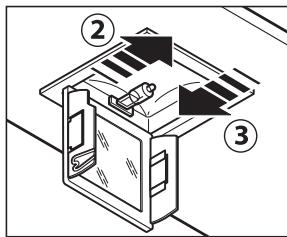
3. FLUORESCENT TUBE
(Section reserved for qualified installers)
Replacing the fluorescent tube:
a) Disconnect the device from the mains;
b) Unscrew the fixing screws and remove the bottom panel;
c) Remove the fluorescent tube, by rotating through 90^ , and replace it with one of similar features (8W-13W-21W-28W according with the model);
d) Reconnect the device to the mains.

MAINTENANCE AND CLEANING
Constant maintenance ensures the correct operation and efficiency of the appliance over time. Special attention should be paid to the metal grease-trapping filters and the charcoal filters. Frequent cleaning of the filters and their supports will ensure that fats and grease do not accumulate on the range hood, with the consequent risk of fire.
1. METAL GREASE-TRAPPING FILTERS
These trap the fat and grease particles suspended in the air, and therefore should be washed every month in hot water and detergent, without bending them. Wait until they are completely dry before repositioning them. To remove and replace these filters, see the instructions in point H1. This operation should be performed at regular intervals.
2. CHARCOAL FILTERS
These trap the odours present in the stream of air that passes through them. The air is purified by passing a number of times through the filters and being recirculated into the kitchen. The charcoal filters cannot be cleaned, and should be replaced on average every 3-4 months (according to use). To replace the charcoal filters, see the instructions in point H2.
3. CLEANING THE OUTSIDE OF THE APPLIANCE
It is advised to clean the external hood surfaces at least every 15 days in order to avoid that oily or greasy substances affect the steel surfaces.
The aside of the range hhod should be cleaned using a damp cloth and neutral liquid detergent or denatured alcohol.
In case of fingerprint-less finish (fasteel) clean only with water and neutral soap using clean with a soft cloth, rinse and wipe dry thoroughly. Do not use products that contain abrasive substances, rough cloths or cloths specifically designed for cleaning steel. Using abrasive substances or rough cloths will inevitably damage the finish of steel.
The steel surface will be irrevocably damaged if the instructions above are not complied with.
Keep these instructions together with the instructions for use of your hood.
The manufacturer accepts no liability for any damage caused by non-compliance with the instructions above.
4. CLEANING THE INSIDE OF THE APPLIANCE
The electrical parts or parts of the motor assembly inside the range hood must not be cleaned using liquids or solvents.

Do not use abrasive products.
All the above operations must be performed after having disconnected the appliance from the mains power supply.

WARRANTY
The new equipment is covered by warranty. The warranty conditions are provided by the distributor.

The manufacturer is not liable for any inaccuracies in this booklet resulting from printing or transcription errors. The manufacturer reserves the right to modify its products as it considers necessary or in the interests of the user, without compromising their essential safety and operating characteristics.

- Rest the support batten (A-Fig. 1) against the wall at a height above the hob determined by the sum of the values X + Y + 265 mm .
- Use a spirit level to make sure it is perfectly horizontal and make 2 marks at the ends of the batten where the 2 holes are to be drilled.
- Drill the holes, insert the two 8 mm screw anchors and fasten the batten using the relevant screws.
Step 2
- Hook the hood onto the support batten (Fig. 2).
Step 3
- Adjust the alignment of the hood using the screws on the brackets (Fig. 3). The upper screw (B) is used to adjust the distance from the wall, and the lower screw (C) the vertical sliding
Step 4
- In order to prevent the hood from unhooking owing to pressure from underneath, fasten it to the wall with a screw anchor and relevant screw inserted in the appropriate hole (Fig. 4).
FOR CORNER HOODS WITHOUT BAR
Step 1
- Undo the rear metric screw (A) and remove the motor from the bottom of the hood (fig. 1).
- Check the horizontal alignment with a spirit level and mark the 4 holes to be drilled.
- Drill the holes, insert 2 × 8mm dia. screw anchors and fix the hood in the desired position, using 2 screws B fixed in the two slots in the top back panel (Fig. 5).
- Fit the safety screws C in the bottom back panels (Fig. 5).
Step 2
- After having fixed the hood, connect the flexible hose to the fume outlet hole and to the circular pipe fitting of the motor chamber.
- Replace the motor at the bottom of the hood and secure it with the rear metric screw (A) (fig. 2).
MOUNTING THE RANGE HOOD WITHOUT MOTOR CHAMBER
1) Measure the distance (L) from the bottom of the range hood to the centre of the mounting holes (Fig. 7).
2) Measure the distance (M) between the two mounting holes.
3) Line up the centre of the cooktop with the centre of the range hood. Is: L+650 mm.
4) The height of the holes to be drilled above the cooktop is calculated by adding (L) to (H), where (H) is defined by point C-1.
5) Drill the holes for the Fischer screw anchors (the diameter of the holes depends on the type of screw anchor).
6) Before hanging and securing the range hood, remove:
-
the steel grilles for range hoods with tangential motors
-
the entire build-in assembly, if fitted, by unscrewing the screws that secure it to the bottom.
7) To avoid hood unhooking due to underneath pressure, fix it to the wall with a screw anchor and related screw, by using the appropriate holes at the back of the hood or the cope flasks.
8) Hang the range hood.
9) Check, through the hole at the bottom, that the range hood is properly anchored to the Fischer hooks.
10) Adjust the height of the range hood using the screws on the Fischer hooks.
11) Fit the steel grilles or the build-in assembly.
12) Mounting instruction for chimney (fig. 8):
-
Fasten bracket (A) to the wall, at the correct distance;
-
Fasten the upper part of the extension to bracket (A).

HINWEISE

Square halogen light
Square halogen light
Square halogen light
MEPbI IPREdoCTOPOXHOCTN

OueHb BaxHo, 4TO6bl DaHHe PyKOBOdCTBO NO 3KcPnyataun xpaHnocb BmecTe c annapaTpyo IJIra BO3MOxHO Heo6XoDMOCtN KOHCyIbTaUIN B 6dyuem.
Pn npoJaKe np6opa HnI nepeaue erO pyromy Nmuy K np6bopy 6o3aTeNbHO JOnJH0 npnlaratcbc PykoBODCTBO, YTObI HObI NOJIb3OBaTeNb 6blN B Kypce TOrO, KaK NOJIb3OBaTcBc BAITJKKO IN KAKne COOTBetCTByIOUne MEpbI ppeIOctOpXHOCTn Heo6xoDMo Co6IIoDaTb.
ДанhoePykoBoCTBO6bIIO COCTaBJIeHOДЯ 6e3OaNacHocTи KaK BaWei,ТAKИ OKpyKaIooNIX, NO3ToMу npocm Bac BHNMaTeIbHo C Hm O3HaKOMuTbcr NepeD yCTaHOBKoi N 3KcIpyaTuaeN np6opa.
IETAM N 60JIbHbIM IIOdAM pa3peaetcra IOJIb3OBaTbCRA pIN6OpOM IINb IOd aAeKBaTHbIM KOHTPOIEM OTBeTCTBENbIX INU, KOTOpBle MOrYT o6ecneHbATb 6e3OJaCHOe IcNoJIb3OBaHne pIN6Opa.
OTBeTcBENHomy IInu Heo6xOdImo CneIaTb, YTo6bl DeTu He nIrpamn C npIbOpom.
Pa60tI NO yCTaHOBKe DOnJXhbl IPOBOIDNTBCa KOMTETeHTHBIM N KBaJIINΦUPOBaHHbIMn CnelnaJIInCTAMN COrJaCHO DeiCTByIOUzIM HOpMaM.
JIO6oe Heo6xOIMOE dIy yCTaHOBKn BbITXKn N3MeHeHne B 3JIeKTpUHeCKOM 6JIOKe DOJIxHO OCUYIeCTBJIrTcR ToJIbKO KOMIeTeHTHbIM JINlOM.
I3MeHeHne IIN NOnbITka I3MeHeHn XapaKTePncTkn Pnp6opa onaCHO! B cnyae HeKOppeKTHoI pa6Otbl BbITJkKn He nbTaIteCb yCTpaHntb HEnCpapBHOCTb camOcTOTeJIbHO.
PemOH, nPOBeHeHHbI HeKOMnTeHTbIM JINlOM, MOKET Bb3BaTb NOBpeXdHna.
BbItraKKa He MoXeT NcNoIb3ObaTbc HnAue KaK dIy ydaJeHna YbIMa C DoMaunHX KxOHB. JIo6oe dpYroe NcNoIb3ObaHne np6opa Chnmaet C n3rTOBnteN BcKaYIO OTBeCTBEHHOCTb.
MakcimalbHbI O6uBc PneDMeTO, NIOXKeHHbIX Ha BbITaKKy IIN NODBeWeHHbIX K Hei (Tam, rTe 3To PpeyCMToPeHO), He DOnJKe Hn PpeBbIaTb 1,5 Kr.
Iocne yctaHOBKn BbITJXKN u3 HepKabeIOuee CTaII Heo6xOIMMO pOn3BecTn UcTky npu6opa dIydaJIeHnO cTaTkoB 3aunTHOH NJIeHKN u Bo3MOXhIX PAnE Hknpa IIN MaCna. DInr 3TOrO n3ROtOBtEn b peKOMeHdyET NcNOlb3OBAb TpNJraHOUncE CaTzune cafTeKN.
IcnoB3OBAHne dpynX TINOB uCTaunx CpeDCTB CHIMAE t N3ROTOBtJe OTBeTCTBEHHOCt b 3a BO3MOXhble BO3HKNKUne B CCB3N C 3TNM NOBpeKdEHn.
БЕЗПАСНСТВ МЕРБИ ПЕДОCTОPOЖHOCTN


3JIeKtpnuecka CXema ChabxkeHa KOHTAKTOM 3a3emJHnC OGRJaHApOdHbIM HOpMaM 6e3oNaChOCTN; KpOME TOrO, OHa COOTBeTCTByET EBPoneeCKm HOpMaM 3aunTbI OT paDnONomex.
He nodkluyaTe np6op K Tpy6am, OTbOJaIum DbIM OT CROPaHnT OToJIInBa (KOTJIbI, KaMHbI n T.I.). Y6eJntecb B TOM, UTO HAnpJKeHne B CeTN COOTBeTCTByET yKa3aHHomy Ha TaBNIuKe, npIKpeJIeHHoB BHyTpN BbITaJKN.
B ueJx 6e30nachocTn paCCToHHe OT BapOuHo NOBepXHOCTn Do BbITaKn DOJXHO COCTaBJIaTb He meHee 65 cm.
HeIb3ra roTOBnTb nIuHa oTKpbITOM orHe noD BbITaKo. CneInte 3a pfPHTOpHnUaMn: neperpeToe MaCIO MoKET 3aropeTbcra.
- Y6eIntecb B TOM, yTO B NOMEUHIM IMeETcA DoCTaTOUHaB BeHTUNJzH, eCJN BbITJXKA, IcNOJIb3yETcO CBMECTHO CpyrHMn PpIbOpamn, paBoTaIOUHMn Ha ra3e nIIN Dpyrom rOpioHem.
- He 3aXnIaIe OTKpbITbI OOrH bOd BbITaXkOi.

- He noДКЛЮЧаite npибор K Trpy6am, OTbOДЯшIM DыIM OT cropaHry TOnJIINBa (KOTлbl, KaMnHbI n T.n.).
- Y6eIntecb B CO6JIIODeHIN BCEx DeIcTBYIOUX HOpM IIO BBIOy BO3Dyxa HApKy U3 NOMEueHna, npexJe Yem IONb3OBAtCBaBITRAKKoI.
Ipepe npoBeHnem IIO6bIX MaHnnylaqnn No qNCTKe nIyXOy BbIKNIOHTe npi6Op, BblAunB BNkY n3 po3ETKn nIIN C NOMOuBHO oBcero BbIKNIOaTeJ. PpeepnTneH3ROTOBNTeJb He Hecet OTBeTCTBeHHOCTHn 3a BO3MOxHbI BpeD, pPnHHeHHbI, pPRAO nIIN KOCBEHNO, IIOJAM, PpeMetam nIIN DomaunHM XKNBOTbIM BCJeCDTBne HECO6NJIODeHnnpEtncaHn, yka3aHHbIX B PyKOBODCTBe NO 3KcnjLyaatauHn, Oco6eHb TOM, YTO kacaetc npabUN yCTaHOBKn n 3KcnjLyatauHm np6Opa nYxoDa 3a HmM.
- Ecni NICTky npOBODntb C hapyuHHeHem DaHHbIX INCTpyKUIN, BO3MOKeH pNCK BO3ROPaHn.
IPEIOCTEPEXEHNE. Ipn nCnOJIb3OBaHm C KxOHHO NOcUdON IOCTyINHbE qAcTn MOryt CNlbHO HaPeTbcra.
- MakcimalbHaJa DInHa BnHTa DnKpeIeHn BbITaKHO Tpy6bl COCTABJIeT 10 MM (BnHT noCTabJIeTc npOn3BODnteMe).
PPEyIpyEeHHe. HapyeHne Tpe6oBaHn DaHHo INHCTpyKcH N BOTHOeHN YCTaHOBKN BHTOB IIN KpeEnkHbIX DeTaleM MoKeT npVBecTN K ONaCHOCTN NopaxEHN 3JIeKTpUYeCKHM TOKOM.

TEXHUNYECKNEXAPAKTEPNUKNI
TXHNUHbI pInbOpa npINBbHb Ha 3TNKTK, HAXOJUcBcBHTpN BbITaXHO rOyCTpoMCTBa.

MOHTAX
OCHOBhbie3AMEUHnA
(naparpaΦ npdha3NaH dIg KBaJIHΦnIupoBAHHbIX CnIaJIncTOB, MOHTIpyUOxN BbITJXHO yCTpoIcTBO)
PacctoHne MeJxdy KxyxHNo nnTOn n Camo HnxKHe ToyKo BbTyAaKn, NO cTaHdapTy D0JxHo 6bIb He MeHee 65 cm (CMOTpeB nJIIOCTpaCmIO C1). DaHHOe pacCToHne N3MepaTeC B o63aTeIbHOM npOaKe B camo HnxKHe TOnKn pN He6eONacHom HanpJxHn. YuHTbBaH NaCToUAn acNeKT, PndyCMtpeHHb EbponeNcKIMn cTaNdaptAm, pacCToHne Ha HeKOTopbIX MoDeIax MoKeT 6bITb COKpaSeHo, KaK 3TO yKa3bIbaETcB RgnaBHOM kataIoRe. EcIn B INHCTpyKUHX ra3OBo KxyxHNo nnTb Iyka3bIbaETc60JIbWee pacCToHne, Heo6XoNMo yHTbBaT b erO.
B Bercn BcacbBaIOeero Tnna DbIMooTbOdHa Tpy6a DoJXHa IMeTb DmaMeTp He MeHbSiN, Yem y naTy6ka BblTgKKn.
B ropn30HTaJIbHbIX cIaTEx Tpy6a DoJXHa IMeTb JERKn yKIOH (OKOIO 10%) KBepx yI BbOda Bo3dyxa n3 nOmeueHn HapyKy.
HeoXIO MBO CBeCTN K MHNMMy KOJIHcTBo N3rIOB, a TaKKe y6eIITbC8 B TOM, TTO Tpy6bl IMeHT MHNMaJIbHyIO HeoXOIMyI DInHy.
Co6IIOJaTe DeIcTByUOJIne HOpMbI, KacaIOJIeCeBbIbOpca Bo3Dyxa HApKy.
Пи рОДнOBрЕмEHOM ИСПОЛБЗВОАнIM ДPyгИХ ппборOB (KOTПО, ПЕЧ, KAMNHOВ I T.I), раБОТЯЦХ На ГAZE ИПДPyгTom TOПЛМЕ, HeO6XODIMO OБ ecneHb HAnIeJkaUyO BeHTINJIaUHIO NOMEseHry, ИЗ КOTOPORO YdAJaAeTcRdblm И NcPapEnHry, CORIacHO DeIcTByUOIm HopMaM.
Ipon3BODHTb H HCT HNKAKOJ OTBTCTBHNOCTN B CNYa, CnHOpMbI 63ONaCHOCTN H CO6JIIOAHOCT.

E BbITJXHOE YCTPOICTBO C BbIbPOCOM BO3dUXA HAPYKU
B 3TOI MOIN DbIM I nap OTOTOBK BbIbpaCbIaOTc HApKy U3 Tpy6y.
Tpy6a IJIy BbIbOca, KOTOPaB BbICTyNAT I3 BpxH N acTn BbyITxKKn DoJXHa 6bITb CoINHHa C Tpy6oI, KOTOPa BbIBODIT bIM IN nap BH NOMUHN, PNC.
B daHOn MOJIN CHIMAOTcI qnJIbTpbl Ha aKTUBNPOBaHOM yI, cIIN OH N yCTaHOBJHbI; KaK OH CNHMAOTcI, CM. nyHKT F. EcII KxOHNa BbITJgKa IcIOJIb3yTCs OJHOBPMHNO I dIpyrNX pIp6OpOB, pa6OtaIOuIX Ha ra3y ININ dpyrom ToPNIIB, POMUHN DoJXHO IMTB Bo3MOXHOCTb DOCTaTOHOro npOBTPBaHn.

BbITJXHOE YCTPOICTBO C PEUNPKUJIaIeN BO3dYXA (cФиьТраи)
B 3toM MoIIN BO3dyx npoxoJIT yP3 c AKTIBnPoBaHHbIM yrIm, rD OHnUaTcN I BO3BpaUaTcB B NOMUHN KUYHNI.
Y6HITcB, YTO yroJIbHbI cINJIbTpbI yCTaHOBnHbI Ha MOTOp, PNC. 6, B npoTINBHOM cInyua yCTaHOBnT INx, KaK yka3aHO B nyHKT F INCHTpkyuM.
IyuyuHnXapaKtpnCTnPKOMHyTcNcNoB3OBaT TpTbIO CKOpocT npHaIuHnCnIbHbIX 3aIaxOB Hn6oBbUoro KOJIYcTba napa, BTOpyo CKOpocTB HopMaIbHbIX YcIobnX,IPByo ckOpocT dIy OunchKn BO3dyxa npn Hn3KOM pacxoOBoAHm 3KNTpO3HPrnn.
PKOMHdyTcB BKIOUaTb BbITXKky, KOrda Bbl HaunHat rOToBnTb N OCTaBnTb pa6oTaIoJ do NCy3HOBnI CNlbHbIX 3aIaNxOB.
1.ДБУХКОПОЧЕУРВАЛЕNHIE
OCBEUEHNE- npKlIOuATIb A
Пложн 0:ОCBUн BBKIOHNO.
CKOPOCTb - npKJIIOUaTlb B
I03B0JrT BkIIOuHaTb n pryIINPOBaT bCKOpOCTb pa6Otbl MOTopa B 3aBnCIMOCtN OT moIIN C 1 no 3,JIb6o C HnppBbHOBn pryIINPOBko CKOpOCTn.
INHUKATOPHAR JAMNA-C
1: MOTOP BKHOUATcHa MINHIMaJIbHOI CKOPOCTN
2: MOTOP BKJIQUaTcHa CpIh CKOPOCTn
3: MOTOP BKJIQUATcHa MaKcIMaJIbHOr CKOpOCTn
OFF: MOTOP BbIKJIOUaTcA.

Square halogen light
3.ФЛYOPECUEHTHAJIAMNA(pa3deJINДЯспeциаиCTOB)
3aMeHa ΦnyOpEcUeHTHOn JaMnbl:
a) OTKIIOUHTb Pn6Op OT cTeu nITaHna;
6) ChraTb MeTaJIHueCKyIO NaHeB, OTKpyTNIB KpeIeKhbIE BnHTbl, ecIN TaKOBaI NMeETcR. ChraTb fIyopeCseHThyIO Tpy6y, NOBepHyB eHa 90^ , n3aamEnHbE e npYro c aHaNoTnHbIMxapaKTePncTnKaAMn (8 Bt - 13 Bt - 21 Bt - 28 Bt - B 3aBNCmOCTn OT MoJeN);
B) BHOb IOJIKIQUHTb Pn6Op K Cetn IITAHNA.

CHNTKA I YXOD
CBoBpMHbI yXoI rapaHTnpYxopoOyU pa60Ty I 6oIbW Oc6KbI. Oc6HIO BHMaHI H6xoIMMo yIpyTb MtaJIINHCKM qInIbTpam dIra3axBaTa Jnpu I nJInIbTpam CakTNBIPOBaHHbIM yrIm, DCTBNTlbHO, Yacta OCHCTKa qInIbTpOB IN MCT IN KpIIHNRA rapaHTnpY, TTO B BblTgKK H Co6uPaTCR KIp, KOtOpBI ONACH N3-3a IIGKOTN BO3ROPAHNA.
1. METAJIJIHUECKHE ΦNJbTPblДЯ 3ADEPJKAHNY KIPA
PpHa3NaHbI yIaBnBaHnIyactuJKnpa,PKOMHyTCMytB pa3 McrB BOD N C MOOUM cpCTBOM,H pRn6aIx.Do yCTaHOKn DojNTcbnx NOJHOro BBcIxHaHn.
ДяТOrO YTO6bI CHaTbФиЛьТР И yCTaHOBuTb Ha MCTO CM. INHCTpyKlM, pyHKT I. PKOMHdYTCa pryIaPHO BbIOnHЯТ b3Ty OnpaMuIO.
2.ФИЛбТРБС AKТИВИРОBAHHыМУГДЕM
Ппнанзнayны Ддя 3аджанязлaxOB,псутCTByIOxNxB Bo3dYx,КOTopьчрЗнх npoxOДNT. Oинь BO3dYx BHOb Bblnyckatcra Na KyxHIO.
Фильtpbl Ha akTNBupOBaHOM yIb H MOrYt 6bIb II pPOMbITb I 3AmHryOTc B cpHM KaXdbI 3-4 Mcya (3aBnCIT OT qactotbl NcNolb3OBaHn).ДЯ 3amHbI ФильtpOB c aKTNBupOBaHHbIM yrJIM cIyHT nHCTpykUmM,pyHKT H2.
3. YNCTKA HAPYXHON CTOPOHbl
PekomeHdyETcOUnuTaB BHeUHHe NOBepxHOCTn BbITaKek He MeHee Yem KaJdbie 15 dHe, TToBi KInpHbE BeueCTBa He NOBpeDnI CtaJIbHyIO NOBepxHOCTb.
YHCTKa BbITJXKN D0JXHa OcyIeCTBnTbC R NOMOuB BnaXHO TkaH C NcIOJIb3OBAHnEM XnIDKOro HeITpAlhBOrO YHCTaIeO cpeDCTBa IIN DeHaTypata.
Ecnn BbIyKca IMeet CneuaJIbHoe NOKpbITne IpOTnIB OTNeaTKOB nIbIeB (Fasteel), Heo6xoJIMO OcyIeCTBnIbT bUcTky TOJIbKO BOIOJ C HeINTPaJIbHbIM MblON PnI NMOOnuM MraKo TKaHn I TsaTeJIbHO ONoIaCKINBaT b CyIwITb NOBepXHocTb. He donyUcKaETcNcJIb3OBAHne cpeCTB, CoDEpKaaUx abpa3INBHe BWeueCTBa, rpy6Be TkaHN, a TaKxe TKAHN, IMeIoUmeCe B IpoJaXe IpnY CTKn CTaIN. IVcNoJIb3OBAHne abpa3INBbIX BeueCTB INrpy6BX TkaHeN pInBEdet K Heo6paTMOMMy NOBpeXdHIO NOKpbITnCtAN.
Heco6JIOeHne daHbIX npaBnI ppeOCTOpOXHocTn BneueT 3a co60h 6e3BO3BpaTHoe NOBpeKDeHne ctaII.
IapaHTnHbI yCNoBnI POJIHOCTbIO pNIBDbI Ha NocIaHcN CTpaHic 3TOrO I3daHna.

PpOn3BODnTbHOTBvAT3aBO3MOXhblHTOuHOCnIOwn6KnB DaHOMn3daHnn,BO3HNKUnn PpNnIINPpNaTbIBaHnn. PpOn3BODnTbOCTabJrT 3a Co6oB IpapBOHa T MoDnΦnKaun CO6CTBHHoPiOpykun, KOtOpblcoTTHOxOdMblmNlNlNo13hblm,a TaKK B NHTpcax POIb3OBaTl, H BnIyIoU Hi IraNbHbI cyHKnOHaJIbHbI XapaKtpnCTknN 630NaChocTb.

FILTRY INSTRUKCJE WYJMOWANIA I WYMIANY
1. FILTRY METALOWE
Square halogen light