CFB6431 - CFB 6431 W - Fridge Freezer BEKO - Free user manual and instructions
Find the device manual for free CFB6431 - CFB 6431 W BEKO in PDF.
User questions about CFB6431 - CFB 6431 W BEKO
0 question about this device. Answer the ones you know or ask your own.
Ask a new question about this device
Download the instructions for your Fridge Freezer in PDF format for free! Find your manual CFB6431 - CFB 6431 W - BEKO and take your electronic device back in hand. On this page are published all the documents necessary for the use of your device. CFB6431 - CFB 6431 W by BEKO.
USER MANUAL CFB6431 - CFB 6431 W BEKO
HCTpyKuIN PbKOBOdCTBO
INDEX EN
RECOMMENDATIONS AND SUGGESTIONS 4
GENERAL INFORMATION-SAFETYWARNINGS 5
INSTALLATION 6
USE-MAINTENANCE 7
SOMMAIRE FR
CONSEILSET SUGGESTIONS 8
GENERALITES-CONSEILS CONCERNANT LA SECURITE 9
INSTALLATION 10
UTILISATION-ENTRETIEN 11
The Instructions for Use apply to several versions of this appliance. Accordingly, you may find descriptions of individual features that do not apply to your specific appliance.
INSTALLATION
- The manufacturer will not be held liable for any damages resulting from incorrect or improper installation.
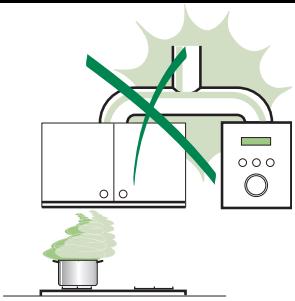
- The minimum safety distance between the cooler top and the extractor hood is 650mm (some models can be installed at a lower height, please refer to the paragraphs on working dimensions and installation).
- Check that the mains voltage corresponds to that indicated on the rating plate fixed to the inside of the hood.
- For Class I appliances, check that the domestic power supply guarantees adequate earthing. Connect the extractor to the exhaust flue through a pipe of minimum diameter 120mm . The route of the flue must be as short as possible.
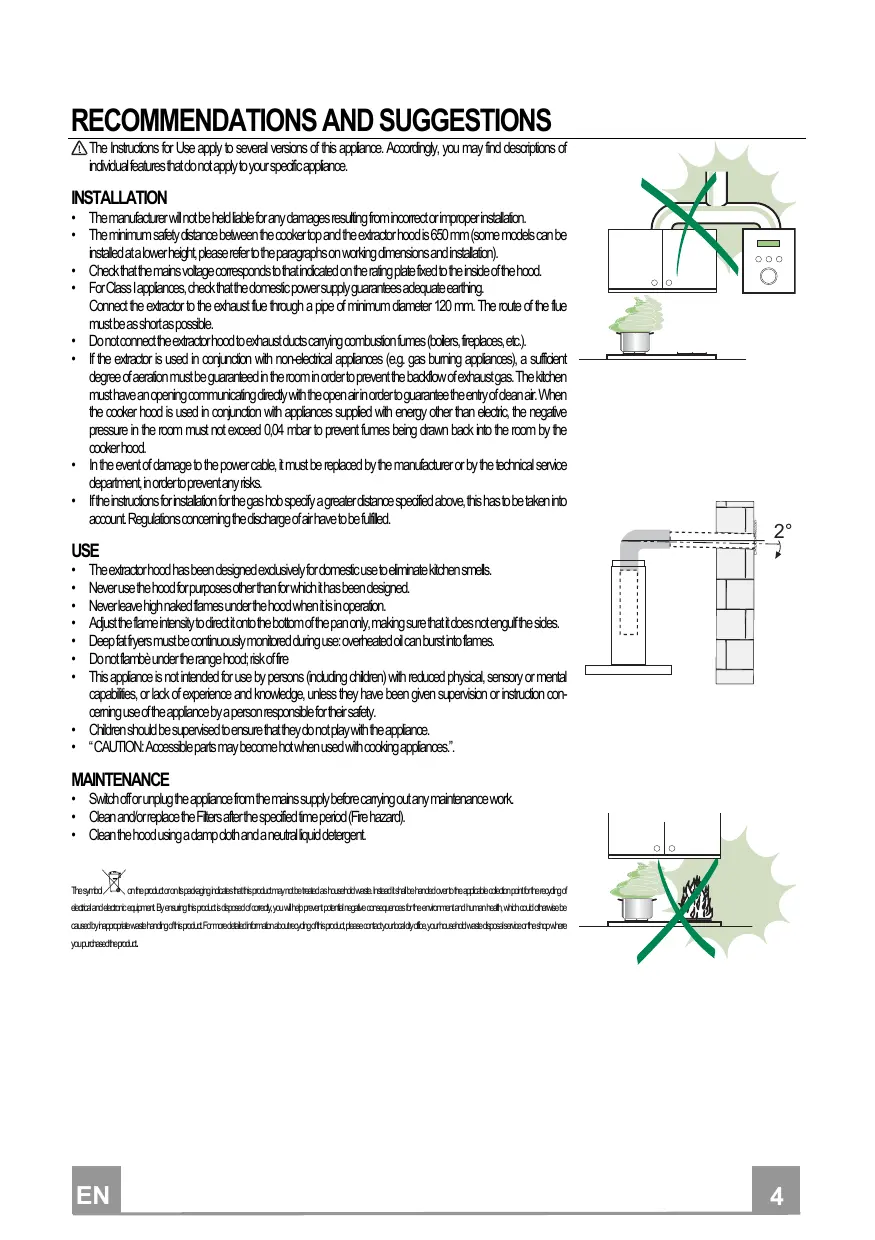
- Do not connect the extractor hood to exhaust ducts carrying combustion fumes (boilers, fireplaces, etc.).
- If the extractor is used in conjunction with non-electrical appliances (e.g. gas burning appliances), a sufficient degree of aeration must be guaranteed in the room in order to prevent the backflow of exhaust gas. The kitchen must have an opening communicating directly with the open air in order to guarantee the entry of clean air. When the cooker hood is used in conjunction with appliances supplied with energy other than electric, the negative pressure in the room must not exceed 0.04 mbar to prevent fumes being drawn back into the room by the cooker hood.
- In the event of damage to the power cable, it must be replaced by the manufacturer or by the technical service department in order to prevent any risks.
- If the instructions for installation for the gas hob specify a greater distance specified above, this has to be taken into account. Regulations concerning the discharge of air have to be fulfilled.
USE
- The extractor hood has been designed exclusively for domestic use to eliminate kitchen smells.
- Never use the hood for purposes other than for which it has been designed.
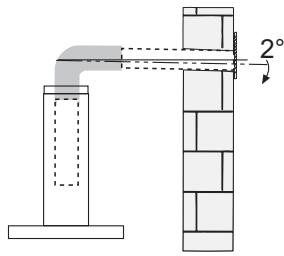
- Neverleave high naked flames under the hood when it is in operation.
- Adjust the flame intensity to direct it onto the bottom of the pan only, making sure that it does not engulf the sides.
- Deep fat fryers must be continuously monitored during use: overheated oil can burst into flames.
- Don't flambe under the range hood; risk of fire
- This appliance is not intended for use by persons (including children) with reduced physical, sensory or mental capabilities, or lack of experience and knowledge, unless they have been given supervision or instruction concerning use of the appliance by a person responsible for their safety.
Children should be supervised to ensure that they do not play with the appliance. - "CAUTION: Accessible parts may become hot when used with cooking appliances."
MAINTENANCE
- Switch off or unplug the appliance from the mains supply before carrying out any maintenance work.
Clean and/or replace the Filters after the specified time period (Fire hazard).
Clean the hood using a damp cloth and a neutral liquid detergent.
The symbol on the product on this packaging indicates that this product may not be labeled as household waste. Instead, it has been labeled to be applicable for children in the recycling of electronic equipment. By enusing this product is disposed of properly, you will help present information to make sure for the environment and human health which could otherwise be caused by inappropriate handling of this product. For more detailed information about recycling this product, please contact your body office or your household compost service or the shop where you purchased the product.
GENERAL INFORMATION
This canopy hood is designed to be fixed to any rigid vertical surface, over a gas or electric hotplate and can be used either in the extraction mode (ducted to the outside) or in the recirculation mode (internal recycling). All cookers hood perform better when used in extraction mode. During winter time it may be convenient to use the hood in the recycling mode to avoid heat loss from the kitchen.
Before starting the installation, consideration should be given to the difficulties that can be found during installation. The installation work must be undertaken by a qualified and competent person in conformity to the rules concerning the evacuation of contaminated air.
The manufacturer disclaims all liability for any damage or injury caused as a result of not following the instructions for installation contained in the following text.
1 - SAFETYWARNINGS
1.1 - When used in the extraction mode, the cooker hood ducting must not be connected to a flue which is used for exhausting fumes from appliances supplied with energy other than electric, such as a central heating flue or water heating flue.
1.2 - Before connecting to the mains supply ensure that the mains voltage corresponds with the voltage on the rating plate inside the hood.
1.3 - Connect the cooker hood to the mains via a double poled switch which has 3mm clearance between the contacts.
1.4 - For cooker hoods featuring an earth cable, make sure the electric plant of your house is correctly earthed.
1.5 - Appliance in class II are provided with a double insulation; therefore do not connect them through earthed plugs but through a double poled plugs.
1.6 - When installed, the hood must be positioned at least 65cm above the hotplate.
1.7 - Never do flambe cooking under this cooker hood.
1.8 - Never leave frying pans unattended during use as overheated fat and oil may catch fire.
1.9 - Before carrying out any kind of maintenance or cleaning, disconnect the hood from the mains supply.
1.10- If the room where the cooker hood is to be used contains a fuel burning appliance such as a central heating boiler then this must be of the room sealed or balanced flue type. If other types of flue or appliance are fitted, ensure that there is an adequate supply of air into the room. When the cooker hood is used in conjunction with appliances supplied with energy other than electric, the negative pressure in the room must not exceed 0.04 mbar to prevent fumes being drawn back into the room by the cooker hood.
1.11- The appliance must be positioned so that the plug is accessible.
1.12- If the supply cord is damaged, it must be replaced by a special cord or assembly available from the manufacturer or its service agent.
1.13- This appliance is not intended for use by persons (including children) with reduced physical, sensory or mental capabilities, or lack of experience and knowledge, unless they have been given supervision or instruction concerning use of the appliance by a person responsible for their safety.
1.14- Children should be supervised to ensure that they do not play with the appliance.
2 - INSTALLATION INSTRUCTIONS
Some installation systems require the opening and removal of the metal grille panel.
2.1 - Instructions for opening and removing the metal grille panel
To open the grille panel, press inwardly on the two slider catches at each side of the grille panel and the grille will pivot down.
To remove the metal grille, pull forward on the right hand side so that the hinge pin on the back of the grille will be released from the slot in the side of the casing.
2.2 - Wall cabinet fixing
a - Predrilled wall cabinet fix the hood onto the wall cabinet base panel using the four screws 4.2 × 45 ~mm (supplied with the fixing kit). It is not necessary to open the metal grille.
b - No predrilled wall cabinet
b.1 - If the hood is provided with a paper fixing template, follow the instructions.
b.2 - If the hood is not provided with a paper fixing template, position the hood on the wall cabinet base panel and pilot drill the 3.5 × 16 mm screws (not supplied with the fixing kit) from the inside onto the wood.
2.3 - Wall mounting
a - Drill two 0.8 mm holes on the wall using the paper template, insert two raw plugs and two 4.2 × 44,4 mm screws leaving 5 ~mm untightened. Open the metal grille panel, hook the hood on and fully tighten the screws.
b - If the hood is not provided with a paper fixing template, drill two 0.8 ~mm holes (see draw.), insert the plugs and screws, proceeding as directed under paragraph a.
c - For wall mounting using wallbrackets (optional), follow the instructions of the fixing template.
d - Pay attention to the safety regulation of point 1.6.
24 - Choice of operating mode
a - Evacuation mode
To check that the hood is set up for evacuation, open the grille panel and make sure that the conversion lever or the change-over knob on the centrifugal unit is in the DUCTING position. The charcoal filter is not required.
For ducting to the outside, the hood is supplied with a rear and top outlet. A flange spigot of 100mm diameter (120 mm in certain models) is usually fitted on the top outlet and a blanking plug on the rear outlet. If you choose to duct the hood from the rear of the casing, you should invert the position of the flange and of the blanking plug. Pay attention to the safety regulation 1.1.
b - Internal recirculation mode
To check that the hood is set up for recycling, open the grille panel and make sure that the conversion lever or the change-over knob on the centrifugal unit is in the RECYCLING position.
The charcoal filter is to be fitted. To fit the charcoal filter, support the filter with one hand and turn the thumb screw through the centre of the charcoal filter. If the filter is of the interlocking type, turn the filter clockwise. The hood can remain connected to the outside.
2.5 - Electrical connection and working test
1 - The safety measures 1,2, 1,3, 1,4 and 1,5 of paragraph 1 are to be strictly observed.
2 - Once the electrical connection has been completed, check that the worktop illumination, motor and speeds work properly.
3 - OPERATION
3.1- Controls are located on the right hand side of the front to operate worktop illumination and select the most suitable working speed for your cooking. To increase the area of extraction, the glass visor should be pulled open. The top speed should be used when frying or cooking foods with strong odours, while a lower speed can be used for normal cooking. To obtain the best performance from your hood, turn it on before you start cooking and leave it running for a few minutes after your cooking is over to clear the air.
3.2- Pay attention to safety regulations 1.7 and 1.8.
4 - MAINTENANCE AND CLEANING
Regular maintenance and cleaning will ensure good performance and reliability, while extending the working-life of the hood. Special attention should be reserved to the grease filter and to the charcoal filter (recycling mode).
4.1 - Grease filter
This retains the solid grease particles and can be supplied in different types. It is fitted onto the reverse side of the metal grille panel. Maintenance of the grease filter varies according to the used type.
a-Whatever type of filters used, the filter is easily removed from the grille by pushing the metal wire clips to one side and removing.
b-Thin synthetic filter (1 mm thick). It should not be washed and should be replaced every two months. If the filter is provided with a saturation indicator, replace when:
b.1-The violet colour of the dots, which are visible through the metal grille, is spread over the whole surface of the filter.
b.2-The red colour of the stripes, which is not visible through the metal grille when the filter is clean, becomes visible from the outside of the metal grille.
c-Multi-layer metal filter. It should be washed once a month in hot water using mild detergent or liquid soap. It can be washed in a dishwasher. It should not be bent and should be left to drain dry.
WARNING: An excess of grease in the filter not only would affect the performance of the hood, but it is also a possible fire risk. We strongly recommend therefore to clean and replace filters in accordance with the manufacturer instructions.
4.2 - Cleaning Metal self-supporting Grease Filters
The filters are washable and must be cleaned at least every 2 months of operation, or more frequently for particularly heavy usage.
- Remove the fillers one at a time by pushing them towards the back of the group and pulling down at the same time.
- Wash the filters, taking care not to bend them. Allow them to dry before refitting.
- When refitting the filters, make sure that the handle is visible on the outside.
4.3 - Charcoal filter
The charcoal filter is a chemical filter to be used only when the hood is in the recycling position. To replace the charcoal filter, open the grille and remove the thumb screw through the centre of the charcoal filter. If the filter is of the interlocking type, turn the filter anticlockwise. Replace by reversing the operation. For a good performance replace the charcoal filter on average every three months.
4.4 - Worktop illumination
If a lamp fails to function at any time, open the metal grille panel and check that the lamp is fully screwed into the holder. When changing the lamp, an identical replacement must be fitted to ensure a safe working of the hood.
4.5 - Cleaning
The metal work should be cleaned regularly, at least once a month, using mild household cleaner and polish. Never use abrasives. For all operations from point 4.1 to point 4.4 and in particular for point 4.3, pay special attention to the safety regulation 1.9.
2.1 - OtkpbIne I CHTHe BCacbBaHouSeI peWetKn
TtObI OTKbITb peLETKY, CDBHHTb K LcHHTpy HxOoPILIEeCR B HIXHHe YACTN BbTnM 6eYHm. BpaalraBb Ha dByx 3aDnX LITbPax, peLETKa OyCTNTCA.
KoIa peLsTeTka OTKpbIta HAXOITTCB B eRtMnAIBHOM NIOXKeHM, CDbHHTb PpABbIM 3aDHM LITbIPb BInpeD, IIO BoKOBm IpopeM, YTObI pELsTeTka BBILIIa IV NIOXKeHM.
22 - YctahOBka nOJnOLIKo
a- PnIka COTBepCTVMM. CoeDINMb BbITKwC PnIKoYpeE3 cedAHbHb E OCHOBaHIM NpIePCTMA pIpaTaeMbIM B KOM- nIkeTe 4 BMHTAMM 4,2x44,0. OTKpbBaBt peLWETKY He o6raTeNbHO.
b- Ptoka63 OTBepctn:
b.1-EcnnKbIbTnKpePnnaeTcKOHcykTOpDraCbePeHn,prnepxmbatcbyKa3aHHbxHaHEMHCTpyuM.
b2- Ecm KOHcyToppa HET,OTKpbIb pelleTy, PmNIOXMTb BByTTKy KcOChOBAHNO TIOIM N PmIKpyTITb ee NHHTPM BmTaMM 3,5x16 (He BXoDAR B KOMTNEKT).
2.3 - HacteHHa nJka
a- PnI pOMOLU KOHdyKTOPA DnI CBepeHMA CDeTb BCTeHE DBA OTBEPCTA 8MM, BCTABIVB HMH BXITADILIM IN DEBA BVHTA4 2X 44.4, OCTABIVB 5 MM He BBHHENHbIMM. ChTb BCACbIABOUlyo peLietky, NOBecrMb ByTRkKy 3a NETTM Ha YKA3aHHbE BVHTb I N 3a- TAHyTB BVHTbI DO KOHua CBHYTPEHHH CTOPHOH bIOHM.
b - EconKOHJYKToppa Het, cdeIaB 2 OTBepCTN 08 MM (CM. PNC.) IN BCTABMTb BKTAbILIN IN BHTbI, DEIECTBYI NO IYKTya
c - Пин HabTeHNo UCTaHOBKe PnI NOMOuN cNo6 (dIpONHmTeBHO) PpUePbBaTcR NcHTpyLIM, PpUBeDEHHbIX Ha CteUyAInbHOM PpINPARaEMOM KOHDyKTOpe.
d-CobioaTb npabnO, ykaaHHe B nyKte 1.6.
24-Bb160pMoHmKauu
a-Bcaobibou
OtKbTB BCAcBIBAOHpyeIeTKy UYCTAHOBITy pyKOTKY WIM YKZATeRy PBYM INTOXHEINE "BCaCbIBAOHJ" B KOJIe ee XODA. BHyTb, eCm CTOT, nATPOn Ha AKTVBPOBAHOM yTne; drr 3TOO OTKpyTNTy CEHTPAHbHY pOKOTKY WIM MEINHO BpALJtB nATPOn pOTIV HAcBOH CTPEIM, YTObI paCCoeDHHbTEHPTaBHO LTIbIKBOE COEDHNEHIE.
CoEHHHb BHeLLHIO Tpy6c CpIaHcEM 010 MM (VIMn 0 120 MM B HeKOpBIX MOeTARx), HaxOJIuIMcHa BePxHem IMN 3aHcHb BByIyckOM OTBepCTM, B 3abMCIMoCTN OT He6bXOpIMCtN. B OCTaBLueecr C6o6DHOe OTBepCTVE BCTABHb 3aTTyLUky. CToPO c6bHd4b TpabITNO pTuKy 1.1.
b-Φmbltpyolua
OtKbI BCAcBIBaOHU pELeTIky UCTAHOBIT pyKOTAY NmY kAa3TeBpyHIM BnIOXHeMe"QmNtpyOuaB"B KOJIe ee XoJa. UCTAHOBIT nATPOH Ha AKTINPBOAAHOM yIte HA ONOpy DmIAteTA PRn NOMOU LcHTpAlhON METANINHEcO pyKOTAI NmMEDIEHNO BrAPLAE TnPCH NO YAcOB 0CTrPEHKe, YTO6b1 ZaIeIKNHyTc HENTPAHHOe BoKOBoe CoedInHeMe. BHeuHr TpyBa, ecJIeECTb, MOKET bIbPiNcoEDInHeHa.
2.5 - 3nektpnckoe npdktuohme n dyhkuohalbna npobepka
1- Heo6xmoTtuaTeBnOooBnOaDabTnpdeynpeXeHEnno 6eaonacHcTnyKTOB 12,13,14 n1.5 paepera 1.
2-BbIIOHMB 3eKTHNEeO NOKTHNOHME,IOBepMb paBoTy OOBeUeHMe,BKTHNOHMe DBMATEA INOMeHY CIOPOCTa paBObTb.
3 - ДЕИСТВЕ
3.1 - BbIKHOHATEIN UYPABRIOT BKIOHEHMEM BbITKIM, PERTYMPOBKO CXOPOCTN paobtI DBMRTAETRAI N OCBLEHMMEN PTTNTB.I DnT HANHTUe paobtI pRMOOPa peHOHdyETCR OTKpBT K33peK IN HACTPOITB DBMTAEIB Ha BbIOCKyO CXOPOCTB GCTYae BOJI- IOKCHENTPAJUM 3aIAPX aDbMA TOBOTK, aDII TIAKO IN EKOMOHMHON CMEHb I BQDIYA h AkyHe OTPERTYMPOBATb CKOPOCTb Ha cpeHHIO HmN HsKyO.CIeYET pIMBECTIN BbITBXAYBpaobTy B HAnane Ipouecca rTOBKM N OCTABITte BkTIHOHHNH eE BTEYEHE MECKbIX MMHTNCCNE 3abePEHINHPRITOTOBNEHMRIML.
3.2 -Ctporo oobnoaTb npdeynpeekdHn no nyhtam 1.7 n 1.8.
4- YXOJIIOUHCTKA
XopoumIyxoIO6eOeHbAeBbIOoKoe KHeCTBOpaobTbIaIMTeIbHbIcOcKcTyKybIbITyRKM.
BHIMAHME:CKOTNIHME XMPA BHUTPn HE TOnBIO CHMKAET KAECTBO DEICTBMA PnIOBOPa,HO IN MOKET COO3DAtb ONACHOCHAPA. POCTOMY PEKOMEHUYETC TLIATEBHO PPNDEPKMBAATCB PnIPBEDEHNHBX HNOKE INCHTPUIN.
4.1 -ПOTINBOXIMPOBOIФИВТР
JaHHbI qHbI pMEXAHHEKOrO DeiCTBnYyDpeXmBaBt YACTMLbIXMPa.
CTOM OH BHYTPM BCaBbBAHOLJeu peLLETK.
Tpyxopa3aФmbltpomDeiCTBOBAtCnElyOMMooBazom:
a-0ouine niooxeHnra: He3BbMmIO OT Tmna qinltpa, YTOobI BbHytB eO,OTKpbTb peLHTKy NCHrTB cNELMaJIbHbIe MTeAITINHE CxVE CTOnOpbl.
b-ToHmOaHOpa30BbΦmNbTp (ToIuHa npMmepeHO 1 MM):
Tahon dpmbtb Mblb HnB3a, cndyet MeHbE b E0 BcpHem paB 2 MeCya. Ecn Ha dpmbte mHeOTc XMMNKeWne HmKATOpbI HAcBILHEM, MEHbE, KODA:
b.1-ΦmIoNETOBbI LEBT BMDHbIX CHApEyK ToHcK PaCnPoCTpAHINcR IO BOE NIOBExHOCtN CmNbTpa.
b.2-KpachbI LipET BHTpyHnIX nOIOC, KOTOpB IOb HHO He BIDeH, CTAHOITcB IBDH ChApYIM
C-MetartnnHeckmMHOrOcNtHbIcPmbTbp:ero CnEETMbITBcpeHem 1pa3 B MeCAU B BoDE C ObbHHbIM MOOLIM COCTABOM IINB PNOCDOMEOHMOALINE. JOpctahOBKAK CnEETPiocyUHTb.
4.2·ΦnIbTpHaakTMBHOMyTTE
XmmHecMnFmTbTp, YdeepMbBaHouy 3aAaxn B cmTbpyoue BbTtRkne. UTObI BByHytB cmTbTp, OTKpbIb pELtky n OTKpyTMTb LEHTpabHyMo METaHINHeCKyO pyKoRTy mTN CTeKg NoeepHyT bcmTbP rnoTMB caoobc TpeKIM, UTObI paCCoeHNITb LcHTpabHOe UTbKOBE coEHHNE. IpyctAHOBM BbyIOHHTb ONepaUM B o6paTHOM nparKe. Ipy KaehctBeHHoP abotbI cmTbPa MeHHTb erO pnpmeRho KKaKdBe 3 MeCAU.
4.3 - OcbeseHne
EcmHHe ropmt Hmnperectaet ropeb lamnoHcA,OTKpbIb BCAbsBaHouy peuTeKy HnpoeBnTb,HTObIa lamnoHcKa 6Igna xopoLIO BBINHEBA HTH3D. PIm HeooXoDMOCNt 3aMeHbIb lamnoHcy HA HOByo TAKOT Xe TNIa NMOUHOCTN.
4.4 - OHHCTKa
OUMUATb BITRAXY CHAPUYI TENIOI BOID C HETPABHIM XIMMOOM MOHUM COCTABOM; HE IONB3OBATCBI 3TOI POACTBOPMTTMM, CTPTOMN ABOPAIBHBIM BELIECTBAM.
PmBbIipHHeHH Boex opeaun C npNkra 4.1 no npNkra 4.4 n, oOobehno no npNkra 4.3, oOobiaat bppeDpypeKxdeHme npNkra 1.9.
Bukulana talimat birden fazla chaz modeli jn geperid Chaznza uymayan baz donanm ozelkeri tanedilmis dc
MONTAJ
1 - VARNOSRNA OPOZORILA
32-Seguir com atenço as advertencias 1.7 e 1.8.
1 - SIGURNOSNE UPUTE
1.1 - Nemojte spajati napu na vodove za odvodenje plinova, koji nastaju izgaranjem (kotlovi, kamini, itd.).
1.2 - Provjerite je lmi'rezn i napon isti kao i napon, naveden na ploci koja se nalazi u unutra'snjosti nape.
1.3 - Spojite napu na mrežni napon stavljanjem izmedu dvopolog prekidača s otvorom kontakata od majmanje 3mm.
1.4 - Kod napa suzemljem uvjerite se da kucne elektrichne instalacione jamc pravilno funkcioniranje.
1.5 - Nape klas II imaju dvostruku izolaciju; ne moraju se spajati na mrezu pomocu utikača s uzemljenjem, već se spajaju pomocu jegnostavnog dvopolnog utikača.
1.6 - Minimalna sigurnosna udalenost izmedu povrsine za kuhanje i nape mora iznositi 65 cm.
1.7 - Nemojte flambirati hranu ispod nape.
1.8 - Provjeravajte friteze dok su uradu: pregrijano ulje moze se zapaliti.
1.9 - Prijne nego poduzmete bilo koju radnju cscenja ili adržavanja, iskljucite uredaj takdo da izvučete utikač, ili takdo da iskljucite glavni prekidač.
1.10- Ako se u prostoriji osim nape koriste i uredaji, koji ne rade na struju (primjerice uredaji koji rade na plin), treba se pobrinuti za dostatno provjetravanje prostorije. Pravilna i sigurna uporaba postze se kada maksimalni niski tlak prostorije.nie veci od 0,04 mbara; na taj se način izbjegava vracanje otpadnih plinova natrag u prostoriju.
1.11- Uredaj mora biti takomontiran da je utika'dostupan.
1.12- Ako je kabel za napajanje oštećen, treba ga zamijeni drugim kabelom ili posebnim kompletom, koji se mogu nabaviti od proizvodača ili ovlaštenog servisera.
1.13- Ovaj uredajijke namijenjen za uporabu od strane osoba (ukdjučujuci i djecu) koja imaju smanjene fizicke, senzoricke ili mentalne sposobnosti, ili nemaju dovolno iskustva i znanja, osim ako nisu pod nadzorom ili im nisu dane jasne upute vezane uz uporabu uredaja od strane osobe odgovorne za njihovu sigurnost.
1.14 Djeca bi trebala biti pod nadzorom kakobi se osiguralo da se ne igraju s uredajem.
2 - INSTALACIJA
Kod nekh sustava instalacion potrebno je otvorti u kloniti usisnu rešetku.
2.1 - Otvaranje iuklanjanje usinerešetke
Kako biste otvoril rešeku, potrebno je da tipkice, koje se nalaze u donjem dijelu nape, kiznu prema sredini. Rešekla oc se spustiti, okrećuš se ok o dva stržinja klina.
Kada je rešetka olvorena iu okomitom položaju, neka stražnj desni klin klizne prema naprijed, duž bočne ušće, sve dok ne izade van.