
MGE250 - Microwaves HITACHI - Free user manual and instructions
Find the device manual for free MGE250 HITACHI in PDF.
User questions about MGE250 HITACHI
0 question about this device. Answer the ones you know or ask your own.
Ask a new question about this device
Download the instructions for your Microwaves in PDF format for free! Find your manual MGE250 - HITACHI and take your electronic device back in hand. On this page are published all the documents necessary for the use of your device. MGE250 by HITACHI.
USER MANUAL MGE250 HITACHI
Important - Please read these instructions fully before installing or operating and keep for future reference.
These instructions contain important information which will help you get the best from your microwave oven and ensure safe and correct installation and operation.
Contents
IMPORTANT SAFETY INSTRUCTIONS 2
COOKING UTENSILS 5
OVEN OVERVIEW 7
TURNTABLE INSTALLATION 7
COUNTERTOP INSTALLATION. 8
MICROWAVE OVEN INSTALLATION. 8
CONTROL PANEL 9
OPERATION 10
CLEANING AND MAINTENANCE 15
SPECIFICATIONS 16
TROUBLESHOOTING 17
INFORMATION FOR USERS IN EUROPAN UNION COUNTRIES.18
IMPORTANT SAFETY INSTRUCTIONS
READ CAREFULLY AND KEEP FOR FUTURE REFERENCE.
PRECAUTIONS TO AVOID POSSIBLE EXPOSURE TO EXCESSIVE MICROWAVE ENERGY
The oven cannot be operated with the door open due to the safety interlocks built in the door mechanism which switch off cooking functions when the door is opened. Operating the oven with the door open could result in harmful exposure to microwave energy. It is important not to tamper with the door mechanism.
Do not let water or any other liquid enter the oven through the ventilation slots.
Do not place any object between the oven front face and the door or allow soil or cleaner residue to accumulate on sealing surfaces.
Do not operate the oven if it does not work as expected or the mains lead is damaged or the unit is damaged in any way.
It is particularly important that the oven door closes properly and that there is no damage to the door (bent), or hinges and latches (broken or loosened), or the door seals and sealing surfaces.
The oven should not be adjusted or repaired by anyone except qualified personnel.
Only use utensils that are suitable for use in microwave ovens.
When heating food in plastic or paper containers, keep an eye on the oven due to the possibility of ignition.
If smoke is observed, switch off or unplug the appliance and keep the door closed in order to stifle any flames.
Microwave heating of beverages can result in delayed eruptive boiling; therefore care must be taken when handling the container.
The contents of feeding bottles and baby food jars shall be stirred or shaken and the temperature checked before consumption, in order to avoid burns;
Eggs in their shell and whole hard-boiled eggs should not be heated in microwave ovens since they may explode, even after microwave heating has ended.
The oven should be cleaned regularly and any food deposits removed.
Failure to maintain the oven in a clean condition could lead to deterioration of the surface that could adversely affect the life of the appliance and possibly result in a hazardous situation.
Only use a temperature probe recommended for this oven.
Avoid using straight-sided containers with narrow necks.
Stir the liquid before placing the container in the oven and again halfway through the heating time.
After heating, allow to stand in the oven for a short time. Stir or shake the contents (especially feeding bottles and baby foods) and carefully check the temperature before use.
The microwave oven shall not be placed in a cabinet unless it has been tested in a cabinet.
The appliance is not intended to be operated by means of an external timer or separate remote-control system.
This appliance is intended for domestic / household use only, and should not be used for any other purpose. Any other use may invalidate the warranty and might be dangerous.
This appliance is not intended for use by persons (including children) with reduced physical, sensory or mental capabilities, or lack of experience and knowledge, unless they have been given supervision or instructions concerning use of the appliance by a person responsible for their safety. Children should be supervised to ensure that they do not play with the appliance.
If the supply cord is damaged, it must be replaced by the manufacturer, its service agent or similarly qualified persons in order to avoid a hazard.
WARNING: MICROWAVE ENERGY. DO NOT REMOVE THIS COVER.
WARNING: The appliance and its accessible parts become hot during use. Care should be taken to avoid touching heating elements. Children less than 8 years of age shall be kept away unless continuously supervised.
WARNING: If the door or door seals are damaged, the oven must not be operated until it has been repaired by a competent person.
WARNING: It is hazardous for anyone other than a competent person to carry out any service or repair operation that involves the removal of a cover which gives protection against exposure to microwave energy.
WARNING: Liquids and other foods must not be heated in sealed containers since they are liable to explode.
WARNING: Only allow children to use the oven without supervision when adequate instructions have been given so that the child is able to use the oven in a safe way and understands the hazards of improper use.
WARNING: Ensure that the appliance is switched off before replacing the lamp to avoid the possibility of electric shock.
NB. If the lamp needs replacing please contact your dealer.
This appliance can be used by children aged from 8 years and above and persons with reduced physical, sensory or mental capabilities or lack of experience and knowledge if they have been given supervision or instruction concerning use of the appliance in a safe way and understand the hazards involved. Children shall not play with the appliance. Cleaning and user maintenance shall not be made by children unless they are older than 8 and supervised.
Keep the appliance and its cord out of reach of children less than 8 years.
The rear surface of appliance shall not be placed against a wall.
Warning: When the appliance is operated in the combination mode, children should only use the oven under adult supervision due to the temperatures generated.
This product is intended to be used free standing only.
Install or locate this oven only in the accordance with the installation instructions provided.
Do not store or use this appliance outdoors.
The grill rack is used in the microwave oven for grill and convection cooking and should be placed on the glass tray. Do not use the grill rack for microwave cooking and do not install the grill rack without the glass tray and turntable ring assembly.
Utensils should be checked to ensure that they are suitable for use in the microwave oven.
Materials you can use in microwave oven
| Utensils | Remarks |
| Aluminium foil | Shielding only. Small smooth pieces can be used to cover thin parts of meat or poultry to prevent overcooking. Arcing can occur if foil is too close to oven walls. The foil should be at least 2.5cm away from oven walls. |
| Browning dish | Follow manufacturer's instructions. The bottom of browning dish must be at least 5mm above the turntable. Incorrect usage may cause the turntable to break. |
| Dinnerware | Microwave-safe only. Follow manufacturer's instructions. Do not use cracked or chipped dishes. |
| Glass jars | Always remove lid. Use only to heat food until it's warm. Most glass jars are not heat resistant and may break. |
| Glassware | Heat-resistant oven glassware only. Make sure there is no metallic trim. Do not use cracked or chipped dishes. |
| Oven cooking bags | Follow manufacturer's instructions. Do not close with metal tie. Make slits to allow steam to escape. |
| Paper plates and cups | Use for short-term cooking/warming only. Do not leave oven unattended while cooking. |
| Paper towels | Use to cover food for reheating and absorbing fat. Use with supervision for a short-term cooking only. |
| Parchment paper | Use as a cover to prevent splattering or a wrap for steaming. |
| Plastic | Microwave-safe only. Follow the manufacturer's instructions. Should be labelled “Microwave Safe”. Some plastic containers soften, as the food inside gets hot. “Boiling bags” and tightly closed plastic bags should be slit, pierced or vented as directed by package. |
| Plastic wrap | Microwave-safe only. Use to cover food during cooking to retain moisture. Do not allow plastic wrap to touch food. |
| Thermometers | Microwave-safe only (meat and candy thermometers). |
| Wax paper | Use as a cover to prevent splattering and retain moisture. |
Materials to be avoided in microwave oven
| Utensils | Remarks |
| Aluminium tray | May cause arcing. Transfer food into microwave-safe dish. |
| Food carton with metal handle | May cause arcing. Transfer food into microwave-safe dish. |
| Metal or metal-trimmed utensils | Metal shields the food from microwave energy. Metal trim may cause arcing. |
| Metal twist ties | May cause arcing and could cause a fire in the oven. |
| Paper bags | May cause a fire in the oven. |
| Plastic foam | Plastic foam may melt or contaminate the liquid inside when exposed to high temperature. |
| Wood | Wood will dry out when used in the microwave oven and may split or crack. |
NOTES:
- Care should be taken when removing utensils or the glass turntable, as they may become hot during cooking.
- Only use a thermometer that is designed for use in the microwave oven.
Ensure the turntable is in place when you operate the oven.
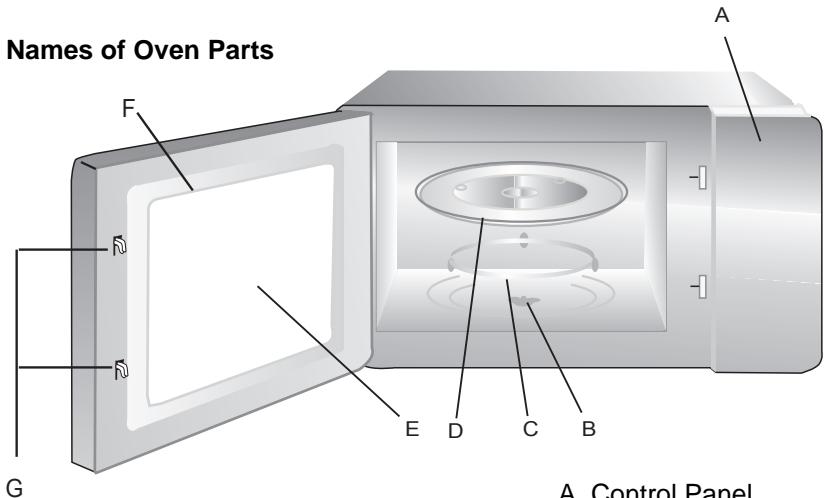
OVEN OVERVIEW
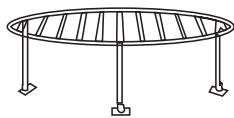
Grill rack
A. Control Panel
B. Turntable shaft
C. Turntable ring assembly
D. Glass Tray
E. Oven Window
F. Door assembly
G. Safety interlock system
TURNTABLE INSTALLATION
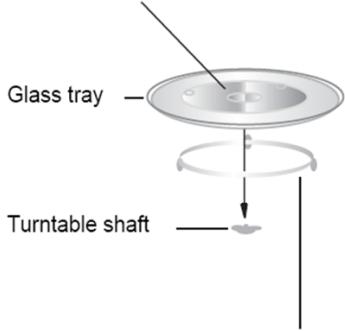
Hub (underside)
Turntable ring assembly
a. Never place the glass tray upside down. The glass tray should never be restricted.
b. Both glass tray and turntable ring assembly must always be used during cooking.
c. All food and containers of food are always placed on the glass tray for cooking.
d. If glass tray or turntable ring assembly cracks or breaks, contact your nearest authorised service centre.
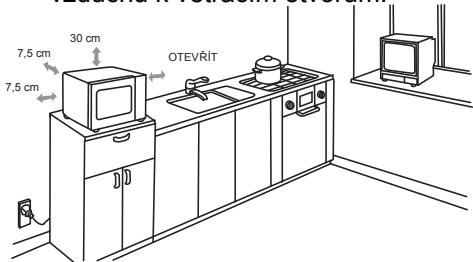
COUNTERTOP INSTALLATION
Remove all packing material and accessories. Examine the oven for any damage such as dents or broken door. Do not install if the oven is damaged.
- Select a level surface that provides enough open space for the intake and/or outlet vents.
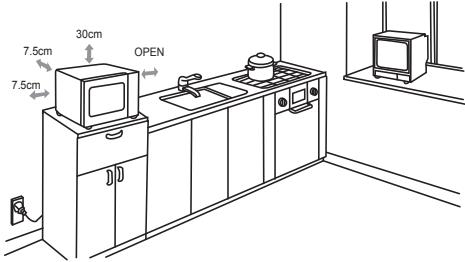
A minimum clearance of 3.0 inches (7.5cm) is required between the oven and any adjacent walls. One side must be open.
(1) Leave a minimum clearance of 12 inches (30cm) above the oven.
WARNING: Do not install the oven over a range cooktop or other heat-producing appliance. If installed near or over a heat source, the oven could be damaged and the warranty would be void.
Cabinet: Remove any protective film found on the microwave oven cabinet surface.
Do not remove the light brown Mica cover that is attached to the inside of the oven cavity to protect the magnetron.
(2) Do not remove the feet from the bottom of the oven.
(3) Blocking the intake and/or outlet openings can damage the oven.
(4) Place the oven as far away from radios and TV as possible. Operation of microwave oven may cause interference to your radio or TV reception.
- Plug your oven into a standard household outlet. Be sure the voltage and the frequency is the same as the voltage and the frequency on the rating label.
CAUTION: Outer surface gets hot.
CONTROL PANEL
MGE250

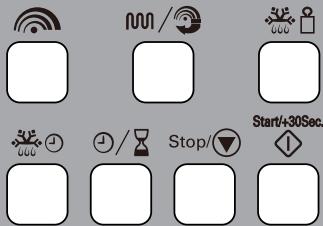

Microwave Cooking
Press to set microwave power level.


Grill/Combi.
Press repeatedly to select a grill cooking or one combination cooking program.

Weight Defrost
Press to defrost food by weight.

Time Defrost
Press to defrost food by time.

Clock/Kitchen Timer
Press to set clock time or kitchen timer function.

Stop/Clear
Press to cancel setting or reset the oven before setting a cooking program.
Press once to temporarily stop cooking on press twice to cancel cooking.
It is also used for setting child lock.
Start/+30Sec.

Start/+30Sec./Confirm
Press to start cooking program or set speed cooking program.
Press to confirm the setting.

(Dial)Time/Weight/Auto Menu
Rotate to select auto cook menus or enter time or weight.
OPERATION
When the oven is plugged in, the display will show "0:00" and a beep sound will be heard.
General
- Press Stop/ once to temporarily stop cooking and you can start the cooking again by pressing Start/+30Sec, or press Stop/ twice to cancel the cooking program.
- After the cooking time has elapsed, the oven beeps five times and returns to the standby mode.
Setting the Clock
- Press / to set the clock in 24-hour cycle. The hour digits will flash.
- Turn to adjust the hour digits, the input hour should be a 24-hour time value.
- Press / , the minute digits will flash.
- Turn to adjust the minute digits.
- Press / to confirm the setting. ":" will flash on the display.
NOTE:
If the clock is not set, the oven will not function when powered on.
During clock setting, if you press Stop/ , the oven will return to the previous status.
Microwave Cooking
The longest cooking time is 95 minutes. You can select a power level by
pressing
| Press | Display | Cooking Power |
| once | P100 | 100% |
| twice | P80 | 80% |
| 3 times | P50 | 50% |
| 4 times | P30 | 30% |
| 5 times | P10 | 10% |
Example: Choose 80% power for cooking 20 minutes.
- Press once. "P100" will be shown on the display.
- Press again or turn to choose 80% microwave power. "P80" will be shown on the display.
- Press Start+30Sec. to confirm.
- Turn to set the cooking time until "20:00" is shown on the display.
- Press Start+30Sec. to start cooking.
NOTE:
You can check the cooking power during cooking by pressing
During microwave cooking, each press of Start/+30Sec. can increase 30 seconds of cooking time.
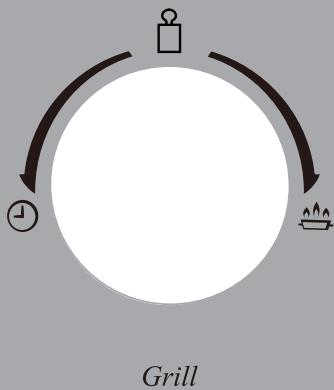
Grill/Combination Cooking
The longest cooking time is 95 minutes.
Example: Choose 55% microwave power and 45% grill power to cook for 10 minutes.
-
Press / "G" will be shown on the display.
-
Press again or turn to select C-1 mode.
-
Press Start+30Sec. to confirm.
-
Turn to set the cooking time until "10:00" is shown on the display.
-
Press Start/+30Sec. 1 to start cooking.
NOTE: If half the grill time passes, the oven beeps twice, and this is normal. In order to have a better effect of grilling food, you should turn the food over,
close the oven door then press Start/+30Sec. to continue cooking. If no operation, it will continue working.
| Display | Microwave | Grill |
| G | 100% | |
| C-1 | 55% | 45% |
| C-2 | 36% | 64% |
Speed Cooking
In standby state, press Start/430Sec. to cook with 100% power level for 30 seconds. Each press of the button will increase the cooking time by 30 seconds. The longest cooking time is 95 minutes.
Defrosting by Weight
The oven could be used to defrost food based on the weight selected. The defrosting time and power level are automatically set once the weight is programmed. The frozen food weight ranges from 100g to 2000g.
- Press once."dEF1" will be shown on the display.
- Turn to select the desired food weight.
- Press Start+30Sec. to start defrosting.
Defrosting by Time
- Press once. "dEF2" will be shown on the display.
- Turn to select the desired defrosting time.
- Press Start/+30Sec. to start defrosting.
Kitchen Timer
- Press / twice. "00:00" will be shown on the display.
-
Turn to enter the correct time (the maximum cooking time is 95 minutes).
-
Press Start/4-30Sec. to confirm. The timer indicator light will flash.
- When the kitchen time is reached, the buzzer will sound 5 times. If the clock time is set, the display will return to clock time.
Multi-Stage Cooking
Your oven can be programmed for up to 2 automatic cooking sequences. Defrosting can only be set in the first stage.
NOTE: Auto cooking cannot be selected in a cooking program.
Suppose you want to set the following cooking program:
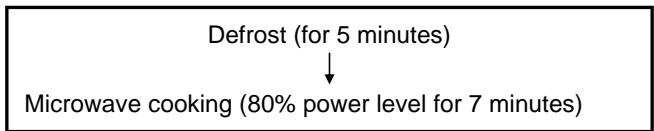
- Press . "dEF2" will be shown on the display.
- Turn to select the defrosting time until "5:00" is shown on the display.
- Press once.
- Repeatedly press or turn to select the microwave power level until "P80" is displayed.
- Press Start+30Sec. to confirm.
- Turn to select the cooking time until "7:00" displays.
- Press Start+30Sec to start cooking.
NOTE: After one cooking stage is finished, a beep sound is heard, indicating the next cooking stage has begun.
Auto Menu
For the food in the following table, it is not necessary to program the cooking power and time. Take the following steps:
- In standby mode, turn clockwise to select the desired menu from the table below.
- Press Start+30Sec. to confirm.
- Turn to select the food weight.
- Press Start+30Sec. to start cooking.
| Menu | Weight(g) |
| A-1 Pizza | 200 |
| 400 | |
| A-2 Meat | 250 |
| 350 | |
| 450 | |
| A-3 Vegetable | 200 |
| 300 | |
| 400 | |
| A-4 Pasta | 50 g (with 450 ml water) |
| 100 g (with 800 ml water) | |
| A-5 Potato | 200 |
| 400 | |
| 600 | |
| A-6 Fish | 250 |
| 350 | |
| 450 | |
| A-7 Beverage | 1 cup (120 ml) |
| 2 cups (240 ml) | |
| 3 cups (360 ml) | |
| A-8 Popcorn | 50 |
| 100 |
Child Lock
The child lock prevents unsupervised operation by children.
To set the child lock, press and hold Stop/ until a long beep sounds and will be shown on the display. In the lock state, all buttons are disabled. To cancel the child lock, press and hold Stop/ until a beep sounds and the will disappear.
CLEANING AND MAINTENANCE
Disconnect the electrical supply to the oven before cleaning.
General Advice
Frequent cleaning prevents smoke and bad odours during cooking and also sparking in the oven cavity and around the door seal.
Do not let food deposits or grease accumulate inside the oven cavity or on the door seal.
If your microwave oven is fitted with a waveguide cover (usually located inside the oven cavity on the right side wall) it must be kept clean at all times, should food deposits or grease be allowed to accumulate on the cover, sparking will occur and may damage your oven invalidating the warranty.
Before any maintenance or cleaning, disconnect the oven from the mains supply and wait for it to cool to room temperature.
Oven Door
Remove any food deposits and grease between the door seal and oven cavity using a damp cloth, it is important to keep this area clean at all times.
Do not use harsh abrasive cleaners or sharp metal scrapers to clean the oven door glass since they can scratch the surface, which may result in shattering of the glass.
Interior Walls
Remove any grease splashes from the oven cavity walls with soap and water, then rinse and dry.
The door seal and oven cavity have to be particularly well cleaned to ensure the door will close properly and to avoid sparking between the oven cavity and door assembly.
Do not use abrasive products such as scouring pads which will damage the surfaces of the oven cavity and door.
Only warm soapy water must be used to clean stainless steels surfaces.
Outer Surfaces
To clean the outside surface, use a damp cloth.
Avoid using abrasive products such as scouring pads that may damage the cosmetic surfaces. Make sure water does not seep into the ventilation slots.
Accessories should be washed in warm soapy water by hand.
CAUTION
Some waveguide covers can be easily damaged take care when cleaning.
Do not wash accessories in a dishwasher.
WARNING:
If the inside of the oven cavity and door seal are not kept scrupulously clean there is a danger of damage due to sparking inside the oven cavity invalidating the warranty.
Never scrape the oven cavity walls with sharp objects.
Never immerse the appliance, its cord or plug in water or any other liquid.
Never clean this product with a steam cleaner.
SPECIFICATIONS
| Power Consumption: | 230V~, 50Hz |
| Rated input power (Microwave): | 1450W |
| Rated output power (Microwave): | 900W |
| Rated input power (Grill): | 1000W |
| Microwave Frequency: | 2450MHz |
TROUBLESHOOTING
| Normal | |
| Microwave oven interfering TV reception | Radio and TV reception may be affected when the microwave oven is operating. It is similar to the interference of small electrical appliances, like mixer, vacuum cleaner and electric fan. It is normal. |
| Dim oven light | In low power microwave cooking, the oven light may become dim. It is normal. |
| Steam accumulating on door, hot air out of vents | In cooking, steam may come out of food. Most will escape from the vents. But some may accumulate on a cool place like the oven door. It is normal. |
| Oven started accidentally with no food in. | It is forbidden to run the unit without any food inside. It is very dangerous. |
| Trouble | Possible Cause | Remedy |
| Oven can not be started. | (1) Power cord not plugged in tightly. | Unplug. Then plug in again after 10 seconds. |
| (2) Fuse blowing or circuit breaker works. | Replace fuse or reset circuit breaker (repaired by professional personnel of authorised agent) | |
| (3) Trouble with outlet. | Test outlet with other electrical appliances. | |
| Oven does not heat. | Door not closed well. | Close door well. |
| Glass turntable makes noise when microwave oven operates. | Dirty roller rest and oven bottom. | Refer to ‘CLEANING AND CARE’ to clean dirty parts. |
Information for Users in European Union Countries
The above mark is in compliance with the Waste Electrical and Electronic Equipment Directive 2002/96/EC (WEEE). The mark indicates the requirement NOT to dispose the equipment including any spent or discarded batteries as unsorted municipal waste, but use the return and

collection systems available. If the batteries or accumulators included with this equipment display the chemical symbol Hg, Cd, or Pb, then it means that the battery has a heavy metal content of more than 0.0005% Mercury, or more than 0.002% Cadmium or more than, 0.004% Lead.
We apologise for any inconvenience caused by minor inconsistencies in these instructions, which may occur as a result of product improvement and development.
This instruction book is also available at http://www.hitiserviceeu.com/support/guides/userguides.htm
Kesa Electricals © UK, HU1 3AU 02/09 / 2011
Table des matieres
CONSIGNES DE SECURITE IMPORTANTES 2
USTENSILES DE CUISSON 6
DESCRIPTION DU FOUR. 8
INSTALLATION DU PLATEAU ROTATIF. 8
INSTALLATION SUR LE PLAN DE TRAVAIL 9
INSTALLATION DU FOUR À MICRO-ONDES. 9
PANNEAU DE CONTROL 10
UTILISATION. 11
NETTOYAGE ET ENTRETIEN 16
SPECIFICATIONS. 17
DEPANNAGE 18
INFORMATION A L'ATTENTION DES UTILISATEURS RESIDANT DANS LES PAYS MEMBRES DE L'UNION EUROPEENNE. 19
INSTRUCTIONS DE SECURITES IMPORTANTES LIRE AVEC ATTENTION ET GARDER POUR DE FUTURES UTILISATIONS
INSTALLATION DU FOUR
Démarrer/+30Sec./Confirmer
| Affichage | Micro-ondes | Grill |
| G | 100% | |
| C-1 | 55% | 45% |
| C-2 | 36% | 64% |
Cuisson express
Start/+30Sec.
Kesa Electricals © UK, HU1 3AU 02/09 / 2011
Inhoudsopgave
BELANGRIJKE VEILIGHEIDSINSTRUCTIES. 2
KEUKENGEREI. 5
OVERZICHT VAN DE OVEN 7
INSTALLATIE VAN HET DRAAIPLATEAU. 7
INSTALLATIE OP HET AANRECHT. 8
INSTALLATIE VAN DE MAGNETRONOVEN. 8
BEDIENINGSPANEEL 9
WERKING. 10
REINIGING EN ONDERHOUD. 15
SPECIFICATIONS. 16
PROBLEEMOPLOSING. 17
| Display | Magnetron | Grill |
| G | 100% | |
| C-1 | 55% | 45% |
| C-2 | 36% | 64% |
Snelkoken
Kesa Electricals © UK, HU1 3AU 02 / 09 / 2011
Indices
INSTALACE MIKROVLNÉ TROUBY
- Vyberte vodorovn'y povrch, kde bude dostatek mista pro privod vzduchuk vetracim otvorum.
Hodiny/Kuchynsky casaova
Kesa Electricals © UK, HU1 3AU 02 / 09 / 2011
Obsah
DOLEZITE BEZPECNOSTNE POKNY. 2
RIAD DO MIKROVLNNEJ RURY 5
NAZVY SUCASTI 7
MONTAZ OTOCNHO TANIERA 7
MONTAZ NA VOL'NO. 8
INSTALÁCIA MIKROVLNNEJ RÜRY. 8
OVLADACI PANEL. 9
OBSLUHA 10
CISTENIE A UDRZBA. 15
SPECIFKÁCIE 16
RIESENIE PROBLEMOV 17
INFORMÁCIE PRE SPOTREBITEL'OV V KRAJINÁCH EUROPSKEJ UNIE...18
DOLEZITÉ BEZPEČNOSTNÉ POKNY PRECÍTAJTE SI TIETO POKNY A USCHOVAJTE ICH NA BUDUCE POUŽITIE
BEZPEČNOSTné OPATRENIA NA VYVAROVANIE SA NADMERNEHO PÓSOBENIA MIKROVLNNEJ ENERGIE
Hodiny/Kuchynsky casovač
Kesa Electricals © UK, HU1 3AU 02 / 09 / 2011