
MGE25 - Microwave HITACHI - Free user manual and instructions
Find the device manual for free MGE25 HITACHI in PDF.


| Product Type | Microwave Oven |
| Brand | Hitachi |
| Model | MGE25 |
| Capacity | 25 Liters |
| Power Output | 900 W |
| Power Levels | 10 Levels |
| Control Type | Digital Touch Control |
| Display | LED Display |
| Dimensions (W x D x H) | 530 x 430 x 310 mm |
| Weight | 12.5 kg |
| Power Supply | 230 V ~ 50 Hz |
| Cooking Functions | Microwave, Grill, Convection, Auto Cook Menus |
| Door Type | Side Opening with Child Lock |
| Interior Material | Stainless Steel |
| Cleaning | Easy Clean Interior, Turntable Removable |
| Safety Features | Child Lock, Overheat Protection, Door Safety Switch |
| Spare Parts Available | Turntable, Glass Tray, Grill Rack |
| Reparability | Service Center Support, Some Parts User-Replaceable |
| Warranty | 1 Year Standard Warranty |
| User Manual Languages | English (Available for Download) |
Frequently Asked Questions - MGE25 HITACHI
User questions about MGE25 HITACHI
0 question about this device. Answer the ones you know or ask your own.
Ask a new question about this device
Download the instructions for your Microwave in PDF format for free! Find your manual MGE25 - HITACHI and take your electronic device back in hand. On this page are published all the documents necessary for the use of your device. MGE25 by HITACHI.
USER MANUAL MGE25 HITACHI
natural_image
Exterior view of a Hitachi microwave oven with digital display and control panel (no text or symbols on main body)INSTRUCTION MANUAL
Table of Contents
ELECTRICAL CONNECTION....2
IMPORTANT SAFETY INSTRUCTIONS.... 3
COOKING UTENSILS......4
OTHER HELPFUL INSTRUCTIONS .... 6
OVEN OVERVIEW 7
TURNTABLE INSTALLATION 7
COUNTERTOP INSTALLATION 8
CLEANING AND MAINTENANCE 14
SPECIFICATIONS.... 15
QUESTIONS AND ANSWERS 16
TROUBLESHOOTING 17
BEFORE YOU CALL FOR SERVICE.... 18
IMPORTANT DISPOSAL INSTRUCTIONS.... 18
WARRANTY 19
ELECTRICAL CONNECTION (UK ONLY)
For your safety please read the following information.
Warning: This appliance must be earthed.
The appliance must be connected to a 230 volts 50 cycle AC supply.
The appliance is supplied with a moulded 13 amp 3 pin mains plug fitted with a 13 amp fuse. Should the fuse require replacement, it must be replaced with a fuse rated at 13 amp and approved to BS1362.
The plug contains a removable fuse cover that must be refitted when the fuse is replaced. In the event of the fuse cover being lost or damaged, the plug must not be used until a replacement cover has been obtained.
The mains plug must not be cut off.
If you wish to extend the lead, obtain an appropriate safety approved extension lead or consult your dealer. Observe the manufacturers instructions when connecting extension leads to the set. Check the fuse rating on the new plug; this should be fitted with a 13 Amp fuse which conforms to either ASTA or BSI
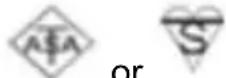
(BS1362) approvals, these are easily identifiable by either the or symbols. If you are in any doubt about the installation of an extension lead, please consult a competent electrician.
Power Cord
Do not place the appliance, a piece of furniture, etc. on the power cord (mains lead) or pinch the cord. Handle the power cord by the plug. Do not unplug the appliance by pulling from the power cord and never touch the power cord with wet hands as this could cause a short circuit or electric shock. Never make a knot in the cord or tie it with other cords. The power cords should be placed in such a way that they are not likely to be stepped on. A damaged power cord can cause fire or give you an electric shock. When it is damaged and needs to be replaced, it should be done by qualified personnel in order to prevent a hazard.
IMPORTANT SAFETY INSTRUCTIONS
PRECAUTIONS TO AVOID POSSIBLE EXPOSURE TO EXCESSIVE MICROWAVE ENERGY
- The oven cannot be operated with the door open due to the safety interlocks built in the door mechanism which switch off cooking functions when the door is opened. Operating the oven with the door open could result in harmful exposure to microwave energy. It is important not to tamper with the door mechanism.
- Do not place any object between the oven front face and the door or allow soil or cleaner residue to accumulate on sealing surfaces.
- Do not operate the oven if it is damaged. It is particularly important that the oven door closes properly and that there is no damage to the door (bent), or hinges and latches (broken or loosened), or the door seals and sealing surfaces.
- The oven should not be adjusted or repaired by anyone except qualified personnel.
- Read these instructions carefully and keep them for future reference.
- Only use utensils that are suitable for use in microwave ovens.
- When heating food in plastic or paper containers keep an eye on the oven due to the possibility of ignition. Do not use plastic or paper containers when cooking in grill or combi mode.
- If smoke is observed, switch off or unplug the appliance and keep the door closed in order to stifle any flames.
IMPORTANT SAFETY WARNINGS:
- Microwave heating of liquids can result in delayed eruptive boiling; therefore care must be taken when handling the container.
- The contents of feeding bottles and baby food jars shall be stirred or shaken and the temperature checked before consumption, in order to avoid burns. Do not heat a baby feeding bottle with a lid or teat on it in a microwave oven, as the pressure will cause it to explode.
- Eggs in their shell and whole hard-boiled eggs should not be heated in microwave ovens since they may explode, even after microwave heating has ended.
- The oven should be cleaned regularly and any food deposits removed.
- Failure to maintain the oven in a clean condition could lead to deterioration of the surface that could adversely affect the life of the appliance and possibly result in a hazardous situation.
- Only use a temperature probe recommended for this oven.
- Avoid using straight-sided containers with narrow necks.
- Stir the liquid before placing the container in the oven and again halfway through the heating time.
GB
- After heating, allow to stand in the oven for a short time. Stir or shake the contents (especially feeding bottles and baby foods) and carefully check the temperature before use.
WARNINGS:
- If the door or door seals are damaged, the oven must not be operated until it has been repaired by a competent person.
- It is hazardous for anyone other than a competent person to carry out any service or repair operation that involves the removal of a cover which gives protection against exposure to microwave energy.
- Liquids and other foods must not be heated in sealed containers since they are liable to explode.
- Only allow children to use the oven without supervision when adequate instructions have been given so that the child is able to use the oven in a safe way and understands the hazards of improper use.
- This appliance is intended for domestic use only; any other use may invalidate the warranty and might be dangerous.
- When the microwave is switched off it is NOT disconnected from the mains, to do this you must remove the plug from the mains supply outlet.
- The plug shall be the main disconnect device and shall remain operable at all times.
- The microwave oven shall not be placed in a cabinet unless it has been tested in a cabinet. Please refer to the installation instructions on page 8.
- The appliances are not intended to be operated by means of an external timer or separate remote-control system.
COOKING UTENSILS
Utensils should be checked to ensure that they are suitable for use in the microwave oven.
Materials you can use in microwave oven
| Utensils Remarks | |
| Aluminium foil | Shielding only. Small smooth pieces can be used to cover thin parts of meat or poultry to prevent overcooking.Arcing can occur if foil is too close to oven walls. The foilshould be at least 2.5cm away from oven walls. |
| Browning dish | Follow manufacturer's instructions. The bottom of browning dish must be at least 5mm above the turntable. Incorrect usage may cause the turntable to break. |
| Dinnerware | Microwave-safe only. Follow manufacturer's instructions. Do not use cracked or chipped dishes. |
| Glass jars | Always remove lid. Use only to heat food until it's warm. Most glass jars are not heat resistant and may break. |
| Glassware | Heat-resistant oven glassware only. Make sure there is no metallic trim. Do not use cracked or chipped dishes. |
| Oven cooking bags | Follow manufacturer's instructions. Do not close with metal tie. Make slits to allow steam to escape. |
| Paper plates and cups | Use for short-term cooking/warming only. Do not leave oven unattended while cooking. |
| Paper towels | Use to cover food for reheating and absorbing fat. Use with supervision for a short-term cooking only. |
| Parchment paper | Use as a cover to prevent splattering or a wrap for steaming. |
| Plastic | Microwave-safe only. Follow the manufacturer's instructions. Should be labelled "Microwave Safe". Some plastic containers soften, as the food inside gets hot. "Boiling bags" and tightly closed plastic bags should be slit, pierced or vented as directed by package. |
| Plastic wrap | Microwave-safe only. Use to cover food during cooking to retain moisture. Do not allow plastic wrap to touch food. |
| Thermometers | Microwave-safe only (meat and candy thermometers). |
| Wax paper | Use as a cover to prevent splattering and retain moisture. |
Materials to be avoided in microwave oven
Do not use plastic or paper containers when cooking in grill or combi mode.
| Utensils Remarks | |
| Aluminium tray | May cause arcing. Transfer food into microwave-safe dish. |
| Food carton with metal handle | May cause arcing. Transfer food into microwave-safe dish. |
| Metal or metal-trimmed utensils | Metal shields the food from microwave energy. Metal trim may cause arcing. |
| Metal twist ties | May cause arcing and could cause a fire in the oven. |
| Paper bags | May cause a fire in the oven. |
| Plastic foam | Plastic foam may melt or contaminate the liquid inside when exposed to high temperature. |
| Wood | Wood will dry out when used in the microwave oven and may split or crack. |
Notes:
- Care should be taken when removing utensils or the glass turntable, as they may become hot during cooking.
- Only use a thermometer that is designed for use in the microwave oven.
- Ensure the turntable is in place when you operate the oven.
OTHER HELPFUL INSTRUCTIONS
For best results and more enjoyable cooking, please read these comments thoroughly.
For Best Results:
- When determining the time for a particular food, begin by using minimum time and checking condition occasionally. It is easy to overcook food because microwaves cook very quickly.
- Small quantities of food or foods with low water content may dry out and become hard if cooked too long.
Defrosting Frozen Food:
- Foods that have been frozen can be place directly in the oven for thawing. (Be certain to remove any metallic ties or wraps).
- Defrost according to the Defrosting instructions found in this manual.
- For areas of the food thawing faster than others, cover with small pieces of aluminium foil. This helps slow down or stop the defrosting process.
- Some foods should not be completely thawed before cooking. For example, fish cooks so quickly that it is sometimes better to begin cooking while still slightly frozen.
- It may be necessary to increase or decrease the cooking time in some recipes, depending on the starting temperature of the food.
Note: Air from the vent may become warm during cooking.
Browning:
There are a few foods which are not cooked long enough in the microwave oven to brown and may need additional colour.
Coatings such as paprika and browning agents such as Worcestershire sauce may be used on chops, meat patties or chicken pieces.
Roasts, poultry or ham, cooked for 10-15 minutes or longer, will brown without extra additives.
OVEN OVERVIEW
Names of Oven Parts


Grill Rack
A) Control panel
B) Turntable shaft
C) Turntable ring assembly
D) Glass tray
E) Observation window
F) Door assembly
G) Safety interlock system
TURNTABLE INSTALLATION

a. Never place the glass tray upside down.
The glass tray should never be restricted.
b. Both glass tray and turntable ring assembly must always be used during cooking.
c. All food and containers of food are always placed on the glass tray for cooking.
d. If glass tray or turntable ring assembly cracks or breaks, contact your nearest authorised service centre.
COUNTERTOP INSTALLATION
Remove all packing material and accessories. Examine the oven for any damage such as dents or broken door. Do not install if the oven is damaged.
Cabinet: Remove any protective film found on the microwave oven cabinet surface.
Do not remove the light brown Mica cover that is attached to the inside of the oven cavity to protect the magnetron.
- Select a level surface that provides enough open space for the intake and/or outlet vents.

A minimum clearance of 3.0 inches (7.5cm) is required between the oven and any adjacent walls. One side must be open.
(1) Leave a minimum clearance of 12 inches (30cm) above the oven.
(2) Do not remove the feet from the bottom of the oven.
(3) Blocking the intake and/or outlet openings can damage the oven.
(4) Place the oven as far away from radios and TV as possible. Operation of microwave oven may cause interference to your radio or TV reception.
- Plug your oven into a standard household outlet. Be sure the voltage and the frequency is the same as the voltage and the frequency on the rating label.
WARNING: Do not install the oven over a range cooktop or other heat-producing appliance. If installed near or over a heat source, the oven could be damaged and the warranty would be void.
Accessible surfaces may get hot during operation.

CONTROL PANEL
DISPLAY SCREEN
Cooking time, power, indicators and present time are displayed.
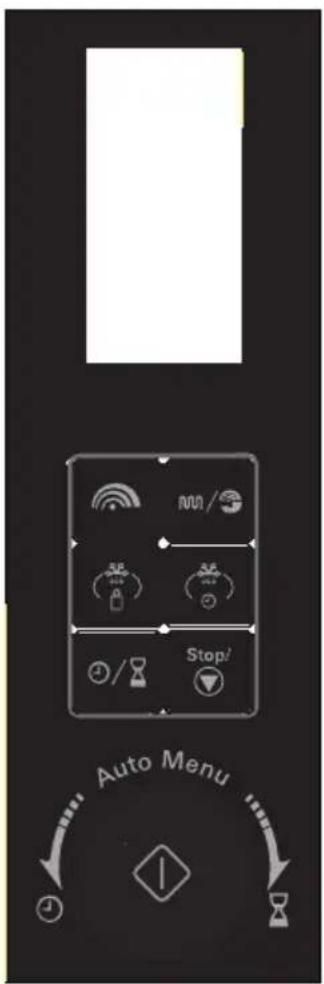

MICROWAVE
Press to set microwave power level.

GRILL/COMBI.
Press repeatedly to set a grill-cooking program or select one of four combination cooking settings.

WEIGHT DEFROST
Press to defrost food by weight.

TIME DEFROST
Press to defrost food by time.

CLOCK/KITCHEN TIMER
Press to set clock time or kitchen timer.
Stop/

STOP/CLEAR
Press to cancel setting or reset the oven before setting a cooking program.
Press once to temporarily stop cooking, or press twice to cancel cooking.
It is also used for setting child lock.
Start/+30Sec./

Press to start cooking program or set speed cooking program.
Press to confirm the setting.

/ AUTO MENU/

(Dial)
Rotate to select auto cook menus or enter time or weight.
OPERATION
When the oven is plugged in, the display will show "0:00" and a beep sound will be heard.
Setting the Clock
- Press 📋/☒ to set the clock in 24-hour cycle. The hour digits will flash.
- Turn 🔍 to adjust the hour digits, the input hour should be a 24-hour time value.
- Press 📋/☒, the minute digits blink.
- Turn 📋 to adjust the minute digits.
- Press ☐/8 to confirm the setting. “:” blinks on the display.
Note:
- If the clock is not set, the oven will not function when powered on.
- During clock setting, if you press status, the oven will return to the previous
Kitchen Timer
- Press twice, "00:00" will show on the display.
- Turn to enter the correct time (the maximum cooking time is 95 minutes).
- Press ☐ to confirm. indicator light will flash.
- When the kitchen time is reached, the buzzer will sound 5 times. If the clock time is set, the display will return to clock time.
Microwave Cooking
The longest cooking time is 95 minutes. You can select a power level by
pressing
| Press Microwave | Display Cooking Power | |||
| once | P100 | 100% | ||
| twice | P80 | 80% | ||
| 3 times | P50 | 50% | ||
| 4 times | P30 | 30% | ||
| 5 times | P10 | 10% | ||
Example: Choose 80% power for cooking 20 minutes.
- Press twice, "P80" will show on the display. and indicator lights will come on.
- Press ⏻ to confirm.
- Turn 🔍 to set the cooking time until "20:00" shows on the display.
- Press to start cooking. and indicator lights will flash.
Note: You can check the cooking power during cooking by pressing

Grill
The longest cooking time is 95 minutes.
Example: Choose 100% power for cooking 35 minutes.
- Press 📌/ 🔒. "G" will show on the display. 🔒 indicator light will come on.
- Press ⏻ to confirm.
- Turn to set the cooking time until "35:00" shows on the display.
- Press ☐ to start cooking. 📋 indicator light will flash.
Note: If half the grill time passes, the oven beeps twice, and this is normal. In order to have a better effect of grilling food, you should turn the food over,
close the oven door then press 📋 to continue cooking. If no operation, it will continue working.
Combination Cooking
This feature allows you to combine microwave, grill or convection cooking on four different settings. The longest cooking time is 95 minutes.
Example: Use combination C-1 to cook for 40 minutes.
- Press / repeatedly until "C-1" shows on the display.
• and indicator lights will come on.
- to confirm. Press
- Turn 🔍 to set the cooking time until "40:00" shows on the display.
- Press to start cooking. and indicator lights will flash.
| Press Display nnn / | Microwave | Power | Grill Power |
| once | G | 0% | 100% |
| twice | C-1 55% | 45% | |
| thretimes | C-2 | 36% | 64% |
GB
Weight Defrost
The oven could be used to defrost food based on the weight selected. The defrosting time and power level are automatically set once the weight is programmed. The frozen food weight ranges from 100g to 2000g.
- Press "dEF1" will show on the display.
• and indicator lights will come on.
- Turn 🔔 to select the desired food weight. "g" will come on.
- Press to start defrosting. "g" will go out, indicator lights will flash.
Defrost by Time
The longest defrosting time is 95 minutes.
- Press "dEF2" will show on the display.
• and indicator lights will come on.
- Turn to select the desired defrosting time.
- Press to start defrosting. and indicator lights will flash.
Note: Each press of ⏻ will increase the defrosting time by 30 seconds.
Speed Cooking
In standby state, press 🖼️ to cook with 100% power level for 30 seconds. Each press of the button will increase the cooking time by 30 seconds. The longest cooking time is 95 minutes.
In standby state, turn 📁 anticlockwise to choose cooking time then press

to cook with 100% microwave power.
Auto Menu
For the food in the following table, it is not necessary to program the cooking power and time. Take the following steps:
- In standby state, turn 📄 to choose the desired menu.
- Press 1 to confirm.
- Turn to choose weight.
- Press to start cooking.
| Menu | Weight(g) |
| A-1 Pizza | 200 |
| 400 | |
| A-2 Meat | 250 |
| 350 | |
| 450 | |
| A-3 Vegetable | 200 |
| 300 | |
| 400 | |
| A-4 Pasta | 50 (with 450ml cold water) |
| 100 (with 800ml cold water) | |
| A-5 Potato | 200 |
| 400 | |
| 600 | |
| A-6 Fish | 250 |
| 350 | |
| 450 | |
| A-7 Beverage | 1 (about 120ml) |
| 2 (about 240ml) | |
| 3 (about 360ml) | |
| A-8 Popcorn | 50 |
| 100 |
Note: The result of auto cook depends on factors such as the shape and size of food, your personal preferences as to the doneness of certain foods and even how well you happen to place food in the oven. If you find the result at any rate not quite satisfactory, please adjust the cooking time accordingly.
Multi-Stage Cooking
Your oven can be programmed for up to 2 automatic cooking sequences. Defrosting can only be set in the first stage.
Suppose you want to set the following cooking program:

flowchart
graph TD
    A["Defrost (5 minutes)"] --> B["Microwave cooking (80% power level for 7 minutes)"]
GB
- Press "dappears on the display.
- Turn 📋 to select the defrosting time until "5:00" displays.
- Press once.
- Press 📄 again or turn 🌿 to select the microwave power level until "P80" displays.
- Press 1 to confirm.
- Turn 📋 to select the cooking time until "7:00" displays.
- Press ☐ to start cooking.
Note: After one cooking stage is finished, a beep sound is heard, indicating the next cooking stage has begun.
Child Lock
The child lock prevents unsupervised operation by children.
To set the child lock, press and hold 3 seconds then a long beep sounds and flashes on the display. In the lock state, all buttons are disabled.
To cancel the child lock, press and hold 3 seconds then a beep sounds. stops flashing on the display.
CLEANING AND MAINTENANCE
Disconnect the electrical supply to the oven before cleaning.
General Advice
Frequent cleaning prevents smoke and bad odours during cooking and also sparking in the oven cavity and around the door seal.
Do not let food deposits or grease accumulate inside the oven cavity or on the door seal.
If your microwave oven is fitted with a waveguide cover (usually located inside the oven cavity on the right side wall) it must be kept clean at all times, should food deposits or grease be allowed to accumulate on the cover, sparking will occur and may damage your oven invalidating the warranty.
Before any maintenance or cleaning, disconnect the oven from the mains supply and wait for it to cool to room temperature.
Oven Door
Remove any food deposits and grease between the door seal and oven cavity using a damp cloth, it is important to keep this area clean at all times.
Interior Walls
Remove any grease splashes from the oven cavity walls with soap and water, then rinse and dry.
The door seal and oven cavity have to be particularly well cleaned to ensure the door will close properly and to avoid sparking between the oven cavity and door assembly.
Do not use abrasive products such as scouring pads which will damage the surfaces of the oven cavity and door.
Only warm soapy water must be used to clean stainless steels surfaces.
Outer Surfaces
To clean the outside surface, use a damp cloth.
Avoid using abrasive products such as scouring pads that may damage the cosmetic surfaces. Make sure water does not seep into the ventilation slots.
Accessories should be washed in warm soapy water by hand.
CAUTION
Some waveguide covers can be easily damaged take care when cleaning. Do not wash accessories in a dishwasher.
WARNINGS:
If the inside of the oven cavity and door seal are not kept scrupulously clean there is a danger of damage due to sparking inside the oven cavity invalidating the warranty.
Never scrape the oven cavity walls with sharp objects.
Never immerse the appliance, its cord or plug in water or any other liquid.
Never clean this product with a steam cleaner.
SPECIFICATIONS
| Power Consumption: | 230V AC, 50Hz |
| Rated Input (Grill): | 1000W |
| Rated Input (Microwave): | 1450W |
| Rated Output (Microwave): | 900W |
| Microwave Frequency: | 2450MHz |
| Outside Dimensions: | mm(L)×411m20(5)/3 mm(H) |
| Oven Capacity: | 25 Litres |
| Net Weight: | Approx. 16.0 |
QUESTIONS AND ANSWERS
Q. What is wrong when the oven light will not glow?
A. * Light bulb has blown.
*Door not closed.
Q. Why is steam coming out of the air exhaust vent and/or why is water dripping from the bottom of the door?
A. Steam is normally produced during cooking operations. This microwave oven has been made to vent this steam out of the side and top vents, occasionally this steam condenses on the door and water then drips out at the bottom of the door. This is quite normal and safe.
Q. Does microwave energy pass through the viewing screen in the door?
A. No. The screen reflects the energy to the oven cavity, the holes, or ports are made to allow light to pass, they do not let microwave energy through.
Q. Will the microwave oven be damaged if it operates while empty?
A. Yes. Never run it empty.
Q. Why do eggs sometimes pop?
A. When baking or poaching eggs, the yolk may pop due to steam build-up inside the yolk membrane. To prevent this, simply pierce the yolk with a toothpick before cooking. Never cook eggs without piercing their shells.
Q. Why is standing time recommended after the cooking operation has been completed?
A. Standing time is very important.
With microwave cooking, the heat is in the food, not in the oven. Many foods build up enough internal heat to allow the cooking process to continue, even after the food is removed from the oven. Standing time for joints of meat, large vegetables and cakes is to allow the inside to cook completely, without overcooking the outside.
Q. Why does my oven not always cook fast as the microwave cooking guide says?
A. Check your cooking guide again, to make sure you've followed directions exactly and to see what might cause variations in cooking times. Cooking guide times and heat settings are suggestions, to help prevent overcooking the most common problem in getting used to a microwave oven. Variations in the size, shape and weights could require longer cooking time. Use your own judgement along with the cooking guide suggestions to check whether
the food has been properly cooked just as you would do with a conventional cooker.
Q. Why do sparks and crackling (arcing) occur in the oven?
A. There may be several reasons why sparks and crackling (arcing) within the cavity happens.
* You have left a fork or other metal utensils in the oven.
* You are using dishes with metal parts or trim (silver or gold).
* You are using a large amount of metal foil.
* You are using a metal twist tie.
TROUBLESHOOTING
| Normal | |
| Microwave oven interfering TV reception | Radio and TV reception may be affected when the microwave oven is operating. It is similar to the interference of small electrical appliances, like mixer, vacuum cleaner and electric fan. It is normal. |
| Dim oven light In low power m | microwave cooking, the oven light may become dim. It is normal. |
| Steam accumulating on door, hot air out of vents | In cooking, steam may come out of food. Most will escape from the vents. But some may accumulate on a cool place like the oven door. It is normal. |
| Oven started accidentally with no food in. | It is forbidden to run the unit without any food inside. It is very dangerous. |
| Trouble | Possible | Cause | Remedy |
| Oven can not be started. | (1) Power cord not plugged in tightly. | Unplug. Then plug in again after 10 seconds. | |
| (2) Fuse blowing or circuit breaker works. | Replace fuse or reset circuit breaker (repaired by professional personnel of authorised agent) | ||
| (3) Trouble with outlet. Test outlet with other electrical appliances. | |||
| Oven does not heat. Door not closed well. Close door well. | |||
| Glass turntable makes noise when microwave oven operates. | Dirty roller rest and oven bottom. | Refer to ‘CLEANING AND CARE’ to clean dirty parts. | |
BEFORE YOU CALL FOR SERVICE
Refer to the following short checklist. You may find that the problem you are experiencing has nothing to do with the microwave oven itself. A couple of quick checks may save you an unnecessary service call.
Problem
The oven doesn't work at all.
Check the following
- The mains plug is securely plugged into the mains socket.
- The door is firmly closed and the door hooks are not broken.
- The cooking time is set on the timer selector control.
- The mains circuit breaker in the home has tripped.
Problem
“Arcing” or sparking in the oven interior.
Check the following
- Any dishes, trays etc which are made of metal or have metal trims must not be used in the microwave oven.
- Metal skewers should be covered with food and make sure they don't touch the sides of the oven interior when rotating. If "arcing" occurs again, remove skewers until food is cooked.
- Remove any other metal cookware.
IMPORTANT DISPOSAL INSTRUCTIONS
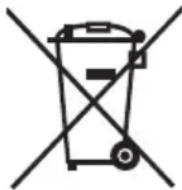

As a responsible retailer we care about the environment.
As such we urge you to follow the correct disposal procedure for your product and packaging materials. This will help conserve natural resources and ensure that it is recycled in a manner that protects health and the environment.
You must dispose of this product and its packaging according to local laws and regulations. Because this product contains electronic components, the product and its accessories must be disposed of separately from household waste when the product reaches its end of life.
Contact your local authority to learn about disposal and recycling.
The product should be taken to your local collection point for recycling.
Some collection points accept products free of charge.
The above mark is in compliance with the Waste Electrical and Electronic Equipment Directive 2002/96/EC (WEEE). The mark indicates the requirement NOT to dispose the equipment including any spent or discarded batteries as unsorted municipal waste, but use the return and collection systems available.
HITACHI
MGE25 Warranty
Hitachi Europe Ltd.
If Something doesn't seem to work
If there is something about your appliance which you do not understand and you live in the UK, you can phone our helpline during normal hours on: 0844 8009595. (COMET HELPLINE)
Calls are charged at standard rates.
Guarantor: Comet Group plc Comet House Three Rivers Court Rickmansworth, Hertfordshire, WD3 1FX
Kesa Electricals UK, HU1 3AU 18/05/2010
- Table of Contents
- ELECTRICAL CONNECTION (UK ONLY)
- Warning: This appliance must be earthed.
- The mains plug must not be cut off.
- Power Cord
- IMPORTANT SAFETY INSTRUCTIONS
- PRECAUTIONS TO AVOID POSSIBLE EXPOSURE TO EXCESSIVE MICROWAVE ENERGY
- IMPORTANT SAFETY WARNINGS:
- GB
- WARNINGS:
- COOKING UTENSILS
- Materials to be avoided in microwave oven
- Notes:
- OTHER HELPFUL INSTRUCTIONS
- For Best Results:
- Defrosting Frozen Food:
- Browning:
- OVEN OVERVIEW
- TURNTABLE INSTALLATION
- COUNTERTOP INSTALLATION
- CONTROL PANEL
- DISPLAY SCREEN
- MICROWAVE
- GRILL/COMBI.
- WEIGHT DEFROST
- TIME DEFROST
- CLOCK/KITCHEN TIMER
- Stop/
- STOP/CLEAR
- Start/+30Sec./
- / AUTO MENU/
- (Dial)
- OPERATION
- Setting the Clock
- Note:
- Kitchen Timer
- Microwave Cooking
- Grill
- Combination Cooking
- Defrost by Time
- Speed Cooking
- Auto Menu
- Multi-Stage Cooking
- Child Lock
- CLEANING AND MAINTENANCE
- General Advice
- Oven Door
- Interior Walls
- Outer Surfaces
- CAUTION
- QUESTIONS AND ANSWERS
- BEFORE YOU CALL FOR SERVICE
- Problem
- Check the following
- IMPORTANT DISPOSAL INSTRUCTIONS
- As a responsible retailer we care about the environment.
- HITACHI
- MGE25 Warranty
- If Something doesn't seem to work
Brand : HITACHI
Model : MGE25
Category : Microwave