
MR8140 - Microwave HITACHI - Free user manual and instructions
Find the device manual for free MR8140 HITACHI in PDF.


| Product Type | Microwave Oven |
| Brand | Hitachi |
| Model | MR8140 |
| Color | White |
| Capacity | 0.8 cu ft |
| Power Output | 800 W |
| Control Type | Digital with LED Display |
| Dimensions (H x W x D) | 10.2 x 17.5 x 14.2 inches |
| Weight | 25 lbs |
| Voltage | 120 V / 60 Hz |
| Auto Cook Programs | Yes (Popcorn, Potato, Pizza, etc.) |
| Defrost Function | By Weight or Time |
| Timer | Up to 99 minutes 99 seconds |
| Clock | 12-Hour or 24-Hour Display |
| Child Safety Lock | Yes |
| Interior Light | Yes |
| Turntable | Glass, 10.6 inch diameter |
| Cleaning | Wipe interior and exterior with damp cloth |
| Repair Service | Contact Hitachi authorized service centers |
Frequently Asked Questions - MR8140 HITACHI
User questions about MR8140 HITACHI
0 question about this device. Answer the ones you know or ask your own.
Ask a new question about this device
Download the instructions for your Microwave in PDF format for free! Find your manual MR8140 - HITACHI and take your electronic device back in hand. On this page are published all the documents necessary for the use of your device. MR8140 by HITACHI.
USER MANUAL MR8140 HITACHI
natural_image
Line drawing of a microwave oven with control panel and door (no text or symbols)IMPORTANT:
Read the safety instructions and precautions carefully before using the microwave oven.
Keep all documents relating to the microwave oven in a safe place.
THESE INSTRUCTIONS ARE FOR AN 800 WATT OVEN (IEC705).
CONTENTS
- SAFETY PRECAUTIONS 2
- IMPORTANT SAFETY INSTRUCTIONS....3
- NAMES AND FUNCTIONS OF PARTS 4
OPERATION PANEL 5 - ELECTRICAL CONNECTIONS
- INSTALLATION
- DO'S AND DON'TS 7
7 CONTAINERS ...... - PREPARATION FOR USE 9
HOW TO SET THE CLOCK
HOW TO SELECT MICROWAVE COOKING POWER......9
HOW TO DETERMINE MICROWAVE COOKING TIME 9
HINTS FOR MICROWAVE COOKING 10
HINTS FOR DEFROSTING....10 - OPERATION PROCEDURE....10
MICROWAVE COOKING 10
DEFROSTING 12
HOW TO USE DELAY START 12
HOW TO USE MEMORY 13
HOW TO USE PAUSE/CLEAR 14
HOW TO USE RECALL 14 - NOTES ON USE 15
- CLEANING AND CARE 16
- BEFORE ASKING FOR REPAIR 17
- SPECIFICATIONS....17
This appliance complies with the requirements of BS800 and EN55014 regarding suppression of radio and television interference
This appliance has been manufactured for household use only. It is not guaranteed for business or commercial use.
1. SAFETY PRECAUTIONS
Please read the following precautions to prevent microwave leakage.
PRECAUTIONS WHEN USING YOUR MICROWAVE OVEN
Because the door on your microwave oven has been carefully designed to contain the microwave energy, the precautions below are important.
-
Do not tamper with or attempt to defeat the safety interlocks which are operated by the door mechanism, or to make any irregular attempt to cause the appliance to operate with the door open.
-
Do not place any object between the oven front face and the door or allow dirt or cleaner residue to accumulate on sealing surfaces.
-
Do not operate the oven if it is damaged until it has been repaired by a service technician trained by Hitachi.
It is particularly important that the door closes properly and that there is no damage to the:
(a) Door (bent),
(b) Hinges and latches (broken or loosened),
(c) Door seals and door seal areas (broken or cracked).
-
It is dangerous for this oven to be adjusted or repaired by anyone other than a properly qualified service technician trained by Hitachi.
-
Do not operate the oven empty. The appliance should not be operated without food in the oven, operation in this manner being likely to damage the appliance.
2. IMPORTANT SAFETY INSTRUCTIONS
When using electrical appliances basic safety precautions should be followed, including the following:
WARNING — To reduce the risk of burns, electric shock, fire, injury to persons or exposure to excessive microwave energy:
- Read all instructions before using the appliance.
- Read and follow the specific "SAFETY PRECAUTIONS" found on page 2.
- This appliance must be earthed. Connect only to properly earthed outlet.
- Install or locate this appliance only in accordance with the provided installation instructions.
- Some products such as whole eggs and sealed containers — for example, closed glass jars, narrow necked containers — may explode and should not be heated in this oven.
- Use this appliance only for its intended use as described in this manual.
7 As with any appliance, close supervision is necessary when used by children. - Do not operate this appliance if it has a damaged cord or plug, if it is not working properly, or if it has been damaged or dropped.
- This appliance should be serviced only by a service technician trained by Hitachi. Contact nearest authorized service facility for examination, repair or adjustment.
- Do not cover or block any openings on the appliance.
- Do not use outdoors.
- Do not immerse cord or plug in water.
- Keep cord away from heated surfaces.
- Do not let cord hang over edge of table or counter.
- Use only mild-non-abrasive soaps or detergents applied with a sponge or soft cloth when cleaning surfaces of door and oven. See "CLEANING AND CARE" of your microwave oven on page 16.
- To reduce the risk of fire in the oven cavity:
a. Do not overcook food. Carefully attend appliance if paper, plastic, or other combustible materials are placed inside the oven to facilitate cooking.
b. Do not use re-cycled kitchen paper as it may contain metal particles.
c. Remove wire twist-ties from paper or plastic bags before placing bag in oven.
d. If materials inside the oven should ignite, keep oven door closed, turn oven off, and disconnect the power cord, or shut off power at the fuse or circuit breaker panel.
SAVE THESE INSTRUCTIONS
3. NAMES AND FUNCTIONS OF PARTS

How to set roller ring and turntable
Locate the roller ring in the bottom of the oven, and place the turntable on top.
Make sure it is located properly to prevent any damage when the turntable operates.

OPERATION PANEL

'BLEEP' SIGNAL
A 'bleep' sounds when a pad is pressed correctly. If a 'bleep' is not heard when a pad is pressed the oven has not accepted the instruction.
There will be three audible 'bleeps' between stages and at the end of the programme.
4. ELECTRICAL CONNECTIONS
WARNING - THIS APPLIANCE MUST BE EARTHED

IMPORTANT
The wires in this mains lead are coloured in accordance with the following code:
| Green-and Yellow: | Earth |
| Blue: | Neutral |
| Brown: | Live |
As the colours of the wires in the mains lead of this appliance may not correspond with the coloured markings identifying the terminals in your plug, proceed as follows.
The wire which is coloured green-and-yellow must be connected to the terminal in the plug which is marked with the letter E or by the earth symbol ± or coloured green or green-and-yellow.
The wire which is coloured blue must be connected to the terminal which is marked with the letter N or coloured black.
The wire which is coloured brown must be connected to the terminal which is marked with the letter L or coloured red.
In the U.K., the appliance must be connected to the supply by a properly earthed 3 pin plug (minimum capacity 13 amp). If a BS 1363 fused plug is used, it should be fitted with a 13 amp fuse to BS 1362. Seek professional advice if you are unsure of the correct procedure for the above.
5. INSTALLATION
Remove all the packing from the oven, and check for any damage, for example, deformation or breakage of the door, gaps around the door, or dents on the cabinet or door.
Should any damage be found, do not use the microwave oven but contact a Hitachi agent. The serviceman will check the damage and repair the oven if necessary.
PLACE OF INSTALLATION
Place the microwave oven on a level and sturdy surface.

natural_image
Line drawing of a microwave oven with control panel and front panel (no text or symbols)If the surface is not level, the door may not open automatically.
Do not place the microwave oven near a gas appliance which produces heat and steam or near the sink where water may splash on it.

natural_image
Illustration of a microwave oven with steam rising from a stove, emitting smoke (no text or symbols)Heat, steam or water may cause parts failure and damage.
Allow an ample space between the microwave oven and wall.
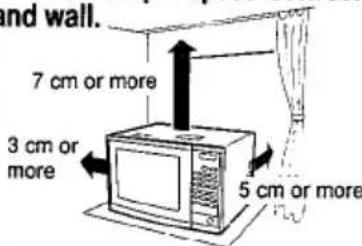
The wall may be soiled with the excess steam mist from the air outlets at the rear. Do not place the microwave oven near a curtain.
Allow a space of 7 cm or more from the top surface, 3 cm either side and a minimum 5 cm at the rear for ventilation during cooking of the microwave oven.
Place the microwave oven more than three metres away from radios, TVs, and antenna lines.

The microwave oven may cause noise interference or distort the picture.
Air inlets and air outlets should be kept free at all times to allow for ventilation.
Do not place the power cord across the oven or against a hot surface.
6. DO'S AND DON'TS
To use the microwave oven safely, be sure to observe the following rules:
| Do not remove the cabinet.The cabinet contains high voltage wiring, and it is dangerous. | 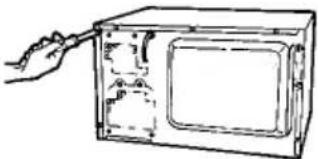 |
| Do not insert anything into the holes of the safety catches, air outlets, air inlets, the small holes inside the oven, or the holes at the rear of the appliance.The insertion may cause not only the failure of the switches and internal parts but there is also the danger of an electric shock. | 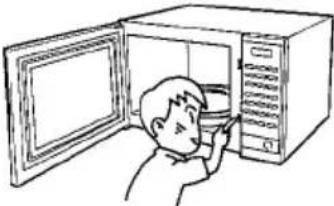 |
| Do not run the microwave oven when the turntable is empty.The door, turntable, and roller ring will be overheated and the life of the magnetron, an important part of the microwave oven, will be shortened. |  |
| Do not cover the air outlets or inlets on the cabinet, nor place anything on the cabinet.The microwave oven may be damaged because the internal parts cannot be cooled sufficiently. Also, the item placed on the cabinet may be overheated and become dangerous. |  |
| Do not boil eggs in the microwave oven.The eggs will explode because of the buildup of pressure within the shell.When cooking poached or baked eggs, pierce egg yolk with a pointed knife. |  |
If the microwave oven is out of order or damaged, do not try to repair it by yourself. Contact your nearest Hitachi service agent.
- CONTAINERS
| Container type | Explanation | Microwave | |
| Heat resisting glassware | Glass containers with high heat-resisting properties such as Pyrex and Corning are the most suitable for the microwave oven | YES | |
| Normal glassware | Glass containers that may be broken easily by the sudden increase of temperature should be used carefully Table glassware can be used for drinks, fruits, and sweets. Lead crystal is unsuitable NOTE: Do not use plates or receptacles made of coloured glass or having metallic decorations, since these can be damaged. | YES | |
| Heat resisting ceramic ware | Ceramic ware and glazed earthenware are suitable | YES | |
| Normal ceramic ware | Containers having cracks, scratches, or metal brims cannot be used | YES | |
| Polypropylene containers | Polypropylene containers can be used if the temperature of the food does not exceed 100°C. | YES | |
| Other containers | Melamine, styrol, and urea resin containers absorb the microwaves and easily become hot or are weak against heat. | NO | |
| Metalware, iron skewers, wire nets, etc. | Since the microwaves cannot pass through these items, they cannot be used for microwave cooking Metal skewers and aluminum foil may be used partially for some types of cooking, but they must not touch the walls of the oven | NO | |
| Plastic films | Plastic films that can resist temperatures of 120°C or higher can be used if the temperature of the food is not estimated to exceed 100°C Note, however, that plastic film is not suitable for wrapping meat or foods with a high fat or sugar content as it may melt when heated | YES | |
| Bamboo ware, woodenware, etc | These containers may burn if they are heated for a long time (They can be used for microwave cooking for a short time.) | YES | |
How to test that a dish can be used in the microwave
First, put the dish on the turntable without food, and place a glass containing approximately 100 cc of water on the dish. Then, select HIGH POWER and heat the water for 15 to 30 seconds. If the dish does not become warm, it can be used in the microwave oven; if it becomes warm, it cannot be used
8. PREPARATION FOR USE
HOW TO SET THE CLOCK
Example: To set 12:30 (a.m. or p.m.)
- Press Clock Pad.
- Press numeric pads as follows:
press 1
press 2
press 3
press 0
- Press Clock Pad.
• Time of day is entered and locked into display.
Example:
12:30
NOTE:
- The oven will not accept a time entry higher than 12:59 (e.g. 13:00)
(When a time of more than 12:59 is set, the oven accepts that time but the correct time set before is indicated in the display window) - To change the time of day already set, set a new time using the same procedure. The old time is replaced with the new one.
- Set the clock before starting the oven.
- The clock is cleared when the power supply cord is disconnected or at power failure.
HOW TO SELECT MICROWAVE COOKING POWER THIS OVEN IS RATED AT 800 WATTS (IEC705)
The microwave oven provides six power levels. Select the power level suitable to the food by using the numeric pads inconjunction with instructions on page 11.
They are as follows:
HIGH 800W power Press 'Time' Pad
M.HIGH 560W power Press Pad 7
MEDIUM 400W power Press Pad 5
M.LOW 320W power Press Pad 3
LOW 120W power Press Pad 1
REST No power Press Pad 0
HIGH - M.HIGH ( )
Select these power levels for reheating, cooking, boiling and steaming.
M.HIGH - MEDIUM ( )
Select these power levels for foods that benefit from slower cooking, such as joints of meat and delicate fish dishes.
MEDIUM - M.LOW ( )
Select these power levels for casseroles, milk puddings and egg dishes.
LOW( )
Select this power level for softening butter or keeping food warm.
HOW TO DETERMINE MICROWAVE COOKING TIME
The required cooking time varies with the weight and density of food, temperature of the food, and the container to be used. Since food that is heated too much cannot be made good, set the cooking time shorter than the estimated one and add more time if necessary after checking the state of the food.
1) The cooking time is roughly proportional to the quantity of food. If the quantity is doubled, the cooking time should be a little less than doubled, and if the quantity is reduced to half, the cooking time should be reduced to a little more than half.

2) Food that has been stored in a refrigerator is cooler than food kept at room temperature and therefore requires longer cooking time-approximately 1.3 of normal recommended time.
3) Food that is thin or light textured is heated more quickly than thicker or denser foods.

1) Food with skins such as potatoes and tomatoes should be pierced or slit before cooking.
2) Vegetables should be cooked in a covered container to retain moisture.
3) Popcorn should be made in a special popcorn pan for the microwave oven.
4) After cooking or reheating food needs to stand for a while to allow the heat to equalize within the food.
This can take place in the oven or outside.
HINTS FOR DEFROSTING
1) To defrost irregular shaped food evenly, wrap thin parts of the food with a piece of aluminum foil.
Aluminum foil
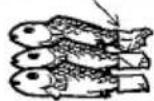
This will shield the sensitive area from starting to cook whilst the rest is still defrosting.
2) Microwaves cannot penetrate through to the centre of a large joint of meat, so allow it to stand at room temperature for a while before cooking.
A piece of meat weighing 1.5 kg/3 lb needs to be left at room temperature for 45 to 60 minutes after being defrosted by the microwave oven.
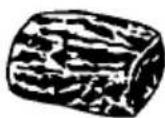
3) To defrost the food evenly, turn over or rearrange the food in the oven halfway through the defrosting time.

4) Pieces of steak, meat, or chicken frozen together should be separated as soon as they start defrosting.
5) Meat portions, with the exception of pork or chicken can be defrosted and cooked without standing in between.
6) Food that is covered, will defrost and cook more quickly and retain its moisture.
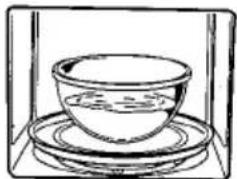
1 Open the door and put the food in the oven.
- The food must be placed on the turntable. If the food protrudes beyond the turntable, it cannot rotate smoothly.
- When closing the door, push it against the oven till it clicks. If the door is not closed securely, the microwave oven may not operate.
natural_image
Simple line drawing of a bowl placed on a tray inside a container (no text or symbols)- Select timed cooking by pressing Time Pad.
- This causes the time of day shown on the display to disappear and the output indicator "HIGH" and "STAGE1" to light up.
-
For the adjustment of cooking power, see "How to select microwave cooking power other than high" on page 9 and 11.
-
Set cooking time by pressing Numeric Pads.

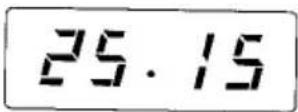
- Stage indicator light turns off. Cooking time appears in the display window in minutes and seconds. (A maximum of 99 minutes and 99 seconds may be programmed)
Example: 25 minutes 15 seconds.
- Press the Start Pad (◇).

- The oven lamp will light up and the oven will operate.
• The cooking time counts down. - There will be three audible "bleeps" when the cooking time is complete.
Then, the present time of day reappears on the display.
HOW TO SELECT MICROWAVE COOKING POWER OTHER THAN HIGH
Follow instructions 1, 2 and 3 for microwave cooking on page 10 and proceed as follows:
- Press Power pad (☐-☐).
- Select a lower cooking power by pressing numeric pads.
0
1
3
5
7
• The selected power indicator light turns on.
NOTE
- The cooking power is described above the appropriate numeric pad on the operation panel.
0 - Rest, 1 - Low, 3 - Med. Low, 5 - Medium,
7 - Med. High
- Press the Start pad (◇).

- The oven lamp will light up and the oven will operate.
• The cooking time counts down.
- There will be three audible 'bleeps' when the cooking time is complete.
- Then, the present time of day reappears on the display.
TWO STAGE COOKING
This microwave oven can be programmed to carry out 2-stage cooking.
-
Follow instructions 1 to 3 for 1 stage cooking on page 10.
-
If using a power level other than High, follow instructions 5 and 6 on this page.
-
Before pressing Start, select second stage of cooking by pressing Time Pad.

- Stage indicator light "STAGE 2" and power indicator light "HIGH" turn on.
- Set second stage cooking time by pressing Numeric Pads.
0 to 9
• Stage indicator light turns off.
- Second stage cooking time appears in the display window.
NOTE:
-
To select a power level other than 'HIGH' follow steps 5 and 6 on this page, then proceed as follows:
-
Select cooking power by pressing Power Pad.
- Select a lower cocking power by pressing Numeric Pads.
0
1
3
5
7
• Second stage power indicator light turns on.
- Press Start Pad ( ◊ ).
- Oven light turns on. First stage cooking time and power indicator light turn on again in the display window and countdown in seconds begins.
- When first stage cooking ends, the 'bleeper' sounds 3 times. Second stage cooking time and power indicator light turn on again in display window and count-down in seconds begins.
- When second stage cooking ends, the 'bleeper' sounds 4 times and the power is shut off automatically.
- Indicator light and oven light turn off. "Time of Day" appears in display window.
NOTE:
- Some examples of 2 stage cooking are:
- Any of the above time cooking may be preceded by DELAY START.
DEFROSTING
ONE STAGE DEFROST
- Open the door and put the food in the oven.
- The food must be placed on the turntable. If the food protrudes beyond the turntable, it cannot rotate smoothly.
- When closing the door, push it against the oven till it clicks. If the door is not closed securely, the microwave oven may not operate.

natural_image
Simple line drawing of a dessert on a plate inside a transparent container (no text or symbols)- Press Defrost Pad.

- Clock time disappears. Stage indicator light "STAGE 1." and defrost indicator light "DEF" turn on in display window.
- Set defrost time by pressing Numeric Pads.

- Stage indicator light turns off. Defrost time appears in display window in minutes and seconds (A maximum of 99 minutes and 99 seconds may be programmed.)
[4. Press Start Pad. ◆]

TWO STAGE COOKING
- Before pressing Start Pad, select second cooking time by pressing Time Pad.

- Stage indicator light "STAGE 2" and power indicator light "HIGH" turn on.
- Set second stage cooking time by pressing Numeric Pads.

- Stage indicator light turns off. Second stage cooking time appears in display window.
NOTE:
-
To select a power level other than 'HIGH' follow steps 4 and 5, then proceed as follows:
-
Select cooking power by pressing Power Pad.
- Select cooking power except "HIGH" by pressing Numeric Pads.

• Second stage power indicator light turns on.
- Press Start Pad (◇).

- Oven light turns on and defrosting begins. Time will count down second by second.
- When defrosting ends, the bleeper sounds 3 times. Second stage cooking time will appear in window and count-down in seconds starts. Indicator light and oven light turn off. "Time of day" appears in display window.
NOTE:
- Defrost can be incorporated with 2-stage cooking:
Examples:
* DEFROST — MEDIUM
* DEFROST — HIGH
-
The defrost setting incorporates two levels of defrost which remove the necessity in most instances for food to rest before continuing with cooking. However for larger items such as poultry or joints of meat it is recommended that food is allowed to 'rest' or 'equalize' before cooking. This can be programmed automatically to follow a defrost cycle by using '0 — Rest' in steps 6, 7 and 8 above.
-
Any of the above combinations may be preceded by DELAY START.
HOW TO USE DELAY START
- Press Delay Start Pad.

- Clock time disappears from display window. Delay start indicator light "DELAY" turns on and " . " appears in display window.
- Set desired amount of time for which you want to delay the start of cooking by pressing Numeric Pads.

- Selected amount of time appears in display window in hours and minutes.
(A maximum of 9 hours and 99 minutes may be programmed).
Example: Delay instruction for 1 hour 30 minutes.
1:30
- Programme desired cooking according to directions already given in this manual, i.e. Microwave Cooking, and Defrosting.
Desired Cooking Program
- Delay time disappers. Selected programme and indicator light appear in display window.
- Press Start Pad (◇).

- Selected programme disappears. Oven light does not turn on; no cooking activity begins. Time of day appears. DELAY indicator light stays on.
- When delay time has elapsed, oven enters into previously selected cooking function. Oven light turns on.
DELAY indicator light turns off and oven bleeps 3 times. - When cooking is complete, oven bleeps 4 times and shuts off automatically. The oven light turns off, and "Time of day" appears in the display window.
IMPORTANT:
DELAY START IS PROGRAMMED IN HOURS AND MINUTES, not in minutes and seconds as with all other functions.
NOTE:
- Use DELAY START to delay subsequent instructions up to 9 hours, 99 minutes. DELAY START must be programmed first, immediately followed by desired cooking instructions. These cooking instructions will be automatically delayed for the period of time programmed into DELAY START.
- It is important to press Start Pad after delay time and cooking times have been programmed for oven to operate.
- It is advisable not to use DELAY START for perishables.
Keep the possibility of food spoilage in mind when programming the oven to prevent delaying cooking for too long a time period. - To recall how much time is left until starting time, press Delay Start Pad.
- 2 stage cooking can be programmed after Delay Start.

flowchart
graph LR
    A["DELAY START"] --> B["STAGE 1 HIGH"]
    B --> C["STAGE 2 MED. LOW"]
    D["MED. HIGH"] --> E["STAGE 2 LOW"]
HOW TO USE MEMORY
(HOW TO STORE MENUS IN MEMORY)
- Programme desired cooking according to directions already given on page 10, 11 and 12, i.e. Microwave Cooking, and Defrosting.
Desired Cooking Program
- Press Memory 1 (or Memory 2) pad.

- Memory indicator light "M1" (or "M2") instantly turns on and the "Time of day" appears in the display window.
NOTE:
- Two different menus can be stored by pressing the memory pads 1 and 2 separately.
- The old menu is automatically erased as a new menu is stored in the memory following the above steps 1 and 2.
- All the stored menu are erased if the power plug is switched off or the power supply stops or is interrupted.
- Delay Start cannot be used in a stored memory programme.
(HOW TO COOK USING MEMORY)
- Press Memory 1 (or Memory 2) pad.
MEMORY 1 (2)

- The programme stored in the memory pad appears in display window.
- Press Start Pad (◇).
- Oven light turns on.
First stage cooking time and power indicator light turn on in display window, and count-down in seconds starts. - When first stage cooking ends, the oven bleeps 3 times. Second stage cooking time and power indicator light will appear in display window and time count-down starts.
- When the second stage of cooking ends, the bleeper sounds 4 times and the power is shut off automatically. The indicator light turns off, and "Time of day" appears in the display window.
NOTE:
Memory 1 (or Memory 2) can store 2 stage cooking.

flowchart
graph LR
    A["STAGE 1"] --> B["HIGH"]
    B --> C["LOWER POWER LEVEL"]
    D["STAGE 2"] --> E["DEFROST"]
    E --> F["HIGH OR LOWER POWER LEVEL"]
HOW TO USE PAUSE/CLEAR
Before cooking: Pressing the pad once clears your instructions.
During cooking: Pressing the pad once temporarily stops the cooking process. Another press cancels all your instructions and time of day appears in display window.
HOW TO USE RECALL
When you want to check the cooking programme you have entered, press RECALL pad.

Before cooking:
Pressing the pad once instantly displays the first stage instruction, which is followed by the second stage instruction.
Pressing the pad twice displays the second stage instruction alone without showing the first stage instruction.
During cooking:
If you press the Recall pad after stopping temporarily the first stage cooking process, the second stage instruction is displayed followed immediately by the indication of cooking time when the first stage was interrupted.
NOTE:
Any pad may not be pressed for one or two seconds after the cooking program has been displayed using this RECALL function.
10. NOTES ON USE
IMPORTANT:
If food is not cooked or PIPING HOT RIGHT THROUGH, even after following the recommended times, then cook it until it is; just as you would with conventional cooking.
Where possible, STIR OR RE-ARRANGE FOOD during cooking for even heating.
Always OBSERVE STANDING TIMES before testing, to allow the heat to spread evenly throughout the food.
- When using metal cooking tools to stir or re-arrange food, do not let them touch the oven walls, door surround, turntable.
- Arcing will occur, and could crack the glass or damage the turntable.
- Caps must be removed from jars, sealed packages of food should be opened, and shelled food should be cracked before heating.
- Capped jars, sealed packages, and shelled food may explode, and are dangerous.
- Do not heat a small amount of food for a long time.
• The overheated food may scorch or burn.
-
Food in foil containers should be transferred to a suitable microwave container for heating or cooking. Foil containers reflect microwaves away from the food.
-
Do not use a thermometer during cooking.
• Take the temperature of the heated food after it has been removed from the oven. If the thermometer is used in the oven, it may be broken by the heat.
- Do not heat oil or greasy fried food.
- The food may be overheated because the temperature of oil cannot be controlled.
7 Do not put food heavier than 10 lbs on the turntable.
- The turntable cannot rotate when the food is too heavy, and that could cause damage to the oven.
- If food becomes charred from overcooking and smoke develops, keep the door closed and turn the oven off. Any possible fire will then be stifled.
- Certain foodstuffs with a low water-content, such as cooking chocolate and pastry with sweet fillings, must be heated cautiously; otherwise they may spoil or may damage the cooking container.
- Liquids may be heated and boiled in the microwave oven, but, as with any other form of heating liquids, great care should be taken. Please ensure that the liquid is left standing for at least 20 seconds in the oven after it is switched off. As always when handling boiling liquids, great care should be taken on removing the liquids from the oven. These considerations are particularly important when water is being boiled in cups, mugs, or vessels of a similar size as there is a risk that bubbles may combine to form a large bubble inside the container which may erupt and displace the water. The displaced boiling water could cause injury.
- Do not leave the oven unattended when food is heated or cooked in disposable containers of plastic, paper or other combustible materials. If smoke is observed, keep the oven door closed and switch off or disconnect the oven from the power supply.
- The oven is expanded by heat and the noise of expansion may be heard during heating, but that is normal.
- Use the microwave oven for the purpose of cooking only.
- Do not use the microwave oven for drying clothes or paper products, they may catch fire or smoulder.
- If a fire should occur in the oven, keep the door closed and cut off the power supply by disconnecting the power supply cord, any possible fire will then be stifled.
11. CLEANING AND CARE
- It is important that the oven is cleaned frequently to avoid food splashes from being baked on.
- Clean the microwave oven after turning off the power and pulling out the plug.
Oven
(Ceiling, walls, bottom, and inside of door)
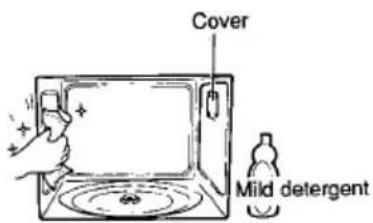
Each time food has been cooked, wipe off the dirt or food splashes as soon as possible.
Greasy spots should be wiped off with a cloth soaked in mild detergent.
- If dirt is left in the oven for a long time, it cannot be wiped off easily, it will hold the smell of the food, and may cause corrosion or rusting. Also, arcing may occur and the side cover may be scorched because the microwaves are concentrated on the food splashes.
- If the side cover becomes too dirty to be cleaned, consult the Hitachi agent and replace it.
- Check the microwave oven for any visible damage, such as a misaligned door, damaged door seals around the door or dents inside the oven cavity or on the door. Ensure that the door and door sealing areas are clean before use, clean with a mild detergent, water and a soft cloth. Do not use scouring pads, powder or other abrasive materials.
Roller Ring

Always keep the roller ring clean.
When it is soiled with food splashes or grease, remove the food splashes or grease using a sponge or cloth soaked with mild detergent and wash it in water.
- If food splashes are left on the roller ring, arcing may occur because the microwaves are concentrated on the food splashes.
- Keep the roller ring in position in the oven except when it is to be cleaned.
Turntable

When the turntable is soiled with grease or food splashes, remove the dirt with a sponge soaked in mild detergent, wash it in water, and dry it.
Cabinet

Wipe the cabinet with a soft cloth.
- When the cabinet is heavily soiled, wipe it with a cloth soaked in mild detergent and then wipe off the mild detergent thoroughly with a clean damp cloth.
- Do not splash water on the air outlets.
CAUTIONS
Do not rub the oven and accessories with a wire brush or sharp-edged tool.

The surface may become scratched.
Do not apply oven cleaner, benzene, or thinner to the surface of the panel or door.

The letters on the panel may fade, and the surface may lose gloss or may corrode.
12. BEFORE ASKING FOR REPAIR
Before calling the serviceman to repair the microwave oven, check the following points:
| Problem | Points to be checked |
| Food is not cooking. | • Is the plug connected?• Is the circuit breaker off or fuse blown out?• Is the door closed securely? |
| Food not cooked enough. | • Has the correct cooking power been selected?• Has the correct cooking time been set?• Has the food been left to "stand" for a sufficient period of time after cooking? |
| Arcing occurs in the oven or a cracking noise is heard. | • Does the container of the food have a metal trim?• Is there a fork, metal cooking tool, or aluminum foil touching the oven wall? |
If the problem cannot be overcome after the above points are checked and corrected, contact your nearest authorized service agent to repair the microwave oven.
The following conditions are normal in the microwave oven:
| (1) The turntable may turn clockwise at one time and counter-clockwise at another time. | The turning direction does not affect the result of cooking. |
| (2) The inside of the door and the oven walls are wet with condensation, and steam comes out not only from the air outlets but also from around the door. | Food with a high water content may cause condensation. |
13. SPECIFICATIONS
| Power Source: | 240V ~ 50 Hz, earthed |
| Power Consumption: | 1350 W |
| Power Output: | 800 W (1 litre water load) (IEC705) |
| Exterior Dimensions: | Width 532 mm (20-7/8 in.)Depth 400 mm (15-3/4 in.)Height 330 mm (13 in.) |
| Interior Dimensions: | Width 340 mm (13-3/8 in.)Depth 350 mm (13-3/4 in.)Height 240 mm (9-1/2 in.) |
| Net Weight: | 18.4 kg (40 lbs 8 oz) |
| Microwave Frequency: | 2450 MHz |

HITACHI
Hitachi House, Station Road, Hayes, Middlesex, UB3 4DR ENGLAND.
Tel. 081-849-2000
- IMPORTANT:
- CONTENTS
- SAFETY PRECAUTIONS
- PRECAUTIONS WHEN USING YOUR MICROWAVE OVEN
- IMPORTANT SAFETY INSTRUCTIONS
- NAMES AND FUNCTIONS OF PARTS
- How to set roller ring and turntable
- OPERATION PANEL
- 'BLEEP' SIGNAL
- ELECTRICAL CONNECTIONS
- IMPORTANT
- INSTALLATION
- DO'S AND DON'TS
- PREPARATION FOR USE
- NOTE:
- HOW TO DETERMINE MICROWAVE COOKING TIME
- HINTS FOR DEFROSTING
- HOW TO SELECT MICROWAVE COOKING POWER OTHER THAN HIGH
- NOTE
- TWO STAGE COOKING
- DEFROSTING
- ONE STAGE DEFROST
- HOW TO USE DELAY START
- HOW TO USE MEMORY
- (HOW TO STORE MENUS IN MEMORY)
- (HOW TO COOK USING MEMORY)
- HOW TO USE PAUSE/CLEAR
- HOW TO USE RECALL
- Before cooking:
- During cooking:
- NOTES ON USE
- CLEANING AND CARE
- Oven
- Roller Ring
- Turntable
- Cabinet
- CAUTIONS
- BEFORE ASKING FOR REPAIR
- SPECIFICATIONS
- HITACHI
Brand : HITACHI
Model : MR8140
Category : Microwave