HCA92741B - Fridge Freezer BEKO - Free user manual and instructions
Find the device manual for free HCA92741B BEKO in PDF.
| Product type | Range hood |
| Brand | BEKO |
| Model | HCA92741B |
| Supply voltage | 220-240 V |
| Installation | Wall-mounted |
| Minimum installation height | 50 cm (gas cooking) / 45 cm (electric cooking) |
| Connection diameter | 120 mm or 150 mm |
| Number of speeds | 4 (including an intensive speed) |
| Lighting type | LED |
| Brightness levels | 5 |
| Grease filter | Metal, dishwasher safe |
| Charcoal filter | Optional, replace every 4 months |
| Grease filter alarm | Yes |
| Charcoal filter alarm | Yes (activated/deactivated) |
| Delayed shut-off function | Recommended 15 min after cooking |
| Material | Stainless steel and glass |
| Spare parts | Available for 10 years |
| Lifespan | 10 years |
| Safety | Automatic shut-off in case of overheating |
Frequently Asked Questions - HCA92741B BEKO
User questions about HCA92741B BEKO
0 question about this device. Answer the ones you know or ask your own.
Ask a new question about this device
Download the instructions for your Fridge Freezer in PDF format for free! Find your manual HCA92741B - BEKO and take your electronic device back in hand. On this page are published all the documents necessary for the use of your device. HCA92741B by BEKO.
USER MANUAL HCA92741B BEKO
Please read this manual first!
Dear Customers!
Thank you for preferring a Beko product. We hope that you get the best results from your product which has been manufactured with high quality and state-of-the-art technology. Therefore, please read this entire user manual and all other accompanying documents carefully before using the product and keep it as a reference for future use. If you handover the product to someone else, give the user manual as well. Follow all warnings and information in the user manual.
Remember that this user manual is also applicable for several other models. Differences between the models are explicitly described in the manual.
Meanings of the Symbols
Following symbols are used in the various section of this manual:


This product has been manufactured in environmental friendly modern plants without giving any harm to the nature.
| ENGLISH | 5-18 |
| DEUTSCH | 19-36 |
| БългAPСКИ | 37-54 |
| ČESKY | 55-70 |
| NEDERLANDS | 71-88 |
| ESTONIAN | 89-104 |
| FRANÇAIS | 105-122 |
| HRVATSKI | 123-138 |
| ITALIANO | 139-155 |
| LIETUVIU | 156-172 |
| POLSKI | 173-189 |
| PORTUGUES | 190-207 |
| РУССКМ | 208-226 |
| SLOVAKIA | 227-242 |
1 Important safety and environmental instructions 5-8
1.1 General safety 5
1.1.1 Electrical safety.. 5
1.1.2 Product safety.. 6
1.1.3 Children's safety 7
1.2 Intended use 7
1.3 Compliance with WEEE Directive and disposing of the waste product............ 8
Compliance with RoHS Directive: 8
1.4 Package information.. 8
2 Technical specifications of your appliance 9
3 Installing your appliance 10-13
3.1. Power connection 10
3.2.Installation 10
3.2.1 Before you start installation: 10
3.2.2 Preparation for the Assembly of the Hood onto the Wall 11
3.2.3 Assembling the hood flue 12
3.2.4 Assembly of the Hood onto the Wall 13
4 Operating your appliance 16
4.1 Operation 16
4.2 Control with levels 16
4.3 Grease filter alarm 16
4.4 Charcoal filter alarm 16
4.5 Energy efficient usage: 16
5 Cleaning and maintenance 17-18
5.1 Cleaning. 17
5.2 Cleaning the glass panel 17
5.3 Charcoal filter (filtered models only) 17
Circular charcoal filter 17
5.4 Grease filter 17
5.5 Cleaning 18
5.6 Replacing the lamps 18
01M-8847943200-4615-03
01M-8847953200-4615-03
01M-8847963200-4615-03
01M-8847973200-4615-03
01M-8847983200-4615-03
01M-8847993200-4615-03
01M-8850553200-4615-03
01M-8848003200-4615-03
01M-8851133200-4615-03
01M-8851143200-4615-03
1 Important safety and environmental instructions
This section contains safety instructions that will help protect from risk of personal injury or property damage. Failure to follow these instructions invalidates the granted warranty.
1.1 General safety
- Always have the installation and repairing procedures carried out by the Authorized Service Agent. Manufacturing firm shall not be held responsible for damages that may be caused by unauthorized persons.
- This appliance is not intended for use by persons (including children) with reduced physical, sensory or mental capabilities, or lack of experience and knowledge. Children should be supervised to ensure that they do not play with the appliance.
1.1.1 Electrical safety
-
Always unplug the appliance from the mains supply during installation, maintenance, cleaning and repair operations.
-
If the power cable is faulty, it should be replaced by a qualified person certified by the manufacturer, after-sales service or similar (preferably an electrician) or a person described by the importer.
- Operating voltage is 220 to 240 volts.
- If the appliance has a failure, it should not be operated unless it is repaired by the Authorized Service Agent. There is the risk of electric shock!
- Do not route power cable close to hobs. Otherwise power cable may cause fire since it melts down easily.
- Never plug the hood before installation is completed.
- In order to obtain the best performance, external conductor must not be longer than 4 ~m . It must not contain more than 2 perpendicular (90^) angles and its diameter must be min. 120 ~mm .
- Disconnect the appliance from mains before any intervention to the internal parts of the appliance.
- Use the appliance with a grounded outlet only.
1.1.2 Product safety
- You can use a pipe with a diameter of 120 ~mm or 150 ~mm on the flue connection of the hood.
- Do not make connections to the flues connected with stoves, exhaust shafts or flues with rising flames. Observe the rules set by authorities on the discharge of exhaust air.
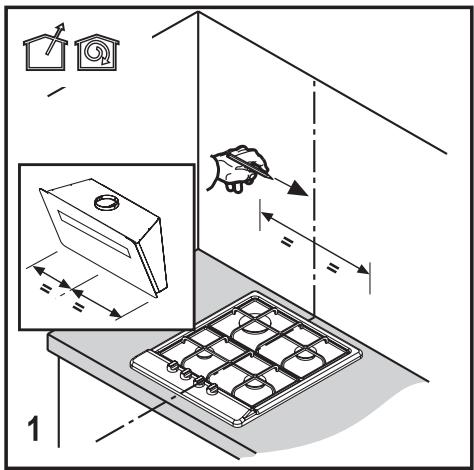
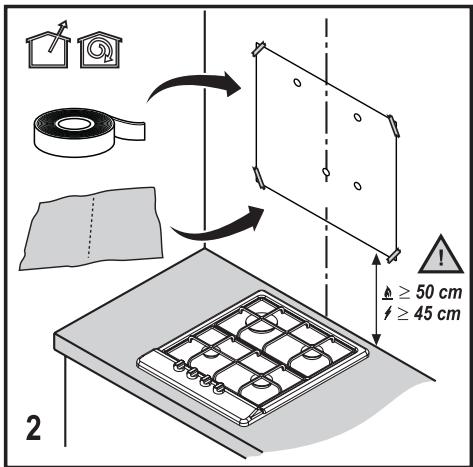
- The height between the lower surface of the hood and upper surface of the stove/oven should not be less than 50~cm for gas hobs and 45~cm for electric hobs.
- Do not operate the hood without aluminum filters and do not remove the filters while it is operated.
- Never touch the hood's lamps after they are operated for a long time. Hot lamps may burn your hand.
- Avoid large flames beneath the product. Otherwise, particles on oil filter may ignite and lead to a fire.
-
Turn on the hobs after placing pans or pots on it. Otherwise, rising heat may deform certain parts of your product.
-
Turn off the hobs before taking away pans or pots.
- Avoid inflammable materials under the hood.
- Oil may ignite while frying foods. Therefore, be careful about cloths and curtains.
- Never leave the cooker unattended when frying foods; otherwise hot oil may cause fire.
- There is the risk of fire if your hood is not cleaned in the specified periods.
- Be extremely careful and wear gloves when cleaning the hood.
- We advise you to operate the appliance a few minutes before starting to cook in order to increase the suction power. Thus, you shall have a continuous and stable suction power when the vapors arise.
- Operate your hood for 15 minutes more after the end of cooking or frying in order to remove the smell and cooking vapor in the kitchen.
- When the hood is in use, especially together with gas cookers, make sure that environment is ventilated with clean air.
1 Important safety and environmental instructions
- Pay attention not to connect the appliance to the flues used by non-electrical devices. (E.g.: Heater flue).
- Simultaneous and smooth operation of the hood and another device that require air is only possible when a low pressure of 4 Pa (0.04 mbar) is reached, and thus the reabsorption of the gas is avoided. This can only be achieved by means of air coming from uncovered openings (door, window, ventilation openings or other technical measures). Pay utmost attention to provide sufficient air flow. A flue that provides air ingress/egress is not enough for this purpose.
1.1.3 Children's safety
- Packaging materials are dangerous to children. Keep packaging materials in a safe place out of reach of children.
-
Electrical appliances are dangerous to children. Keep children away from the product. Do not allow children play with the appliance.
-
This appliance can be used by the children who are at the age of 8 or over and by the people who have limited physical, sensory or mental capacity or who do not have knowledge and experience, as long as they are supervised with regard to safe use of the product or they are instructed accordingly and understand the risks of using the product. Children should not play with the appliance.
- CAUTION: Accessible parts may heat up when used with a cooking device.
1.2 Intended use
- This appliance is intended for domestic use. It is not suitable for commercial use and it must not be used out of its intended use.
- The manufacturer shall not be liable for any damage caused by improper use or handling.
- Service life of your appliance is 10 years. This is the period required for availability of spare parts for proper functioning of the product.
- WARNING: Failure to fix the screws in concordance with the instructions provided in the manual may lead to electrical hazards.
1.3 Compliance with WEEE Directive and disposing of the waste product
This product complies with EU WEEE Directive (2012/19/EU). This product bears a classification symbol for waste electrical and electronic equipment (WEEE).
This product has been manufactured with high quality parts and materials which can be reused and are suitable for recycling. Do not dispose of the waste product with normal domestic and other wastes at the end of its service life. Take it to the collection center for the recycling of electrical and electronic equipment. Please consult your local authorities to learn about these collection centers.
Compliance with RoHS Directive:
The product you have purchased complies with EU RoHS Directive (2011/65/EU). It does not contain harmful and prohibited materials specified in the Directive.
1.4 Package information

Package of the product is made of recyclable materials in accordance with our National Legislation. Do not dispose of
the packaging materials together with the domestic or other wastes. Take them to the packaging material collection points designated by the local authorities.
2 Technical specifications of your appliance


Usage with flue


Usage with charcoal filter
Markings on the product or the values stated in other documents supplied with the product are values obtained under laboratory conditions as per relevant standards. These values may vary depending on operational and environmental conditions of the product.
Please consult the nearest Authorized Service Agent for the installation of the hood.
*Preparation of location and electrical installation for the product is under customer's responsibility.

WARNING: Remove the protective film (if any) on the hood and flue surface after the installation.
The height between the lower surface of the hood and upper surface of a hob should not be less than 50cm for gas hobs and 45cm for electric hobs.
Have a qualified electrician make the electrical connection.
Install your product so that you can reach the power connection (plug, outlet) easily after installation.
Dimensions are given in mm.
3.1. Power connection
- Main power supply should comply with the values indicated on the plate inside the hood. Connect the hood to an outlet in compliance with current regulations by means of a plug and place it within an accessible area. After installation; if device doesn't have a plug (direct mains supply connection) or plug is out of reach, use a double-pole switch in line with standards, that enables disconnection of main plug under circumstances related to overcurrent category III.

WARNING: Before reconnecting the hood to main power source and checking if it functions correctly, ensure that main power cable is connected properly.
- The hood is equipped with a special power cable. Contact Authorised Service Agent if the the power cable is damaged.
3.2. Installation
3.2.1 Before you start installation:
-
Check that the product purchased has appropriate sizes for installation location.
-
Remove the active charcoal (*) filter if supplied (see also relative paragraph). That/those will only be installed if you want to use the hood as a filtered model.
-
Check if any other material (such as screw package () , warranty card () etc.) is delivered in the hood and if available, remove them and keep elsewhere.
-
If possible, remove freestanding or sliding hob and pull it aside in order to reach rear wall / ceiling easily. If not possible, cover the bench, hob or oven with a thick protective cloth in order to secure them against damage and dirt. Select a flat surface to install the appliance. Cover the surface with a protective cloth and place all awning hood parts and hardware in it.
-
Besides; check if a plug is available on assembly area of hood (besides, on the accessible area after assembling the hood) and check if connecting the hood to outside (only for the model with aspiration) is possible.
-
Finish all required operations related to wall (e.g. plugging power plug and/or opening a hole for discharge hose).
Wide dowels are available to allow for fixing the hood on a variety of wall/ceiling types. Additionally, conformity of material to wall/ceiling type should be confirmed by a qualified technician. Wall/ceiling should be able to sustain the hood. Do not assemble the appliance on tile, plaster or silicon surfaces. Assemble it only on to a wall.
If a panel and/or side wall and/or furniture exist, check that there is sufficient place for assembly of hood and that control panel is easily accessible.
3 Installing your appliance
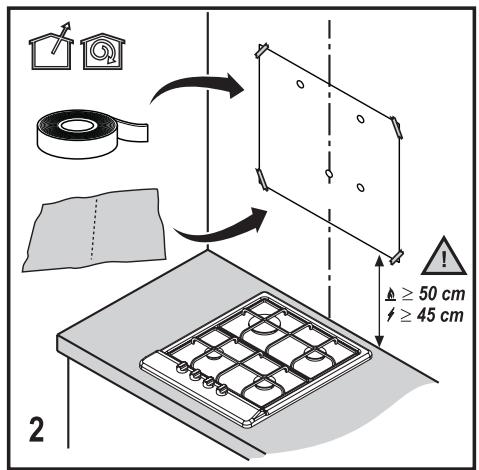
3.2.2 Preparation for the Assembly of the Hood onto the Wall
Information required for the preparation of the installation place for your hood is given below.
- Mark the surface where assembly template is going to be hung. (Figure 1)

- Affix the assembly template onto the installation place of the hood. (Figure 2)
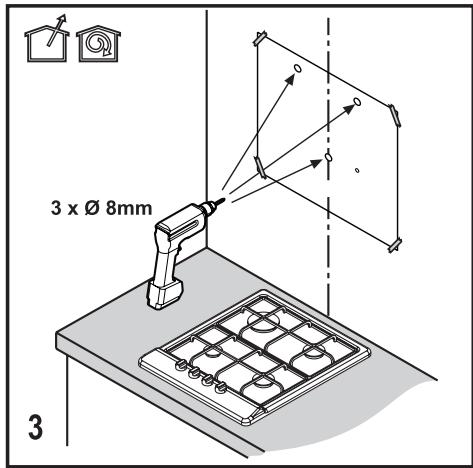
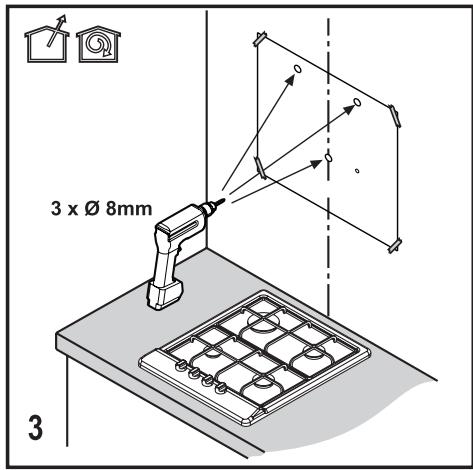
- Drill a hole with 8 mm bit on marked points. (Figure 3)
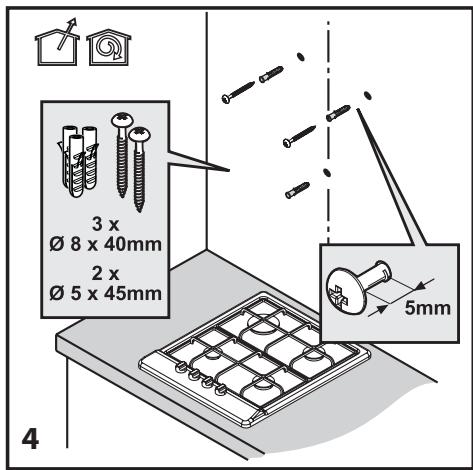
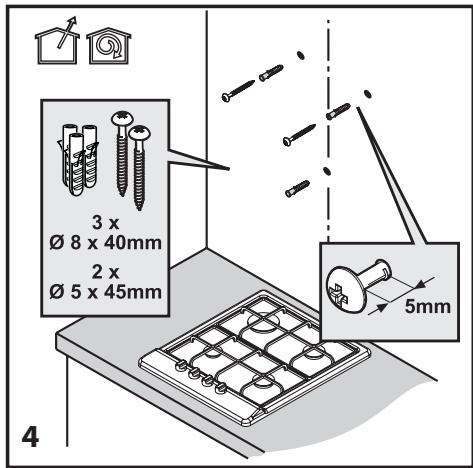
- Hammer 3 pieces of 0.8 × 40 mm dowels in drilled holes. Screw 2 pieces of 0.5 × 45 mm hanging screws to dowels hammered above. There must be a gap of 5 ~mm between the screw head and the wall. (Figure 4)
3 Installing your appliance
3.2.3 Assembling the hood flue
Drill holes on marked points with 08mm bit in order to attach flue plate. Hammer 2 pieces of 0 8× 40mm dowels in drilled holes. Screw 2 pieces of 05× 45mm hanging screws to dowels hammered.
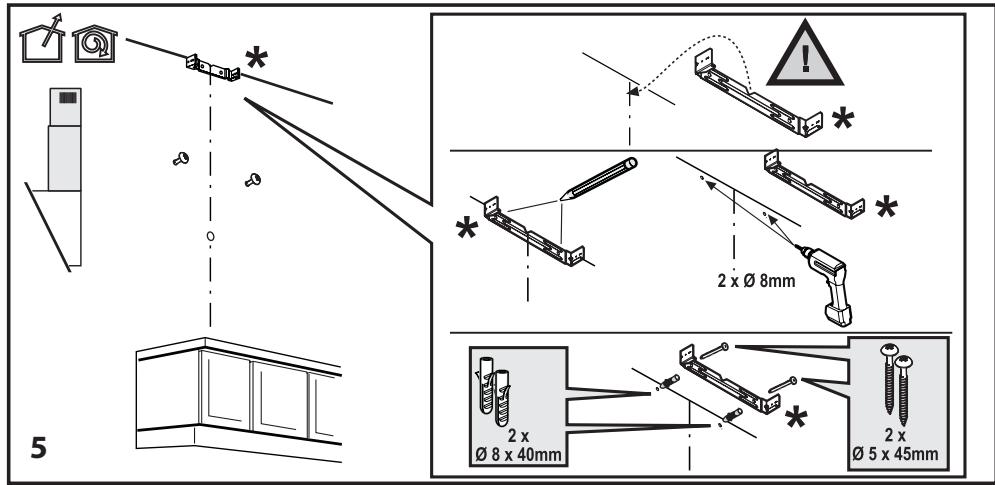
(Figure 5)
3 Installing your appliance
3.2.4 Assembly of the Hood onto the Wall
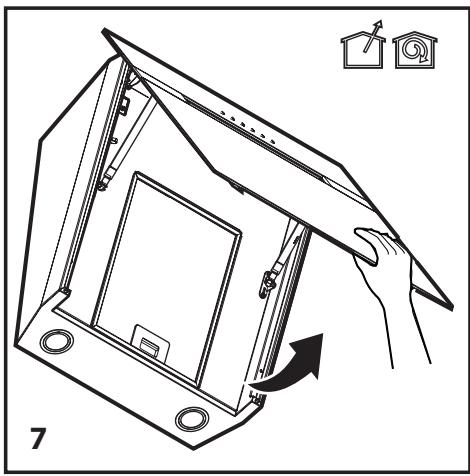
- Remove front panel to attach the hood onto the wall. (Figure 7)
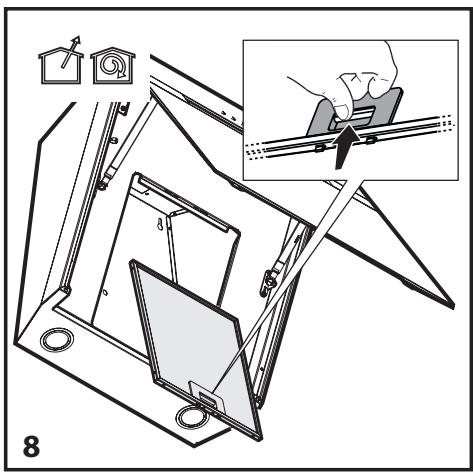
2. Remove the filters. (Figure 8)
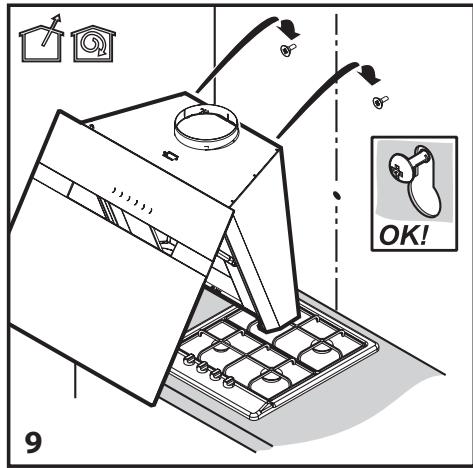
- Place the hood in a way that screws match with screw heads. (Figure 9)
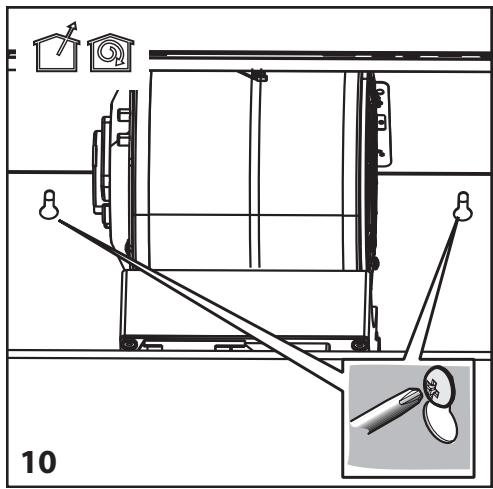
4. Tighten the screws to fasten the hood. (Figure 10)
3 Installing your appliance
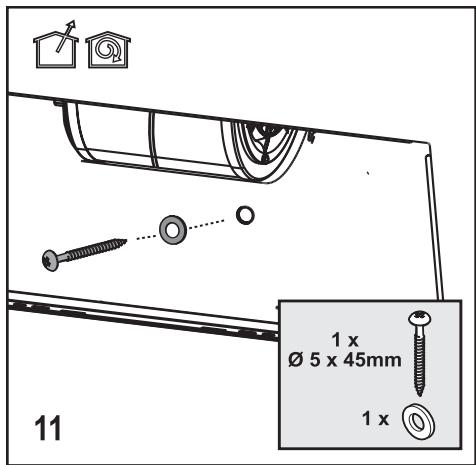
- In order to fasten the hood, use washers and tighten with 0.5 × 45 screws.(Figure 11)
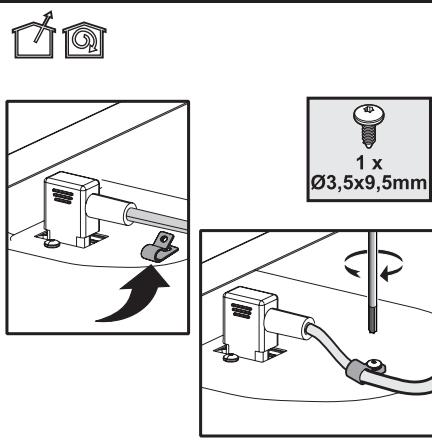
- Plug in the power cable. Use 0 3.5x9.5 screw to fasten the cable.(Figure 12)

3 Installing your appliance
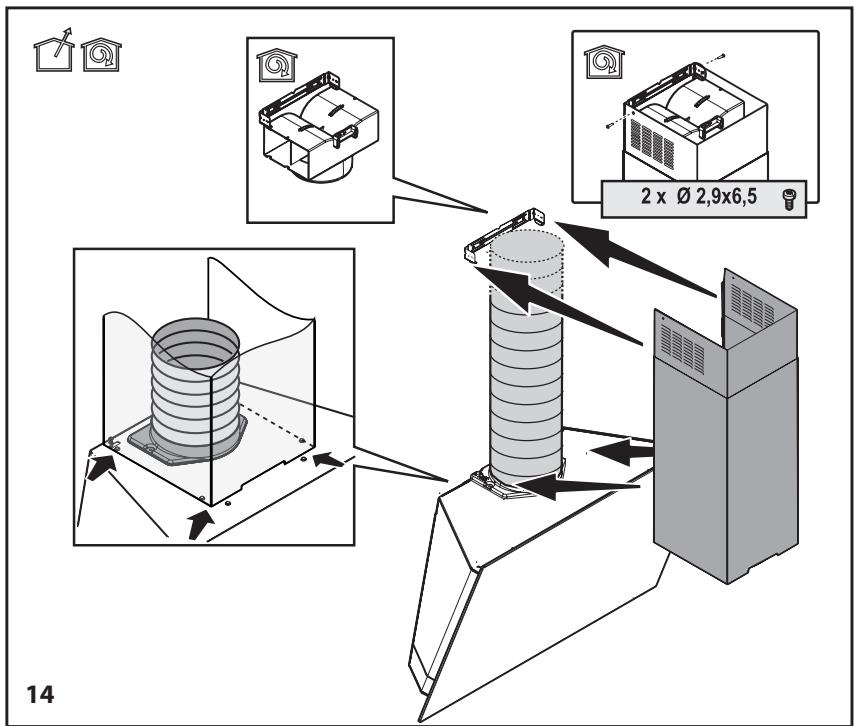
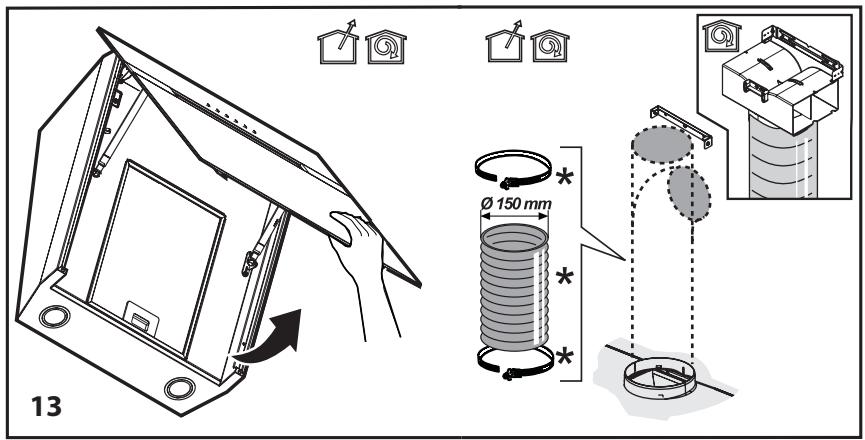
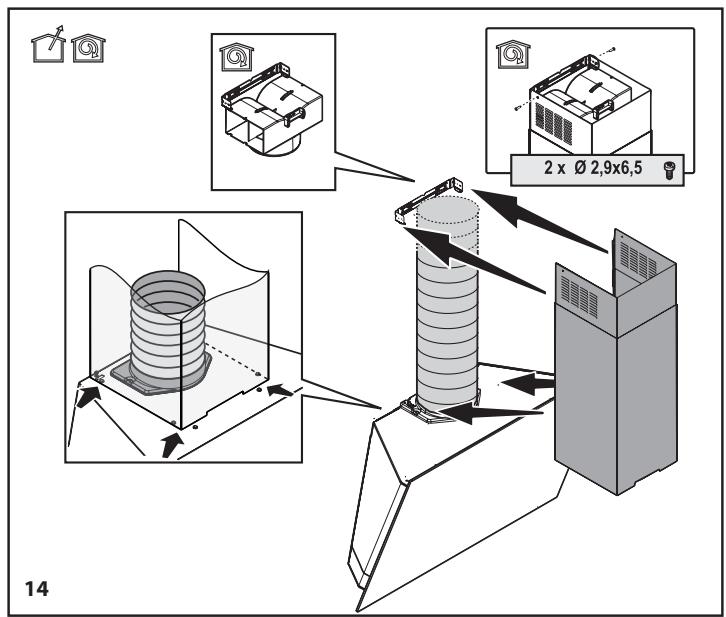
- Place flue connection according to figures.
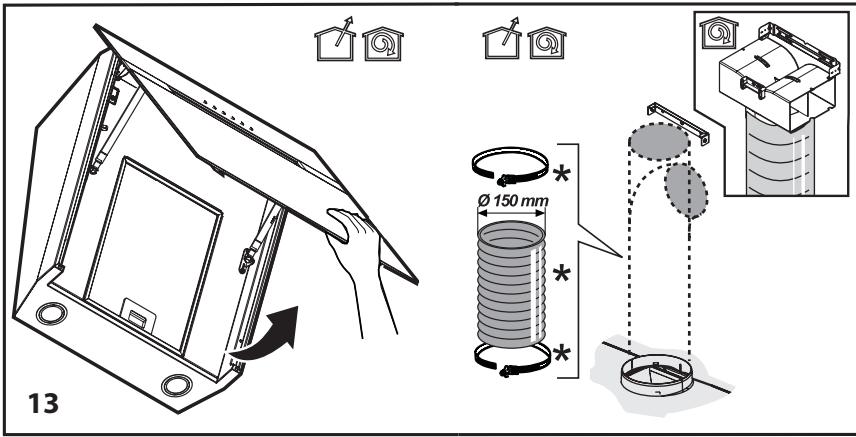
(Figure 13, 14)
4 Operating your appliance
4.1 Operation
- Use high suction power if excessive vapor is formed in kitchen. It is recommended that hob hood suction unit is turned on 5 minutes before beginning cooking and is left in operation during and for 15 minutes after cooking.
4.2 Control with levels
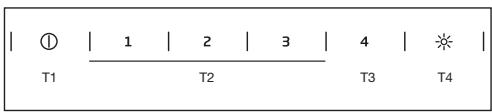
T1. On/Off key. If the appliance is OFF, turns on the appliance. If the appliance is at any speed level, turns it OFF.
T2. Operates the appliance in speed levels 1, 2 and 3.
Operates the appliance in speed level 1. LED 1 lights.
Operates the appliance in speed level 2. LED 2 lights.
Operates the appliance in speed level 3. LED 3 lights.
T3. Operates the appliance at speed level 4 for 5 minutes. While the appliance is in operation in any level (1, 2, 3) if this key is pressed then the current speed LED will become steady and speed level 4 LED will flash. At the end of 5 minutes, speed level 4 LED will switch OFF and the product will exit max. speed mode. If speed level 4 key is pressed before 5 minutes is over, the product exits max. speed mode.
T4. Lamp On/Off key. Briefly press this key to turn ON/OFF the lamp. Press and hold for more than 1 second to select one of the 5 brightness levels.
4.3 Grease filter alarm
Flashing of LED 1 warns the user for cleaning the metal filter. When this alarm is given, it is time to clean the grease filter. Press and hold the ON/OFF key for 3 seconds to reset the warning while the product is in operation. LED 1 will stop flashing.
4.4 Charcoal filter alarm
The product is delivered with the charcoal filter alarm deactivated. Press and hold keys 1 and 2 for 3 seconds to activate the charcoal filter cleaning warning while the product is OFF. First LED 1 and then LED 1 and 2 light up and indicate that the warning is activated. Press and hold keys 1 and 2 for 3 seconds to deactivate the warning while the product is OFF. First LED 1 and 2 then LED 1 light up and indicate that the warning is deactivated.
Flashing of LED 2 warns the user for cleaning the charcoal filter. Press and hold the ON/OFF key for 3 seconds to reset the the warning while the product is in operation.

If both metal and charcoal filter warnings are activated simultaneously, resetting should be performed separately for each warning.
4.5 Energy efficient usage:
- When operating the hood, adjust the speed level according to the odour and vapour intensity in order to prevent unnecessary power consumption.
- Use low speeds in normal conditions (1-2), and high speeds (3-4) when smell and vapors are intensified.
- Lamps on the hood are intended for illuminating the cooking zone. Using them to illuminate the ambient/kitchen will result with unnecessary power consumption and inadequate illumination.
5.1 Cleaning
- Prior to cleaning and maintenance, unplug the appliance or turn the main switch off or loosen/ switch off the fuse that supplies the hood.
- Hood should be cleaned regularly (at least with the same frequency with which you carry out maintenance of the grease filters) internally and externally.
- Clean the hood using a clean cloth dampened with a mixture of warm water and neutral liquid detergent.
- Do not use abrasive products. DO NOT USE ALCOHOL!

WARNING: Failure to carry out the basic cleaning instructions of the hood and to replace the filters may cause fire.
- For this reason, we recommend you to follow mentioned instructions.
- Manufacturer cannot be held responsible for motor and fire damage caused by inappropriate maintenance or not following the above mentioned safety recommendations.
5.2 Cleaning the glass panel
- Glass panel and suction surfaces should be cleaned with the same interval valid for grease filters.
- Clean with a damp cloth and a neutral liquid detergent.
- Avoid using abrasive products. DO NOT CLEAN WITH ALCOHOL!
5.3 Charcoal filter (filtered models only)
After a long usage period, charcoal filter may become full depending on cooking type and whether the oil filter is cleaned regularly.
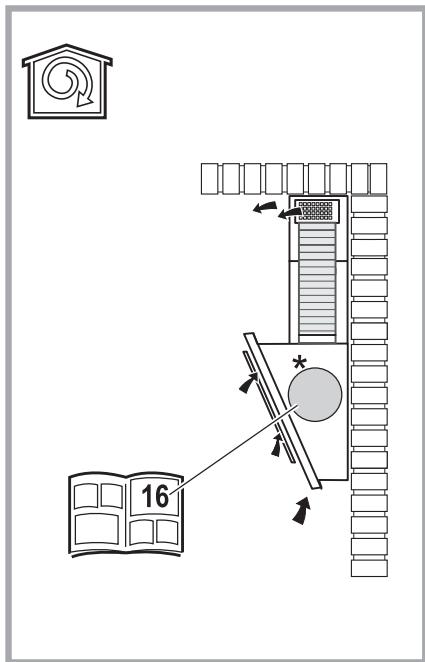
- In any case, cartridge should be replaced at least every four months (or when filter fullness indicator system indicates that filter should be replaced if available in the model). (Figure 16)
- Charcoal filter cannot be washed and reused.
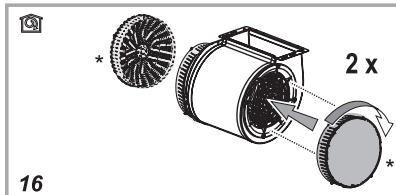
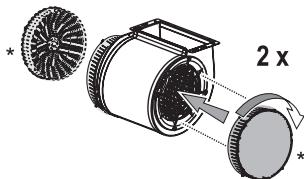
Circular charcoal filter
- Place one filter next to the protection cages of motor propeller, then turn the part clockwise.
- For disassembly, turn the part counterclockwise.
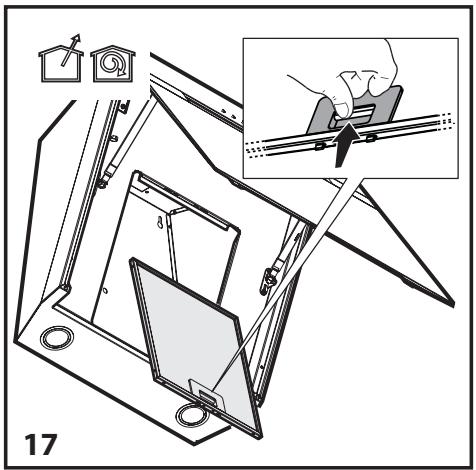
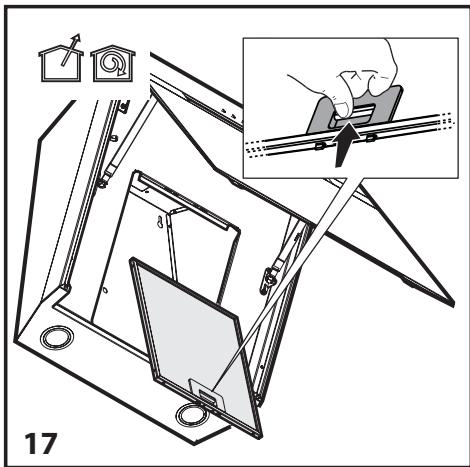
5.4 Grease filter
- Retains grease particles caused by cooking procedure.
- Grease filter should be cleaned monthly (or filter fullness indicator system - if available in purchased model - indicates when it is time) using acid-free detergent by hand or in a dishwasher with low temperature and short program.
- When washed in a dishwasher, color of grease filter may fade slightly, but this does not affect its filtering capacity.
- Pull spring release lever in order to remove grease filter. (Figure 17)
5.5 Cleaning
- Particularly do not neglect to clean your hood immediately after you have made frying.
- Use a soft cloth soaked with liquid detergent to clean the outer surface of your hood.
- Never use abrasive or scratching materials for cleaning.
- You may use the cleaning agents commercially available for persistent grease etc. by following the warnings on the product. In order not the scratch the brushed steel body, wipe in the same direction with the bush trace.
- Do not use cleaning agents containing hydrochloric acid, bleach or abrasive powders in order to maintain the surface quality of your product. Use a cloth dampened in soapy water or special stainless steel cleaning spray for stainless steel surfaces. Remove the protective foil on the appliance.

Caution: You may cause a fire if you do not follow the instructions on the cleaning and replacement of the filters of your hood.

If you need to transport the appliance:
Keep the original packaging of the appliance. Transport the appliance with its original package, and follow the transport markings on the original package.
If you do not have the original package:
- Do not put heavy objects on the hood.
- Protect the outer surface from impacts.
- Pack the product so that it would not be damaged during transport.
5.6 Replacing the lamps

WARNING: Prior to touching the light bulbs, ensure that they are cooled down.

Contact Authorized Service Agent for lamp replacement.
3 MoHTaX Ha ypeDa 44-48
3.1.Cbbp3BaHeHa3axpaHbAHeTo 44
3.2.Montax 44
3.2.1Ппедидазапоченeto монтаяк: 44
3.2.2ПоД�ТовkaЗа мОнтурапе на abcopбатора на стенata... 46
3.2.3 Crno6BaVe Ha DnMoOToB0Da Ha a6cop6aTopo 47
3.2.4 Crno6BaHe Ha abcopbAtopa Ha cTeHaTa . . . 48
4 Pa6oTa c ypeDa 51-52
4.1 Pa6oTa 51
4.2 Unpablenne c nOmoUHa HnBa 51
4.3 AnapMa HaФиТьра 3a Ma3HnHn .51
4.4 AnapMa Ha BbIeHna QnIITbp 51
4.5 EheprnHIO epeKTHBHa ynoTpe6a 52

U3nON3BaHe C BbIeH qnnTbp
MapknpoBknte Ha npodykTa nIN cTOnHOCTnTe, IocOChEN B dpyrN DOkyMeHTN,IOCTaBeHN C Hero ca cTOnHOCTN, nOlyuEni npiaIbopatOpHn ycNoBn, CbIgNACHO npInIoKmM CTaNdApTN. Te3N cTOnHOCTn MOKe Da BapnP aT, B 3aBcIMMOCT OT pa6oTHnTE ycNoBn Ha npodykTa n YCNOBnra Ta H OkONHa TcpeA.
CbpxKeTe ce c Hai-6n3KnybHOMOue Hen cepBn3eH areHT 3a MOhtax Ha abcop6atopa.
*IIOJrTOBkata Ha MrcTOTO n eJeKTPnueckOTO INHCTaIIpaHe Ha IpoDyKta ca OTROBOPHOCT Ha notpe6bnten.

IPENyPExEHN:OTcPaHete 3aunHTOΦoNIO(aKO hma TAKOB)OT NOBbPxHOCTTa Ha ab6copBaTopa N dIMooTBoDa cNeD MOHTaKa.
Bicouhata Mekdy donhata noBbpxHocT ha a6- cop6atopa n rohpata nobbpxhoCT ha nekata/ cyphata He Tp86ba da 6bde no-MaIko OT 50 cm npn ra3OBn KOTIOHN 45 cm npn eJektpnueckn KOTNOHN.
EneKtpnuecknte Bpb3kn Tp86Ba da ce HappaBt OT KBaIImΦuIpuH eNEKtpoTeXnK.
MOnTnpaIte npOdykTa Taka, Ye Da MoXeTe Da DOCTnIrate 3axpaHbAunKa6en (Uencel, KOHTaKT)JeCHO CNeD MOHTaxa.
Pa3MePnte ca daJeHn B mm.
3.1. CBbp3BaHe Ha 3axpaHbAHeTo
3axpaHbAHeTo Tpr6Ba Da CbOTBeCTBa Ha NocOueHIne B Kopnyca Ha a6cop6aTopa DaHHN. CbByPKeTe abCop6aTopa KbM KOtAKT, CbOTBeCTBaU Ha NocOueHIne BbPxy Hero DaHHN, Iro pa3nONoxKeTe Taka, Ye da 6bJe Ha DOCTbIHO MRCTo. CNeI MoTAtka, Ako ypeBbT HMa UenCeI (DnpeKTHO 3axpaHbAHe) IINu UenCeJIbT e TpyNDIOcTbNeH, IN3NON3BaIte NpeBkLIQUbATEI B JINHnra, KOITo PO3BOJRA BaN3KJIyBaHe Ha 3axpaHbAHeTo pRyUCOBnHa CBpBXTOK OT Kateropnia III.

PNEpyPEXKDEHNE: Ppei Da CBpbkTe OTHOBo a6copbTaTopa KbM 3axpaHbAHeTo N da npOBepnte DaJI pa6OTn PpaBnHc, Ce yBepeTe, Ye 3axpaHbAunrKaBeIe Cbbp3An PpaBnHc.
- Abcp6batoptteobopydbancscneuaen3axpaHbaKabEn.CBbpxKeTe c cyynbHMOueHen cepBn3eH aKeHT, aKO 3axpaHbaaIyT KaBeI ce nobpei.
3.2. MoThax
3.2.1 Ппедида започенье монтаха:
- Поберете ддл пюдукт bт Иma пoxдяш pa3мр 3a мястOTO Ha MOHTажа.
- OTeTpaHete BbIeHnI nITbp (^*) , aKo e DoCTaBEN (BIXTE CbOTBeTHnI naparpaΦ). ToI Ce MOHTnpa, cAmO aKO JKeJaEte Da n3nON3BaTe abcOp6bAtopa KaTo MoDen C nITbp.
- Пюверете далс acopбатора с дoctавени дуги матерпали (нарример пakетс винтоber (), rapанцунна Kapta () и д.) и akо това e takа, Г NTCTpaHeteи CBxpaHete Ha dpyro място.
Ako e Bb3MOJHO OTCTaPaHeTe CBO6OJHOCTOJUITE NIN PIIb3raIc CE KOTIOHN I IN N3DbPnaiTe HAcTpaHn, 3a Da DOCTURHeTe 3aHATACTHa /TabaHa IecHO. Ako He e Bb3MOJHO, NOKPInTe ILOTA, KOTIOHa NIN PhpHata C PIIbTHO 3aUHTHO NOKPUBaNO, 3a Da IIN 3aNa3Ite OT NOBpeN I 3AmBpcBaHe. N3BepeTe paBA NaOBbpxHOCT 3a MOHTnpaHe Ha ypeDa. NOKPInTe NOBbPxHOCTTa Cbc 3aUHTHO NOKPBANo I pa3PiOnoXeTE BCNUK Pa3OJaKOBaHn YactN BbpxHrEo.
Ocben ToBa npOBePe DaIb B oBnactTa 3a CrIO6BaHe Ha a6Cop6bAtopa IMa KOHTaKT (B 6bIM3oCT B IOcTBnHaTt ObNtAc TneM OMTaxa Ha a6Cop6bAtopa) n DaIe E b3MOxHO CBbp3BaHe Ha acnnpaunrHa a6Cop6bAtopa (cAmO 3a MoDeJIc Acnnpaunr).
3 MoNTaЖ Ha ypeDa
3aBbPwTe Heo6xOdMnTe Oepaunn Ha CTeHaT (HaNPmEp BkIIOUbaHe Ha IeNcena N/INI npOIBaHe Ha OTBOP 3a MapKyua 3a OTBeXdaHe).
PpeIparat ce shnpOKn 7a qKcnahe Ha a6cop6atopa KbM pa3Hoo6pa3HN TINOBe CTeHN / TabAHN. OCBEN TOBA e Heo6OIMo Da ce IOTBbpyd cBMeCTNMOCCTTa Ha MaTePnAna C MaTePnAna Ha CTehata/TabaHa OT yIbJIHOMOueh TEXHk. CTeHATA/TabaHbT Tp6Ba da n3Dbpxat TerlTOHa a6cop6atopa. He MOHTpaIte UpeHa Na NobbpxHOCTn OT kepaMHn PIOOH, IINC ININ CNIIKKOH. PpiKpeINBaIte camo KbM CTeHa.
Ako Ima nane Hn/nn CtpaHnHa cTeHa, n/nn Me-6eHN, npOBepTe daHn IMa dOCTaTbUHO MRCTO 3a crNo6BaHe Ha aBcOp6aTopa N daHn pAnenbT 3a ynpabIeHne ige bDe neCHO DoCTbNeH.
3
Mоnt tax ha ypeda
3.2.2ПоД�OTOBka 3a MoHTnpaHe Ha a6cop6aTopa Ha cTeHaTa
Ito-dony e daedeHa INΦopMaζηra, Heo6xOuIma 3a noTROBkata Ha MOtaxKHOTo MxCTO Ha a6- cop6atopa.
1.Ob03HaueTe NOBbpxHOCTTa, Bbpyx KOrTO NcKaTe da OKaHTe Crlno6kata. (Фигура 1)
T3. BkIIOvBa ypeDa Ha HnBO Ha CKOpOCT 4 3a 5 MNHyTN. IOKaTO ypeBbT pa6OTn Ha npOn3-BOJHO HnBO (1,2,3) HAtNcKaHeTo Ha 6yToHa BOi Do Cta6JIHNo CBTeHe Ha CBeTIINHHN INdIKaTOP Ha CKOpOCTTa N pRIMnIRBaHe Ha CBETNIHHN INdIKaTOP 3a HnBO Ha CKOpOCT 4. B KpaHa 5 MNHyTHCBeTIINHHN INdIKaTOP 3a HnBO Ha CKOpOCT 4 n3rAcBa N npOdyKbT n3JIH3a OT pExHM Ha MaKcMaJIHa CKOpOCT. Ako HATNCHE To 6yToHa 3a HnBO Ha CKOpOCT 4 npeDi n3TuHaHeTo Ha 5 MNHyTN, PpOdyKbT n3JIH3a OT pexkMa Ha MaKcMaJIHa CKOpOCT.
T4. ByToH 3a BKN./n3Kn. Ha JIamnata. HAtncHete 6bP30 To3n 6yToH, 3a Da BKJIOHTe/n3KJIOHTe JAMnata. HAtncHete n 3aDpBXTe 3a NOBuee ot 1 cekynda, 3a da n3BepeTe eHOr OT 5 HnBa Ha npCKoCT.
4.3 AnapMa Ha qnIbpa 3a Ma3HnHn
PnIMRBAHeTo Ha CBETJIHEn INHdNkATOp 1 npedynpejxdaba Notpe6nteJa da NOChTe MeTaIHHaФINTBp. PnHaJIuHne Ha Ta3n anapMa e BpeMe Da NoCHCTte FJITbpa 3a Ma3HNH. HAtncheTe n 3aDpbXkTe 6yToHa 3a BKJ./n3Kn. 3a 3 cekyHn, 3a Da Hnynpate NpEduynpejckDeHnTo, KORATO npdykTbT paobTu. CBETJIHEn INHdNkATOp 1 npectaBa Da npIMRBA.
4.4 AIIapMa Ha BbIeHnaФИNTbP
IpoDyKtBT Ce OocTabr C DeakTNBnPaHa anapMa Ha BByIeH aNITbp. HatncheTe n 3aDPbXTe 6yToH 1 n 2 3a 3cekyHn, 3a da akTNBnPate npedynpeXDeHneTo 3a noHCTBaHe Ha BByIeH aNITbp, Korato IpoDyKtBT e N3KJIIOueH. CBeTba nbpBO cBETIIHEn INdIKatOp 1, a cIeT ToBA 1 n 2, 3a Da nokaxat, ye anapMaTa e akTNBnPaHa. HatncheTe n 3aDPbXTe 6yToHn 1 n 2 3a 3 ceKyHn, 3a Da deakTNBnPate npedynpeXDeHneTo, KORATO IpoDyKtBT e N3KJIIOueH. CBeTbat nbpBO cBETIIHHn INdIKatOpn 1 n 2, a cIeT ToBA 1, 3a da NOKaxat, ye anapMaTa e deakTNBnPaHa.
ПрииMuRbaHToHa CBeTJIiHEn INIДnKaTOp 2 npedynpeXdaba Notpe6nteJa noUcTn BbIJIeHnФINrTp. HatncHeTe n 3aDpBXkTe 6yToHa 3a BKn./n3Kn. 3a 3ceKHyndn, 3a Da HynipaTe npedynpeKDeHnETo, KOrato nopdyKTBt pa6OtN.

Ako eHNOBpeMeHHo ca aKTNBn npEdupeJxDeHn 3a nouCTBaHe Ha BbIeH mTeaIeH fNITbP, HynipaHeto Tp8Ba Da ce N3BbPsN NoOTdEHN 3a BCaKO OT npEdupeJxDeHnTa.
4.5 EHeprnHOb eΦeKTHBHa ynoTpe6a
- По врeme Ha paobota Ha abcospbata peryIinaPaiTe HnBata Ha CKOPoCT Cnopei INHTEN3IBHOCTTA Ha MmPn3MITE n napite, 3a da InpedOTbpaTIne HexKeJaHa eHeproKOHcymaIyra.
- I3noJ3BaIe HnCKn CkOpocTn (1-2) npn HopMaJIHn ycJIOBnI n BVCOKn CkOpocTn (3-4) npnToJIyMa nHTeH3NHBOCT Ha MmPn3MnTe n NapITe.
- Lamnnte Ha abcop6bTopa ca npedHa3NaueHn 3a OCBETBaHe Ha 30Ha7a 3a rotBeHe. N3noJ3BaHeTo IM 3a OCBETJeHne Ha KxHyTa Ie BOBeDe Do HeKeJaHa eHeproKOHcymaunr HeadeKBaTHO OCBETJIeHne.
5.1 Почистванe
-Ппеди поочьани подрьжka ИЗкlioчete ураза ИЗкlioчete ппевкlioчateян Ha 3axpanbaheTo Ил pa3xJa6te/ИЗкlioчete npedna3nteЯ Ha 3axpanBaUaata BeInra Ha abcop6batopa.
- Abcopbatopt Tprba da ce nouchTa peoobHO (pni BCaKO nouchTahe N NOdpbKka Ha dntbpa 3a MaHnH) OTbTpe N OTbH.
-Почистваite abcopбаTopа Като ИЗползВат eнТОпЕнБТОЛЯ ВОДА И HeYТралeн TeчЕн Почиствацпренир ATbPа.
He n3noJ3BaIte a6pa3nBHN npOyKTH. HE N3IOJ3BAIYE CnIPT.

PPEyPPEKDEHNE:Пун HeCnA3BaHe Ha OCHOBHnTe HnCTpykUn 3a ПОчNTBaHe Ha a6cOp6aTopu n aKO He CmEЯTe ФHTpIte, e Bb3MOxEH Noxap.
-Поради таи пчина перорьваимда спедвate снOMEHAITTE ИНСТPyкци.
- Пюпзводптелгун НОСИ OTROВОРНOC 3a DBИralteляи сеTN OTOJOKAP,пчИнEHINОради He npabUNHa NOДрьЖКAnHecIeDbAHe Ha CnOMeHATNTe NO-rope npenopbKm 3a Be3onachOCT.
- Postavljanje i popravak uvijek mora obavljati samo ovlasteni servisni partner. Proizvodač*nije odgovoran za štetu koju uzrokuju neovlastene osobe.
- Urežaj不同程度 has been found in the region of the Czech Republic. The area is located in the Czech Republic, and it is also located in the Czech Republic.
1.1.1 Elektricna sigurnost
figure. (Figura 13, 14)
YnakOBka np60pa n3roTOBneHa n3 MaTepeHAnOB, npiroDhbIX dIy BToPnuHOnObpa6oTKn,B COOTBetCTBnC rocyap
CTBeHbIMn 3aKoHamn. He BbIbpaCbIBaIte ynaKOBOUHbIe MaTePnAIIb I BMeCTe C 6bITOBbIMn ININ DpyHMN OTXODAMN. OTHeCIne INB NPyHKTBI npneMa yNaKOBOHyBX MaTePnAIOB, yUpeKdEHHbIe MeCTHBIMn OprAHm BNactN.
2 Texnueckne xapaKtepcntknp6opa

IcnoIb3OBAHne c IOJIKIOUChENEM K DbIMOXOy

IcnoB3OBAHHe C yroIbHbIM qnIbTpOM
3HaueHn, yka3aHbIe Ha MapKIpOBKe 3JIeKTPoPnObopa nIN B cOpnoBOnTeNbHbIX DOkUMeHTax K Hemy, noJyHebl B JIabOpatopHbIX YCNoBnX COrNaCHO Tpe6oBaHNm COOTBeTcByIOx CTaHApTOB. KaTtueckne 3HaueHn MOryt OTInuYaTBcR B 3aBNCIMocTn O pexnma 3KcNpyataun npioBpa N yCNoBn OkpyKaIoUe Cpebl.
YTO6bI YCTaHOBnTb BbITJkKy, HeoXoDmO ObpaTnTbcK 6bnXaHMeMy aBTOpN3OBaHHOMy TexHnYeCKOM CneuaJIInCTy.
*OTBETCTBeHHOCTb 3a NIOIROTOBky MeCTa IINI60pa n ero 3JNEKTPOMOHtax Hecet NOKyNaTeNb.

IPEIOCTEPEXHENE: Heo6xOIMO CHTb 3aunTHyU pJeHky (pnp ee HaJIuyni) C BbITJgKn I NOBepxHOCTN DbIMOXOda NOCJe YcTaHOBKn.
PacctoHne MeKdy HIXHeN NOBepxHOCTbIO BblTJIKN IN BepXHeN NOBepxHOCTbIO KOHOpKN DOJIHKHO 6bITb He MeHbSe 50 cm dIra3OBbIX KOHOpOKn 45 cm -dIa 3NEkTpnuCeKnX.
3JNeKtpnueckne CoeINHeHnI DOnXhbl BbIIOJI-HrTbcra KBaJIInPfUPOBaHHbIM 3JNEKTPNKOM.
N3dene CneyetyctahabnBaTb TaK, YTObI NOtOM MOxHO 6blcJIeIKOCTbIO DOTAHyTbCra DoCTNIITAHIN (PO3eTKBbIXoJa).
Pa3mepbI npBVeDeHb B MM.
HhOpMaun, HeoOxOIma JIJI POIOrTOBKn Me-CTaYCTaHOBKn BbITJXKN, PnIBoDITcH HIXe.
1.CdenaTe OTMeTn Ha NOBepxHocTn corlacho 7a6noHy Ira KpeIeHn. (PncyHok 1)

2.ПикpenTe MOHTaЖньшабнOKМecTyДЯУctahOBKnВblTJXKN.(PncyHok 2)
3.Посверлente OTьрстя CBepnom 8 MMВ OTMeehhblx MecTax.(PncyHOK3)
4.YctaHOBInTe 3IIO6eN 8x40MM BnpocBep- IeHHbte OTBepCTn.3aBHTInTe 2 BNHTa IIN POnBeuBaHnI 5x45 MM B BblJeyKa3aHHbIe IIO6eN.Mexdy rOIOBKO BVHTa N CTHeOH DoJXeH 6bITb 3a3Op B 5 MM (PncyHok 4)
3 UctaHOBka npnbopa
3.2.3. C6opKa BbITaJxHOn Tpy6bl
IPEDOCTEPEXHENE: Heco6JIIO-DeHHe 6a3OBbIX INHCTpyKcIIN PO ONUCTKe BbITAAKKN 3aMeHe QnIBTPOB MOJET PnIBeCTN K NOJApY.
-ПоэтOMу peKOMeHДуЕМ npДeрЖиВаТьСУ yka3aHHbIX INHCTDyKUIM.
- PpOIN3BODInTeJIb He Hecet OTBETCTBEHHOCtIaMEXAHueckn yUepe6 nIIy uyepe6 OT pIaMeHb, Bbl3BaHHbI He npabINbHbIM 06cnyKbHaHem IINI HECo6JIIODeHEm BblIeYka3aHHbIX peKoMeHNlaH.
5.2.OuNTka CTeKJIaHHoI naHeIi
CTekJIaHHyI NaHeJI N IOBepxHOctN BCAcbIbAHn CJIeDyET ONUuATb C ToI JKe IepNoIDNuHOCTbIO. YTO N dMbTObI-JKINPOVNIOBtEN.
OuNCTky npoBOOnTe TkaHbHO, CMOUeHHoB B paTBope HeNtPaJIbHOrO MOIOSeTo CpeIcTBa.
- IV36eraIte nCpOJIb3OBAHnA a6pa3NbHbIX cpeIcTB. HE OUYIaIte IPII NOMOUI AJI-KOIGON!
5.3.YrOJIbHbIyΦnIbTp (ToIbKOДЯMOdIeNc C ΦnIbTpamn)
- PocneДиNTeJIbHOrO nepNoDA nCnOJIb3OBAHnYrOJIbHbIyФИNbTp MOKeT nepENoJInHtBcR, B 3a-BINCMOCTH O T TnIa npriOTabJIbAeMoI NIIuN DEvVIAJHOCTN OHCTKN.
B JIIObOM CJIyuee KApTpNIXCNeDyET MeHЯTb He pexe Yem pa3 B YeTbIpe Mecya (INI NIO CnHany, ecNI CNCTema OCHaUeHa INHdNKATOpOM HANOJIHeHnI QnJIbTpa, KOtOpBn I CNHaNIm3uPyET O NOTpeHoCTn B 3aMeHe). (PncyHOK 16) - YToIbHbIe 0nIbTpbl He npeHa3NaYeHb I dJaMbITbI IOBTOPHO IcNObIb3OBaHIM.
16
KpyroBoy yroJbHbI ΦnJbTp
Pa3MeCTIte OINH FInbTp pIaOM C 3aUHTbIM KOxuyXOM IpOeNIIepa DBrIaTeJIa, 3aTeM NOBEdHNTe DeTaNb NQ YacOBoI CTOpENke.
- Пи разборке поевенITE Deеталь потив ча-cobой стpenк.
5.4.Фильт-жироуновтуь
-
YnaBnBaet qactuIbI Jknpa, oba3OBaBUniecr BO BpEMy pNIOROTOBJIeHNIuIN.
-Фильт-жирочьпгьслсдуET OчицатExeMeecyaHNO (ИлЖе CLEДNTb 3a ИнДИКATOPM3aONHHeNЯ Фильтpa,пri NaIChuN NocleH-HeroВПибрTeHNo MОdJI) BpyHypoPnOMOUs He cOdepxaJero KNCOTbI cpeDCTBaIINJxB NOCyDOMoeUHOM MaSInHe,БыбРakOKOTKYI pOrpamMy C H3K0I TEMNEPATyOi. -
Pn MOKe B NocyDmOeHNO MaUInHe ΦnIbTp MoKET HEMHO BbUcBecTn, HO 3TO He NOBnIaRt Ha eTo ΦyHKUHOHaJIbHoCTb.
- UTo6bI n3BLey JxipoyJIOBtTeJI, NotaHInTe 3a oCBO6oKdAioUnn PpyKnHy pbHaR. (PucyHok 17)
5.5.Чистka
- He cIeJyET npene6peraTb uNCTKoB BbITgKKn cpa3y nocne xapkn.
-Дя OунstКи BHeшН ПOBepхHOCTN BByTЯKKI HeO6xOДIMO ИСОЛьЗОВаТ МягkyIO TkaHb, CMOчEHHyJO KИДКIM MOЮцIM CpeДCTBOM. - He cIeJyET IcIcOJIb3OBAt bI abpaIIBHbIe IINI UapanauoIe MaTePnAbl IJa YICTKn BblTJKKN.
- Moxho nCnOJb3ObaT bKOMMepeeCKn DoCTynHbIe YNCTaIe CpeCTBa dIy NoCToHHoN Cma3Kn I T.Д., npDcEpxKBaBc bPepdynpexKaIOuXIN HNCTpykUHa npOdykTe. UTo6bI He NOpaapanatb 5eTKOcSTaNbHO KOpny, Heo6XoDIMO pOtnpaTb erO B HnPaPbIeHN cIeda.
He cIeNyEt nCIOJIb3OBAbT yIcTЯIe CpeICTBa, CoDEpKaUaIe COJAHyU KNCIoTy, OT6eJIINBATEIb IINI a6pa3INBhIe NopOuKIn, YTObI coXpaHnTb KaeCTBO NOBepxHOCTn PnIBOpa. IcNoJIb3yIte TKAHb, CMOeHHyU B MblbHOI BODe, IINI CneIIaJIbHi B cPpe IJr OChCTKn NOBepxHOCTe I3 HEPKABeOJSe CTAn. CJeDyET CHrA T3aUHTHyU PJIeHKy C BbITaKKn.

BHHMaHHe! HecobJIOeHne IN-CTpyKUIN PO ONUCTKe I 3aMeHeФЛьТрOB BbITaKKMOKET PnIbeCTN K NOkApy.

B cnyuae ecn Hneobxoadmo nepebe3n np6op:
COxpaHnTeOpunHaJIbHyIOyNAKOB KY BbITaKKn; NepeBO3NtB BbITaKky CJIeDyET B ee OpunHaJIbHOI yNAKOBKe, PpIePckINBaJcTpaHCnOPTHOI MapKnipOBKn Ha yNaKOBKe.
B cnyae oTcytCTBna opnHahlbHOYnaKOBKn:
He cneIyET KlaCTb Ha BbITJxKv TjXKeJIe IpeI-Metbl;
- cIeJyET Obe3OpacITb BHeUHIO IOBepxHOCTb OT yIapOB;
CneNyET ypaKOBaTb npnbop TaKIM o6pa3OM, UTo6bl He NpBpeDnTb ee BO BpeM TpaHcnpOpTnPOBKn.
5.6. 3aMeHa JIamn

IPEDOCTEPEXHENE: nepei Tem KAK npKacTaBcK IaMnAm, y6eNi-TEcb, YTO OHN OCTbJIN.

Дязамениламп CBЖNTeCb C abTOpIN3OBaHHbIM TEXHnueCKM CneUaJIInCTOM.