ZU500A10 INFINYPRESS - Juicer MOULINEX - Free user manual and instructions
Find the device manual for free ZU500A10 INFINYPRESS MOULINEX in PDF.
| Brand | Moulinex |
| Model | ZU500A10 INFINYPRESS |
| Type | Juice extractor |
| Main functions | Fruit and vegetable juice extraction, coulis preparation |
| Included filters | Juice filter (orange, small holes) and coulis filter (raspberry, large holes) |
| Maximum continuous use capacity | 20 minutes recommended |
| Main spare parts | Pusher, lid, press screw, filters, dry residue tab, bowl, cup, drip-stop spout, jugs, foam stopper, cleaning brush, dry residue collector |
| Safety | Automatic shutdown in case of overload, red/white lights, lid lock |
| Maintenance and cleaning | Immediate washing of removable parts with soapy water, brush provided for filters, motor unit not submersible |
| Power supply | Mains (power cord included) |
| Additional accessories | Foam stopper, two jugs, cleaning brush |
| Repairability | Spare parts available, manual with disassembly tips |
| Dimensions (estimated) | Approximately 30 x 20 x 40 cm (without packaging) |
| Weight (estimated) | Approximately 4 kg |
| Certifications | Compliance certificate No. TC RU C-FR. AF27. B.00199, EAC |
Frequently Asked Questions - ZU500A10 INFINYPRESS MOULINEX
User questions about ZU500A10 INFINYPRESS MOULINEX
0 question about this device. Answer the ones you know or ask your own.
Ask a new question about this device
Download the instructions for your Juicer in PDF format for free! Find your manual ZU500A10 INFINYPRESS - MOULINEX and take your electronic device back in hand. On this page are published all the documents necessary for the use of your device. ZU500A10 INFINYPRESS by MOULINEX.
USER MANUAL ZU500A10 INFINYPRESS MOULINEX
FR p 1-3
EN p4-6
AR p7-9
FA p 10 - 12
UK p 13 - 15
RU p 16-18
KK p 19 - 21
ES p 22 - 24
PT p 25 - 27
IT p 28 - 30
EL p 31-33
NL p 34-36
DE p 37 - 39
FR
EN
AR
FA
UK
RU
KK
ES
PT
IT
EL
NL
DE
3NeKtpocokobikmMauMn Moulinex ZU5xxxxx
H3roToBneHo Bo OpaHcnn Ia XoIunHra "GROUPE SEB", France
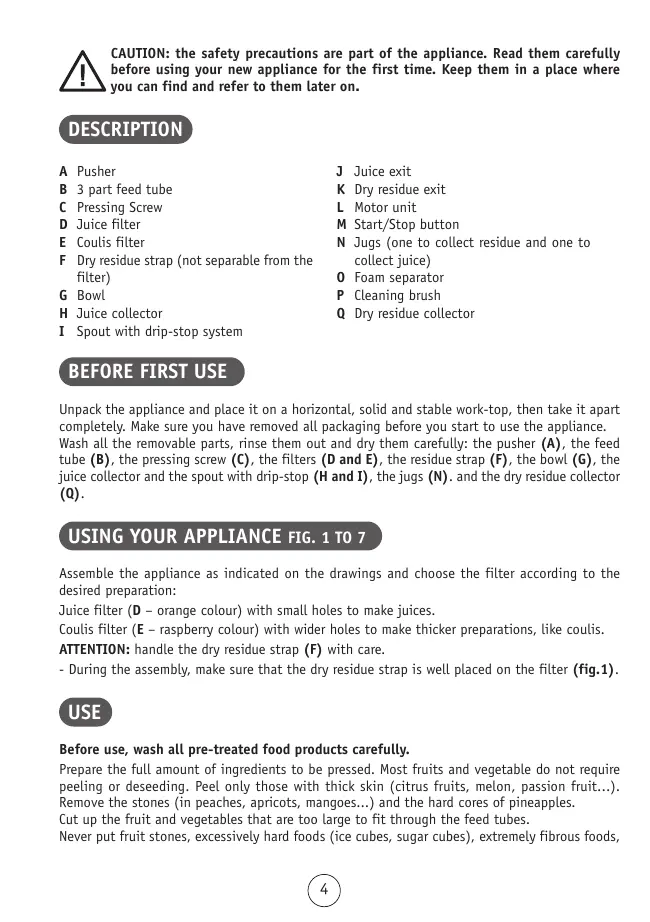
CAUTION: the safety precautions are part of the appliance. Read them carefully before using your new appliance for the first time. Keep them in a place where you can find and refer to them later on.
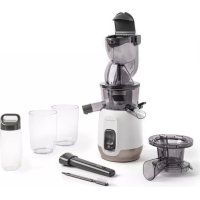
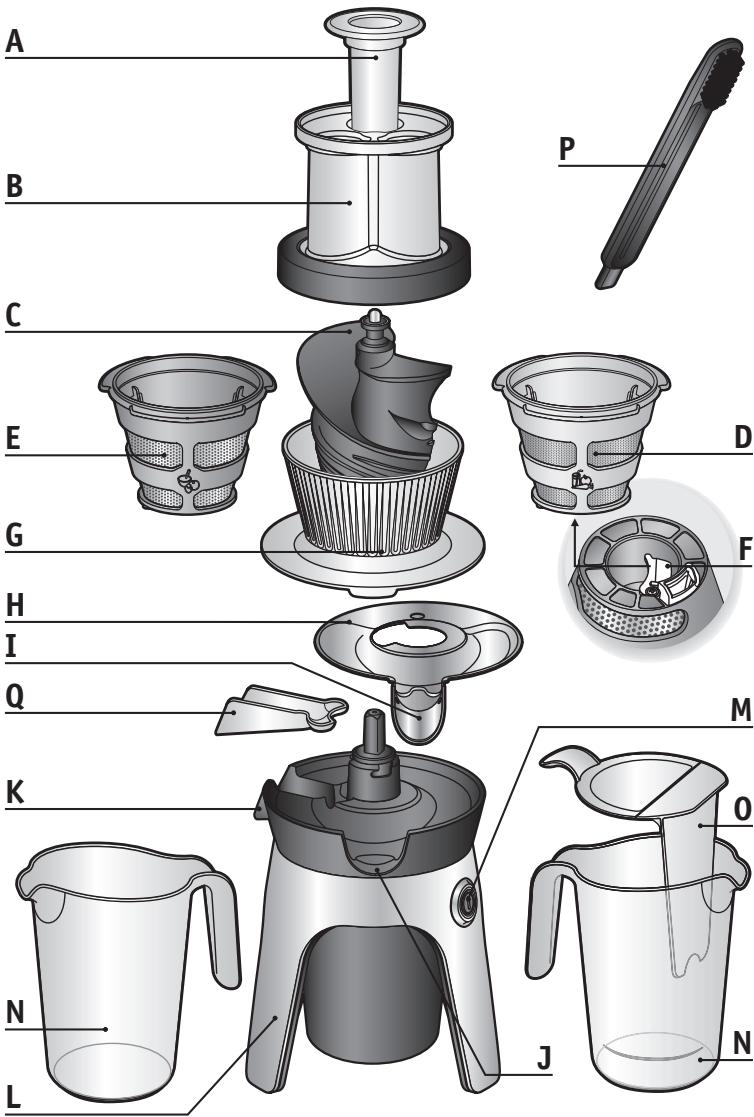
DESCRIPTION
A Pusher
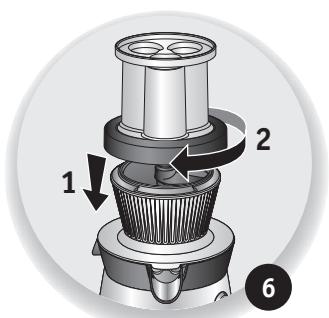
B 3 part feed tube
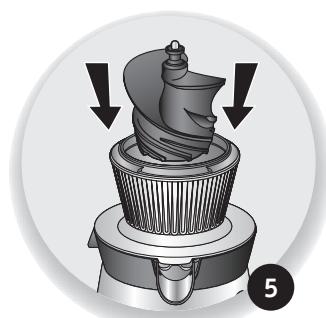
C Pressing Screw
D Juice filter
E Coulis filter
F Dry residue strap (not separable from the filter)
G Bowl
H Juice collector
I Spout with drip-stop system
J Juice exit
K Dry residue exit
L Motor unit
M Start/Stop button
N Jugs (one to collect residue and one to collect juice)
0 Foam separator
P Cleaning brush
Q Dry residue collector
BEFORE FIRST USE
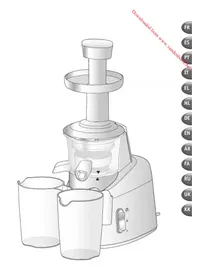
Unpack the appliance and place it on a horizontal, solid and stable work-top, then take it apart completely. Make sure you have removed all packaging before you start to use the appliance.
Wash all the removable parts, rinse them out and dry them carefully: the pusher (A), the feed tube (B), the pressing screw (C), the filters (D and E), the residue strap (F), the bowl (G), the juice collector and the spout with drip-stop (H and I), the jugs (N), and the dry residue collector (Q).
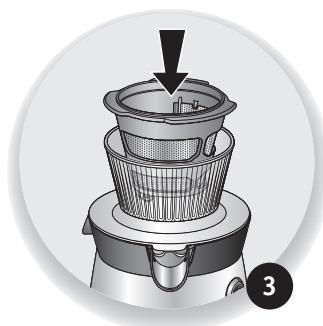
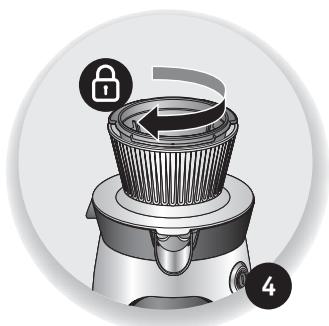
USING YOUR APPLIANCE FIG. 1 TO 7
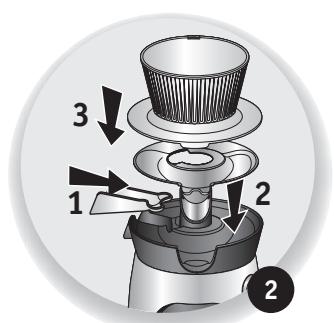
Assemble the appliance as indicated on the drawings and choose the filter according to the desired preparation:
Juice filter (D - orange colour) with small holes to make juices.
Coulis filter (E - raspberry colour) with wider holes to make thicker preparations, like coulis.
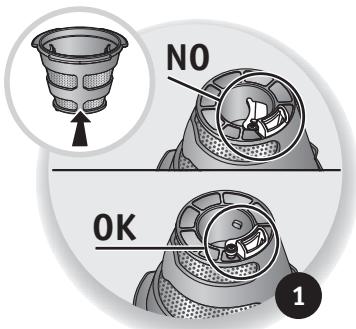
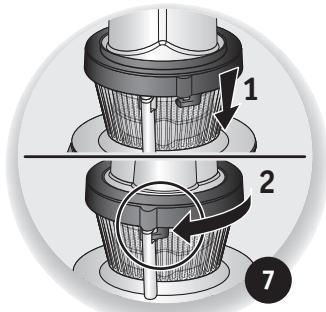
ATTENTION: handle the dry residue strap (F) with care.
- During the assembly, make sure that the dry residue strap is well placed on the filter (fig.1).
USE
Before use, wash all pre-treated food products carefully.
Prepare the full amount of ingredients to be pressed. Most fruits and vegetable do not require peeling or deseeding. Peel only those with thick skin (citrus fruits, melon, passion fruit...). Remove the stones (in peaches, apricots, mangoes...) and the hard cores of pineapples.
Cut up the fruit and vegetables that are too large to fit through the feed tubes.
Never put fruit stones, excessively hard foods (ice cubes, sugar cubes), extremely fibrous foods,
or meat into your juicer.
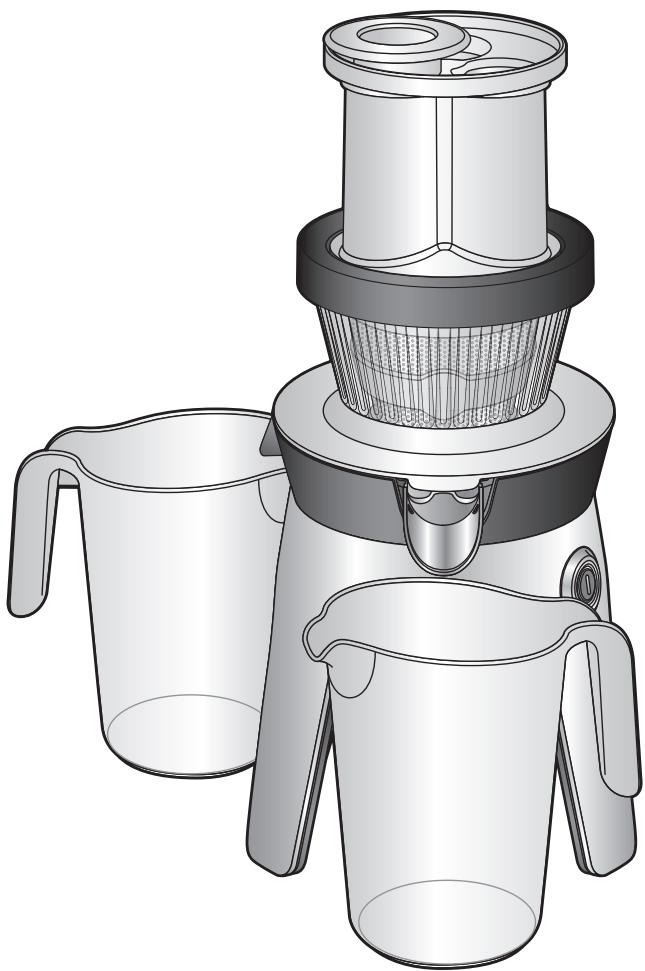
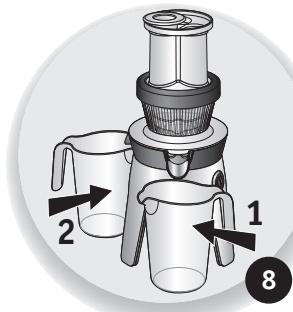
Place one jug (N) under juice exit (J) and the other jug (N) under the dry residue exit (K) (fig. 8).
Remember to empty the jug under the residue exit when it is full.
Press the Start/Stop button (M) to turn on the appliance, place the food in the feed tubes (B) and push them down using the pusher (A). Make sure that the spout (I) is in the "low" position (juice flow).
The fruit and vegetables must only be inserted while the motor is running.
Never use your fingers or other utensils to push food through the spout.
Do not press too hard on the pusher (A).
Once the ingredients have passed through, let the appliance turn for a few more seconds in order to obtain the maximum amount of juice.
We recommend that you do not use the appliance continuously for over 20 minutes.
After making your juice, activate the drip-stop system by pushing the spout up before removing the jug to stop the flow of the juice.
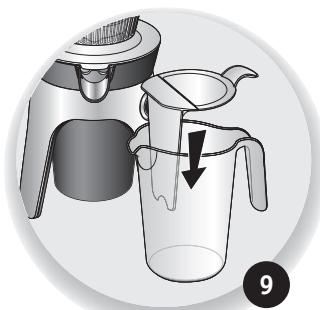
If the juice contains froth, you can fit the foam separator accessory (0), onto the jug (N) which allows you to keep the froth inside the jug when you pour out the juice into a glass (fig. 9).
Practical tips when choosing ingredients:
- Choose fruit and vegetables that are best for juicing such as oranges, apples, pears, pineapple, grapes, tomatoes, carrots, celery, cucumber, beetroot ....
- It is difficult to extract juice from some fruit and vegetables such as bananas, avocados, aubergines and figs.
- When you press less juicy fruit (like bananas) and aromatic herbs, alternate with other juicy fruits or vegetables in order to facilitate extraction. Always finish with juicy fruit or vegetables.
- When you press long leaf herbs (such as wheatgrass), cut the leaves in 3 cm pieces in order to keep them from getting tangled around the pressing stem. Press a maximum of 400g of herbs at a time.
- Out of season, you can use frozen fruit. Let them thaw completely before pressing. You can also use fruit with syrup (lychees, peaches...).
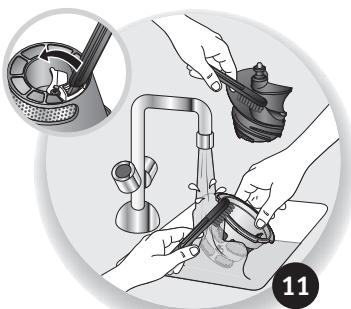
CLEANING (FIG. 10 TO 12)
Between 2 preparations
It is enough to rinse the appliance without taking it apart by pouring water gradually into the feed funnel (B), with the appliance on. Make sure that you have placed an empty jug (N) under the juice exit. You can then make one juice immediately after the other!
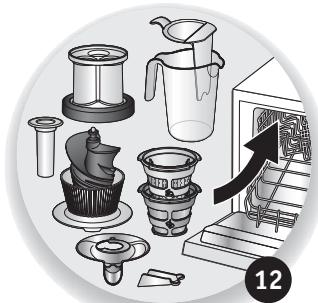
After Use
Cleaning must be carried out immediately after use.
Make sure that the appliance is disconnected.
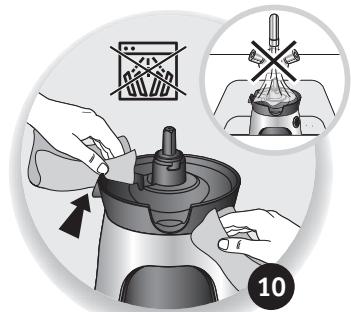
Never immerse the motor unit (L), power cord or plug in water or any other liquid.
Do not put the motor unit (L) in the dishwasher.
Take apart and clean all the removable parts, filters (D-E). If necessary, use the brush (P), to clean the residue strap (F) (wrap inseparable from the filter but you should slide open the silicone cover for cleaning purposes; if necessary, also use the end of the brush (P) to clean this area and then close the silicone cover. The brush can also be used to clean the bowl (G), juice collector (H) with spout with drip-stop (I).
Make sure to clean the inside of the screw (C) carefully; if necessary, use the brush (P). Clean the residue exit (K) with a lightly moist and non-abrasive sponge.
The pusher (A), the feed tube (B), the bowl (G), the screw (C), the juice collector (H) with the spout with drip-stop (I), the jugs (N), and the foam separator (O) can all go into the dishwasher. If the filters (D/E) are clogged, prewash them with warm water and washing up liquid and use the brush (P). If the filter residue exit is clogged, remove the residues using the other end of the brush (P).
Do not clean the juice collector (H), the spout with drip-stop (I), the plastic parts (bowl (G), food presser (A), feed tube (B)) with the abrasive side of the sponge.
Tips: To extract the screw (C) from the filter (D / E) , turn both pieces together and then press on the screw.
WHAT TO DO IF YOUR APPLIANCE DOES NOT WORK
| PROBLEMS | SOLUTIONS |
| The appliance does not turn on | - Make sure that all parts are correctly assembled. - Make sure that your appliance is properly plugged in. - Check that the feed tube (B) is correctly locked in position. |
| The appliance stops suddenly while functioning: the red light flashes | - Press the Start/Stop button (M) to switch off the appliance. - Start your appliance again. If the safety mechanism shuts the appliance off again, take it apart, clean it and turn it on again. - Make sure that the screw (C) is not blocked. |
| The appliance turns off: the white light flashes | - This is a safety mechanism. We recommend that you let the appliance cool down for a few minutes, clean it, and then restart it by pressing the Start/Stop button (M). |
| Poor Juice Extraction | - Clean the appliance: wash, rinse out and dry: the feed tube (B), the pressing screw (C), the filter (D or E), the residue strap (F), the bowl (G), the jugs, the spout (H and I) and the dry residue collector (Q). - Make sure that the strap (F) is correctly positioned on the filter (to collect residues) and that it is in good condition. |
| Problems related to leaking | - Check that all parts are correctly assembled, especially the spout with drip-stop (I). |
| اللهُّل | العَلْمُّل |
| العَلِّلُّلُّهُّلُّهُّلُّهُّلُّهُّلُّهُّلُّهُّلُّهُّلُّهُّلُّهُّلُّهُّلُّهُّلُّهُّلُّهُّلُّهُّلُّهُّلُّهُّلُّهُّلِّهُّلُّهُّلُّهُّلُّهُّلُّهُّلُّهُّلُّهُّلُّهُّلُّهُّلُّهُّلُّهُّلُّهُّلُّهُّلُّهُّلُّهُّلُّهُّلُّهُ" | :العَلِّلُّلُّهُّلُّهُّلُّهُّلُّهُ" |
| العَلِّلُّلُّهُّلُّهُ"ON/OFF(M)العَلِّلُ"LEbɪdɪ(Б)العَلِّلُ"LEbɪdɪ(Д) | :العَلِّلُ"العَلِّلُ"العَلِّلُ"العَلِّلُ"العَلِّلُ"العَلِّلُ"العَلِّلُ"العَلِّلُ"العَلِّلُ"العَلِّلُ" |
| العَلِّلُ"العَلِّلُ"العَلِّلُ"ON/OFF(M)العَلِ"LEbɪdɪ(Б)العَلِ"LEbɪdɪ(Д) | :العَلِ"العَلِ"العَلِ"العَلِ"العَلِ"العَلِ" |
| العَلِ"العَلِ"العَلِ"ON/OFF(M)العَل"LEbɪdɪ(Б) | :العَل"العَل"العَل"العَل" |
| \((A)\) "العَل"العَل":\(^\text{العَل}\) "العَل":\(^\text{الع} \) "العَل":\(^\text{الع} \) "العَل":\(^\text{الع} \) "العَل":\(^\text{الع} \) "العَل":\(^\text{الع} \) " | :العَل"العَل"العَل" |
| \((F)\) "العَل"العَل":\(^\text{F} \) " \(^\text{F} \) " \(^\text{F} \) " \(^\text{F} \) " \(^\text{F} \) " \(^\text{F} \) " \(^\text{F} \) " \(^\text{F} \) " \(^\text{F} \) " \(^\text{F} \) " \(^\text{F} \) " \(^\text{F} \) " \(^{\text{F}} \) " \(^{\text{F}} \) " \(^{\text{F}} \) " \(^{\text{F}} \) " \(^{\text{F}} \) " \(^{\text{F}} \) " \(^{\text{F}} \) " \(^{\text{F}} \) " \(^{\text{F}} \) " \(^{\text{F}} \) " \(^{\text{F} }\) " \(^{\text{F}} \) " \(^{\text{F}} \) " \(^{\text{F}} \) " \(^{\text{F}} \) " \(^{\text{F}} \) " \(^{\text{F}} \) " \(^{\text{F}} \) " \(^{\text{F}} \) " \(^{\text{F}} \) " \(^{\text{F}}\) " \(^{\text{F}} \) " \(^{\text{F}} \) " \(^{\text{F}} \) " \(^{\text{F}} \) " \(^{\text{F}} \) " \(^{\text{F}} \) " \(^{\text{F}} \) " \(^{\text{F}} \) " \(^{\text{F}} \) " \(^{\text{F}} \)\( ^{\text{F}} \) " \(^{\text{F}} \) " \(^{\text{F}} \) " \(^{\text{F}} \) " \(^{\text{F}} \) " \(^{\text{F}} \) " \(^{\text{F}} \) " \(^{\text{F}} \) " \(^{\text{F}} \) " \(^{\text{F}} \) " \(^{1} \) | :العَل"العَل"العَل" |
| \((Q)\) "العَل"العَل":\(^\text{الع} \) "\(^\text{F} \) " \(^\text{F} \) " \(^\text{F} \) " \(^\text{F} \) " \(^{\text{F}} \) " \(^{\text{F}} \) " \(^{\text{F}} \) " \(^{\text{F}} \) " \(^{\text{F}} \) " \(^{\text{F}} \) " \(^{\text {F}} \) " \(^{\text{F}} \) " \(^{\text{F}} \) " \(^{\text{F}} \) " \(^{\text{F}} \) " \(^{\text{F}} \) " \(^{\text{F}} \) " \(^{\text{F}} \) " \(^{\text{F}} \) " \(^{\text{F}} \) " \(^{\text {F}} \) " \(^{\text{F}} \) " \(^{\text{F}} \) " \(^{\text{F} }\) " \(^{\text{F}} \) " \(^{\text{F}} \) " \(^{\text{F}} \) " \(^{\text{F}} \) " \(^{\text{F}} \) " \(^{\text{F}} \) " \(^{\text {F}} \) " \(^{\text{F}} \) " \(^{\text{F}} \) " \(^{\text{F}}\) " \(^{\text{F}} \) " \(^{\text{F}} \) " \(^{\text{F}} \) " \(^{\text{F}} \) " \(^{\text{F}} \) " \(^{\text{F}} \) " \(^{\text{I}} \) | :العَل"العَل" |
| \((R)\) "العَل"العَل":\(^\text{الع} \) "\(^\text{F} \) " \(^\text{F} \) " \(^{\text{F}} \) " \(^{\text{F}} \) " \(^{\text{F}} \) " \(^{\text{F}} \) " \(^{\text{F}} \) " \(^{\text{F}} \) " \(^{\text{F}} \) " \(^{\text{F}} \) " \(^ {\text{F}} \) " \(^{\text{F}} \) " \(^{\text{F}} \) " \(^{\text{F}} \) " \(^{\text{F}} \) " \(^{\text{F}} \) " \(^{\text{F}} \) " \(^{\text{F}} \) " \(^{\text{F}} \) " \(^{\text{F}} \) " \(^ {\text{F}} \) " \(^{\text{F} }\) " \(^{\text{F}} \) " \(^{\text{F}} \) " \(^{\text{F}} \) " \(^{\text{F}} \) " \(^{\text{F}} \) " \(^{\text{F}} \) " \(^{\text{F}} \) " \(^{\text{F}} \) " \(^ {\text{F}} \) " \(^{\text{F}}\) " \(^{\text{F}} \) " \(^{\text{F}} \) " \(^{\text{F}} \) " \(^{\text{F}} \) " \(^{\text{F}} \) " \(^{\text{F}} \) " \(^{\text{F}} \) " \(^{\text{F}} \) " \(^{\mathbb{I}} \) | :العَل" |
gill gill sll gall jll (M) ON/Off 1111111111111111111111111111111111
. 101 101 101 101 101 101 101 101 101 101 101 101 101 101 101 101 101 101 101 101 101 101 101 101
aalalalalalalalalalalalalalalalalalalalalalalalal
Jlssll, jssll Jll lssss sssall no aal 1s k s s s s s s s s s s s s
aai aai aiai aiai iai aiai aiai aiai aiai aiai aiai aiai aiai aiai aiai aiai aiai aiai aiai aiai aiai aiai aiai aiai aiai aiai aiai aiai aiai aiai aiai aiai aiai aiai aiai aiai aiai aiai aiai aiai aiai aiai aiai aiai aiai aiai aiai aiai aiai aiai aiai aiai aiai aiai aiai
Llaalglal
1 1 1 1 1 1 1 1 1 1 1 1 1 1 1 1 1 1 1 1 1 1 1 1 1 1 1 1 1 1 1 1 1
J 1
20110k
y
aal l a (N) 15
1 1 1 1 1 1 1 1 1 1 1 1 1 1 1 1 1 1 1 1 1 1 1
iial 1aiii piai iie aai jao Jiaai diSai
Jusuuy
J
L L
L L
" 1
( ) J
s j
s j
s j
s j
A
B
C
D
E
F
G
H
I
yjyj
1
JyI yall Jaaal Jia aaiil 1go aagllj no sli
aill 10. (A) aill: lai jai jai jai jai jai jai jai jai jai jai jai jai jai jai jai jai jai jai jai jai jai jai jai jai jai jai jai jai jai jai jai jai jai jai jai jai jai jai
gH) aagall gJ (G) 1gll. (F) 1gll. 1gL. (DgE) jzjll. (C) 1gll. (B)
aaiia aaiia aaiia aaiia aaiia aaiia aaiia aaiia aaiia aaiia aaiia aaiia aaiia aaiia aaiia aaiia aaiia aaiia aaiia aaiia aaiia aaiia aaiia aaiia aaiia aaiia aaiia aaiia aaiia aaiia aaiia aaiia aaiia aaiia aalaa
20 j 1 k o w s l a w d g
:Jggo Jzjj Jgagd jdojglu
jolg jolglj g jolg jolg jolg jolg jolg
.(jduuulgooljg)duuul
... 100000000000000000000000000000000000000000000000000000000000
1
y 1 La Sry, y. y y J L a J (piaie ale iila) y jy b S y I y laa L aai -
j 400 j
aJ 1 aJ 1 J 1 J 1 J 1 J 1 J 1 J 1 J 1 J 1 J 1 J 1 J 1 J 1 J 1 J 1 J 1 J 1 J 1 J 1 J 1 J 1 J 1 J 1 J 1 J 1 J 1 J 1
g 1 g j 1 1 1 1 1 1 1 1 1 1 1 1 1 1 1 1 1 1 1
aik aaii i 1
oujui ju
sds jia. gai plai oaiwai j y aaiy bly juy s ay
1 1 1 1 1 1 1 1 1 1 1 1 1 1 1 1 1
(P)sjJlaiwglguljIJIJI.(D/E)la
a d
-
-
-
-
-
-
-
- 1.
-
-
-
-
-
-

J
Sii 11i j
Gj
L
g/4
M
Sii (Y) N
SS i S
O P
Q
A
B
C
D
E
F
G
H
I
01
1 j 1 s s s s s s s s s s s s s s s s s s s s s s s s s s s s s s s s s s s s s s s s s s s s s s s s s s s s s s s s s s s
| x - 1| = | x - 2| = | x - 3|
(A)aaijlaai Lg y g k,1y jLg (204
.(Q)JfSi(N)S(I+H)
71jkaowlolksjolad
jLw oJoi 4 4 1 J j 1 1 1 1 1 1 1 1 1 1 1 1 1 1 1 1
山
. 1000000000000000000000000000000000000000000000000000000
Jul 5 Jilolo
(1)
Ola
(K) 1111 (N) Sii J (J) a 1 1 1 1 1 1 1 1 1 1 1 1 1 1 1 1 1 1 1 1 1 1 1 1 1 1
(9) (J) J (J) a a a a a a a a a a a a a a a a a a a a a a a a a a a a a a a a
ONMC
UK
A LTOBxau
B Kpniuka J roptloBnHa
CTnCKaJIbHnI rBnHT
DΦinbTp dna coky
EΦinbTpДЯrγctnxpiIN
F 3nukIyBiaDxOiB (He BID'EDHyETbCByiDΦInbtpa)
G yawa
HPiictabka dnyaasi
I IpotmKpaneJbHn HocNk
J OTrBipIaBnXoOy COKy
K OTbip nla BixoDIB
L BnokDbnryHa
M KhoJa «BbIMKHeHHBIMKHeHHH
N EMHOCTI
0PiHOBicika
P Ⅲitouka dnyuueHHa
Q KonekTopДЯВiIXoDIB
TakoX MoKHa BnKOpNCTOByBaTu 10 KOpNcHny nopaDy IJnI pOnJIeWHeHHa YUeHHa npInlaDy.
Nicra BnKopucTahna
UuueHHa cnid BnKohyBaTH HeraiHo nicn BnKOpncTAnH. IpekeoHaItec, 0 npnnad BmKHeNo. He 3aHypoiTe 6Iok DnBryHa (L) y Body, biH e re pemTuHMM.
Jktoo fIbtpn (D/E) 3a6pydnehi, npomnte ix B Mmblhio Boi 3a donomoro o toouk (P).
Kopncnnapa: 106 BnHnTn rBnHT (C) 3 iInbtpy (D/E), nepeBepHtB, AKnO nOtpiHo, rBnHT pa3oM i3 iInbTpM Ta HnCHiTb Ha HnKHiO uactHyr BnHTa.
PENEI PEPBbIM NCNoJb3OBAHnEM
PacnakyuTre npri6Op nIOCTABTe erOHa roPnzOHtalbHyU,poPCHyU nCTaBulHyU NOBepxHOCTb, 3aTeM BbIbTe BCE KOMHENTbI. Ppeed nCIOJIb3OBAHNem npri6opba 6o3aTeNbNO npOBepbTe, Tc0bBe BcE aIeMEHTbI yIaNOKBk 6blm ydaneHbI.
ПROMОЛТЕ,ΤΙΑΤΑΝΥΝΑΤΗΟΥΝΥΝΑΤΗΟΥΝΑΤΗΟΥΝΑΤΗΟΥΝΑΤΗΟΥΝΑΤΗΟΥΝΑΤΗΟΥΝΑΤΗΟΥΝΑΤΗΟΥΝΑΤΗΟΥΝΑΤΗΟΥΝΑΤΗΟΥΝΑΤΗΟΥΝΑΤΗΟΥΝΑΤΗΟΥΝΑΤΗΟΥΝΑΤΗΟΥΝΑΤΗΟΥΝΑTΗΟΥΝΑΤΗΟΥΝΑΤΗΟΥΝΑΤΗΟΥΝΑΤΗΟΥΝΑΤΗΟΥΝΑΤΗΟΥΝΑΤΗΟΥΝΑΤΗΟΥΝΑΤΗΟΥΝΑΤΗΟΥΝΑΤΗΟΥΝΑΤΗΟΥΝΑΤΗΟΥΝΑΤΗΟΥΝΑΤΗΟΥΝΑΤΗΟΥ
BBOДВЭКПЛУATAЦИО (PMC.1-7)
Co6epnte np6op, kak nok3aHO ha nnIOCTpaunx IN Bb6epnTe fInIbTp, COOTBETCTByUOuN 3aDymHOMy peuenTy.
MaKcMmaJIbHo peKOMeHnyeMaJ npOoJXnTeIbHOCTb NcPOnb3ObaHna COKOBbIXKImaJIKN2 20 MmHyT.
Iocne nepepa60tkn Bcex INHrpEneHTOB daIte cOKOBxIMaJIke npa60TaTb eue HeCKoJIbKO CEyHd, YTO6bl BbIXaTb MaKcIMaJIbHOe KOINueCTBO COKa.
CobetbI NO Bbl60py nHrpdeJeHTOB
- OtdaBaiTe PnpDIOHTeHne CBEXM ppyKTAM n OBOUAM. C NOMOJIbO COKOBXIMAJKN MOXHO BIXMAbTc K0N 33 ppyKTOB, OBOUeI n npRbIb TpAB (B COYETAHN C COUYBMN INHPrEINHTAMN) BCEX TNIOTB.
-уTo KaacatcЯBLOK,гуш, anelbCnHOB, nOMuOp n.Д.,TO peKOMeHnyetc Bbl6paTb copTa, npedHa3NaueHHbIe DnIy BblJIMaHnA COKa.
-Пгьвдиманк сока ИЗ ФКТВС НЕБЛБИМ COДЕКHAИМСОKA (HAPIMER, БАHAHOВ) Ипразых трав, Утосы облеловны роцesc, И СLEDEУТЧЕРДOBATС ФКТAMи ИОBOДAMС BсКОКС COДЕКHAИМСОKA.ЗАКИНВВТ роцesc TOKE ChEDYET COUHBMIN INHTPDEIHTAMN.
-Прии Быхимани соки n3 динньхтрав (hanpimep, no6bero Пшени),npedbariptenbHO pa3pexbte nx ha otpekn DKHnOHe 6 bonee 5 cm,чTOбi He donyctntb nx hakpyuBaHna Ha nHEk. He bkyimameKc n3 d0one 400 rTrab a3 pa3.
-BHe ce3OHa MoXHO nCnOJIb3OBaTb 3aMOpOKeHHBe pykTb .IpePeBbIXmAHmE COKA IIOHocTbO PA3MoPOb3Be IN. TaKZe MOxHO nCnOJIb3OBaTb KOHcEpBNPOBaHnBHe pykTb B cUPOne (NIuN, nepCnKu T. d.).
OuNCTKA (PNC.10-12)
Mekdy 2 peuenrann
Bb Mojke Te Ouchntb np6op, He pa3bnpa ero. NocTeeHNO He6obuHmnpOcHm 3aJeIte BovBy BovKHy npOau npBkUOHeHOM np6Opoe. Y6BeNcBc, Yo nOd OTBepCTnEM dRy BbXoDa coka yctaHOBHe naTca eMOKcb TpD cKaO (N). KOrda NoctyaIauoJua n3 OTBepCTnB oDa bEydt npOzAHOH, MOxHO NaHInHb nprTOBHeJIne CNeDuOuEro peueNTa!
3TOT npnem TaKke moKHO npedBapuTeNbHO nCOnJb3OBA Tb IynpoSeHn OUcHcTKn npn6opa.
Tocne npumeneHHN
Ouictky cIeJyET bblonHbTc p3ay Ze nocne IcnoB3oBaHn np6opa. IpOBepTe, yTo yctpoiCTBO OTKIOUeHO OT eNkTOpcetn. He norpykaite B JxIKIOCTb 6IOK MOTopa (L), taK
KaK OH He 3arepMeTn3npoBaH.
Ecnfunbtpbl3acopehbl (D/E),npedBapntelbHn npomOHTe NxMbIbHO BODOn n OUYCTNTe 电Tko(P).
Cobet: yto6bI n3Bney bBixiMHOI uHEK (C) n3 fNtpa (D/E), npn Heo6xOIMOCrTo NIOHcTbIO nepeBepHInTe uHEK BMECTe C fNtPOM HaxMtte Ha HxNtIOU cAcb THeka.
CHTO DEJATb, ECJIIN PUNBOP HE PAJBOTAET?
ETEP K¥PAJI X¥MbIC ICTEMECE, HE ICTEY KEPEK?
| Кибуль Балын: Кибуль Балын: Кибуль Балын: Балын: Балын: Балын: Балын: Балын: Балын: Балын: Балын: Балын: Балын: Балын: Балын: Балын: Балын: Балын: Балын: Балын: Балын: Балын: Балын: | WEIJIMDEP |
| Курал Косьлмайы. | - Барлык Курама 6өліktердін үүүс орнасылfaынTekceperihi3. - Куралын Коректendіру 6элідір үүүс орнылfaынTekceperihi3. - Касныкын (B) 6элірс орнылfaынTekceperihi3. |
| Жуmbic iстен Турдан Kezeide Куралын TOKТAN Kалы: Кызын aiKынДaБыш ЖуралынТайды. | - Куралын Сондір ушін 6оу/cондір 6aTырmaын6асыныз (M). - Касныкын (B) 6эрс oрнылfaынTekceperihi3. - Куралын кaitа Кocьынiz.Егр саTKандір 6уч\'eci Ka...\эпікія; Сытіаінісікіліа, Куралын 6олseхтendіz, O...\э. Та...\элalnyз 6э\"э He Ka...\эпіЗу. - Сыratын inipliuktin (C) 6уfasТалmaFAынha 6о\ Жеткізihi3. |
| Куралын TOKТayы: ak aiKынДaБыш ЖуралынТайды. | - Бул Куралын CakTaHdpybIFan 6aklyaРылuyы, 6ocbyндій KeztIDE Kуралын 6ipHneш мИн'ty 6...\э Ca...\эн'daTынl3, O...\э TazalaHni3 6о\ Kocy/6ондір 6aTырmaын (M) 6acy apklyaыкai KocbynI3. |
| Курам 6олseхтер徳 Шурынды яжтkiinKi салын CBknaDы. | - Куралын TazalaHni3: KaKNAkTBi (B), CBfaTын inipikti (C), cyrɪinepiDI (D xəнE), Kypfak CBfHbIbHbIh CenapaúncЯбla hyа aphanfah TɪnlɪkTI (F), TocTafangDi (G), Shbypib HyinaHafbiTl (H), ShyMeKTi (I) xəнe Kypfak CBfHbIbHbIhyia KhyaFbIbTI (Q) xzybHbIb, TazalaHbI3 xəнe KypfakbIHyCyrɪtɪ3. - TɪnlɪkTIch (F) cyrɪde duþlyc Oрнасылfaын (Kypfak CBfHbIbFla hya aphanfah Ca...\эыlaудіу kaybɪn ТураHbIbFbH) xəHe O...\э, 3aKbIMdaHbFaHbH Tekceprihi3. |
| СалынayсынЗыктbing Бузыну. | - Барлык Курама 6олseхтердін 6оус/ Жинhalfaын, eh an'dbIMeH, Tamshын bI uekTeyiш Бapшумeктɪng (I) shbybHbIb aflb3у xəfdaɪbɪnɪdə eken'dirɪŋ Tekcepɪhi3. |
DESCRIPCION
IPIN ANO THN INPQTH XPHSEH:
Apaipéote Tn oukeun ano Tn oukeuaia tnc kai tonothe note Tnv enavw OE opicovio, OtaBepo kai eniteo nakyo epyaioac, katoniv apapeote ola ta eapntnata. Beaiowteite otI balyate ola ta stoiexia ano Tn oukeuaia touc npiv va apxioete v xpnoionoieite tn oukeun.
IIaVte ola ta apaipoumeva eapntmuata, eIauveta kai okouniote ta npoektika: to pieotnpio (A), to kalmu kai to otioopoooic (B), tov koxia ouvthetai (C), ta piltpa (D kai E), toyawosidi npwuv unolaemuatwv (F), to doxiieo (G), tn xovn kai to bpuok (H kai I), tic kavatec (N) kaowc kai to oulawknt npwuv unolaemuatwv (Q).
'ENAPEH AIEITOYPTIAZ: X 1 E027
SuvapuoloynoTe TNOsKeUN ONWC,UnOBeIKVUETA OTA OxNmuata KAI EMIeYovTAC To pIitpo avaloya Me TnV EmUunTH xHON:
PPOZOxH : xpoiouoioe ie μe poooxn to yλωσδi ξηρων unολειματων (F).
-Kata tn ouvapuoloyonneaiowteiTo yIawoidi Enpw unloemuatw vexi tonoetntheta i Owta otny npoBaeouen thean eravw oto qiltpo (x.1).
XPHZH:
Piv ano tn xipn, nluve tpooektika ta tpoqma nou npoketial va eeneepyaoTeite.
Ipoetoumae OAn TnV nooTnta ouotatikwv Nou 0a Xpnoiunoietae. An ta nepioootepa
wpouta kal aaxaviká δev eivai anapaitno va aqapeoete Tn φloouda ka tau koukoutoa.
Apaipoe Tn pfouδa móvo ano Ta ulká με xovtpn φloouda (oTepeiodei, πeTovia, pOuta
tou naouc,...). Byalte Ta oklnpa koukoutaia (podakiva, βepikoka, maVyko,...) kTnv kappia
tou avava.
Koptya niv ta qpouta nou dev xwpave va npapaoov an to otoio tropodooiac.
TOnoTeIaTe Mia kavata (N) KATw ano TnV Edo xmuou (J) KAI TnV aAAn Kavata (N) KAtw ano TnV Edo Enpw unOeImuatwv (K) (Ox.8).
Eav o xuoc, npiéix αφρo, μπopeiTE va xρnoiμoioηεTe to Εáptηma KaT aou αφρou (O) to onio npéπe va tooθεntηεte Μεσa στην kavata nou βρίοκεtai KATω anó tny εξδo χuou (J) (σχ.9).
Platnote ToV diakottn Evpyooinoc/aenepeyooinoc (M) yia va theoet e 5eitoupyia tn oukeun, totoetote ta koumatia ota otia toia tpofoooiac kai, eav elai anapaitnto, onpTe Ta me toieotnpio (A).Bbaowte i0t to puoaki (I) pioketai oe xaunlomegaevn thon (ponxmuou).
MnV npwxyote nE t a dxtula n allo epyaleio eo sto otouio tropoosoiac.