USER MANUAL T11 ROTEL
DAB/FM ctepeo TIOhep
Owner's Manual
This symbol is to alert the user to the presence of uninsulated dangerous voltages inside the product's enclosure that may constitute a risk of electric shock.
This symbol is to alert the user to important operating and maintenance (service) instructions in this manual and literature accompanying the product.
APPLICABLE FOR USA, CANADA OR WHERE APPROVED FOR THE USAGE
CAUTION: TO PREVENT ELECTRIC SHOCK, MATCH WIDE BLADE OF PLUG TO WIDE SLOT. INSERT FULLY.
ATTENTION: POUR EVITER LES CHOCSE ELECTRIQUES, INTRODUIRE LA LAME LA PLUS LARGE DE LA FICHE DANS LA BORNE CORRESPONDANTE DE LA PRESE ET POUSSER JUSQU AU FOND.
This Class B digital apparatus complies with Canadian ICES-003.
This symbol means that this unit is double insulated. An earth connection is not required.
CE


Rotel products are designed to comply with international directives on the Restriction of Hazardous Substances (RoHS) in electrical and electronic equipment and the disposal of Waste Electrical and Electronic Equipment (WEEE). The crossed wheelie bin symbol indicates compliance and that the products must be appropriately recycled or processed in accordance with these directives.
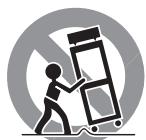
ANTENNA GROUNDING ACCORDING TO NATIONAL ELECTRICAL CODE INSTRUCTIONS SECTION 810: "RADIO AND TELEVISION EQUIPMENT"
Notice
The rear RS232 connection should be handled by authorized persons only.
This equipment has been tested and found to comply with the limits for a Class B digital device, pursuant to Part 15 of the FCC Rules. These limits are designed to provide reasonable protection against harmful interference in a residential installation. This equipment generates, uses and can radiate radio frequency energy and, if not installed and used in accordance with the instruction, may cause harmful interference to radio communications.
However, there is no guarantee that interference will not occur in a particular installation. If this equipment does cause harmful interference to radio or television reception, which can be determined by turning the equipment off and on, the user is encouraged to try to correct the interference by one or more of the following measures:
Reorient or relocate the receiving antenna.(TV, radio, etc.)
- Increase the separation between the equipment and receiver.
- Connect the equipment to an outlet on circuit different from that to which the receiver is connected.
- Consult the dealer or an experienced radio/TV technician for additional help.
Caution
This device complies with part 15 of the FCC Rules. Operation is subject to the following to conditions: (1) This device may not cause harmful interference, and (2) this device must accept any interference received, including interference that may cause undesired operation.
NOTE TO CATV SYSTEM INSTALLER: Call the CATV system or antenna installer's attention to Article 820-40 of the NEC. This provides guidelines for proper grounding and, in particular, specifies that the cable ground shall be connected to the grounding system of the building, as close to the point of cable entry as practical. See installation diagram.
NOTE: This equipment has been tested and found to comply with the limits for a Class B digital device, pursuant to Part 15 of the FCC Rules. These limits are designed to provide reasonable protection against interference in a residential installation. This equipment generates and can radiate radio frequency energy and, if not installed and used in accordance with the instructions, may cause interference to radio or TV communications. There is no guarantee that interference will not occur in a particular installation. If this equipment does cause interference to radio or television reception, which can be determined by turning the equipment off and on, try to correct the interference by one or more of the following measures:
- Reorient or relocate the receiving antenna.
- Increase the separation between the unit and the television tuner.
- Connect the unit to an AC power outlet on a different electrical circuit.
- Consult your authorized Rotel retailer for assistance.
Important Safety Instructions
WARNING: There are no user serviceable parts inside. Refer all servicing to qualified service personnel.
WARNING: To reduce the risk of fire or electric shock, do not expose the unit to moisture or water. Do not expose the unit to dripping or splashing. Do not place objects filled with liquids, such as vases, on the unit. Do not allow foreign objects to get into the enclosure. If the unit is exposed to moisture, or a foreign object gets into the enclosure, immediately disconnect the power cord from the wall. Take the unit to a qualified service person for inspection and necessary repairs.
Read all the instructions before connecting or operating the component.
Keep this manual so you can refer to these safety instructions.
Heed all warnings and safety information in these instructions and on the product itself. Follow all operating instructions.
Clean the enclosure only with a dry cloth or a vacuum cleaner.
Do not use this unit near water.
Do not place the unit on a bed, sofa, rug, or similar surface that could block the ventilation openings. If the unit is placed in a bookcase or cabinet, there must be ventilation of the cabinet to allow proper cooling.
Keep the component away from radiators, heat registers, stoves, or any other appliance that produces heat.
WARNING: The rear panel power cord connector is the mains power disconnect device. The device must be located in an open area that allows access to the cord connector.
The unit must be connected to a power supply only of the type and voltage specified on the rear panel. (USA: 120 V/60Hz, EC: 230V/50Hz)
Connect the component to the power outlet only with the supplied power supply cable or an exact equivalent. Do not modify the supplied cable. A polarized plug has two blades, with one wider than the other. A grounding plug has two blades plus a third grounding prong. These are provided for your safety. Do not defeat grounding and/or polarization safety provisions. If the supplied plug does not fit your outlet, please consult an electrician for replacement of the obsolete outlet. Do not use extension cords.
The mains plug is the disconnect of the unit. In order to completely disconnect the unit from the supply mains, remove the main plug from the unit and the AC power outlet. This is the only way to completely remove mains power from the unit.
Do not route the power cord where it will be crushed, pinched, bent, exposed to heat, or damaged in any way. Pay particular attention to the power cord at the plug and where the cord exits the back of the unit.
The power cord should be unplugged from the wall outlet during a lightning storm or if the unit is to be left unused for a long period of time.
Use only accessories specified by the manufacturer.
Use only with a cart, stand, rack, bracket or shelf system strong enough to support the unit. Use caution when moving the unit to avoid injury or damage to the unit.

Immediately stop using the component and have it inspected and/or serviced by a qualified service agency if:
- The power supply cord or plug has been damaged.
- Objects have fallen or liquid has been spilled into the unit.
The unit has been exposed to rain.
- The unit shows signs of improper operation.
- The unit has been dropped or damaged in any way.
The batteries in the remote control should not be exposed to excessive temperature such as sunshine, fire or other heat sources.
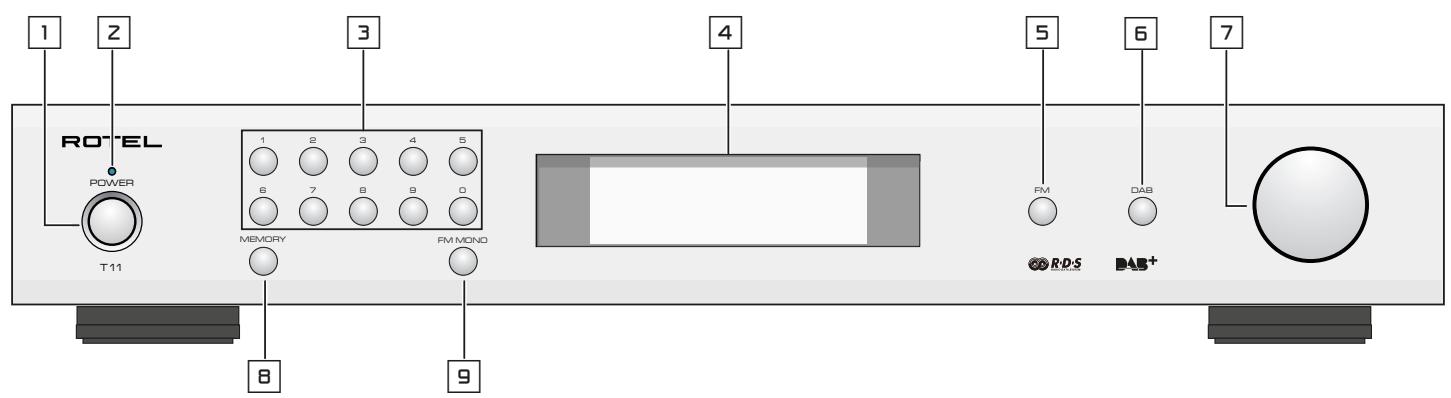
Figure 1: Controls and Connections Commandes et Branchements Bedienelemente und Anschlisse Controles y Conexiones
Bedieningselementen en aansluitingen
Controll e connessioni
Funktioner och anslutningar
Oprahbl ynpablenia npa3bembl

Figure 2: RR-T98 Remote Control
Télécommande RR-T98
Fernbedienung RR-T98
Mando a Distancia RR-T98
Afstandsbediening RR-T98
Telecomando RR-T98
Fjärrkontrollen RR-T98
Пульт ДУ RR-T98
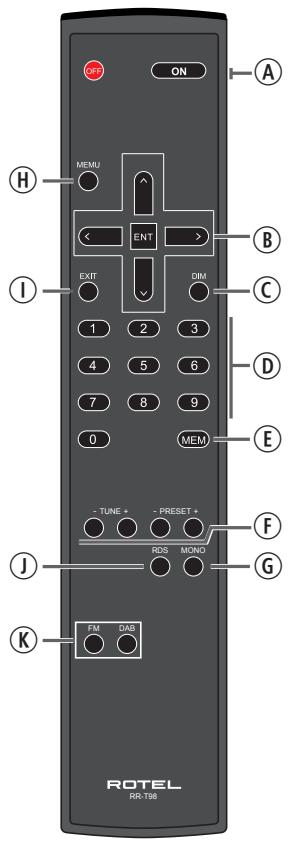
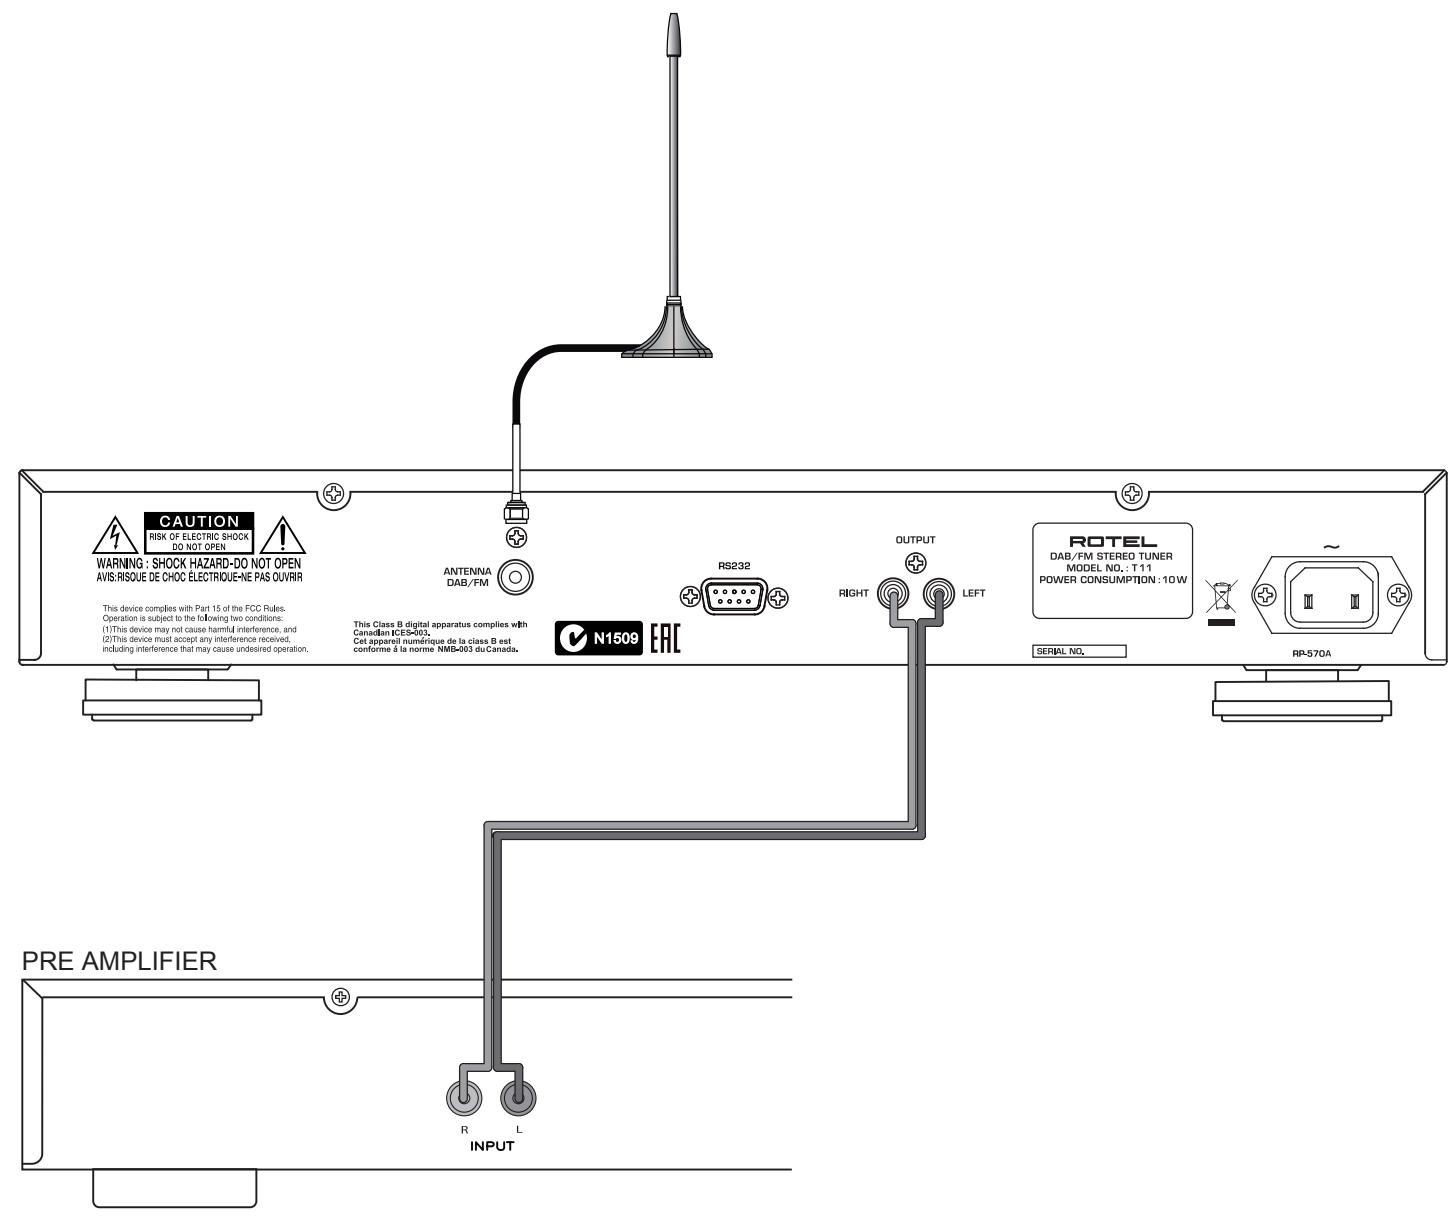
Figure 3: Hook-up Illustration Branchements Principaux Anschlussdiagramm Ilustracion del Conexionado Aansluiten Afbeelding Collegamenti Inkoppling Cxema podknuehenia
Important Notes
When making connections be sure to:
Turn off all the components in the system before hooking up any components, including loudspeakers.
Turn off all components in the system before changing any of the connections to the system.
It is also recommended that you:
Turn the volume control of the amplifier all the way down before the amplifier is turned on or off.
Remarques importantes
Important Safety Instructions 3
Figure 1: Controls and Connections 4
Figure 2: RR-T98 Remote Control 4
Figure 3: Hook-up Illustration 5
Important Notes 6
About Rotel 7
Getting Started 8
A Few Precautions 8
Key Features 8
Placement 8
AC Power and Control 8
AC Power Input 8
Power Switch 1A and Power Indicator 2
Connection Overview 8
DAB/FM Broadcasting 8
RS232 Connector 11 8
OUTPUT 8
FM RADIO 8
FM Radio Station Playing 8
Storing a radio station in a preset 9
Playing a preset radio station 9
FM Settings Menu 9
RDS Broadcast Reception 9
RDS Button ① 9
MONO Button ⑥ 9
DAB RADIO 10
DAB Radio Station Playing 10
Storing a DAB station in a preset 10
Playing a preset DAB station 10
DAB Settings Menu 10
Remote Unit Advanced Buttons 10
Troubleshooting 11
Power Indicator Is Not Illuminated 11
No Sound 11
Cannot Tune to DAB/DAB+ Preset Station 11
Specifications 11
About Rotel
Our story began over 50 years ago. Over the decades, we have received hundreds of awards for our products and satisfied hundreds of thousands of people who take their entertainment seriously - like you!
Rotel was founded by a family whose passionate interest in music led them to manufacture high-fidelity components of uncompromising quality. Through the years, that passion has remained undiminished and the family goal of providing exceptional value for audiophiles and music lovers, regardless of their budget, is shared by all Rotel employees.
Rotel's engineers work as a close team, listening to, and fine tuning, each new product until it reaches their exacting musical standards. They are free to choose components from around the world in order to make that product the best they can. You are likely to find capacitors from the United Kingdom and Germany, semiconductors from Japan or the United States, while toroidal power transformers are manufactured in Rotel's own factory.
We all have concerns about our environment. And, as more and more electronics are produced it is especially important for a manufacturer to do all it can to engineer products that have a minimum impact on the environment.
At Rotel, we are proud to do our part. We have reduced the lead content in our products by using special lead-free ROHS solder and components. Our engineers continually strive to improve power supply efficiency without compromise to quality. When in standby mode Rotel products use minimal power to meet global Standby Power Consumption requirements.
The Rotel factory is also doing their part to help the environment through constant improvements to product assembly methods for a cleaner and greener manufacturing processes.
All of us at Rotel thank you for buying this product. We are sure it will bring you many years of enjoyment.
Getting Started
Thank you for purchasing the Rotel Tuner. When used in a high-quality music or home theater system, your Rotel Tuner will provide years of musical enjoyment.
A Few Precautions
WARNING: To avoid potential damage to your system, turn off ALL the components in the system when connecting or disconnecting components. Do not turn the system components back on until you are sure all the connections are correct and secure.
Please read this manual carefully. In addition to basic installation and operating instructions, it provides valuable information on various unit system configurations as well as general information that will help you get the optimum performance from your system. Please contact your authorized Rotel dealer for answers to any questions you might have. In addition, all of us at Rotel welcome your questions and comments.
Save the unit shipping carton and all enclosed packing material for future use. Shipping or moving the unit in anything other than the original packing material may result in severe damage to your unit and void the warranty.
If included in the box please fill out and send in the owner's registration card. Also be sure to keep the original sales receipt. It is your best record of the date of purchase, which you will need in the event warranty service is ever required.
Key Features
- Listen to FM and DAB/DAB+ broadcasts.
- 30 Station Presets for memorizing your favorite DAB/DAB+, FM stations.
- RDS (Radio Data System) capability.
- DAB/DAB+ (Digital Audio Broadcast), a digital transmission available throughout Europe and other parts of world.
Placement
Place the unit on a solid, level surface away from sunlight, heat, moisture, or vibration.
AC Power and Control
Your unit is configured at the factory for the proper AC line voltage in the country where you purchased it (USA: 120 volts/60 Hz, Europe: 230 volts/50 Hz). The AC line configuration is noted on a label on the back panel.
NOTE: Should you move your unit to another country, it may be possible to reconfigure it for use on a different line voltage. Do not attempt to perform this conversion yourself. Opening the enclosure of the unit exposes you to dangerous voltages. Consult a qualified service person or the Rotel factory service department for information.
NOTE: Some products are intended for sale in more than one country and as such are included with more than one AC cord. Please use only the one appropriate for your country/region.
The T11 unit should be plugged directly into a 2-pin polarized wall outlet or into the switched outlet on another component in your audio system. Do not use an extension cord.
Be sure the POWER SWITCH 1 on the front panel of the unit is turned off (in the "out" position). Then, connect the supplied power cord to the Power Connector 13 on the rear of the unit and the AC power outlet.
If you are going to be away from home for an extended period of time such as a month-long vacation, it is a sensible precaution to unplug the unit (as well as other audio and video components) while you are away.
Power Switch 1A and Power Indicator z
The power switch is located on the left side of the front panel. To turn the unit ON, push the switch in.
The indicator light above the switch will light, indicating that the unit is turned on. To turn the unit off, push the button again and return it to the "out" position.
Connection Overview
Before continuing further to other sections in the manual, please make sure all the cable connections are made properly. Refer to figure 3.
DAB/FM Broadcasting
Please use the supplied indoor antenna to connect the DAB and FM connector on the rear panel. Experiment with different positions to maximize reception.
RS232 Connector
The unit can be controlled via RS232 for integration with automation systems. The RS232 input accepts a standard straight DB-9 Male-to-Female cable.
For additional information on the connections, software, and operating codes for computer control of the unit, contact your authorized Rotel dealer.
OUTPUT
The unit outputs a stereo analog signal. Use the supplied audio cable to connect it with input jacks of your pre-amplifier or processor. Be careful and make sure that connections correspond to each other. Right channel output must be connected to right channel of pre-amplifier's or processor's right channel and vice versa.
FM RADIO
Before listening to FM radio, make sure that the antenna has been properly connected.
FM Radio Station Playing
- Select FM Button from the source buttons 5K. The display will show as below.
MO 95.25 MHz Y1
[RDS TEXT]
- Turn the knob 7 on the front panel or use the up/down arrow buttons on the remote control to change the frequency of radio station. Turning the knob on the front panel or using the up/down arrow buttons on the remote control one step at a time changes the frequency one step.
-
To auto scan for an FM station, you can choose any of the steps below:
-
Press and hold the up/down arrow buttons on the remote control.
- Press the fast-forward/back-ward F buttons on the remote control.
Storing a radio station in a preset
While a radio station is playing, push the memory button 8 , then press the number of preset assigned from numeric keypad 30 , the display will show preset saved. Up to 30 preset FM radio stations may be stored.
Playing a preset radio station
When a radio station is playing, you can switch to a preset station in one of the following ways.
- From the numeric keypad 30 , press preset number of the desired station.
- Press the PRESET +/- F buttons on the remote control to view preset numbers and corresponding station. Press the up/down B arrow buttons or the PRESET +/- F buttons on the remote control or turn the knob 7 on the front panel to select the desired station, then press the ENT B button on the remote control to select. Press the FM 5 K button again to exit the preset menu and go back to playing status.
Press the FM 5 K button and toggle to the FM settings Menu. There are 3 sub-menus under FM setting.
- Scan Settings: Select between STRONG STATIONS ONLY or ALL STATIONS.
FM SETUP
Strong Stations Only* All Stations
- Audio Settings: Allow Stereo or Forced Mono.
FM SETUP
Stereo or Mono*
Mono Only
- FM Preset: Displays all 30 of the FM preset stations and allows tuning to the selected preset by pressing the ENT button on the remote control.
To make changes in the FM settings menu, turn the knob 7 on the front panel or use the up/down 8 arrow buttons on the remote control. To make a change press the ENT 8 button on the remote control.
RDS Broadcast Reception
This Rotel unit is equipped with RDS (Radio Data Systems) reception capabilities. The RDS broadcast system provides additional functionality to FM radio reception by transmitting encoded information along with the radio signal. This signal is decoded by an RDS receiver and can provide a range of informational features including:
- A display of the station's identifying name (e.g. BBC1).
- A display of the station's program content (e.g. ROCK or NEWS).
- Traffic information broadcasts.
- A scrolling text display for announcements or information.
- Current time and date.
RDS broadcasting has been widely available in many European markets for years. There are a large number of RDS stations and most users will be familiar with the features and operation.
NOTE: The RDS features are entirely dependent on the broadcaster sending properly encoded signals. Thus, they will only be available in markets where RDS is currently implemented and where stations are broadcasting these data signals.
The RDS button on the remote control can step through the various displays. Press the RDS button on the remote control to step through the following displays.
- Radio Text.
- Name of station.
- PTY, or the type of content.
- Today's date and current time.
The MONO button on the remote control changes the FM mode from stereo reception to mono reception. In stereo mode, a stereo signal will be heard if the station is broadcasting a stereo signal and there is sufficient signal strength.
NOTE: Switching to mono mode can be a useful way to improve the reception of weak or distant FM signals. Less signal strength is required for clean mono reception than for stereo reception.
DAB RADIO
Make sure that your local area can receive Digital Audio Broadcast (DAB) broadcasting signal.
Press the DAB 6 button on the front of the panel, or remote (K).
DAB channels are categorized into ensembles, which are also known as multiplexes. Each multiplex provides a number of stations and each service contains a primary service that can contain secondary services. DAB technology allows broadcasters to transmit additional data along with the audio, which can include other audio channels, text and even images and computer data in the future.
DAB Radio Station Playing
- Select DAB 6 Button from the front panel and the unit will scan for available stations. After scanning you will see the following menu.
Station List
BBC 1
BBC 2
- Press the ENT button on the remote control to select the station and start playing the station.
Storing a DAB station in a preset
While a DAB station is playing, push the memory button ⑨ E, then press the number of preset assigned from numeric keypad 3 D. Up to 30 preset DAB radio stations may be stored.
Playing a preset DAB station
When a DAB station is playing, you can switch to a preset station in one of the following ways.
- From the numeric keypad 30 , press the preset number of the desired station.
- Press the PRESET +/- F buttons on the remote to view preset numbers and corresponding station. Press the up/down arrow buttons or the PRESET +/- F buttons on the remote control or turn the knob 7 on the front panel to choose the desired station, then press the ENT B button on the remote control.
Press the DAB 6 on the front panel or remote to toggle to the DAB settings Menu. Turn the knob on the front panel or use the up/down arrow buttons on the remote control to go through each sub-menu.
- Station List: Shows station list.
-
Local Scan: Start a limited scan of available stations by pressing the ENT button on the remote control. (Not available in all markets).
-
Full Scan: Start a full range scan of available stations by pressing the ENT B button on the remote control.
- Manual Tune: Press the ENT B button on the remote control and select stations manually by turning the knob on the front panel or using the up/down B arrow buttons on the remote control.
- DRC, Dynamic Range Control: Select between "High", "Low" and "Off". Press the ENT B button on the remote control and turn the knob on the front panel or use the up/down B arrow buttons on the remote control to change.
- Station Order: Display station order as either "Alphanumeric", "Ensemble" or "Valid".
- Prune Station: Select between "Yes" or "No". The Prune setting allows you to remove stations that are not active or can not be received.
NOTE: Prune will remove unavailable stations from both the Station List and the DAB Preset List.
- DAB Preset: Displays all 30 of the DAB/DAB+ preset stations and allows tuning to the selected preset by pressing the ENT B button on the remote control.
SETUP
To enter the setup menu, press the MENU button on the remote control and you will see the following display:
SETUP
Dimmer
Version
- Dimmer: Controls the brightness of the front panel display, it can be dimmed with seven steps. Press the left / right arrow buttons on the remote control to change the display brightness.
NOTE: This setting is stored permanently even after the unit is powered off.
To temporarily change the display brightness, press the DIM button on the remote control.
- Version: Shows the software version loaded in the unit.
- Factory Default: Sets the unit into the original state as when it left the factory. Presets will be lost.
- Exit: Exits the setup menu.
Troubleshooting
Most difficulties in audio systems are the result of incorrect connections, or improper control settings. If you encounter problems, isolate the area of the difficulty, check the control settings, determine the cause of the fault and make the necessary changes. If you are unable to get sound, refer to the suggestions for the following conditions:
Power Indicator Is Not Illuminated
The power Indicator should be illuminated whenever the unit is plugged into the wall power outlet and the power button is pushed in. If it does not light, test the power outlet with another electrical device, such as a lamp. Be sure the power outlet being used is not controlled by a switch that has been turned off.
No Sound
Check the cables between the output and the pre-amplifier inputs, be sure they are connected properly. Refer to Fig. 3.
Cannot Tune to DAB/DAB+ Preset Station
Some stations may become unavailable and will be displayed in the Station List with a "?" character in front of the station name. These stations are no longer broadcasting or received by the T11 unit. Presets that are set to these stations will not function and if selected the T11 unit will display the DAB menu. To remove stations no longer transmitting use the PRUNE function in the DAB Menu. This will remove these stations from the Station List and from the Preset list.
Specifications
FM Tuner
Usable Sensitivity 22.2 dBf
50dB Quieting Sensitivity 27.2 dBf (mono)
Signal to Noise Ratio (at 65 dBf)
MONO
STEREO
Harmonic Distortion (at 6.5 dBf)
MONO
STEREO
Frequency Response
Stereo Separation
(100Hz/1kHz)
Output level
Antenna Input
63 dBf
60 dBf
0.2%
0.3%
10Hz - 15kHz, ±3dB
40dB/37dB
1.0 V
75 ohms F connector
DAB Tuner
Sensitivity -80 dBm
Tuning Range Band III (174 - 240MHz)
Audio Data Rate 224kbps (Max)
Frequency Response 20 - 20k Hz +/- 1.0 dB
Analog Output 2.1V at 0 dBFS
Antenna Input 75 ohms F connector
General
Power Consumption 10 watts
Standby Power Consumption < 0.5 watts
BTU (at 5 watts) 17 BTU/h
Power Requirements (AC)
USA:
Europe:
Dimensions (W× H× D)
120V, 60Hz
230V, 50Hz
430× 73× 330mm
(17 × 2^7 / 8 × 13 in)
Front panel height 60 mm
Weight (net) 4.3 kg (9.48 lbs)
All specifications are accurate at the time of printing.
Rotel reserves the right to make improvements without notice
Rotel and the Rotel Hifi logo are registered trademarks of The Rotel Co., Ltd. Tokyo, Japan.
CAUTION
RISK OF ELECTRIC SHOCK DO NOT OPEN
WARNING: SHOCK HAZARD-DO NOT OPEN AVIS: RISOUE DE CHOC ÉLECTRIQUE-NE PAS OUVRIR
This Class B digital apparatus complies with Canadian ICES-003.
Strong Stations Only* All Stations
Poids (net) 4,3 kg (9,48 lbs)
This Class B digital apparatus complies with Canadian ICES-003.
MO 95.25 MHz [RDS TEXT]
Strong Stations Only* All Stations
This Class B digital apparatus complies with Canadian ICES-003.
Strong Stations Only* All Stations
- "Audio Settings" ("Ajustes de Audio"): Permite seleccionar entre "Stereo" ("Estereo") y "Forced Mono" ("Mono Forzado").
FM SETUP
Stereo or Mono*
Mono Only
This Class B digital apparatus complies with Canadian ICES-003.
Strong Stations Only* All Stations
- Audio Settings (Audio-installingen): Allow Stereo (Stereo toegestaan) of Forced Mono (Alleen Mono).
FM SETUP
Stereo or Mono* Mono Only
This Class B digital apparatus complies with Canadian ICES-003.
Antenna radio DAB/FM
Strong Stations Only* All Stations
This Class B digital apparatus complies with Canadian ICES-003.
MO 95.25 MHz [RDS TEXT]
Strong Stations Only* All Stations
The Rotel Co. Ltd, Tokyo, Japan.
CAUTION
RISK OF ELECTRIC SHOCK DO NOT OPEN
WARNING : SHOCK HAZARD-DO NOT OPEN AVIS: RISOUE DE CHOC ÉLECTRIQUE-NE PAS OUVRIR
I3o6paXeHHe MoJHnB P aBHOCTOpOHem TpeYroJIbHnke IpEduPpExKaET NIOJIb3OBaTeJI O HAIuN BHyTpN KOPNyCA N3DeJIH NHE3OJIPOBaHnHO HApIpaXeHnBEINHnA KOTOPOro MOKeT Co3DABaTb ONACHOt NOPaXeHnYeJIOBeka JNeKTPnueckmTOKOM.
M3o6paXeHne BOCKnIaTeIbHorO 3HaKa B pabHOCTOPOHHe TpeYrOblnKe npeDynpKJaTaeNtOB3oBATEI O HAnuNc COpBOxQDaIOSe annapat DOkymeHTaUN Baxhbl NHCryKmIo NO 3KcnPlyTaTuN I TexHnueckOMy ObcLyXnBaHIO.
He ncpnoB3yute daHnb npn6op B6n3n BObl.
He ctabte np60op Ha KpOaTb, DmBaH, KOBep nIi anahonuhyo nobepxhoctb, KOTOPaM oKet nepeKpbItb BeHTnlaUIOHNbIe OTBePcTna. Ecn np60op pa3Meuen BKNXHOM nIi CTehHom uKafo, Ta m DoJNkHa 6bItb BeHTnlaUzIa IIn DoJNkHOr OXnAxxDeHn.
ДержITE KMONHOENT B OТДАLEHIN O T 6aTapei, KALOPHΦePOB, Neey uIu IIO6OДpyrOДappaTpybl, KOTOPA npOn3BODIT TEnNo.
PNEUYPEXDEHNE:Pa3bem shhpya nHTAHNA Ha 3aHa Hei NaHeN YBJIaTcY UcTPOCTBOM dIe OTKJIOUHn cTe HnTHA. Pnp60 dpOJxhen 6bItb pa3MeuH ha OTKpbITom npoctpaHCTBE, KOTOpoe o6ecneuBaET Doctyn K pa3bemy cTeBoro shhpa.
JaHbI np6OpdoJxHe6 bTb NIOcOeINHeK KIOCTOHNK YITAHN TOLbKO TAKOROTINa HAnpRJeHH, KOtObIy yka3AbHa 3aDHei NaHEn. (CUSA: 120 B/60 Ic, EC: 230 B/50 Iu)
IpondoeHnayte KOMnoHENT K NHTaUoSei po3eTke TOnbko npn NOMOoi ceTeBOro shHypa n3 KOMNNEKTA NOCTABKN, UIn erO TOuHORO 3KBVBaJIeNTHa. He nepeJeBIAIte NoctabNaReMbe IUnyp. IOnapri3OBAHNBt WEKKEP IMeET DBA HOKeBBIX KOtAKTa, Odn H3 KOTOpBX IUnpe dpyrTO. 3a3EMNoUoiy WEKKEP IMeET DBA HOKeBBIX KOtAKTa IUnptn 3a3EMNoUoiy tBtpb. OIn o6ecneuHbAIOT BAsy 6e3oNaChocTB. He OTKa3bIAIteCB To Mep 6e3oNaChocTN, ppeOCTaBnaMeBIX 3a3EMNoUoiMIM NIOJPN3OBAHNBIM WEKKEPOM. Ecln NoCTaBNaReMbI WTEKKEP He noxDxOHIT K BAsew P0eTKe, O6pATnIEcB K 3eKeTpRky dJa 3aMeHbY cTapeBWeepo3eKn. He nCnOlb3yue YdHHInHEn b NtAHIN.
OchOBHoi tKeKep cTeBOro shypa ABJAEcTc OTKIOUaembIM o annapata yctpoCTbOM.ДлгNonHOrO tKIOUeHnI N3dENrO nITnTaIOUeI CETn, OCHOBHoi tKeKep cTeBOrO Ka6eNcNeDyETOTcoEINHATb OT cTeBoI PO3eKN nepemEHnOR TOk a TaKke N3dENr.3To eINHCTBeHHbI CnOC6bTO6blI NIOHCTbIO ydaJIbTcTeBOe NITAHne OT N3dENr.
He npoklaibai Te cetoBwHyp TaM, rge OH MoKet 6bIb pa3daBneH, nepeXaT, ckpyen, noDBeRHT B03JeCTBIO TennA HIN NOBpeXeH KAKIM-Ni6o CnPoCo6OM. O6paaiTe OC6oe BHMaHme Ha cetoBoi HHyp B6NIm HiTEKKePA HAM, rge OH BXOuNT B3aHIO NaHEn bYcPoHCTBA.
Cetbeo shypr cneayet oToeHnryt b ot cTeHHoP zo3kN BO BpeM rpo3bI nH ecnn np60p octabHe HEncnoB3yeMbIM dInTeBHOe BpeM.
3ToT npn6op D0JIKeH 6bITb NOcOeHNHeN K cTeBOI po3ETke, o6OpyOBaHHo 3aunTHbIM 3a3EmnEHm.
IcnoIb3yIteToIbKO pInHaadJeXHoCTn, yKa3aHhIbe npOu3BODHTeNeM.
IcnoIb3yTe ToIbKO TeNeKkY, NoCTabKy, CToIky, KpOHIteH IINI NIOKY DoCTaTOH OINbHbIM, UTO6bl BbIDepXaTb 3OTn 3dEInN. ByIbTe OCTOpOxHbI pnI nepeMeIeHN npIbOpaHa nOcTABKe IINI CTOb KE BO I36ekaHne paHEnH IIN NIOBpeJckEHN I3dEInN.

HemeJeHNO pneKpaTHe IcNoIb3ObaHnE KOMnoHEnTa I nepeJaTe Ha o6cneJIOBaHnE n/nn 06cnyKmbaHnE KBaIIuΦmUpObaHnO peMOThHO opraH3aUeIe cIIN:
BxOJnITaHnI nepeMeHHoro Toka 57
BbKJIuOaTeJIb NITaHnIg 1A INNDAkATOp 2 57
063op coedinheni. 57
PapnoBeeuHne DAB/FM 57
Pa3beM RS232 57
BbIXoI - OUTPUT 57
FM padio 58
Bocnpn3BeDHeIe FM padnoctaunnn 58
CoxpaHHeMaPnOCTaHmN B aYeKe PpeBaPteIbHoN HacTpoKn 58
Bocnpn3BeHne npceTob padnoctanu 58
MeHIO yCTaHOBOK FM 58
IIpHemRDS 59
Khoika RDS ① 58
KhoIka MONO ⑥ 58
DAB padio 59
Bocnpon3BeJeHne DAB padnoctanu 59
CoxpaHHepe radioctanuDABBraeKeIpeBaPtehNoiHaCtpoKn (npceTe) 59
Bocnpn3BeHeHne pceTeB DAB padnoctaun 59
MeHIO yCTaHOBOK DAB 59
KhoNk paacnpeHHbIX yHKcu nIyBa Tny 59
Bo3MOxHbIe HncnpaBHOCTN 60
He ropit uHdkatop nHTAHNA 60
OTcyTCTByET 3BYK 60
HeB03MOxHn HacTpOntbCra Ha npceTebl DAB/DAB+ cTaHcui 60
Texnueckne xapaKtepncTKN 60
O kompani Rotel
Haa nctopnHa hauanac 6olee 50 let Ha3aJ. Ha npotjxehnn decaTneTni, Mbl nonyunn COTHn Hapad 3a Hauin n3JeJInu yUOBoNTBOPnIN COTHn TbcIcay IIOe, KOTOpbIe TAK Je cepBe3HO OTHOCTK CBOUM pa3BneueHmam, KaN Bbl!
Kompania ROTEL 6bIa ochoBaHa cembei, KOtopa n3-3a ctpactHoi IIO6Bn K My3bIke 3aHJIacb npOn3BODCTBOM hi-fi KOMNHOENTOB BEcKOMNPOMCCHORO kaeeCTBA. C rOdAMN 3Ta cTpaCTb He yTuXHa, i cerOndra cTpeMHe HceMnK o6ecneueHIO ayDINOΦHIOB M MeLOMaHOB, He3aBNCIMo OT IX ΦHnHaCBOrO noLoJeHnA, annapaTpyoB BbICoayuero KaueCTBa, pa3dEJIaOT BCE COTpydnIK ROTEL.
HekToOpbIe MepblpeoctopoxhOcTH
ПРИМЕЧАНО:Во u3беканue BO3MOЖНО NOБржденя KOMnoHemocucmemb, BCE noodcoedunehu u omcoedunehu npou3bodume npubkIIOUeHHom numahu.пржdeч EMKIIOvamb numaHue, y6edumecb,уmo coedunehua bInoJHnebl npabulho u HadexHo.
IoxaJynta, BnMaTeNbHO npOHTaTe 3To pyKOBoCTBO. BdoJOnHeHKe K OCHOBHbIM UHCTpyKcIaM NO yCTaHOBKe I ynpaBJIeHIO, OHO daet BaXHyIO HOpmaIIO O pa3NIuHbIX KOHfNgypaIaIX CnCTEmbI Ha 6a3e T11, a TaKxe 06UYIO INΦopMaIIO, KOtOpa NOMOKe BAM NOLyUITb ONTImaJIbHoE KaYeCTBO OT BaSeI CnCTembl. IoxaJyNTa, 6OpaTIteCb K BaIeMy ABTopn3OBAHHOMy DInepy Rotel 3a OTbAM Na IIO6bIe BO3MOxHbIe BONpOcbl. KpOme TOrO, BCE cotpydNkIK KOMPAnHH Rotel npINBeTCTByIOT BAHN BONpOcbl I KOMMeHTapm.
CoxpaHnTe TpAHCnOpTHyIO KApToHHyIO Kopo6Ky I Bce BLOKeHNbIe yNaKOBOuHbIe MaTePnaJIbI DnI NcNoJIb3ObaHnI B 6ByUeM. PpecsblKa IINI nepeBo3ka T11 B YEm-TO dpyrom, KpOME oprInHaJIbHorO yNaKOBoUHOrO MaTePnaIa, MoKet npuBecTn K cepBe3HOMy NOBpeJDeHNIO BaIero npi6opa.
Ecnn BV Kopo6ke ectb pernctpaioohna KapTochka BlaaJeIbca, 3aOpHnITe ee n BblJNTe Ham. CoXpaHnTe Yek O npOdaJe. OH yBJIraTc IyUWM NcBMeHHbIM NOITBvpeJxDeHnem DaTbI pnpOBeTeHnHa, KOtOpoe IonoAIO6uNTcBAm B Clyuae, ecnn KOrDa-JIn6o Notpe6ByTc rapaHTnHoe 06cLyKINBaHne.
OchOBhIe xapaKTepeNCTUNK
- Порocльшваиме Вescань DAB/DAB+ FM paadinoctahui.
Рамати на 30 поdedустановок дя вадших пюбимьх радиocтанций DAB/DAB+,и FM.
- Ппем сиформачи RDS (Radio Data System).
LünφροBoe paДIO DAB/DAB+ (Digital Audio Broadcast), takne nepepaHIO doCTyINbI IO BcEi Ebpone (KpOME PocCm, noka).
PazMeueHne
UctaHOBHTyeCTPOINCTBOHa TBepDo,ROPn3OHTaIbHoN NOBepXHOCTN BdaNN OT CoJIHeuHOro CBeTa,TeIIa,BaIaN NII BN6paun.
YnpaBHeHne NtHaHnem
Bxod nHTaHnI nepeMeHHoro Toka 13
BawyctpoiCTBO cKOHfIpynpoBaHO Ha 3aBOe dJe npaBnIbHOrO hApJKeHnIcTeN nepemEnHoro ToKa B ToJ CTpaHe, rJe BBy erO npio6peN (CUSA: 120 B/60Tg,Ebponeckn coIO3: 230 B/50 T).KOHfIpypaZna CTeN nepemEnHoro ToKa yka3aHa Ha NaKneKe, Ha 3aJeHnPaHEn BaWero pnp6opa.
IPNIMEYAHNE: Eclu Bbl nepeedeme b dpyzuycmpaHy, MoJHO npucnocobum ycunmelenk dpyzomy cemebomy HanpajkeHuO. Odnako, He nbimaebc cde lambmo camu. Omkpbyar Kopnyc bbl noodeepzaemecb onachocmu blicokozo HanpajekHua. O6pamumebc k KbaIuphiupoabHOMy Macmepy uU e cepbuuchyo cnyk6y Rotel.
Strong Stations Only*
All Stations
Bocnpoun3BeDeHne DAB paAnocTaHcui
- Bb6epnte KhoNky DAB 6 c nepednei paHEni u yctpoIcTBo NaHET cKaHnpOBAtB BCE doCTyHbIe paAdIOCTaHcUu N DAB. IocJe cKaHnpOBaHn Bbl yBnDITe CNeDuIOUee MeHIO.
Station List
BBC 1
BBC2
- Haxmte KhoNky ENT Ha nyIbTe, YTO6bI Bbl6paTb CTAHcIIO HAaTaB BOCpOun3BeDeHne.
Bo3MOxHbIe HeNCnPaBHOCTN
BolbunctBO 3atpydneHn B ayDno cncTeMaX YBnIOTcpe3yIbTaTOM HnnpabInbHbIX coeHNHeHn, IIN6 He npabInbHbIMn HacTpoKAMn ynpabLeHn. Ecnn Bbl CTOLKNHyNCb C np6bnemamn, n3OJnpyte 0bnactb 3atpydHeHn, npOBepbTe HacTPOKn ynpabLeHn, ONpeJeNtpe pnuHny c60n iCenaIte Heo6xOaMble n3MeHHeHn. Ecnn Bbl He Me MojTe POnyHTb Ha BblXoJe 3Byk, 6paNTecb K COBeTAM dJa CledyIOuNX CnTuAa:
He roput uHdkaTOp nHTAHNA
INHdkaTOp nHTaHnI DOJKeH rOpeTb BcAkn pa3, KOrda yCTpOJICTBO BcTaBJeHO B CTehHyIO pO3ETky I nepeKlIOUaTeIb nHTaHnI hJaAt. Ecln OH He rOpIT, IpoBepbTe cTeByIO pO3ETky Ipn I NOMoIu npyIoro 3eKTPoPnp6Opa, TAKORo kak lamna. Y6eDNTcB, YTO NcNoIb3YeMaI aCteBaIPO3eKa He JABJIeTcK KOMMyTIpyeMoI, I ee peKlIOUaTeIb He BBKIIIOUeH.
OTCYTCTBYET3BYK
UyBCTBHTeJIbHOCTb -80D5M
T6apHTbIe pa3Mepb (U×B×Γ) 430×73×330MM
BbCota nepedne nane 60 MM
Bec 4,3Kr
BceTexnueckne xapaKtepcntuKN YBLIOTc TOnHbIMn Ha MOMeHT ny6nkaCIN. KomnaHnra Rotel ocTbIaTe 3a co6o npabo DeLaT ycoBepseHCTBOBaHn 6e3 yBeDomLeHn.
Rotel n Iorotin Rotel Hi-Fi yBIAIOTc 3apeRiNCTpnpoBaHHbIMn TOPROBbIMn Mapkamr Rotel Co., Ltd, Tokno, JnoHna.
The Rotel Co. Ltd.
Tachikawa Bldg. 1F,
2-11-4, Nakane, Meguro-ku,
Tokyo, 152-0031
Japan
Rotel of America
54 Concord Street
North Reading, MA 01864-2699
USA
Phone: +1 978-664-3820
Fax: +1 978-664-4109
Rotel Europe
Dale Road
Worthing, West Sussex BN1 12BH
England
Phone: +44 (0)1903 221 710
Fax: +44 (0)1903 221 525
Rotel Deutschland