
RT-06 - Radio tuner ROTEL - Free user manual and instructions
Find the device manual for free RT-06 ROTEL in PDF.
| Type de produit | AM/FM/DAB Radio Tuner |
| Marque | ROTEL |
| Modèle | RT-06 |
| Dimensions (L × H × P) | 437 × 72 × 319 mm |
| Hauteur de la face avant | 60 mm |
| Poids | 3.9 kg |
| Alimentation secteur | 120 V / 60 Hz (USA) or 230 V / 50 Hz (Europe) |
| Consommation | 15 watts (operating), 5 watts (standby) |
| Gammes de réception | AM, FM, DAB (Band III, 174-240 MHz) |
| Présélections | 30 AM/FM stations, 99 DAB stations |
| Fonctions RDS/RBDS | Station name display, program type, radio text, clock, PTY search, TP, TA |
| Modes d'accord | Manual, automatic, preset, direct frequency, preset scan |
| Sorties audio | Stereo RCA (fixed level), coaxial and optical S/PDIF digital |
| Entrées antenne | FM (F-type 75 ohms), AM (double wire 300 ohms), DAB (F-type) |
| Commutation Trigger 12 V | Yes (3-30 V, Rotel compatible) |
| Contrôle externe | RS-232 (RJ-45 jack), external infrared input (3.5 mm jack) |
| Télécommande | RR-T95 (all functions) |
| Sensibilité FM | 14.2 dBf (useful), 20.2 dBf (S/N 50 dB mono) |
| Rapport signal/bruit FM | 73 dB (mono), 70 dB (stereo) |
| Nettoyage | Dry cloth or vacuum cleaner (unplugged) |
| Sécurité | Double insulation, do not expose to water, no user-serviceable parts |
Frequently Asked Questions - RT-06 ROTEL
User questions about RT-06 ROTEL
0 question about this device. Answer the ones you know or ask your own.
Ask a new question about this device
Download the instructions for your Radio tuner in PDF format for free! Find your manual RT-06 - ROTEL and take your electronic device back in hand. On this page are published all the documents necessary for the use of your device. RT-06 by ROTEL.
USER MANUAL RT-06 ROTEL
This symbol is to alert the user to the presence of uninsulated dangerous voltages inside the product's enclosure that may constitute a risk of electric shock.

This symbol is to alert the user to important operating and maintenance (service) instructions in this manual and literature accompanying the product.

Rotel products are designed to comply with international directives on the Restriction of Hazardous Substances (RoHS) in electrical and electronic equipment and the disposal of Waste Electrical and Electronic Equipment (WEEE). the crossed wheealie bin symbol indicates compliance and that the products must be appropriately recycled or processed in accordance with these directives.

This symbol means that this unit is double insulated. An earth connection is not required.
Important Safety Information
WARNING: There are no user serviceable parts inside. Refer all servicing to qualified service personnel.
WARNING: To reduce the risk of fire or electric shock, be sure that the apparatus shall not be exposed to dripping or splashing and that no objects filled with liquids, such as vases, shall be placed on the apparatus.
Do not allow foreign objects to get into the enclosure. If the unit is exposed to moisture, or a foreign object gets into the enclosure, immediately disconnect the power cord from the wall. Take the unit to a qualified service person for inspection and necessary repairs.
Read all the instructions before connecting or operating the component. Keep this manual so you can refer to these safety instructions.
Heed all warnings and safety information in these instructions and on the product itself. Follow all operating instructions.
Clean the enclosure only with a dry cloth or a vacuum cleaner.
You must allow 10 cm or 4 inches of unobstructed clearance around the unit. Do not place the unit on a bed, sofa, rug, or similar surface that could block the ventilation slots. If the component is placed in a bookcase or cabinet, there must be ventilation of the cabinet to allow proper cooling.
Keep the component away from radiators, heat registers, stoves, or any other appliance that produces heat.
The unit must be connected to a power supply only of the type and voltage specified on the rear panel of the unit.
Connect the component to the power outlet only with the supplied power supply cable or an exact equivalent. Do not modify the supplied cable in any way. Do not attempt to defeat grounding and/or polarization provisions. Do not use extension cords.
Do not route the power cord where it will be crushed, pinched, bent at severe angles, exposed to heat, or damaged in any way. Pay particular attention to the power cord at the plug and where it exits the back of the unit.
Main plug is used as the mains disconnect device and shall remain ready accessible.
The power cord should be unplugged from the wall outlet if the unit is to be left unused for a long period of time.
The apparatus shall be connected to a mains socket outlet with a protective earthing connection.
Immediately stop using the component and have it inspected and/or serviced by a qualified service agency if:
- The power supply cord or plug has been damaged.
- Objects have fallen or liquid has been spilled into the unit.
- The unit has been exposed to rain.
- The unit shows signs of improper operation
- The unit has been dropped or damaged in any way
Please use Class 2 Wiring when connecting the speaker terminals of the unit to ensure proper insulation and minimize the risk of electrical shock.
Place the unit on a fixed, level surface strong enough to support its weight. Do not place it on a moveable cart that could tip over.

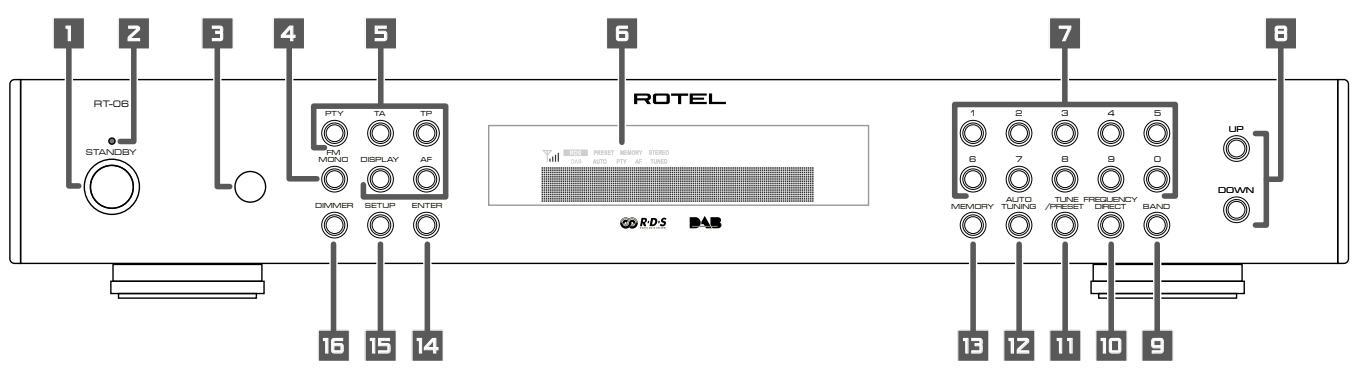
1: Front Panel Controls
Commandes de la face avant Bedienelemente an der Gerätefront Controles del Panel Frontal De bedieningsorganen op de voorkant Controll sul pannello frontale Kontroller pa fronten Opranbly nprablenna na nepednei pahejni
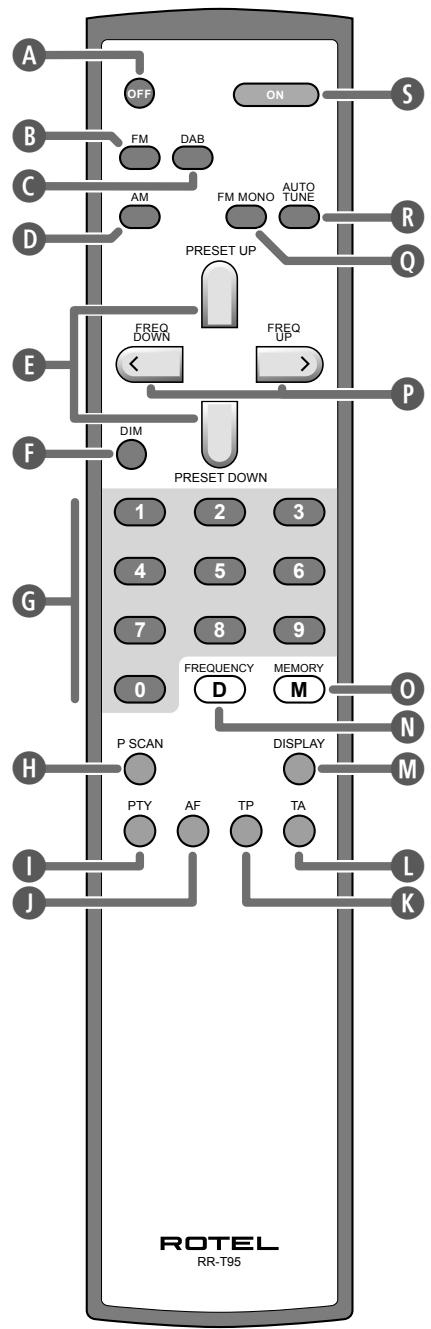
2: RR-T95 Remote Control
Télécommande RR-T95
Fernbedienung RR-T95
Mando a Distancia RR-T95
De RR-T95 afstandsbediening
Telekomando RR-T95
RR-T95 fjärrkontroll
Пульт дY RR-T95
3: Rear Panel Connections
Branchements en face arriere
Anschlussmöglichkeiten an der Geräterückseite
Conexiones del Panel Posterior
De aansluitingen op de hinterkant
Connessioni sul pannello posteriore
Ansluttingar på baksidan
Разъемы слетноCoEdNHЯ на заней панец!
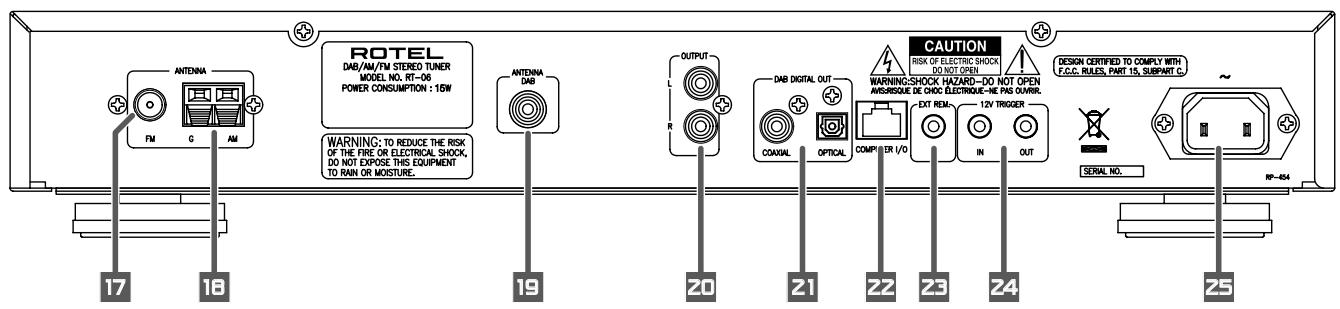
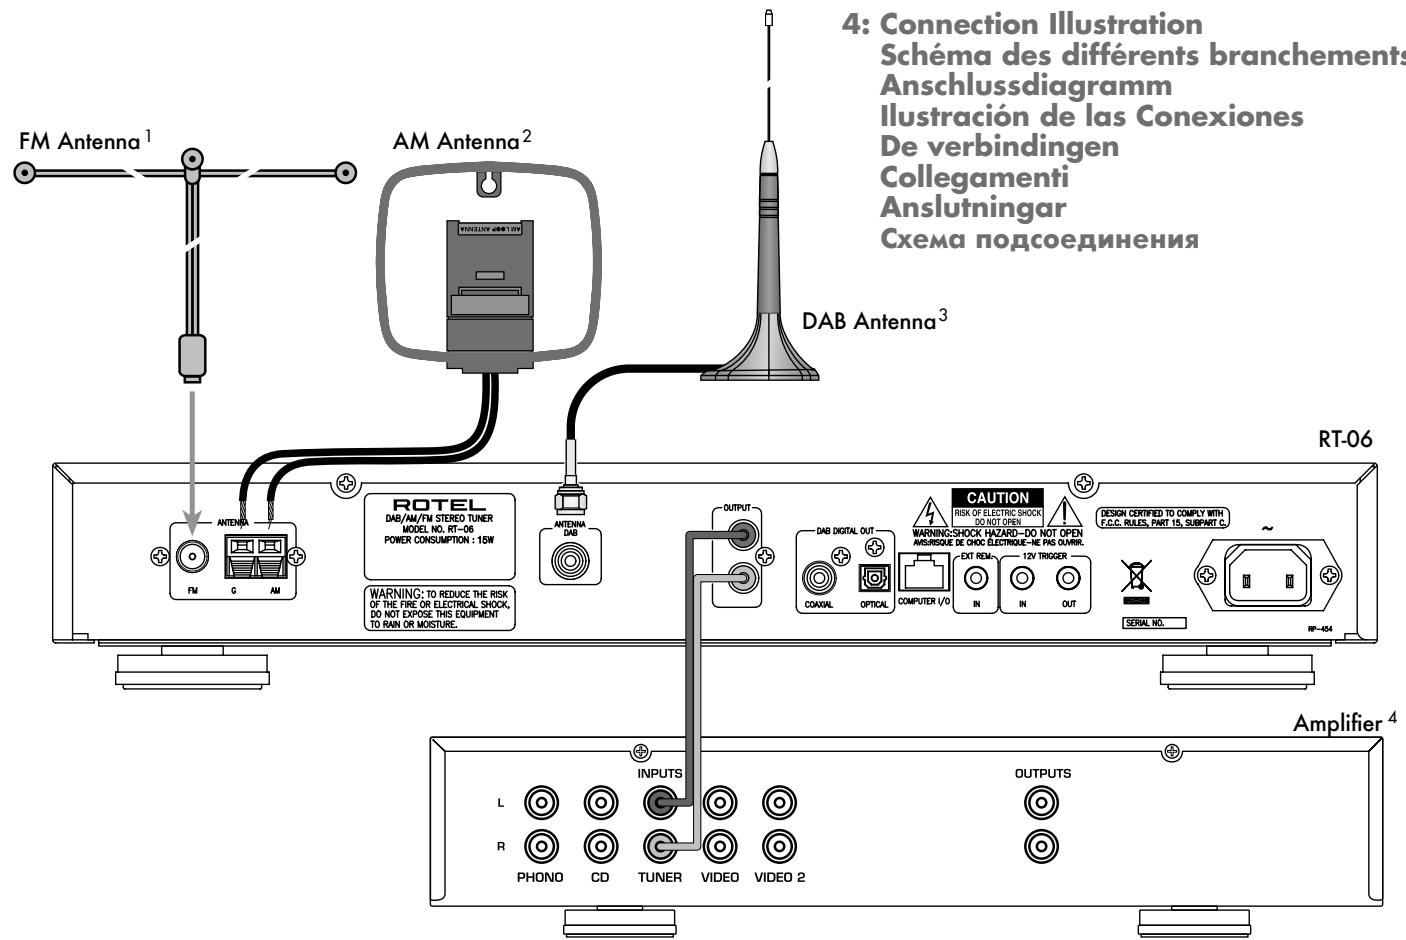
1 Antenne FM
FM-Antenne
Antena de FM
FM-antenne
Antenna FM
FM-antenn
FM aHTeHHa
2 Antenne AM
AM-Antenne
Antena de AM
Middengolfanterne
Antenna AM
AM-antenn
AM aHTeHHa
3 Antenne DAB
DAB-Antenne
Antena para DAB
DAB-antenne
Antenna DAB
DAB-antenn
DAB aHTehHa
4 Amplificateur
Verträker
Amplificador
Versterker
Amplificatore
Förstärkare
Ycunntenb
Important Notes
When making connections be sure to:
Turn off all the components in the system before hooking up any components, including loudspeakers.
Turn off all components in the system before changing any of the connections to the system.
It is also recommended that you:
Turn the volume control of the amplifier all the way down before the amplifier is turned on or off.
Remarques importantes
1:Front Panel Controls 3
2:RR-T95 Remote Control 4
3: Rear Panel Connections 5
4: Connection Illustration 5
About Rotel. 7
Getting Started. 7
A Few Precautions 8
Key Features 8
Unpacking 8
Placement 8
Rear Panel Connections 8
FM Antenna 17 8
AM Loop Antenna 8
DAB Antenna 19 8
RCA Outputs 8
DAB Digital Outputs 21 8
Computer I/O 22 9
EXT REMOTE IN Jack 23 9
12V TRIGGER Connection 24 9
AC Input 9
Basic Operating Controls. 9
Standby Button 1 and
StandbyLED 2 9
ON Button 5 9
OFF Button A 9
Remote Sensor 3 9
Front Panel Display 6 9
MEMORY Button 130 9
ENTER Button 14 9
SETUP Button 15 9
DIMMER Button 15 F 9
Basic Tuning Controls. 10
TUNING Controls E P 10
BANDButton BCD 10
FREQUENCY TUNING Mode 10
PRESET TUNING Mode 10
RDS PTY search mode 10
Numeric Buttons 10
Station Presets 7 G 10
Direct Access Tuning 11
Auto Tuning Button 12 R 11
TUNE/PRESET Button 11
PRESET SCAN Button H 11
FM MONO 4 Q 11
RDS and RBDS Broadcast Reception 12
DISPLAYButton 12
PTY Button 51 12
TP Button K 12
TA Button 12
AF Button 13
Digital Audio Broadcast (DAB) 13
DAB Basic Information 13
BAND, DAB Buttons 13
UP / DOWN Buttons 13
ENTER Button 14 13
DISPLAYButton 13
MEMORY Button 130
NUMERICButton 7G 13
TUNE/PRESET Button 13
Setup Operation. 13
SETUP Button 15 13
SETUP Menu 13
Searching for a DAB station 14
AUTO TUNE button 12 R 14
How to store DAB stations 14
How to call a PRESET 14
Specifications 15
About Rotel
A family whose passionate interest in music led them to manufacture high fidelity components of uncompromising quality founded Rotel 45 years ago. Over the years that passion has remained undiminished and the goal of providing exceptional value for audiophiles and music lovers regardless of their budget, is shared by all Rotel employees.
The engineers work as a close team, listening to, and fine tuning each new product until it reaches their exacting musical standards. They are free to choose components from around the world in order to make that product the best they can. You are likely to find capacitors from the United Kingdom and Germany, semiconductors from Japan or the United States, and toroidal power transformers manufactured in Rotel's own factory.
Rotel's reputation for excellence has been earned through hundreds of good reviews and awards from the most respected reviewers in the industry, who listen to music every day. Their comments keep the company true to its goal - the pursuit of equipment that is musical, reliable and affordable.
All of us at Rotel thank you for buying this product and hope it will bring you many hours of enjoyment.
Getting Started
Thank you for purchasing the Rotel RT-06 DAB/AM/FM Stereo Tuner. Rotel's Balanced Design Concept combines advanced circuit board layout, comprehensive parts evaluation and extensive listening tests for superior sound and long term reliability. The Rotel RT-06 will provide years of listening enjoyment.
A Few Precautions
Please read this manual carefully. In addition to installation and operating instructions, it provides valuable information on various RT-06 system configurations as well as general information that will help you get optimum performance for your system. Please contact your authorized Rotel dealer for answers to any questions you might have. In addition, all of us at Rotel welcome your questions and comments.
Save the RT-06 packaging material for future use. Shipping or moving the RT-06 in anything other than the original packaging material may result in severe damage that is not covered by the warranty.
Register online at www.rotel.com/register and keep your original sales receipt. It is your proof of purchase in the event that warranty service is required.
Key Features
AM, FM and DAB tuning capabilities.
- User-friendly Fluorescent Display.
- 30 Station Presets for memorizing you favorite AM/FM stations; 99 presets for DAB stations.
- Manual frequency and preset tuning, auto-search tuning, preset scanning and frequency direct tuning.
- RDS (Radio Data System) capability for Europe and RBDS (Radio Broadcast Data Service) capability for the USA.
- DAB (Digital Audio Broadcast); a digital transmission available throughout Europe and Canada as well as many other supported regions.
- Stereo/mono switching.
12-volt trigger connections for remote turn on/off by Rotel preamplifiers and surround processors.
Full- function wireless remote control.
Unpacking
Remove the unit from its packing. Look for the handheld remote control and other accessories. Install the supplied batteries in the remote control. Save the packing and box as it will protect the RT-06 if you move or need to return it for maintenance.
Placement
Place the RT-06 on a solid, dry, level surface away from direct sunlight, excessive heat, high humidity or strong vibrations. The RT-06 can generate some heat during normal operation. If installed in a cabinet, make sure that there is adequate ventilation. Make sure there is enough room behind the RT-06 for easy hookup. Place the unit close to the other components in your audio/video system and, if possible, place it on its own shelf. This will make initial cable routing, hookup, and any subsequent system changes easier. It also minimizes potential interference or heat buildup from other components.
Don't stack heavy objects on top of the RT-06. Do not expose the unit to moisture; this could damage the circuitry and cause a safety hazard.
Rear Panel Connections
The RT-06 provides rear panel connections for audio line level output, an FM antenna, on AM antenna, a DAB antenna, a 12V Trigger, a remote IR sensor, DAB digital outputs and AC power input.
NOTE: Do not plug any system component into an AC source until system hookup is complete and you are confident that all component-to-component connections have been properly made.
FM Antenna 7
The RT-06 is supplied with a T-shaped indoor FM antenna. Remove this antenna from the box and connect its attached coax F-type plug to the FM antenna connector on the RT-06. For best reception, unfold the T-shaped antenna. Eyelets at both ends of the T allow tacking the antenna to a wall if desired. Experiment with positioning for best reception.
NOTE: To use an outdoor antenna, connect its 75 ohm coax lead wire to the FM connector in place of the indoor wire antenna, only after a professional contractor has installed the antenna system in accordance with local electrical codes. In the USA, you will need to use the supplied F-type converter to connect the 75 ohm coax cable to the antenna input.
AM Loop Antenna 18
The RT-06 includes a loop antenna to receive AM radio signals. Remove this antenna from the box and locate it near the RT-06.
Connect the 300 ohm twin-conductor wire from the loop antenna to the pair of screw terminals labeled AM LOOP, attaching one wire to each terminal. It does not matter which wire attaches to which terminal, but make sure that the connections are solid and that the two wires do not touch
You may need to rotate or otherwise reorient the antenna to find the best position.
NOTE: To use an outdoor antenna, connect its 300 ohm twin-conductor wire to the G and AM terminals in place of the loop antenna, only after a professional contractor has installed the antenna system in accordance with local electrical codes.
DAB Antenna 19
Included is a DAB indoor antenna. If you cannot obtain good reception using this supplied antenna, it is recommended to use an outdoor DAB antenna. The outdoor antenna can be connected with a F-Type connector (male) then to the "Antenna DAB" connection on the rear panel.
RCA Outputs 20
Line level RCA audio outputs send a fixed-level stereo signal from the RT-06 to your pre-amplifier, system controller, or integrated amplifier.
Use a standard RCA audio cable to connect the LEFT OUTPUT jack to the left channel tuner input on your system controller and the RIGHT OUTPUT jack to the right channel tuner input on your system controller.
DAB Digital Outputs 21
One coaxial and one S/PDIF output capable of outputting available DAB (Digital Audio Broadcast) stations. DAB provides interference free, near CD quality audio as well as well as any corresponding broadcast data.
Computer I/O 22
The RT-06 can be operated from a computer with audio system control software from third-party developers. This control is accomplished by sending operating codes from the computer via a hardwired RS-232 serial connection
In addition, the RT-06 can be updated using special software from Rotel.
The COMPUTER I/O input provides the necessary network connections on the rear panel. It accepts standard RJ-45 8-pin modular plugs, such as those commonly used in 10-BaseT UTP Ethernet cabling. For additional information on the connections, cabling, software, and operating codes for computer control or updating of the RT-06, contact your authorized Rotel dealer or Rotel Tech Support.
EXT REMOTE IN Jack 23
This 3.5mm mini-jack receives command codes from industry standard infrared receivers (Xantech, etc.) via hard-wired connections. This feature could prove useful when the unit is installed in a cabinet and the front panel sensor is blocked. Consult your authorized Rotel dealer for information on these external repeaters and the proper wiring of a jack to fit the mini-jack receptacle.
12V TRIGGER Connection 24
The RT-06 can be activated by a 12 volt trigger signal from a Rotel preamplifier.
The trigger input accepts any control signal (AC or DC) ranging from 3 volts to 30 volts. When a cable is connected to the input and a trigger signal is present, the tuner is activated.
When the trigger signal is interrupted, the tuner goes into standby mode. The front panel indicator light remains lit, but the display goes dark and the unit will not operate.
The RT-06 will also pass a 12V trigger signal to associated equipment using a trigger. The signal will remain 12V in normal operation.
AC Input 25
Your RT-06 is configured at the factory for the proper AC line voltage in the country where you purchased it (120 volts AC at 60Hz in the USA and 230 volts AC at 50Hz in Europe). The AC line configuration is noted on a decimal on the back of your unit. Make sure that your unit is configured properly for your AC line voltage.
Plug the supplied cord into the AC INPUT receptacle on the back of the unit. Once all other rear panel connections are completed, plug the power cord into an AC wall outlet or switched AC outlet on another system component.
Basic Operating Controls
The following explanations will help you get familiar with the features and controls. When a function is available on both the front panel and the remote, a number (see front panel illustration) and a letter (see remote control illustration) are shown in the instructions. For example, to change from the AM to FM band, you can either press the front panel button or use the button on the remote. When only one identifier appears, that control is available only on the front panel or the remote, but not both.
NOTE: Controls used for tuning the DAB/ AM/FM receiver are described in the next sections of this manual.
Standby Button 1 and Standby LED 2
The STANDBY button is located on the front panel of the RT-06 and is not duplicated on the remote control.
The STANDBY LED will be lit when the AC input line is connected.
ON Button 5
Remote only
Pressing the ON button deactivates the standby mode and places the RT-06 into normal operation.
OFF Button A
Remote only
Pressing the OFF button places the RT-06 into standby mode. Power is still supplied to the unit, but functions are disabled
Remote Sensor 3
This front panel sensor receives infrared signals from the remote control. Make sure you do not accidentally block this sensor with cables of accessories.
Front Panel Display
The large fluorescent display in the center portion of the RT-06 provides status information used in operating the DAB/AM/FM receiver (such as station frequency display, band preset memory, RDS information, etc.).
MEMORY Button 130
The MEMORY button is used to confirm and memorize various settings in the setup and operation of the RT-06, including tuner station presets. Its use is described in detail in the relevant sections below.
ENTER Button 14
Pressing the ENTER button selects the highlighted parameter in the SETUP display.
SETUP Button
Opens and closes the RT-06 setup menu. This provides the RT-06 setup menus as well as the ability to change country modes by using the front panel ENTER, UP/DOWN BUTTONS.
DIMMER Button 16 F
Available on the front panel and remote control, this button selects four display brightness settings. Press the button to cycle through the four settings.
NOTE: When the tuner is turned off then back on, the display reverts to its normal setting. The dimmer setting is also available in the SETUP menu for memory setup until the AC line is disconnected.
Basic Tuning Controls
The RT-06 features a digital synthesized AM/FM tuner with RDS or RBDS capability, 30 station presets and a DAB tuner with a maximum of 99 station presets.
- Manual frequency tuning lets you tune up or down to the next station frequency. Set the TUNE/PRESET mode to TUNE. Turn off AUTO TUNING. Use the TUNING controls to tune up or down.
- Direct frequency tuning lets you enter the desired station frequency digits. Press the FREQUENCY DIRECT button on the remote or front panel and enter the digits using the NUMERIC buttons.
Automatic frequency search tuning lets you search up or down to find the next available broadcast signal. Set the TUNE/ PRESET mode to TUNE. Turn on AUTO TUNING. Use the TUNING controls to search up or down. - Memory station preset tuning lets you directly enter the number of a memorized station preset number. Enter the number of the memorized preset using the NUMERIC buttons for the AM/FM or DAB band.
- Preset scan tuning lets you scan up/down through the memorized station presets. Press the PRESET SCAN button to begin scanning the AM/FM bands.
- RDS (Europe) or RBDS (USA) tuning provides a range of special tuning and search features based on data codes encoded with the broadcast signal. See the RDS section of this manual for detailed information.
TUNING Controls EEP
A pair of buttons, labeled
BAND Button EBCD
The BAND button selects whether the tuner will receive DAB, AM or FM broadcast signals. Press the button to toggle back and forth between DAB, AM and FM. A corresponding indicator will light at the left portion of the front panel DISPLAY to confirm your choice. The currently tuned station frequency will be shown.
FREQUENCY TUNING Mode
- With AUTO TUNING off, press a TUNING button to manually jump to the next frequency, regardless of whether or not a station is broadcasting on that frequency. [See the TUNE/PRESET button and AUTO TUNING button sections for details on changing the tuning modes.]
- With AUTO TUNING on, press a TUNING button to start auto tuning. The tuner begins automatically scanning up or down through the frequencies until the next receivable signal is detected. If this is not the desired station, repeat the automatic tuning procedure to find the next station. Weak stations will be skipped during auto tuning. If no receivable signal is detected, the tuner will revert to the last previously tuned station. (See the TUNE/PRESET button and AUTO TUNING button sections for details on changing the tuning modes.)
PRESET TUNING Mode
Press a TUNING button to advance to the next memorized station preset. [See the TUNE/PRESET button section for details on changing the tuning modes.]
RDS PTY search mode
Press a TUNING button to select the desired program type from the scrolling list in the display. See the section on RDS tuning for more details. [See the RDS PTY button section for details.]
NOTE: Several indicators in the front panel display assist tuning. A large display shows the tuned frequency and increases or decreases during tuning. A signal strength indicator shows the strength of an incoming signal. A TUNED indicator lights when a sufficiently strong signal is received. An ST indicator lights when a stereo FM signal is received. In addition, indicators show the currently selected tuning mode.
Numeric Buttons
Station Presets 7 6
The RT-06 can store up to 30 station presets for recall at any time using the NUMERIC keypad. These station presets can be used for any combination of AM stations and FM stations as well as 99 station presets for DAB.
The RT-06 is delivered from the factory with a set of generic station presets that may or may not match any available stations in your area.
To memorize a new station preset:
- Tune to the desired station, AM or FM.
- Press the MEMORY button on the front panel. A MEMORY indicator will flash in the front panel display.
- While the MEMORY indicator is flashing, press the number of the preset where you wish to store the station frequency. For example, to memorize the station as preset 3, press the 3 button. To memorize preset 15, press the 1 button followed by the 5 button.
- A previously stored frequency is erased from memory when a new frequency is memorized for the same preset number.
To tune to a previously memorized station preset, press the preset number using the NUMERIC buttons. For example, to tune to preset 3, press the 3 button. To tune to preset 30, press the 3 button and then press the 0 button within 5 seconds.
NOTE: The NUMERIC buttons can also be used for FREQUENCY DIRECT tuning with the AM/FM band.
Direct Access Tuning N
If you know the exact frequency of the desired station, you may tune it directly using the FREQUENCY DIRECT button and the NUMERIC buttons.
- Press the FREQUENCY DIRECT button to change the NUMERIC buttons from station preset to direct access mode. The station frequency in the front panel display will change to a series of bars, representing the digits of a station frequency, with the first bar blinking.
- Enter the first digit of the station frequency using the NUMERIC buttons. The digit will appear in the frequency display and the next bar will flash. Enter the remaining digits of the frequency. When all of the digits have been entered, the tuner will automatically tune to the displayed station frequency.
NOTE: On the USA version only, pressing 1 in the FM mode will enter 10 as the digit in the frequency display. On the European version, it is necessary to press 1 and then 0 to enter 10. For US FM stations, press only one digit following the decimal point as shown in the first example following. For European FM stations, press two digits after the decimal point as shown in the second example.
EXAMPLES:
USA FM) 87.50MHz Press 8 > 7 > 5
- (Europe FM) 87.50MHz Press 8 > 7 > 5 > 0
- (USA AM) 1610kHz Press 1 > 6 > 1
- (Europe AM) 1611kHz Press 1 > 6 > 1 > 1
If no frequency is entered within 5 seconds, the tuner will cancel FREQUENCY DIRECT tuning mode and revert to the last previously tuned station.
Auto Tuning Button R
The AUTO TUNING button toggles between the frequency search tuning feature and manual frequency tuning. When using the TUNING controls on the front panel or remote in AUTO TUNING mode, the tuner will begin automatically scanning up or down through the frequencies until the next receivable broadcast signal is detected. If this is not the desired station, use the TUNING controls again to find the next station. Weak stations will be skipped during auto tuning. If no receivable signal is detected, the tuner will revert to the previously tuned station. To toggle between FREQUENCY TUNING mode and AUTO TUNING mode, press the AUTO TUNING button. An AUTO indicator will appear in the display.
NOTE: AUTO TUNING mode is disengaged when the TUNE/PRESET button is set to PRESET tuning mode. See the following section.
TUNE/PRESET Button 11
The TUNE/PRESET button toggles between FREQUENCY TUNING mode (the TUNING controls advance to the next station frequency) and PRESET TUNING mode (the TUNING controls advance to the next memorized station preset). To toggle between the two modes, press the TUNE/PRESET button. A PRESET indicator in the front panel DISPLAY will light when the PRESET mode is active.
NOTE: AUTO TUNING mode is disengaged when the TUNE/PRESET button is set to PRESET tuning mode.
PRESET SCAN Button
This button activates a preset scanning feature. When you press the button, the tuner will automatically scan through all memorized station presets, playing each for five seconds before moving to the desired station preset, press the button again.
NOTE: If a PRESET station is currently tuned when the PRESET SCAN button is pressed, scanning will start with the next higher preset number and continue through all preset stations, stopping on the initial preset. If a PRESET station is not currently tuned when the button is pressed, scanning will start from PRESET 1 and continue to PRESET 30.
FM MONO 40
The FM MONO button changes the FM mode from stereo reception to mono reception. In stereo mode, a stereo signal will be heard if the station is broadcasting a stereo signal and there is sufficient signal strength. A stereo indicator will light in the front panel display. In mono mode, a mono signal will be heard even if the station is broadcasting a stereo signal.
NOTE: Switching to mono mode can be a useful way to improve the reception of weak or distant FM signals. Less signal strength is required for clean mono reception than for stereo reception.
RDS and RBDS Broadcast Reception
The Rotel RT-06 is equipped with RDS (Radio Data Systems) reception capabilities for Europe and RBDS (Radio Broadcast Data Service) capabilities for the United States. These broadcast systems provide additional functionality to FM radio reception by transmitting encoded information along with the radio signal. This signal is decoded by an RDS or RBDS receiver and can provide a range of informational features including:
- A display of the station's identifying name (e.g. BBC1)
- A display of the station's program content (e.g. ROCK or NEWS).
- Traffic information broadcasts.
- A scrolling text display for announcements or information.
In addition, RDS provides several advanced search features including
- The ability to search for a station with the desired program content (PTY).
- The ability to search for traffic information (TP).
- The ability to automatically search stations broadcasting special traffic announcements (TA).
RDS broadcasting has been widely available in many European markets for years. There are a large number of RDS stations and most users will be familiar with the features and operation. In the USA, implementation of the RBDS system is more recent. Fewer stations are currently broadcasting RBDS signals and the features may be less familiar to many users. Consult your authorized Rotel dealer for more information on RDS or RBDS broadcasting in your market.
NOTE: The RDS and RBDS features are entirely dependent on the broadcaster sending properly encoded signals. Thus, they will only be available in markets where RDS or RBDS is currently implemented and where stations are broadcasting these data signals. If there are no RDS or RBDS stations, the RT-06 will function as a standard radio receiver.
NOTE: RDS and RBDS services are only available on FM broadcasts. The features and buttons described below are only operational in FM mode.
DISPLAYButtonM
There are five display options when the currently tuned station is broadcasting RDS information and the RDS indicator in the front panel display is lit. Press the DISPLAY button to step sequentially through the five available display options:
- Standard FREQUENCY display.
- PROGRAM SERVICE name. This is typically the station's call letters, such as BBC1). If the current station is not broadcasting an RDS signal, the display will show a blinking PS indication.
- PROGRAM TYPE. This is a description of the station's content from a standardized list of program types in each market (for example: NEWS, CURRENT AFFAIRS, INFO, SPORT, EDUCATION, DRAMA, CULTURE, SCIENCE, VARIORED, POP, ROCK, EASY LISTENING, LIGHT CLASSICAL, SERIOUS CLASSICAL, OTHER MUSIC, WEATHER, FINANCE, CHILDREN, SOCIAL AFFAIRS, RELIGION, PHONE IN, TRAVEL, LEISURE, JAZZ, COUNTRY, NATIONAL MUSIC, OLDIES, FOLK, and DOCUMENTARY). If the current station is not broadcasting an RDS signal, the display will show a blinking PT indication.
- CLOCK TIME. A time and date display broadcast by the station. If the current station is not broadcasting an RDS signal, the display will show a blinking CT indication.
- RADIO TEXT. Additional scrolling text messages broadcast by the station. If the current station is not broadcasting an RDS signal, the display will show a blinking RT indication.
PTY Button 51
The PTY search function permits you to scan available signals for RDS stations broadcasting a particular type of program content.
- Press the PTY button. The current RDS program content type will appear in the display.
- If desired, change to a different PROGRAM TYPE using the TUNING controls to scroll through the list.
- Press the PTY button a second time within 5 seconds. The tuner will attempt to find an RDS station broadcasting the selected type of program. If the button is not pressed within 5 seconds after selecting a program type, the PTY function will be cancelled.
- If no station is located for the desired content type, the tuner will return to the last previously tuned station.
- Cancel the PTY function by pressing any button (except DIMMER or FM MONO).
TP Button 5K
Searches for an RDS station broadcasting traffic information programming:
- Press the TP button. The tuner will attempt to find an RDS station broadcasting the traffic programming.
- If no station is located, the tuner will return to the last previously tuned station.
- Cancel the TP function by pressing any button (except DIMMER or FM MONO).
TA Button 5
Searches for an RDS station broadcasting special traffic announcements:
- Press the TA button. The tuner will attempt to find an RDS station broadcasting traffic announcements.
- If no station is located, the tuner will return to the last previously tuned station.
- Cancel the TA function by pressing any button (except DIMMER or FM MONO).
AF Button 5
- Press the AF button. The tuner will scan each of the alternate frequencies for the same programming in the stored list and tune to the strongest signal.
- If no station is located, the tuner will return to the last previously tuned station.
- If the signal strength of the new station is weaker, the tuner will revert to the previously tuned station.
Cancel the AF function by pressing any button (except DIMMER or FM MONO).
Digital Audio Broadcast (DAB)
DAB Basic Information
DAB is short for 'Digital Audio Broadcast' and is a new form of radio broadcasting which utilizes digital technology. DAB is capable of providing near CD quality audio with virtually interference free reception.
DAB operates in frequency band III (174 - 240MHz). Band III is divided into 41 channels labeled 5A to 13F.
DAB channels are categorized into ensembles, which are also known as multiplexes. Each multiplex provides a number of stations and each service contains a primary service that can contain secondary services. DAB technology allows broadcasters to transmit additional data along with the audio, which can include other audio channels, text and in the future, even images and computer data.
NOTE: When the DAB tuner is used for the first time the FL display will ask whether you want to auto-tune to find the available service in your area. For most applications auto-tune should only need to be carried out once. Select
BAND, DAB Buttons
The RT-06 receives AM, FM and DAB signals. DAB mode is selected by pressing the BAND key on the front panel. Direct access to DAB mode can be selected using the DAB button on the remote control
UP / DOWN Buttons
The UP and DOWN keys available on the front panel and remote control can be used to change between stations and also for selecting options in the set-up menu (see SETUP MENU).
ENTER Button 4
Press the ENTER button on the front panel to confirm a selected parameter.
DISPLAYButton
The RT-06 displays service identification in the upper portion. This is information received from the network. The RT-06 allows for several display modes which are shown in the lower portion of the FL display. Press
- Program type: Displays genre or other program information.
- Ensemble name: Multiplex identification is displayed.
- Frequency: Indicates the frequency that the selected multiplex is transmitted on.
- Bit rate: The rate at which bits (information) are transmitted. This is expressed in thousands of bits per second (Kbps), which effectively shows the quality of the broadcast. The higher the bit rate is the better the sound quality is.
- Dynamic label segment: This is the text that scrolls across the FL display giving information on the play list and current program content. This feature is subject to the service provider and station.
- Signal strength: Indicates the input signal level to the DAB module in block format.
MEMORY Button 10
The RT-06 can store up to 99 DAB preset stations. When you want to save a selected station, press the memory button on the front panel, then one of the numerical buttons of the front panel that you wish to save the station to. FM and DAB memorized stations are separate meaning that a station can be saved to '1' on DAB and another station with the same number for DAB.
NUMERIC Button 7G
The numerical buttons can be used to store to a PRESET station or recall a PRESET.
TUNE/PRESET Button 11
The RT-06 has two operating modes:
- DAB Manual Mode: When the tuner is selected to this mode you can scroll through all the available stations using the up and down keys.
- DAB Preset Mode: Use the preset button to enable you to use the up and down keys to scroll through your saved stations. Preset is displayed in the FL display when you are selected to this operating mode.
Setup Operation
NOTE: The set-up menu features advanced settings. In most installations the factory default will be the optimal required setting for the RT-06.
SETUP Button
The SETUP button on the front panel accesses the Setup menu used for the advanced settings of the RT-06.
SETUP Menu
Press the SETUP button on the front panel to view the menu settings in the FL display. The operation can be cancelled by pressing setup again. The menu will also automatically be exited after a short period of when there is no key press.
Use the UP and DOWN keys of the front panel to scroll through the different menu settings. Press the enter button to confirm a selection.
The following options are available: Use of these features will require knowledge of your local DAB transmitter.
DAB DAC VOLUME - The RT-06 allows level adjustments to the DAC volume. The DAC volume can be adjusted between 0 - 255 using the up and down keys. This feature can be used to match the output signal level of other equipment in your set-up.
DIMMER - Select to change the FL display brightness using the up and down keys. This can be adjusted to your preference.
FACTORY DEFAULT - Select when you wish to return the RT-06 to its factory settings. Confirm factory default by pressing the ENTER button. WARNING: Selecting factory default will erase all saved settings.
TUNER AREA - Your tuner should be set to operate within the country of purchase. The tuner area can be set to either
VERSION - This feature will confirm the main software version of the RT-06.
Front CPU Upgrade - select this option to upgrade the front CPU. Note: this menu selection is used only with the factory so there is no need for you to use this feature.
EXIT - Select to exit the set-up menu.
Searching for a DAB station
NOTE: When using the DAB tuner for the first time the FL display will ask whether you want to auto-tune to find the available service in your area. For most applications auto-tune should only need to be carried out once. Select YES to confirm the selection. The tuner will then search automatically for available stations on the DAB network. The number of stations received will depend on the location of your aerial and the available multiplexes in your location. For optimal reception we recommend using a dedicated outdoor antenna.
AUTO TUNE button 2R
You may also wish to repeat the search periodically to discover if any new multiplexes (i.e. group of services) have gone on air, or if you move the tuner to a different area.
NOTE: Auto tune will erase any preset stations saved to memory.
- Select the DAB tuner by keying BAND on the front panel or DAB of the remote control.
- Press AUTO TUNE to search for first ensemble stations. The FL display will change to [DAB Auto Tuning] and <No> , <Yes> to perform.
- Choose <No> by keying the UP/DOWN buttons on the front panel, press ENTER if you do not wish to retune. Choose <Yes> by keying the UP/DOWN buttons of the front panel, press ENTER to search new ensembles and replace current stations automatically.
How to store DAB stations
When auto tune is finished the service identification will be displayed. Use the up/down buttons to select the desired station.
To memorize the station press MEMORY followed by your numbered preference.
Example: "Memory" + "1" + "2"
Repeat this process for saving additional stations.
How to call a PRESET
After a station has been saved to memory it can be recalled using the number keys.
Example: "1" + "2"
Specifications
FM Tuner
Usable Sensitivity 14.2 dBf
50dB Quieting Sensitivity 20.2 dBf (mono)
45.3 dBf (stereo)
Signal to Noise Ratio (at 65 dBf) 73 dBf (mono)
70 dBf (stereo)
Harmonic Distortion (at 65 dBf) 0.2% (mono)
0.3% (stereo)
Frequency Response 10 Hz-15kHz, +3 dB
Capture Ratio 2.0 dB
Alternate Channel Selectivity 47 dB (+-400 kHz)
Spurious Response Ratio 90 dB
Image Rejection Ratio 80 dB
IF Rejection Ratio 80 dB
AM Suppression Ratio 55 dB
Stereo Separation (100Hz/1kHz/10kHz) 40 dB/45 dB/35 dB
Output level 1V
Antenna Input 75 ohms unbalanced
AM Tuner
Usable Sensitivity 500mV / m
Selectivity 25 dB
Harmonic Distortion 0.5%
Image Rejection Ratio 45 dB
Signal to Noise Ratio 40 dB
Output level 500 mV
Antenna Input Loop Antenna
DAB Tuner
Sensitivity -96dBm
Tuning Range Band III (174-240MHz)
Audio Data Rate 224Kbps (Max)
Frequency Response 20-20KHz
Analog Output 2.0V at 0dBFS
Antenna Output 50 ohms F connector
Digital Output S/PDIF Coaxial/Optical
Format/Sample Rate PCM/48KHz
General
Power Consumption 15 watts
Standby Power Consumption 5 watts
Power Requirements (AC) 120 volts, 60Hz (USA version)
230 volts, 50Hz (European version)
Weight 3.9 Kg/8.6lb
Dimensions (W x H x D) 437 x 72 x 319mm
17^1 / 8^ × 2^7 / 8^ × 10^9 / 16^
Panel Height 60mm / 2^3 / 8^
All specifications are accurate at the time of printing.
Rotel reserves the right to make improvements without notice.
Rotel and the Rotel HiFi logo are registered trademarks of The Rotel Co, Ltd., Tokyo Japan.

ATTENTION :
RISQUE D'ÉLECTROCUTION. NE PAS OUVRIR

ATTENTION: POUR RÉDUIRE LE RISQUE D'ÉLECTROCUTION, NE PAS RETIRER LE CAPOT. IL N'Y A A L'INTERIEUR AUCUNE PIECE SUSCEPTIBLE D'ETRE MODIFIÉE PAR L'UTILISATEUR. EN CAS DE PROBLEME, ADRESSEZ-VOUS À UN REPARATEUR AGRÉ.
APPLICABLE FOR USA, CANADA OR WHERE APPROVED FOR THE USAGE
CAUTION: TO PREVENT ELECTRIC SHOCK, MATCH WIDE BLADE OF PLUG TO WIDE SLOT. INSERT FULLY.
ATTENTION: POUR EVITER LES CHOCS ELECTRIQUES, INTRODUIRE LA LAME LA PLUS LARGE DE LA FICHE DANS LA BORNE CORRESPONDANTE DE LA PRESE ET POUSSER JUSQU AU FOND.

(100 Hz/1 kHz/10 kHz):
40 dB/45 dB/35 dB
Niveau de sortie :
1V
Entrée antenne :
75 ohms asymétrique
Tuner AM
Sensibilité utile :
500 V / m
Sélectivité :
25 dB
Digital Audio Broadcast (DAB)
(100 Hz/1 kHz/10 kHz)
40 dB/45 dB/35 dB
Ausgangsspannung
1V
Antenneneingang
Controles TUNING EEP
Digital Audio Broadcast (DAB)
Formato/Sample rate: PCM/48KHz
Generali
Consumo: 15W
Consumo in standby: 5W
Att vãlja stationer. 73
Kanalsokningsknapparna E P 73
BAND-knapparna 73
Digital Audio Broadcast (DAB). 75
Installation 76
Specificationer 77
DISPLAY-knappen 5 M .75
PTY-knappen 51 .75
TP-knappen 5 K 75
TA-knappen 5 L .75
AF-knappen 5 1 .75
Grundläggande om DAB 75
BAND- och DAB-knapparna 9 C .76
UP/DOWN-knapparna 76
ENTER-knappen 14 76
DISPLAY-knappen 6 M .76
MEMORY-knappen 10 76
Numeriska knapparna 7G .76
TUNE/PRESET-knappen 11 76
SETUP-knappen 15 .76
Inställningsmenyn 76
Soka after DAB-stationer 76
AUTO TUNE-knappen 77
Lagra DAB-stationer 77
Lyssna pa DAB-station. 77
Om Rotel
Digital Audio Broadcast (DAB)
Söka after DAB-stationer
50dB Quieting Sensitivity:
20.2 dBf (mono)
45.3 dBf (stereo)
Signal to Noise Ratio (at 65 dBf):
73 dBf (mono)
70 dBf (stereo)
Harmonic Distortion (at 65 dBf):
0,2% (mono)
0,3% (stereo)
Frequency Response: 10Hz - 15kHz,± 3dB
Capture Ratio: 2,0 dB
Alternate Channel Selectivity: 47 dB (±400 kHz)
Spurious Response Ratio: 90 dB
Image Rejection Ratio: 80 dB
IF Rejection Ratio: 80 dB
AM Suppression Ratio: 55 dB
Stereo Separation (100Hz/1 kHz/10 kHz): 40 dB/45 dB/35 dB
Output level: 1 V
Antenna Input: 75 ohms obalanserat
AM-mottagning
Usable Sensitivity: 500 V / m
Selecti 25 dB
Harmonic Distortion: 0,5%
Image Rejection Ratio: 45 dB
Signal to Noise Ratio: 40 dB
Output level: 500 mV
Antenna Input: Loop-antenn
DAB-mottagning
Sensitivity: -96 dBm
Tuning Range: Band III (174-240 MHz)
Audio Data Rate: 224 kbps (Max)
Frequency Response: 20 Hz-20 kHz
Analog Output: 2,0 V vid 0 dBFS
Antenna Output: 50 ohms F connector
Digital Output: S/PDIF coaxial/optisk
Format/Sample Rate: PCM/48 kHz
Allmänt
Strömfürbrukning: 15 watt
N3o6paJhenoe BocKlnuataTeIbHorO 3HaKa B paBHOCTOPOHHe TpeYOrbHnke NpeDyPrEeKaDeT NOIb3OBaTeJI O HAnHmN CBOPOBQXDAUeH AnPapT DokyMeHTaUcn BAXhBx INCHtpyKuINo KcNpIyaTaUcn I TexHnueCKOMY ObCnyKBaHnU.

IpoDyKbI Rotel cnPoekTnOBoAHb TAK, UTo6b cooTBeTcBOBAT bTepeOBaHmM MekJyAnoDpOHebXu DIneKETNb OtoPraHEnHIO pImpeHEnH BepdHexBu EueCTB B 3NeKtPOTeHXUeCKOM 3NeKtPOHHOM oOpdyobAHm (Restriction of Hazardous Substances - RoHS), TaKxne O noOpaeHnC oTOnPyKbHM CBOI cPcK 3NeKtPOTeHXNecKM H 3NeKtPOHHBM oOpdyobAHm (Waste Electrical and Electronic Equipment - WEEE). N3o6paxehne nepeyePkHTyOrTO mCupHOH 6BaKa h K oKaneac 03HaQeT AakTe To, UTo 3n PnoDyKbI dONKnHb 6bTy BTOpHNo IcNoBObAHb (peuNKnipOBAHb) nHn JKe 6oPaOTohB b COoTBeTcBN C yOnmHYbIMn BIIe DInePKeTbAM.
3TOT CMBON (KBaDpat B KBaDpate) O3Haayet, YTO yctpoIcTb MOeET DOHNO H3OJLAnIO. IOpKnIOUChENe K 3a3eMEnHIO He TpeBcyTA.

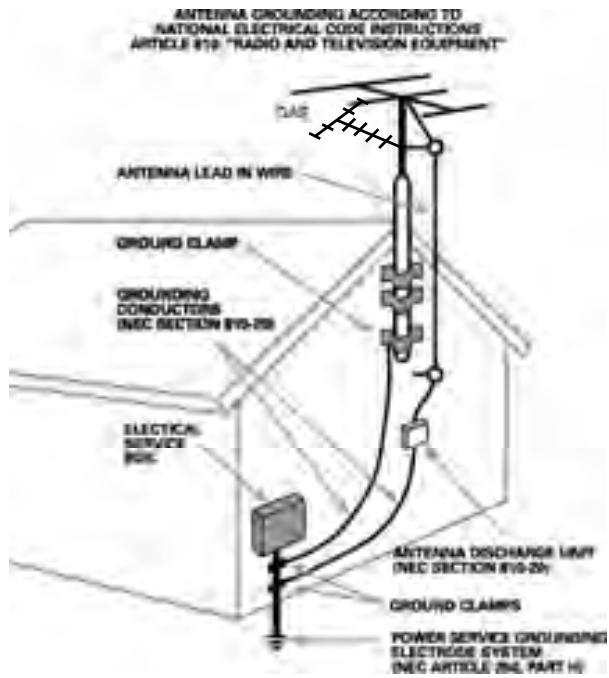
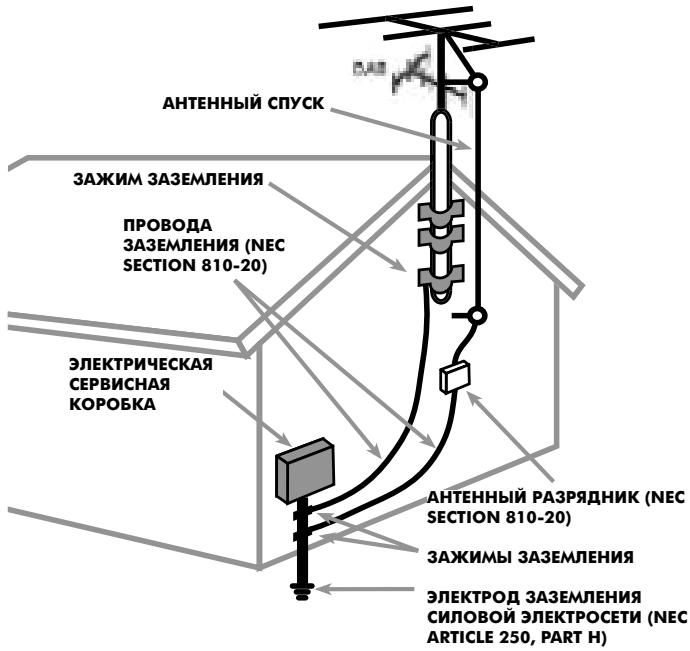
3A3EMJENHE AHTEHBbI B COOTBCTBnC TPEBOBAHmN NEC (HAUHOAHJIbIX 3EJKTPNueKHX HOPMATNBOB CUSA), CTb81 80: "PAIDNO IN TEJIEBN3MOHHOE OOBPOJBOAHNE"
Baxhble nHctpyKu nn no 6e3oNaChocTn
IPEIOCTEPEXEHNE:BHytpn Het qacte,IOcTyNbIX IJIa 06cnyxHBANHNA NOJb3OBATEJIIO. IOBepaTe o6cnyxHBAHne KBaHnCmncpOBAHHomy nepcoHaIy.
IPEIOCTEPEXHEH: IJIa CHNXeHHo ONACHOt BO3ropaHn Hn NopaxHeH 3JIeKTPnueCKm TOKOM He NOdBepraTe DAHHbI aannapat Bo3dEChTBnIO DOJxN Hn BnAri.
He donyckaite nonadahn noctopohnix npemetob Bnytpb Kopnyca. EcIn Bnytpb Kopnyca nonaja Blara mN noctopohnn npedmet, HemeJeHHo BbHbTe Bnky shypa nHTAHn n3 po3eKn. DoCTabBe annapat K KBaJIncnupOBaHHOMy cneuaHncty IJRA OCMOTpa BO3MOXHO r peMOHTa.
PpeKJe yem noCoeHnHaTb annapat uynpaBnA Tm, npOHTte BCE nHcTpkyu. CoxpaHnte pykoBoDCTBO no 3Kcnnyatau nn dna daIbHeuero nCNoNb3OBAHn.
O6paaTe BnmaHne Ha npedocpeXeHHy, yka3aHHbIe HA Kopnyce annapata n B daHHom pykoBoOdCTBe. YnpabJrTe annapatom B COOTBETCTBn C nHCTpyKUmaN.
Pon3BODIne Ounchky Kopnyca TOnbKO cyxOu KaHbO nn nIbJNecOCOM.
OCTaBbTe He MeHee 10cm CBO6oDnHO IPOcTpaHCTBa BOKpyr annapata
dIra oecneueHncaPkyLauuBo3dyxa.He CTaBbTe annapat Ha
KPOBaTb, DnBaH, KOBep nIIN NOO6HyO MArKyIO NOBepxHOCTb, KOTOPa
MOKeT 3aROpOuNTb BEHTnlaUOnHbte OTBepctna. EcnI annapat
BCTpAnBaETcB WkaΦ nIIN dpyroN KopnyC, 3OT Kopnyc DoJXeH
BEHTnInPobAtbcra OecneueHn OxJaKDeHn annapata.
Держinte annapat nodaJIbwe ot paIaIATOpOB OToJIpeHnI, o6orpeBaTeNei, neeH n IIO6bIX pyrnx yCTpoIcTB, BblJeIHOuXx tenNo.
CetBoe HnnpjKeHne, K Kotopomy noCoeunHreTc annapaT, DOnKHO COOTBETCTBOBAT Tpe6OBAHmY, Yka3aHHbIM Ha 3aHHe nane annapata. He nepeDenbBaute BXoJaU B KOMPNeKT UHyp nHTAHy. He nonb3yIteCb yDInHHTenMaN.
He npoknaibBaIte shHyp nItaHnB MeCTax, rJe OH MoKet 6bIb Nobpejken nnnepeperet. O6paauite ocO6oe BnImaHne Ha cTeByo BNJKy N MecTo BbIXOda shHpy n3 annapata.
Ecn npednonaraetc doctatoHOndoIro He nCnoNb3OBaTb annapat, BInbTe BnKy shhpa nItAHn I3 po3eKn.
HemeIeHHo npeKpatnte noJIb3OBaTbC aannapatom n o6paTtecb K KBaIINcNpOBAHOMy nepcoHany,ecn:
- NOBpeKdEnbI shypr nntaHn nn BnKa.
Bnytpb annapata nonan noctopohnne npedmetbl nn KNDKOCTB. - Annapat nonan nojdojkb.
AnnapaT He cyHKcnoHpyeT DonKbIM 6pa3OM.
Annapat yponn nn on noBpeKd en dpyrm cnoco6om.
IcnoJb3yIte npoBOky Class 2 npn noKlnHoyen n KOIoHOHyBk Klemm K yctpoiCTBy Ira NaIeXaue H3OJaun m MHNm3aun pNcKa yapa 3JeKtpnueckm TOKom.
Pa3meaute annapat Ha yctoynboi, nlocko nobepxhoctn, doctatoHno npouhoi, yto6bl bidepkatb erO Bec. He ctabte annapat Ha TeIeKky, KOtopar moKet onpOKHyTcR.
Coepexahanne
1: Oprably npablenHa na nepdne nahei...3
2:ПульТДУRR-T95 4
3:Pa3bEmblIJIJIIOCoEINHeHnHa 3aDHei naHeu. 5
4: Cxema noDcoEduHeHn. 5
BaxkhbIe MHCTpyKuHH no 6e3onachocTH....78
O KompanHHn Rotel. 80
PepbIe war 80
Mepbl npedoctopoKHOCTn 80
OchOBhbleIOCTOnHCTBa 80
PacnaKobka 80
Pa3meueHne 80
PoiocoeHHennn 80
FM aHTehHa 17 81
Pamochna AM aHTehHa 18 81
DAB aHTeHHa 19 81
JInHeHbI ayDnO BbXoD (rHe3Da RCA) 20 ....81
LcΦpOBoBvBxOaDABcmHana 21 81
KombioTePhbBxOa/Bbxo.. 81
THe3doEXTREMOTE IN 23 81
THe3do 12V Trigger 24 81
Bxod nitaHna nepemehnHoro toka 25 81
OchOBhble opraHbI ynpabLeHn8 82
Khoika Standby 1 n cBetoDIOd Standby 2 82
Khoonka ON 82
Khoonka OFF A 82
DatukdctaunohnOy npabHeH 3 82
Dinpnei nepeedne nane 6 82
KhoNka MEMORY 130 82
Khoonka ENTER 14 82
KhoonkaSETUP 15 82
Khoonka DIMMER 15 F 82
OchOBhble opraHbI ynpabLeHHa 82
KhoNk TUNING (HocTpoKa) EEP 82
Khoika BAND (Duaa30H) 83
PeknHacTroKnHaCTOtbl FREQUENCY TUNING 83
Bpejxme HacTroKn Ha npedyctaHOBKn PRESET TUNING 83
B pexnme noncKa RDS PTY 83
LHΦpOBBJIe KHOJIKN 83
BbOaBnAmaytBuactOTpaHnoctanu (npEeBaPHTeJIbHaNHaCtpoKa) 7G 83
Khoinka FREQUENCY DIRECT (PpmaoB BboD
yactotbl) 10 N
Pexim npmaoHactpoKn 83
KhoNka AUTO TUNING (ABTomatnecka HactpoKa) 12 R 84
KhoNka TUNE/PRESET (HactpoKa qactotbl/ hactpoKa Ha npdeUcTaHOBKn) 11 84
KhoNka PRESET SCAN (CkaHnpOBaHne npedyctahOBok) H 84
KhoNka FM MONO (MoHo npHem) 4 Q 84
Papnoepem C mCnoJIb3OBaHnEM RDS HIN RBDS 84
TexHHueckme xapaKTepehCTmKn 88
Khoika DISPLAY (DinCnIe) 5 M 85
KhoKa PTY (TnporpaMmb) 85
KhoNka TP (06ctaHOBka Ha doporax) 85
KhoKa TA (CneuaJIbHbIe COO6ueHn o DopoXHOM DnIXKeHH) 5 L 85
KhoNka AF (AInbTePhaTHBhBie qactotbl) 51 85
LcHpOBoe padNoBeeaHne (DAB) 86
OchOBhble noHraDAB padnoBeaunna 86
KhoIKN BAND, DAB 86
KhoNKn BBePx n Bn3 (UP, DOWN) 86
Khonka ENTER 14 86
Khonka DISPLAY 86
KhoNka MEMORY (PamTb) 130 86
LcnpboBle KhoNKn NUMERIC 7G 86
Khoonka TUNE/PRESET 11 86
YcTaHOBka Setup 86
KhoonkaSETUP 15 86
Mehio SETUP 86
Ponck DAB cTahui: 87
KhONKa AUTO TUNE (AByToHaCTpoiKa) 12 R .87
Kak 3anomnhtb DAB ctauun.. 87
Kak BblBbTb M3 Namrtn CTaHnHO PRESET.....87
OKompanHn Rotel
KoMaHnra Rotel ochobana 45 let Ha3ad cembei, Kotopar n3-3a CtrpacthoIIO6Bn K My3bIke 3aHApacb npOn3BOcCTBOM hi-fi KOMNoHEtOB 6eCKOMnpOMccCHOrO KaueCTBa. C roAmn 3ta Cpactb He yTuXna, n cerOJHa CTpeMneHne cEmBu K oBeCneUeHIO ayDnOΦnIOB mEnOMaHOB, He3ABNCmO OT ux φnHaHcBOrO NOLOKeHnA, annapatypoi BbICouaJwero KaueCTBa, pa3dEJIhot BCE cotpydnKn Rotel.
Дужнaja komанда Инжелов послuyшает и Нстраиваet кждoe HOBOE n3delenie, nOKa ONo He 6ydet COOTBETCTBOBATb CAMblm ВысokIM CTANDPATAM. ИnpedocTAbneHa NonHЯ СвобODa Bby6Opa KOMNKeTKUOnx no BCemy Mny, yTO6bI CSeIaTb annapat kak moXHO LyuWe. БеряТо, Bbl CMOXeTe HauTn OT6OpHbIe KOHdHcAtOpBy n3 BeNIko6pItAHn n Германи, NOIynpoBoDnIKn n3ЯNoHNi n CLLA, a TAKKe TOponDaJIbHbIe cINOBIte tpaHcΦopMaToPbI, n3rotOBNeHHbIe Ha co6CTBeHHOM 3abOde Rotel.
Penytaun KOMpanu HROTEK npoun3- BODnteI npbeocxOHO TeXnIKoNDTBepKdeHa COTHAMN NOJOKNTeNBbIX OT3bIBOB IN Hargad OT Han60oney BaXaembIX 3Kcneptob. XKOMMeHTapnn Npomarot KOMpanu ToUHO depKaTcBcKypca Ha npoun3BODCTBO KAueCTBeHHoro, HAdexKHorO n DOctynHoro O6OpudOBAHn.
Mbl, cotpydHnK KOMpaHmROTEL, 6naoradapm Bac 3a NOKyEtoRO u3denia, nHaedeemc, yTO OHO DOCTABUT BAM MHORO yDOBOJbCTBn.
Первileшагn
Blaoradapm Bac 3a nokynky ctepeo DAB/ AM/FM TIOhepa Rotel RT-06. KoHcENpna rarpMOHNHO KOHCTpyKTHBHO nCnONHeHHN "Balanced Design" coetaet npOyMaHNoe pa3MeSeHne detaneH na neatHoI pate, Ttatehbl ot6Op KOMNKeTyoUxu MHOrOuNCHeHbI ceAHcbl npocnyuBaHnA, 4TO rapaHTnpuyOT BlicOayuWee KaueCTBO BOCPOn3BeDeHn3 Byka nDOnrOBpeMeHHyU HoJeXHOCTb. B COCTabe BlicOKOKaeeCTBeHHoI ayInocnCTembl ctepeo TIOhep Rotel RT-06 6ydet CnyKHTB Bam MHOne roDbI.
Mepbl npedoctopoXhOCTn
BHHMATEbHO npOHTaIte 3TO pYKOBOcTBO. NOMMO OCHOBHbIX INHCTpyKcNn NO yCTaHOBKe n 3KcPnPyatauNN, B HEM CoOpExaTcpeKoMeHdaUu, KOTOpBle NOMOrTy Bam MAKCmAmJIbHO INCNoJIb30BaTb BCE BO3MoXHOCTn BaWe cNCTeMb.I No BCem INTEpeCyIOUmm Bac Bonpocam o6paauTeCb K YpOJIHOMOeHOMy DInepy Rotel.BceMb,cOTpydHnKn RoteL, BcERda roToBbI OTBeNTb Ha BaWn BonpocbI npnHaB BaWn 3aMeuAHn.
CoxpaHnte Kopo6ky dIra TpaHcnpotnpOBKn I BCE octaIbHbIe yNApKOBOUHbIe MaTePnaJIbIy, UTo6bl B daIbHeIWeM MeTb BO3MOXHOCTb BocNoJIb3OBAtbcra MM. NpeMePeHne IIN TpaHcnpotnpOBKa pOnurpBbAtela RT-06 BdpRou yNApOKBe MOKeT bIb3BaTb cepBe3HbIe NOBpeJdeHry YCTpoiCTBa, He NOKpbBaemble rapaHTne.
3aperncptpuytecb Ha caite kompann H www.rotel.com/register n obraatbno coxpanhte uek n rapantnHbI TanoH.3To rnaBhble DOKyMeHtby, yOcTobepraUoJne daty NOKynK, B cnyae 6paueHn 3a rapantnHbIM o6cnyKuBaHnem .
OCHOHBbIe IOCTOnHCTBa
- Пгем радиocанць B AM, FM n DAB dana3ohax
-Дужесвенныкnotьоватиофуорецentнийдиспей. -
NamrBa 30 cTahnB AM/FM dana3ohax; NamrBa 99 cTahnB DAB dana3ohe.
PyuhaHa HAcToPouKa, aBTOHAcToPouKa, Bb6Op cTAnCnI n3 PAmrTn, cKaHnpoBaHne npecetOB, pRmOe BBOD qactOTbl. -
RDS (Radio Data System) ДяЕврonyi RBDS (Radio Broadcast Data Service) Дя CLЛА.
DAB (Digital Audio Broadcast); npneim zucpoboro paio B Ebpone, Kaanae mHornix dpynx pernohax.
-Переклочецстебо/моно
Bxod TprirrepHoro 12-B ynpabraIOUeO CnHana IJN DCTAHNOHHo BkHouEna OT npeducnntenei n npoceccopob Rotel. - POnHocpyHKcIOHOHaJIbHbI NpIbT DY
PacnaKOBka
OcToPOxKHO n3BVeKnTe annapaT n3 yNAKObKn.
HaIInTe npIbT n dpyrHe npHnAJIeXHoCTn.
YcTAHObNt B npIbT 3JemEnTb nITaHn.
CoxpaHnTe yNAKObKy Ha cnyaH nepee3da
uIN DoCTabKn annapaTa B pEmoHT.
Pazmeichen
IocTabTe RT-06 ha Tbepyo ropu3oHTaIbHyOnOBepxHocTb npaIbwe OT npMbxCOJIneuHbIyIyuey,IOCTOUYKOB TeNlaBnBnB6paun.
B npoucese HopmaIbHO pa6oIb RT-06 BbIeJraT tenNo. Ecn annapat BcTpaIbAetcB Me6eIb, 06ecneYbTe IocTaOuHyo BEHTnIaHIO. Y6eIntecB, 70 no3aIa annapata octanocb heKOTOpoe npocTpanCTBO dIra NOdcoEHNHeNk Ka6eNe. Pa3MeCTnte RT-06 B6IIN3 INpyNX KOMNoENTOB BaWe CnCTembl, N, NO BO3MOXKnOCTN, HA OTDeJIbHO nnKe. 3TO o6IerHNT npOBedeHne nepBOHaayabHbIX MEXCOeHNHeNm I daJIbHeNx INMeHENB B CnCTeme. TaKke 3TO MNHMn3npyET BO3MOXKnOCTb HABeHEnn NOMex INn HARpeBA RT-06 ot dpyroro obOpyDobAHn.
He ctaBte TjXeIbe npEmdetHa KpbIuKy RT-06.He onyckaiTe nonaDaHna JxukocTb BNYtpb Kopnyca.
PoiocoeHHeHn
Ha 3aHne nane RT-06 haoTcra He3da
nHeHoro ayNo BixOda, rHe3do dna
noCoeHnHnFM aHTenHbI, DAB aHTenHbI,
KlemMbI dN noCoEHNHeA M aHTenHbI, BXoD
12-B nyCkoBOro CnHana, BXoD npOBOnHO
pepaun CnHana nOpapacHoro
dntaHnOHoro ynpabEnHn, ndpoboi
BxOoD DAB CnHana, a TAKKe BXoD nITAHn
OT cTe n nepemehHoro ToKa.
PIMMEAHHE: He noDcoeINHJrTe HN ODNH N3 KOMHOHeHToB CnCTembl K CETNIpeMeHHORO TOKA, NOKa HE BbIOnHIne BCE CoeINHeHn.
FM aHTehHa 17
B KOMPNIKT NOCTABKn RT-06 BXOJNT KOMHATHA aHTeHHa, IMEHOaTg T-06pa3Hyo fOpMy n npedHa3NaueHHa dIg npHeMa paadinocirHanOB FM. BbInBe aHTeHHy n3 KOpO6Kn N BCTabbTe Wtekepe ee KoAKcnaJIbHoro Ka6eIa R rhe3do "FM" TIOhepa RT-06. IJa o6ecneueHn haunyuWero npiema nonHoctbpo pa3BepHnte aHTeHHy B VIDE 6yKBbl T. Ha o6oX koncax aHTeHHbI eCTb KpyTlbe netTI, no3BOJIAUoHne npn Heo6xoDnMoCTn npNKpenITb ee K CTHe. Po3KcnepImeHTnpuYte, YTO6bl HauTn noLoXKeHne aHTeHHbI, o6ecneuBaHOoee HAunyuShn pniem.
PIMMEAHNE: ECIN BbXOTHe NcONb3OBaTb BHeuHIO aHTeHHy BMeCTO KOMHaTHoI npBOJIoUHO aHTeHHbI, NOcOeDInHte ee KoAKcuaNbHbIM Ka6eJeC BOnHObIM cOpOTnBHeHem 75 OMKrHe3Ny FM. OdHako DeNtB 3TO MOxH0 ToIbKO NocTe TORO, KAc AHTeHHa 6yDet YcTaHOBNeHa ONbTHbIM CneuHaJIncTOM, 3HakOMbIM C DeIcTBYouMn HOpMaTbAMn 3JeKtpo6e3OnaCHOCTn.
Pamocha AM aHTehHa 18
B komnnekt noctabkn Tiohepa RT-06 BXoNT pAMOCHa aHTeHHa dIy npHeMa paAnocnHAnOB AM-dnAna3OHa. IocTaNbTe 3Ty aHTeHHu n3 Kopo6Kn u pacNoJoxNte ee OKONO TIOhepa.
Дыхкильньим Кббелем Ha 300 Om посоe-динite pamOчHy aHTeHNY K BnHTOBbIM Klemmam AM LOOP, coeHnЯ kaxdbl npobod c otdeIbHOJ Klemmoi. He nmeet 3aueHn, K kakoi Klemme noKlIOyeh Tot nInu HNO npOBod. BaxHo npocneDITb TOnbKO 3a Tem, YTO6bI coeINHeHn 6bIn NaedexKbIMn I DBa npOBoHa He copnikacanbc.
Дя toro yto6bI haiTn lyuwee noLoxKeHne aHTeHHbl, Bbl moKTe Bpaatb ee nIn nepeOpneHTnpOBaTB kAk-Nu6ydbNo-dpyrOmy.
INPMUEAHNE: EcnBbXOTne nCNOJIb3OBaTb BHeuHIO aHTeHHy BMecTO pAMOCHOH, NOcOeHNHTe ee 300-OMhBI dByxKnIbHbIKa6eNk KNeEMMaM G u AM. Ondako deJatb 3TO MOxHO TOJIbKO NocTe TOrO, KAK aHTeHHa 6ydet YctahOBJIeHa ONbTHbIM CneUaNICTOM, 3HAKOMbIM C DeIcTBYHOUMN HOpMaTINBAMN 3JIeKtpo6e3oNaChOCTn.
DAB aHTehHa 19
B KOMNKeTc NoCTABnIeTcKOMHaTHaR DAB aHTeHHa. Ecn n He He ydaetc nonyuntb xopoOee KaueCTBO npHema, peKoMeHdyETc rNoJb3OBaTB HApXHyD DAB aHTeHHy. HApXHyO aHTeHHy MoxHO nOdCoEINHtB c NOMoCbIO F-pa3bema (nana) k rHe3dy "Antenna DAB" Ha 3aJne naHenn.
Линейнbiудно ВьхоД (rhe3da RCA) 20
HaIINHeHbI ayDIO BbIXoJ noCTyNae TcRHan 6nKcnpOBaHHoro ypOBHdIpaNHa Ha npEiBaPnteHbIy ycInTeJIb, cIcTeMHbI KOHTpOJIpe IIN INTERpnpOBaHHbI ycInTeJIb.
ПриnomошистандартHorOауdnoKa6eЯ RCA coeinnite rHe3do LEFT(JIeBoe)rpynnbl OUTPUTS(BbXoDb)co BxOdomLeBoro KaHanaTIOHEPA cIcTeMHOKHTpONnepa,a rHe3doRIGHT(PpaBOE)-co BxOdom npaboro KaHanaTIOHEPA cIcTeMHOKHTpONnepa.
UncpOBOB BbIXoD DAB CnRHaJa 21
Odn KoaKcnAJIbHbI n Odn S/PDIF BbIXoJ npedHa3NaYeHbI dJa BbIaOn CnHaNoB DAB padnoctanu (Digital Audio Broadcast). DAB o6ecneuBaet npnem 6e3 nomex n KaueCTBO cnHaHa NaTu KaK Ha KOMnAKT-dNCKax CD, a TAKKe cOnyTCTByUOuy Bo WeaTeJIbHyo INOpMaunIO.
KOMnbOTepHbI BxOJ/BbIXoD 22
TIOHEPOM RT-06 MOxHO ynpabnayb c KOMNbIOTepa c NOMOuB IO IO dnyynpabneHna ayDNO CnCTeMAmo OT CTOpOHnHX npOnzBOJntenei. Iyra 3TOrO c KOMNbIOTepa nocblauHcKoDb kOMAnNo INHTepceCy RS-232.KpOME TOrO, npOuINBkN RT-06 MOxHO 06HOBVt c NOMOuBIO CneuaJIbHorO IO ot Rotel.
KoMnIbIOTePbHb I/O pa3bEm 06ecneuBaET Heo6XoDmBle cetEble coeINHeHna Ha 3aDHei NaHei. OH npHHMaET CTAndapTbIe 8-KoHTAKThbIe pa3bEmbl RJ-45, o6bHyO nCnoNtBcYEmbl B cetx 10-BaseT UTP EHernet. 3a DononHnTeBHO INcFopMaueNe no coeHNHeHIO, npoknAke Ka6ene, PO n KoAM KomAnD dIra anrpeJa BaWero RT-06, 6paauTeCb K ABTopn3OBaHHomy DInepy Rotel nIHa cepBvC Rotel.
CbeToOnOHyn HndNkAtOp STANDBY LED 3aRopaetc npn nooCoeHHeHH nHTAHNA AC.
Khonka ON 5
ToIbKO HApynbTe
HaKaTne Ha KhONky ON BbIbOuNT THOhe RT-06 n3 pexKMa standby npebeOuNT ero B peKm HopMaNbH opa6Otbl.
Khonka OFF A
ToIbKO Hc npIbTe
HaKaTne Ha KhoNky OFF nepeBoNDt RT-06 B pexm standby. HanpJxKeHne no npexKhemy nOaETcHa Hero, Ho cyHKcHn He BbINOJIHrOTc.
P03B0JraET Bb6paTb OINH n3 yetblpex pexHMOB IpKoCTn DnCnJe. Haxatne Ha KhoNky nepe6uPaet BapaHTbl.
PIMMEAHHE: EcIn THOHe BPKIOHUTb, a 3aTeM BKNIOHTb TO DCNIIeB O3BpaUaeTc K HopMaJIbHOJ yCTAHOBKe JPKoCTn. Ho UCTAHOBKn DOCTyINbI TAkXe B MeHIO SETUP dJa 3AnOMINHaHnI, NOKA THOHe OTKNoueH COBCem OT CETn.
OchOBhble opraHbI ynpabJeHnA
RT-06 ochaueh ufoPoBbIM AM/FM THePOM c CnHTe3atOpom YactOtblc RDS nRBDS cIcTeMo, NaTbHO Ha 30 CTaHau, a TaKke DAB THePOM c NAMrTbHO Ha MaKcNMyM 99 CTaHau.
- PexkM pyHOn HAcTpoKn No3BOJnE TocneIOBATEbHO yBeJIuHbATb NmI yMeHbWATb YactOTy HAcTpoKn. KhoNkoi TUNE/PRESET BbIbepnte pexkM TUNE. OTKInouTe peXkM AUTO TUNING. Ipn nOMoUsn KhoNok TUNING BbINOJHnTe HAcTpoKy Ha HyxHyO qAcTOTy.
PexnmpaHCTpOKnNo3BOJREt HAcTPOuTBcCpa3yHaXeJaemyo padnoctanuHO.HaxmTe KhONky FREQUENCY DIRECT Ha npIbTe N BBeDInTe qactoty BeuaHnra padnoctanuN npi nOMoUsuΦpoBbIX KhONOK.
Bpexme ABtomatueckoro nonka ocuyceCTBnEeTc nonck BBepx nnn BHN3 no dnaanaoHy cactot do o6hapykeHn 6nHexaWe CTAnCn CdoCTatoHo moNbIM Ira npneMa cInHaOM. KhoNKoI TUNE/PRESET Bb6epnte peXm TUNE. BKnOHTe peXm AUTO TUNING. Pnp nOmoOnu OndOnn nKhoNok TUNING 3anyctnte ABtomatueckn nonck B HnapabLeHHn yBeJIuYeHn nn UMehbSeHn qACTOTbl.
Ha paHnoctaHnIO, cactota kotoPO npedBapntelbHO coxpaneha B nAMrN, MoJHo HAcTpOHTbcR, BVeJr Homep, NOD KOTOpBIM XpaHNTcB NAMrN ee cactota (Homep npedyCTaHOBKn). BVeJrTe 3TOT Homep uCpPoBbIM KNOHkAmn dJa AM/FM nIN DAB dIana3oHa.
Bpeximeckanipobanna npedycta-HOBOKnpoicxOJNT Hactpojka Ha BCE BVeJeHHbE BnAmTb YactOTb BELaHnno Oyepei. Yo6bl3anyCTnbCKanipobAHne, HaxmTe KhoNky PRESET/SCAN. - Hactpoika c nCnoJb3ObaHnem cnjx6bl RDS (Ebpona) nn RBDS (CLUA) nCnoJb3yET CneuAnbHbIe cyHKn iONcKa i NaCTpOki, OCHOBANbHe Ha cnJyKe6hIx dAnHbIX, nepeJaBaembIX BMeCTe CpaNIOBEaTeJIbHbIM CNrHaJOM. IOpDpo6HbIe CBeEHen CoedePaxatcB pa3dJe, NocBraUeHHom CnCTeme RDS.
KhoNkTUNING (HacTpoNka)
IapHbIe KhoNkN
KhoNka FM MONO (MoHo npHem) 4 Q
OcyuieCTBnIeT nepeKIOUoyHe MeJy pexkumm MOH N Ctepeo npneMa B FM dna30He. Ctepeo npneM Bo3MOxKeH, ecn paNocTAnzra npepaet Ctepeo cunHan, n OH mMeet DOctatoHyO CNly B MeCte npneMa. Torda Ha dnCnlee CBETITcra INDnKATOp ctepeonpneMa. B pexkme MOHO npneMa TOnHep 6ydt BbIDABaTB MOHO cunHan, daXe ecn CTAHnIa nepedaet Ctepeo.
INPMUEAHNE: IpeKJIIOUeHne B MOHO peKIM MoXeT yIyUuHTb CbIUsMocTb Cna6bIX FM CnHaNoB uNn CnHaNoB OT yJaIeHHbIX PaIIOCTaHcN, TAK KAc JIra MOHO pInema IOCTaOtuHO MehJWe MOnHOCtN CnHaHa.
Papnoepnem c HcnoJIb3OBaHneM RDS IIN RBDS
Rotel RT-06 coBmecTm c eBponecko cnCTemoi paAnOaHbIX RDS (Radio Data System) n amepnKaHcKo RBDS (Radio Broadcast Data Service). 3Tu cnyX6bl, pa6oTaOnue B FM dana3OHe, nepeaoT BMeCTe C paAnOscrHaIOM 3aKoDnPoBaHhbIe
Cnyxke6hble daHHbIe, KOtOpbIe KeoOINpyOTc COBMeCTnMbIM C RDS nn RBDS npneMHNKOM IN ppeIOCTabNIOIb3OBaTeHNO pI ANDONOHHTeHBHX yO6CTB, BKNIoua:
- BbIOd Ha dncnIeH H3BaHnIcTAnCuN (Ha npImep, "BBC1");
- BbBOJ Ha nCnnei Tnna npOrpaMMbl, Hapnpemep, "ROCK" (Pok) nn "NEWS" (Hoboctn);
- nepeeauy nHΦopMaun O dBxKeHHn TpaHCnOPTa;
- BBIOB n HnCnIe TeKCTa B BVne 6eryuei CTPOKN IpyroINHOpMaunu.
Kpome toro, cnCTema RDS o6ecneuHaet HeckoIbko dOnonHnteIbHbIX cyHKcuIN nonCKa, a mHeHo:
- BO3MOXHOCTb NONCK CTAHUN, nepe-daHOUeI nporpammy HxKHoro Bam Tnna (PTY);
- BO3MOXHOCTb NONcKa INHΦOpMaζn O DBHXKeHN TpaHCnOpTa (TP);
- BO3MOxHOCbT abTOMaTHueCKOrO noncka cTahn, nepeDaIOuX coo6ueHna O dBHXeHN TpaHCnopta (TA).
CnCTema paAnoanHbix uipoko paacnpocTpaHena B cTpaHax EbpOnbl. Mhorne ebPoneiCKne paNocTanu np6oTaOT BCNTeMe RDS, 60nbUnHCTBO nIb3OBaTeNe 3HaKOMbI Cee cyHKUmaM N BO3MOxHOCTaMn. BCLJA CNTeMa RBDS BBeDeHa OTHOCHTBn HedABHO. IopRo6hble CBeDeHnO CNTeMe RDS nn RBDS, dEeCTByUoSeB BaWei cTpaHe, Bby MoXe Te POnyUHb y MeCTHoro dInpepa KOMpaHnn Rotel.
PIMMEAHHE:Функши RDSSRBDSIOCTYNHbI TOlbKO BTexpernoHax,rpeImeOTcpa6oTaUOuueB CnCTeMe RDS nIN RBDS paAnocTahnn. HeKotOpbIe cTahnn HeNoIHOCTbpopeaun3yOt CnCTeMyRDS, HAnpUmep,nepeaIoT ToBko Ha3BaHne cTahnn.EcIn B BaWeM perNoHe Het cTahnn,p6oTaHoUxB CnCTeMe RDS nIN RBDS,TO TIOhe RT-06 6yDet pa6oTaTB KAK O6bHuNb paDnOpnpemHnk.
INPMEYAHNE: Cntembl RDS n RBDS pa6oTaoT toIbKO B dnaIa3OHe BeuaHn FM. OncaHbIe HnXe fynKcNn pa6oTaOT toIbKO B peKmme FM.
KhoNka DISPLAY (Диспл征) 5M
Ecn tAnzna,Ha KOTOpyH NactpoenB DaHHbIMoment Bau TIOHep,pepeaet CnIHaNbI RDS, H Na DnCnIe eCBETNTcN IHDNKAtop "RDS", To Ha DnCnIe MOnKHO BbIECTN PnTb BnIOB INΦOPMaun. HaxKaTHeM KhONKn DISPLAY npOn3BOJNTc NOcNEoDBaTeNbHbN nepeXoD n3 OndHoro peXmuB Dpyro:
- O6bUHbI dncnpei - qactota hactpoikn (OyHKzur FREQUENCY).
- Ha3BaHnE paAnocTaHn (ФункиЯ PROGRAM SERVICE), Hanpimep BBC1. Ecnn Bb6paHnaB DaaHbI MOpHeT paAnocTaHnI He nepeaet CnHrHan RDS, To Ha DiacnIee NoaBtcaMiraIoUuI INdNkatop "PS".
- Tn nporpammbi (fynkncn PROGRAM TYPE). Yka3bIbaetcB COOTBETCTBmco cTanhdpTbnM CnncKOM TnOB nporpaMM, npHnAeBIM B KAKdompernohe (HaPnmeP, NEWS [HoBocn],CURRENT AFFAIRS [TeKyunie co6bITn],INFO [Nchopmaa], SPORT [Cnopt],EDUCATION [O6pa3oBaHne], DRAMA [PaHnocneKtakNb],CULTURE [KynbTypa],SCIENCE [Hayka], VARED [Pa3Hoe],POP [PiOn-My3bIka],ROCK [PoK-My3bIka],EASY LISTENING [JERKaMy3bIka],LIGHTCLASSICAL [JERKa KnaCCnueckaMy3bIka],SERIOUS CLASSIC [Cepbe3HaaKnaCCnuecka My3bIka],OTHER MUSIC [My3bIka npOuNX JAnpoB], WEATHER [PiOrDa], FINANCE [ΦHHaHCoBbE HOBocn], CHILDREN [DcTeckne nporpammbi],SOCIAL AFFAIRS [CoounalhBie Bonpocbl,RELIGION [PeNirg],PHONE IN [Onpocblcnyatenei],TRAVEL [PyteWectBna],LEISURE [Docyr],JAZZ [JxKa3OBaMy3bIka],COUNTRY [My3bIka B CTnle KaHTpn],NATIONAL MUSIC [HaUHOHbHaNMy3bIka], OLDIES [CTapbIe My3bIkaNbHbIe 3anncn],FOLK [HapOHaHaNMy3bIka] n DOCUMENTARY [DokymentaJIbHaNpepea),Ecnbl Bb6paHNaB B daHbim MOMENT paNDIOCTAHUN He nepepaet CnHAN RDS,TO Na DnCnnee NOBHTcMnraUoUHInHdkaTOp "PT".
-
Bpem (dyhknzCLOCK TIME).Ha nncnnei BbIBOaTcBpeMnData, nepeDaBaemble paNocTanuEe. Ecnn Bb6paHna B daHHb MOMeHT paNocTanuH He nepedaet CunHan RDS, to Ha dnCnnee noBntc MmraHouu nnHdkatop "CT".
-
Pañotekct-Coo6üeHne, nepeDabaemoe pañocTahnueB B Vnde 6eryué CTpOKn (dyHKzra RADIOTXT). EcnBb6paHnaB DaHHb MOMENT pañocTahnue Hne peEDAet CnHnRDS, To Ha DnCnnee noBtca Mraiou nHdkatop RT".
KhONka PTY (TnnporpaMMbl) 51
3a KHONka No3B0JraET BbINOJIHnIb NOcK CTAHuN,pepeaHOse nporpaMMy HxKHO BAM TUNa, npu ycNOBn, yTO 3a cTAuN pa6oTaet B CnCTeMe RDS.
- Haxmte KhoNky PTY. Ha dinCnnee noBtca Bb6paHHb B daHHb MOMENT Tnp nporpambl.
- Ппnomоши Кногok TUNING Bbl moхete Bbl6paTb n3 cnNcKa npryoTnnporpamMbI.
- He no3xe yem uepe3 5 cekyHn Haxmte KhoNky PTY eue pa3. Tiohep nonbItaetc HauTn ctaHuno RDS, nepeadouuyo nporpammy Bb6paHoro Tnna. EcnB TeueHne 5 cekyHn nocne Bb6opa Tnna nporpammbi BbHe haxmete KhoNky PTY, cyHKnna noncKa ctaHUn, nepeadoUoe nporpammy HxKHO rO Tnna, 6ydet OTMeHeHa.
- Ecnn TOnHe He O6HapyKnT CAnuHIO, NpepaIooUHO nporpaMMy HJxKnO To TnA, TO BOCCTaHOBNTc HAcTpoNkA Ha NCxoDHyo padnoctAHCuHIO.
- Перваь поck можно, нажав Лобук Honky, крOME DIMMER n FM MONO).
UcpoBbIe KhoNk MoKHO NcNoJIb3OBaTb IJIa 3aHeceHnI CTaHnI B NpMaTb - PRESET n IJIa BBIOBA Ix I3 Hee.
Khonka TUNE/PRESET 11
YRT-06ecTbDpapeKma pa6oTb:
- Puchon DAB pexnM:
Korda THOHeP B 3OM pExnMe, Bbl MoKeTe npOKpyuHBaTb BCE DoCTynHbIe CTaHcNc nomoubIO KhoNOK BBePx N BHN3.
- PekkM DAB npeceToB:
IcnoIb3yIte KhoNky npeCeTob Inra TORO, 4TO6bI c nOmoIbIO KhoNOK BBepx n Bn3 npokpyuBaTb CTaHcIM, COxpaHeHHbIe B naMrti. Korda Bbl Bb6npaet 3OT peXm, Ha FL dinCnIee BbcBceuNbAeTcR «PreseH».
YctaHOBka Setup
ПИМЕЧАН: B MeHNo yCTaHOBOK set-up IMeHOTcR 6OJIe cCIOXKhIe yCTaHOBKn. OДнako ДЯ 6OЛьшИNcTBA cIyuaeB DoCTaTOUH0 3ABoDcCKnX yCTaHOBOK NO yMOJUHaHNO ДЯ ONТIMANbHOи HAcTPOkN RT-06.
Khonka SETUP 15
KhoNka SETUPHa nepednei nahein Bb3bBaET MeHIO Setup, nCnoB3yEmoe dIg 6Oone cNoXhix HAcTpoek RT-06.
MeHIO SETUP
Haxmnte ha KhoNky SETUP Ha nepeDnei nanei Ira npocMOTpa onuim MeHIO Ha FL dncnlee. OnpaunIO moXHO OTMeHHTb, Haxab Ha KhoNky SETUP eue pa3. Ype3 HeKotopoe Bpem, ecn He HaxmAtb KhoNk pynbTa, THOEP BbiIeT u3 MeHIO yCTAHOBKn.
IcnoB3yute KhoNkUPDOWHa nepeHne nanei IpnpokpyTk pa3nHybIX BapnAHTOB MeHO.HaXmTe Ha KhoNkY ENTER dIra NoTBePxxDeHry Bb6opa.
ImeHOTc CneDyUOJIne OuIN: OHaKo IcNoIb3OBaHHe 3TuX cyHKn Tpe6yeT 3HaHn INCΦopMaun O BaWe MeCTHom DAB nepeDaTUnke.
Ppomkoctb DAB DAC VOLUME: RT-06 no3boJnaret perynipobatr pomkoctb no skane DAC (LAP - ndpoahanororo npoe6pa3oBataT).Ppomkoctb DAC MoXHO
perynipobatb npeidenax 0-255 nncnbl3y KhoNk np u down. Ta cyHKuia O6bUHO nCnObl3yeTc dIa corlacobAHna ypOBHn CnHana c TIOhepa c DpyrIMn BAaHmKOMTOHEHTAMn.
BbIXoA EXIT:ДлЯ BbIXOJa I3 MeHIO YCTaHOBKN set-up.
Ponck DAB cTanu:
INPMEAHNE:KordaDABTHOHEBVKHouaOT nepBbipaa3,FLdncnne3anpaunBaet, XOTITEIINBbI3anyctntbABTOHACTPOky, YTO6blHaHTNBEcDOCTyNHbIEcePBNCbIB BAeempaiohe.B60nbUnHCtBe cnyaeb ABTOHAcTPOky DOCTatoUHO pOBecTN OINH pa3.Bb6epnte
Khonka AUTO TUNE (Abtohactponka) 12 R
Bb moKTe nepNoDnueckn noBToPraTb nOnck, ecn B BAWeM perNoHe nOaBnIcB HOBble MyNbTuPiKeKcb (T.e. rpynnb cepBucOB) nIe Xe, ecn Bbl nepeexan BmecTe C TIOHepOM B dpyuHO6NaCTb.
PIMMEAHNE: ABytoHactpoiKa cTnpaet BCE npceTebl paNIOCTAnu, 3aHeceHHbIe B nAmrTb.
1.BoiDnteBpeKIM DAB TOnhepa,Haxkab KhoNky BAND Ha nepedne naneu nn DABHa npNbTe.
2. Haxmte Ha KhoNky AUTO TUNE nIa noncka nepBoro aHcAm6Jra cTaNzH. Ha FL dncnnee noBHTcRa HAdnncb [DAB Auto Tuning]. Bb6epnte
3. Bb6epTe
Kak 3aONOMHHTb DAB cTahcunm
Korda aBTO hactpoika 3aKoHueHa,Ha 3kpahe 6ydet noka3an HdeHTnΦnkatop cepBnca. IcnoIb3yIte KhoNkUp/down dIra Bb6opa JxenaemO CTAHm.
Дязанецен CTANCUB NAMATb HoxMTe KhoNky MEMORY, a 3aTeM XeNaemblHOMep. HanpImep:"Memory" + "1" + "2"
IobtorpTe 3Ty npoceDpy dIJI 3aONMHnA JIOJHNTeJIbHbIX CTAHU.
KaK Bbl3BaTb m3 namrtn CTahcHIO PRESET
3aheceHHaB NpamrTb CTanuM MoKet 6bTb Bb3BaHa C NOMOuIIO uNcPobBix KHOJOK. HanpImep:"1" + "2".
TexHnueckneXapakTepnCTnKn
FM Tiohep
Pa6oayyBCTBnTeNbHOCTb:
14.2 abΦ
UyBCTBNTeJIbHOCTb npn ocIa6JIeHm cHrHaJHa 50 d5:
20.2 έΦ (MOHO)
45.3 dΦ (ctpeo)
OthoWeHHe CnRHa/woM (npn 65 dΦ):
73 abΦ (MOHO)
70dΦ(ctpeo)
TapMOHmueckne mckaxkehn (npn 65 dΦ):
0.2% (MOHO)
0.3% (ctrepeo)
Дианэончactor:
10 Hz-15 kHz, 3 dB
Ko3c0nmuent 3axbata:
2.0 ab
N36npatelbhoctb no cocedhemy kahany:
47 dB (+ -400 kT)
H36npateIbHocTb no no6oHomy KaHaNy:
90ab
Iopabnene nomex no 3epkanaHomy
Kahany:
80ab
H36bpaTeNbHocTb no npomeKytoHou
VACTOTE:
80ab
Ko3cfoaHnENT noabBHeHnA M:
55ab
Pazdelenne ctepeokahanob
(100 _u / 1 kTg/10kTg):
40b/45b/35b
BbIXoHoi ypoBeHb:
1B
ANTeHHbI BXoI:
75OM,He6aJAHCHbI
AM TIOHEP
Pa6oaa yBCTBnTeJIbHoctb:
500MB/M
H36mpaTeNbHOCTb:
25ab
TapMOHnueckne nCKaXeHHa:
0.5%
Iopablenne nomex no 3epkaalbHomy
Kahany:
45ab
OthoWeHne cHraHn/whm:
40ab
BbIXoHNo ypOBeNb:
500 MB
AHTeHHbI BxOJ:
pamouhag aHTehnHa
DAB TIOHEP
UyBCTBNTeNbHOCTb:
-96 ABM
Dnana3ohbI npHHMaembix qactOT:
Band III (174-240 Mf)
Ayno notok daHHbIX:
224 K6nt/cek (MAKc.)
ДианazonудночастOT:
20-20KΓ
AHAJOROBbI BbIXoD:
2.0 B npn 0 dBFS
AHTeHHbI BxOd:
50OMFpa3bem
LncpobOB BbIXoI:
S/PDF KOAKCnAaHbHy/onTneckn
Φopmat/γactota dNckpTeH3aunn:
PCM/48KΓ
06uhe xapaktepcnKn
Notpe6IeMa MoUHocb:
15 Bt
Notpe6JeHne B pexnme Standby:
5 B
Tpe6obAHnK nHTaHmIO (AC):
120B,60T(CLUA)
North Reading, MA 01864-2699
USA
Phone: +1 978-664-3820
Fax: +1 978-664-4109
Rotel Europe
Dale Road
Worthing, West Sussex BN1 12BH
England
Phone: +44 (0)1903 221 761
Fax: +44 (0)1903 221 525
Rotel Deutschland
- Important Safety Information
- 3: Rear Panel Connections
- Important Notes
- When making connections be sure to:
- It is also recommended that you:
- Remarques importantes
- About Rotel
- Getting Started
- A Few Precautions
- Key Features
- Unpacking
- Placement
- Rear Panel Connections
- FM Antenna 7
- AM Loop Antenna 18
- DAB Antenna 19
- RCA Outputs 20
- DAB Digital Outputs 21
- Computer I/O 22
- EXT REMOTE IN Jack 23
- 12V TRIGGER Connection 24
- AC Input 25
- Basic Operating Controls
- Standby Button 1 and Standby LED 2
- ON Button 5
- OFF Button A
- Remote Sensor 3
- Front Panel Display
- MEMORY Button 130
- ENTER Button 14
- SETUP Button
- DIMMER Button 16 F
- Basic Tuning Controls
- TUNING Controls EEP
- BAND Button EBCD
- FREQUENCY TUNING Mode
- PRESET TUNING Mode
- RDS PTY search mode
- Numeric Buttons
- Station Presets 7 6
- Direct Access Tuning N
- EXAMPLES:
- Auto Tuning Button R
- TUNE/PRESET Button 11
- PRESET SCAN Button
- FM MONO 40
- RDS and RBDS Broadcast Reception
- DISPLAYButtonM
- PTY Button 51
- TP Button 5K
- TA Button 5
- AF Button 5
- Digital Audio Broadcast (DAB)
- DAB Basic Information
- BAND, DAB Buttons
- UP / DOWN Buttons
- ENTER Button 4
- DISPLAYButton
- MEMORY Button 10
- NUMERIC Button 7G
- Setup Operation
- SETUP Menu
- Searching for a DAB station
- AUTO TUNE button 2R
- How to store DAB stations
- How to call a PRESET
- Specifications
- FM Tuner
- AM Tuner
- DAB Tuner
- General
- ATTENTION :
- APPLICABLE FOR USA, CANADA OR WHERE APPROVED FOR THE USAGE
- Tuner AM
- Controles TUNING EEP
- Generali
- Att vãlja stationer. 73
- Digital Audio Broadcast (DAB). 75
- Installation 76
- Specificationer 77
- Om Rotel
- Söka after DAB-stationer
- AM-mottagning
- DAB-mottagning
- Allmänt
- Baxhble nHctpyKu nn no 6e3oNaChocTn
- Coepexahanne
- BaxkhbIe MHCTpyKuHH no 6e3onachocTH....78
- OchOBhble opraHbI ynpabLeHn8 82
- LHΦpOBBJIe KHOJIKN 83
- Papnoepem C mCnoJIb3OBaHnEM RDS HIN RBDS 84
- TexHHueckme xapaKTepehCTmKn 88
- OKompanHn Rotel
- Первileшагn
- Mepbl npedoctopoXhOCTn
- OCHOHBbIe IOCTOnHCTBa
- PacnaKOBka
- Pazmeichen
- PoiocoeHHeHn
- FM aHTehHa 17
- Pamocha AM aHTehHa 18
- DAB aHTehHa 19
- Линейнbiудно ВьхоД (rhe3da RCA) 20
- UncpOBOB BbIXoD DAB CnRHaJa 21
- KOMnbOTepHbI BxOJ/BbIXoD 22
- Khonka ON 5
- ToIbKO HApynbTe
- Khonka OFF A
- ToIbKO Hc npIbTe
- OchOBhble opraHbI ynpabJeHnA
- KhoNkTUNING (HacTpoNka)
- KhoNka FM MONO (MoHo npHem) 4 Q
- Papnoepnem c HcnoJIb3OBaHneM RDS IIN RBDS
- KhoNka DISPLAY (Диспл征) 5M
- KhONka PTY (TnnporpaMMbl) 51
- Khonka TUNE/PRESET 11
- - Puchon DAB pexnM:
- - PekkM DAB npeceToB:
- YctaHOBka Setup
- Khonka SETUP 15
- MeHIO SETUP
- Ponck DAB cTanu:
- Khonka AUTO TUNE (Abtohactponka) 12 R
- Kak 3aONOMHHTb DAB cTahcunm
- KaK Bbl3BaTb m3 namrtn CTahcHIO PRESET
- TexHnueckneXapakTepnCTnKn
- Rotel Europe
- Rotel Deutschland
Brand : ROTEL
Model : RT-06
Category : Radio tuner