USER MANUAL EA 8118 KRUPS
FR HOTLINE:BE:3270233159-FR:0974501061-CH:0800377737
EN HOTLINE:UK:0345 3306460-ROI: (01)6774003
DE HOTLINE:DE:0800980000-AT:0800225225-CH:0800377737
NL HOTLINE:NL:0318582424
IT SERVIZIO CONSUMATORI: IT: 199 207701 - CH: 0800 37 77 37
ES HOTLINE:ES:902312300
PT Centro de Contacto do Consumidor: PT: 808 284 735
EL EAMAA:GR:2106371251
RU TOPYAA JINHNA:RU:4952133228
UK TAPRAJALIHJ:UK:0443001304
PL INFOLINIA:PL:0801300420
CZ HOTLINE: CZ:731010111
SK ZAKAZNICKA LINKA:SK:233595224
HU Ügyfélszolgálat:HU:(1)8018434
www.krups.com
L8V808808808808808808808808808808808808808808808808808808
SD
enbnyde6eess : uoeesieee - 6L02 - L - 8ouss - 2880000208
KRUPS
ESPRESSERIA AUTOMATIC
SERIE EA80 EA81

www.krups.com
Xn 7d S0 Xs NH

1
2
3
4
5
6
7

8

9
10
11
12
13
14
15
16
17
18
19
20
21
22
23
24

25
26


29
26
31
32

33
34
J Grille repose-tasses

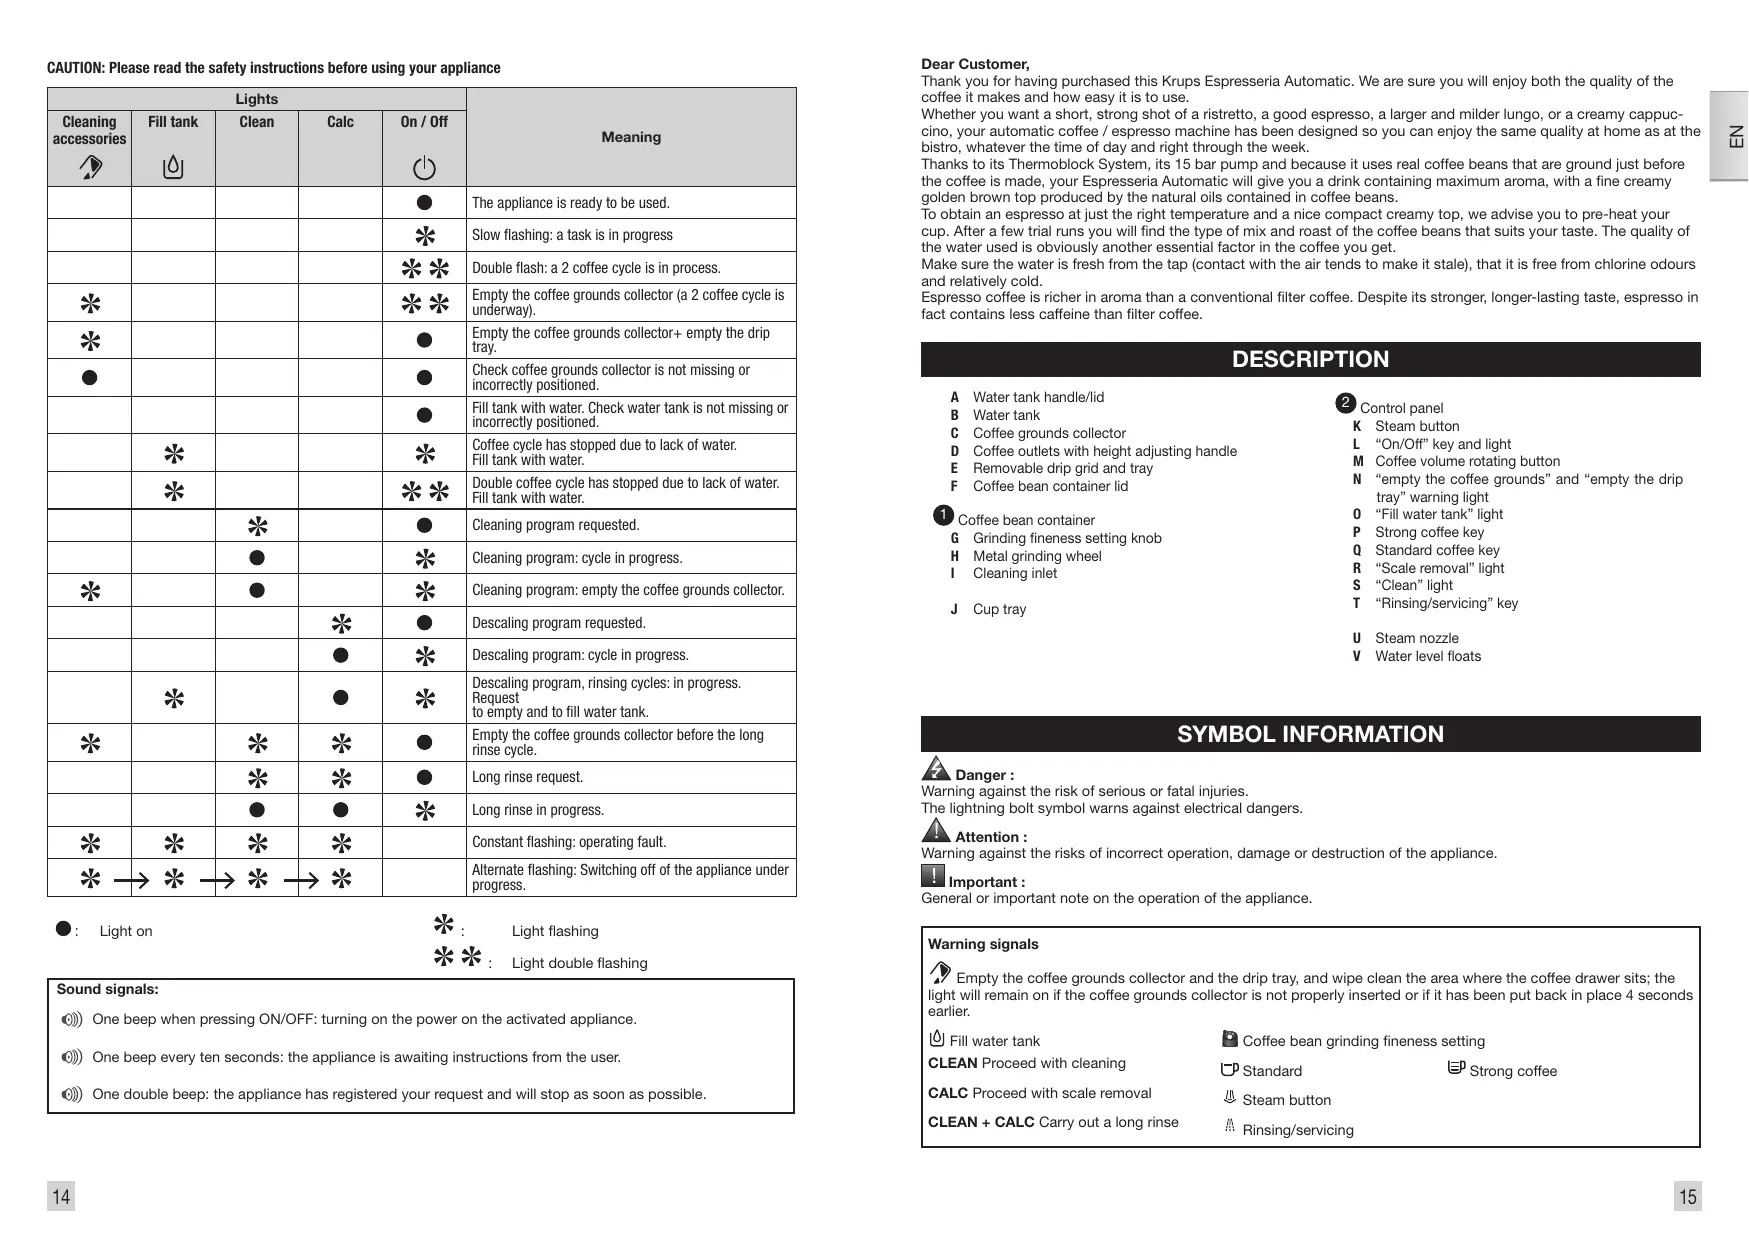
CAUTION: Please read the safety instructions before using your appliance
| Lights | Meaning |
| Cleaning accessories | Fill tank | Clean | Calc | On / Off |
| | | | ● | The appliance is ready to be used. |
| | | | * | Slow flashing: a task is in progress |
| | | | ** | Double flash: a 2 coffee cycle is in process. |
| * | | | | ** | Empty the coffee grounds collector (a 2 coffee cycle is underway). |
| * | | | | ● | Empty the coffee grounds collector+ empty the drip tray. |
| ● | | | | ● | Check coffee grounds collector is not missing or incorrectly positioned. |
| | | | ● | Fill tank with water. Check water tank is not missing or incorrectly positioned. |
| * | | | * | Coffee cycle has stopped due to lack of water. Fill tank with water. |
| * | | | ** | Double coffee cycle has stopped due to lack of water. Fill tank with water. |
| | * | | ● | Cleaning program requested. |
| | ● | | * | Cleaning program: cycle in progress. |
| * | | ● | | * | Cleaning program: empty the coffee grounds collector. |
| | | * | ● | Dscaling program requested. |
| | | ● | * | Dscaling program: cycle in progress. |
| * | | ● | * | Dscaling program, rinsing cycles: in progress. Request to empty and to fill water tank. |
| * | | * | * | ● | Empty the coffee grounds collector before the long rinse cycle. |
| | * | * | ● | Long rinse request. |
| | ● | ● | * | Long rinse in progress. |
| * | * | * | * | | Constant flashing: operating fault. |
| *→ | *→ | *→ | * | | Alternate flashing: Switching off of the appliance under progress. |

Light on

Light flashing

Light double flashing
Sound signals:
One beep when pressing ON/OFF: turning on the power on the activated appliance.
One beep every ten seconds: the appliance is awaiting instructions from the user.
One double beep: the appliance has registered your request and will stop as soon as possible.
Dear Customer,
Thank you for having purchased this Krups Espresseria Automatic. We are sure you will enjoy both the quality of the coffee it makes and how easy it is to use.
Whether you want a short, strong shot of a ristretto, a good espresso, a larger and milder lungo, or a creamy cappucino, your automatic coffee / espresso machine has been designed so you can enjoy the same quality at home as at the bistro, whatever the time of day and right through the week.
Thanks to its Thermoblock System, its 15 bar pump and because it uses real coffee beans that are ground just before the coffee is made, your Espresseria Automatic will give you a drink containing maximum aroma, with a fine creamy golden brown top produced by the natural oils contained in coffee beans.
To obtain an espresso at just the right temperature and a nice compact creamy top, we advise you to pre-heat your cup. After a few trial runs you will find the type of mix and roast of the coffee beans that suits your taste. The quality of the water used is obviously another essential factor in the coffee you get.
Make sure the water is fresh from the tap (contact with the air tends to make it stale), that it is free from chlorine odours and relatively cold.
Espresso coffee is richer in aroma than a conventional filter coffee. Despite its stronger, longer-lasting taste, espresso in fact contains less caffeine than filter coffee.
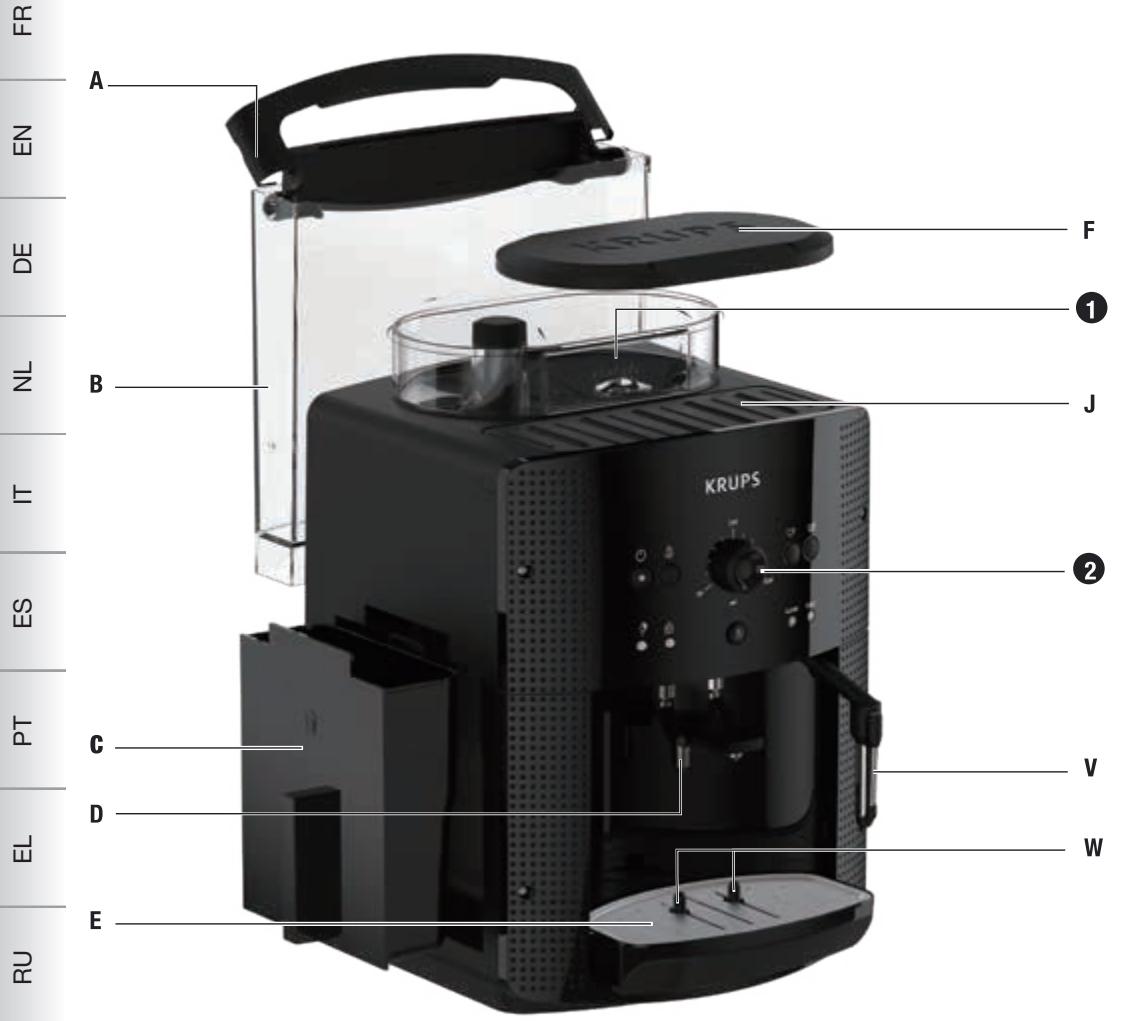
DESCRIPTION
A Water tank handle/lid
B Water tank
C Coffee grounds collector
D Coffee outlets with height adjusting handle
E Removable drip grid and tray
F Coffee bean container lid

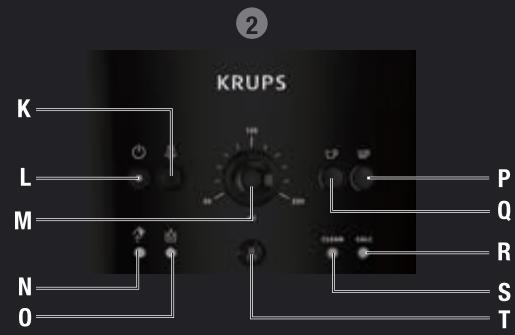
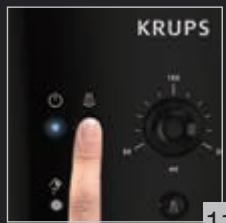
Control panel
K Steam button
L "On/Off" key and light
M Coffee volume rotating button
N "empty the coffee grounds" and "empty the drip tray" warning light
0 "Fill water tank" light
P Strong coffee key
Q Standard coffee key
R "Scale removal" light
S "Clean" light
T "Rinsing/servicing" key
U Steam nozzle
V Water level floats

Danger :
Warning against the risk of serious or fatal injuries.
The lightning bolt symbol warns against electrical dangers.

A. Attention :
Warning against the risks of incorrect operation, damage or destruction of the appliance.

Important :
General or important note on the operation of the appliance.
Warning signals
Empty the coffee grounds collector and the drip tray, and wipe clean the area where the coffee drawer sits; the light will remain on if the coffee grounds collector is not properly inserted or if it has been put back in place 4 seconds earlier.

Fill water tank

Coffee bean grinding fineness setting
CLEAN Proceed with cleaning

andard

Strong coffee
CALC Proceed with scale removal
Steam button
CLEAN + CALC Carry out a long rinse
Rinsing/servicing
BEVERAGE PREPARATION
| TYPES OF COFFEE | Number of cups possible | Possible volume settings (ml) | Possible strength settings |
| RISTRETTO | 1 | 20 to 30 ml | ☐ or ☐ |
| 2 x 1 | 2 x 20 to 30 ml in two cycles |
| ESPRESSO | 1 | 30 to 70 ml | ☐ or ☐ |
| 2 x 1 | 2 x 30 to 70 ml in two cycles |
| COFFEE or LUNGO | 1 | 80 to 220 ml | ☐ or ☐ |
| 2 x 1 | 2 x 80 to 220 ml in two cycles |
BEFORE FIRST USE
Preparing the appliance
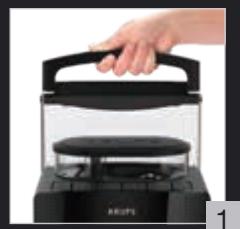
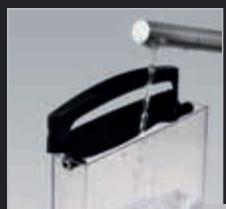
Pull out and fill the water tank - Fig. 1 and 2.
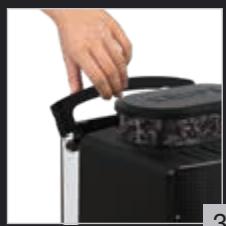
Put it back in place by pressing firmly and close the lid again - Fig. 3.
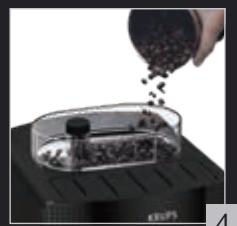
Open the coffee bean container lid. Add the coffee beans - Fig. 4.
Close the coffee bean container lid again.
Do not fill the water tank with hot water, milk or any other liquid. If you turn on the appliance when the water tank is not in place or not correctly filled (under the "min." level.), the light will come on and making an espresso or a cup of coffee will be made impossible.

NEVER PUT GROUND COFFEE IN THE COFFEE CONTAINER.
It is recommended that you do not use oily, caramelised or flavoured coffee beans for this appliance. These kinds of beans may damage the appliance.
Check that the coffee beans do not contain any foreign particles such as grit, as any damage caused by the presence of foreign particles will invalidate the guarantee.
Do not put water into the coffee bean container.
Remember to fit the drip tray to avoid waste water flowing onto the work surface and staining it or scalding you.
Check that your water tank is clean.
Initialisation cycle - total duration: around 3 minutes
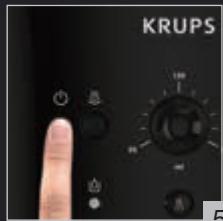
Turn on the appliance by pressing the button - Fig. 5. The light is constant.
Put a container with a minimum capacity of 0.6 litres underneath the two coffee outlets and steam nozzle.
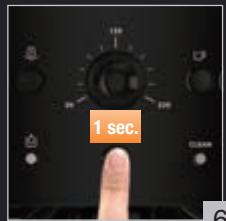
Press the 山 - Fig. 6 button: the appliance starts the initialisation cycle for rinsing of the steam and coffee circuits. The light flashes.
The cycle is finished when the light becomes constant. The appliance is now ready to use.

It is preferable to rinse the 2 circuits out at least once after the appliance has not been used for several days. Each time you plug your appliance in, it will carry out an initialisation cycle.
Preparing the grinder
You can choose the strength of your coffee by setting the coffee bean grinding fineness. The finer the grinding setting, the stronger and creamier the coffee should be. Set the desired fineness for grinding by turning the 'Grinding fineness setting' knob. Turn to the left for finer grind. Turn to the right for coarser grind.

CHANGE THE SETTING DURING GRINDING.
Never force the grinding fineness setting button.
PREPARING ESPRESSO AND LONG COFFEES

YOUR APPLIANCE IS DESIGNED TO MAKE COFFEE FROM COFFEE BEANS ONLY.
When you first make coffee with the appliance or after a long period of absence or a cleaning or scale removal procedure, a little steam and hot water will come out of the steam nozzle (priming).
Splashing or scalding may occur if the coffee outlets are set too high in relation to the size of the cups.
Note:
The amount of water needed to make an espresso is between 30 and 70ml
The amount of water needed to make a coffee is between 80 and 220ml
Production of an espresso or coffee
Plug in your appliance.
Press the button ①. The light will flash during the pre-heating and initialisation cycle.
The light becomes constant.
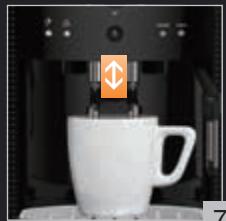
Put a cup under the coffee outlets. You can lower or raise the coffee outlets to suit the size of your cups - Fig. 7.
Select the key to get a strong espresso or the key to get a standard espresso - Fig. 8.
You can change the volume of water at any time - Fig. 9
To stop coffee flowing into the cup, you can either again press one of the or , keys or turn the knob to the min. position.

The ground coffee is moistened with a little hot water after the grinding stage. A few moments later, percolation as such starts. Beyond a certain amount of coffee in the cup, we recommend - in order to obtain a stronger coffee - to divide your preparation into two separate cycles. Example 2 × 70 ml cycles for a cup of 140 ml .
2 cup function
You can prepare 2 cups of coffee or espresso with your appliance.
Press the button the light flashes during the pre-heating of the appliance
The light becomes constant.
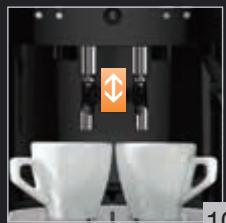
Place 2 cups under the coffee outlets. You can lower or raise the coffee outlets to suit the size of your cup - Fig. 10.
Select the button or according to your choice, by quickly pressing the button twice. The light comes on with a double flash to inform you that you have requested two cups of coffee.

The appliance will automatically sequence 2 complete coffee-making cycles.
Make sure that you don't remove the cups after the first cycle.
If you press the button once and the button a second time (or the other way round), the second one isn't taken into account.
PREPARING STEAM
Steam froths up the milk to make a capuccino or a caffe latte, for example, and also heats up liquids. As you need a higher temperature to produce steam than to make an espresso, the appliance runs an additional pre-heating phase for steam.
Plug in your appliance.
Press the button: the light flashes during the pre-heating of the appliance.
The light becomes constant.
Press the button 念 -Fig.11.
The light flashes during the pre-heating.
Once the pre-heating is finished, the light ① stays constant and you can start the steam production by pressing the ② button again.
Press the button again to stop the cycle.

The appliance goes back to its initial position if the steam control is not used after 2 mins.

Frothing milk
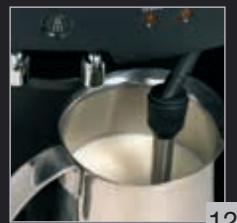
We recommend that you use pasteurised or UHT milk that has been recently opened. Untreated milk does not give the best results.
Pour the milk into your milk jug. Immerse the nozzle in the milk - Fig. 12.
Initiate the steam function as explained in the paragraph above.
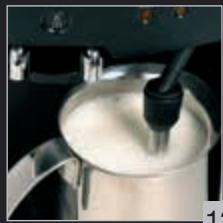
Once your milk is frothy enough - Fig. 13 - again press the button to stop the cycle.
To remove any milk traces from the steam nozzle, place a container under the nozzle and restart a preparation with steam (around 10 seconds).
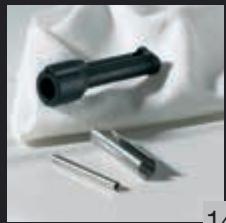
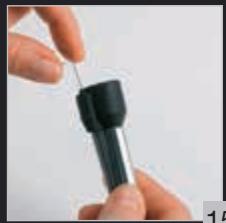
The steam nozzle can be removed for more intense cleaning. Wash it out with water and a little washing up liquid and a small non-abrasive brush. Rinse and dry it - Fig. 14. Before putting it back, ensure that the air inlet holes are not blocked by any milk residues. If necessary, unblock them using the needle supplied - Fig. 15.

Do not wash the steam nozzle in a dishwasher.
To interrupt the steam function, simply press any button.
If the nozzle is obstructed, unblock it with the needle provided.
Steam can be produced for a maximum of 2 minutes per cycle.

After the steam function has been used, the nozzle can be hot, and we recommend that you wait for a few moments before handling it.
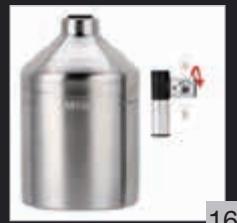
Auto-cappuccino XS 6000 Set (sold separately)
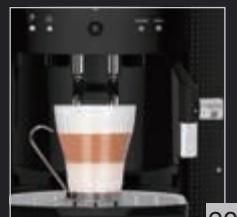
This auto-cappuccino accessory enables you to make cappuccinos or lattes - Fig. 16. Connect the different parts to each other. Ensure that you do not pierce the pipe by keeping the button in the correct place.
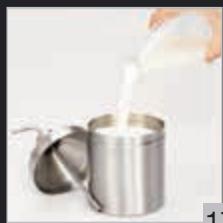
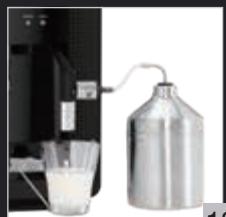
After removing the lid, fill the jug with milk - Fig. 17 and place a cup or glass under the auto-cappuccino nozzle - Fig. 18. Select the cappuccino or latte position on the special nozzle - Fig. 19.
Start the steam, as indicated in the chapter 'Making drinks with steam'.
Once you have made the milk froth, place your cup under the coffee outlets and start a coffee cycle - Fig. 20.
To prevent the milk from drying on the auto-cappuccino accessory, ensure that you clean it thoroughly. You are advised to wash it immediately by running a steam cycle with the accessory jug filled with water in order to clean the inside of the nozzle. You can use the KRUPS liquid cleaner for this, available separately.
MAINTAINING YOUR APPLIANCE
Emptying the coffee grounds collector and the drip tray.
If the light flashes,
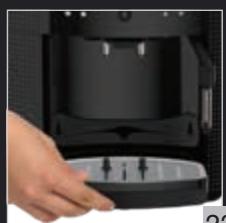
Remove, empty and clean the coffee ground collector - Fig. 21.
Replace the coffee grounds collector - Fig. 22
Remove, empty and clean the drip tray - Fig. 23.
The drip tray is equipped with floats to indicate when it needs to be emptied.
Put all parts back in place.
As soon as you remove the coffee grounds collector, you will have to empty it completely to avoid any overflow.

The light will remain on if the coffee drawer(1) area is not cleaned thoroughly and if the used grounds collector is not pushed firmly into place or is incorrectly installed.
You cannot make espresso or coffee while the light is on or is flashing. The coffee grounds collector has a capacity of 9 coffees.
Rinsing of circuits
These 2 functions are available anytime, except if the appliance requests a 'CLEAN' and/or 'CALC' cycle.
Rinsing out the coffee circuit:
Place a container under the coffee nozzles. Press the button - Fig. 6 quickly to start a coffee circuit rinsing cycle, which will automatically stop after around 40ml .
Rinsing out the steam circuit:
Place a container under the steam nozzle and press the button for 3 seconds to start a steam circuit rinsing cycle, which will automatically stop after around 300ml .
Appliance cleaning program, 3 times a year (total duration: about 13 minutes)
For hygienic reasons and to preserve all best coffee flavor we recommend you to clean the coffee system when the machine asks you to, about 3 times a year.
To perform this cleaning you will need:
- 1 KRUPS cleaning tablet
- 1 container of minimum 600ml
several flows will follow one another
When to carry out this program?
When it is necessary to run a cleaning program, the appliance alerts you by flashing the CLEAN indicator light. This program can only be accessed when the appliance requests it (approximately every 300 brews of coffee or espresso).
To comply with the warranty conditions, it is essential to perform the cleaning cycle when the appliance alerts you. Follow the order of operations carefully
Use only KRUPS cleaning tablets (available on our KRUPS.com store)
How to start the automatic cleaning program?
- Start the cleaning program by pressing the button . The CLEAN indicator becomes solid and the and indicators flash.
- Remove, empty, clean and replace the coffee grounds collector Fig 21-22 The indicator light go off.
- Remove, empty, clean and replace the drip tray Fig 23.
- Fill and replace the water tank.
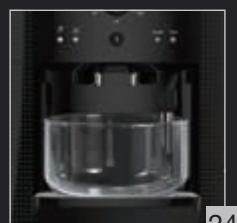
- Place the 600 ml container under the coffee nozzles Fig 24.
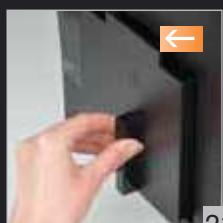
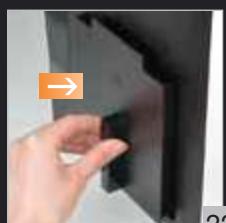
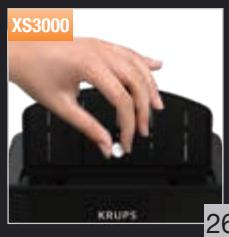
- Open the maintenance hatch Fig 25.
- Insert the KRUPS XS3000 cleaning tablet into the cleaning chute Fig 26.
- Press the button to start the cleaning cycle
- The cleaning phase (about 13 min) starts. Several water flows follow one another in several phases without any necessary intervention. They allow the device to be rinsed and the cleaning residue to be removed.
- The cleaning cycle is finished when the light ① stays on and the CLEAN light goes out, empty the drip tray.
Your device is ready to be used.
Important :
You do not have to run the cleaning program as soon as the appliance requests it, but you must do it reasonably soon after. If cleaning is postponed, the alert message will remain displayed as long as the operation has not been performed.
if you unplug your machine or if you turn it off during cleaning or in the event of electrical failure, the cleaning program will resume the current step at the time of the incident.
It will not be possible to postpone this operation: rinsing the water circuit is mandatory.
If there is not enough water in the water tank when you start the program, the light will come on to warn you. Add the appropriate amount of water to the container and cleaning will continue automatically.

If you unplug the appliance during cleaning, press the ① button, or there is an electrical power cut, the cleaning program will start again from the beginning. In this case, another cleaning tablet may be necessary. Make sure to carry out the full cleaning cycle to ensure good maintenance of your appliance. The cleaning cycle is intermittent: do not put your hands under the water outlets ‘E’ and ‘W’ while the cyc is in progress.
Only use KRUPS (XS3000) cleaning tablets. We cannot be held responsible for any damage that may result from the use of tablets from other brands.
You can obtain cleaning tablets from KRUPS Service Centres.
Scale removal program - total duration: about 20 minutes
The quantity of scale deposited depends on the hardness of the water used. The appliance will automatically warn you by the 'CALC' light coming on when you need to proceed with scale removal.
This program is only accessible when the appliance requests it.

To benefit from the guarantee conditions, it is essential to perform the appliance's scale removal cycle when informed to do so. Be sure to follow the procedure closely step by step. You can continue to use the appliance when the light is on, but you are advised to perform the program as soon as possible.
If your appliances fitted with our Claris - Aqua Filter System F088 cartridge, please remove the cartridge during the descending operation.
Only use KRUPS scale removal products. You can obtain scale removal products from KRUPS Service Centres.
We cannot be held responsible for any damage that may result from the use of tablets from other brands.

Make certain to protect your work surface during cleaning and scale removal cycles, especially if it is made of marble, stone or wood.
Start the descending program by pressing the button. The 'CALC' light becomes constant and the indicator lights and flash.
Remove and clean the drip tray.
Place a container with a minimum capacity of 0.6 I under the coffee outlets as well as under the steam nozzle - Fig. 24.
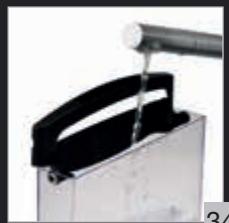
Empty the tank and refill it with warm water up to the line 'CALC' - Fig. 33.
Dissolve a sachet of Krups (40g) F054 descaler in the tank - Fig. 33.
Replace the water tank. The indicator light switches off.
Press the button after carrying out all of these operations.
The first phase (approximately 8 min) begins.
The descending cycle will start automatically.
At the end of this phase, the sound signal beeps every 10 seconds and the indicator light 0 ’ flashes.
Empty the used water container and put it back in place.
Empty and rinse the water tank - Fig. 34.
Refill the tank with water and put it back into place. The warning light 日 goes out.
Press the button again to start the second phase. The sound signal stops.
The second phase (about 6 min) begins.
The program continues. It rinses the appliance and removes any traces of the descaler.
At the end of this phase, the sound signal beeps every 10 seconds
Remove and empty your used water container and put it back in place.
Press the button again to start the final phase. The sound signal stops.
The final phase (approximately 6 min) begins.
The program continues. It removes the last particles of descaler.
When the descending cycle is finished, the indicator light 'CALC' goes out.
Refill your water tank.
Your appliance is ready for the next use.
If there is not enough water in the water tank, you will be warned by the light.
Add the appropriate amount of water to the tank and scale removal will continue automatically.

If you unplug the appliance during cleaning, press the ① button, or there is an electrical power cut, the cleaning program will start again from the beginning. In this case, another cleaning tablet may be necessary. Make sure to carry out the full cleaning cycle to ensure good maintenance of your appliance.
The cleaning cycle is intermittent: do not put your hands under the water outlets 'E' and 'W' while the cycle is in progress.
Long rinsing program - total duration: about 2 minutes
When it is necessary to make a long rinsing program, the appliance warns you of this by flashing the 'CLEAN' and 'CALC' lights.
Remove, fill and replace the water tank.
Place a container with a minimum capacity of 0.6 I under the coffee outlets and the steam nozzle.
Start the long rinsing program by pressing the button. The lights 'CLEAN' and 'CALC' become constant and the indicator light starts flashing.
When the long rinse is finished, the lights 'CLEAN' and 'CALC' go out and the indicator light becomes constant.
Your appliance is ready for the next use.
The appliance can ask you to empty the coffee ground collector.
OTHER FUNCTIONS
To switch the appliance off
You can switch off your appliance at any time. As the appliance is switching off, a double beep is emitted and all of the red lights flash, one after the other. The appliance has registered your request and will stop as soon as possible.
Installation of the filter cartridge - total duration: around 2 min
To get the best taste from your coffee and extend your appliance's service life, we advise you to use only the Claris - Aqua Filter System cartridge sold as an accessory.
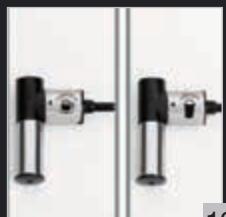
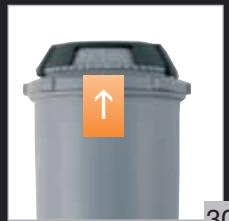
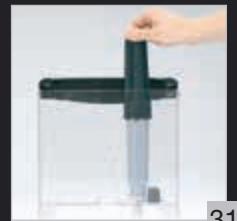
Fig. 30 : Mechanism to indicate the month the cartridge was fitted and when to replace it (after 2 months at most). Installing the cartridge in the appliance. On first use, screw the filter cartridge into the bottom of the water tank - Fig. 31. Place a 0.6 I container under the steam nozzle.
Press the button for more than 3 seconds (unless the appliance requires a 'CLEAN' and/or 'CALC' maintenance). The indicator light flashes.
When the installation of the filter cartridge is finished, the indicator light 日 becomes constant.
Your appliance is ready for the next use.
The Claris cartridge needs to be replaced after about every 50 litres of water or every two months at least. If you are using the Claris - Aqua Filter System cartridge, set the water hardness to level 0.
Coffee temperature display
Appliances are pre-set in the factory to level 2.
Connect the appliance to the mains supply but do not switch it on.
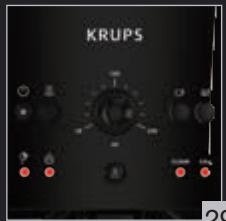
Press the and buttons together, -Fig.27.
The LED flashes during the setting phase.
Twist the knob to 20ml to set the coffee temperature - Fig. 28.
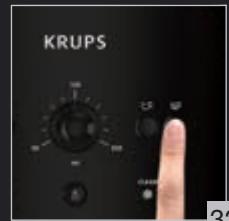
Press the button to increase or touch the button to decrease the setting - Fig. 32.
Select the coffee temperature level: 1 LED lit = temperature 1, 2 LEDs lit = temperature 2, 3 LEDs lit = temperature 3, the hottest setting.
To exit settings mode, press
Water Hardness Setting
Appliances are pre-set in the factory to hardness level 4.
Before using the appliance for the first time or after a change to the water hardness, it is advisable to set the appliance to the correct water hardness. Contact your water supplier to find out the water hardness for your area.
| Degree of hardness | 0 Verv soft | 1 soft | 2 moderately hard | 3 hard | 4 extremely hard |
| °f | < 5,4° | >7,2° | >12,6° | >25,2° | >37,8° |
| °dH | < 3° | >4° | >7° | >14° | >21° |
| °e | < 3,75° | >5° | >8,75° | >17,5° | >26,25° |
Connect the appliance to the mains supply but do not switch it on.
Press the and buttons together, -Fig.27.
The LED flashes during the setting phase.
Twist the knob to 120ml to set the water hardness - Fig. 28.
Press the button to increase or touch the button to decrease the setting - Fig. 32.
Select the level of water hardness to be used: 0 LEDs lit = very soft, 1 LED lit = soft, 2 LEDs lit = average hardness, 3 LEDs lit = hard, 4 LEDs lit = very hard - Fig. 29.
To exit settings mode, press 心
Setting the electrical supply cut-off mechanism
Appliances are pre-set in the factory to 1 hour.
You can program your machine's automatic shut-off following a pre-programmed number of hours.
Connect the appliance to the mains supply but do not switch it on.
Press the and buttons together, -Fig.27.
The LED flashes during the setting phase.
Twist the knob to 220ml to set the automatic cut-off duration - Fig. 28.
Press the ^p button to increase or touch the ^p button to decrease the setting - Fig. 32.
Select the desired hardness: 1 LED lit = 1 hour, 2 LEDs lit = 2 hours, 3 LEDs lit = 3 hours, 4 LEDs lit = 4 hours - Fig. 29. To exit settings mode, press .
Connect the appliance to the mains supply but do not switch it on.
Press the 和 and 和 buttons together, - Fig. 27.
The LED flashes during the setting phase.
To go to "cycle number" mode, press and hold the button for 3 seconds; all of the red LEDs flash three times before displaying the information - Fig. 29.
Cycle number:
- Less than 3000: 1 LED lit.
- Greater than 3000: 2 LEDs lit.
- Greater than 6000: 3 LEDs lit.
To exit settings mode, press

At each of these steps you can exit settings mode by pressing the button if you have finished your settings. All of the lights are off. These settings will be saved even if there is an electrical failure. You can modify these settings at any time by repeating these steps.
TROUBLESHOOTING, CORRECTIVE ACTIONS
| PROBLEM MALFUNCTION | CORRECTIVE ACTION |
| Your appliance detects a fault. | Switch off and disconnect the appliance, remove the fil-
ter cartridge, wait for a minute and restart the appliance. |
| The appliance does not turn on when the ⊙ button is pressed. | Check your fuses and plug sockets.
Check that the two power plugs are correctly pushed in the socket. |
| The coffee grinder makes a strange noise. | There is a foreign body in the grinder. Disconnect the appliance before investigating. See if you can extract the foreign body using your vacuum cleaner. |
| The steam nozzle makes a noise. | Check that the steam nozzle is correctly attached to its corresponding end piece. |
| The steam nozzle on your appliance seems partially or completely clogged. | Ensure that the opening in the end piece is not ob-
structed by milk residue or limescale. Unclog the holes with the needle supplied with your appliance. |
| The steam nozzle makes little or no milk froth. | For milk-based drinks, use very fresh, very cold pa-
teurised or UHT milk. It is also advisable to use a cold container. If the results do not improve, try changing the brand of milk. |
| No steam comes out of the nozzle. | Empty the tank and temporarily remove the filter car-
tridge. Fill the water tank with mineral water which is high in calcium (>100 mg/l) and run successive steam cycles. |
| The auto-cappuccino set makes little or no froth.
The auto-cappuccino set does not take in milk. | Check that the accessory is correctly attached to the appliance, remove it then replace it.
Check that the flexible tube is not obstructed or pierced and that it is correctly attached to the accessory so as to make it airtight. Rinse and clean the accessory (refer to the “Auto-cappuccino accessory” chapter). |
| PROBLEM MALFUNCTION | CORRECTIVE ACTION |
| There is water underneath the appliance. | Before removing the water tank, wait for 15 seconds after the coffee has finished flowing so that the appli-ance finishes its cycle properly.
Check that the drip tray is correctly positioned on the appliance; it should always be in place, even when the appliance is not in use.
Check that the drip tray is not full.
The drip tray should not be removed during a cycle.
Clean the tank and its connection regularly to avoid the build up of scale, which can cause leaks. |
| After emptying the coffee grounds collector, the warning message is still displayed on the screen. | Remove the coffee grounds collector and ensure it is empty and clean. Wait at least 6 seconds before replac-ing, and ensure it is correctly installed. |
| The coffee dispenses too slowly. | Turn the coffee fineness dial to the right to make the grounds courser (this could also depend on the type of coffee used).
Run one or several rinsing cycles.
Change the Claris Aqua Filter System cartridge (see “Installing the filter”). |
| The water/steam is not dispensed normally from the steam nozzle. | At the beginning or end of making a drink, the steam nozzle may drip slightly. |
| The coffee fineness dial is difficult to turn. | Only change the grinder setting when it is running. |
| The espresso or coffee is not hot enough. | Change the coffee temperature setting. Warm the cup by rinsing it with hot water before making the drink. |
| The coffee is too lightly coloured or too weak. | Avoid using oily, caramelised or flavoured coffee. Check that the coffee bean container has coffee in it and that it is dispensing correctly.
Decrease the drink volume, increase the drink strength.
Turn the coffee fineness dial to the left to make the grounds finer.
Make the drink in two cycles by using the 2 cups func-tion. |
| The appliance is not producing coffee. | A problem has been detected during preparation of the drink.
The appliance has restarted automatically and is ready for a new cycle. |
| Why can I not start the descaling or cleaning program? Why does my appliance not request to be descaled or cleaned? | The appliance only requests to be cleaned once it has made several types of coffee. The appliance only requests a descaling cycle once it has made a certain number of drinks using steam. |
| A power failure occurs during a cycle. | The appliance is automatically restarted when power is switched back on. |
| Coffee flows behind the coffee nozzles. | Pour cold or room-temperature water into the tank. Re-duce the temperature level. |
| The appliance is working but no liquid comes out. | Check that the water tank is in the correct position and that the cord is not jammed between the appliance and the water tank. |
| Ground coffee is in the drip tray. | Yes, to stay clean the appliance clears ground coffee which has fallen out of the percolation tank. |
Here are some recipes you can make using your Espresseria Automatic:
Cappuccino
For a cappuccino in the rules of the art, the ideal proportions are as follows: 1/3 hot milk, 1/3 coffee, 1/3 milk froth.
Caffe Latte
To make coffee with milk, also often called Latte Macchiato, the proportions are as follows: 3/5 hot milk, 1/5 coffee, 1/5 milk froth.
- For these milk-based preparations, it is best to use cold skimmed milk straight from the refrigerator (ideally between 6 and 8^ C).
- To finish off, you can sprinkle with cocoa.
Café Crème
- Prepare a conventional espresso in a large cup.
- Add a little cream to get a café crème.
Café corretto*
Prepare a cup of espresso as usual.
Then add 1/4 or 1/2 of a liqueur glass of Cognac to taste.
- You can also use anisette, brandy, Sambuca, Kirsch or Cointreau.
- There are many other ways to give some punch to your espresso.
- Just use your imagination.
Coffee liqueur*
Mix 3 cups of espresso, 250g of brown sugar candy and 1/2 litre of Cognac or Kirsch in an empty 0.75 litre bottle.
Leave the mixture to macerate for at least 2 weeks.
- You will obtain a delicious liqueur. A real treat for coffee lovers
Italian style iced coffee
4 scoops of vanilla ice-cream, 2 cups of espresso with sugar to taste, 1/8 I milk, fresh cream, grated chocolate.
- Mix the cold espresso with the milk.
- Serve the scoops of ice-cream into the glasses, pour the coffee onto them and decorate with fresh cream and grated chocolate.
Café à la frisonne*
Add a small glass of rum to a cup of sweetened espresso.
Decorate with a good layer of fresh cream and serve.
Flambéed espresso*
2 cups of espresso, 2 small glasses of Cognac, 2 teaspoons of brown sugar, fresh cream.
- Pour the Cognac into heat-resistant glasses, heat and light.
- Add the sugar, mix, pour in the coffee and decorate with fresh cream.
Espresso Parfait*
2 cups of espresso, 6 egg yolks, 200g sugar, 1/8 litre of sweetened fresh cream, 1 small glass of orange liqueur.
- Beat the egg yolks with the sugar until it forms a thick, frothy mass.
- Add the cold espresso and the orange liqueur.
- Then mix in the whipped fresh cream.
- Pour the mix into saucer champagne glasses or ordinary.
- Put the champagne glasses in the freezer.
(∵ Remember, over-indulgence in alcohol is bad for the health.)
ESPRESSO EN KOFFIE MAKEN

DE MACHINE IS UITSLUITEND GESCHIKT OM KOFFIE TE MAKEN MET KOFFFIEBONEN.
Eikovoypμμata kai TpoeiδoToiniKa Θμata
Aoeiaote to oullknt uioalemuatw kae kai to bioka oulloync otayovw: n auxvia 0a meivei avumuevn av dev eapupoei oot a oulkntnc utloalemuatuv kaep n av etanatoTOnetne tOnt eon tou piv Tepaoou 4 6eutepeTTta.
T Eμiatofoeio vepou
CLEAN EKTEAeTe Kαθaipou
CALC EKTELEOTe apaalatwo
CLEAN PpoBcIte OChTky
CALC IpoBedeTe OChTky OT HaKnnn
PENEI PEPBbIM IcNoJIb3OBAHnEM
IoprotoBka npnbopa
I3BnKeNte pe3epByap IIN BObI HAnoHnHTe erO - pnc.1 n 2.
YctaHOBInTe ero o6paTHo Ha MeCTO, TBePdo Haxab Bn3 3aKpbIb KpbIIkU - pnc.3.
OTkpOte KpbIshky KOHTeHepa IJRA KoPe B 3ephax. HacbInbTe KoPe - pnc.4.
3aKpOHTe KpbIuKy KOHTeHepa DnA KoPe B 3epHaX.

He 3aonHne KOnTeHep RopueB OBoD, MONOkom IInI NIO6o Dpyro JxKdoctb. Ecn np BNIOUeHNn HApBopa pe3epByap n BoiO tOcyTCTByet nn 3aONnHEn He Do KOuHa, aRopntc INndkatop u nprirotobnHeN CnpeCoo IIn Koede cTaHed BEmeHNO HEBO3MOXHO.

HKNKOrDA HE HAcbIaIe MOlOtBIM KOΦE B KOHTeHEP DJI KOFe B 3EPHX.
B30T KOFEMAHNE HE KEPOMEHAEYETCA NCOJI3OBAHT MACNAHCTBE, KAPAMENI3IOPAOBAHBE IIN apOMAITN3IOPAOBAHBE KOFENHE 3ePHa. IVX NCOJI3OBAHYE MOKET PNPBECTN K NPONOME KNP6OBA
Yb6eTteB, TcB O KHTeHHepe IJy KoFe B 3epHax Het NocToPOHHN pIeMToB, TaKx KaK MeIKe MamyuKm, COpErKaIuEca B KoFeHbIX 3epHax. RaapTnHa He pacnPoCTpaHreTc H Na NobpeXdEHN, Bb3BaHbIe INHOndbIMu YactTuAMn, PONaBWMn B KOHTeHep.
He haJIInBaIte BODy B KOHTeHep DJIa KoPe B 3epHaX.
Bo n36ekaHne oXorOB i npoteKaHnB OdbI Ha paOchYIO NOBepxHocTb He 3a6bIbAte ONopoxKHe TIOIDOn IINc6opa Kaenb.
Cneute 3a Tem, yTo6bI pe3epByap IJRA BObl 6bl JNCTbIM.
Lukn HnunnaJn3aun - oouar nnTeJbHocTb: np6Jn3nteJbHO 3 MnHytB
BknHouTe npmbop, haxab Ha knlabuSy ① -pnc.5. INndkaTop CBeNTcH enpepbIBHO.
YcTaHOBnTe KOHTeHep EMMKoCTbU MmHMym O,6 JnoD cOnna Dnra KoFe n npa
HAnKmte KOnkIy 6, yctpoCTBO HauHTEN HINHINHINHAZIMnI pynpbIKn CnCTEMI npa nCnCTEMB Koede. HndkatoMgAe.
Lizk3aBepweH, KOrda HnDnKaTOp CBeTntcH enpepbIBHO. MaunHa DoCTynHa dIy nprirotOBneHra Baunx peeTTOB.

KeNATEHbNO BbIOnNHtB OdHy Nn HcckObnkPnOmbbOK 2 CnCTeM B cnyae,ecnPi np6Op He nCNOb3OBaNCra H apotjxHeHH NcckoBKnX dHe. KaJdb pa3, KOrDa bY bNoKInOuAe Te pnp6op K cETn, MaunHa BblONHRe TcNKn HnuaJIa3aUan.
IoiROTOBka KOFeMOJKN
BbMoketo BbIbapKpOeT KoPe,peyIpyoToHKOtB NOMOA 3epen KoPe. CEm 6oJee MenIKN NOMON yCTAHOBEN Ha KOFeOMKe, tem Kpenue I maryue 6ydt KoPe. YcTaHOBnTE TpeSyemyU cTeENb NOMOA NOBOTOM peryIaTopa ToHOKOnT NOMOA. NOpOT BBeO -6ooie MenKIM NOMON. NOpOT BnPaBo -6ooJe KpyINb NOMON.

PERYUNPOBKYMOXHO IPOUN3BOINTb TOJbKO BO BPEM NOMOJA.
HnKoIa He NbTaIeTcB N3MeHnTb NIOXKeHne peRyIaTOpA TOHKOCTN NOMOJa PnIMHeHHeM CnJIbI.
ПРИГOTOBЛЕNHUE ЗСПЕCCО И KOФЕ

BAU INPUEOP PA3PAEOTAH NCKJIIOUYTEJIbHO IINI NCIOJIb3OBAHNA KOΦE B 3EPHAX.
Pn nepBOM npriROTOBHeHNI KoFe nocne npOBeDEHnO uNCTKN IIN yUcTpaHEHnA hKInn, a TAKKe Nocne DInTeNBHO rnocto pnpbopa n3 napOBOro conna BbIXODNT HEMHO rnapu nropauey BDoI (ABTomatueckn KOHTpONbHbN uNK).
Ecnn BbIXoN Kofoy UcTaHOBJIeN CnUKOM BbICOKIM OTHOCHTeIbHO pa3Mepa BaIHX YaIeK, BO3HnKaET pIck pa3- 6pbI3rBbAHn IINI NOLYeHnOxOROB.
PpmeaHne.
KoJIInHeCTBO BOdI JIa OJHOro 3cPpecco coCTabJraeT oT 30 do 70 mI.
KoJIInueCTBO BOdI JIa OJHOro KoOpe coCTabIaTe 80-220 mI.
3anyc npnroTOBneHna 3cnpecco nIkn Kofoe
BkIIOUHTe npI6Op B po3eTKy.
Hakmnte KhoNky . Hndnkatop Mnaet BO BpeM npeDbapntbHoro HarpeBa MaunHbl.
INHnKaTOp CBETNTC HENpepbBHO.
IocTabbTe yauKy noB bInyckHbte OTBepCTnA nla KoFe. bMOKeTe ONyCTNTb NIN noDnHrTB BblNyCKHbte OTBepCTnA nla KoFe no pa3mepy uauKu - Puc.7.
Haxmnte KhoNkU pDnIy noIyueHnKpeNko 3cnpecco nIi KNoKy DnIy noIyueHnCTaHdApTHOrO 3cnpecco -
Pnc.8.
BbBCerda moKTe HaCTpOntb HxHbI OObem BoDbI - Pnc. 9.
YTo6bI OCTaHOBNTb 3aONJIHeHne YauKn, Bbl MoKeTe IIOBO HaxaTb Ha OJHy N KHOJOK 日 ININ, IIOBO NOBepHyTB Bpa- uOuIcNcpeyIaTOp B nOJIOKeHne MNHMMyMa.

NtBIOy Koepe yBlaJxHReTcne HeobIbIMKoINueCTBOMrOpeey BODbl NocLe OOKHaHnna 4a3bl NOMona.CnycTeckOBko CekyHd HauNaeTECnpoUeCCFmInbTaupuH. HauNae C onpeDeneHHoro KOnueCTBa KoPe B ChuKe, MblETyEM Bam daepEnIbnprrTOBNEHe Na Dba ZkKnA, TTo6bI nOnyuHTb Kpeknik KoPe. HanpImep, 2 paa 701, TTo6bI nOnyuHTb ChaKy c 140 mN KoPe.
Функця《2Чашки》
YcTpoIcTBo N03BOJareT npriTOBnTb 2 qaIKN KoPe IIN 3cnpecco.
Haxmnte KhONky INDnKATOp MnaT BO BpeMa npeBaTbHO HarpeBa MaunHbI
HdNKaTop CBETNTc HnpepbIBHO.
IocTAbBe TE DBe YauKn IOJ OTBepCTN IJIaNoaH N KoFe. Bbl MoKTe OncyTb IIIN IIOHrTB BblYcKHbIE OTBepCTN dJIa KoPe no pa3Mepy uauKn - Pnc.10.
Ibawjblb6bIcTpo HaxmTe KhoNky EINnno CBOemy Bb6opy. IBoHoe MepuaHne INHdkatopa COO6aet, YTO BbB bIbpaJIN DBe ChaUKN KoPe.

Pn6op aBtOMaTueckn BbINOJIHNT 2 NOJbIX ZIKNa pnproTOBJIeHn KoPe.
Будъoctopokнbl, He y6upaTte yaSkn nocne nepBoro uKna
EcnBb Haxmae Tchayla Ha KhoNky P, a 3aTeMa HkOng Ky (HnHaobopot), nocJeDHee Haxatne He yHTbBa-ETcR.
ПИГOTOBJIЕНС ПAPOM
Iap nOnbIyctTg DnONyHEnNtBnI3 MOnoka pRnPnroTOBHeHnKanyuHNO nnIaTte, a TAKKE dIe IIOdOrpeBa KJNDKoCTei. Plockbky npOn3BODCTBOnapa tpe6ybeTBoeJeBICOKoTeMnepaTybl, cHem npriToOBHeHne 3cnpccco, KOfepMaunHa npOn3BODNT DoonNHnTeBhNbl 3tAn npedBaMnEHorO npOrpReBaHnD IpnrTOBHeHne npa.
BkIIOUHTe npn60b p03eTKy.
HaxmTe KhONky INDnKATOp Mnraet BO BpeMa IpeDbapnteHoro HarpeBa MaunHbI.
INHnKaTOpCBETNCr HnpepbIBHO.
HakmTe KhoNky - Pnc.11
INHdkaTop MNaet BO Bpem npedBapnteHoro HarpeBa.
Korda 3an npedabapntelbHoro harpeba 3abepehen, HndkaTOp CBETNTc HnpepbBHO N Bbl MoKeTe Haatb noDToBky npa, Haxab CHOBA Ha KHONKY
HaKMTe eue pa3 Ha KhoNky , UTObI OCTaHOBnTb ZIKJ.
Maunha Bo3BpaaetcB nCxOndHoe noIooKeHne, ecn peryIaTOp npap He BkIIOaTeCBA TeHeHne 2 MmH.

OctaHOBka zukna He npoCxOJNT MRHOBeHHO.
Molouhna TeHa
Mbl peKOMeHnyEM NcONb3OBAtB HeNaBHO OTKnbpToe NaCTepn3OBAHHoe INJyNbTpAnactepn3OBAHHoe MONOKo. Cblpoe MOnoko He oBeCneuHbAeT ONtImaIbHbIe pe3ynbTaBl.
PomeCTIte napoBoe cOJIIO B MONOKO - Pnc. 12.
3aynctnte yhkuu npirotoBneHna papa, kak onncaHO bpa3dene BbIe.
Korda obpa3yetyra DOCTaTOUHoe KOJIueCTBO NeHbI - Pnc. 13 - CHOBa HAKMITE KHONky Dnla OCTaHOBKn UIKJa.
UTo6bOuOCTnTb CneBbMOJOKa C CONIIa IINa IAPA, NOCTABbTe NOI Hero EMKOCTb N CHOBa 3aNcYCTnTe nprirotobHeHne c nCOnb3oBaHmE m npa (okono 10 cekynd).
Дяболесгуьбоковocи connoлдяпа можногсны.Мотеше огшков boDE c HeboBshmKONHuecTBM Heaobp3MBOFO HOMOUeOcreCTBA nDIONOCbI.3aTeM cNoONCHNEu BbClyWne -Pnc.14.IpeKJde HcYCTAHOBITb COnHOHaMeTO y6BeNTbcN TO,чTo OTBepctnaIg 3aObaOpBaO3dyxaHe zakynopebhOcTaKaMMN0kA.EcInNe HeoXdmo,OChNTHe erO cNOMOuBIO INOTKIN,KOTOPARBXOHTB KOMPINEKT-Pnc.15.
He moTe hacaKy dIpa napa B nocydomooeHoi MaunHe.
UTo6bIOCTaHOBnTbФyHKcIIOnapa,IpOcTO HaxMITEJIIObYIO KHOJKy.
Ecnn conno 3acopeHo, ouhnte erc nomoubu IROJKN, BXOJaueB KOMnneKT.
MaKcImaIbHa npoDOnJxNteBHoCTb o6pa3OBaHnna npa 3a OdIN cUKN coCTabJIeT He 6oJIee 2 MInHT.

Tocne nCnOlb3OBaHna FyHKn npapa cOnIIO MOKet 6bITb rOpRyHM, Mbl COBetyem Bam NIOOxdaTb HeCKoJIbKO MNHyT, npexJe Ym IpOBODHT KaKHe-JINBO MaHNUYJNc HnM.
AByokanyuHaTop XS 6000 (npoJaTcra OTeJbHo)
3T0T abtokanyuHATOp obJrcaet nprirotobIeHne kanyuHIO nnI natae - Puc. 16. Coedinnte ero deTAMm Mekdy coBoi. YbeintcB, yTO Tpyka He nepekpyeHa npi coxpanehn yDObHorO noLoKeHHa KHONIK.
Pcne 3nTnKpIbIKnCocda 3aONJHnTe ERO NOKOM - Pnc.17 n NOMeCTIne YauKu IIN CTAKAN NOI CONNIO ABTOKnyHnatopa - Pnc.18. UcAHOBnTE cneuaJIbHOe CONNO BNOXKeHNE IIN pRIOTOBNeHnK aKunHNO IIN NaTte - Pnc.19. IpaOJI nap, KaT0 yka3aHO b Tnabe "PnroTOBHeNE CnapOM".
Kak TOnbKO NpOBBtCMA NOUHnA NeHa, NoCTaBBte YaSHKy NOI BbInyCKHoe OTBepCTme KoFe n 3aNcTnTe ZnKn KoFe - Pnc.20.
IITTO TOTO6bI 3E6KAtBa 3acbIXaHINMA ONOka HA bTOKAYHnHATOp, HeOBXMOIO TUaTeBHO eO ONUIaTb. PEKOMEHyETcMaTb erO cpa3y C nOMoCbU 3aNYCa K UCNLa C nONLb3OBaHem Napa r NONHbM BauchKO BODJI DNI OUNSeHIN CoNla BHTPN. IIN 3tNx CEJIeN MOxH TOAKCe NcONLb3OBaT BxJIMKoe MOHooee cpeCTBO KRUPS.
YXOD 3A PIPNEGOPOM
OnycToWnte KOHTeHep dIy OTPa6OtaHHoro KoPe I NpDoHa dIy c6opa Kaenb.
EcnnnHndnkatop Muraet
I3BJIeKInTe,OnycTooWInTe n OOnCTInTe c6OpHNK KoPeHNoI rUzNi - Pnc.21
IocTAbbTe Ha MeCTO KOHTeHep dIy OTOpaBToHHoro KoFe. - pnc.22.
I3BnKeHte,ONOPOXHNTe H ONUCTHTe NODOH dIa c6opa KaneJb-Pnc.23
IoiDIOH dIy c6bopa kaneNB Imeet nonnabkn, KOtOpBie CnHaN3npUOT O HeoXoIMOCn OnopOxHeHn IooDHa.
YCTAHOBNTE BCE 3JEMENTbHa MeCTO.
KaK TOnbKO Bbl N3BneHcTe KOJIeKTop KOeHoi ryU, Bbl DOnJHbI erO nonHOCTbIO ONOPOXHITb, YTO6bl B daJIbHeMn36exaTb nepenONHeHn.

HnDnKaTOp. npOdoJIkaeT ropeTb, ecn C6opNk KoFeHOn rUyIu He BCTaBHeN nIu yTaHOBHeN HnPaBnJbHo, a TAKKe ECJn OH yCTaHOBJeH Ha MecTo MeHee YEm 3a 4 CeKyHDbI.
Korda nHnIkaTOp ropnt nIIMMraet, nprirotobHeHne 3cnpceco nIIN KoPe HeBO3MOxHO. C6opHnK paccHTaH ha c6bp KoeHnO rUeN 9 uaeK KoPe.
Ppmbibkacntem
IocTyN K 3TmDyBmФyHKzIM MOKHO NOpUHTb B IIO6oe BpeM, 3a NCKIIOHcHEm ClyuAeB, KOrJa MaUNHa Tpe6yeT o6CnykBaHnA 'CLEAN' W/nn 'CALC'.
PpombyBka cnCTembl npnroTOBneHn Kofoe:
YCTAHOBITe EMKOCTB NOI CONJIO BIXOda KOfe. BbICTPO HAKMITE KONKY . - Pnc. 6ДЯ 3aNYcKa UKNJa npOMbIKN CNTEMbl KoFe, KOTOpB I ABTOMATUHeCKN OCTAHOBITc NocJIpe PACXoDA 40 Mn BObl.
PombyBka napoBoN CnCTembl:
IocTabe TcNIOI cONlOM dIyBbInyCa npa. 3aTeM haxMtne uEpyKbAte KhoNky I da 3anycKaunklapnpmbKn npabOBn CNTeMb, KOtobn ABToMaTuCeckn OCTaHOBITC nOcne paXoDa 300 mN BObl.
ПрорразмmaЧистки,3 pa3aВ rod (noJIHЯДЛNTeIbHOCtь:прИбЛИЗИТeIbHo 13 mHyT)
По ГиенческIM COOBpaKeHЯн Ддг COxpaHЯн HANJyUWeR Bkyca N apOMaTа коpe peKoMeHnyETcR OuIaTb CnCTeMy npriroTOBHeHЯ KOpe, KOrda KoPemAunHa BbIaDcT 3anPoc (pnp6n3ntbHo 3 pa3aВ roD).
3anycntte nporpaMMy ydaeneHn haKnn, haxab Ha KhoNky . Hndnkatop 'CALC' cBeNTcHnepepbBHO, a HndNKaTOpbl O MMRaHOT.
CHIMITE N OUHCTNTE NODOH DnA KANEJIb.
PomeCTIe EMKoCTb ObeMOM 0,6 IInTpa NOB BbIXOdbI dNk KoPe, a TaKke NOD cOnNo npa - Pnc.24.
Onopoxhntpe3epByap n 3anOpHnTe ero TeIIOB BOOJ DO OTMeTKn 'CALC' - Pnc. 33.
Pactbopnte naketik cpeictba dnyuanaenna hakinn Krups (40 r) F054 B pe3epByape - Pnc. 33.
3anonHnTe pe3epByap INaBbI. HndkaTOp rachet.
Haxmte KhONky nocIe BbINonHeHnBcex Opeaun.
PepBbI 3Tan (OKOIO 8 MmH) 3anyckaetc.
LuknydaJIeHnHaKINb6yIeT BbInONHeNAbTOMaTUnCeKn.
B KOHcE 3TOrO 3TaNa 3ByKOBoN cHnA p3dAeTcR kKaJdbIe 10 cekyH, a HnDnKaTop Mmraet.
CneIte nCIOJIb3OBAHHyU BODy I3 EMKOCTn I NOCTaBBTe ee Ha MeCTO.
OnopoknTe n npomOte pe3epByap dIy BObl - Pnc.34.
HanoJIHnTe pe3epByap BOIoN I NOCTaBte erO Ha MeCTo. INdIkaTOp L rachET.
CHOBA HAXMNTe KHONky , YTO6bl 3anyCTnTB BTOPOJ 3tan. 3BYKOBOI CNrHaN npepbBaetcra.
Btropo3tan (okoJIO 6 mH.) 3anyckaetc.
PpOpaMa npoJOnJaetc. OHa no3BoJnE T npOMbIb yCTpoJcTBO n ycTpaHInTb octaTKn cpeiCTBa ydaJIeHnHaKINN.
B KOHcE 3TOrO 3Tana 3ByKOBoN CnHnPa3DaeTc KaKdIbe 10 cekyHd.
CHIMITE EMKOCTB, CJIeTe NcNOJb3OBaHHyO BODY INoCTaBBTe EMKOCTb Ha MeCTO.
CHOBA HAXMNTe KONky , yTO6bl 3anyctntb nocneHn 3tan. 3ByKOBoi CNrHan npepbIbaeTcra
PocneHn 3Tan (OKOJ6 MN.) 3anyckaetc.
Iporpamma npoDOnkaaetc. OHa no3BolnT ydaJIITb nocneHne YacTeCbI cpeCTBa ydaJIeHnaHKINN
Lukn Ounctkn 3aBepweH, HndkaTop 'CALC' rachet.
HanoJIHnItepe3epByapBODoI.
UcTPOINCTBO rOToBO K pa6Ote.
EcnBpe3epByape HeIOCTaTOUHO BObI, npi6op OIOBecTNT Bac 03OM C IMOUbH INDnKaTopa
Iobabte doctatoHoe KOJIueCTBO BObl Bpe3epByap, uKJI ydaenHaKINn 6yJeT ABtOMaTHeCKn npOdoJXkaTbca.

Ecnbl OTKJIOHNTyeCTBOOTPO3ETKBNBVPmrydaneHnHAKINHAKMETe KONkyIINBL CNYae c6oBITaHnnporpamMa ydaneHnHAKINbEydtBbInOnHeHa ccamoro hauJa. B 3tOM cnyae npyro naketnk cpectBa dnydaneHnHAKINHHe Tpe6byc. BbInOpHNTE nonhbluNKl ydaneHnHAKINN, YTObbl oBeceNeHTb Hndnexaun yxOd 3a MaunHoH.
Lukn ydaJIeHnHaKINI RAJIaTeTcN IpepbIbIcTBIM, BO BpMraEro BblONHeHn He CneDyET NODCTABJr tyKn noD BbIXOdbI dIg BoDbI 'E' n W'.
PporpamMa dIInTeJbHOIN pOMbIBKN - 06aJa dIInTeJbHOCTB: npn6JIIn3HTeJbHO 2 MmHyTbI
Пибор п徴уп徴итВасо Heo6xOДИМОCTnПрobeDEHЯДПITeIbHoi ONUCTKIMIRaHMeCBeTObbIX INHdNkaTOPOB «ОчNTKa»‘CLEAN'И«HakInb»CALC'.
CHIMNTE,3aONHnTe nIOCTabBe Ha MeCTo pe3epByap.
YctaHOBNTe IOI cOnIO dJIra napa emKoCTb obbeMOM He MeHee 0,6 I.
3aynctntpe nporpammy dInntelbHoro npombHaHnna, Haxab Ha KhoNky . INdNKatOpby 'CLEAN' n 'CALC' cbetTcH He- npepbIBHO, a INdNKatOp NaHnHaET MmTaTb.
KordaДлntьhoe npombIbAHne 3aBepseHo, INdNKaTOpbl 'CLEAN'и'CALC' rachyT, INdNKaTOp 念 NaHHaET CBe- TnTbCer HeNpepbIBHO.
YcTpoIcTBo roTOBO K pa6Ote.
Maunha MoKeT npednOxNtB BamOnyctOuINb cOpHKn KoPeHOnr yu.
ДPyгпЕ ΦУнКцИN
BbIKJIouHHe yCTpoNCTBa
Bb MoKTe B IIO6O MOMENT ppeBaTb pa60Tu yCTpOCTBa. Ppi BbIKIOHeHn pa3aIeTcB IOHn 3ByKOBo CINHAn, BCE KpaChbIE HmDkNAtOpbI MfAoiOT OINH 3a DpyrIM. YCTpOCTBO pInHApNo 3aPoc N npOn3BeTeMakCmMaJIbHO 6bIcTpyo OCTAHOBKY.
YCTAHOBKA Φильтуюцero Злем enta - ошая ДЛNTeьнocтб: npi6JIH3nTeJbHo 2 MInHytbl
Для ONТМИЗАЦИ BKYca nprirotabINBaEMORO KoFe n OJIOROBEHOCHT npri6bopa peKOMeHdyEM BAM NcIOnIb30BaTbФиьтдЯ BObli Claris - Aqua Filter System, KOTOBiy npoJaETCk Akceccsyap.
Puc. 30: MexAHm3M, IO3BOJIAOuIcI 3aIINCaTb B IaMraTb MecrU yCTaHOBKn FInIbTp a N MeCz ero IpeDnolaraeMOI 3aMeHbI (MaKcIMyM Uepe3 2 MeCzua).
YctaHObKaΦnJIbTpBa npiIbOp:OTBnHTnTEΦnJIbTpHa nIhe pe3epByapa.-Pnc.31.
IocTabeEMKoCTb 0,6 n oD cOnJOM dJa BbInycka npa.
Haxmnte u ydepkunbaite KhoNky B TeueHne 3 cekyHd (Kpome clyaeb, KOrda mauHa Tpe6yet o6cnykunbaHn
'CLEAN' n/nnn 'CALC'). INHdikatop Mmraet.
Korda yctahOBka qnIbtpyUoIe 3JeMeHt a3aBepSeHa, INdikatop 日 NaHaeT CBeTbC HnepepbIBHO.
YcTPOIcTBo roTOBO K paBote.
Kaptrudj Klaris Heo6xodmo 3aemrTb Cheepz np6bnntenbHO KaJdble 50 nITPOB BObln kak MNHmym KaJdble Dba meca. B cIyae IcnoIb3OBAHna KAPTRUDka Claris - Aqua Filter System yctahOBITE ypOBeH jkceKTOKTN BObl 0.
I3MeHeHne TeMnepaTpybI KoPe.
3aBODcKa HAcTpoiKa yCTpoiCTBa -ypoBeHb 2.
IopKnIOHHTe yCTPOINCTBO K cETN, HO He BKNIOUaIte erO.
Haxmnte OndHOBpeMeHHo Ha KOnKn n Ep—Pnc.27.
INdkaTop 6ydt Mngatb B TeheHne BCero npocecca hactpoKn.
IpebeDte NOBOpOTHyO pyuKy B IonoXKeHne 20 Mn IJn I3MeHEnr TeMnpaTybI KoFe - Pnc. 28.
Haxmnte Ha KhoNky 日 yBeIyHeHn3HaeyHn nn Ha KhoNky 日 yMeHbWeHn-Pnc. 32.
Bb6op ypoBnA TeMnepatypkofoe. RopT 1 nHnDnKaTOp = TEmpepatya 1, ropT 2 nHnDnKaTopa = TEmpepatya 2, ropT 3 nHnDnKaTopa = TEmpepatya 3 (camaBbICOKaTeMnepatya).
I3MeHeHHe XeCTKoCTN BObl.
3aBODcKaHacTpoKa yctpoiCTBa -yPoBeNb jxectKoCTn 4.
Peped npBbIM npMMEHEM EYCTPOICTBA ININ B CNYUae IM3MEHENJX JECTKOCTN BObl HEOBXOIMo ADANTPOBAt bpa60by YCTPOICTBA NOI ONPEHENJEIO XEETKOCTB BObl. YTObI y3HaTb CTeNEH JECTKOTCN BObl, CneyET OBPaNTbCS B MeCTHYO BODOSCHXOAIQUOOPRANHAZAUIO.
IopKnIOHHTe yCTPOINCTBO K cETN, HO He BKNIOUaIte erO.
Haxmnte OndHOBpeMeHHo Ha KHONKn n Ep-Pnc.27.
INHdkaTop 6ydt Mngatb B Tehe Hne BCero npocecca HaCTpoKm.
IpebeDnte noBopOTHyU pyKU B noJIOKeHHe 120 Mn dNra n3MeHHe JxecTKoCTN BObl - Pnc. 28.
Haxmnte Ha KhONky ^口 dny yBeIyHeHn 3HaYeHn nHa KhONky ^口 dny yMeHbSeHn — Pnc. 32.
Bb6epnte cTeENb JxecTkoTH INcNoIb3yEmoB BoDJI: He ropNT HN OdH NnHnDnKATOp = OeHb MmKra, ropNT 1 nHnDnKATOp = MMRkA, ropNT 2 nHnDnKATOp = yMepeHHo JxcTka, ropT 3 nHnDnKATOp = JxcTka, ropT 4 nHnDnKATOp = OeHb XecTka - Pnc. 29.
IopKnIOHHTe yCTPOINCTBO K cETN, HO He BKNIOUaIte erO.
Haxmnte OndHOBpeMeHHo Ha KHONKn n Ep-Pnc.27.
INHdkaTop 6ydt Mngatb B Tehe Hne BCero npocecca HaCTpoKm.
IpebeDte noBopOTHyO pyKy B noJIOKeHne 220 Ml dJa HAcTpoKn BpeMeHN aBtOMaTnueeCKOr OTKnUoHEnr
Pnc.28.
Hakmte Ha KhONky pDnYBENueHn3HaueHn nn Ha KhONky DnYyMeHbSeHn — Pnc. 32.
Bb6epnte Tpe6yemoe Bpema: Rot 1 u, ropat 2 uHdkaTopa = 2 u, ropat 3 uHdkaTopa = 3 u, ropat
4 INHINKATOPa = 4 u - Pnc. 29.
HENCPABHOCTN IN DEINCTBNAI NO INX YCTPAHEHIO
Ecnn kakaar-ni6o n3 henoiaok, nepeuiclenhhbix B tabniue, coxpanaetc, obaatntecb b cepbnchn ceHtp KRUPS.
Ha 2 HeJeIIOCTaBbTe CMEcb.
BbI noJyUHTe OTnUHbI NIKeR, KOtOpb InpExE Bcero OueHr TIObTeN KoPe.
KoPe rIae no-ntaJIbHcN
Bam notpebyetc: 4 7apika BaHnIbHoro MOpoxeHoro, 2 7aXkn XoIoDHorO cnaKoro 3cnpecco, 1/8 m Monoka, B36ntbte CImBKn, TeptbI shokona.
Cmeuatae XOJIOHbI 3cnpcecco c MOJIOKOM.
PacnpedeHnTe MOpoxeHoe nO CTaKaHaM, HaneIte KoPe nYkpaCtBe B36NtBIMn CInBkAMn I TepTbIM OOKoJaDom.
KoPe no-Фpn3kn*
IobabbTe pOMky pomA B uakky cJaKoro 3cnpecco.
YkpacbTe TOnCTbIM CNOEM B36ntbIX CINBOK INOaIte Ha CToJ.
Hanobhitbpe3epByapdIBAOIN

PerylloBaHHaCTyneHnepemEnHHKaBn
CLEANIpoBoeiItbOuHueHHA

CtAnapTha KaBa

Miuna KaBa
CALCBuKoHaTe BuJaIeHnHaKaIpy

Khonnka napi

CLEAN + CALC BnKoHaIe TcIKJI TpINBaJIOI pOMMBaHH

PommbaHHy/O6cJyRObyBaHHH
ПИГOTУBAHня HANOIB
IPEEDEPLIMMBKOPNCAHH
PiIroTOBka npnlaNy
BnMItb pe3epByap dIy BOni HAnOBHITb Ioro - Man.1 i 2.
IocTaBTe NOro Ha MicSe, 3akpiniTb i 3akpnTe KpiuKy - Man. 3
BiKpnTe KpnKy KOnteHepa IJn KaBn B 3ephax. HacnPte Kaby - Man.4.
3aKpIte KpUkky KOHTeHepa dIy KaBv B 3ephax.
3a6bopnoeTb8c3aJIbAtnBpe3epByaprapyBoDy,MOKOQHbSyb-kyiHsyPiHy.JaKIO niJac yBIMKHeHHNpIiIaPype3epByapIgBOnBIDcyTHII aBOI BIDCyTHII aBO 3aOBHeHH He Do KINzA,3aOpNTbC iHNkKaTop i npIroTyBaHHecnPecO aBO KaB CTaHE TImHuACOBO HEMoXJIbIM.

3A6BOPOHЯCTbC3ACINATM MEJIENHY KABY B JOTOK DJIY KABN.
He peKoMeHEnyEeTbcra BnKOpNcTObvBAtu y npUaDi MaCJIaHnCTi, KApAmeJI3ObaHi a6o apOMaTI3ObaHi 3epHa KaBn. LcIe Bn 3epeH MoKe TPOUkODHTn npUaI.
IpekoHaiTece, uo 1 pe3epBvap InraKABN He nOtpanHIN CTOpOHNI pEIMeTH, 30kPema Dp6HI KAMHui, uo MOxUTb 3hAXODITNCRA KABONIX 3epHax. Ii rapaHTTI npINHHETcR, AkuIO NsIKoDKJEHHa pe3epBvap IA naKABN cPnUHeNO TnpaIIHNHAM DO hBOrTO CTOPOHHX INpEIMeTIB.
3a6b0pOHaTeBc 3aJIbAtn Body B pe3epByap IJI KABOBx 3epeH.
Ioo 3ano6iTn 3abpydneHHIO pObooOIO nobepxHt Ta pu3NkU OTPMaHnO nIKIB rapaOIO BDOIO, IO MOKe NiDTikATn 3 npuIaNy, He 3abvBaTe BCTaHOBNIbAtn niDOn dIra 3bOpY Kpanenb.
KoHTpOJIouIte YnCTOTy pe3epByapa IJIA BOIN.
Lizknihiiziai3aui-3araJIbHa TpIbAlicTb: npI6Jn3HO 3 XBUNH
YbIMKHiTb npnIaI, HATNCHByWn Ha KnaBiIy ① - Man.5. IHdNkatop ① 6yde CbITnTcNc 6e3nepepbHO.
IocTabe EMHICTb MictKicTIO npHaimMHI 0,6 nITpa niID conna dIy BHXOy KabN Ta napn.
HaTnCHtB KhONky - Man. 6, npncpii noHue zKKn iHuiian3auii dIy npommbaHHc nCTeMn noaHi npu Ta CNTeMn dI py npriotybaHHa KabN. IHnKATop oHnHa e 6nIMatN.
Lckn 3aebpuTbcra, kOJI nHdkatop 1 noUHe cBITNTscra 6e3nepepbHO. KabOMaunHa doctynHa dIra npiroToBaHHa Baux pecentrib.
OnonocnItb obuBti ciTcEmi kIbka pa3iB, kAIO npnaIaD IOBO He BkOpncTOByBaBC. KokeH pa3, koni BN iNkIouaTe npnaIaDo mepeKi, maunHa BkOHy e NkKn iNciianiaui.
Пиготовka MЛИннka
Bn MaTe 3Mory HanaaTobByBatn MiHicThb KaBN, perynIOOCh CTynHb nepemEnHNaKabOBx 3eep. Pn diPbHiOmy nepemEnHNI KABOBX 3eep, Kaba 6yde MlCHIa N MaITMe nHKy. BIdperynIOte baxaHn CTynHb nepemEnHNaBN, noberpHyBm perynIaTOp PReyNIOBaHHra CTynEHIO nepemEnHNA. Pn nobopoTI perynIaTopa BnIO nepemEnHb 6ye de dpiOHiunm.

PENEIOBAHHMAIPOBOINTTcIiD YAC IEPEMENH
Hikon He HamaraiTeca 3miHHTNoLOKeHHpeyIaTopa CTyneHnepeMeIeHHI 3actocyBaHHM CINN.
БудBLEо obepexkHI, He npi6bpaIte YaIck NiicJIpeWOrO uKly.
Як soo ви натундае сючату на Кногку (aNotIM Ha Kногку (a6o Habnakn), octaHHe haTuckaHH He bpaXoby-ETbcr.
ПИГOTУBAHHHAIOIB 3 BKNKOPNCTAHHЯМ ПAPИ
3a donomoropn npm monoko nepetbpoehtcna HnHk, 00 bKNPocHTOByctcbra nJn pnpotrybaHHN, hapinklaad kanyuHNO abo naTe, takon npk cnyge nndi nidiirpmbnnr poDHN. Pnpctpi ochaueneH yHKcuieo daTkoBOro ndiirpby, ockinblk CTbpeHHN npn notpe6ye Bnuoi Temnepatypn, HNK pnpotrybaHHN ecnceco.
IiD'edHaNe Te npnlaD do po3etkn.
HaTnCHiB KhONky iHnKaTOp NOUHe 6nMaTn NiD Yac NonepeHbOro HarpBaHHa KaBOMaunHm.
IHNkaTOp NOHnHae cBITINc6be3nepepeBHO.
HaTnCHiTh Ha KhONkY -MaJ.11.
IHNKATOP 1 nouHae 6nmatn niD yac nonepeHbOro HarpiBaHHa.
KoIeTan nonepedhboRo HarpibAHn 3aBepuHbCBA, iHnKaTOp O NOUHe CbiHTncs6e3nepepBHO i BN 3MOxete noaTn npiroTuBaHH npi, HATNCyBwN 3HOBy Ha KhoNky
HaTnCHiB 1e pa3 Ha KhONky ,UO6 3yUNHHTuNKJ.

Maunna noBepTaεTbca y BmXidne noJooKeHHa, kAIO peryIaTOp napn He BMnKaεTbca npotarom 2 XB.

3yinnHka uKny He BiD6yBaCTbCRA MNTTEBO.
Molouha nihka
PeKOMeHnyEbyBnKOpNCTOByBaTn CbIke nactepu3ObaHe a6o yIbtpanactepu3ObaHe moNOK. BnKOpNCTaHHra Cnporo MoNOKa He 3aBe3neUc ONtMAmJIbHorO pe3yNbTaTy.
Pomictb napobe conno B MONOKo - Man. 12.
3aynctitb yHKciio npirotoyBaHHn napi, kOncsaHO bpo3diJI Bnue.
KoNy TBOpIOeTbCnOCTaTHN KInbKicTb NiHn - Man. 13 - 3HOBy HATNCiThb KHONKy DnIyUINHKuIKNly.
UOc OHCTnI 3aIIuKMOJoka i3 cONla IJI napi, noCTABTe nID HbORo EMHICTb i 3HOBy 3aNcyTITb npriroTyBaHnR 3 BnKOpncTaHnM napi (6nn3bKO 10 cekynd).
Iapobe conno 3Himaetcb, 0o dae 3Mory do6pe ouhctntn Horo BCEpenHi. Binkohnyte OunueneHa 3a donomoroo tKtKa Ta BODN 3doabAHNM HeBENKOi KjibkOCTI Hea6pa3MBHO mIOUOro 3acOby dna Nocdy. Ipomnnte Ta npocuyitb
KoIIN MOnOuHa NiHkA roTOBa, NoCTaBte yauKy niD OTbIP BNTOKy KABn Ta noUHItb npriroTybaHHa KABn - Man. 20.
Petelbho BVtnpaIte ABtOKAnyHInatop B1d MoN0A, 5o6 BOHO Ha bOmy He 3acnXaIIO. PpomniTe conIo BCEpenHi Bvdpa3y nicna npriOtBuHN. Iy cIbO r3ancytB uKIN yTbOpEnH napi, BvKnOPCTOBuYOn KOHeTneHep AkceCyapa, 3anoBHeNBoDoo. Iy mUeHNeHMOxHa BvKnOPCTOBuYBaTI pIKIN MmOCHy 3acIc KOMnAHII KRUPS, doctynHnIK A kaceCyap.
DOrJIa3A INPIJIADOM
CnycstoehnKaontHeHaepaIkaBoBoIryuTaPiDoHyIpaKpaneJIb.
JksoiHdkaTOp 6nmae,
BnMItb, cnopoxHt b i ouNCTiB KOHTeHep dIy 360py KaBOOIT yuCi - Man.21.
IocTabe KOnTeHep Dnla KaBOOi rUsi Ha Micse - Man. 22.
Bnimitb, cnopokhitb i ouhctitb niDOn dna 360py kpanelb - Man.23.
Пддондя 3бору кpaneь оснашени nonnaBkamn, як уac BiД уacy CnghanizyIb npo HeobxdHicTb NOrO OMHeHHa.
36epitb yci deTani ta BCTaHOBt bix Ha Micue.
JIKIbKn Bn BnHnJIaN KOHTeHep nla 360py KaBOOi rui, OuHCTiB NOro NobHicTIO dna 3anobirAHn 7BnKOMy 3abpyd- HENHIO BNTOKy BiXoDIB Upez3 KpaI.

IHNKATOp pnoOBoKyE CbITnTcHsra KJIO 36npaKaBOoI rUsi He BCTaBNeHO a6o BCTaHOHe HnpaBnblHo, a TAKOX JKO BIH BCTaHOBeHn Ha Micue WBNDwe, HIX Hepe3 4 cekyn.
KoIi iHnIkaTOp 7 roptb a6blmae, npiroToyBaHHe cnpecO a60 KaBn HEmoxKnBe. KoHTeHep po3paxOBaHn Ha 9 npuui KABBOoi ruyi.
OnolickyBaHHcCTeM
IocTyIOn Do cHx DBox FyHKui MoKHa OTrpMaTn B 6yDb-RAKn Yac, 3a BNHTKOM BnJaKIB, KOIN MaunHa Bmarae ObcnyroByaHHN 'CLEAN' Ta/afo 'CALC'.
OnolickyBaHHcStEm npiroToBaHHKaBn:
YctahOBt bEmHCTb nID cOnIO BHXOy KabN. WbNIO KaTHcHITb KHOKNy - Man. 6 dIa 3anycky uKny npomBaHHn CNTeMn pIpyBaHHa KabN, kNn ABOMaTNUHO 3yINHHTbCn iNpXoDKeHHA 40 mN BOHN.
OnonickyBaHHcNCTeMn noaui napi:
IocTabeNTOncuDnHy nID cOnNo BnXOdy napi. Iotim HATNCHtB i YtpmUyTe KhoNky dIpy3aNyCKny npOMBaHH naPBOOI CNTeMn, kyn ABOTAMTuHO 3ynHHTbcra nicra BVtOKy 300 Mn BOIN.
3Himitb EMHICTb, 3NITe BnKOpncTahy Body 3 He Ta NoCTaBe II Ha Micce.
3HOBy HATNCiB KONkY , 106 3anyctnOCTAHHn etan. 3ByKOBn CnHaJI nepepnaeTbca.
PouHaCTbC8 octaHnH eTan (tpuBaJIcTB npu6n3HO 6 XB.)
Iporpama npoobkyebcra.Boa dae 3mory BndaJIHTn 3aIIuKKn 3acOby nIy BndaJIeHnHaKIny.
Lukn BuaJIeHnHaKIny 3aBepSeHo, iHnkaTOp 'CALC' rache.
HaIIte BoDy Bpe3epByap.
Pnpctpi roTOBm do pO6OTn.
JaKuO BpeepByapi HeIOctaTHbO Bodn, npnaIc cnoBicITnb Bac npo ce 3a donOMorO IHdkaTopa [0]. DoaTe IOCTaTHIO kJIbKlcB bODn BpeepByap, iUKN OUnueHHe BID HauNpy ABToMaTHNo npoOBxntbCra.
IyKuo BmKHyTn npicpti 3 po3eKn iD cac BuaJenHna HAKny, HATNCHTN KhoNky a6oB pa3i 360o JxNBHeHH, nporpaMy BuaJenHna HAKny 6yde BUKOHaHO 3 Camoro NoaTky. yCbOMy BnAaKy Bam 3HaOobntc HOBa Ta6NeTKa dIy OunuHn. BUKOHai Te NobHn cUKN oUHnHn, Uo 3abe3neHTn HaneXhnn DOrJa 3 KaBOMaunHO.
LcKn OunuHnna npoxoDntb i3 nepepbAmn, ni d yac Ioro BVkoHaHH He cni d nictabTn pykn ni d BVxOdn dIy BoDn E' i W'.
HaTnCHiB i yTpmyte KhONky B npToTROM 3 cekyHd (Kpim BnnaKIB, KOJIM MaunHa nOtpbeye o6cnyroBaHHA
'CLEAN' i/a6o 'CALC'). IHNkaTOp 6JIIMaE.
Koln BCTaHOBLeHHa fInbtpyBaIbHOr KaTpndka 3aBepSeHo, iDnKaTOp 念 noHnae Cbitntncs 6e3nepepeBHO.
Pnpctpi roTOBm do pO6OTn.
KaptpnDxk Claris Heo6xioHO 3amHOBaTn pnp6n3HO uepe3 KOxHi 50 nItpB BOAn a6o npHaiMHI KOxHi Da BmCiu. y pa3i BVOKOpCTaHHa KaptpnDxa Claris - Aqua Filter System bCTaHObit pIBeHb JopcKoCTi BOAn 0.
HanaHTyBaHHa Tempeatypn KabN
Прилади поеднын оданштовано на заюп на рibeь 2.
Iπiklouitb npnlaD do mepexi xnbIeHna, aJe He BmkaTe noro.
OndHouacHO HATNCiTh Ha KONKn i (MaJ.27).
IhdkaTop 6nMaE BnpoobX ycboro npocecy HanaTsyBaHHa.
YctaHObitpeyIIOBaIbHeKilbueHa3NaeHn20Mn,io6HaIaIbTaBAtuTeMnepaTypKaBn (Ma1.28).
Дяцьоги haTnciht Ha KhoNky 已 ,36iNbHTn 3HaueHnAfo Ha KhoNky 已 ,3MeHUnTI 3HaueHn (man. 32).
Bn6epiTb 3NaeHHe TEmpeaTpyn KaBn: 1 yBIMKHeHn iHdkaTOp = TempeaTpya 1, 2 BBIMKHeHi HdkaTOpn = TempeaTpya 2, 3 BBIMKHeHi iHdkaTOpn = TempeaTpya 3 (naBnuca).
IooB BnITn 3 pexkmy HanaHTyBaHb, HATNCHTb KONKy
HajawtybaHHxKopctKoCTi BODN
Ppinnapn nonepeHbO hanaTobAo H 3aBoi Ha pibeHb KOpCTKoCTI BoDn 4.
Ipeed nepuHm BnKOpNCTaHHM npuaNy a6o nicra 3miHn kOcTi BOHn Heo6xIdHO hanaWbAtn pBeHb JopctKocTi BnKOpNtObyBaHO BoH. Ioo db i3HaTncn npo pibeHb JopctKocTi BOH, 3BepHtbcn DO cBOrno nocTaanbHnka BOH.
Bb6epitb 6aKaHn npomixok yacy: 1 yBimKHeHn iHdkaTOp = 1 roD, 2 BBimKHeHi iHdkaTOpn = 2 roD, 3 BBimKHeHi iHdn
kaTOpn = 3 roD, 4 BBIMKHeHi iHdNkTaOpn = 4 roD (MaJ.29).
IioB BnTn 3 pexmMy hanaTsyBaHb, HATNCiTh KhONKy
Ihopmaizipno kijbkiCTb zukJIbPo6OtN
IπiKlnoHtbpnJaDIOMEpexiXuBHeHHaJe He BMKaaiTe NOrO.
Ondohoyacho HataNCHItb Ha KHONKn i (MaJ.27).
IINKaTOp 6nMae BnpoD8k ycB0r npoccy HanaTuBaHHA.
Lio6 ybiHn B pexm «KilbkiCt bizkIb po60Tu》,HaTCHiB i BTPMHyTe BnpoOBx 3 ckyHd KOnKy .IpeEd BiO
6paXeHHaB ViIDIOIHOI IHOpMaIi BcI INuKaTOpN TpNi6bIMHyb (MaI.29).
KilbkiCtB uNKnIB pOboTn:
-MeHsE 3000 uKJiB:1 iDnKaTOp yBIMKHeHm.
- BiJbSe 3000 uKniv: 2 iHdkaTOpB BBmKHeHi.
- BInbSe 6000 uKJIb: 3 iHdIkaTOpn BBIMKHeHi.
Iio6 BnTn 3 pexmmy HanaHTyBaHb, HATNCiTh KhoNky
Ha KOKHOMy 3 cIx etanib MOKHa BnITn 3 pEKMMy HanaUTBaHb. Tomy, kUO Bu 3aKiHNn HanaUTBaHHa, HauNCHiB Ha KNOKy U. Yci iHnKaTOpn BmKHeHI. Yci HanaUTBaHHa 36epiraTOcb R nAm'rTI npnAaHy HabITb nCnAabPiHoro BiKluHHe eneKTPOXKBHeHHa. Bn MoKTe 3MiHTn C I HanaUTBaHHa B 6yD-akm MOMeHT, NOBTopuBwn IpOueDpy.
ПОНБЛЕМТАСПОСОВBNBPIISEHнЯ
Jkso HecnpabHicb, 3a3Haeha B nepeiKy tabnui, He 3Hkae, 3BepHitbcrdo abTOpu3ObaHOr cepBicHOro ceHTpy.
IodaiTe yapky pomy B yawky i3 coIoQkIM ecnpco.
Ieepo npikpacs CBixmBepzkam Ta nodaBaTe
Ecnpco dnam6e\*
2 yawkn ecnpco, 2 manehki yapkn KOhky, 2 loxkn KopnHeBoro lykpy.
Hann Te KOhBak y XapocTiKi CkJHKn, niirpTe N 3anaitb.
IodaiTe cykpy, 3miuaiTe, HauHte KaBn, pniKpaCbTe BepzkamM.
IdeaJIbHe ecnpeco\*
2 yawkn ecnpco, 6 eunx kovkib, 200 r cykpy, 1/8 ntpa cooiknx bepkib, 1 ctonka anelbncnHOoro likepy.
36nIteJeuHi JXOBTkN 3UyKpOM Do rYcToi NiH.
IodaTe XoJIoHn ecnpco Ta aneJIbcHOBNI liKeP
Iotim 3miuaiTe 3i 3bntmBepkamn.
P03KnaDiTb y Ba3OuKn a6o CkJIAHKn.
IocTabeBa3OuKn DO MOpO3NJbHOJ KamepN.
(* 3noekueaHHa ankozoneM uKoDumb bauomy 3doopoe'o.)
PRZYRZÄDZANIE ESPRESSO I KAWY
URZADZENIE ZOSTAŁO PRZEZNACZONE WYŁACZNIE DO STOSOWANIA KAWY ZIARNISTJE.
To get the best taste from your coffee and extend your appliance's service life , we advise you to use only the Claris -
Aqua Filter System cartridge sold as an accessory.
PROBLEM I ICH ROZWIAZANIA
Ježeli problem opisany w tabei utrzymuje sie, naležy skontaktivac sie z punktem obšügi klienów KRUPS.
CLEAN Inditsa el a tisztlitast
CALC Inditsa el a vizkomentesitest